Very nice of you
madpogue
pm sent. Having a better spinning FW For my Trek 420, gives me some freedom to use a bigger hammer on this one. At worst, I'll have spare cogs.
I did did just find this on eBay U.K. As a review of the Var tool used to disassemble (not remove)the freewheel:
Var Maillard Freewheel Remover
RL-41700
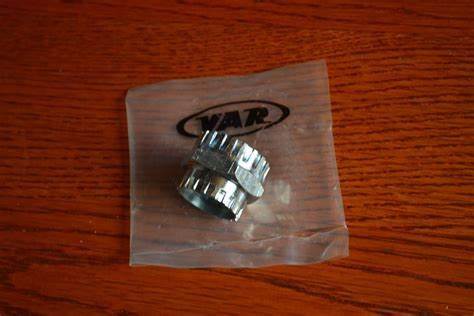 Here's one received by non-fixie

V'ger
3.0 out of 5 stars How this actually works - you need to buy some other things
Reviewed in the United States on 19 August 2017
Verified Purchase
Since this came with no directions and there are none on the net, this is how you use this product. As best as I can tell.
1. Use two chain whips to unscrew the top cog in the Helicomatic cluster. The cheap whips from Amazon will lose their plastic handles. No matter. Reconcile yourself to the idea that you may need to hit the threads on that first cog or two with penetrating oil.
2. If the rest of the cogs don't slide off, repeat with the next one.
3. Put the freewheel - without the cogs - back on the wheel (still off the bike)
4. Grab the VAR tool with a large crescent adjustable crescent wrench. A Craftsman 12" works. The nut on this tool is bigger than any fixed box wrench you can walk into a store and buy. Also, if you are going to spend $28 on a massive wrench, get one you can use for other things, since I would bet that you will probably not make a career out of rebuilding helicomatic freewheels.
5. While having a helper press straight down on the wrench and this tool, and both of you grabbing the rim/tire to prevent the wheel from rotating. turn the wrench CLOCKWISE. Be extremely careful because you can break a spoke very easily. Once the brass cone is loose enough to turn with your fingers, pull the freewheel off the hub.
6. The cone (the brass nut that fits this tool) needs to be unscrewed, again clockwise, until it comes off. Do all of this above a bowl, because you will soon see about a billion 1/8" ball bearings fall out. That's for a 700. Other hubs may have larger, easier to control bearings. Pro tip: buy more bearings of whatever size you will need. Your old ones might be worn, deformed, or rusted. This is a really cheap thing to replace.
7. Clean everything in a degreaser.
8. Using a tube of Phil Wood grease, grease only the lower flange of the inner tube (where the balls run). Replace the balls by sticking them to the grease.
9. Grease the outer tube.
10. Carefully slide the outer over the inner.
11. Drop the washers back in, and then a row of ball bearings, exactly as you did when you disassembled it (just in reverse). At least one washer has to go in first, especially with the tiny bearings; otherwise the balls will jam the pawls below. That washer will probably be pressed into a curve because it forms the lower race for the balls.
12. Flood the unit with light to mid-weight oil. Some people grease the top bearings.
13. Screw the brass cone on until finger tight.
14. Finish tightening the cone.
15. Reassemble the cluster.
16. Tighten the topmost cog(s) with the chain whip as tight as you can. Your pedaling will tighten it up the rest of the way.
17. Spline the cluster back onto the Helicomatic hub and reinstall the lock ring.
So when you get through this fantastic voyage, you will realize that you just spent $75 to rebuild a freewheel. What I observed is that you are no worse off flood-cleaning an assembled unit first with degreaser (naptha, WD-40, teflon oil) and then with dripping in heavier oil through the hub-side than you would be doing this massively expensive and frustrating process. The results were exactly the same.
If your freewheel is going both ways, your pawls are probably stuck down by grime. If a lot of oil doesn't loosen them, they might have broken springs (which is fatal). Either way, you probably don't need this tool. If your freewheel body is trashed, just buy another cluster off Ebay and switch out your cogs.
Look, I know VAR didn't invent the miracle/curse known as Helicomatic, but I am docking the product two stars for a couple of reasons for the way it is sold on Amazon.
1. It really needs to be clear what it is supposed to do. I see from the questions people are asking that it is being mistaken for the Helicomatic bottle-opener/lock nut remover. The product being sold here is not a "freewheel remover." It is a spline for removing bearing cones. The actual "freewheel remover" is the bottle-opener thingie. And your hand.
2. Somebody needs to disclose that the grip surface of this tool is huge. If someone knew that they would spend $30 on this tool and $30 on an exotic size of wrench, they might conclude (correctly) that it might be time to consider getting a new rear wheel with either a standard freewheel thread or modifying a bike to take modern equipment. This is not usable with the types of tools a person would have at home. Large vice-grips can't lock onto that nut, pipe wrenches - even if big enough, are not stable enough, and slip-joint pliers? Well, forget it.