


Need some help/advice on applying "old" decals
 08-09-19, 06:13 PM
#1

Senior Member
Thread Starter

Join Date: Mar 2014
Location: City of Angels
Posts: 4,870
Bikes: A few too many
Mentioned: 42 Post(s)
Tagged: 1 Thread(s)
Quoted: 1364 Post(s)
Liked 2,180 Times
in
1,183 Posts
Need some help/advice on applying "old" decals
Hello,
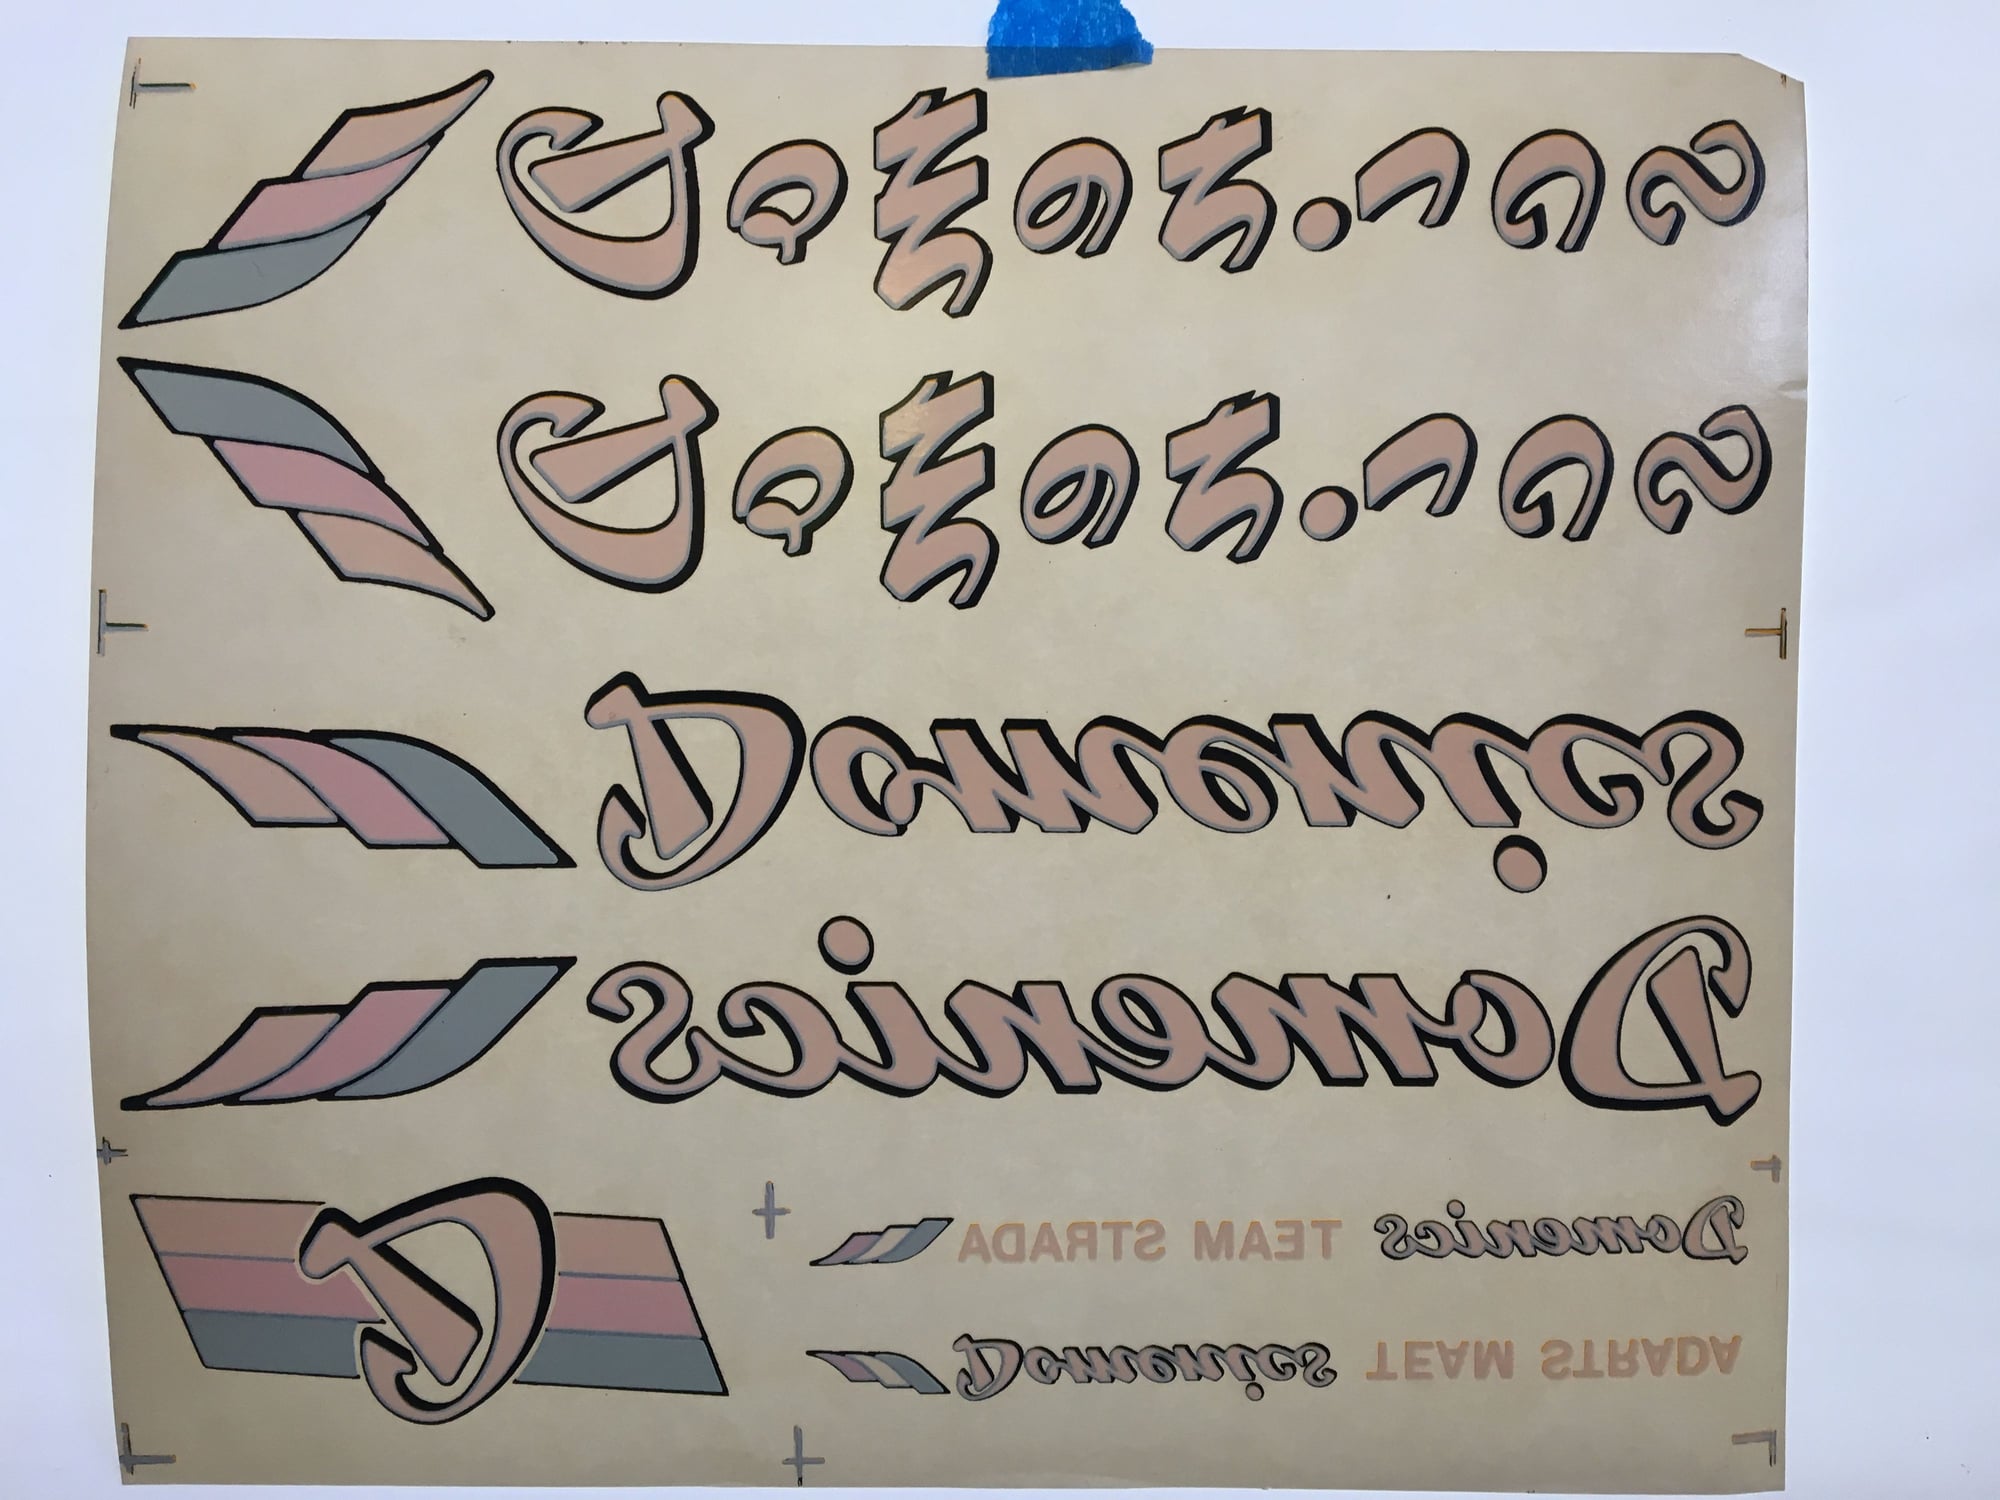
I am restoring a "Domenic's" and found some original (old 80's) decals for the restoration.
They are reverse water slides (see pics) and in good shape no tearing or flaking.
The problem I am having is that after applying the glue that was originally used does not seem to be adhering well.
The first set that I applied went on well with no tearing etc. but flake off easily after they are dry...is there a water slide glue the I can use that will help the decals "set" and not flake off?
I have read on the net that Microset/sol is one option, I am curious what others have used when encountering a similar situation.
Any advice is appreciated. Thanks, Ben

The glue is on this side and after they are applied they are flaking off after they dry...thus the glue is not holding. If I can get them to stick my plan would be to use a clear but I need them to adhere well first so there is no curling.
I am restoring a "Domenic's" and found some original (old 80's) decals for the restoration.
They are reverse water slides (see pics) and in good shape no tearing or flaking.
The problem I am having is that after applying the glue that was originally used does not seem to be adhering well.
The first set that I applied went on well with no tearing etc. but flake off easily after they are dry...is there a water slide glue the I can use that will help the decals "set" and not flake off?
I have read on the net that Microset/sol is one option, I am curious what others have used when encountering a similar situation.
Any advice is appreciated. Thanks, Ben
The glue is on this side and after they are applied they are flaking off after they dry...thus the glue is not holding. If I can get them to stick my plan would be to use a clear but I need them to adhere well first so there is no curling.
__________________
"EVERY PERSON IS GUILTY OF ALL THE GOOD THEY DID NOT DO"
Voltaire
Voice recognition may sometimes create odd spelling and grammatical errors
"EVERY PERSON IS GUILTY OF ALL THE GOOD THEY DID NOT DO"
Voltaire
Voice recognition may sometimes create odd spelling and grammatical errors
 08-09-19, 06:41 PM
#2
se�or miembro

Join Date: Dec 2018
Location: Pac NW
Posts: 6,619
Bikes: '70s - '80s Campagnolo
Mentioned: 92 Post(s)
Tagged: 0 Thread(s)
Quoted: 3884 Post(s)
Liked 6,478 Times
in
3,205 Posts
You might ask the decal expert, Cyclomondo. Here's Greg's email:
gtsoftley@ozemail.com.au
and website: https://cyclomondo.net/
gtsoftley@ozemail.com.au
and website: https://cyclomondo.net/
08-12-19, 08:36 PM
#3
Senior Member
Thread Starter
Join Date: Mar 2014
Location: City of Angels
Posts: 4,870
Bikes: A few too many
Mentioned: 42 Post(s)
Tagged: 1 Thread(s)
Quoted: 1364 Post(s)
Liked 2,180 Times
in
1,183 Posts
Thanks SR,
Anyone else have any ideas?
Ben
Anyone else have any ideas?
Ben
__________________
"EVERY PERSON IS GUILTY OF ALL THE GOOD THEY DID NOT DO"
Voltaire
Voice recognition may sometimes create odd spelling and grammatical errors
"EVERY PERSON IS GUILTY OF ALL THE GOOD THEY DID NOT DO"
Voltaire
Voice recognition may sometimes create odd spelling and grammatical errors
08-13-19, 01:24 AM
#4
Senior Member

Join Date: Apr 2007
Location: Thunder Bay, Ontario, Canada - burrrrr!
Posts: 11,674
Bikes: 1958 Rabeneick 120D, 1968 Legnano Gran Premio, 196? Torpado Professional, 2000 Marinoni Piuma
Mentioned: 210 Post(s)
Tagged: 0 Thread(s)
Quoted: 1372 Post(s)
Likes: 0
Liked 1,751 Times
in
938 Posts
I am about to install a set of water slide decals on my Rabeneick 120d. The maker insisted that the decals, once applied and dry, be clear coated. The clear coat will be sprayed on the entire frame, over paint, decals and exposed chrome plated parts.
__________________
"98% of the bikes I buy are projects".
"98% of the bikes I buy are projects".
08-13-19, 01:59 AM
#5
verktyg

Join Date: Jul 2006
Location: SF Bay Area
Posts: 4,030
Bikes: Current favorites: 1988 Peugeot Birraritz, 1984 Gitane Super Corsa, 1980s DeRosa, 1981 Bianchi Campione Del Mondo, 1992 Paramount OS, 1988 Colnago Technos, 1985 RalieghUSA SBDU Team Pro
Mentioned: 207 Post(s)
Tagged: 0 Thread(s)
Quoted: 1036 Post(s)
Liked 1,238 Times
in
654 Posts
Talk to Ed Litton in Richmond or one of the builders/painters in SoCal like Joe Bell. You might even be able to pay to have them applied for you.
verktyg
verktyg
__________________
Don't believe everything you think! History is written by those who weren't there....
Chas. ;-)
Don't believe everything you think! History is written by those who weren't there....
Chas. ;-)
08-13-19, 08:24 AM
#6
Senior Member
Thread Starter
Join Date: Mar 2014
Location: City of Angels
Posts: 4,870
Bikes: A few too many
Mentioned: 42 Post(s)
Tagged: 1 Thread(s)
Quoted: 1364 Post(s)
Liked 2,180 Times
in
1,183 Posts
Once they are dry the won't hold, it is if the glue is too old to for them to stick to the frame.
Applying an enamel clearcoat simply lifts them, they are originals from the 80's with vibrant colors so I was hoping that there was a solution that I could use to get them to stick before applying the clear.
Best, Ben
__________________
"EVERY PERSON IS GUILTY OF ALL THE GOOD THEY DID NOT DO"
Voltaire
Voice recognition may sometimes create odd spelling and grammatical errors
"EVERY PERSON IS GUILTY OF ALL THE GOOD THEY DID NOT DO"
Voltaire
Voice recognition may sometimes create odd spelling and grammatical errors
08-13-19, 03:47 PM
#7
Senior Member
Join Date: Dec 2016
Location: Long Island, NY
Posts: 2,109
Bikes: Trek 800 x 2, Schwinn Heavy Duti, Schwinn Traveler, Schwinn Le Tour Luxe, Schwinn Continental, Cannondale M400 and Lambert, Schwinn Super Sport
Mentioned: 14 Post(s)
Tagged: 0 Thread(s)
Quoted: 809 Post(s)
Liked 1,022 Times
in
665 Posts
So I am going to offer a wild a** guess at this. I am not an expert. Hairspray is a water soluble glue. Perhaps you could try this on something thin and apply it to a pipe or conduit and see if it sticks. The idea here is if it works, great, if not there was not much invested. I would think that you would spray it, let it dry then wet and apply. Hopefully enough glue stays in place to allow it to stick. You might try several coats. Fail fast.
If that doesn't work try the experts. They look like perfect decals. I don't blame you for wanting to use these and re-applying the correct glue. I would do the same.
If that doesn't work try the experts. They look like perfect decals. I don't blame you for wanting to use these and re-applying the correct glue. I would do the same.
08-13-19, 11:33 PM
#8

Stop reading my posts!

Join Date: Sep 2004
Posts: 12,582
Mentioned: 89 Post(s)
Tagged: 0 Thread(s)
Quoted: 1443 Post(s)
Liked 1,061 Times
in
786 Posts
since you say these are from the '80s I might guess NOT varnish-set (generally quite earlier) or water-slide (next gen) but could be some variety of "rub-down" transfer, AKA chroma-tec (a trademark I probably misspelled, but it was sometimes used as 'generic').
If so these were made with a process that used hand-applied lacquer inks sort of akin to screen-printing yet different) on a release paper (or plastic film) and the final coat was the adhesive which could be a sticky wax or something more refined...but you might have adhesive coating that's dried up and will not stick. The way these are applied is you position them on your surface, sometimes helped to tape with a low-tack removable tape, then burnish over the transfer with a smooth tool made for this and CAREfully peel up the carrier paper/film as the transfer sticks to your surface...it often was nerve-wrackingly slow and dicey cause the delicate thin lac inks could crack and separate if you lost patience, and some of the adhesives did not like the surfaces you applied them on. If you DON'T have such 'chroma-tec' transfers then this is all a bunch of useless trivia...until you do!
Forgot to mention that the final steps were laying a clean paper over the transfer and burnishing over-all to fully smooth and stick flat, then if you wanted protection (the lac inks were surprisingly fade and weather resistant but really easy to scratch!) you could clear-coat them but this was a VERY risky deal. Since inks were lac-based any clear with acetone or MEK could "melt" them, and safe clears like Kristal Klear acrylic still had to be tested first just to be sure. If you had a safe one you went slow and misted a first couple coats and allowed drying before adding heavy coats to build.
DOH! re-read and you say these are "old water-slide" so ignore all written above, unless it turns out this is helpful after-all for somebody else or for the "next time"
Last edited by unworthy1; 08-13-19 at 11:47 PM.
08-14-19, 09:43 AM
#9
Senior Member
Thread Starter
Join Date: Mar 2014
Location: City of Angels
Posts: 4,870
Bikes: A few too many
Mentioned: 42 Post(s)
Tagged: 1 Thread(s)
Quoted: 1364 Post(s)
Liked 2,180 Times
in
1,183 Posts
since you say these are from the '80s I might guess NOT varnish-set (generally quite earlier) or water-slide (next gen) but could be some variety of "rub-down" transfer, AKA chroma-tec (a trademark I probably misspelled, but it was sometimes used as 'generic').
If so these were made with a process that used hand-applied lacquer inks sort of akin to screen-printing yet different) on a release paper (or plastic film) and the final coat was the adhesive which could be a sticky wax or something more refined...but you might have adhesive coating that's dried up and will not stick. The way these are applied is you position them on your surface, sometimes helped to tape with a low-tack removable tape, then burnish over the transfer with a smooth tool made for this and CAREfully peel up the carrier paper/film as the transfer sticks to your surface...it often was nerve-wrackingly slow and dicey cause the delicate thin lac inks could crack and separate if you lost patience, and some of the adhesives did not like the surfaces you applied them on. If you DON'T have such 'chroma-tec' transfers then this is all a bunch of useless trivia...until you do!
Forgot to mention that the final steps were laying a clean paper over the transfer and burnishing over-all to fully smooth and stick flat, then if you wanted protection (the lac inks were surprisingly fade and weather resistant but really easy to scratch!) you could clear-coat them but this was a VERY risky deal. Since inks were lac-based any clear with acetone or MEK could "melt" them, and safe clears like Kristal Klear acrylic still had to be tested first just to be sure. If you had a safe one you went slow and misted a first couple coats and allowed drying before adding heavy coats to build.
DOH! re-read and you say these are "old water-slide" so ignore all written above, unless it turns out this is helpful after-all for somebody else or for the "next time"
If so these were made with a process that used hand-applied lacquer inks sort of akin to screen-printing yet different) on a release paper (or plastic film) and the final coat was the adhesive which could be a sticky wax or something more refined...but you might have adhesive coating that's dried up and will not stick. The way these are applied is you position them on your surface, sometimes helped to tape with a low-tack removable tape, then burnish over the transfer with a smooth tool made for this and CAREfully peel up the carrier paper/film as the transfer sticks to your surface...it often was nerve-wrackingly slow and dicey cause the delicate thin lac inks could crack and separate if you lost patience, and some of the adhesives did not like the surfaces you applied them on. If you DON'T have such 'chroma-tec' transfers then this is all a bunch of useless trivia...until you do!
Forgot to mention that the final steps were laying a clean paper over the transfer and burnishing over-all to fully smooth and stick flat, then if you wanted protection (the lac inks were surprisingly fade and weather resistant but really easy to scratch!) you could clear-coat them but this was a VERY risky deal. Since inks were lac-based any clear with acetone or MEK could "melt" them, and safe clears like Kristal Klear acrylic still had to be tested first just to be sure. If you had a safe one you went slow and misted a first couple coats and allowed drying before adding heavy coats to build.
DOH! re-read and you say these are "old water-slide" so ignore all written above, unless it turns out this is helpful after-all for somebody else or for the "next time"

Ben
__________________
"EVERY PERSON IS GUILTY OF ALL THE GOOD THEY DID NOT DO"
Voltaire
Voice recognition may sometimes create odd spelling and grammatical errors
"EVERY PERSON IS GUILTY OF ALL THE GOOD THEY DID NOT DO"
Voltaire
Voice recognition may sometimes create odd spelling and grammatical errors
08-14-19, 07:56 PM
#10
Senior Member
Join Date: Jun 2016
Location: Saigon - South Vietnam
Posts: 139
Bikes: Saronni Colnago 1982; Battaglin 1982, Centurion Lemans RS 1978, 3Rensho Katana 1978, C. Borghi Olympia 1980, 3Rensho Athlete 1980's, Holdsworth 1980's and more...
Mentioned: 2 Post(s)
Tagged: 0 Thread(s)
Quoted: 33 Post(s)
Liked 9 Times
in
5 Posts
You may use glue stick (water based glue) to apply a thin layer on the surface where your water slide decals will be applied.
08-14-19, 08:10 PM
#11
Senior Member
Old school water slide decals generally used gelatin as the primary adhesive. You could try doing the same by improvising some hide glue. Heat up bit of knox/clear gelatin in water to about 140F . Smear a few drops on the tube surface, then apply normally. I've used this for similar stuff but not decals, so test on scrap. I bet it works fine.
There are also commercial decal application solutions that contain a small amount of adhesive. Check your local hobby shop.
There are also commercial decal application solutions that contain a small amount of adhesive. Check your local hobby shop.
08-15-19, 12:53 PM
#12
multimodal commuter

Join Date: Nov 2006
Location: NJ, NYC, LI
Posts: 19,808
Bikes: 1940s Fothergill, 1959 Allegro Special, 1963? Claud Butler Olympic Sprint, Lambert 'Clubman', 1974 Fuji "the Ace", 1976 Holdsworth 650b conversion rando bike, 1983 Trek 720 tourer, 1984 Counterpoint Opus II, 1993 Basso Gap, 2010 Downtube 8h, and...
Mentioned: 584 Post(s)
Tagged: 0 Thread(s)
Quoted: 1908 Post(s)
Liked 574 Times
in
339 Posts
I have used a thin smear of Elmers glue, which works well. But you have to carefully work out all the bubbles of glue, until there appears to be nothing left, and then you have to let it dry for a week or two.
I have also used simple syrup (equal measurements of water and sugar by volume, bring to a boil, let cool). It's easier to work with, but the bubbles are harder to see. Again, you have to work out all the bubbles, and until it dries the decal will be fragile. It will get tougher in a day or two, but you can't be sure it's really dry for a week or two.
Both of these water based adhesives allow the decal to slide around until you have the location right until you start pressing the glue out. Once the glue is really dry, the decals are durable. Even so, clearcoat helps.
__________________
www.rhmsaddles.com.
www.rhmsaddles.com.

