


Paint repair tips, diffuse scratches
 08-22-19, 03:10 AM
#1
The dropped
Thread Starter

Join Date: Oct 2018
Location: Columbus, OH
Posts: 2,144
Bikes: Pake C'Mute Touring/Commuter Build, 1989 Kona Cinder Cone, 1995 Trek 5200, 1973 Raleigh Super Course FG, 1960/61 Montgomery Ward Hawthorne "thrift" 3 speed, by Hercules (sold) : 1966 Schwinn Deluxe Racer (sold)
Mentioned: 10 Post(s)
Tagged: 0 Thread(s)
Quoted: 1739 Post(s)
Liked 1,014 Times
in
696 Posts
Paint repair tips, diffuse scratches
I'm looking for tips and techniques that those of you who refurbish or flip bikes use to repair or minimize the little scratches all over a frame.
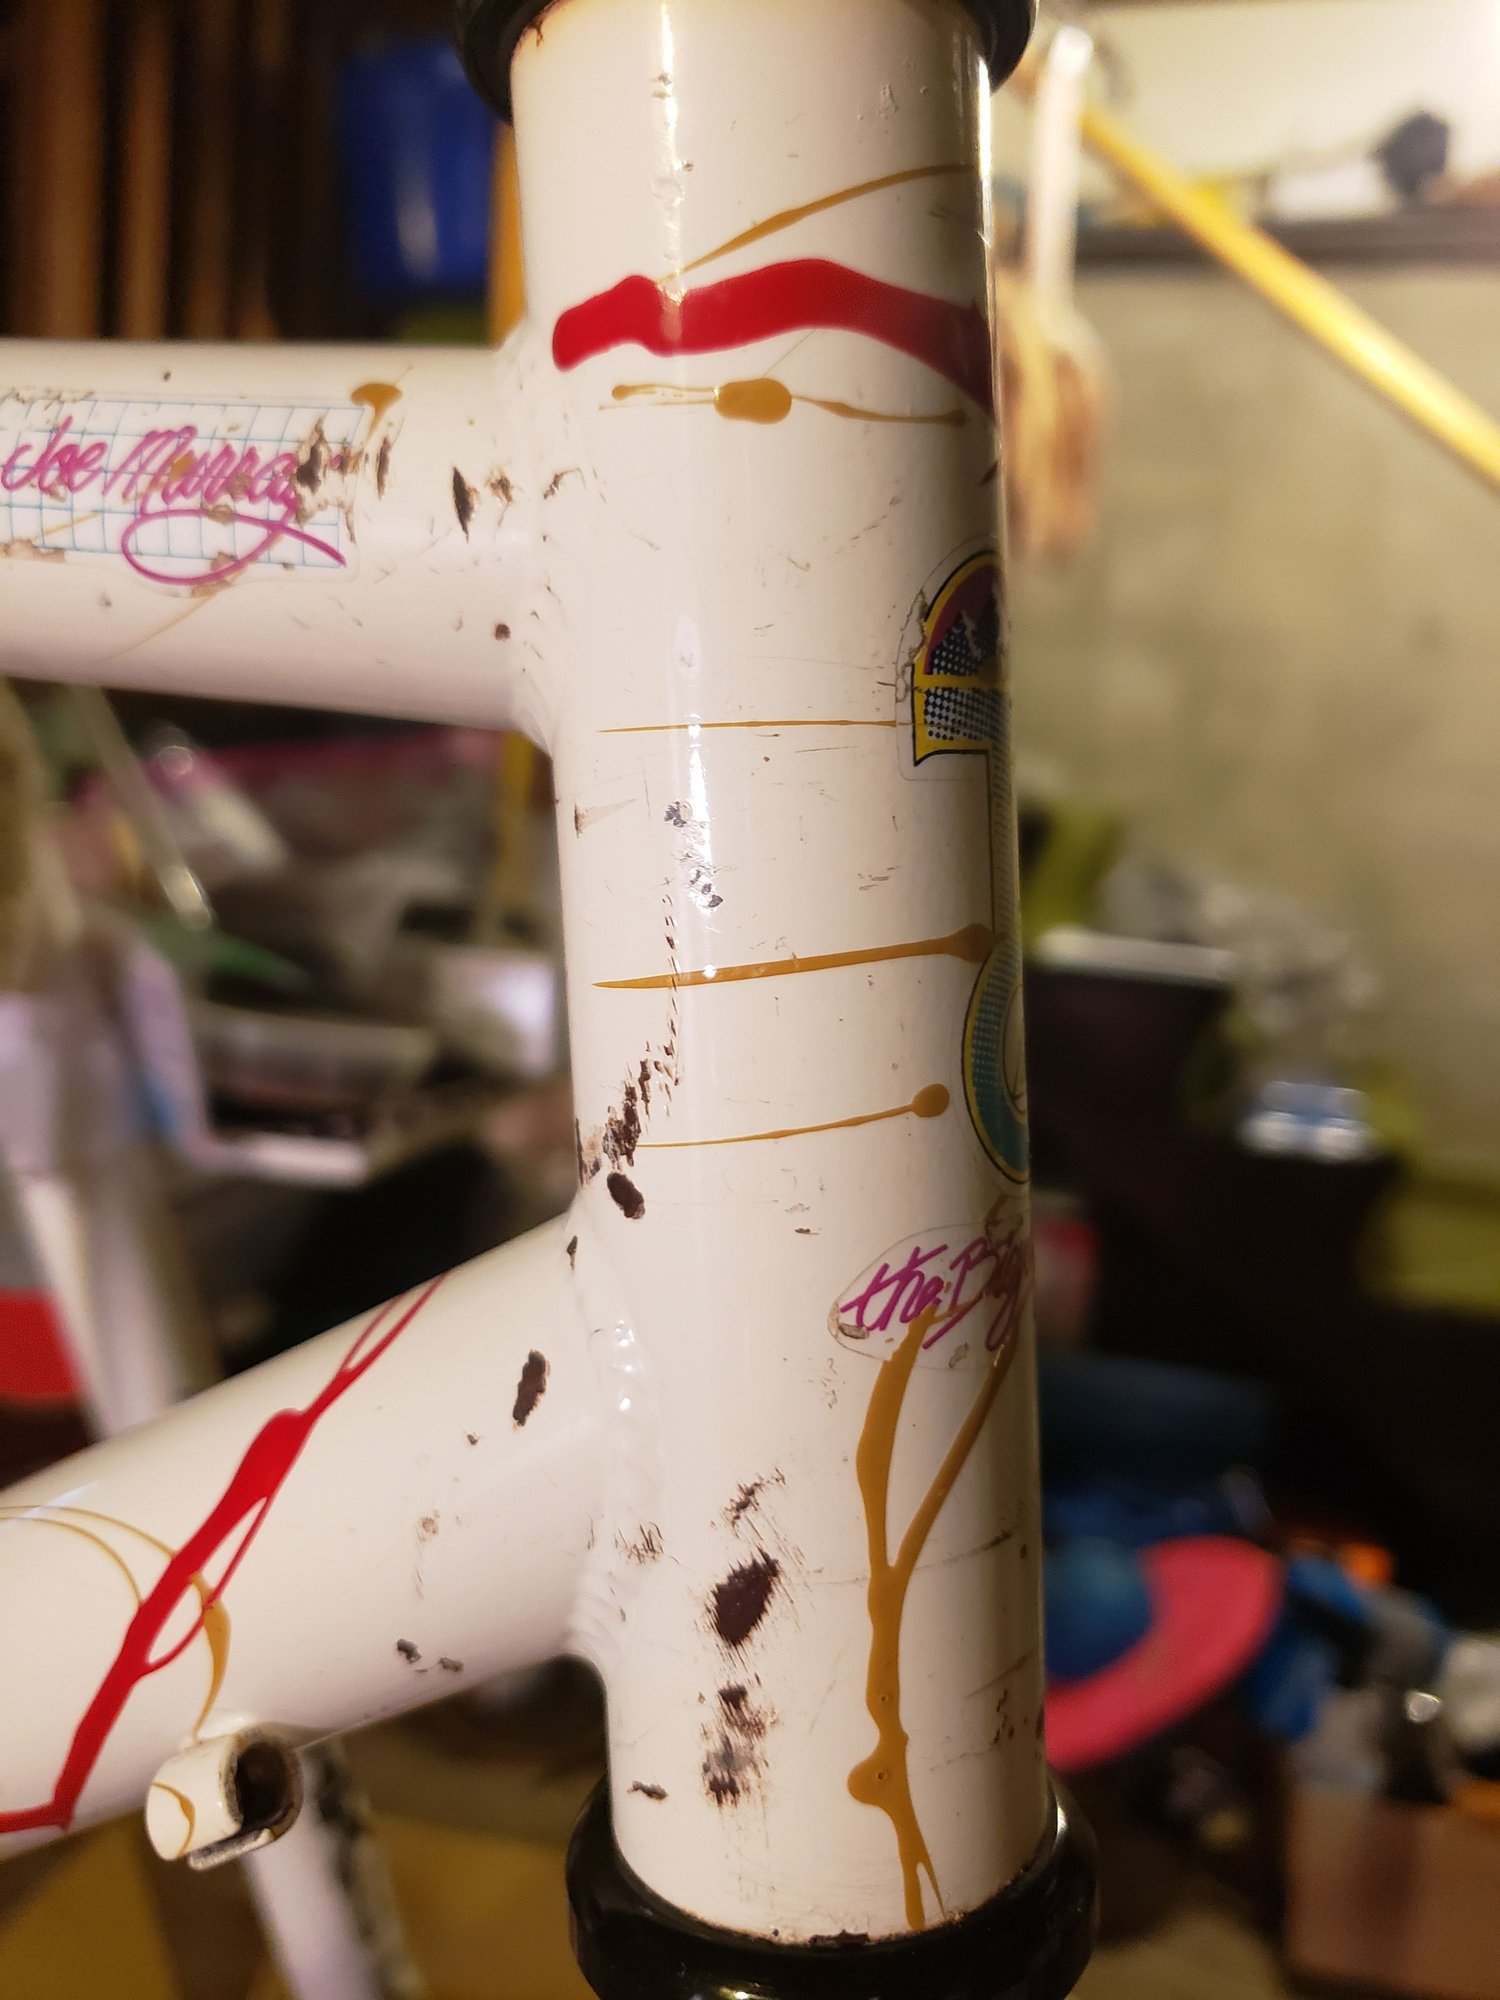
I recently bought this 1989 Kona cinder cone for trail and cx duty. The paint is in fair condition. Unfortunately I'm more than a little vain about my bikes, which is why this bothers me. Here's an example from the head tube.

Cinder cone head tube after single use of auto polishing compound. Cable rub and many instances of scratches.
I will not be blasting and powder coating this bike for perfect paint. I will be riding this bike, hopefully in competition. Larger areas I'll cover with a close match. What can i do with the small stuff too deep to buff out with polishing compound and too small for touch up?
I recently bought this 1989 Kona cinder cone for trail and cx duty. The paint is in fair condition. Unfortunately I'm more than a little vain about my bikes, which is why this bothers me. Here's an example from the head tube.
Cinder cone head tube after single use of auto polishing compound. Cable rub and many instances of scratches.
I will not be blasting and powder coating this bike for perfect paint. I will be riding this bike, hopefully in competition. Larger areas I'll cover with a close match. What can i do with the small stuff too deep to buff out with polishing compound and too small for touch up?
 08-22-19, 05:54 AM
#2

www.theheadbadge.com

Join Date: Sep 2005
Location: Southern Florida
Posts: 28,513
Bikes: https://www.theheadbadge.com
Mentioned: 124 Post(s)
Tagged: 0 Thread(s)
Quoted: 2422 Post(s)
Liked 4,395 Times
in
2,092 Posts
Any of the pasty liquids like Meguiars Scratch X, KIT Scratch Out, and the like can help polish up an area and remove grime. It won't remove the nastiest of scrapes, but it'll clean the crevices to make them less noticeable.
-Kurt
-Kurt
__________________


08-22-19, 09:56 AM
#3
Senior Member

Join Date: Oct 2012
Location: Berkeley CA
Posts: 2,536
Bikes: 1981 Ron Cooper, 1974 Cinelli Speciale Corsa, 2000 Gary Fisher Sugar 1, 1986 Miyata 710, 1982 Raleigh "International"
Mentioned: 97 Post(s)
Tagged: 0 Thread(s)
Quoted: 930 Post(s)
Liked 1,292 Times
in
488 Posts
Polishing compound isn't aggressive enough for the degree of damage you have there. I would suggest that you use a more aggressive diminishing rubbing compound such as Meguiar's Ultimate Compound (not Ultimate Polish). That will probably clean it up quite a bit. If that doesn't get you far enough you might want to try using some ultrafine wet sandpaper (followed by rubbing compound and polish), though look up on YouTube how to go about that since misuse could definitely damage the paint irreparably. After doing that you'll need to deal with the rust spots before touching up. Perhaps somebody else will chime in on the best way. There are a number of rust neutralizers on the market and a lot of folks recommend oxalic acid.
08-22-19, 10:18 AM
#4
Junior Member
Join Date: Aug 2019
Posts: 5
Mentioned: 1 Post(s)
Tagged: 0 Thread(s)
Quoted: 3 Post(s)
Likes: 0
Liked 0 Times
in
0 Posts
My way of going about this would probably be to use some sandpaper, rust neutralizer, and automotive repair paint that you can get in small quantities matched color and use a small brush to fill it in with a steady hand.
08-22-19, 10:35 AM
#5
The dropped
Thread Starter
Join Date: Oct 2018
Location: Columbus, OH
Posts: 2,144
Bikes: Pake C'Mute Touring/Commuter Build, 1989 Kona Cinder Cone, 1995 Trek 5200, 1973 Raleigh Super Course FG, 1960/61 Montgomery Ward Hawthorne "thrift" 3 speed, by Hercules (sold) : 1966 Schwinn Deluxe Racer (sold)
Mentioned: 10 Post(s)
Tagged: 0 Thread(s)
Quoted: 1739 Post(s)
Liked 1,014 Times
in
696 Posts
Polishing compound isn't aggressive enough for the degree of damage you have there. I would suggest that you use a more aggressive diminishing rubbing compound such as Meguiar's Ultimate Compound (not Ultimate Polish). That will probably clean it up quite a bit. If that doesn't get you far enough you might want to try using some ultrafine wet sandpaper (followed by rubbing compound and polish), though look up on YouTube how to go about that since misuse could definitely damage the paint irreparably. After doing that you'll need to deal with the rust spots before touching up. Perhaps somebody else will chime in on the best way. There are a number of rust neutralizers on the market and a lot of folks recommend oxalic acid.
Update: They certainly seem to carry it!
08-22-19, 04:02 PM
#6
Junior Member

Join Date: Dec 2018
Posts: 119
Mentioned: 4 Post(s)
Tagged: 0 Thread(s)
Quoted: 74 Post(s)
Likes: 0
Liked 72 Times
in
21 Posts
I've had really good luck doing the following:
Use Mother's Mag Polish on a microfiber cloth to buff first - this is aggressive enough to remove most scratches and can be found cheaply at many places. It actually works really well on paint clear coat, as well as almost all bare metal parts.
I use a dremel with a point felt tip to hit the rust spots with more of the same polish till they are shiny silver.
Either use a mix of finger nail polishes or auto touch up paint to get a close color match, and fill in any chips or scratches.
Buff touch up paint areas with cloth and more Mother's Mag polish.
On swirl marks/scratches that are in the clear coat, but not through the paint just apply a small amount of auto clear coat and then buff with Mothers to completely remove them.
Repeat the above 2 steps, but instead of touch up paint/nail polish use automotive touch up clear coat.
I've found this is a relatively simple method, and it yields great results.
You can go over it again with a true automotive paint polish as you've already done after all of this if you really want it to shine.
Last edited by Cheseldine; 08-22-19 at 04:06 PM.
08-23-19, 05:37 AM
#7
Senior Member
Join Date: Sep 2017
Location: Eastern Shore, MD
Posts: 2,107
Bikes: Road ready: 1993 Koga Miyata City Liner Touring Hybrid, 1989 Centurion Sport DLX, "I Blame GP" Bridgestone CB-1. Projects: Yea, I got a problem....
Mentioned: 24 Post(s)
Tagged: 0 Thread(s)
Quoted: 753 Post(s)
Liked 737 Times
in
422 Posts
If your feeling artsy, I bet you could add a little more splatter paint to hide the most obvious touch ups.
08-23-19, 07:36 AM
#8
Senior Member
Sandpaper is the last resort, and personally, I wouldn't use it unless glued to a pencil eraser for spot work. The imperfections are below the level of the paint so sandpaper is gonna take off too much, or all of the paint before finally reaching the target area. A magic eraser works wonders on blemishes, and is actually a very, very fine grit sandpaper in sponge form. Meguiars Ultimate by hand is safe for all levels of use. Cable rub type damage is the trickiest because there is rarely a hard edge to contain your touch up. Chips hold the paint well as long as you're patient. White paint is actually tricky to match.
I would remove all components as well. It makes the job much easier and you can't fix the area around the headset unless you remove it
Clean and brighten the paint
Neutralize the rust without collateral damage
Touch up
Yours is a tough one
I would remove all components as well. It makes the job much easier and you can't fix the area around the headset unless you remove it
Clean and brighten the paint
Neutralize the rust without collateral damage
Touch up
Yours is a tough one
Last edited by sdn40; 08-23-19 at 07:42 AM.
Likes For sdn40:
08-23-19, 08:11 AM
#9
The dropped
Thread Starter
Join Date: Oct 2018
Location: Columbus, OH
Posts: 2,144
Bikes: Pake C'Mute Touring/Commuter Build, 1989 Kona Cinder Cone, 1995 Trek 5200, 1973 Raleigh Super Course FG, 1960/61 Montgomery Ward Hawthorne "thrift" 3 speed, by Hercules (sold) : 1966 Schwinn Deluxe Racer (sold)
Mentioned: 10 Post(s)
Tagged: 0 Thread(s)
Quoted: 1739 Post(s)
Liked 1,014 Times
in
696 Posts
Sandpaper is the last resort, and personally, I wouldn't use it unless glued to a pencil eraser for spot work. The imperfections are below the level of the paint so sandpaper is gonna take off too much, or all of the paint before finally reaching the target area. A magic eraser works wonders on blemishes, and is actually a very, very fine grit sandpaper in sponge form. Meguiars Ultimate by hand is safe for all levels of use. Cable rub type damage is the trickiest because there is rarely a hard edge to contain your touch up. Chips hold the paint well as long as you're patient. White paint is actually tricky to match.
I would remove all components as well. It makes the job much easier and you can't fix the area around the headset unless you remove it
Clean and brighten the paint
Neutralize the rust without collateral damage
Touch up
Yours is a tough one
I would remove all components as well. It makes the job much easier and you can't fix the area around the headset unless you remove it
Clean and brighten the paint
Neutralize the rust without collateral damage
Touch up
Yours is a tough one
If the goal was to make the bike like new or fully restore it. I'd be in for a strip and powder coat, plus decal replacement. Thankfully, I hold the opinion that a used mountain bike will have scuffs and scratches.
The goals will be to protect the bare metal and polish the paint to allow for a clean look, when clean. I don't want it to look like a junkyard bike with rust stained paint and bare patches. I'll make a trip to the auto parts store for some light spray primer (I only have the orange stuff) and the Meguiar's ultimate compound to try and clean the dirt out of the little stuff. The compound might reveal a brighter shade of yellow in the splatter too.
Edit: I'll have to wait until I'm done polishing to try and match the white. Who knows how the shade will change as I use the compound.
08-23-19, 07:19 PM
#11
Senior Member
I'm looking for tips and techniques that those of you who refurbish or flip bikes use to repair or minimize the little scratches all over a frame.
I recently bought this 1989 Kona cinder cone for trail and cx duty. The paint is in fair condition. Unfortunately I'm more than a little vain about my bikes, which is why this bothers me. Here's an example from the head tube.
Cinder cone head tube after single use of auto polishing compound. Cable rub and many instances of scratches.
I will not be blasting and powder coating this bike for perfect paint. I will be riding this bike, hopefully in competition. Larger areas I'll cover with a close match. What can i do with the small stuff too deep to buff out with polishing compound and too small for touch up?
After you clean and touch up the lost paint, then some polish will help blend the new into the old.
08-24-19, 06:07 AM
#12
The dropped
Thread Starter
Join Date: Oct 2018
Location: Columbus, OH
Posts: 2,144
Bikes: Pake C'Mute Touring/Commuter Build, 1989 Kona Cinder Cone, 1995 Trek 5200, 1973 Raleigh Super Course FG, 1960/61 Montgomery Ward Hawthorne "thrift" 3 speed, by Hercules (sold) : 1966 Schwinn Deluxe Racer (sold)
Mentioned: 10 Post(s)
Tagged: 0 Thread(s)
Quoted: 1739 Post(s)
Liked 1,014 Times
in
696 Posts
After some Meguiar's
After Meguiar's Ultimate compound More shine!
While it adds shine, most of these are too deep too be affected. The compound also diminished the splatter paint and restored some yellow.
Looks like a toothpick and matched paint...
Last edited by Unca_Sam; 08-24-19 at 06:11 AM.
08-24-19, 07:02 AM
#13
www.theheadbadge.com
Join Date: Sep 2005
Location: Southern Florida
Posts: 28,513
Bikes: https://www.theheadbadge.com
Mentioned: 124 Post(s)
Tagged: 0 Thread(s)
Quoted: 2422 Post(s)
Liked 4,395 Times
in
2,092 Posts
Match the white as best as you can, then fill those areas (if you can lightly remove the rust from those areas with bronze wool first, give it a shot) with touch-up paint. Fill just a tad wider than the scratched area, let it dry until absolutely hard, then polish it smooth with compound. You may have to do this a few times until you've covered the areas, but it'll leave the transition smooth.
-Kurt
__________________
08-24-19, 08:51 PM
#14
The dropped
Thread Starter
Join Date: Oct 2018
Location: Columbus, OH
Posts: 2,144
Bikes: Pake C'Mute Touring/Commuter Build, 1989 Kona Cinder Cone, 1995 Trek 5200, 1973 Raleigh Super Course FG, 1960/61 Montgomery Ward Hawthorne "thrift" 3 speed, by Hercules (sold) : 1966 Schwinn Deluxe Racer (sold)
Mentioned: 10 Post(s)
Tagged: 0 Thread(s)
Quoted: 1739 Post(s)
Liked 1,014 Times
in
696 Posts
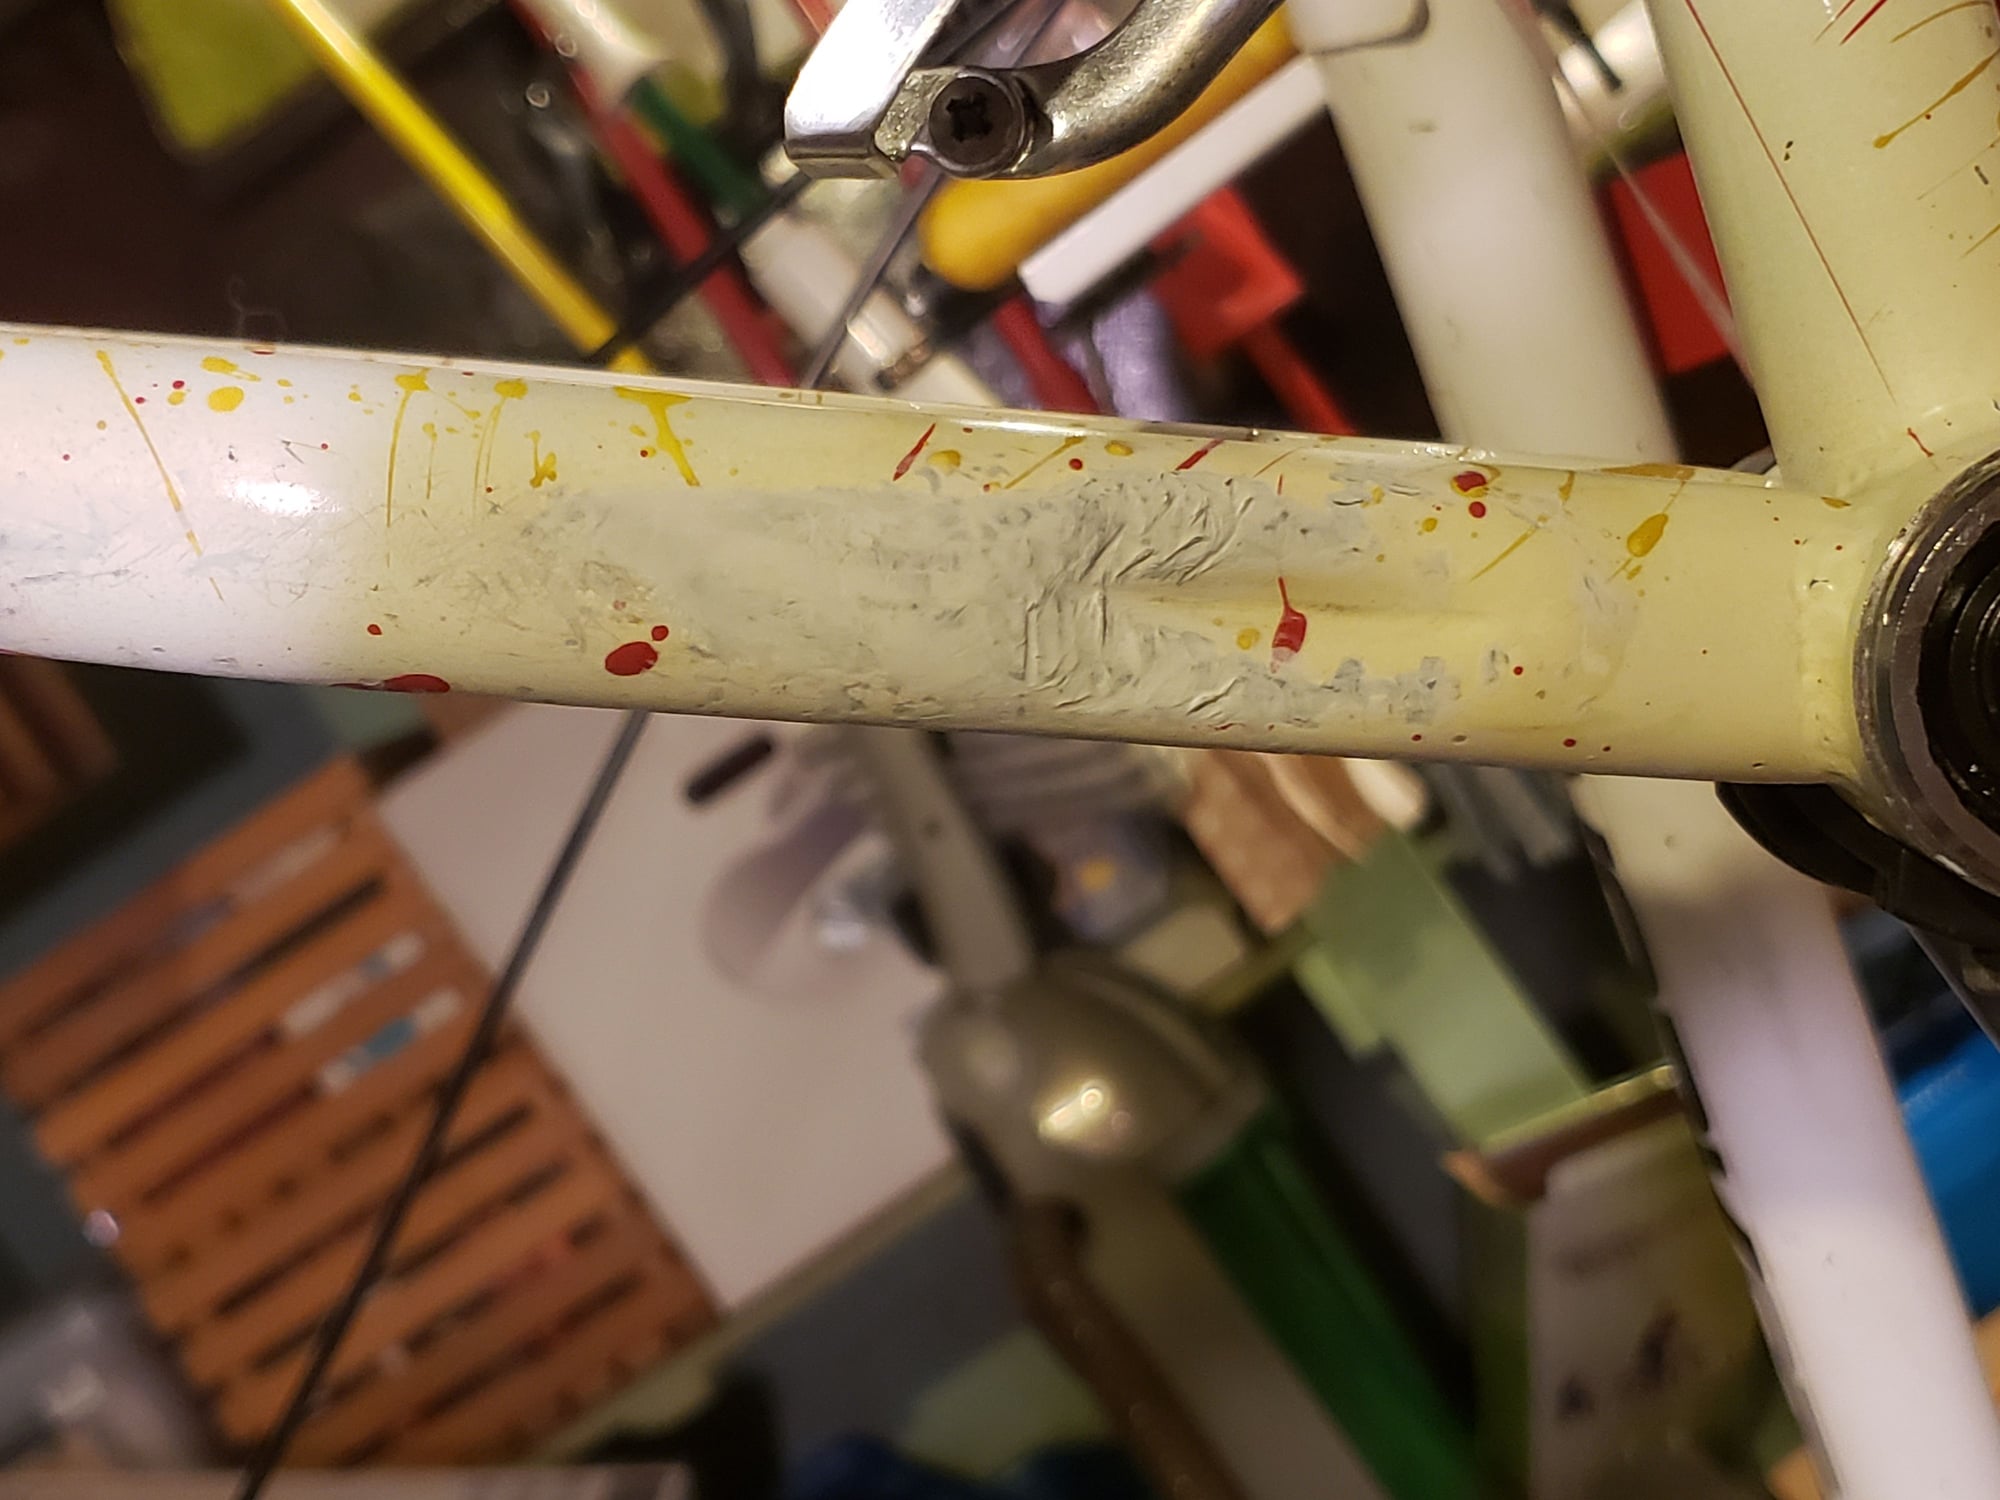
After primer

After primer coats with cheapo watercolor brush.
I think I'll need to sand the primer lightly to flatten it and blend with nearby paint. I don't have a high enough grade on hand to do it. Closest i have is 0000 steel wool. I don't have a nail polish color solution yet, and it might take a while anyways.
The paint match wasn't too far from the original readings after polishing compound.
08-25-19, 03:05 PM
#15
Senior Member
08-25-19, 07:41 PM
#16
www.theheadbadge.com
Join Date: Sep 2005
Location: Southern Florida
Posts: 28,513
Bikes: https://www.theheadbadge.com
Mentioned: 124 Post(s)
Tagged: 0 Thread(s)
Quoted: 2422 Post(s)
Liked 4,395 Times
in
2,092 Posts
08-25-19, 08:11 PM
#17
Senior Member
Yes, it is fine by me but his post seemingly contains an inherent contradiction.
If he is fastidious and ably repairs the paint, he can rightly be proud... and vain.
If he is fastidious and ably repairs the paint, he can rightly be proud... and vain.
08-25-19, 08:46 PM
#18
The dropped
Thread Starter
Join Date: Oct 2018
Location: Columbus, OH
Posts: 2,144
Bikes: Pake C'Mute Touring/Commuter Build, 1989 Kona Cinder Cone, 1995 Trek 5200, 1973 Raleigh Super Course FG, 1960/61 Montgomery Ward Hawthorne "thrift" 3 speed, by Hercules (sold) : 1966 Schwinn Deluxe Racer (sold)
Mentioned: 10 Post(s)
Tagged: 0 Thread(s)
Quoted: 1739 Post(s)
Liked 1,014 Times
in
696 Posts

I was less concerned about the condition of the paint than I was with the late Suntour hubs, cycloid crankset, front and rear accushift derailleur, and the early geometry tange double butted cromo frame. At the least, I have a mtb frame that fits and should make a nice drop conversion if I desire. Central Ohio isn't known for its gnarly downhill scene.
Likes For Unca_Sam:
08-25-19, 09:58 PM
#19
Senior Member
Fastidious, yes. Able?
I was less concerned about the condition of the paint than I was with the late Suntour hubs, cycloid crankset, front and rear accushift derailleur, and the early geometry tange double butted cromo frame. At the least, I have a mtb frame that fits and should make a nice drop conversion if I desire. Central Ohio isn't known for its gnarly downhill scene.
I was less concerned about the condition of the paint than I was with the late Suntour hubs, cycloid crankset, front and rear accushift derailleur, and the early geometry tange double butted cromo frame. At the least, I have a mtb frame that fits and should make a nice drop conversion if I desire. Central Ohio isn't known for its gnarly downhill scene.
If the paint isn't deftly done, it can end up looking worse than what you started with.
Get rid of the rust with oxalic acid. Infill with automotive sandable, filling primer. Apply color and clear coat.
08-29-19, 06:51 AM
#20
The dropped
Thread Starter
Join Date: Oct 2018
Location: Columbus, OH
Posts: 2,144
Bikes: Pake C'Mute Touring/Commuter Build, 1989 Kona Cinder Cone, 1995 Trek 5200, 1973 Raleigh Super Course FG, 1960/61 Montgomery Ward Hawthorne "thrift" 3 speed, by Hercules (sold) : 1966 Schwinn Deluxe Racer (sold)
Mentioned: 10 Post(s)
Tagged: 0 Thread(s)
Quoted: 1739 Post(s)
Liked 1,014 Times
in
696 Posts
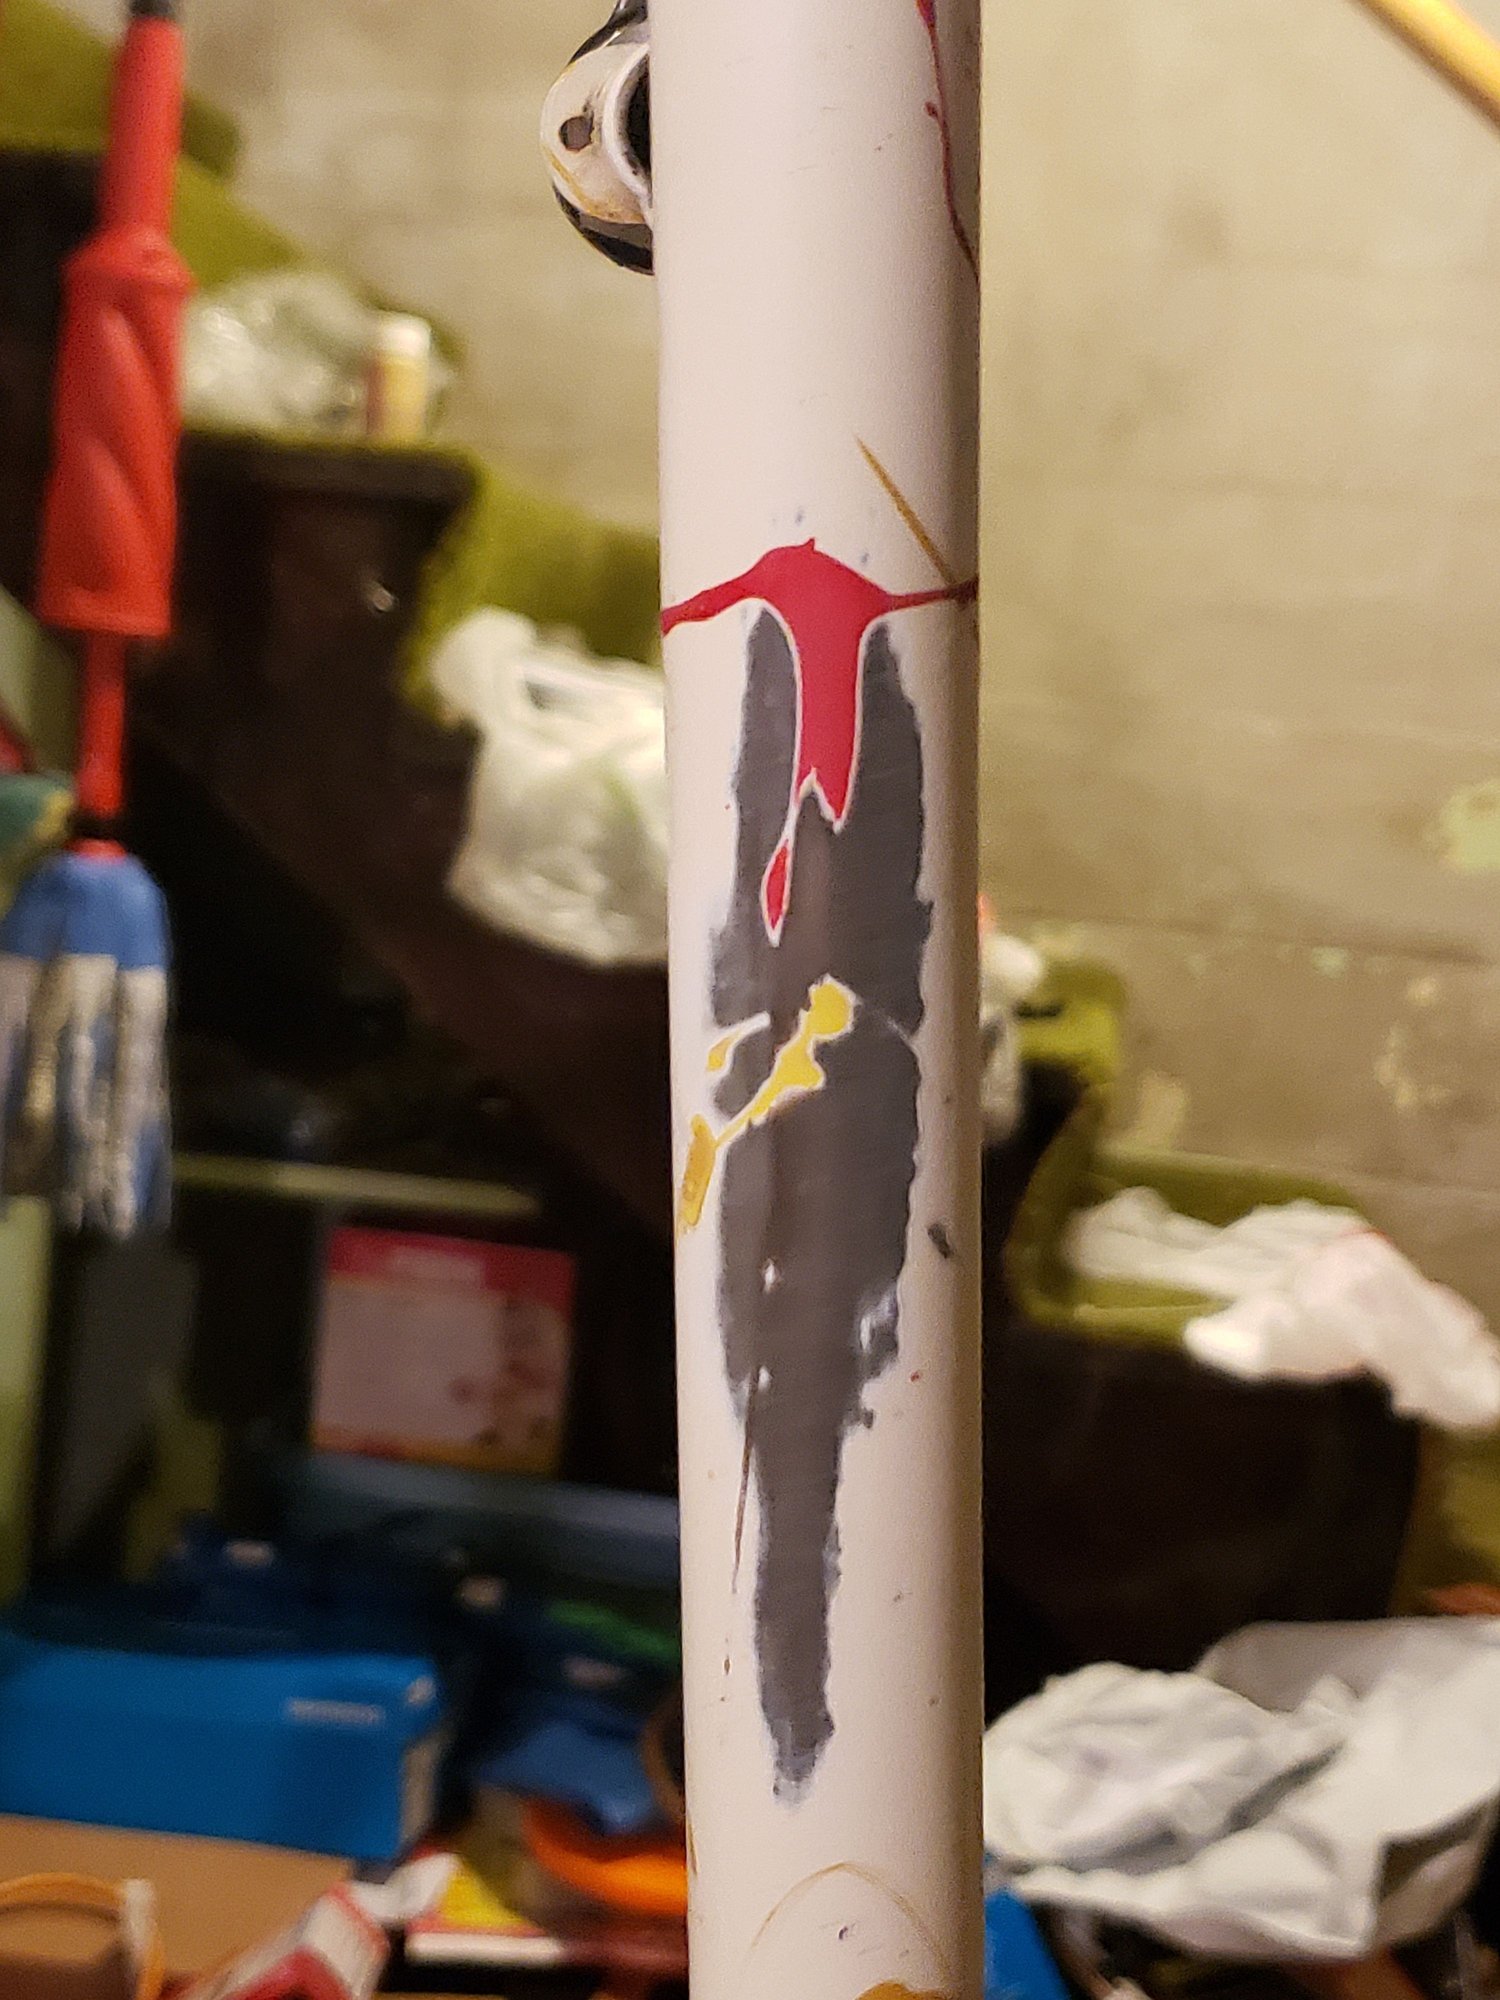
Surprise!

After touch up application, before polishing.
Chain suck damage after primer. Using a body filler would make it look nicer.
Isopropyl removed paint here...
Interesting issue while degreasing before touch up. 91% isopropyl dissolved the paint here! A quick Google search says that isopropyl removes latex paint. In other words, this area was repainted with a gloss latex to match. The red splat had separated from the fork, so I picked it off since I'm painting anyway
") a little wet sanding then a wipe with the alcohol and there goes the paint!
09-02-19, 04:17 PM
a little wet sanding then a wipe with the alcohol and there goes the paint!
09-02-19, 04:17 PM
#21
The dropped
Thread Starter
Join Date: Oct 2018
Location: Columbus, OH
Posts: 2,144
Bikes: Pake C'Mute Touring/Commuter Build, 1989 Kona Cinder Cone, 1995 Trek 5200, 1973 Raleigh Super Course FG, 1960/61 Montgomery Ward Hawthorne "thrift" 3 speed, by Hercules (sold) : 1966 Schwinn Deluxe Racer (sold)
Mentioned: 10 Post(s)
Tagged: 0 Thread(s)
Quoted: 1739 Post(s)
Liked 1,014 Times
in
696 Posts
Finish!
I never thought I'd learn basic bodywork to fix a bike's paint job. 
Head tube after last leveling
Ready for splatter

Fork paint repair, right side.

Unfilled finished chainstay.
Final to come!
Head tube after last leveling
Ready for splatter
Fork paint repair, right side.
Unfilled finished chainstay.
Final to come!
09-03-19, 02:09 AM
#22
The dropped
Thread Starter
Join Date: Oct 2018
Location: Columbus, OH
Posts: 2,144
Bikes: Pake C'Mute Touring/Commuter Build, 1989 Kona Cinder Cone, 1995 Trek 5200, 1973 Raleigh Super Course FG, 1960/61 Montgomery Ward Hawthorne "thrift" 3 speed, by Hercules (sold) : 1966 Schwinn Deluxe Racer (sold)
Mentioned: 10 Post(s)
Tagged: 0 Thread(s)
Quoted: 1739 Post(s)
Liked 1,014 Times
in
696 Posts
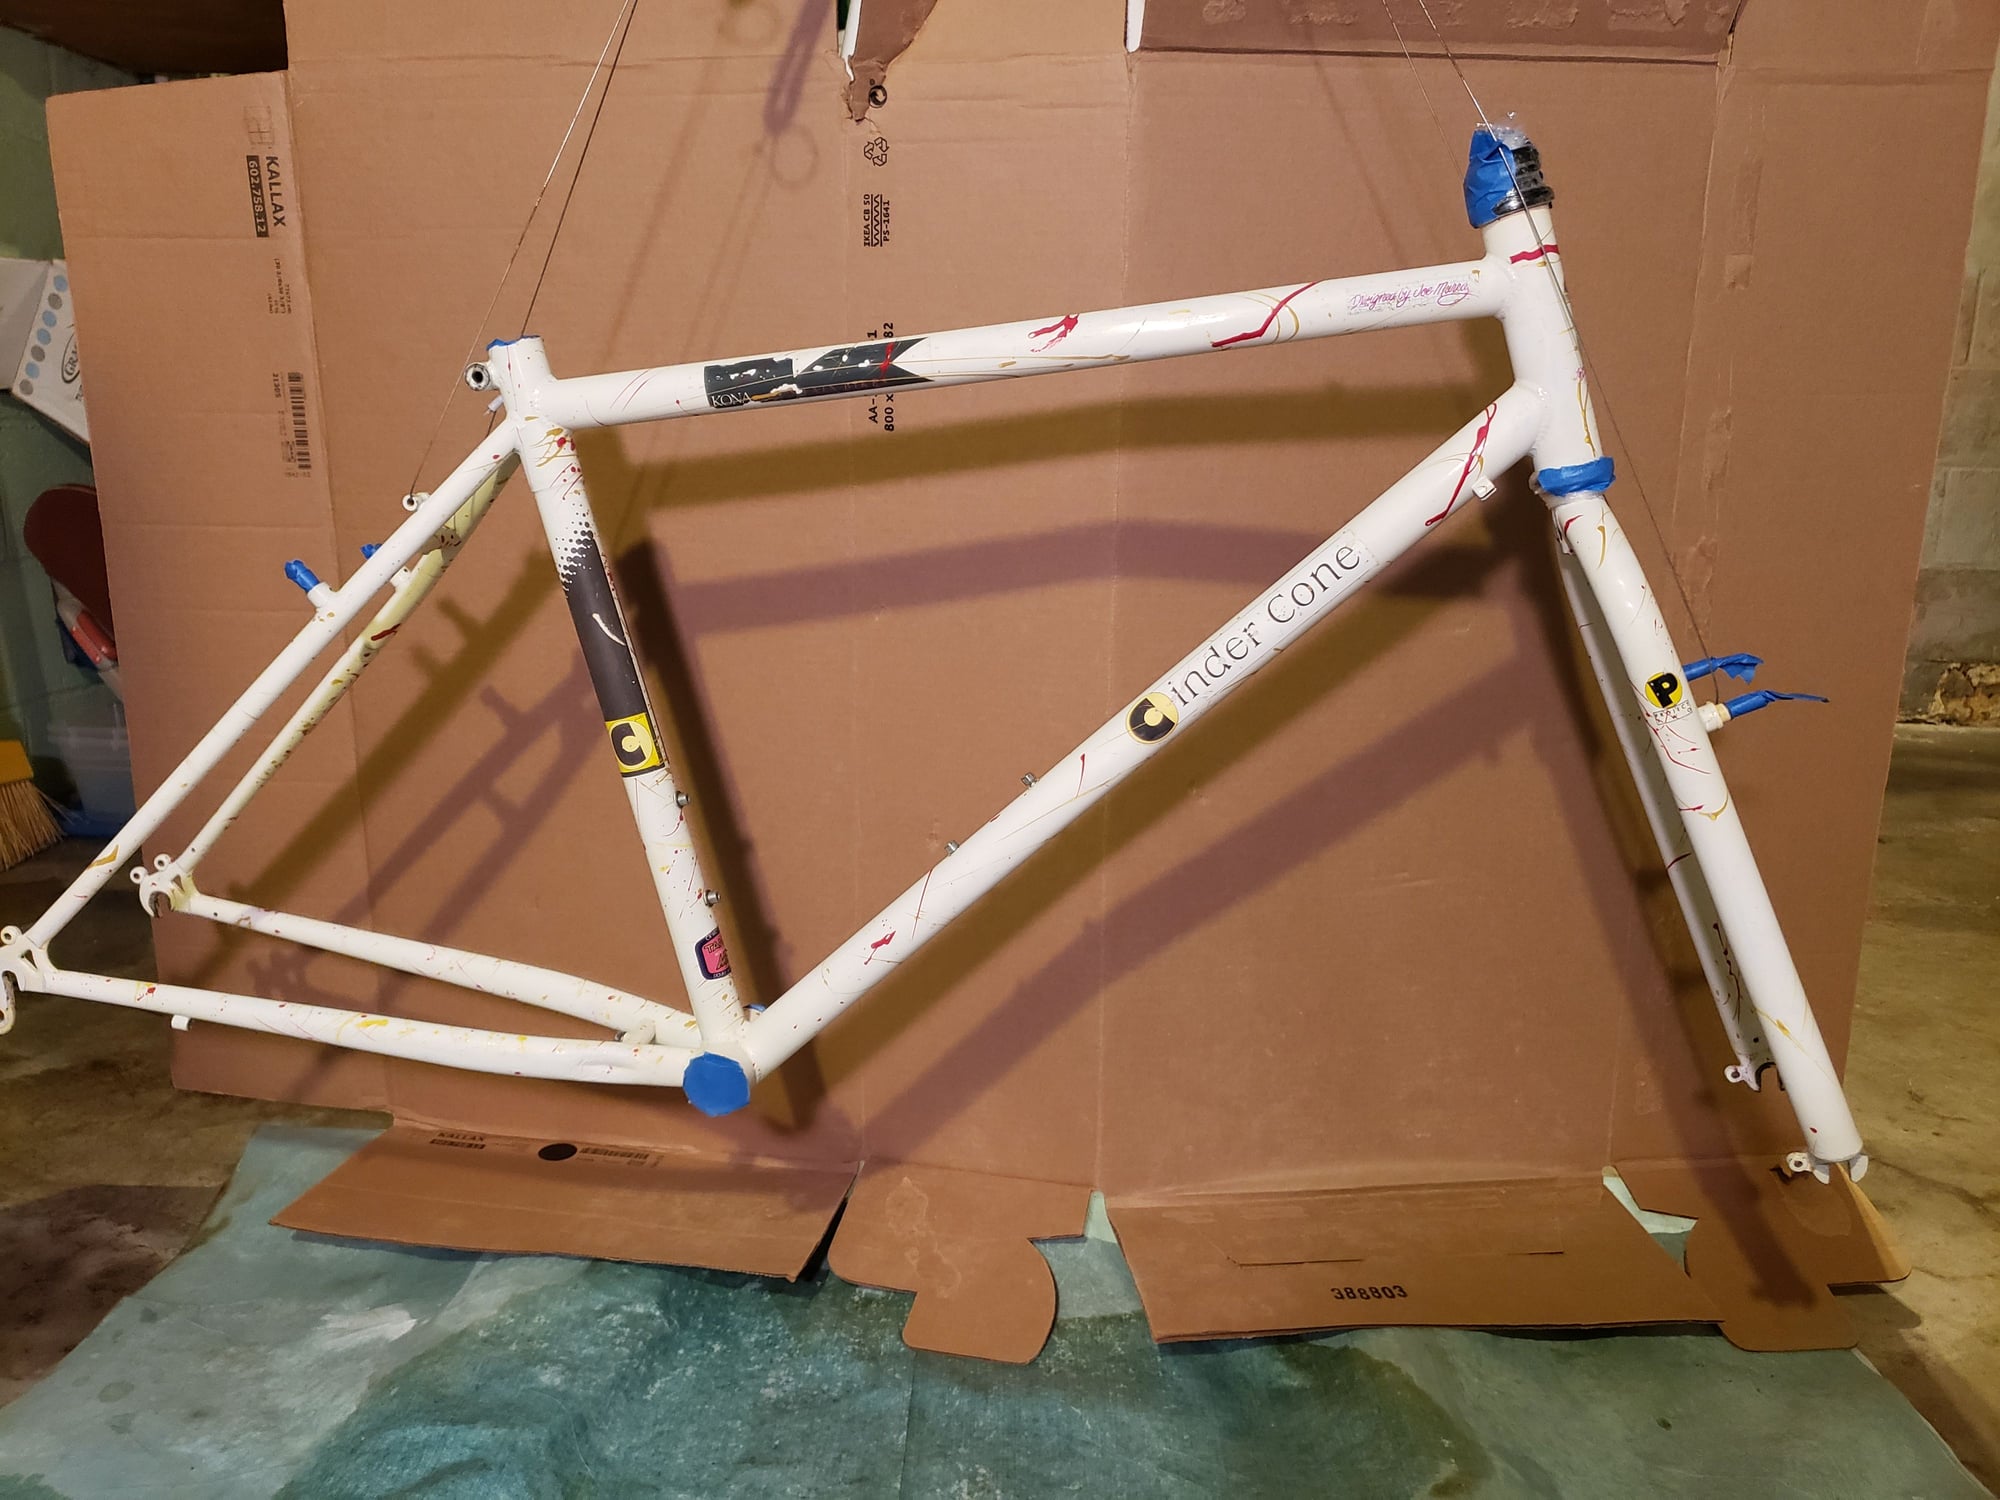
Not perfect
This will be the final post for this paint repair with pictures. I'm happy with the results .
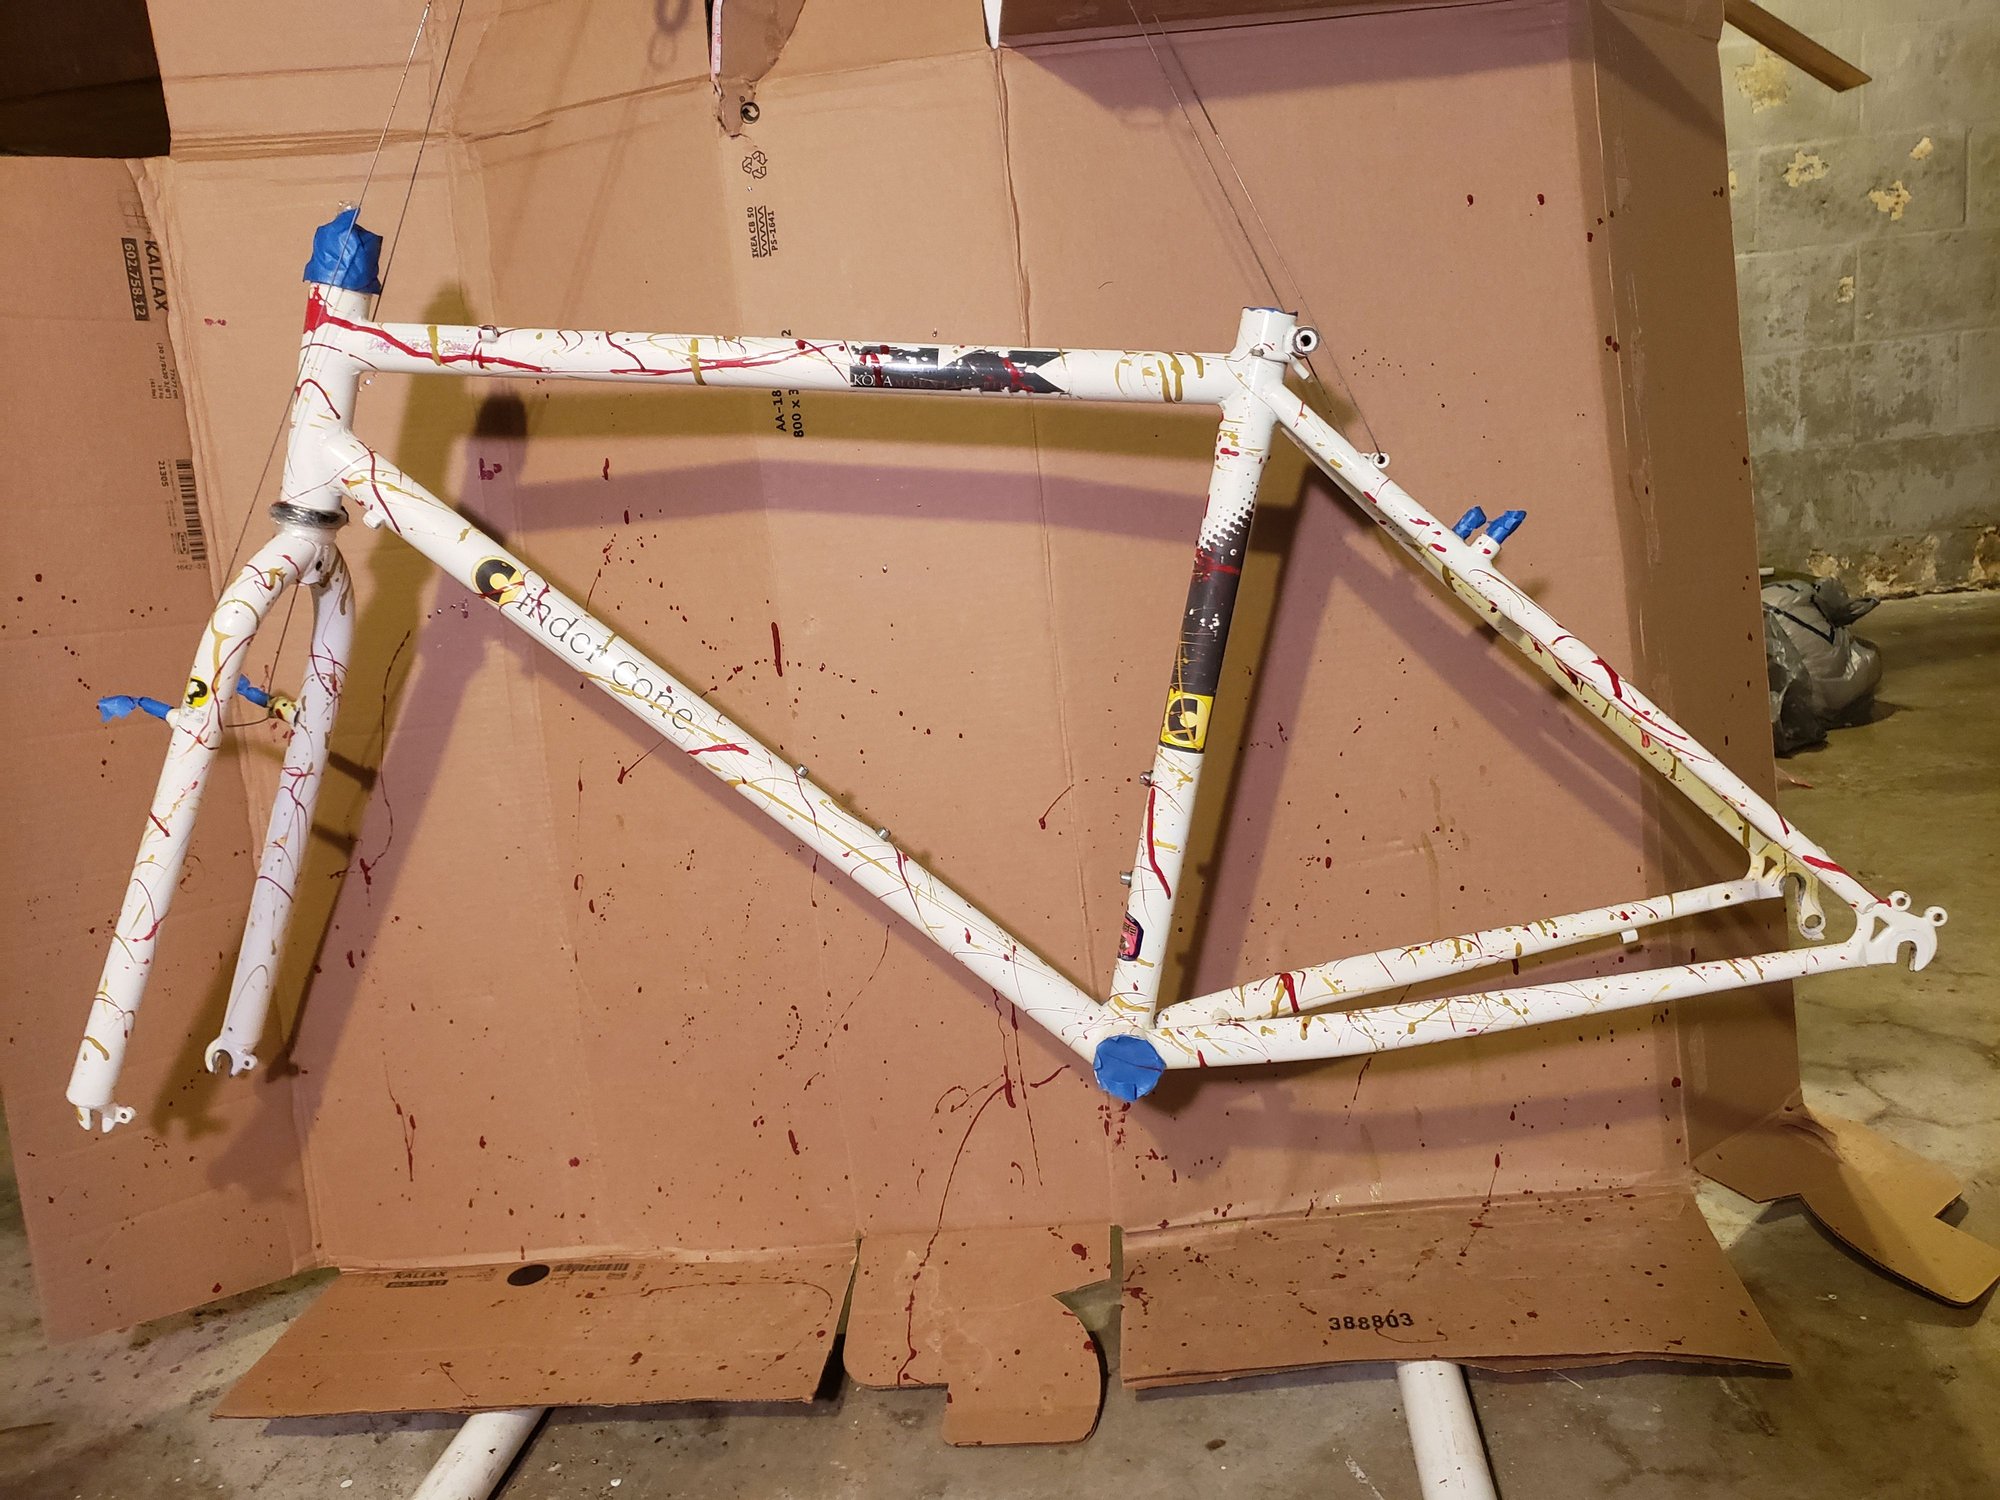
Left side total

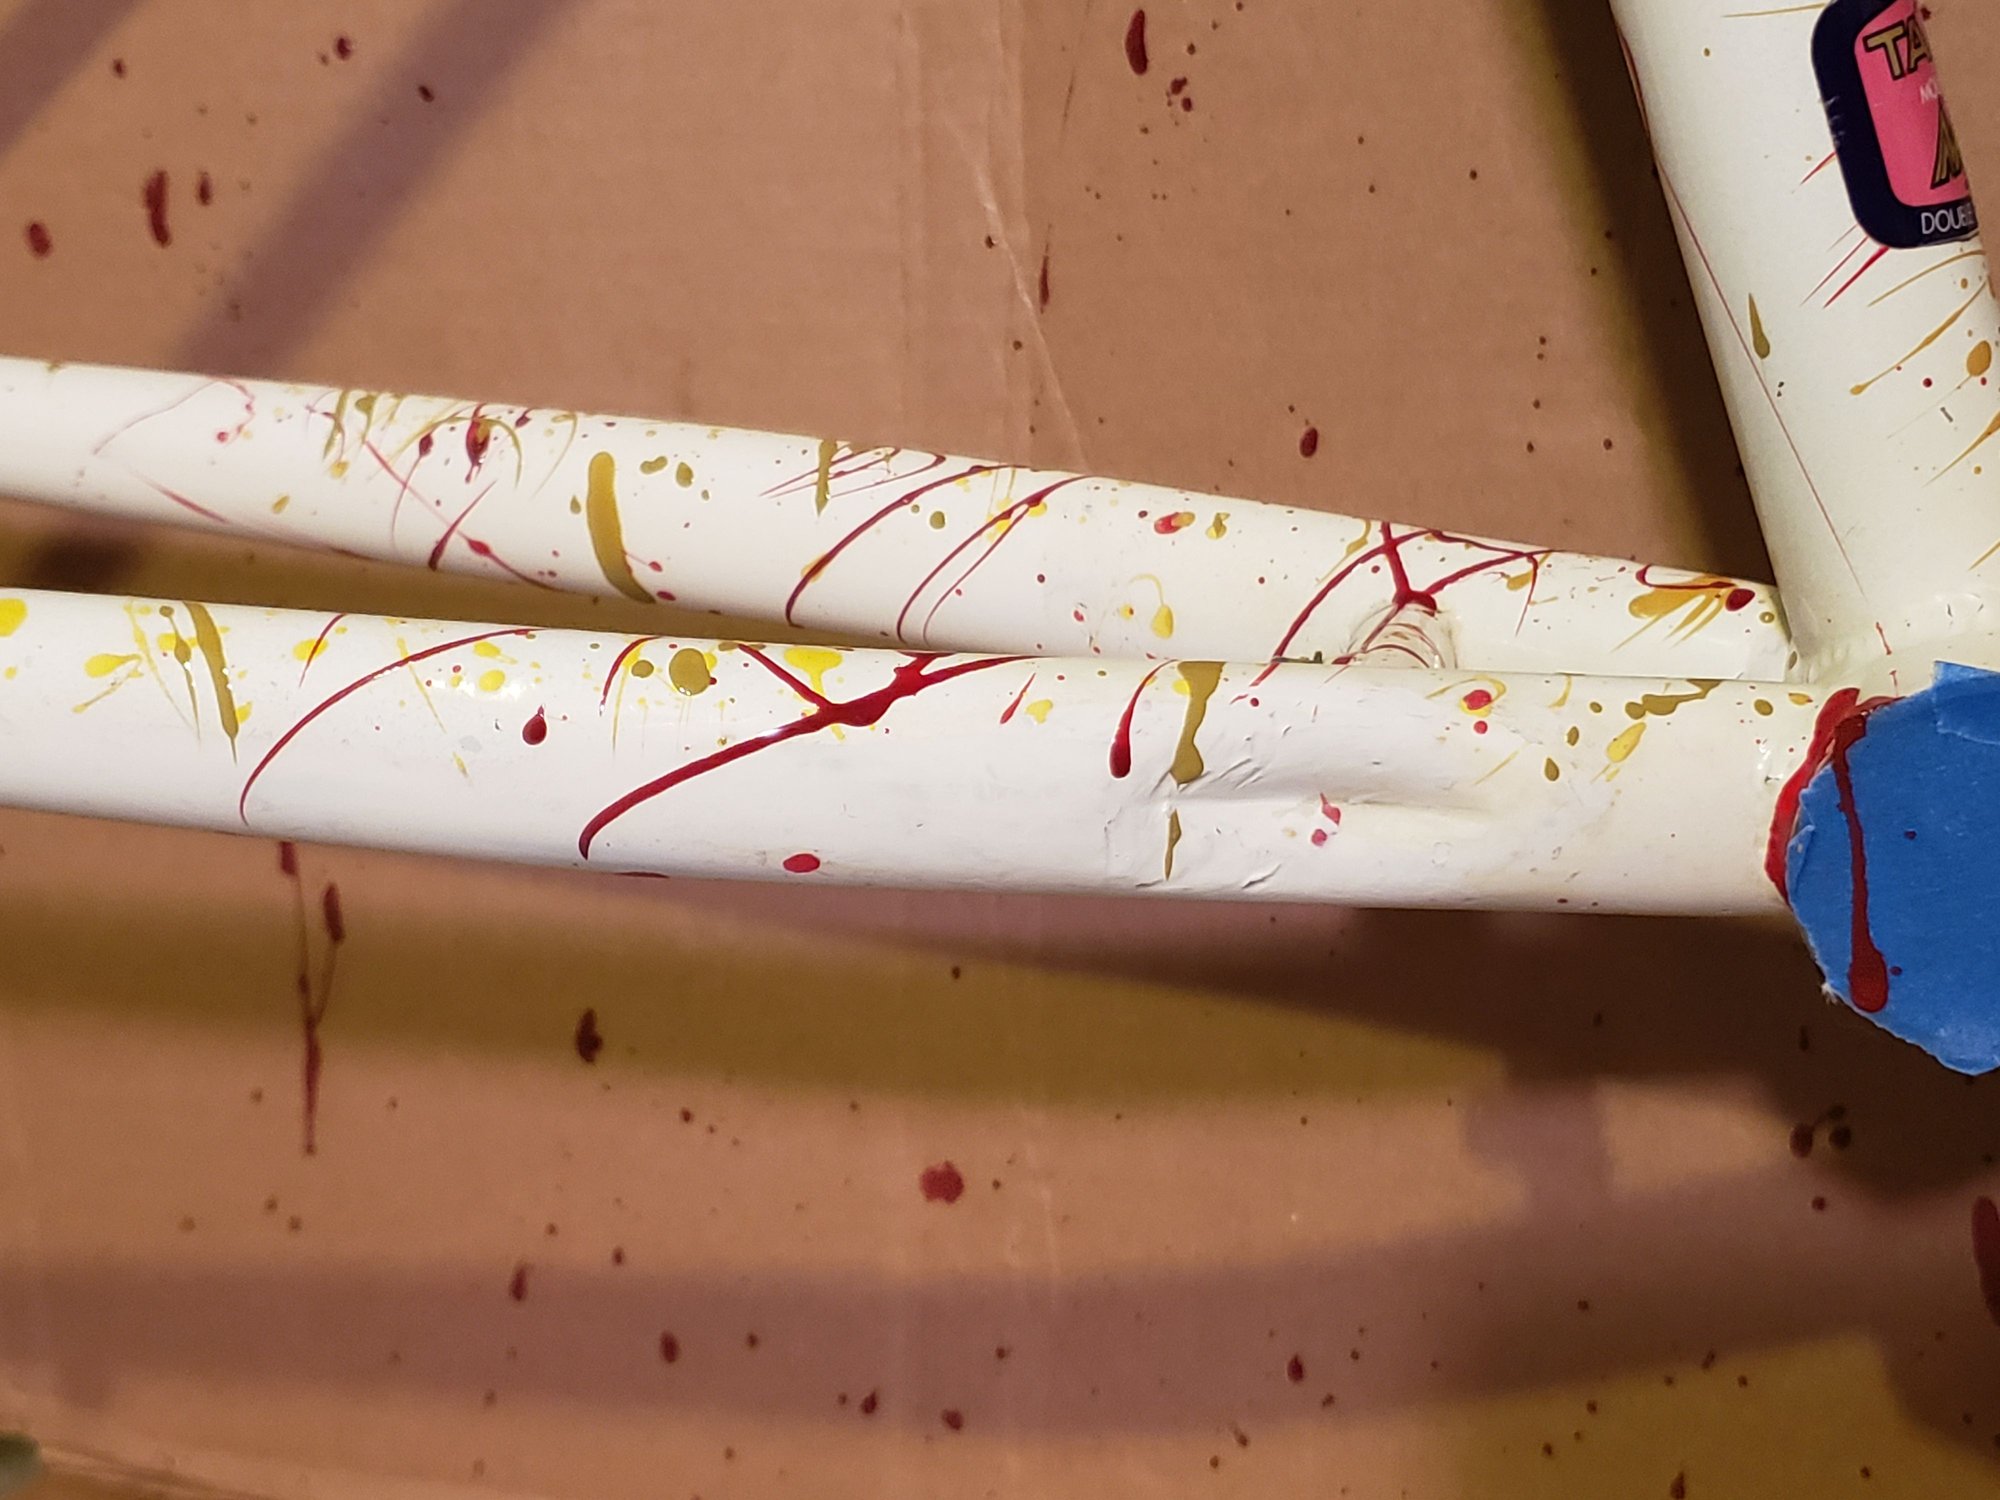
Inside right rear dropout. Some thin touch up on seat stay and chain stay. I was prone to leaving brush marks there.

Fork rear. Primer over previous splatter paint, though it blends alright. Wet sanding that out would go through the paint next to it even with a backer block.
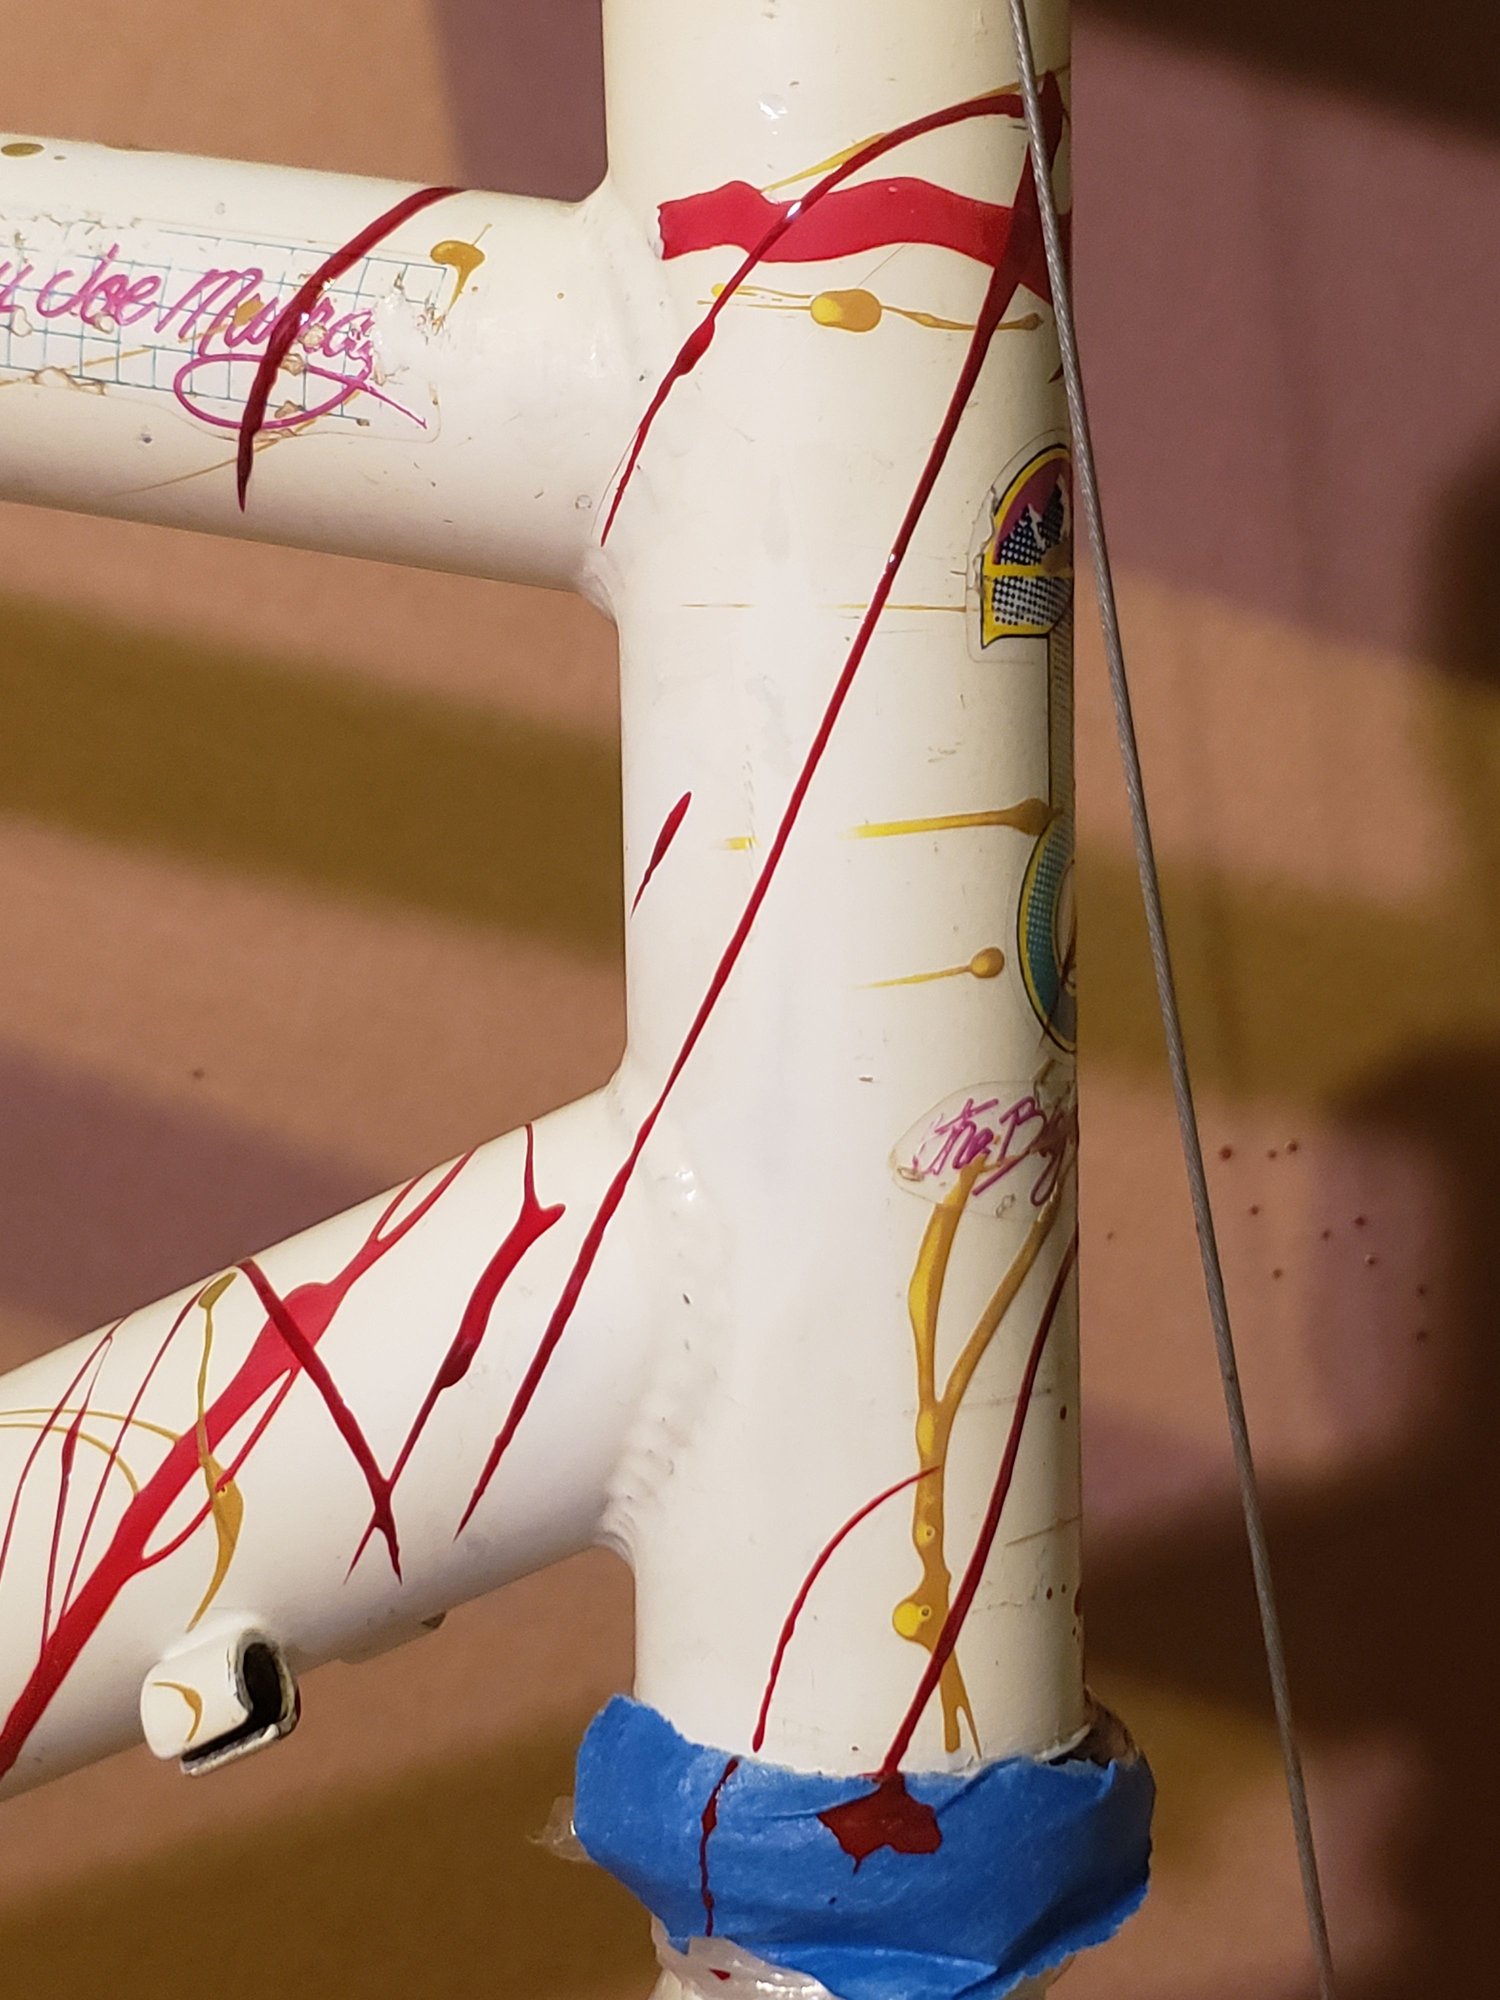
Right side head tube. Best representation of progress overall.

Down tube damage. Splatter hides well. 😉
This should hide the damage well behind the chainrings.
Overall, the finish on this bike is good enough for a rider. I will make my own chips and scratches, and I'll know how to fix them.
.Left side total
Inside right rear dropout. Some thin touch up on seat stay and chain stay. I was prone to leaving brush marks there.
Fork rear. Primer over previous splatter paint, though it blends alright. Wet sanding that out would go through the paint next to it even with a backer block.
Right side head tube. Best representation of progress overall.
Down tube damage. Splatter hides well. 😉
This should hide the damage well behind the chainrings.
Overall, the finish on this bike is good enough for a rider. I will make my own chips and scratches, and I'll know how to fix them.
09-03-19, 02:25 AM
#23
The dropped
Thread Starter
Join Date: Oct 2018
Location: Columbus, OH
Posts: 2,144
Bikes: Pake C'Mute Touring/Commuter Build, 1989 Kona Cinder Cone, 1995 Trek 5200, 1973 Raleigh Super Course FG, 1960/61 Montgomery Ward Hawthorne "thrift" 3 speed, by Hercules (sold) : 1966 Schwinn Deluxe Racer (sold)
Mentioned: 10 Post(s)
Tagged: 0 Thread(s)
Quoted: 1739 Post(s)
Liked 1,014 Times
in
696 Posts
My tips
Look for Sculpey wet/dry sandpaper packs, 400/600/800/1000 grit. Auto refinish packs will have far too many sheets. You'll need a 1500 grit paper, though.
Use a backer block to sand down blobs. Blocks of rubber, plastic, or wood work well enough.
I was fortunate to have a professional auto paint dealer closeby that is happy to mix 2 oz. of touch up to match. YMMV. There's no substitute for matching directly with their cards.
If you have a color match, sand down edges of chips to make blending the repair possible. When you sand a blob back down to original level, you will see the outline of the chip, now filled with paint, if you don't.
Spray primer is cheap and effective. Sand down the tooth on it after the second coat for a smoother finish. Use a hobby brush for small areas to hide exposed metal.
Look for a build thread soon.
Likes For Unca_Sam:

