


Side-pull brake woes
 01-28-20, 08:09 AM
#1


Se�or Member
Thread Starter

Join Date: Oct 2004
Location: Hardy, VA
Posts: 17,921
Bikes: Mostly English - predominantly Raleighs
Mentioned: 70 Post(s)
Tagged: 0 Thread(s)
Quoted: 1491 Post(s)
Liked 1,089 Times
in
637 Posts
Side-pull brake woes
I'm not here just to moan. I like to think that I have a bit more talent than that. 
As I'm in the protracted processes of organizing my shop and puttering along with projects, I've reached the point where I'm taking a close look at side-pull brakes, as I'm trying to fit some on one of my projects. In doing so, I'm noticing two things.
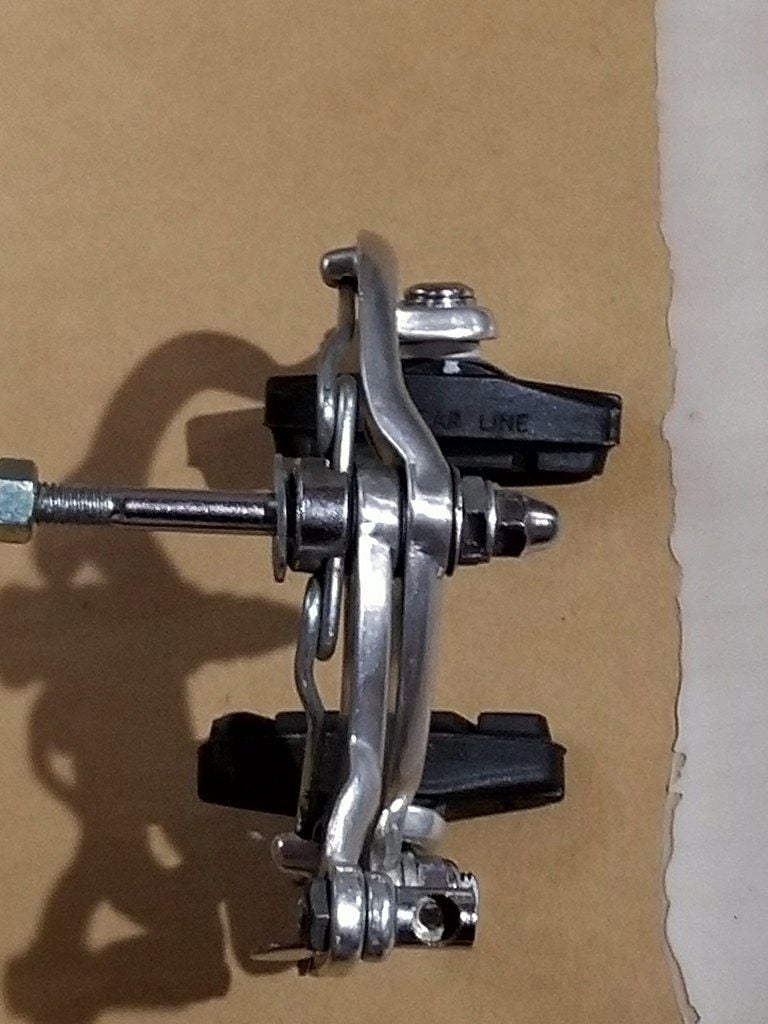
1. I have a couple sets of Weinmann calipers (and a set of Universal 68's) that have the ends of their arms severely misaligned when pressed together. I'm not talking about 2-3 mm off, they are between 1-2 centimeters off. This is the case on both the fronts and the rears. As I look closely at them, the issue appears to by with arm that gets pulled by the brake cable. I suspect they may be twisted, but there's also a bit of play in the movement, so I'm wondering if they were taken apart at some point and then re-assembled incorrectly. Is this something that others here have experienced? Was there some remedy (bending, reassembly, etc.), or are they simply toast?
2. If the above-mentioned calipers are now no better than part donors and memorabilia, Is it possible to transplant the mounting bolts from these onto one of my sets of calipers that does have proper alignment, but has recessed bolts?
Hoping that the collective wisdom here can set me straight.
Thanks,
Z
As I'm in the protracted processes of organizing my shop and puttering along with projects, I've reached the point where I'm taking a close look at side-pull brakes, as I'm trying to fit some on one of my projects. In doing so, I'm noticing two things.
1. I have a couple sets of Weinmann calipers (and a set of Universal 68's) that have the ends of their arms severely misaligned when pressed together. I'm not talking about 2-3 mm off, they are between 1-2 centimeters off. This is the case on both the fronts and the rears. As I look closely at them, the issue appears to by with arm that gets pulled by the brake cable. I suspect they may be twisted, but there's also a bit of play in the movement, so I'm wondering if they were taken apart at some point and then re-assembled incorrectly. Is this something that others here have experienced? Was there some remedy (bending, reassembly, etc.), or are they simply toast?
2. If the above-mentioned calipers are now no better than part donors and memorabilia, Is it possible to transplant the mounting bolts from these onto one of my sets of calipers that does have proper alignment, but has recessed bolts?
Hoping that the collective wisdom here can set me straight.
Thanks,
Z
__________________
In search of what to search for.
In search of what to search for.

Likes For USAZorro:
01-28-20, 08:17 AM
#2

Randomhead
Join Date: Aug 2008
Location: Happy Valley, Pennsylvania
Posts: 24,386
Mentioned: 0 Post(s)
Tagged: 0 Thread(s)
Quoted: 4 Post(s)
Liked 3,687 Times
in
2,510 Posts
I want to say the answer is yes, you can swap parts. But that seems like it would be obvious, so I feel like I'm missing something. Maybe pics would help?
01-28-20, 08:33 AM
#3
Senior Member

Join Date: May 2008
Location: Fredericksburg, Va
Posts: 9,579
Bikes: '65 Frejus TDF, '73 Bottecchia Giro d'Italia, '83 Colnago Superissimo, '84 Trek 610, '84 Trek 760, '88 Pinarello Veneto, '88 De Rosa Pro, '89 Pinarello Montello, '94 Burley Duet, 97 Specialized RockHopper, 2010 Langster, Tern Link D8
Mentioned: 73 Post(s)
Tagged: 0 Thread(s)
Quoted: 1607 Post(s)
Liked 2,214 Times
in
1,103 Posts
Need a better understanding of the alignment. How are they misaligned? is it relative to each other? I believe there is an alignment issue due to the arms being offset at the pivot point. Some calipers don't account for the offset in the design of the arm, so one pad is ahead of the other when "closed." Actually, always.
__________________
Bikes don't stand alone. They are two tired.
Bikes don't stand alone. They are two tired.
Likes For SJX426:
01-28-20, 08:51 AM
#4
Se�or Member
Thread Starter
Join Date: Oct 2004
Location: Hardy, VA
Posts: 17,921
Bikes: Mostly English - predominantly Raleighs
Mentioned: 70 Post(s)
Tagged: 0 Thread(s)
Quoted: 1491 Post(s)
Liked 1,089 Times
in
637 Posts
My experience with assembling and disassembling brake calipers has been confined to centerpulls and cantilevers. Removing the mounting post on side-pulls is something I've never attempted, as it looks like vise-grips would be my tool of choice for removal. That doesn't give me the impression that they were intended to be serviceable.
__________________
In search of what to search for.
In search of what to search for.
01-28-20, 08:56 AM
#5
Se�or Member
Thread Starter
Join Date: Oct 2004
Location: Hardy, VA
Posts: 17,921
Bikes: Mostly English - predominantly Raleighs
Mentioned: 70 Post(s)
Tagged: 0 Thread(s)
Quoted: 1491 Post(s)
Liked 1,089 Times
in
637 Posts
Need a better understanding of the alignment. How are they misaligned? is it relative to each other? I believe there is an alignment issue due to the arms being offset at the pivot point. Some calipers don't account for the offset in the design of the arm, so one pad is ahead of the other when "closed." Actually, always.
__________________
In search of what to search for.
In search of what to search for.
01-28-20, 09:29 AM
#6
Senior Member
Join Date: May 2008
Location: Fredericksburg, Va
Posts: 9,579
Bikes: '65 Frejus TDF, '73 Bottecchia Giro d'Italia, '83 Colnago Superissimo, '84 Trek 610, '84 Trek 760, '88 Pinarello Veneto, '88 De Rosa Pro, '89 Pinarello Montello, '94 Burley Duet, 97 Specialized RockHopper, 2010 Langster, Tern Link D8
Mentioned: 73 Post(s)
Tagged: 0 Thread(s)
Quoted: 1607 Post(s)
Liked 2,214 Times
in
1,103 Posts
You are justified in being concerned. The Universal 61 brake calipers are cast and will break when attempting to bend them. Ask me how I know!
 P1000591, on Flickr
P1000591, on Flickr
__________________
Bikes don't stand alone. They are two tired.
Bikes don't stand alone. They are two tired.
01-28-20, 09:41 AM
#7
Senior Member
Join Date: Nov 2004
Posts: 23,223
Mentioned: 654 Post(s)
Tagged: 1 Thread(s)
Quoted: 4722 Post(s)
Likes: 0
Liked 3,036 Times
in
1,874 Posts
Most side pull brakes have an offset to the front arm so that the lower section of the arms are in alignment. This is primarily to put the spring retention tabs in alignment for symmetrical springs. Consequently both pads should also be in alignment. or at least close.
Edit: Here are two shots of one my Universal 68 calipers.


Edit: Here are two shots of one my Universal 68 calipers.
Last edited by T-Mar; 01-28-20 at 10:04 AM.
Likes For T-Mar:
01-28-20, 10:08 AM
#8
Se�or Member
Thread Starter
Join Date: Oct 2004
Location: Hardy, VA
Posts: 17,921
Bikes: Mostly English - predominantly Raleighs
Mentioned: 70 Post(s)
Tagged: 0 Thread(s)
Quoted: 1491 Post(s)
Liked 1,089 Times
in
637 Posts
This is helpful information.
Apparently though, I think I need to consider cannibalizing the torqued calipers to claim the pivot bolt, and to transplant it in good calipers that have recessed bolts. Not finding instructions for this process when I google "disassembling side-pull brake calipers". It there some good documentation of the steps involved? I shudder at the thought of just going at it with vise-grips.
Here are the worst of them
__________________
In search of what to search for.
In search of what to search for.
Last edited by USAZorro; 01-28-20 at 10:25 AM.
Likes For USAZorro:
01-28-20, 10:37 AM
#9
Senior Member
Join Date: Nov 2004
Posts: 23,223
Mentioned: 654 Post(s)
Tagged: 1 Thread(s)
Quoted: 4722 Post(s)
Likes: 0
Liked 3,036 Times
in
1,874 Posts
This is helpful information.
Apparently though, I think I need to consider cannibalizing the torqued calipers to claim the pivot bolt, and to transplant it in good calipers that have recessed bolts. Not finding instructions for this process when I google "disassembling side-pull brake calipers". It there some good documentation of the steps involved? I shudder at the thought of just going at it with vise-grips...
Apparently though, I think I need to consider cannibalizing the torqued calipers to claim the pivot bolt, and to transplant it in good calipers that have recessed bolts. Not finding instructions for this process when I google "disassembling side-pull brake calipers". It there some good documentation of the steps involved? I shudder at the thought of just going at it with vise-grips...

Likes For T-Mar:
01-28-20, 10:53 AM
#10

Senior Member

Join Date: Apr 2005
Location: Ann Arbor, MI
Posts: 16,868
Bikes: 1980 Masi, 1984 Mondonico, 1984 Trek 610, 1980 Woodrup Giro, 2005 Mondonico Futura Leggera ELOS, 1967 PX10E, 1971 Peugeot UO-8
Mentioned: 49 Post(s)
Tagged: 0 Thread(s)
Quoted: 1854 Post(s)
Liked 661 Times
in
504 Posts
It is the latter. However (as in the case of the Universal calipers), I have two bicycles with the same model of caliper, and their pads are within a mm of each other when pressed together. Not so with my problem child. It looks like the arms on that set may be bent. I am guessing that correcting the bend will leave the arms even more compromised, and possibly subject to catastrophic failure.
Sometimes it seems like elves live in our boxes of old bike parts. Usually when I take them apart I can see what was intended when the calipers were new.
01-28-20, 10:56 AM
#11
Senior Member
Join Date: Aug 2013
Posts: 2,321
Mentioned: 35 Post(s)
Tagged: 0 Thread(s)
Quoted: 767 Post(s)
Liked 1,898 Times
in
889 Posts
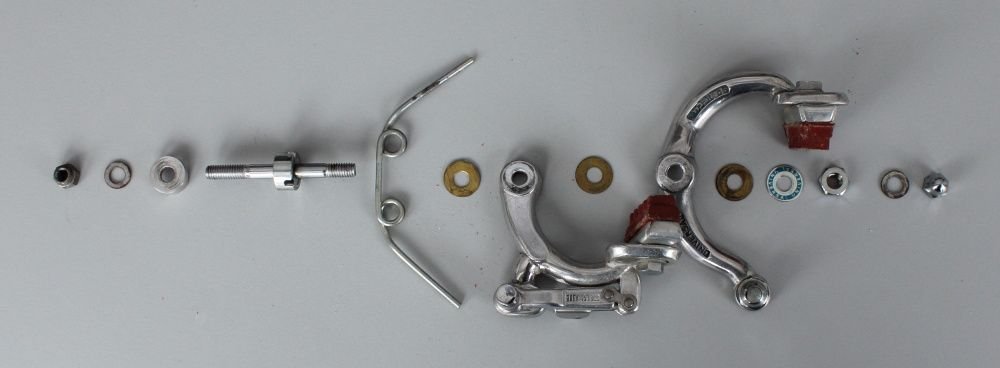
Just like that exploded view, disconnect the spring from the little notches, remove the nuts, slide the whole thing apart.
I have a low profile wrench that works perfectly to get at the nut in the "N" position in the illustration. Hold steady and remove the cone/acorn nut.
I have a low profile wrench that works perfectly to get at the nut in the "N" position in the illustration. Hold steady and remove the cone/acorn nut.
Likes For BFisher:
01-28-20, 10:57 AM
#12
Se�or Member
Thread Starter
Join Date: Oct 2004
Location: Hardy, VA
Posts: 17,921
Bikes: Mostly English - predominantly Raleighs
Mentioned: 70 Post(s)
Tagged: 0 Thread(s)
Quoted: 1491 Post(s)
Liked 1,089 Times
in
637 Posts
Thanks. Part "D" is what concerns me. What tool is used to insert/extract it?
Also, I suspect something(s) is/are missing in the stack of parts between 'E' and 'P'.
Also, I suspect something(s) is/are missing in the stack of parts between 'E' and 'P'.
__________________
In search of what to search for.
In search of what to search for.
01-28-20, 10:59 AM
#13
Senior Member
Join Date: May 2008
Location: Fredericksburg, Va
Posts: 9,579
Bikes: '65 Frejus TDF, '73 Bottecchia Giro d'Italia, '83 Colnago Superissimo, '84 Trek 610, '84 Trek 760, '88 Pinarello Veneto, '88 De Rosa Pro, '89 Pinarello Montello, '94 Burley Duet, 97 Specialized RockHopper, 2010 Langster, Tern Link D8
Mentioned: 73 Post(s)
Tagged: 0 Thread(s)
Quoted: 1607 Post(s)
Liked 2,214 Times
in
1,103 Posts
Did you check the brake block mounts? are the mounting studs in the same location fore and aft?
__________________
Bikes don't stand alone. They are two tired.
Bikes don't stand alone. They are two tired.
Likes For BFisher:
01-28-20, 11:19 AM
#15
Se�or Member
Thread Starter
Join Date: Oct 2004
Location: Hardy, VA
Posts: 17,921
Bikes: Mostly English - predominantly Raleighs
Mentioned: 70 Post(s)
Tagged: 0 Thread(s)
Quoted: 1491 Post(s)
Liked 1,089 Times
in
637 Posts
ok - cool. I think the Weinmanns that I have (not quite as off kilter as these, have a post that is secured by a recessed bolt in the front part of the caliper. If I can get these sorted though, I may not have to explore transplanting the external bolts for recessed ones.
Thanks to all!
__________________
In search of what to search for.
In search of what to search for.
01-28-20, 11:51 AM
#16
Senior Member
Join Date: Apr 2005
Location: Ann Arbor, MI
Posts: 16,868
Bikes: 1980 Masi, 1984 Mondonico, 1984 Trek 610, 1980 Woodrup Giro, 2005 Mondonico Futura Leggera ELOS, 1967 PX10E, 1971 Peugeot UO-8
Mentioned: 49 Post(s)
Tagged: 0 Thread(s)
Quoted: 1854 Post(s)
Liked 661 Times
in
504 Posts
Based on Tmar's photo as well as the exploded assembly diagram, I would disengage the spring ends from the caliper arms first. Then hold the unthreaded shaft of "D" with a small locked Vise-grip or the similar Craftsman version. I have a long nose narrow-jaw one I bought for adjusting old Brooks tensioners. The latched Vise-grip needs either a muscular assistant (cats not recommended) or a real or improvised bench vise. Take careful note of the play between the two arms and if they are able to rock on the shafts of "D". Then unscrew both nuts without losing them or the washers. When you separate the two arms from each other, don't lose any of the washers, or the ones on the interface between the second arm and "D". Those will be really important to re-assembling without play or binding.
01-28-20, 12:15 PM
#17
Senior Member
Join Date: May 2008
Location: Fredericksburg, Va
Posts: 9,579
Bikes: '65 Frejus TDF, '73 Bottecchia Giro d'Italia, '83 Colnago Superissimo, '84 Trek 610, '84 Trek 760, '88 Pinarello Veneto, '88 De Rosa Pro, '89 Pinarello Montello, '94 Burley Duet, 97 Specialized RockHopper, 2010 Langster, Tern Link D8
Mentioned: 73 Post(s)
Tagged: 0 Thread(s)
Quoted: 1607 Post(s)
Liked 2,214 Times
in
1,103 Posts
I would also measure the thickness of F, H, and L. Since there is an offset, I would put the thin one in the H position, if there is a difference. Lubing them slightly would also be a good idea.
__________________
Bikes don't stand alone. They are two tired.
Bikes don't stand alone. They are two tired.
01-28-20, 12:31 PM
#18
Me duelen las nalgas
Join Date: Aug 2015
Location: Texas
Posts: 13,513
Bikes: Centurion Ironman, Trek 5900, Univega Via Carisma, Globe Carmel
Mentioned: 199 Post(s)
Tagged: 0 Thread(s)
Quoted: 4559 Post(s)
Liked 2,802 Times
in
1,800 Posts
If the problem is one brake pad rubbing the rim, or contacting the rim before the other, I've used a kludge on my Suntour GPX and Dia-Compe BRS 500 brakes -- at least until I had the patience to reset the mounting bolts to center the arms.
I just wrap a zip tie once or twice around the cable housing, then wrap that around the handlebar/stem, and tighten the zip tie lock just enough to pull the arms into more equal positioning. A small Velcro strap can do the same thing and is more readily adjustable.
I used that trick for several months before I finally got around the resetting the mounting bolt on the brakes so they'd open/close evenly.
Similar issue on the rear brakes. The cable housing would creep a bit inside the frame-mounted guides. So I could either tug the cable housing back into place, or use a zip tie to keep it in place.
Cutting the brake cable housing to the perfect length also seems to help, but it's a PITA to get that length perfect, and I discovered with some bargain priced cable housing the housing would compress when new and it took awhile to finally take a set where I didn't continued to compress and effectively shorten. (Note to self: Don't by cheap cable housing.)
01-28-20, 12:58 PM
#19
Senior Member
Join Date: Nov 2004
Posts: 23,223
Mentioned: 654 Post(s)
Tagged: 1 Thread(s)
Quoted: 4722 Post(s)
Likes: 0
Liked 3,036 Times
in
1,874 Posts
It doesn't look there is anything missing from the diagram.
01-28-20, 01:26 PM
#21
Senior Member
Join Date: Nov 2004
Posts: 23,223
Mentioned: 654 Post(s)
Tagged: 1 Thread(s)
Quoted: 4722 Post(s)
Likes: 0
Liked 3,036 Times
in
1,874 Posts
Confirmed: there's nothing missing from the diagram.
All three brass washers are identical.
Tools req'd: Flat bladed screwdriver to disengage and re-engage spring, 8mm & 11mm wrenches or sockets.
Disassembly time: 1 minute, 15.23 seconds
Assembly and adjust time: 1 minute, 28.02 seconds
All three brass washers are identical.
Tools req'd: Flat bladed screwdriver to disengage and re-engage spring, 8mm & 11mm wrenches or sockets.
Disassembly time: 1 minute, 15.23 seconds
Assembly and adjust time: 1 minute, 28.02 seconds
01-28-20, 03:13 PM
#23
Se�or Member
Thread Starter
Join Date: Oct 2004
Location: Hardy, VA
Posts: 17,921
Bikes: Mostly English - predominantly Raleighs
Mentioned: 70 Post(s)
Tagged: 0 Thread(s)
Quoted: 1491 Post(s)
Liked 1,089 Times
in
637 Posts
Looks like it's all here, save one washer on the nut end - which I wouldn't think should affect the function.
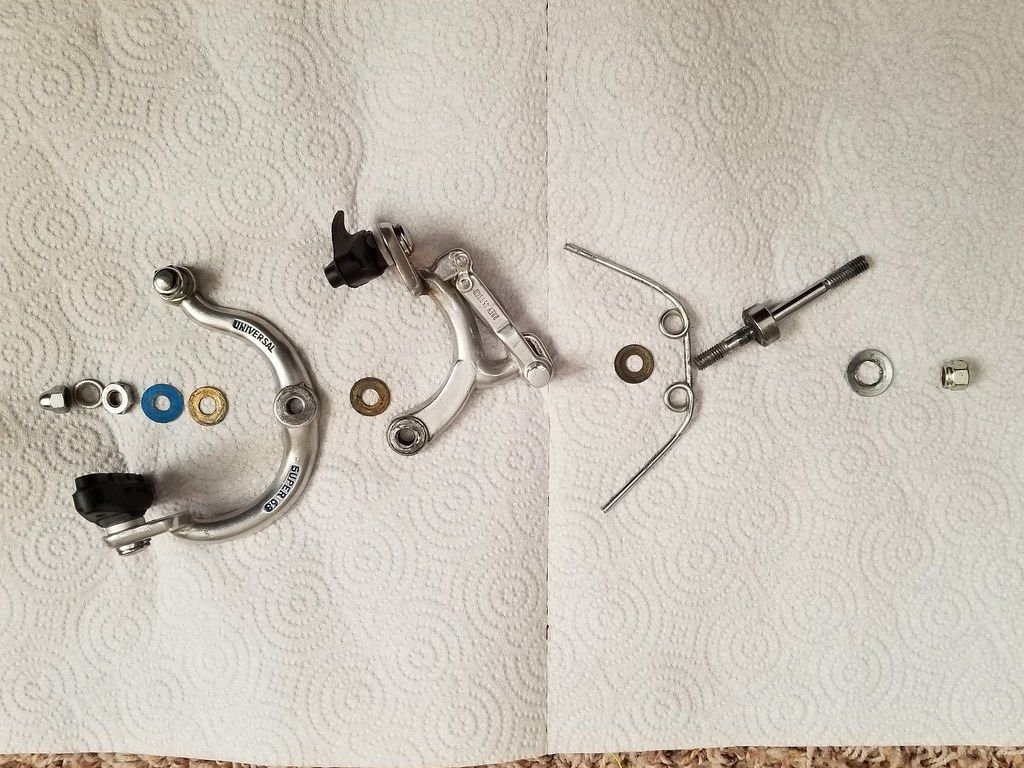
Looking closer at the front half of the caliper, I think I see what the problem is:

Appears substantially warped. Toast?
Looking closer at the front half of the caliper, I think I see what the problem is:
Appears substantially warped. Toast?
__________________
In search of what to search for.
In search of what to search for.
01-28-20, 03:24 PM
#24
Senior Member
Join Date: Aug 2013
Posts: 2,321
Mentioned: 35 Post(s)
Tagged: 0 Thread(s)
Quoted: 767 Post(s)
Liked 1,898 Times
in
889 Posts
Might be. Don't know if Universal sidepulls differed, but I had the same experience as SJX426 when I tried to straighten a Uni. centerpull once. Part was cast, and so snapped right off.
01-29-20, 08:25 AM
#25
Senior Member
Join Date: May 2008
Location: Fredericksburg, Va
Posts: 9,579
Bikes: '65 Frejus TDF, '73 Bottecchia Giro d'Italia, '83 Colnago Superissimo, '84 Trek 610, '84 Trek 760, '88 Pinarello Veneto, '88 De Rosa Pro, '89 Pinarello Montello, '94 Burley Duet, 97 Specialized RockHopper, 2010 Langster, Tern Link D8
Mentioned: 73 Post(s)
Tagged: 0 Thread(s)
Quoted: 1607 Post(s)
Liked 2,214 Times
in
1,103 Posts
There ya go!
__________________
Bikes don't stand alone. They are two tired.
Bikes don't stand alone. They are two tired.