


Amateur replacing a lugged headtube?
 05-19-20, 07:26 AM
#1

Senior Member
Thread Starter
Join Date: Sep 2017
Location: Eastern Shore, MD
Posts: 2,107
Bikes: Road ready: 1993 Koga Miyata City Liner Touring Hybrid, 1989 Centurion Sport DLX, "I Blame GP" Bridgestone CB-1. Projects: Yea, I got a problem....
Mentioned: 24 Post(s)
Tagged: 0 Thread(s)
Quoted: 753 Post(s)
Liked 735 Times
in
421 Posts
Amateur replacing a lugged headtube?
Amateur hour question here:
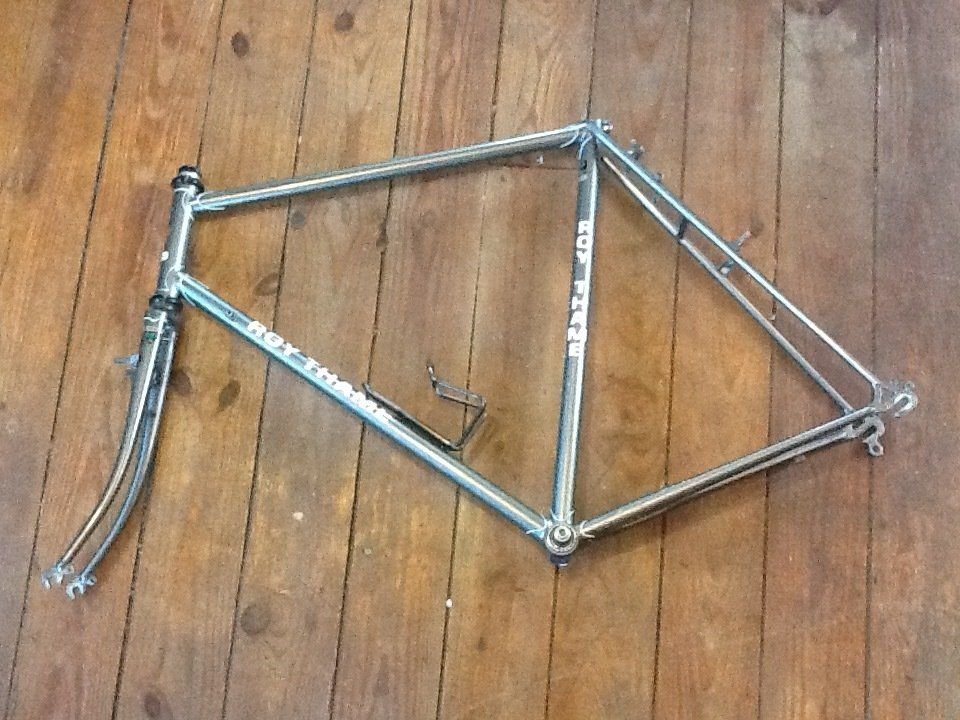
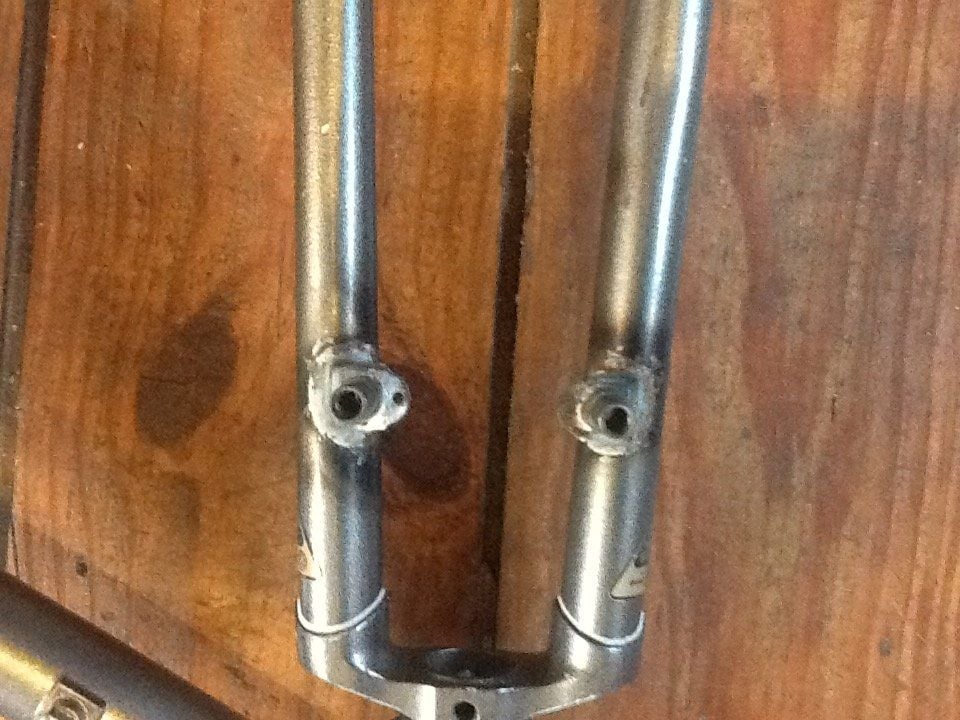
How involved is replacing a lugged head tube? I picked up a 531 Roy Thane touring frame that had its fork cantilever "studs" re silver brazed, but out of alignment. I figured I would have a frame builder replace them and head down the road. However when I removed the fork the bottom headset cup dropped out. I'm not sure why, but someone went at the inside of the head tube with a rasp. The cup doesn't wobble and Loc-tite has been recommended as worth giving a shot, and if I'm lucky the brakes will have enough adjustment to hit the rims. I have a lot of other bike projects so I don't realy want to build up a bike just to see if It will sort of work. I picked this frame up from a co-op just as the world ended, and I'm pretty sure I could return it and at least re-coop the value in greasy components.
How ever I do have aspirations to do some frame building. So I'm wondering, should I hold on to this frame as a project to do after I get some actual brazing experience? Or is this one of those "It would be better just to build a new frame" projects? Thanks, Woody
 05-19-20, 07:41 AM
#2
Senior Member
Join Date: Jan 2013
Location: South Jersey
Posts: 2,262
Mentioned: 18 Post(s)
Tagged: 0 Thread(s)
Quoted: 713 Post(s)
Liked 796 Times
in
473 Posts
It would certainly be easier to build a new frame. Loctite 609 works very well for this purpose. I used it on a frame that had the lower head tube reamed oversize, so that the cup would press in by hand, and it has been working fine for 3 years now.
05-19-20, 10:09 AM
#3
Senior Member
If the gap is too big for loctite get some JB Weld epoxy and use a pipe clamp type clamp to clamp the top/bottom cups in place to try to keep the cups parallel in the head tube.
05-19-20, 10:31 AM
#4
Senior Member
Thread Starter
Join Date: Sep 2017
Location: Eastern Shore, MD
Posts: 2,107
Bikes: Road ready: 1993 Koga Miyata City Liner Touring Hybrid, 1989 Centurion Sport DLX, "I Blame GP" Bridgestone CB-1. Projects: Yea, I got a problem....
Mentioned: 24 Post(s)
Tagged: 0 Thread(s)
Quoted: 753 Post(s)
Liked 735 Times
in
421 Posts
I've got a pretty good grasp of the application of gap filling goop.... Head tube replacement, not so much. . .
05-19-20, 12:45 PM
#5


Randomhead
Join Date: Aug 2008
Location: Happy Valley, Pennsylvania
Posts: 24,386
Mentioned: 0 Post(s)
Tagged: 0 Thread(s)
Quoted: 4 Post(s)
Liked 3,687 Times
in
2,510 Posts
it's a lot of work and a paint job. I have done it. Not sure I would do it again. What if you open it up and the mitering is way off, like happened to me? Best not to know. I probably should have cut the frame up at that point, but sunk cost fallacy defeated good sense. In my case, the head tube was nearly cracked through, about 1/8" of tube was left that hadn't cracked. It was a beautiful bike, too bad the builder was mostly about finish and not construction quality.
05-19-20, 01:36 PM
#7
Senior Member

Join Date: Jun 2018
Location: The Urban Shores Of Michigami
Posts: 1,748
Bikes: ........................................ .....Holdsworth "Special"..... .......Falcon "Special".......... .........Miyata 912........... ........................................
Mentioned: 11 Post(s)
Tagged: 0 Thread(s)
Quoted: 702 Post(s)
Liked 671 Times
in
419 Posts
Use the slow setting epoxy and instead of a clamp, use the actual headset to secure the cup to the headtube. Adjust the headset as you would normally do. This way, there will be little if any chance of the cup being set permanently crooked. Slow setting epoxy will be stronger than the fast stuff and it will also allow you time to set the cup just right.
Also, with slow setting epoxy, if you wake up in the middle of the night in a panick about what you've done, you can always remove it...

Last edited by branko_76; 05-19-20 at 05:30 PM.
05-19-20, 01:48 PM
#8
Senior Member
Thread Starter
Join Date: Sep 2017
Location: Eastern Shore, MD
Posts: 2,107
Bikes: Road ready: 1993 Koga Miyata City Liner Touring Hybrid, 1989 Centurion Sport DLX, "I Blame GP" Bridgestone CB-1. Projects: Yea, I got a problem....
Mentioned: 24 Post(s)
Tagged: 0 Thread(s)
Quoted: 753 Post(s)
Liked 735 Times
in
421 Posts
I'm not worried about the paint. I am concerned that its something that would be way over my head even if I have the tooling and some prior experience. I actually have another 531 British touring bike project hanging in the garage that needs a new fork steerer. That one I'll throw time money and paint at some day. The Roy Thane I'm trying to justify keeping as future project material.
05-19-20, 03:30 PM
#9
Randomhead
Join Date: Aug 2008
Location: Happy Valley, Pennsylvania
Posts: 24,386
Mentioned: 0 Post(s)
Tagged: 0 Thread(s)
Quoted: 4 Post(s)
Liked 3,687 Times
in
2,510 Posts
Well, my pat answer to that question is that if you have to ask you don't have the skills. But really, only you can answer the question. I don't know why you wouldn't just use glue.
Those English builders used brass most of the time, and so you are probably not going to be able to take the head tube out of the lugs by melting the filler. Or at least it's going to take a big fire and some firebricks and a lot of luck. There used to be a webpage on the Yellow Jersey website about doing a repair like that. Also, you have to check for pins and drill them out if they are there. One way to attempt it is to cut as much out as possible with a hacksaw and files and then grind out the part of the head tube that is in the lugs. I found a sanding drum in a dremel to be very effective
Once you can get a head tube in the lugs, brazing it in is the easy part.
Likes For wsteve464:
05-19-20, 04:05 PM
#11
Banned.

Join Date: Jun 2004
Location: Torrance, CA
Posts: 3,061
Bikes: Homebuilt steel
Mentioned: 18 Post(s)
Tagged: 0 Thread(s)
Quoted: 2193 Post(s)
Liked 425 Times
in
337 Posts
I don't think it would be super hard to replace the head tube. I'd cut it above the lugs and then make radial cuts using a hack saw blade on the inside, cutting through the tube but stopping short of the lug. You can then use a carbide burr on a rotary tool to thin down the head tube. Last step is heat with a torch and peel out the remaining pieces of the tube. Then use a long file and smooth down the ID of the lug until the new head tube section fit smoothly inside. You should have some way to judge alignment before you call the fit done. That's the hard part for guys that are not setup for frames.
05-19-20, 04:54 PM
#12
Senior Member
Thread Starter
Join Date: Sep 2017
Location: Eastern Shore, MD
Posts: 2,107
Bikes: Road ready: 1993 Koga Miyata City Liner Touring Hybrid, 1989 Centurion Sport DLX, "I Blame GP" Bridgestone CB-1. Projects: Yea, I got a problem....
Mentioned: 24 Post(s)
Tagged: 0 Thread(s)
Quoted: 753 Post(s)
Liked 735 Times
in
421 Posts
I was kind of considering mechanical removal as being a "amateur" approach, which is fine. I just checked Ebay and it looks like there are some pretty cheap induction coil heaters available. It seems like you could focus a lot of heat directly onto a stub of head tube with out heating the lug.
05-19-20, 05:34 PM
#13
Senior Member
Join Date: Feb 2012
Location: Rochester, NY
Posts: 18,056
Bikes: Stewart S&S coupled sport tourer, Stewart Sunday light, Stewart Commuting, Stewart Touring, Co Motion Tandem, Stewart 3-Spd, Stewart Track, Fuji Finest, Mongoose Tomac ATB, GT Bravado ATB, JCP Folder, Stewart 650B ATB
Mentioned: 0 Post(s)
Tagged: 0 Thread(s)
Quoted: 4195 Post(s)
Liked 3,837 Times
in
2,295 Posts
I replaced a head tube once. But the TT and DT were included in the replacement job for most of their lengths. I left TT and DT stubs just forward of the seat lug and shell for the new front end to attach to with lug like external sleeves. I did this for a very good friend for the cost of materials and for the experience. Don't think I'll do this again as it is a lot of work and very few frames will have the motive to do so much. This was one of the very first frames I had helped to build (more like finish file and add braze ons way back when).
One of the better bits of advice in any repair is to strongly consider the path of least consequence and most reversal. In this case that's a retaining compound for the head cup fit. Completely reversible and the least effort with very good track records (Including a few I've done this way).
The canti bosses are a different issue. They are fairly simple to replace although not without it's amount of work. Unless one is pretty good at mitering and brazing I would suggest brass/bronze as the filler for the new set. I assume the OP has tried all the usual tricks to get the current ones to play nice. Andy
__________________
AndrewRStewart
AndrewRStewart
05-19-20, 10:12 PM
#14
Full Member
Join Date: Dec 2009
Posts: 495
Mentioned: 1 Post(s)
Tagged: 0 Thread(s)
Quoted: 49 Post(s)
Likes: 0
Liked 13 Times
in
12 Posts
Using epoxy doesn't mean you have to glue the headset cup in place. Wax it well and then press it into the smeared in epoxy and then wipe off the excess. It will pop up if need be.
Likes For Canaboo:
05-20-20, 10:48 AM
#15
Senior Member
Thread Starter
Join Date: Sep 2017
Location: Eastern Shore, MD
Posts: 2,107
Bikes: Road ready: 1993 Koga Miyata City Liner Touring Hybrid, 1989 Centurion Sport DLX, "I Blame GP" Bridgestone CB-1. Projects: Yea, I got a problem....
Mentioned: 24 Post(s)
Tagged: 0 Thread(s)
Quoted: 753 Post(s)
Liked 735 Times
in
421 Posts
Thanks for all the feed back. I'm sort of trying to figure out how deep this particular money pit could be. The "Sunk Costs" will be pretty high if the glued in headset only lasts 500 miles. I've also got a lot of "Sunk Cost" into getting set up for frame building. That 500 pound milling machine table I dragged home is going to have to earn its keep some day. So I have been looking for nice broken frames to practice on in the future. Thus the interest in replacing the head tube my self. I have lost 80% of my active free time since the schools closed and the world ended. I do still scheme..
So... moving forward with gluing a head set in, Is there a particular design that would be better for this application? I'm figuring one with sealed replaceable cartridge bearings would make sense as far as being replaceable with out messing with the cups. I've never taken one of these apart, so I don't know what I don't know.
The brake mounts will either work or not work. Valuing my teeth I will have a pro replace if necessary.
Here are some pictures of the dilemma:
05-20-20, 06:43 PM
#16
Senior Member
If the epoxy doesn't work so the headset doesn't come loose you might try building up the inside of the head tube where it is too large with brass and ream it.
Likes For wsteve464:
05-20-20, 07:28 PM
#17
Randomhead
Join Date: Aug 2008
Location: Happy Valley, Pennsylvania
Posts: 24,386
Mentioned: 0 Post(s)
Tagged: 0 Thread(s)
Quoted: 4 Post(s)
Liked 3,687 Times
in
2,510 Posts
Or build it up with 45% silver even.
05-21-20, 08:31 AM
#18
Full Member
Join Date: Dec 2009
Posts: 495
Mentioned: 1 Post(s)
Tagged: 0 Thread(s)
Quoted: 49 Post(s)
Likes: 0
Liked 13 Times
in
12 Posts
Using filled epoxy in this type of application is very common. Plenty of specialty epoxies available just for this purpose.
https://www.masterbond.com/applicati...-epoxy-systems
https://www.masterbond.com/applicati...-epoxy-systems
05-21-20, 08:48 AM
#19
Senior Member
Thread Starter
Join Date: Sep 2017
Location: Eastern Shore, MD
Posts: 2,107
Bikes: Road ready: 1993 Koga Miyata City Liner Touring Hybrid, 1989 Centurion Sport DLX, "I Blame GP" Bridgestone CB-1. Projects: Yea, I got a problem....
Mentioned: 24 Post(s)
Tagged: 0 Thread(s)
Quoted: 753 Post(s)
Liked 735 Times
in
421 Posts
A machinable epoxy is an interesting idea. I think I'd try one of the glues first, and building up a solder as a second try. One thing I would wonder about is weather the glue would be a persistent containment that would effect the solder adhesion. Other question I have is would the 3 heat cycles the 531 forks would go through to replace the cantilever mounts would be a concern.
Last edited by bark_eater; 05-21-20 at 08:52 AM.
05-21-20, 09:20 AM
#20
Randomhead
Join Date: Aug 2008
Location: Happy Valley, Pennsylvania
Posts: 24,386
Mentioned: 0 Post(s)
Tagged: 0 Thread(s)
Quoted: 4 Post(s)
Liked 3,687 Times
in
2,510 Posts
there is no reason to expect heating the fork blades again would be a concern
05-21-20, 01:28 PM
#21
Banned.
Join Date: Jun 2004
Location: Torrance, CA
Posts: 3,061
Bikes: Homebuilt steel
Mentioned: 18 Post(s)
Tagged: 0 Thread(s)
Quoted: 2193 Post(s)
Liked 425 Times
in
337 Posts
Since this is a framebuilding forum not a mechanics forum, the idea of flowing some brazing filler into the lower race seat area of the head tube seems like a winner to me. Silver will pose less risk of loosening up the lower head tube lug so that seems appropriate to me too. Seems like a no brainer fix with very low risk.
05-22-20, 07:55 AM
#22
Randomhead
Join Date: Aug 2008
Location: Happy Valley, Pennsylvania
Posts: 24,386
Mentioned: 0 Post(s)
Tagged: 0 Thread(s)
Quoted: 4 Post(s)
Liked 3,687 Times
in
2,510 Posts
I would normally agree with that, but part of being a framebuilder is to keep people from needlessly messing up their paint job
05-22-20, 08:24 AM
#23
Senior Member
Thread Starter
Join Date: Sep 2017
Location: Eastern Shore, MD
Posts: 2,107
Bikes: Road ready: 1993 Koga Miyata City Liner Touring Hybrid, 1989 Centurion Sport DLX, "I Blame GP" Bridgestone CB-1. Projects: Yea, I got a problem....
Mentioned: 24 Post(s)
Tagged: 0 Thread(s)
Quoted: 753 Post(s)
Liked 735 Times
in
421 Posts
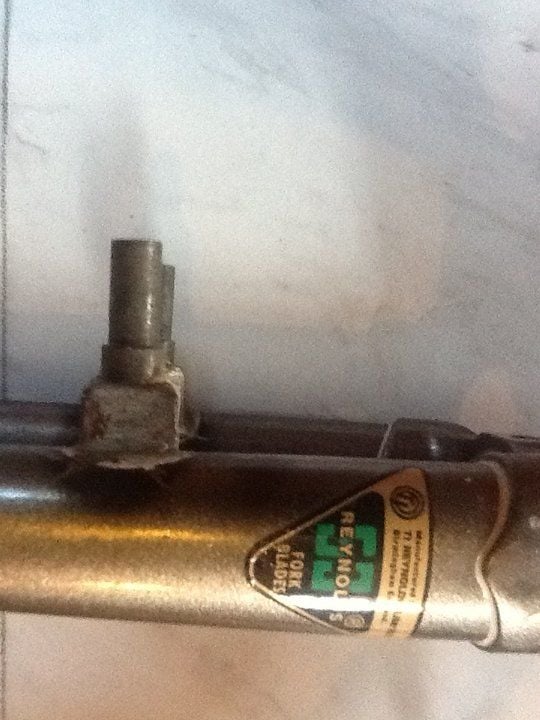
I'm pretty sure this is a respray with vinyl reproduction stickers, as the damage inside the head tube is painted over. As I remember the other condition issue was some one drilling out the cable guide attachment screw and running a larger screw in untapped? So Its a bit of a basket case already.
05-28-20, 09:34 AM
#24
Senior Member
Thread Starter
Join Date: Sep 2017
Location: Eastern Shore, MD
Posts: 2,107
Bikes: Road ready: 1993 Koga Miyata City Liner Touring Hybrid, 1989 Centurion Sport DLX, "I Blame GP" Bridgestone CB-1. Projects: Yea, I got a problem....
Mentioned: 24 Post(s)
Tagged: 0 Thread(s)
Quoted: 753 Post(s)
Liked 735 Times
in
421 Posts
I got a couple of minutes to look at this, and it looks like at the tube is ovalized a bit, and has been reamed a bit with sandpaper, running from 30.10mm to 30.25 mm. The cup that was in there was a Deore Mountain bike cup. I tried a NOS stronglight cup and it measures 30.10 to 30.15 mm, so if I turn it will go from loose to contact. The faceing looks like it was cut with a dull tool or a cup had been loose and rubbing.
What Im wondering, ids if it would be worth faceing it down a bit and trying to get some more contact points for the cup before glueing it in?
If so, How much can I take off the head tube with out running into another problem, like changing the head tube angle. The lug looks like it already might have been refaced/messed with once so I want to proceed with caution. The head tube reamer /face I have is a hand me down that has been resharpened, could anyone tell me what a factory reamer should cut at? Thanks.
P.S I decided on the Tange Falcon 250c sealed bearing headset. It has the same stack height as the Deore headset that came with the frame. I havent descided on what adhesive to go with, or whether to use the fork and head set to hold the cup while the glue cures.
Last edited by bark_eater; 05-28-20 at 01:27 PM.
05-28-20, 07:01 PM
#25
Senior Member
Join Date: Feb 2012
Location: Rochester, NY
Posts: 18,056
Bikes: Stewart S&S coupled sport tourer, Stewart Sunday light, Stewart Commuting, Stewart Touring, Co Motion Tandem, Stewart 3-Spd, Stewart Track, Fuji Finest, Mongoose Tomac ATB, GT Bravado ATB, JCP Folder, Stewart 650B ATB
Mentioned: 0 Post(s)
Tagged: 0 Thread(s)
Quoted: 4195 Post(s)
Liked 3,837 Times
in
2,295 Posts
How far inside the HT is the reamed portion? How long are the Tange headset cup "skirts"? Will removing some HT face get the headset skirts to contact un reamed HT ID? How much face removal to do so is needed? Your measurements will guide you in these aspects.
Any HT face removal will change the head angle It's a question of how much removal and thus what angle change. You could run the math to actually find out but people run different tire heights (widths) all the time and they don't crash from loss of steering control solely due to one tire being bigger then the other.
Unsure what you mean by "what a factory reamer should cut at". Are you meaning the ID, the depth of cut the angle (if any) of the resulting face's edge? I highly suggest at least a skimming of the HT face to insure the cup's sits square to the HT axis. Andy
__________________
AndrewRStewart
AndrewRStewart