


Dishing/Centering tool


 06-10-20, 08:37 PM
#27
Passista
Join Date: Jul 2005
Posts: 7,597
Bikes: 1998 Pinarello Asolo, 1992 KHS Monta�a pro, 1980 Raleigh DL-1, IGH Hybrid, IGH Utility
Mentioned: 5 Post(s)
Tagged: 0 Thread(s)
Quoted: 866 Post(s)
Liked 721 Times
in
396 Posts
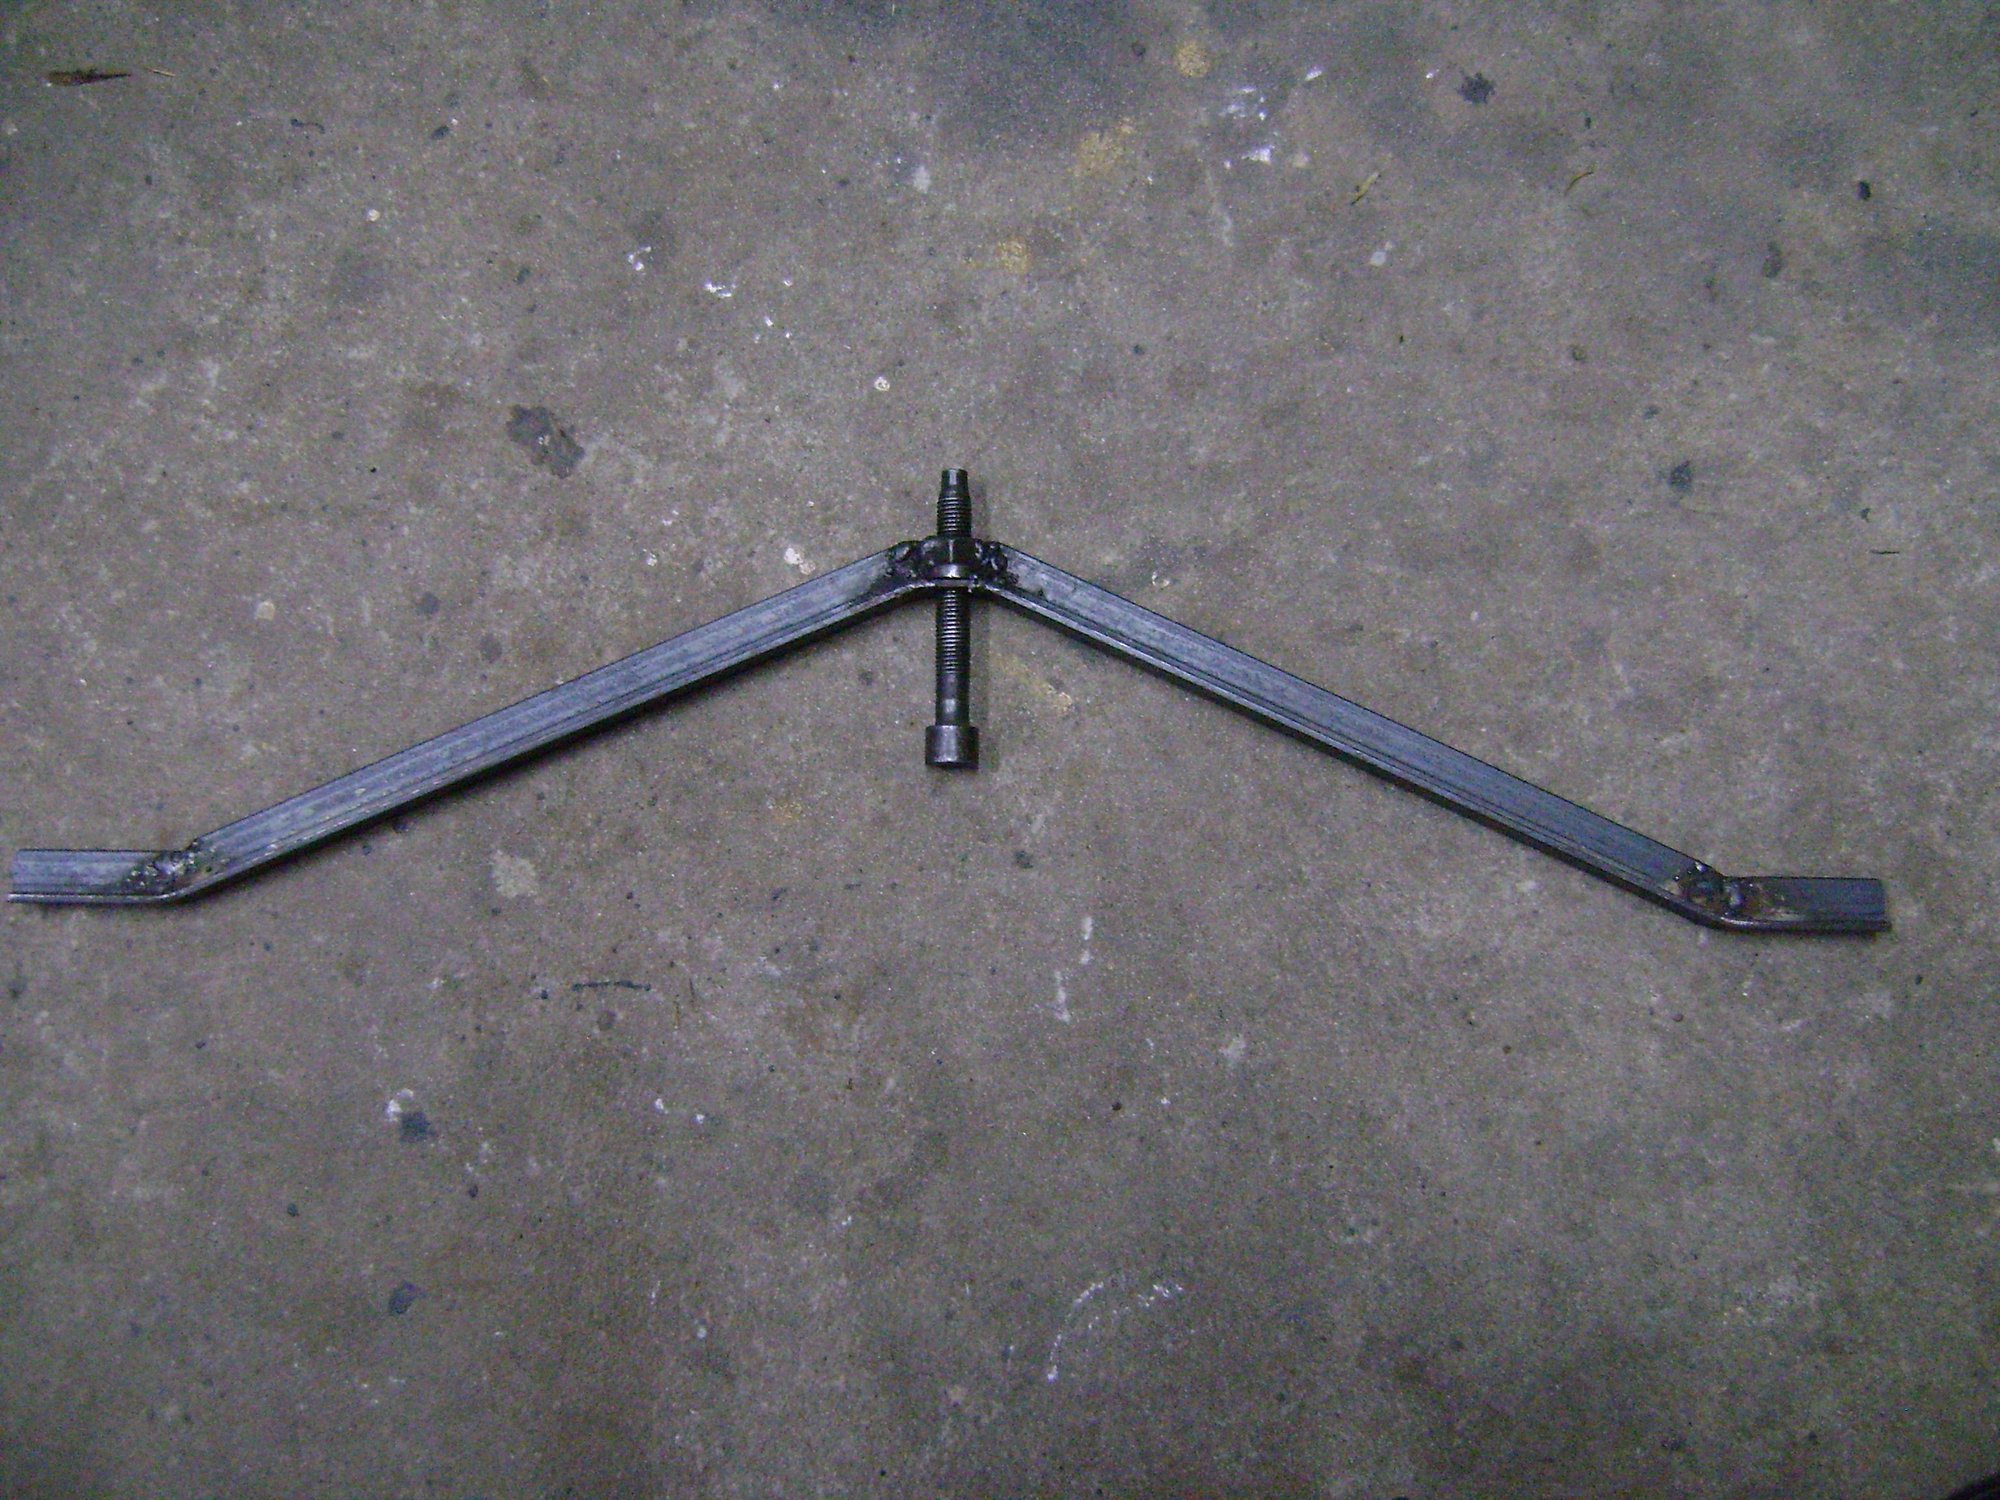
Ugly, crude, made in minutes from some T-stock scrap and Allen bolt... but it works OK for me.
06-10-20, 09:34 PM
#28
Senior Member
Join Date: Dec 2016
Location: Long Island, NY
Posts: 2,109
Bikes: Trek 800 x 2, Schwinn Heavy Duti, Schwinn Traveler, Schwinn Le Tour Luxe, Schwinn Continental, Cannondale M400 and Lambert, Schwinn Super Sport
Mentioned: 14 Post(s)
Tagged: 0 Thread(s)
Quoted: 809 Post(s)
Liked 1,022 Times
in
665 Posts
When I worked in a bike shop, we had a Park Truing stand that someone dropped. This forced us to flip the wheel to ensure that the wheel was centered. This is the method that I used before I worked there and trued wheels on the bike and the method that I used until recently.
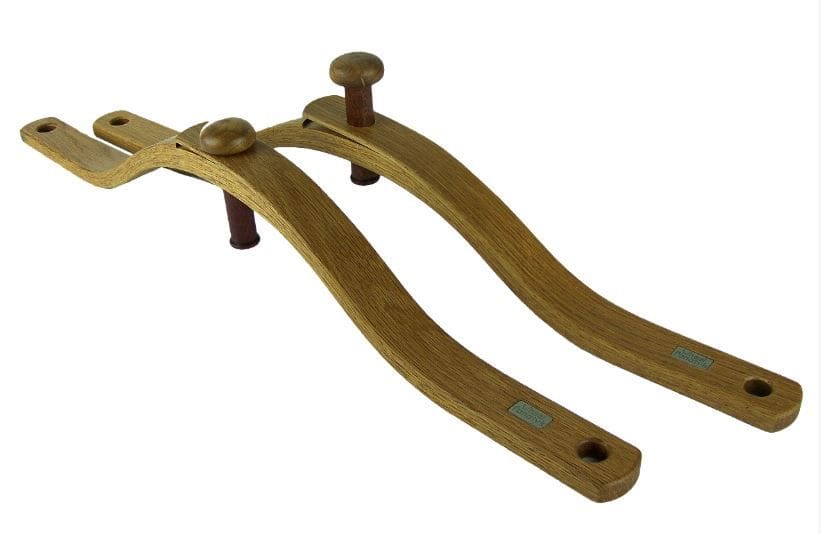
Just this year, after looking at some ideas for DIY wheel truing stands, I came across the fact that many wheel builders use dishing tools. I figured I'd give it a try. This is what I came up with out of scrap wood. I considered exactly what Reynolds built, however, I didn't know if I was going to like using a dishing tool. I have used it. It does work, but it is one extra tool that is not really needed. I don't know yet about continuing to use it.
I used a copper anti-hammer tube to touch off against the axle, or actually against the nut. This is why I wanted something hollow. That dictated that my wood would need to be thick enough to accommodate the tube. I didn't have 5/4" wood, so I came up with two pieces of 3/4" glued together. I added a nub so that when I place it on a flat surface it doesn't teeter and spin. It has a set screw (grub screw) with a plastic tip that has just enough pressure against the tube to hold its position when checking one side then the other.
When I first put it together, the hole was too loose and sloppy for the copper tube. I ended up waxing the copper tube and put polyester resin in the hole and then inserted the copper tube until the polyester resin set up. Then I had to file the inside of the hole to get the fit just right. It ended up being more work than I had thought it would entail. It feels nice and it is lighter than the steel ones like the Park.
06-11-20, 06:50 AM
#29
Senior Member

Likes For due ruote:
06-15-20, 12:37 PM
#31
Member
Join Date: Mar 2017
Location: VA suburbs of DC
Posts: 39
Bikes: '76 Centurion Pro Tour, '78 Centurion Super LeMans custom, '10 Scott CR1 Comp/Pro, '11 KHS Tandemania Cross, '96 Kestrel 200 SCi, German Centurion Al Road Bike, Cannondale 500 (M&W), Museeuw/ZRace project
Mentioned: 0 Post(s)
Tagged: 0 Thread(s)
Quoted: 11 Post(s)
Liked 8 Times
in
7 Posts
I lived in the same neighborhood in the Detroit suburbs as Gordie Howe. Played Little League ball against both Marty and Mark. Mark was a very good catcher. Never had the guts to play hockey in the back yard with either of them though.
Likes For dougdunn:
06-15-20, 01:51 PM
#32
Senior Member
Join Date: Jan 2004
Location: Madison, WI USA
Posts: 6,153
Mentioned: 50 Post(s)
Tagged: 0 Thread(s)
Quoted: 2362 Post(s)
Liked 1,749 Times
in
1,191 Posts
Likes For madpogue:
06-15-20, 01:52 PM
#33
Senior Member
06-15-20, 02:33 PM
#34
Member
Join Date: Mar 2017
Location: VA suburbs of DC
Posts: 39
Bikes: '76 Centurion Pro Tour, '78 Centurion Super LeMans custom, '10 Scott CR1 Comp/Pro, '11 KHS Tandemania Cross, '96 Kestrel 200 SCi, German Centurion Al Road Bike, Cannondale 500 (M&W), Museeuw/ZRace project
Mentioned: 0 Post(s)
Tagged: 0 Thread(s)
Quoted: 11 Post(s)
Liked 8 Times
in
7 Posts
Measurements of all of you DIY Dishing Tools
All, I like all of the ingenuity that went into these tools. You inspired me. I am going to build by own using 1" square aluminum tube, 3 lag bolts and a few washers and nuts. I like working with the aluminum - drills easy, smooths easy, lightweight, accepts threads, etc. What I need from you guys are dimensions: depth (top of apex to bottom of arms/feet), overall length, length of the "feet". That should do it. I will post a pic or two when I finish. D
06-15-20, 08:02 PM
#35
Tortoise Wins by a Hare!
Join Date: Feb 2006
Location: Looney Tunes, IL
Posts: 7,398
Bikes: Wabi Special FG, Raleigh Roper, Nashbar AL-1, Miyata One Hundred, '70 Schwinn Lemonator and More!!
Mentioned: 22 Post(s)
Tagged: 0 Thread(s)
Quoted: 1549 Post(s)
Liked 941 Times
in
504 Posts
All, I like all of the ingenuity that went into these tools. You inspired me. I am going to build by own using 1" square aluminum tube, 3 lag bolts and a few washers and nuts. I like working with the aluminum - drills easy, smooths easy, lightweight, accepts threads, etc. What I need from you guys are dimensions: depth (top of apex to bottom of arms/feet), overall length, length of the "feet". That should do it. I will post a pic or two when I finish. D
 06-15-20, 11:17 PM
#36
blahblahblah chrome moly

Join Date: Apr 2009
Location: Seattle
Posts: 1,986
Mentioned: 92 Post(s)
Tagged: 0 Thread(s)
Quoted: 1172 Post(s)
Liked 2,567 Times
in
1,072 Posts
Another DIY wooden gauge:
Just kidding! It's the Wheel Fanatyk -- most beautiful dish gauge ever, and also excellent in its function. Operates with one hand, a pretty huge feature if you're building a lot. Still nice to have even if you build one wheel. But at $260.00 � $338.00, it better be nice!
Definitely not for me though, especially since I have two already. The Campy that came in my Campy tool kit (which I never use) and the Park that I actually use.
I sharpened up the point on the Park, so it's easier to see the business end. Combined with coming in from the side, allowing you to check dish without removing the skewer. This is a must-have for me, because my truing stand benefits from having the skewer in. Tightening the skewer makes the wheel's position in the truing stand more solid and repeatable, no chance of it it slipping. Removing and re-installing the skewer every time I want to check the dish is a deal-breaker. Most gauges, including the Campy and the Wheel Fanatyk, require the skewer to be out, so I'll stick with my Park.
Any DIY designs that come in from the side and can sneak in under the skewer?
Mark B
06-15-20, 11:29 PM
#37
blahblahblah chrome moly
Join Date: Apr 2009
Location: Seattle
Posts: 1,986
Mentioned: 92 Post(s)
Tagged: 0 Thread(s)
Quoted: 1172 Post(s)
Liked 2,567 Times
in
1,072 Posts
Oh just realized I have to specify, the Park I have, that comes in from the side, is the WAG-1. Looks like later models like WAG-4 or WAG-5 don't have that feature? Dunno for sure, haven't tried them, but it looks like they come straight down from the top, and the skewer would block that.
Here's a WAG-1:

The pic is not mine. The red line crudely drawn shows where I removed metal to make the point more slender, and assure that it will come in under the skewer nut.
Mark B
Here's a WAG-1:
The pic is not mine. The red line crudely drawn shows where I removed metal to make the point more slender, and assure that it will come in under the skewer nut.
Mark B
06-16-20, 06:22 AM
#38
Senior Member

Join Date: Oct 2009
Posts: 1,102
Mentioned: 15 Post(s)
Tagged: 0 Thread(s)
Quoted: 288 Post(s)
Liked 329 Times
in
160 Posts
For the sake of argument I'll respectfully disagree. I like my new-ish tension gauge ok, but I'm not convinced that most of these tools are accurate. I also think spoke tension isn't that critical (within reason) and my guess is that many mechanics probably use too much. (Mighty tighty makes wheels... righty?) I'd say 80-90% of the vintage rear wheels I've worked on could use some dish correction, and many sorely needed it. And a properly dished wheel is important to determine whether a bike tracks straight, which is important to those of us who don't have the tools or knowledge to diagnose this properly. 
I went decades without using a spoke tensioner gauge, I don't think they were around in my LBS days yet. When I finally bought one, I found that my usual wheel build was 5-10% low on recommended tension, which isn't too terribly bad, but I had muscle memory from building a few hundred sets of wheels. A gauge is the one thing I'd buy if you were getting into more than a few wheel builds.
06-16-20, 09:08 AM
#39
Bike Butcher of Portland

Join Date: Jul 2014
Location: Portland, OR
Posts: 11,633
Bikes: It's complicated.
Mentioned: 1299 Post(s)
Tagged: 0 Thread(s)
Quoted: 4678 Post(s)
Liked 5,793 Times
in
2,280 Posts
For the sake of argument I'll respectfully disagree. I like my new-ish tension gauge ok, but I'm not convinced that most of these tools are accurate. I also think spoke tension isn't that critical (within reason) and my guess is that many mechanics probably use too much. (Mighty tighty makes wheels... righty?) I'd say 80-90% of the vintage rear wheels I've worked on could use some dish correction, and many sorely needed it. And a properly dished wheel is important to determine whether a bike tracks straight, which is important to those of us who don't have the tools or knowledge to diagnose this properly.
But yeah, thousands of mechanics built wheels BITD without a tension gauge, but it's the one measurement that you do need a special tool for. As I've shown, you can make a jig out of your frame and fork with tie-wraps for true, round, and dish.
__________________
If someone tells you that you have enough bicycles and you don't need any more, stop talking to them. You don't need that kind of negativity in your life.
If someone tells you that you have enough bicycles and you don't need any more, stop talking to them. You don't need that kind of negativity in your life.
06-16-20, 09:27 AM
#40
Senior Member

Join Date: May 2008
Location: Fredericksburg, Va
Posts: 9,579
Bikes: '65 Frejus TDF, '73 Bottecchia Giro d'Italia, '83 Colnago Superissimo, '84 Trek 610, '84 Trek 760, '88 Pinarello Veneto, '88 De Rosa Pro, '89 Pinarello Montello, '94 Burley Duet, 97 Specialized RockHopper, 2010 Langster, Tern Link D8
Mentioned: 73 Post(s)
Tagged: 0 Thread(s)
Quoted: 1607 Post(s)
Liked 2,216 Times
in
1,103 Posts
jethin I agree to some extent and with gugie . If you are within 10-15%, you are good. My take is the the tension gauge is more useful for ensuring event tension around the wheel. The right tension is secondary but still valuable. Using a spider diagram in Excel is extremely informative for understanding the tension variation around the wheel. Park suggests that the tension variation should be no more than 20%, plus or minus nominal. That is reasonably generous and likely can be found on wheels built without a gauge by an experienced wheel builder.
__________________
Bikes don't stand alone. They are two tired.
Bikes don't stand alone. They are two tired.
07-25-20, 04:22 PM
#41
Member
Join Date: Mar 2017
Location: VA suburbs of DC
Posts: 39
Bikes: '76 Centurion Pro Tour, '78 Centurion Super LeMans custom, '10 Scott CR1 Comp/Pro, '11 KHS Tandemania Cross, '96 Kestrel 200 SCi, German Centurion Al Road Bike, Cannondale 500 (M&W), Museeuw/ZRace project
Mentioned: 0 Post(s)
Tagged: 0 Thread(s)
Quoted: 11 Post(s)
Liked 8 Times
in
7 Posts
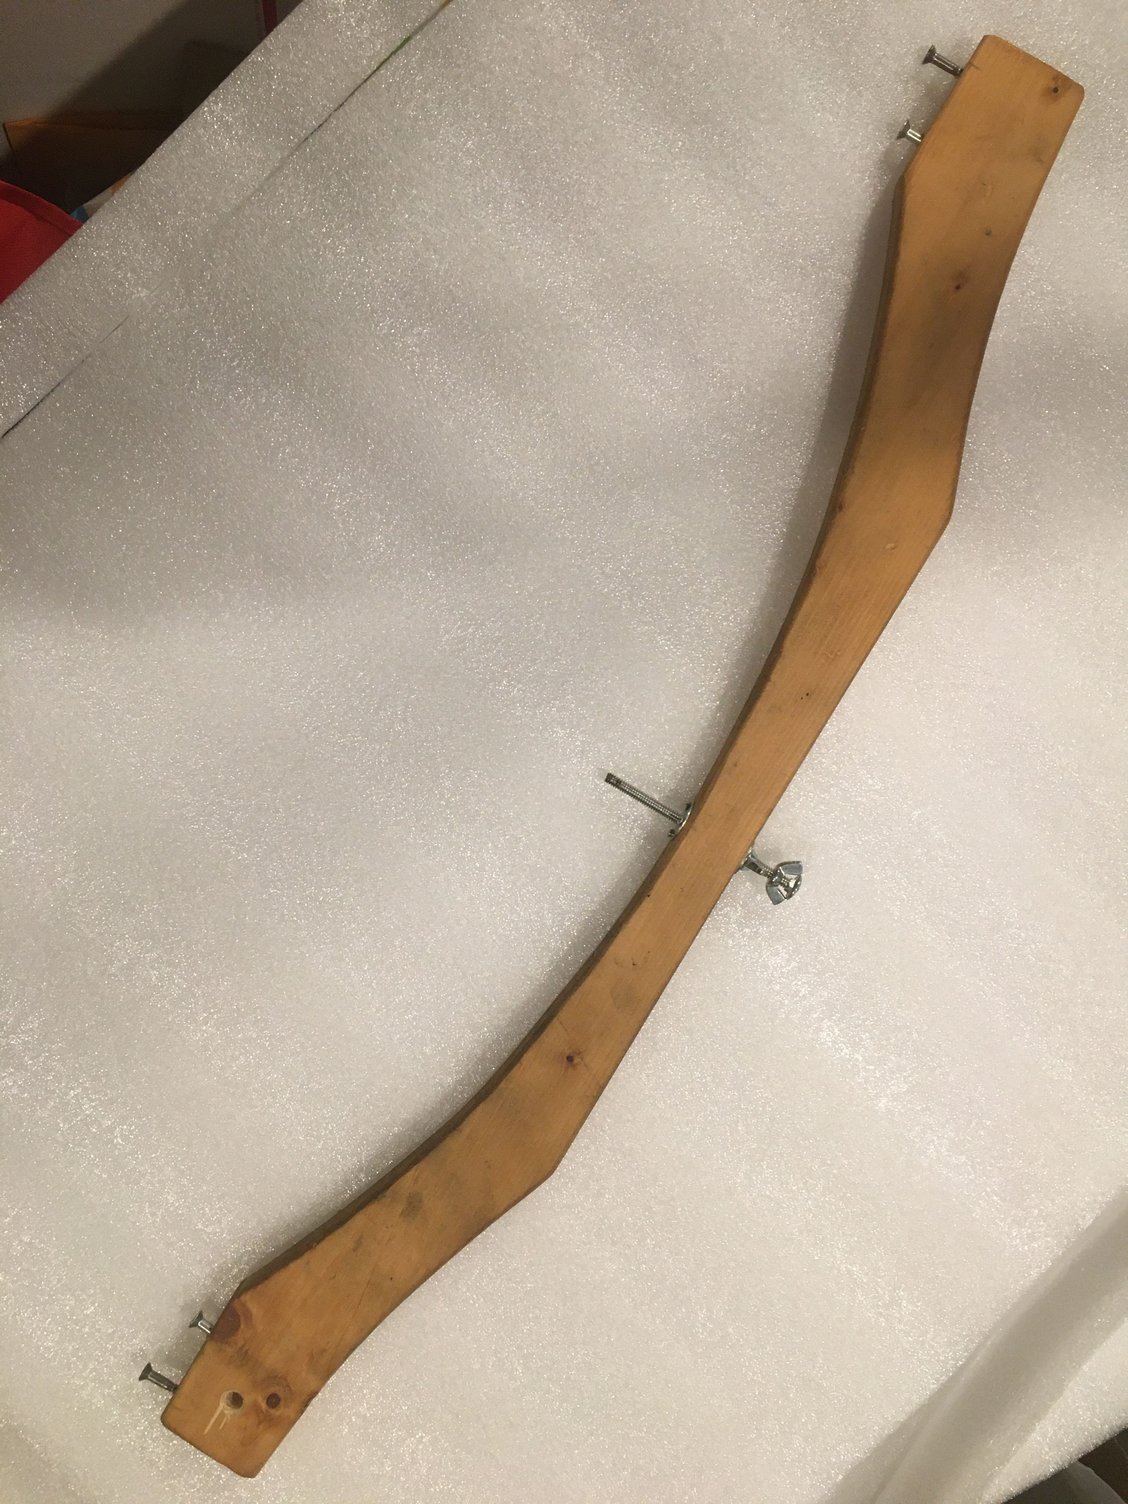
My Home-built Dishing Tool
All, I like all of the ingenuity that went into these tools. You inspired me. I am going to build by own using 1" square aluminum tube, 3 lag bolts and a few washers and nuts. I like working with the aluminum - drills easy, smooths easy, lightweight, accepts threads, etc. What I need from you guys are dimensions: depth (top of apex to bottom of arms/feet), overall length, length of the "feet". That should do it. I will post a pic or two when I finish. D
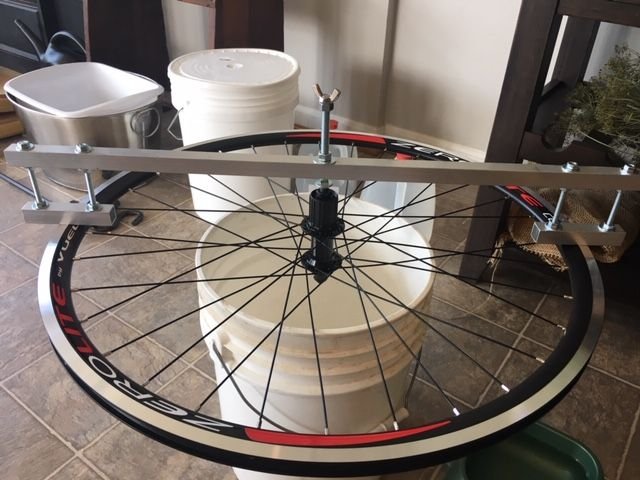
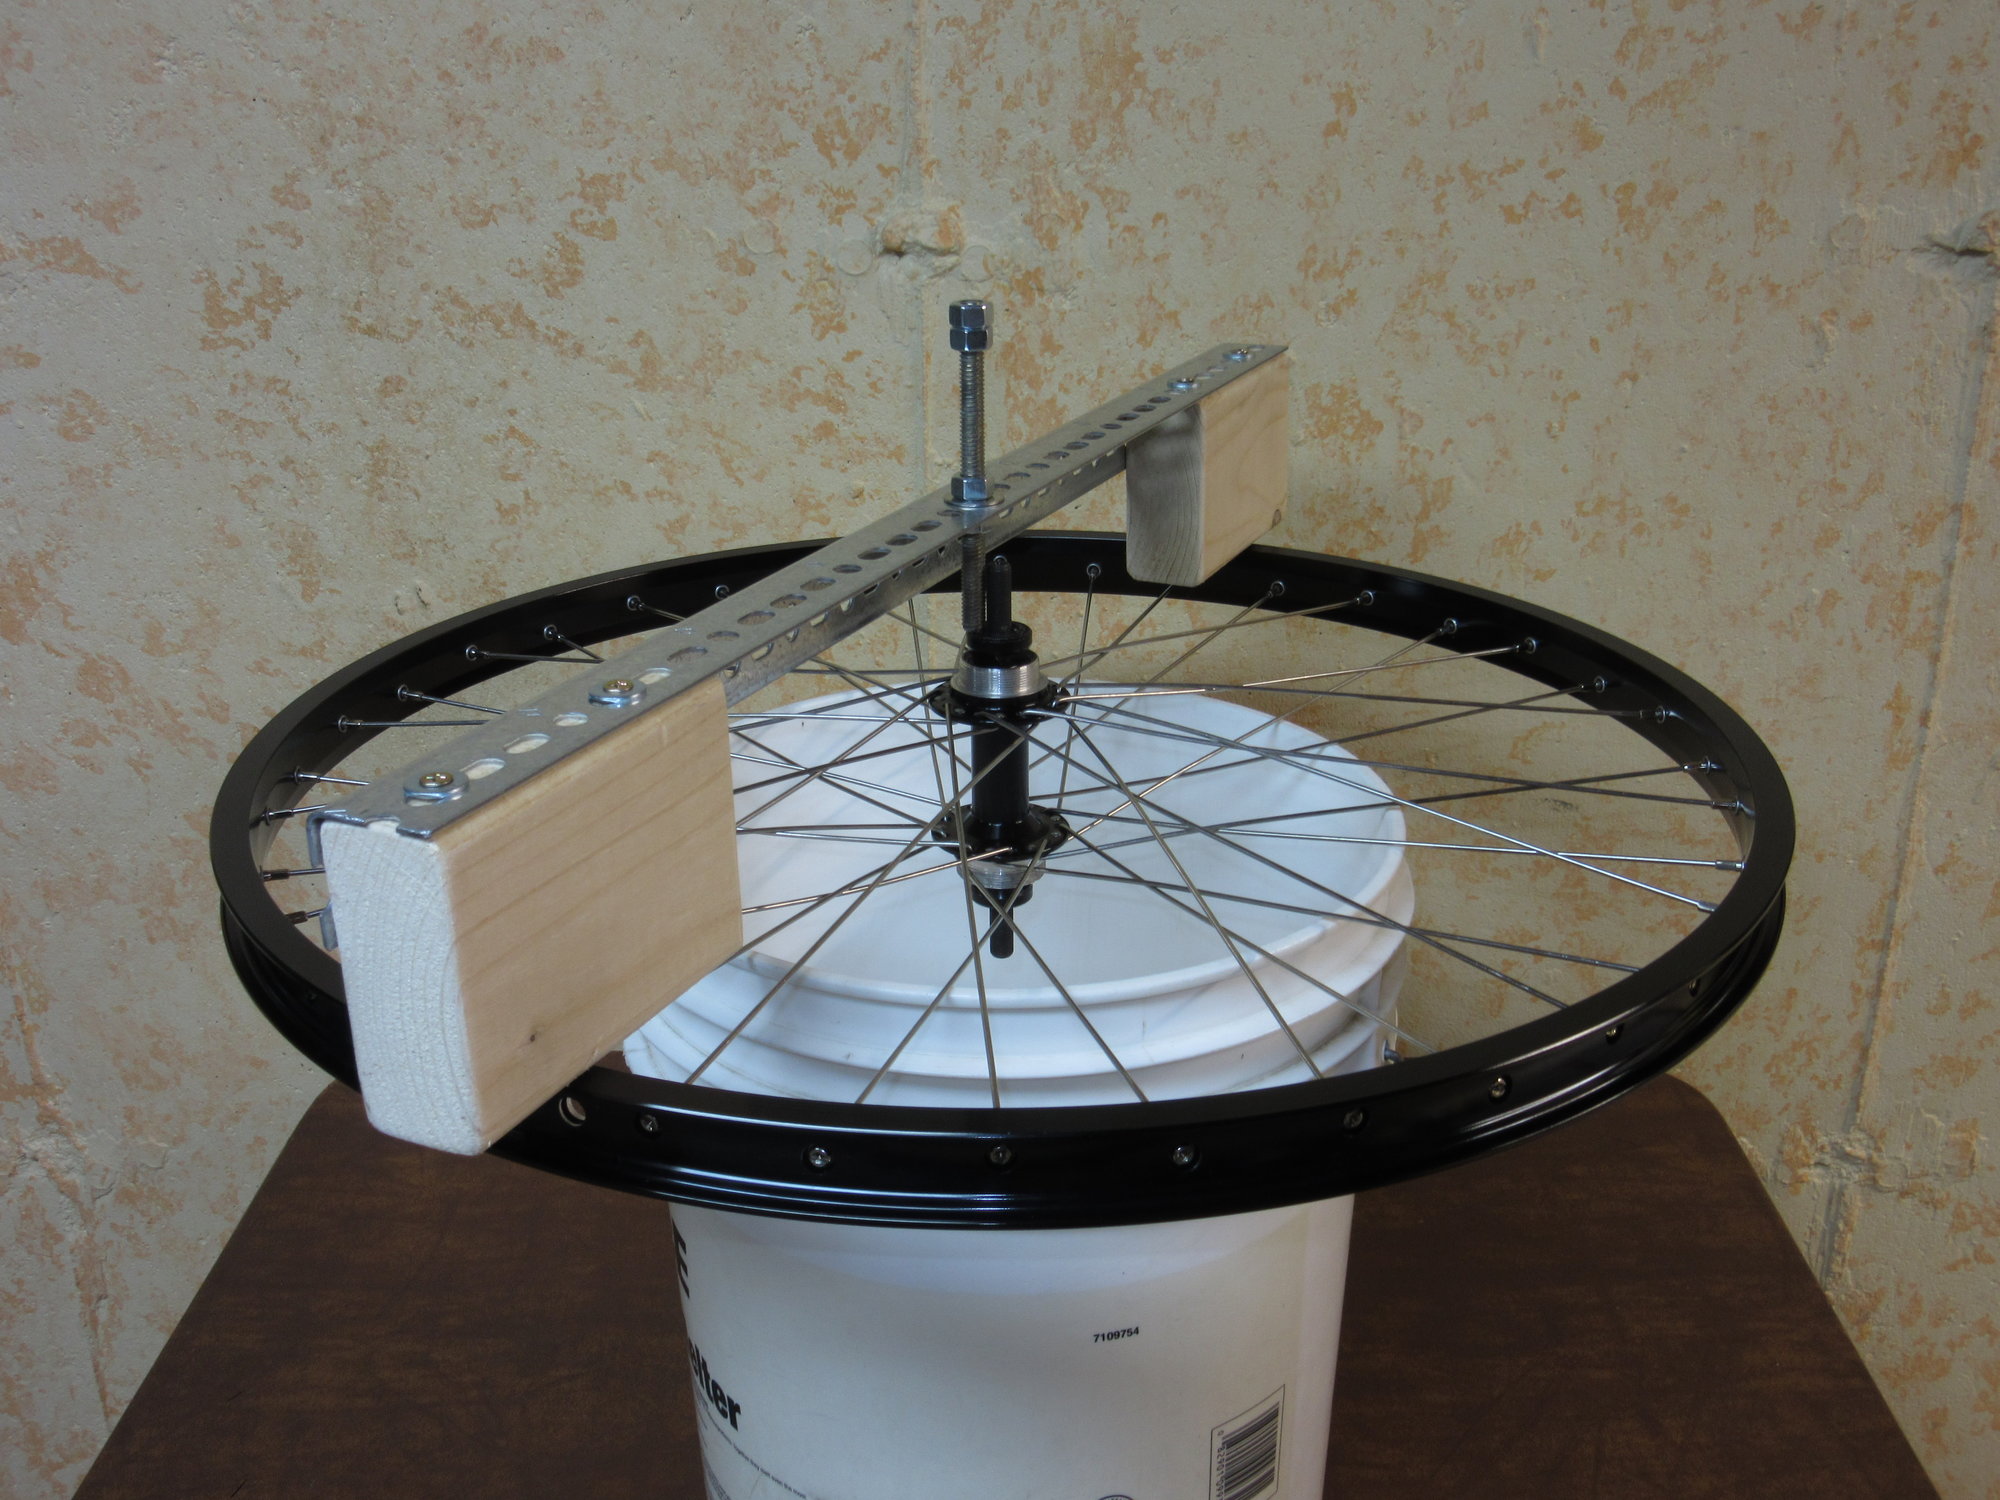
Dishing Tool in action.
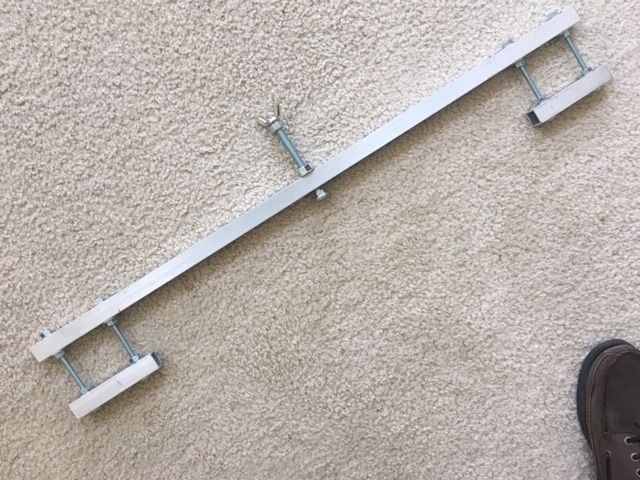
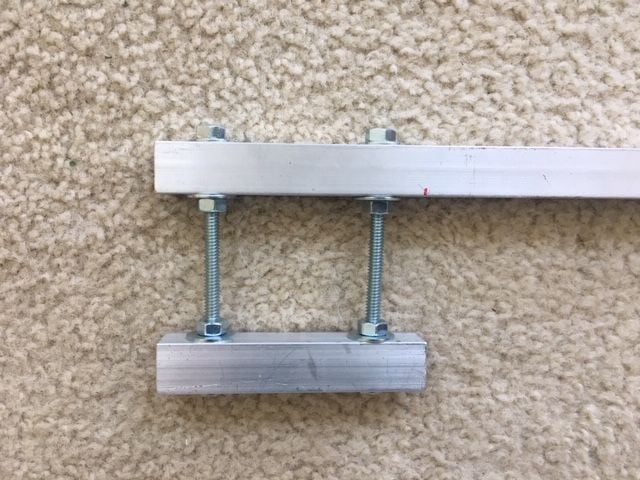
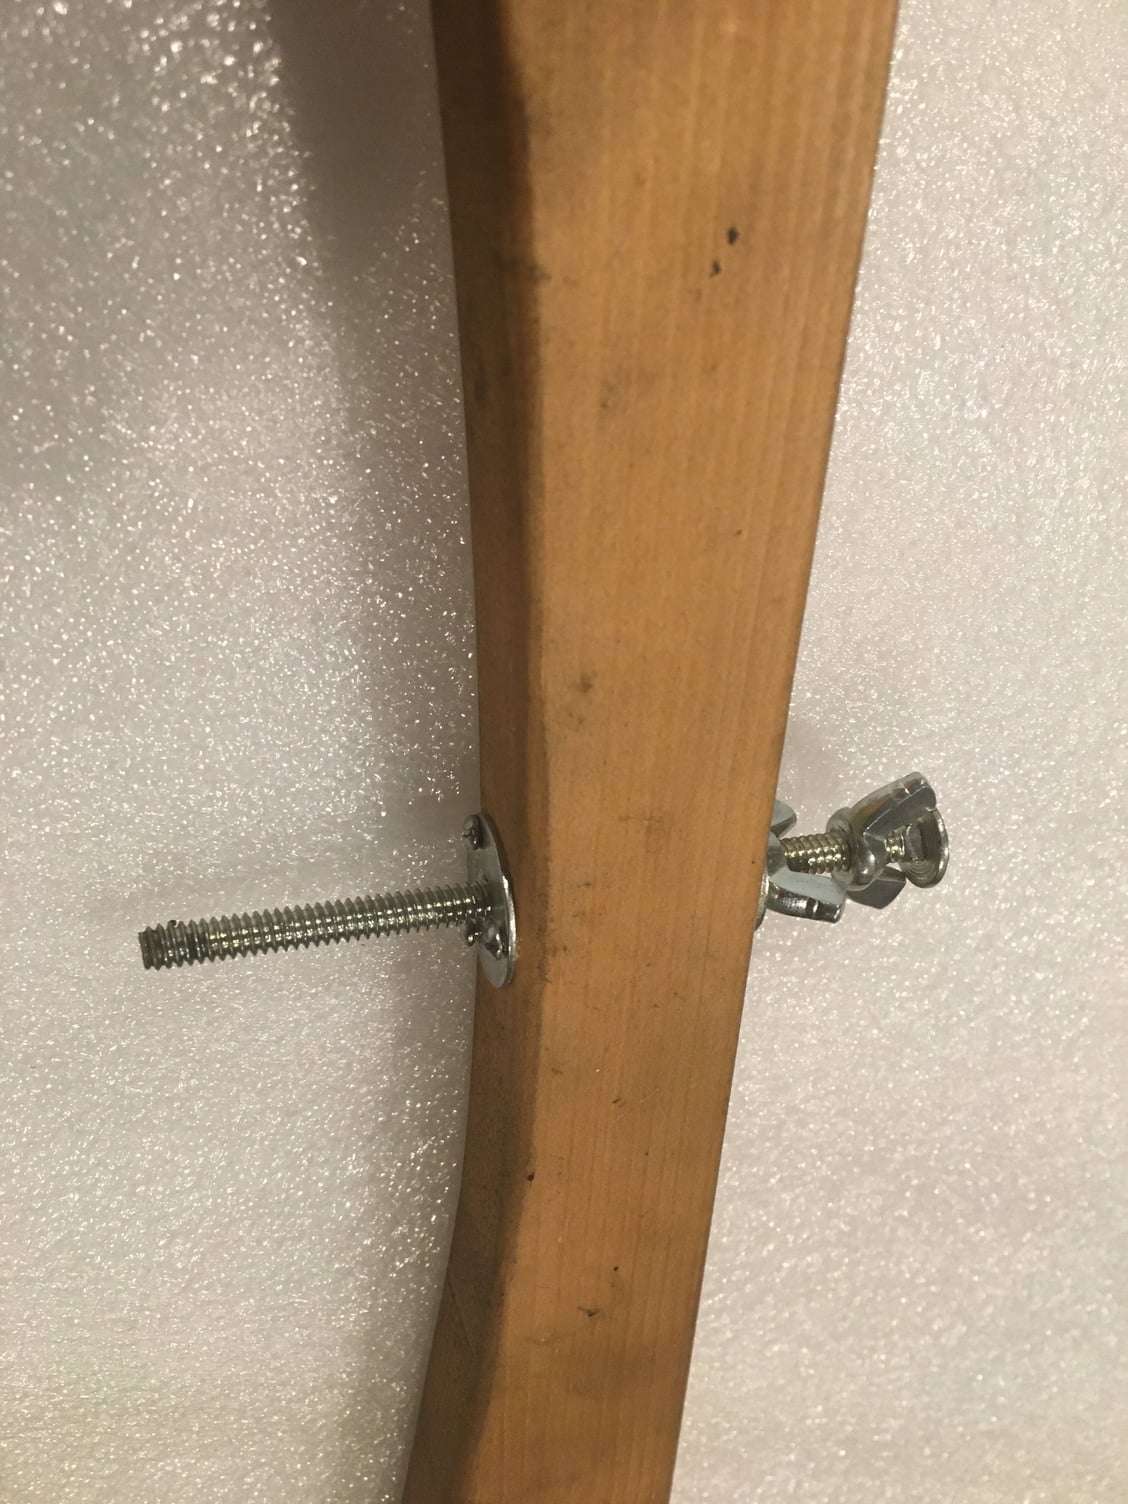
These are adjustable if you need a smaller reach
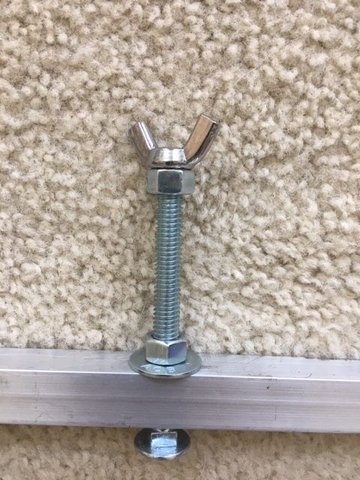
This has a lock nut to keep your measurement when you flip the wheel.
07-25-20, 04:36 PM
#42
Senior Member
Join Date: Jan 2004
Location: Madison, WI USA
Posts: 6,153
Mentioned: 50 Post(s)
Tagged: 0 Thread(s)
Quoted: 2362 Post(s)
Liked 1,749 Times
in
1,191 Posts
^^^^^ Measures to the end of the axle shaft, rather than the lock nut. A socket or the like would measure to the lock nut.
07-25-20, 07:38 PM
#43
Senior Member

Join Date: Jul 2018
Location: Eugene, OR
Posts: 1,326
Mentioned: 64 Post(s)
Tagged: 0 Thread(s)
Quoted: 535 Post(s)
Liked 346 Times
in
196 Posts
I rebuilt a wheelset recently. I didn’t want to mess around with soup cans, a ruler, and math like I’ve done before. Going back and forth to the truing stand. It’s all too much hassle.
The solution I came up with this time was to use zip ties as a reference for center. And to build the wheels on the bike.
With the brake calipers removed, I routed a zip tie through the fork crown, and another through the bridge, and oriented each pointing straight downward.
Front is spot on center, and the 7 speed rear is dished perfect. How do I know? The bike tracks like a locomotive, hands free riding all day.!
Last edited by deux jambes; 07-25-20 at 09:40 PM.
Likes For deux jambes:
