


When you don't have the right cassette tool - make one.
 09-13-20, 09:54 PM
#1
Senior Member
Thread Starter
Join Date: Apr 2013
Posts: 1,173
Bikes: Surly Disk Trucker, 2014 w/Brooks Flyer Special saddle, Tubus racks - Duo front/Logo Evo rear, 2019 Dahon Mariner D8, Both bikes share Ortlieb Packer Plus series panniers, Garmin Edge 1000
Mentioned: 2 Post(s)
Tagged: 0 Thread(s)
Quoted: 405 Post(s)
Liked 115 Times
in
99 Posts
When you don't have the right cassette tool - make one.
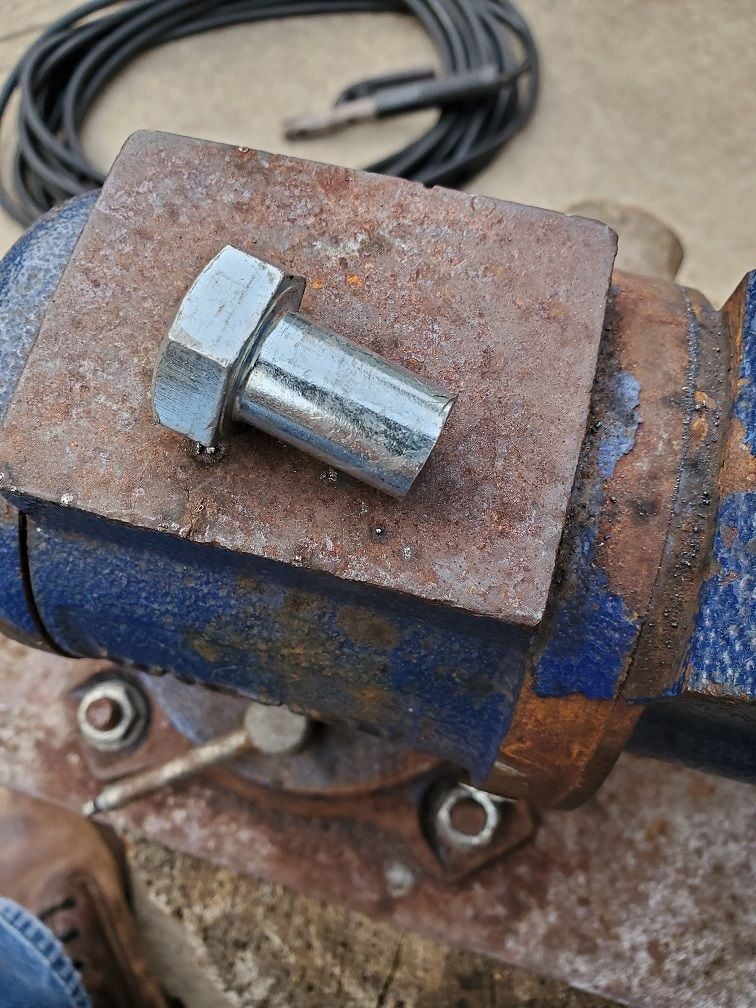
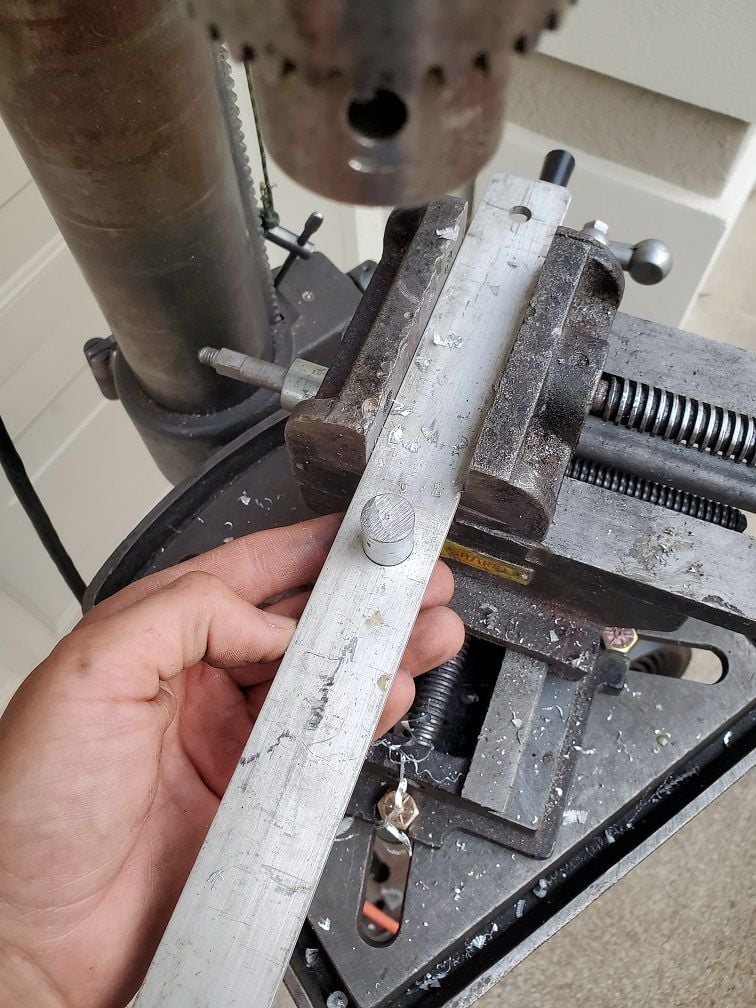
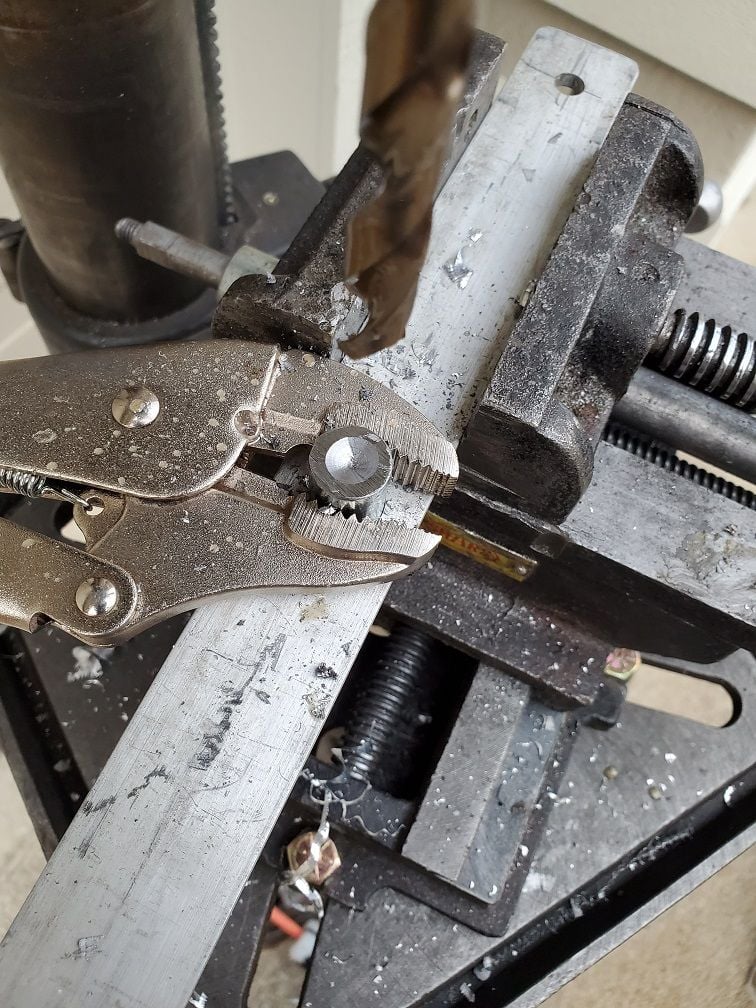
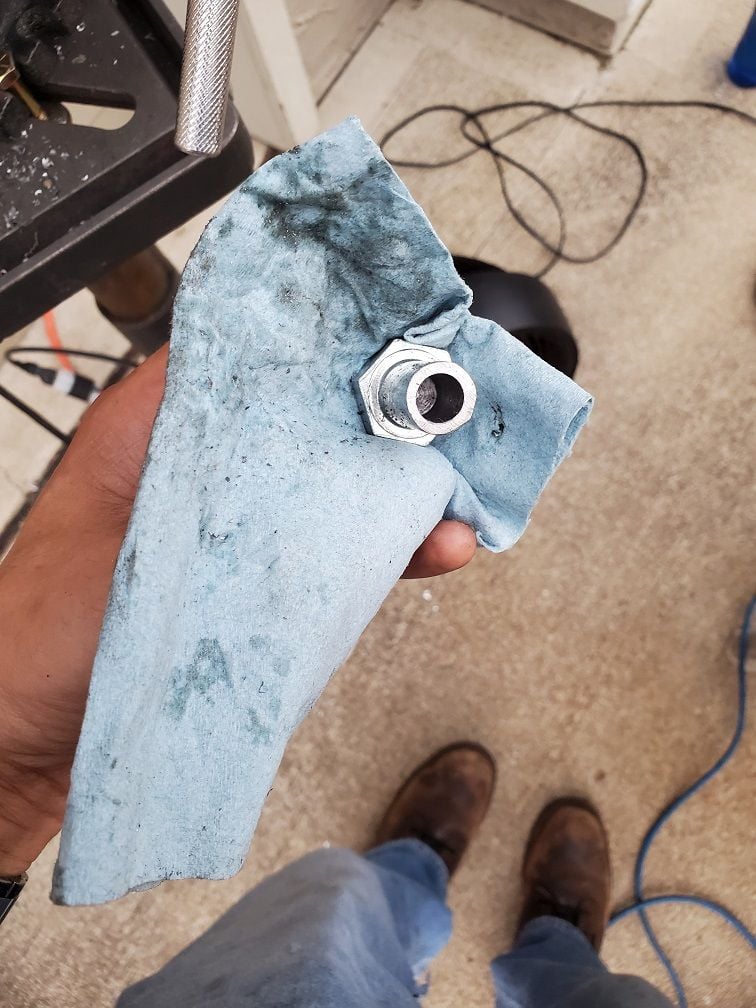
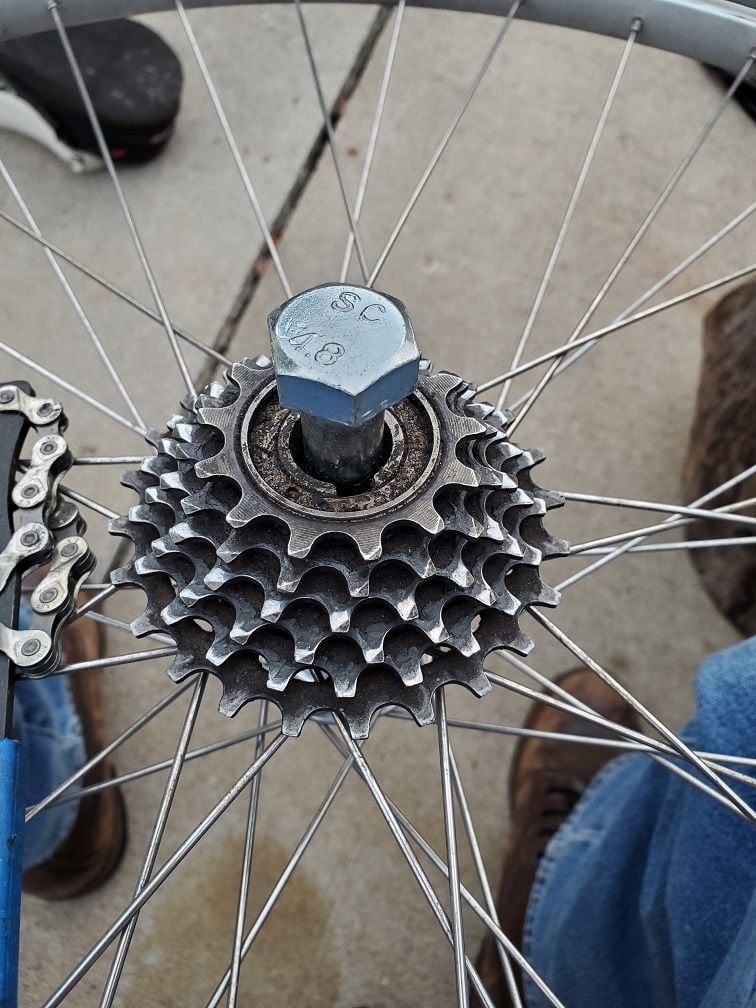
The tabs that go in the notches on the cassette are 1/4" thick steel strips, welded to the bolt. I didn't get the hole in the bolt perfectly centered. If I had a thicker piece of metal to use as the die for it that would have been better. I locked the vice in and drilled the die hole, then swapped bits and drilled the center of the bolt so both the die hole for the bolt and the bit for the axle hole in the bolt were on the same axis - only the bolt moved a bit too much in the die hole. Oh well, good enough. It doesn't have to be real precise. The axle hole is only a few thousandths over the thread on the axle so it is a nice, very little slop, fit (letter X bit if it means anything to anyone).
I also filed the tabs down a bit to get a better fit in the notches. They were intentionally cut about .015-020" over and welded on.
Question - does this style cassette nut loosen regular? Or reverse? As in - lefty loosey? Or righty loosey (reverse thread)? I used a long 1/2" ratchet and tried to back the nut out lefty loosey and put an abnormal amount of torque (that I felt was way too much) on it and didn't get it to budge. If that is the right direction I'll put my lighter impact wrench on it tomorrow and see what happens. It is an old bike and hasn't been maintained too well so it doesn't surprise me to get in to a stuck part.
 09-13-20, 11:15 PM
#2
Really Old Senior Member

It's a RH thread-
The usual method of destroying the tool happens when it cocks a little bit and the pressure on the "tabs"gets concentrated in a small area.
IF you could add a close fitting pilot that went all the way through to the NDS, it would help keep the tool "square" when applying force.
I hope the metal didn't anneal too much.
Last edited by Bill Kapaun; 09-13-20 at 11:24 PM.
Likes For Bill Kapaun:
09-13-20, 11:19 PM
#3
Senior Member
Thread Starter
Join Date: Apr 2013
Posts: 1,173
Bikes: Surly Disk Trucker, 2014 w/Brooks Flyer Special saddle, Tubus racks - Duo front/Logo Evo rear, 2019 Dahon Mariner D8, Both bikes share Ortlieb Packer Plus series panniers, Garmin Edge 1000
Mentioned: 2 Post(s)
Tagged: 0 Thread(s)
Quoted: 405 Post(s)
Liked 115 Times
in
99 Posts
09-14-20, 12:47 AM
#4
Senior Member
Join Date: Mar 2008
Posts: 8,688
Mentioned: 46 Post(s)
Tagged: 0 Thread(s)
Quoted: 1074 Post(s)
Liked 295 Times
in
222 Posts
I�m not sure that�s a cassette.
It looks to me like you�ve made yourself a freewheel puller. Freewheels tighten by pedalling action and can be on wickedly tight.
A very common method is to stick the tool in a vise solidly mounted to a bench solidly anchored to a wall, put the wheel on top, grasp it like a bus steering wheel, then �turn left�.
If it is a cassette, you�re about to open the part that holds the DS wheel bearing cup and the coasting mechanism.
On Shimano Uni-Glide - which is somewhat similar to yours - that is a reverse thread.
Determine what you have before trying harder.
I�ve made DIY freewheel pullers on occasion. Never managed to get one made out of �household� grade steel to work. Have had some luck starting with an appropriately sized tool socket, then grinding away material to form the tabs.
I appreciate the attempt though.😁👍
Likes For dabac:
09-14-20, 12:53 AM
#5
Really Old Senior Member
I�m not sure that�s a cassette.
It looks to me like you�ve made yourself a freewheel puller. Freewheels tighten by pedalling action and can be on wickedly tight.
A very common method is to stick the tool in a vise solidly mounted to a bench solidly anchored to a wall, put the wheel on top, grasp it like a bus steering wheel, then �turn left�.
If it is a cassette, you�re about to open the part that holds the DS wheel bearing cup and the coasting mechanism.
On Shimano Uni-Glide - which is somewhat similar to yours - that is a reverse thread.
Determine what you have before trying harder.
I�ve made DIY freewheel pullers on occasion. Never managed to get one made out of �household� grade steel to work. Have had some luck starting with an appropriately sized tool socket, then grinding away material to form the tabs.
I appreciate the attempt though.😁👍
It looks to me like you�ve made yourself a freewheel puller. Freewheels tighten by pedalling action and can be on wickedly tight.
A very common method is to stick the tool in a vise solidly mounted to a bench solidly anchored to a wall, put the wheel on top, grasp it like a bus steering wheel, then �turn left�.
If it is a cassette, you�re about to open the part that holds the DS wheel bearing cup and the coasting mechanism.
On Shimano Uni-Glide - which is somewhat similar to yours - that is a reverse thread.
Determine what you have before trying harder.
I�ve made DIY freewheel pullers on occasion. Never managed to get one made out of �household� grade steel to work. Have had some luck starting with an appropriately sized tool socket, then grinding away material to form the tabs.
I appreciate the attempt though.😁👍
PARK FR-2.equivalent.
09-14-20, 02:00 AM
#7

Droid on a mission

Join Date: May 2018
Location: Palm Coast, FL
Posts: 1,012
Bikes: Diamondback Wildwood Classic
Mentioned: 4 Post(s)
Tagged: 0 Thread(s)
Quoted: 320 Post(s)
Liked 286 Times
in
199 Posts
I see a chain whip in your pictures, it is not needed to remove a freewheel.
As others have pointed out, put your "tool" into a vise with the tabs facing up. Slip the wheel onto the tool and turn "the bus steering wheel" to the left. easier to do when a tire is mounted on the rim, provides extra grip.
Another method I use, especially when a vise is not available, is to use a long (25") breaker bar with a socket to fit the tool like this one
https://www.harborfreight.com/12-in-...bar-60819.html
__________________
JoeTBM (The Bike Man) - I'm a black & white type of guy, the only gray in my life is the hair on my head
 www.TheBikeMenOfFlaglerCounty.com
JoeTBM (The Bike Man) - I'm a black & white type of guy, the only gray in my life is the hair on my head
www.TheBikeMenOfFlaglerCounty.com
Likes For JoeTBM:
09-14-20, 07:42 AM
#8
With a mighty wind
Join Date: May 2015
Posts: 2,667
Mentioned: 13 Post(s)
Tagged: 0 Thread(s)
Quoted: 1131 Post(s)
Liked 926 Times
in
524 Posts
I have a buddy kinda like you.
Will machine a tool to the thousandths just because he can. Will mill a new bolt to avoid another trip to the store. It's an art and I'm jealous.
Did it work?
Will machine a tool to the thousandths just because he can. Will mill a new bolt to avoid another trip to the store. It's an art and I'm jealous.
Did it work?
09-14-20, 10:24 AM
#9
Senior Member
Thread Starter
Join Date: Apr 2013
Posts: 1,173
Bikes: Surly Disk Trucker, 2014 w/Brooks Flyer Special saddle, Tubus racks - Duo front/Logo Evo rear, 2019 Dahon Mariner D8, Both bikes share Ortlieb Packer Plus series panniers, Garmin Edge 1000
Mentioned: 2 Post(s)
Tagged: 0 Thread(s)
Quoted: 405 Post(s)
Liked 115 Times
in
99 Posts
Ultimately what I need is those gears off the hub so I can clean them. I also need to open up the hub because the wheel has resistance on it. The person who's bike it is never said anything about the resistance - I suspect they don't have a clue. The chain and gears need a good scrub down and re-lube for sure, but the resistance has me more concerned. So I want to open it up and see whats what. The axle does spin rough and tight off the bike (spinning the axle in the hub by hand).
I haven't had a chance to work on it yet today. I will get to it here this afternoon or evening. I may have to run out for a few hours.
I haven't had a chance to work on it yet today. I will get to it here this afternoon or evening. I may have to run out for a few hours.
09-14-20, 10:29 AM
#10
Senior Member
Thread Starter
Join Date: Apr 2013
Posts: 1,173
Bikes: Surly Disk Trucker, 2014 w/Brooks Flyer Special saddle, Tubus racks - Duo front/Logo Evo rear, 2019 Dahon Mariner D8, Both bikes share Ortlieb Packer Plus series panniers, Garmin Edge 1000
Mentioned: 2 Post(s)
Tagged: 0 Thread(s)
Quoted: 405 Post(s)
Liked 115 Times
in
99 Posts
09-14-20, 11:23 AM
#11
With a mighty wind
Join Date: May 2015
Posts: 2,667
Mentioned: 13 Post(s)
Tagged: 0 Thread(s)
Quoted: 1131 Post(s)
Liked 926 Times
in
524 Posts
I spun one off relatively easily with a vise from an 87' that likely had been on since new.
My guess is that you're going to have a lot harder time getting the seatpost out of the same bike.
Dual chain whips will remove the cogs for cleaning, something that surprised me when I figured it out. The freewheel will still be attached though.
09-14-20, 11:29 AM
#12
Old fart

Join Date: Nov 2004
Location: Appleton WI
Posts: 24,848
Bikes: Several, mostly not name brands.
Mentioned: 154 Post(s)
Tagged: 0 Thread(s)
Quoted: 3617 Post(s)
Liked 3,454 Times
in
1,960 Posts
That's a freewheel, not a cassette. Looks like the old Regina two-notch style, also used by Atom, Caimi (Everest), and even early Shimano Dura-Ace freewheels. The problem with them is that it is very easy for the remover tool to damage the slots of the freewheel body. Better tools included a stabilizing ring to hold the tool in proper alignment and reduce the chance of damaging the slots.
The freewheel itself comes off the hub counter-clockwise. The cover plate for the freewheel mechanism comes off clockwise.
Question - does this style cassette nut loosen regular? Or reverse? As in - lefty loosey? Or righty loosey (reverse thread)?
09-14-20, 11:53 AM
#13
LR�P=HR
Join Date: Sep 2019
Location: SF Bay Area
Posts: 2,237
Bikes: 1981 Holdsworth Special, 1993 C-dale MT3000 & 1996 F700CAD3, 2018 & 2019 Cervelo R3�s & 2022 R5, JustGo Runt, Ridley Oval, Kickr Bike 8-)
Mentioned: 2 Post(s)
Tagged: 0 Thread(s)
Quoted: 892 Post(s)
Liked 1,248 Times
in
720 Posts
Just to be clear... as other have mentioned
Old style freewheel.
You hold the wheel and unscrew the entire Freewheel (with cogs) from the wheel
You must not use a chain whip! - you will be holding the same assembly you're attempting to unscrew.
New Style cassette
You hold the cassette cogs with a chain whip and unscrew the cap.
The cogs then slide off of the freewheel that remains attached (and is part of) the wheels hub.
Reassembly... the Cassette cap has to be torqued to the correct value, the old style freewheel tightens when you ride it.
All the best
Barry
Likes For Sal Bandini:
09-14-20, 12:35 PM
#15
Senior Member
Join Date: Jun 2002
Location: Montreal, Quebec
Posts: 6,045
Mentioned: 16 Post(s)
Tagged: 0 Thread(s)
Quoted: 1881 Post(s)
Liked 1,753 Times
in
1,017 Posts
The "gears" on that freewheel are not going to be easier to clean if the freewheel is removed from the hub. If cleaning the cogs is the goal, you need 2 chainwhips to remove them from the body of the freewheel. If cleaning the internals of the freewheel is the goal, it isn't necessary to remove the freewheel from the wheel. It is possible to service the bearings of the axle without removing the freewheel although it is a bit easier to do with the freewheel removed. The only time it is essential to remove a freewheel is if you have to replace spokes
09-14-20, 12:56 PM
#16
Senior Member
Join Date: Mar 2008
Posts: 8,688
Mentioned: 46 Post(s)
Tagged: 0 Thread(s)
Quoted: 1074 Post(s)
Liked 295 Times
in
222 Posts
You are aware that your tool - if it holds up - will spin off all the sprockets and the coasting mechanism as one unit?
Advantages WRT cleaning mainly consists of not getting the wheel dirty.
On occasion, I�ve been able to pull the axle by removing the NDS locknut, spacer and cone while leaving the f/w in place. Getting the DS cup clean is fiddly and slow, but doable.
Advantages WRT cleaning mainly consists of not getting the wheel dirty.
On occasion, I�ve been able to pull the axle by removing the NDS locknut, spacer and cone while leaving the f/w in place. Getting the DS cup clean is fiddly and slow, but doable.
09-14-20, 03:09 PM
#17
Droid on a mission
Join Date: May 2018
Location: Palm Coast, FL
Posts: 1,012
Bikes: Diamondback Wildwood Classic
Mentioned: 4 Post(s)
Tagged: 0 Thread(s)
Quoted: 320 Post(s)
Liked 286 Times
in
199 Posts
Ultimately what I need is those gears off the hub so I can clean them. I also need to open up the hub because the wheel has resistance on it. The person who's bike it is never said anything about the resistance - I suspect they don't have a clue. The chain and gears need a good scrub down and re-lube for sure, but the resistance has me more concerned. So I want to open it up and see whats what. The axle does spin rough and tight off the bike (spinning the axle in the hub by hand).
I haven't had a chance to work on it yet today. I will get to it here this afternoon or evening. I may have to run out for a few hours.
I haven't had a chance to work on it yet today. I will get to it here this afternoon or evening. I may have to run out for a few hours.
I have removed hundreds of freewheels using the methods I described previously, with and without a vise. I have only encountered one freewheel that beat me and would not come off. I have never damaged a hub in the process.
The resistance you describe in the axle has nothing to do do with removal of the freewheel, that is a separate problem and the issue is having to do with the bearings in the hub and proper adjustment of the cones on the axle. The freewheel is threaded onto the body of the hub and had no direct connection to the axle.
__________________
JoeTBM (The Bike Man) - I'm a black & white type of guy, the only gray in my life is the hair on my head
www.TheBikeMenOfFlaglerCounty.com
JoeTBM (The Bike Man) - I'm a black & white type of guy, the only gray in my life is the hair on my head
www.TheBikeMenOfFlaglerCounty.com
09-14-20, 07:45 PM
#18
Old fart
Join Date: Nov 2004
Location: Appleton WI
Posts: 24,848
Bikes: Several, mostly not name brands.
Mentioned: 154 Post(s)
Tagged: 0 Thread(s)
Quoted: 3617 Post(s)
Liked 3,454 Times
in
1,960 Posts
No need to remove freewheel from the hub or the sprockets from the freewheel body to clean them. Use a strip of cloth soaked in mineral spirits to "floss" between the sprockets to remove grime.
Likes For JohnDThompson:
09-14-20, 08:11 PM
#20
Senior Member
Thread Starter
Join Date: Apr 2013
Posts: 1,173
Bikes: Surly Disk Trucker, 2014 w/Brooks Flyer Special saddle, Tubus racks - Duo front/Logo Evo rear, 2019 Dahon Mariner D8, Both bikes share Ortlieb Packer Plus series panniers, Garmin Edge 1000
Mentioned: 2 Post(s)
Tagged: 0 Thread(s)
Quoted: 405 Post(s)
Liked 115 Times
in
99 Posts
Thanks for the input everyone.
The freewheel assembly came off fairly easy when I spun it against the whole wheel (no chain whip). I guess I was interpreting the assembly differently than it actually works.
In any case, I got it cleaned a bit.
The bad part is the hub is toast. The races are pitted and grooved in the cones and at that point I don't trust the assembly going back together. As to how things got pitted - that I don't know. I am thinking perhaps that it was installed incorrectly with too much tension on the cones and the riders weight, plus road bumps, exacerbated it. But those races should be pretty darn hard.
The wheel was apparently replaced a few years ago, it wasn't the original wheel. The freewheel + gear assembly is original (and from what I can tell is still in pretty good shape - just a tad bit of slop in it, but nothing that stands out as being a problem yet).
Looks like I am going to be rebuilding a wheel next if I can find a decent hub.
09-15-20, 08:13 AM
#21
Old fart
Join Date: Nov 2004
Location: Appleton WI
Posts: 24,848
Bikes: Several, mostly not name brands.
Mentioned: 154 Post(s)
Tagged: 0 Thread(s)
Quoted: 3617 Post(s)
Liked 3,454 Times
in
1,960 Posts
1) as long as you're replacing the hub, consider moving to a freehub system rather than a freewheel. This would bring the advantages of a stronger wheel (less likely to break the axle), compatibility with modern parts, and potentially more sprockets on the gear cluster.
2) unless you have a burning desire to build your own wheel, it is often more cost effective to buy a built wheel. You mention that the current wheel you're replacing doesn't seem to be original to the bike, so there should be little concern about using another replacement wheel.
09-15-20, 08:16 AM
#22
Used to be Conspiratemus
Join Date: Jan 2009
Location: Hamilton ON Canada
Posts: 1,512
Mentioned: 4 Post(s)
Tagged: 0 Thread(s)
Quoted: 297 Post(s)
Liked 245 Times
in
163 Posts
...or coarse string like binder twine, dry, not soaked in anything. Much less messy, just needs more elbow grease. Avoids use of toxic solvents that have a way of finding their way into the water table, which should enter our minds at least long enough to say, deliberately, �Oh, eff it, can�t be bothered,� instead of just not thinking about it at all.
Likes For conspiratemus1:
