


Huret gear set problems
 03-21-21, 06:24 PM
#1
Senior Member
Thread Starter

Join Date: May 2020
Location: Great White North
Posts: 1,226
Bikes: 2013 Cannondale Caad 8, 2010 Opus Fidelio, 1985 Peugeot UO14, 1999 Peugeot Dune, Sakai Select, L'Avantage, 1971 Gitane Apache Standard, 1999 Specialized Hard Rock
Mentioned: 10 Post(s)
Tagged: 0 Thread(s)
Quoted: 548 Post(s)
Liked 473 Times
in
302 Posts
Huret gear set problems
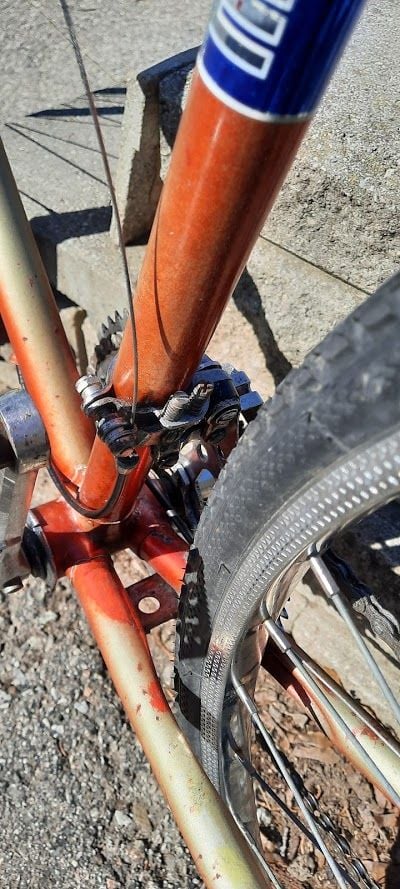
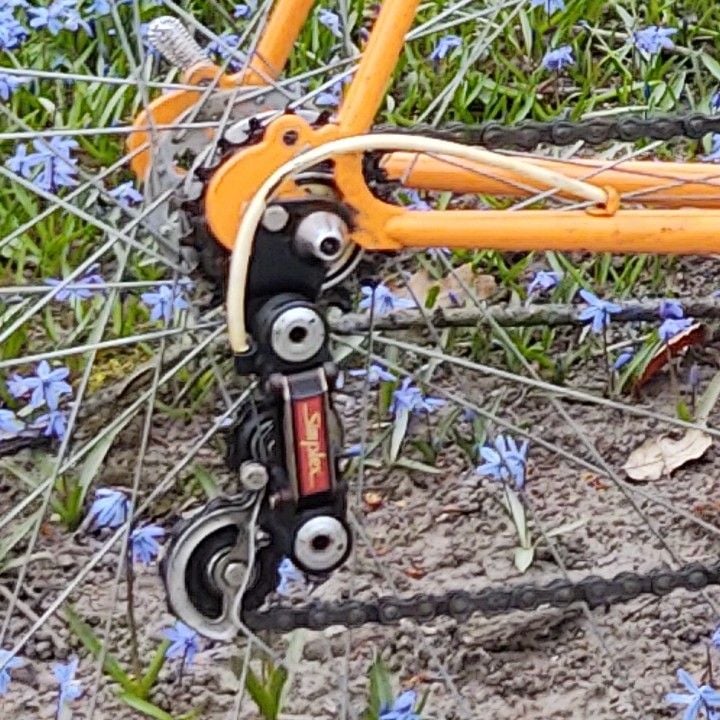
Not sure what I am doing wrong but I stripped out all the original cables and casings on this 1971 Gitane bike but when I replaced everything, I can't get it working. With the original cables I was able to move the derailleurs (not a proper test as it didn't have wheels or gears) but not I can't get either derailleur to shift after replacing with new cables.
Have I set it up wrong? To me the shifters almost look as if they are facing the wrong way? sorry picture is not great but I can take another one.

Have I set it up wrong? To me the shifters almost look as if they are facing the wrong way? sorry picture is not great but I can take another one.
 03-21-21, 06:47 PM
#2

Senior Member
Join Date: Feb 2020
Posts: 2,826
Mentioned: 49 Post(s)
Tagged: 0 Thread(s)
Quoted: 1110 Post(s)
Likes: 0
Liked 1,329 Times
in
785 Posts
At least one cable looks very loose.
Both should be tight enough that when the mech is all the way in (front) out (rear) the cable won't allow the lever to go as far forward as you have them in the first pic.
Both should be tight enough that when the mech is all the way in (front) out (rear) the cable won't allow the lever to go as far forward as you have them in the first pic.
03-21-21, 06:56 PM
#3
Senior Member

Join Date: Feb 2013
Location: Alta California
Posts: 14,280
Mentioned: 415 Post(s)
Tagged: 1 Thread(s)
Quoted: 3815 Post(s)
Liked 3,348 Times
in
2,184 Posts
-----
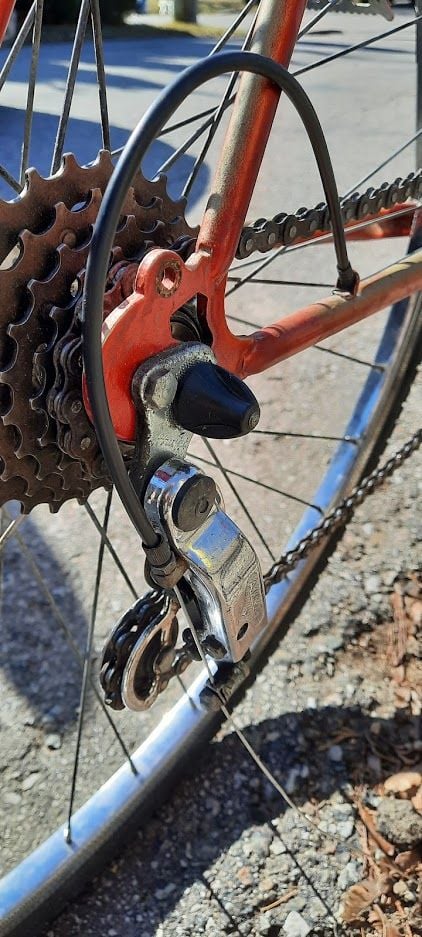
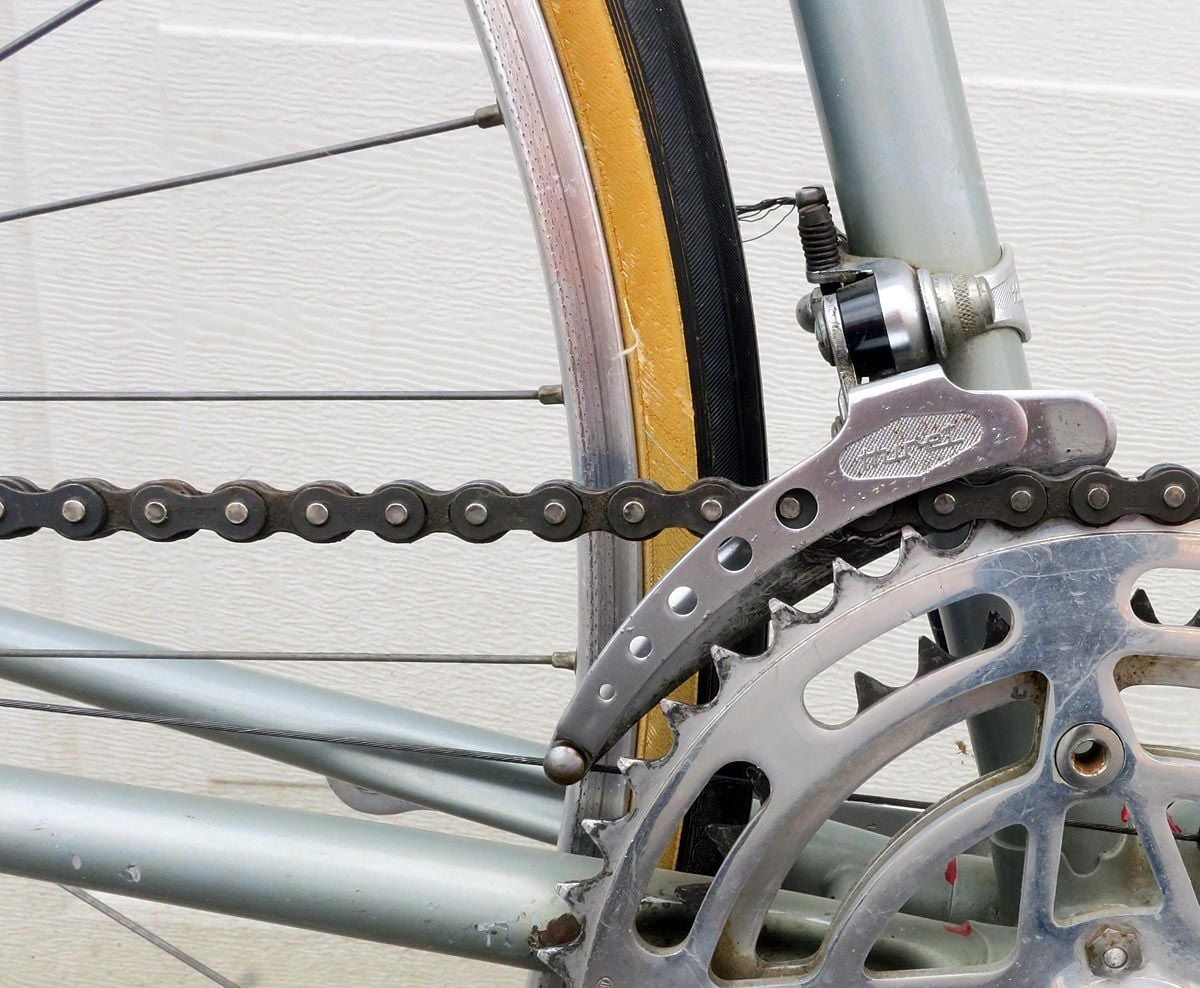
the image of the rear shows a good deal of unnecessary friction at the chainstay stop
folks oft employ a tie-wrap or similar just aft of the chainstay stop to give a smoother path for the cable
did you re-use cable casings for fit new ones?
ends of casings should be run against bench grinder to give a flat smooth surface so that they butt up against housing stops evenly
did you grease cables?
did you disassemble, clean and lubricate both gear mechs? if not, you could have binding at one or more pivot points. a short cut is to liberally apply spray lubricant to the pivot points of the mechs.
readers might be able to offer more/better advice with a better image of the shift lever set...
-----
Last edited by juvela; 03-21-21 at 07:05 PM. Reason: addition
03-22-21, 06:59 AM
#4
Senior Member
Thread Starter
Join Date: May 2020
Location: Great White North
Posts: 1,226
Bikes: 2013 Cannondale Caad 8, 2010 Opus Fidelio, 1985 Peugeot UO14, 1999 Peugeot Dune, Sakai Select, L'Avantage, 1971 Gitane Apache Standard, 1999 Specialized Hard Rock
Mentioned: 10 Post(s)
Tagged: 0 Thread(s)
Quoted: 548 Post(s)
Liked 473 Times
in
302 Posts
I wanted to show the loose cable because that's what it does when I try and change gears. I have the shifters set to the top, pull the cable tight in the derailleurs but when I try to shift, the cable goes slack and does not move the derailleur.
juvela thank you, so all new cables and casings. That's what a friend suggested as well that the cables are pinching or getting caught for some reason. I did not grease the cables before running them through the casings nor did I try to lubricate the gear mechs. so will try that.
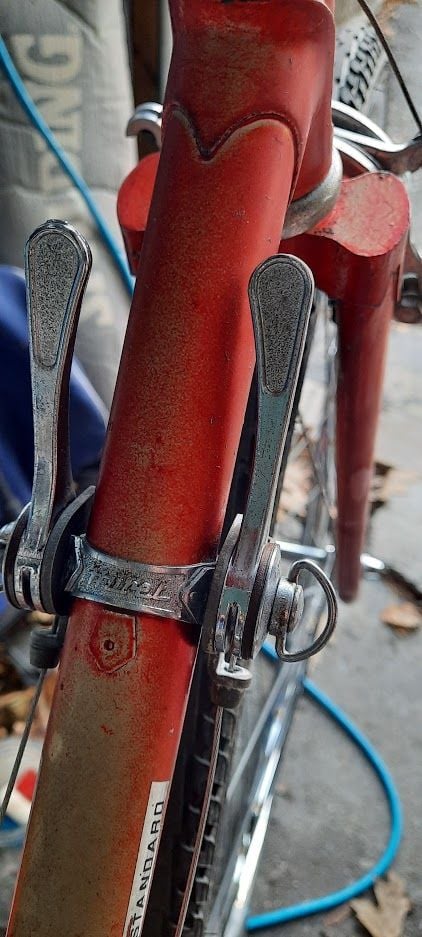
Here is a better shot of the shifters. For some reason they don't look right. It seems the lever should contour out away from the down tube instead of inwards? I wish I had taken pictures of everything as I was stripping it all down but I was working in a shop and found it hard to focus while I was working on it.
juvela thank you, so all new cables and casings. That's what a friend suggested as well that the cables are pinching or getting caught for some reason. I did not grease the cables before running them through the casings nor did I try to lubricate the gear mechs. so will try that.
Here is a better shot of the shifters. For some reason they don't look right. It seems the lever should contour out away from the down tube instead of inwards? I wish I had taken pictures of everything as I was stripping it all down but I was working in a shop and found it hard to focus while I was working on it.
03-22-21, 07:15 AM
#5
Senior Member
I wanted to show the loose cable because that's what it does when I try and change gears. I have the shifters set to the top, pull the cable tight in the derailleurs but when I try to shift, the cable goes slack and does not move the derailleur.
juvela thank you, so all new cables and casings. That's what a friend suggested as well that the cables are pinching or getting caught for some reason. I did not grease the cables before running them through the casings nor did I try to lubricate the gear mechs. so will try that.
Here is a better shot of the shifters. For some reason they don't look right. It seems the lever should contour out away from the down tube instead of inwards? I wish I had taken pictures of everything as I was stripping it all down but I was working in a shop and found it hard to focus while I was working on it.
In terms of the rear derailleur try a little zip tie to hold the end of the housing down against the chainstay so there isnt friction at the cable stop.
Does the front derailleur move freely by hand? It could be binding or a worn spring.
Likes For Narhay:
03-22-21, 07:41 AM
#6
Senior Member
Join Date: Feb 2013
Location: Alta California
Posts: 14,280
Mentioned: 415 Post(s)
Tagged: 1 Thread(s)
Quoted: 3815 Post(s)
Liked 3,348 Times
in
2,184 Posts
-----
thank you for the additional image
Narhay's information is spot on
it should sort things for you
if not, you can post back with an update...
tip -
when you have the grease out to grease the cables also grease the faces of the shift levers where they touch the washers and the faces of the washers themselves
-----
03-22-21, 08:33 AM
#7
Senior Member
Join Date: Aug 2010
Location: Utah
Posts: 8,688
Bikes: Paletti,Pinarello Monviso,Duell Vienna,Giordana XL Super,Lemond Maillot Juane.& custom,PDG Paramount,Fuji Opus III,Davidson Impulse,Pashley Guv'nor,Evans,Fishlips,Y-Foil,Softride, Tetra Pro, CAAD8 Optimo,
Mentioned: 156 Post(s)
Tagged: 0 Thread(s)
Quoted: 2331 Post(s)
Liked 5,020 Times
in
1,786 Posts
Yep, you need to somehow secure the cable housing for the RD. My Stella's braze-on's took care of that for me. My Huret RD also had two positions for the cage spring. That spring comes off easily and can be out of tension.
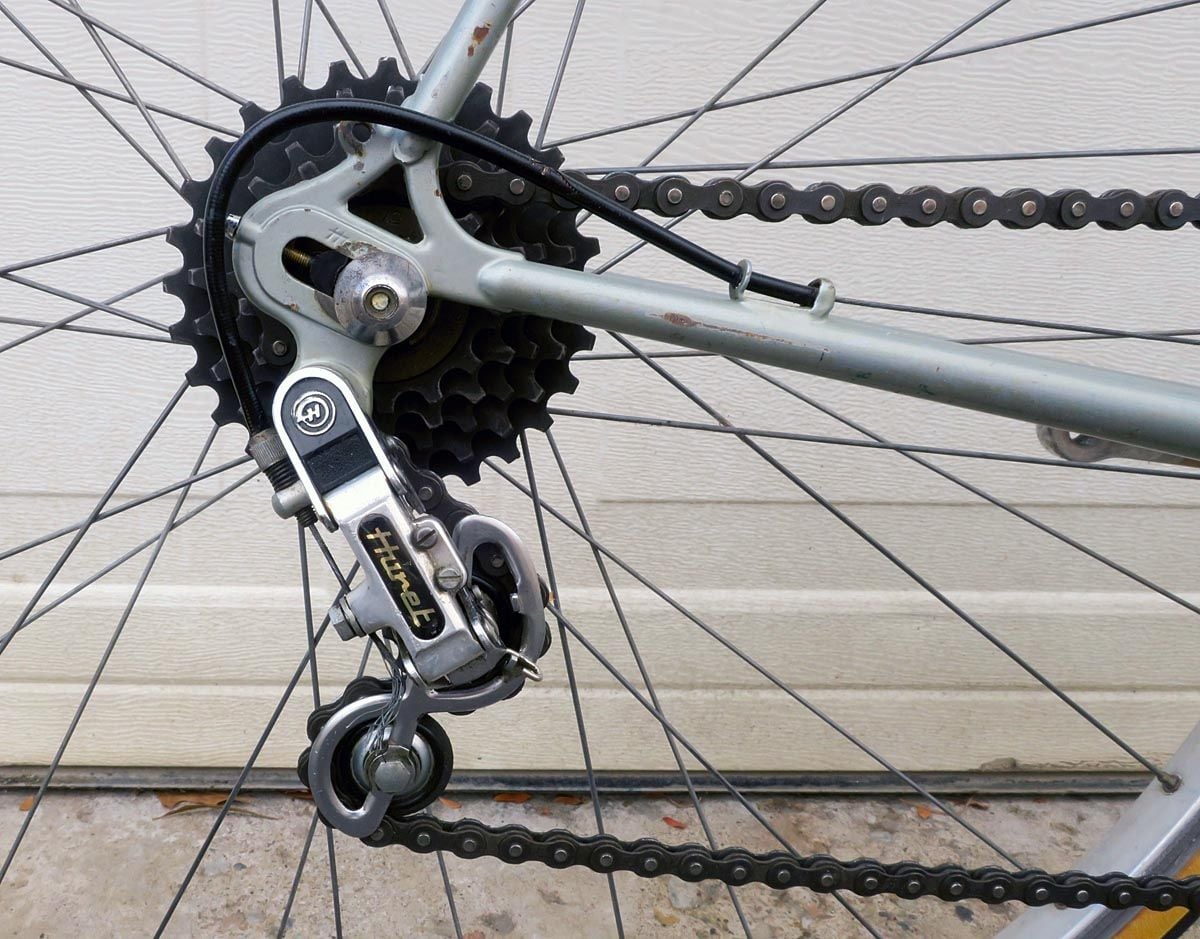
I had to actually cut down a ferrule to fit in inside the mount braze-on. This pic is from how I got it.
These are from before I changed the crank and reworked the FD.
These are from before I changed the crank and reworked the FD.
These are from before I changed the crank and reworked the FD.
I took a ton of pictures with my cellphone as I worked on the Huret stuff on mine. Unfortunately I didn't save them. The bike has already been donated to the local collective so I can't go check anything for you, sorry. I remember the FD being super easy to work as you can clearly see how the limit screws are working against the body of the FD. With cable detached I worked the FD by hand rough setting the limits.
Oh and I too somehow put my shifters back on backwards. Even though I'd swear I only did one side at a time to prevent me from doing that. My old man mind wanders bad, LOL!
__________________
Steel is real...and comfy.
Steel is real...and comfy.
03-22-21, 10:57 AM
#8
Senior Member
Thread Starter
Join Date: May 2020
Location: Great White North
Posts: 1,226
Bikes: 2013 Cannondale Caad 8, 2010 Opus Fidelio, 1985 Peugeot UO14, 1999 Peugeot Dune, Sakai Select, L'Avantage, 1971 Gitane Apache Standard, 1999 Specialized Hard Rock
Mentioned: 10 Post(s)
Tagged: 0 Thread(s)
Quoted: 548 Post(s)
Liked 473 Times
in
302 Posts
Great information guys, thank you, I wish you were all my neighbours!!!  When I get some time, I will dismantle and start again. I realized almost immediately when I was at the coop shop my mistake of stripping it all down and laying the parts on the bench and then realized that was a bad idea. A classic newbie move to have to figure out how it all went back together again.
I was also advised to put these little end caps on the casing which provided a small hole just big enough for the cable to slide through. i was told it would finish the casing and improve the connection to those cable housings. Does that make sense?
When I get some time, I will dismantle and start again. I realized almost immediately when I was at the coop shop my mistake of stripping it all down and laying the parts on the bench and then realized that was a bad idea. A classic newbie move to have to figure out how it all went back together again. I was also advised to put these little end caps on the casing which provided a small hole just big enough for the cable to slide through. i was told it would finish the casing and improve the connection to those cable housings. Does that make sense?
03-22-21, 01:26 PM
#9
Senior Member
Join Date: Feb 2013
Location: Alta California
Posts: 14,280
Mentioned: 415 Post(s)
Tagged: 1 Thread(s)
Quoted: 3815 Post(s)
Liked 3,348 Times
in
2,184 Posts
Great information guys, thank you, I wish you were all my neighbours!!! When I get some time, I will dismantle and start again. I realized almost immediately when I was at the coop shop my mistake of stripping it all down and laying the parts on the bench and then realized that was a bad idea. A classic newbie move to have to figure out how it all went back together again.
I was also advised to put these little end caps on the casing which provided a small hole just big enough for the cable to slide through. i was told it would finish the casing and improve the connection to those cable housings. Does that make sense?
When I get some time, I will dismantle and start again. I realized almost immediately when I was at the coop shop my mistake of stripping it all down and laying the parts on the bench and then realized that was a bad idea. A classic newbie move to have to figure out how it all went back together again.I was also advised to put these little end caps on the casing which provided a small hole just big enough for the cable to slide through. i was told it would finish the casing and improve the connection to those cable housings. Does that make sense?
yes, the ends caps you mention as usually termed ferrules in bicycle jargon
there are differing sizes and shapes of them so it is good to employ the best size and shape for a given application
some are stepped and some are flat; for your requirement you want the flat type
---
another "little end cap" that is good to use are the ones for cables themselves at their free ends
because the cables are braided they tend to unwind at the free end and can catch on clothing or skin
also, once they have unwound there is no way to thread them through again and still have their full length
cable end caps cost only a few pennies and are made in metal and in plastic; the metal ones need to be crimped to stay in place
---
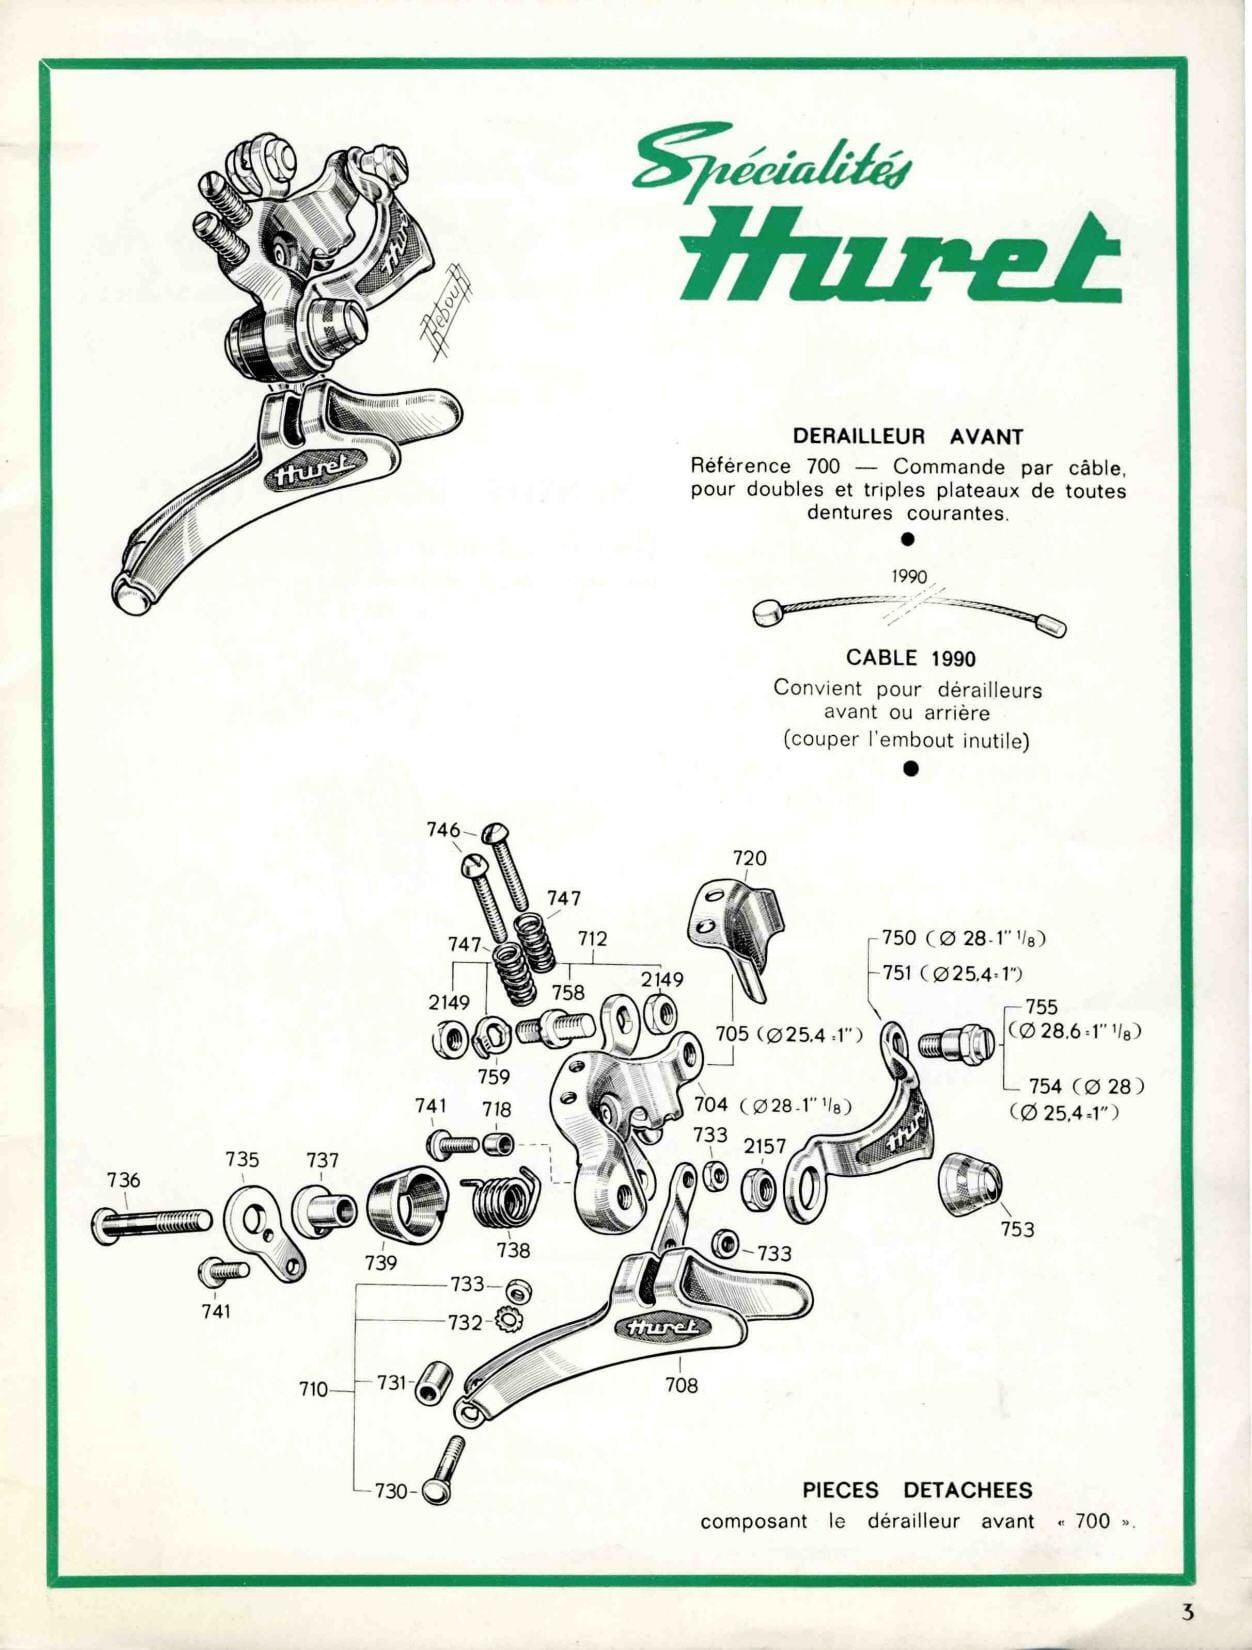
you mention taking things apart and not knowing how they go back together
here are the manufacturer's parts drawings for the three components of your Gitane's gear ensemble -
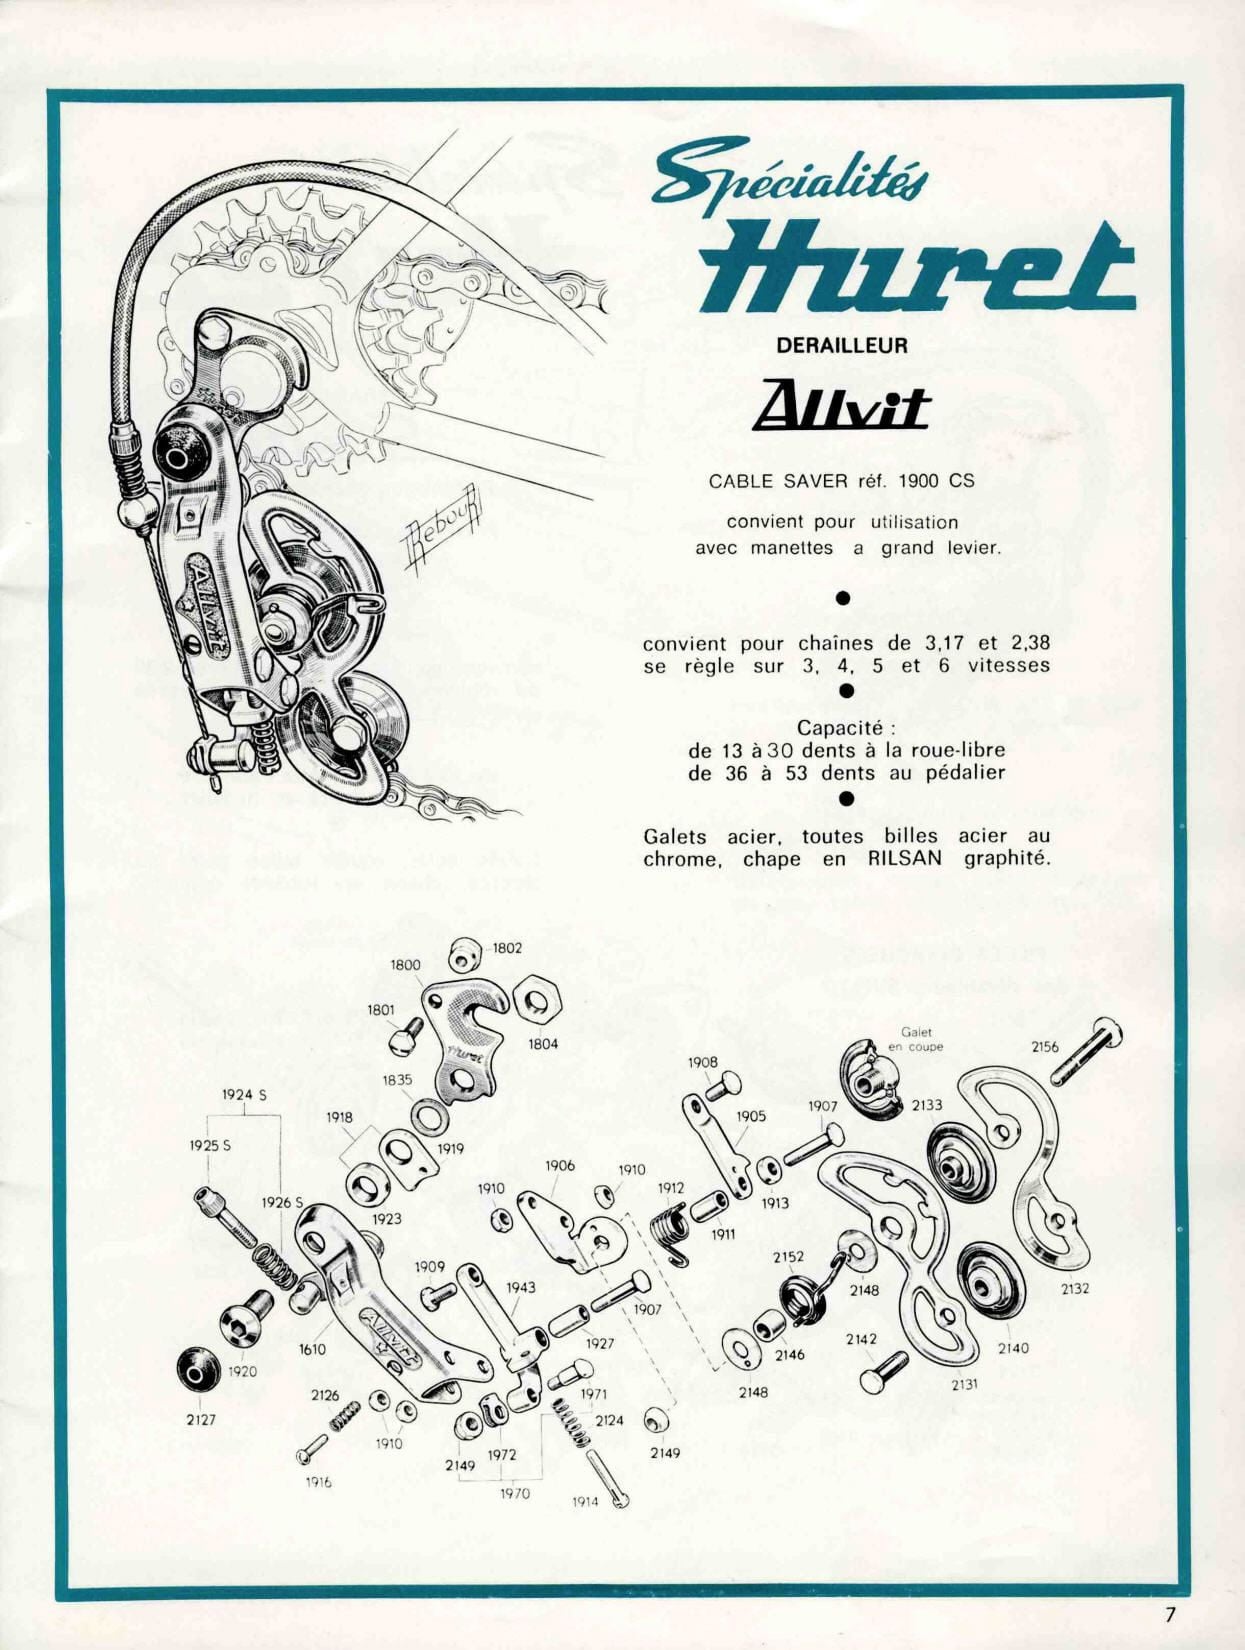

-----
Likes For juvela:
03-22-21, 06:21 PM
#11
Senior Member
Thread Starter
Join Date: May 2020
Location: Great White North
Posts: 1,226
Bikes: 2013 Cannondale Caad 8, 2010 Opus Fidelio, 1985 Peugeot UO14, 1999 Peugeot Dune, Sakai Select, L'Avantage, 1971 Gitane Apache Standard, 1999 Specialized Hard Rock
Mentioned: 10 Post(s)
Tagged: 0 Thread(s)
Quoted: 548 Post(s)
Liked 473 Times
in
302 Posts
Awesome, those diagrams will be super helpful when putting it all together again or trouble shooting if I'm missing any pieces. I am good with metal end ferrules for brake and gear cables, I just hadn't got that far yet. The cap that i was recommended to use for mounting into the metal tab of the frame is this one. It's a closed cap but has a small enough hole for the cable to fit through. I guess to prevent debris and moisture from getting in? I don't know. Hopefully this picture indicates what it is. I then used some of the open ended metal ferrules on the top tube.
Thanks Narhay, I clipped the end of the housings to make sure they weren't rough and also inserted some oil through them for lubrication. I forgot that I did that in my earlier post.
Thanks Narhay, I clipped the end of the housings to make sure they weren't rough and also inserted some oil through them for lubrication. I forgot that I did that in my earlier post.
04-02-21, 05:39 PM
#12
Senior Member
Thread Starter
Join Date: May 2020
Location: Great White North
Posts: 1,226
Bikes: 2013 Cannondale Caad 8, 2010 Opus Fidelio, 1985 Peugeot UO14, 1999 Peugeot Dune, Sakai Select, L'Avantage, 1971 Gitane Apache Standard, 1999 Specialized Hard Rock
Mentioned: 10 Post(s)
Tagged: 0 Thread(s)
Quoted: 548 Post(s)
Liked 473 Times
in
302 Posts
I finally got the chance to work on the bike today and made some progress. I secured the cable housing to the RD using a bodge solution of just using an elastic band to secure it and the rear derailleur is now working well. Is there a better solution for securing the cable housing that is more fitting with the genre of the bike? I know I could use zip ties but that's just so trash looking ha ha. Should I just shorten the cable housing so it has less of an aggressive bend?
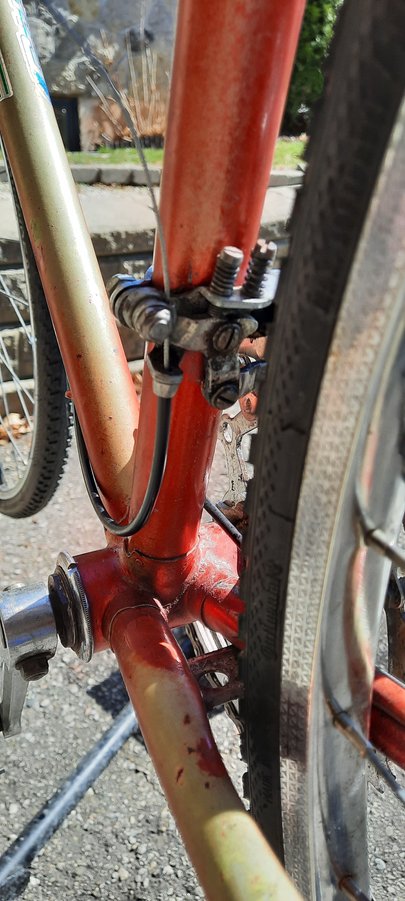
Now there's still a problem with the front derailleur for some reason. I did flip the shift levers around to face the proper way but the cable will not pull enough to move the derailleur and chain over. I did spray some lubricant in the front derailleur to see if it needed to be loosened up a bit.
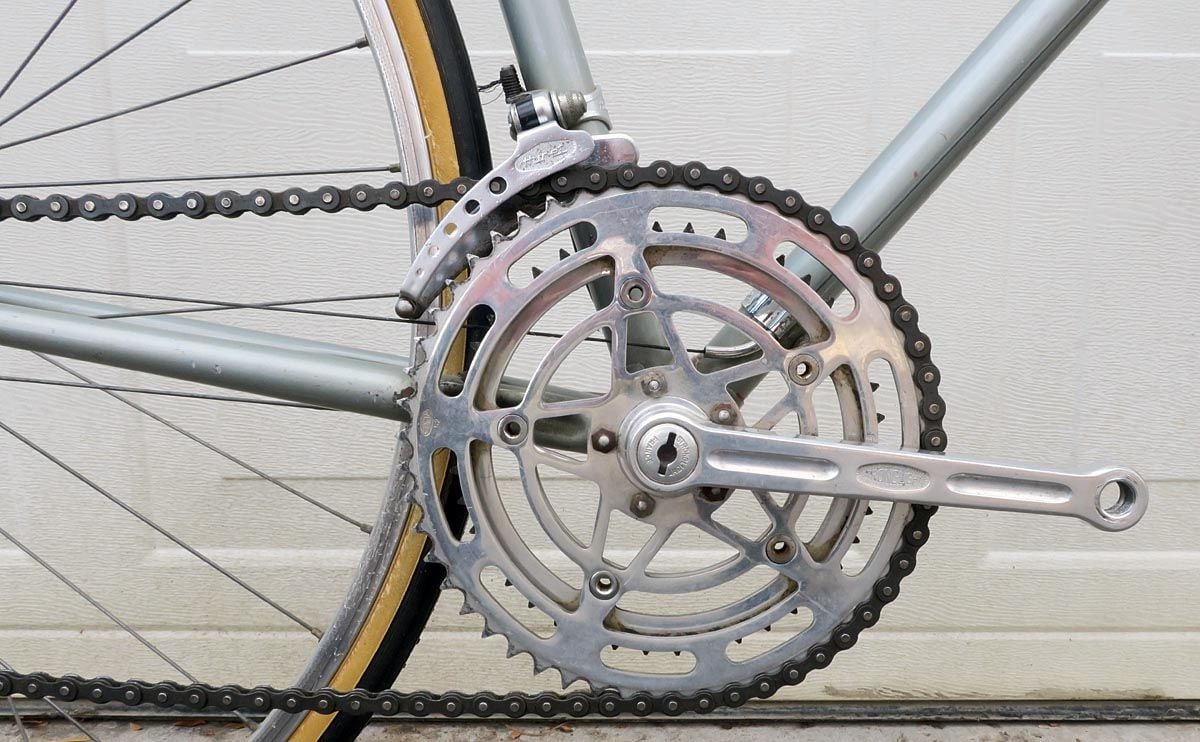
Should I take it apart and grease it all up or have I got something set up incorrectly? Here's a view of what it looks like up to now.
Riding with the chain on the small ring, I rode up and down the street testing out the gears and the bike felt good. Still some tweaking to do but not bad considering it's a new freewheel with a well used chain and both need cleaning and greasing.
Initially I had the brakes unengaged and riding back into my driveway I had to bail out into the lawn to slow down because it was rolling along so nicely!
Now there's still a problem with the front derailleur for some reason. I did flip the shift levers around to face the proper way but the cable will not pull enough to move the derailleur and chain over. I did spray some lubricant in the front derailleur to see if it needed to be loosened up a bit.
Should I take it apart and grease it all up or have I got something set up incorrectly? Here's a view of what it looks like up to now.
Riding with the chain on the small ring, I rode up and down the street testing out the gears and the bike felt good. Still some tweaking to do but not bad considering it's a new freewheel with a well used chain and both need cleaning and greasing.
Initially I had the brakes unengaged and riding back into my driveway I had to bail out into the lawn to slow down because it was rolling along so nicely!
04-02-21, 07:12 PM
#13
Senior Member
Join Date: Nov 2019
Location: SF Bay Area
Posts: 503
Bikes: Raleigh Super Course, Raleigh International, Raleigh Gran Sport
Mentioned: 10 Post(s)
Tagged: 0 Thread(s)
Quoted: 251 Post(s)
Liked 317 Times
in
198 Posts
Are you using the shift cables with the "lollipop" ends that are appropriate for those levers? See the illustration in @juvela 's post #9 - part #1990, left side. They are harder to find these days. If you are using the more common "bullet" ends you may have to file those to get them narrow enough that they don't cause the lever to bind.
04-02-21, 08:55 PM
#14
Senior Member
Thread Starter
Join Date: May 2020
Location: Great White North
Posts: 1,226
Bikes: 2013 Cannondale Caad 8, 2010 Opus Fidelio, 1985 Peugeot UO14, 1999 Peugeot Dune, Sakai Select, L'Avantage, 1971 Gitane Apache Standard, 1999 Specialized Hard Rock
Mentioned: 10 Post(s)
Tagged: 0 Thread(s)
Quoted: 548 Post(s)
Liked 473 Times
in
302 Posts
Are you using the shift cables with the "lollipop" ends that are appropriate for those levers? See the illustration in @juvela 's post #9 - part #1990, left side. They are harder to find these days. If you are using the more common "bullet" ends you may have to file those to get them narrow enough that they don't cause the lever to bind.
04-03-21, 05:40 AM
#15
Senior Member
Join Date: Jan 2007
Location: Ontario
Posts: 2,648
Mentioned: 16 Post(s)
Tagged: 0 Thread(s)
Quoted: 478 Post(s)
Liked 634 Times
in
336 Posts
From what I can see you have the front hooked up correctly, but to my eye it seems you don�t have a lot of space for the arm to move.
You should be able to operate the front by hand with no cable at all (though can be quite hard). Trying this will determine if it�s a lever problem (becoming highly unlikely with all that you have done) or an FD issue. Also make sure for the purposes of testing you back off the limit screws to give you the most movement. Finally, check that you don�t use too much travel simply taking up slack in the cable - when you move the lever you should see movement at the FD within the first few degrees of lever travel.
You should be able to operate the front by hand with no cable at all (though can be quite hard). Trying this will determine if it�s a lever problem (becoming highly unlikely with all that you have done) or an FD issue. Also make sure for the purposes of testing you back off the limit screws to give you the most movement. Finally, check that you don�t use too much travel simply taking up slack in the cable - when you move the lever you should see movement at the FD within the first few degrees of lever travel.
Likes For markk900:
04-06-21, 12:54 PM
#16
Senior Member
Thread Starter
Join Date: May 2020
Location: Great White North
Posts: 1,226
Bikes: 2013 Cannondale Caad 8, 2010 Opus Fidelio, 1985 Peugeot UO14, 1999 Peugeot Dune, Sakai Select, L'Avantage, 1971 Gitane Apache Standard, 1999 Specialized Hard Rock
Mentioned: 10 Post(s)
Tagged: 0 Thread(s)
Quoted: 548 Post(s)
Liked 473 Times
in
302 Posts
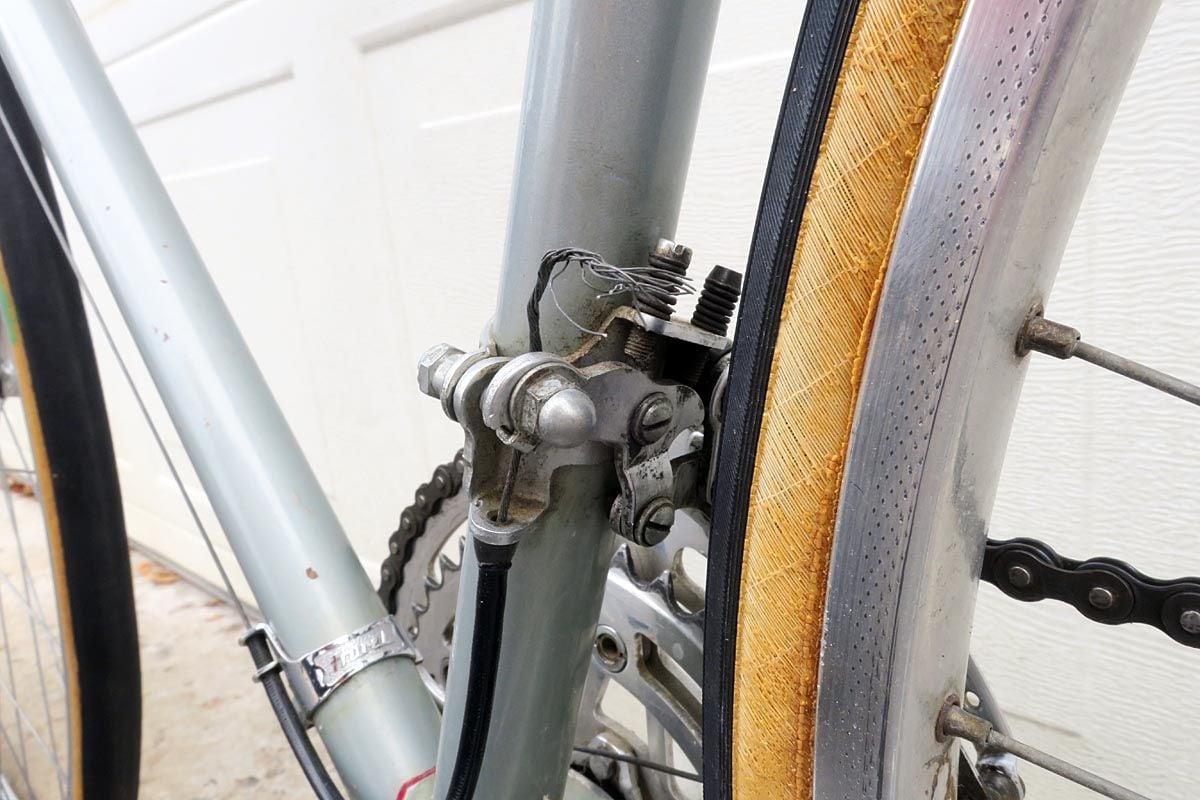
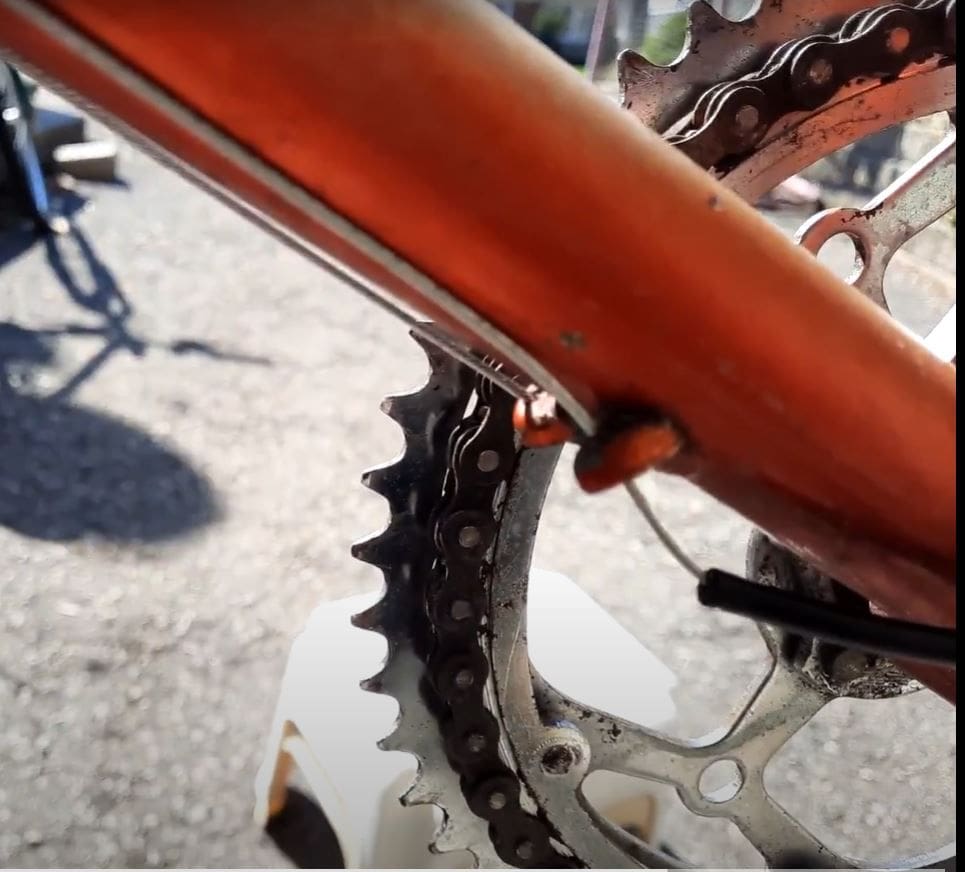
was playing around with it on the weekend and here's what I see. When I move the FD lever from the down position (pointing towards the back) and then push it upwards it is pulling the cable through the derailleur (not secured to the FD) but then when I shift it back, pushing the cable back through it snags and won't feed through the casing, hence not moving the cable. See the image below and tell if you think that cable eyelet looks bent and and is maybe catching the cable and preventing it from moving?
04-11-21, 04:49 PM
#18
Senior Member
Join Date: Jun 2014
Location: Ontario, Canada
Posts: 4,624
Bikes: iele Latina, Miele Suprema, Miele Uno LS, Miele Miele Beta, MMTB, Bianchi Model Unknown, Fiori Venezia, Fiori Napoli, VeloSport Adamas AX
Mentioned: 16 Post(s)
Tagged: 0 Thread(s)
Quoted: 1324 Post(s)
Liked 927 Times
in
640 Posts
Very lightly tap that cable stop so that it becomes 90 degrees to the downtube.
When the cable is on t he front derailleur is it staying in place on the front derailleur?
If you disconnect the cable can you freely move the front derailleur cage to the big chainring and back again?
Good luck and cheers
When the cable is on t he front derailleur is it staying in place on the front derailleur?
If you disconnect the cable can you freely move the front derailleur cage to the big chainring and back again?
Good luck and cheers
Likes For Miele Man:
04-11-21, 06:01 PM
#19

Senior Member
Join Date: Jun 2006
Posts: 20,305
Mentioned: 130 Post(s)
Tagged: 0 Thread(s)
Quoted: 3464 Post(s)
Liked 2,831 Times
in
1,997 Posts
Huret derailleurs of this era in general did not use cable casing end caps. Do cut the cable housing nice and square, debur, (grind if you can) use an awl to confirm the cable passes through freely.
On the front unit, I have a hunch that the cable is pulling through the anchor bolt.
While the rear housing (casing) is too long, the front could sweep a bit longer, so the loop almost touches the top of the bottom bracket shell.
I would take the cable off the front mech and work the mechanism by hand. oil the pivots, these are notorious for rusting up, often redeemable but shuld be worked to confirm movement, yes, it should have some resistance, but that of the return spring. Make sure the limit screws are adjusted so that the cage can center over the inner and outer chainring. That is subject to further adjustment, but what I am writing about is to make sure you are not hopelessly tugging against the limit screws. Pro tip, but you are in deep now, back out the screws three turns and oil then work the mechanism by hand, that way the travel of the arms will be confirmed to be limber enough. If the limit screws cannot be made to be in contact, you are going to need removal and an evaporust dip. The rinse and oil.
Same might go for the rear mech. These units do not like to "rest" in one position for a long time.
All that written, my top thought is the movement limit screws are set too close right now. Do not attempt to take either the front or rear mechanism fully apart. It looks like it can be done... emphasis on "LOOKS"
Likes For repechage:
04-17-21, 11:35 AM
#20
Senior Member
Thread Starter
Join Date: May 2020
Location: Great White North
Posts: 1,226
Bikes: 2013 Cannondale Caad 8, 2010 Opus Fidelio, 1985 Peugeot UO14, 1999 Peugeot Dune, Sakai Select, L'Avantage, 1971 Gitane Apache Standard, 1999 Specialized Hard Rock
Mentioned: 10 Post(s)
Tagged: 0 Thread(s)
Quoted: 548 Post(s)
Liked 473 Times
in
302 Posts
I gave in and took it to the LB and they fixed it in like 5 minutes Now I just need to finish off the brakes, trim up the cables and it will be done for now. Thanks for all your help guys!
Now I just need to finish off the brakes, trim up the cables and it will be done for now. Thanks for all your help guys!
04-17-21, 05:54 PM
#22
Senior Member
Note original cable housing on my Gitane.
 04-18-21, 07:45 AM
#23
Senior Member
Thread Starter
Join Date: May 2020
Location: Great White North
Posts: 1,226
Bikes: 2013 Cannondale Caad 8, 2010 Opus Fidelio, 1985 Peugeot UO14, 1999 Peugeot Dune, Sakai Select, L'Avantage, 1971 Gitane Apache Standard, 1999 Specialized Hard Rock
Mentioned: 10 Post(s)
Tagged: 0 Thread(s)
Quoted: 548 Post(s)
Liked 473 Times
in
302 Posts
gthomson Not fair - what did they do?
Likes For gthomson:
04-18-21, 07:45 AM
#24
Senior Member
Thread Starter
Join Date: May 2020
Location: Great White North
Posts: 1,226
Bikes: 2013 Cannondale Caad 8, 2010 Opus Fidelio, 1985 Peugeot UO14, 1999 Peugeot Dune, Sakai Select, L'Avantage, 1971 Gitane Apache Standard, 1999 Specialized Hard Rock
Mentioned: 10 Post(s)
Tagged: 0 Thread(s)
Quoted: 548 Post(s)
Liked 473 Times
in
302 Posts


