


Getting harder to fold into place. Danger or no?

 01-11-24, 10:53 AM
#27

55+ Club,...

Join Date: Aug 2012
Location: Somewhere in New York, NY
Posts: 4,363
Bikes: 9+,...
Mentioned: 11 Post(s)
Tagged: 0 Thread(s)
Quoted: 1136 Post(s)
Liked 869 Times
in
609 Posts
I just found a new home for the Dahon today, so it's no longer available. A tree fell on my house, so I'm giving it to one of the contractors. People act like I'm trying to scam someone... Oh well. 
__________________
If it wasn't for you meddling kids,...
 01-12-24, 05:57 AM
#29
Senior Member
Got an email back from Dahon and they put it bluntly that "they do not sell the pin components" and "the frame needs to be replaced". Not to get too ranty on here, but way too many people seem to be putting liability and injuries at the front of things as opposed to "do it yourself".
Definitely born in the wrong era.
Definitely born in the wrong era.
Absolutely, zero surprise on response from Dahon. I wish Thor was still in business, he might have sold a pin kit, or if not, knows the dimensions. If I ever take that tour, I'll first pull the pin, see if there is a hardened and ground dowel pin at my local industrial screw supply that matches, they have an astonishing amount of hardware, just to have on hand with me in case the pin breaks, sure wouldn't occupy much space or weight. Come to think of it, I'll try to pull the pin from my old cracked Dahon frame that I saved to use as a truing jig, rather than risk my daily rider. Back when I worked in industry, every place I worked at had a full machine shop, and I was cockpit-qualified from working my way through school as a toolmaker, I could make anything I need. Last year of college, had bought my first new bike ever, a road racer, wanted to true the wheels, old spoke wrench I had didn't fit new bike, Sunday, bike shop closed, I just fired up the lathe and mill, half hour later...
 01-12-24, 09:10 AM
#30
55+ Club,...
Join Date: Aug 2012
Location: Somewhere in New York, NY
Posts: 4,363
Bikes: 9+,...
Mentioned: 11 Post(s)
Tagged: 0 Thread(s)
Quoted: 1136 Post(s)
Liked 869 Times
in
609 Posts
Oh, no, I wasn't directing that at you. I'm sorry if I wasn't a clear. Others thought it was a scam, not you. I apologize for the confusion. I did find a new home for it though. My house was damaged by a tree during the storm on Tuesday night/Wednesday morning. I gave it to one of the workers. And I made sure his bosses knew I actually gave it to him. It was one hell of a horrible night.
__________________
If it wasn't for you meddling kids,...
Likes For tds101:
01-13-24, 01:11 AM
#31
Senior Member
(above) Very sorry to hear that. Someone I know had that happen a few years back, was lucky, big tree knocked against side of garage, damaged the roof overhang but the wall held. Still over $20k to repair, insurance covered. They were able to get a crane out there the next day, lift and cut the tree up, tarp and tape the roof until it could be repaired. Be careful: Some time later, the water main to the house broke under the driveway where one of the crane pads was, connection couldn't be conclusively proven, so the owner had to eat that repair cost. Man it was gusty as heck about the same time on the west coast as well, I was worried about the same person.
Good on ya for giving the bike. If any difficulties with them replacing the derailleur, have them reference one of my posts above (if it's a Dahon compact derailleur, I don't know if they even sell those any more, but a conventional style is an upgrade).
Good on ya for giving the bike. If any difficulties with them replacing the derailleur, have them reference one of my posts above (if it's a Dahon compact derailleur, I don't know if they even sell those any more, but a conventional style is an upgrade).
01-14-24, 07:44 PM
#32
55+ Club,...
Join Date: Aug 2012
Location: Somewhere in New York, NY
Posts: 4,363
Bikes: 9+,...
Mentioned: 11 Post(s)
Tagged: 0 Thread(s)
Quoted: 1136 Post(s)
Liked 869 Times
in
609 Posts
(above) Very sorry to hear that. Someone I know had that happen a few years back, was lucky, big tree knocked against side of garage, damaged the roof overhang but the wall held. Still over $20k to repair, insurance covered. They were able to get a crane out there the next day, lift and cut the tree up, tarp and tape the roof until it could be repaired. Be careful: Some time later, the water main to the house broke under the driveway where one of the crane pads was, connection couldn't be conclusively proven, so the owner had to eat that repair cost. Man it was gusty as heck about the same time on the west coast as well, I was worried about the same person.
Good on ya for giving the bike. If any difficulties with them replacing the derailleur, have them reference one of my posts above (if it's a Dahon compact derailleur, I don't know if they even sell those any more, but a conventional style is an upgrade).
Good on ya for giving the bike. If any difficulties with them replacing the derailleur, have them reference one of my posts above (if it's a Dahon compact derailleur, I don't know if they even sell those any more, but a conventional style is an upgrade).
__________________
If it wasn't for you meddling kids,...
01-15-24, 04:06 AM
#33
Senior Member
(above) Yeah the Dahon "compact" derailleurs, were not that compact, they mounted just a skosh higher than a conventional one, they just had a short cage (typical road race length). The flaw, in my opinion, is that they mounted far enough forward that the jockey pulley was far enough away from the sprocket that any lateral compliance in the chain caused poor shifting, either delayed shifting, and/or overshoot onto the next cog or into the spokes. A pulley directly under the sprocket and close to it, works better. The following is from the Sheldon Brown website, talking about a wide range derailleur on a closer-geared cluster (not ideal), so greater vertical distance gap instead of horizontal like the Dahon compact, but I think the same logic applies:
"A wide-range rear d�railleur will work with medium-range or even close-range gearing, but it will not shift nearly as well as the appropriate type. The main reason for this is that the jockey pulley (the upper one) is too far away from the freewheel sprockets. This means that the chain angle created by shifting your d�railleur is less pronounced. It is this angle that makes the chain move from one sprocket to another.
If the jockey pulley is too far from the freewheel sprocket, you have to shift your d�railleur farther to create an angle sharp enough to make the chain climb out of its comfortable bed. When it finally does, the chain probably will overshoot and shift two gears when you only meant to shift one. This is because the d�railleur cage has moved farther than the normal 5.5- to 6-millimeter distance from one sprocket plane to the next. Once the chain is derailed, it is just as easy for it to jump two gears as one."
Last edited by Duragrouch; 01-15-24 at 04:10 AM.
01-15-24, 11:40 AM
#34
Junior Member

Unsuitable hinge pin
I have a Speed frame, but never pulled the pin yet. Yes, at minimum, the pin is bent or the holes it fits in are enlarged.
Frame fix: Obviously, #1 is removing the pin and replacing with a new one. After that, one of two things will greatly improve frame strength, and reduce bending loads on the hinge.
#2: "We don't need no stinking Deltech": Obtain a piece of kevlar braided line (strong as steel, very low stretch), 1/8" diameter by about 6' long (5' should be enough, but just in case).
I had already removed the old pin and replaced it with a temporary one before taking this shot.
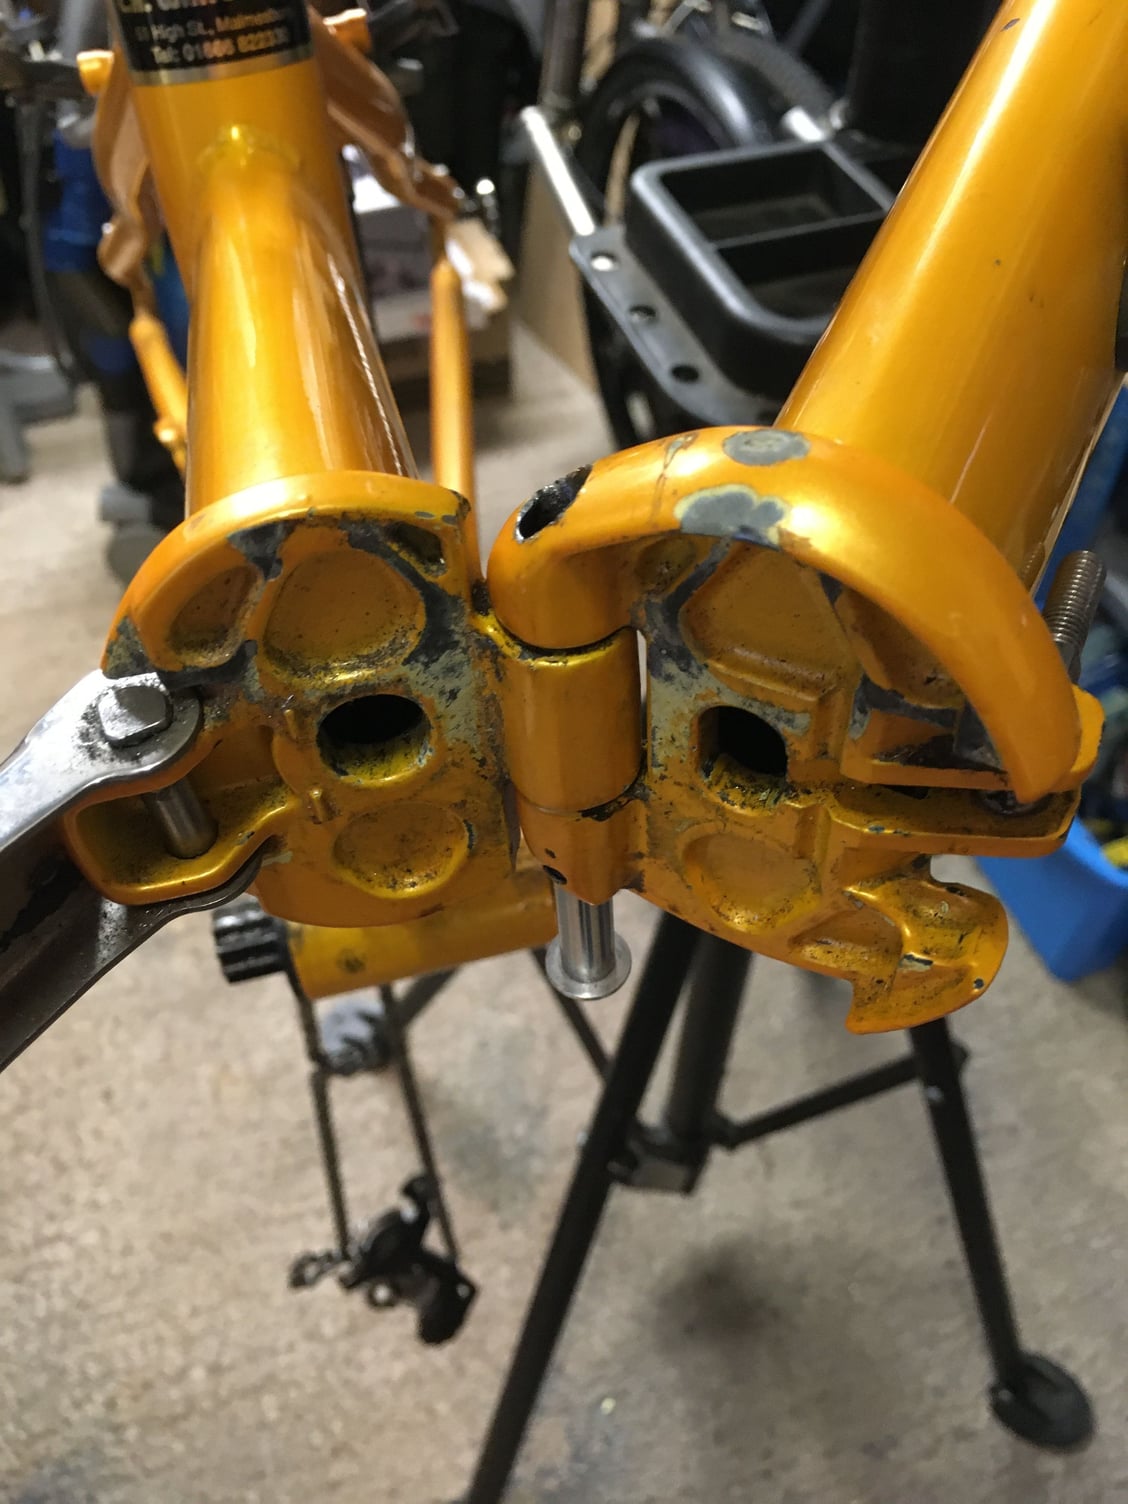
I was keen to try and pull the pin out from the bottom because the paintwork is still in excellent condition and I wanted to preserve the finish as much as possible. I attempted to drill and tap an M6 hole into the bottom of the pin but was unable to drill deep enough despite using a brand new tungsten carbide tipped drill. I guess I may have hit a super hard section of the pin or the cutting edges of the drill had blunted too quickly.
So plan B was to drill down from the top to expose the top of the pin and then make a press tool to drive it out from top to bottom.
I started by using a mini drill (e.g. Dremel) fitted with a tungsten carbide rotary burr with a flat end to create a flat area on the top of the hinge plate above the centre of the pin. After that I had to eyeball the centre position of the pin on the flatted area (tricky!) and centre punch the location for the drill point. Knowing my punch mark was likely off centre of the pin below I started with a 5mm carbide tipped drill in an attempt to avoid cutting into the parent material around the 8mm diameter pin.
I drilled down about 8mm, which with hindsight was unnecessarily deep, 4 or 5mm would have been enough. (Difficult to be sure, but I think the top of the hinge pin was about 10mm above the upper joint in the hinge). At this point I could clearly see this hole was not concentric with the pin and switched back to using a 6mm diameter rotary burr in the mini drill to simultaneously enlarge and re-centre the hole. I was still eyeballing the centre position at this point, and hoping I wouldn’t cut into parent material. The final hole was inevitably larger than 6mm diameter and later I found I had cut into the parent material on one side – see pic of removed pin at the end of this post.
This is the ‘quick and dirty’ press tool I made. I used mild steel square bar and a short piece of angle section and a M8 high tensile bolt with the end ground down to 6mm diameter.
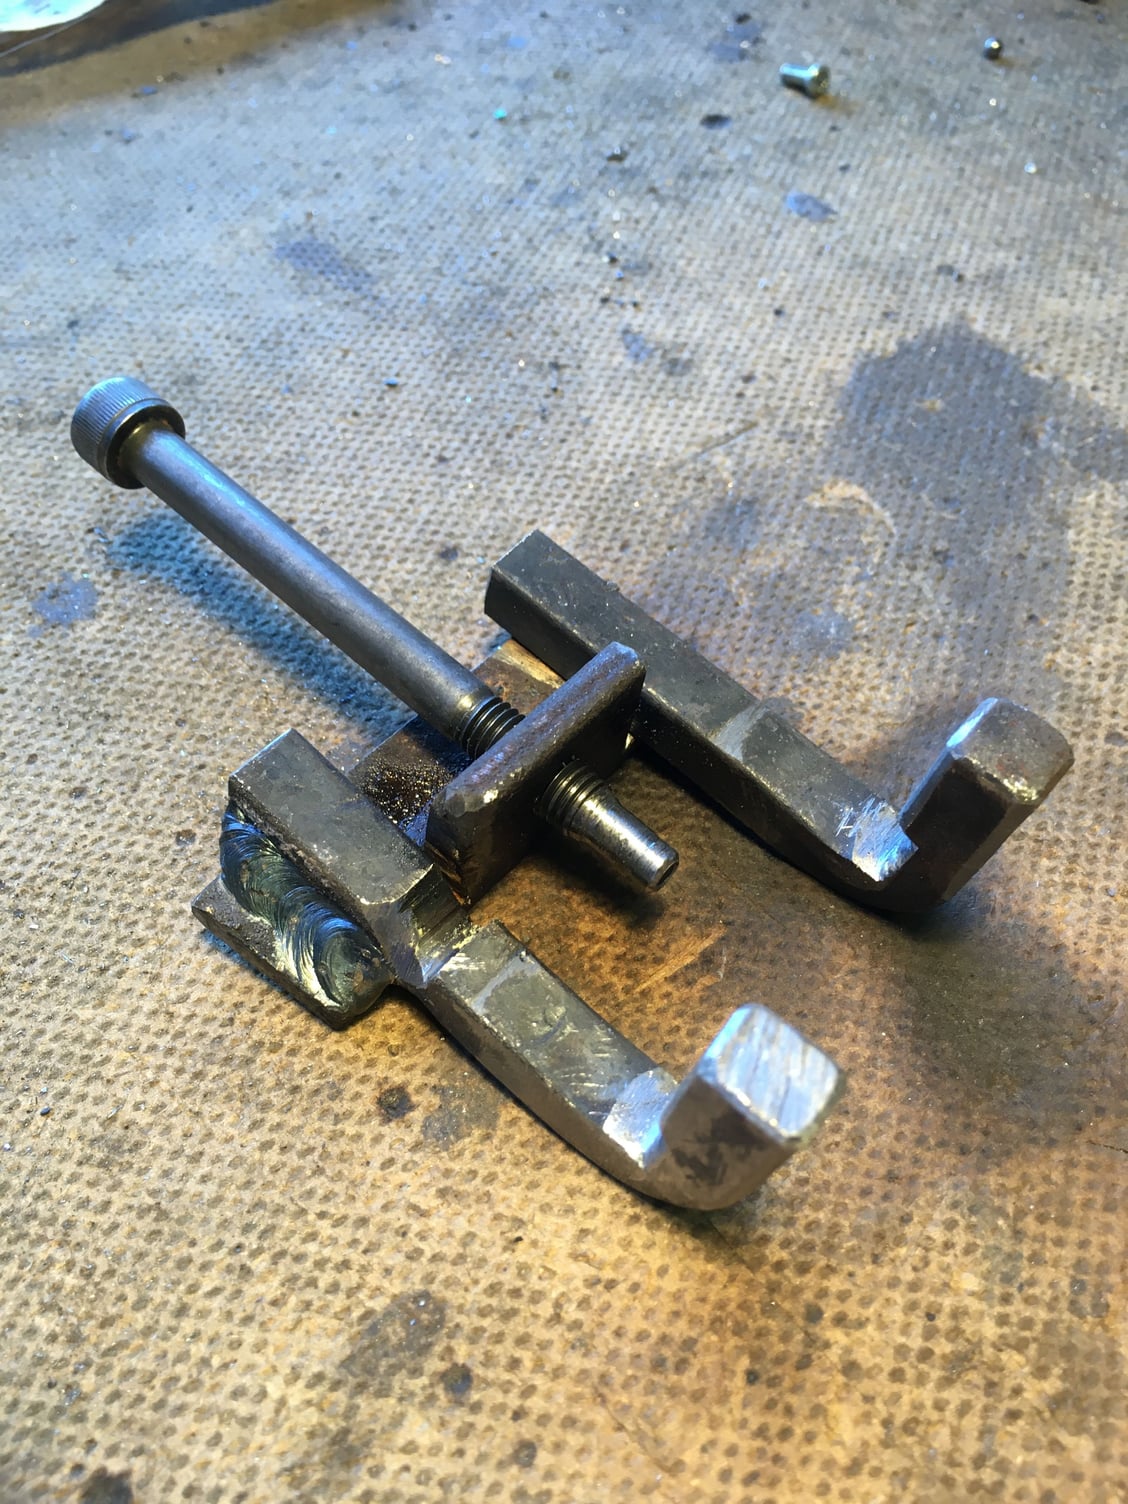
One leg is notched to accommodate the protruding hood at the top of the front hinge plate.
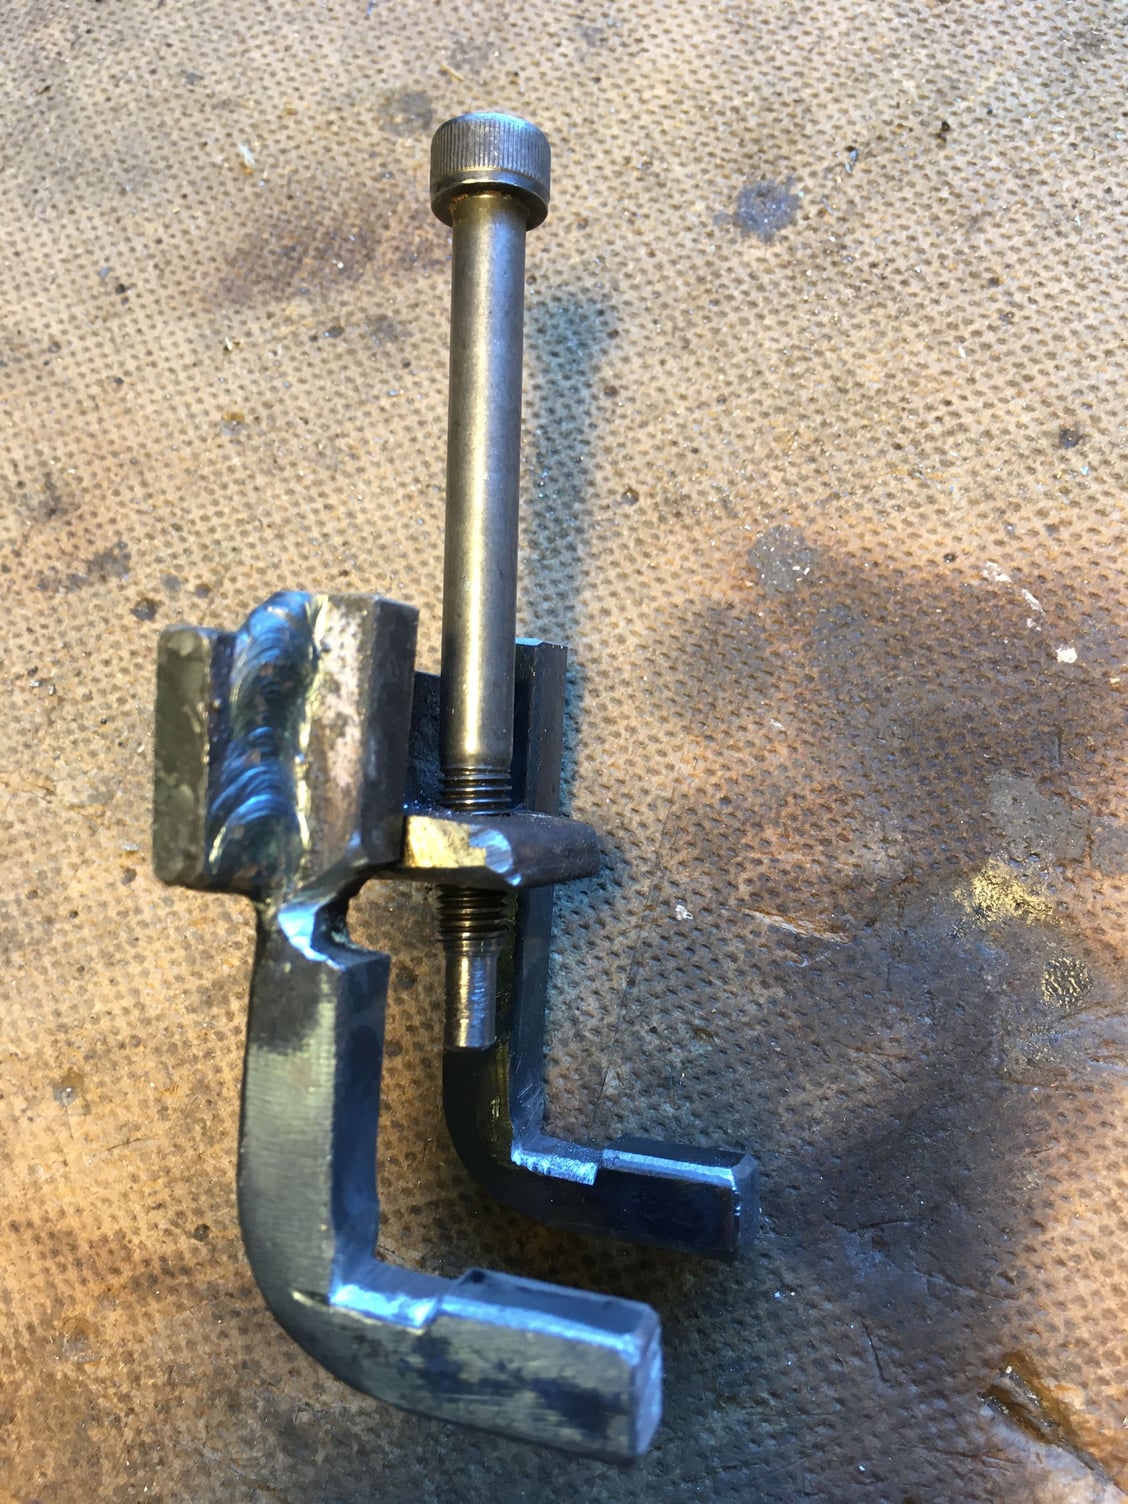
The “feet” locate in the centre holes of the hinge plates.
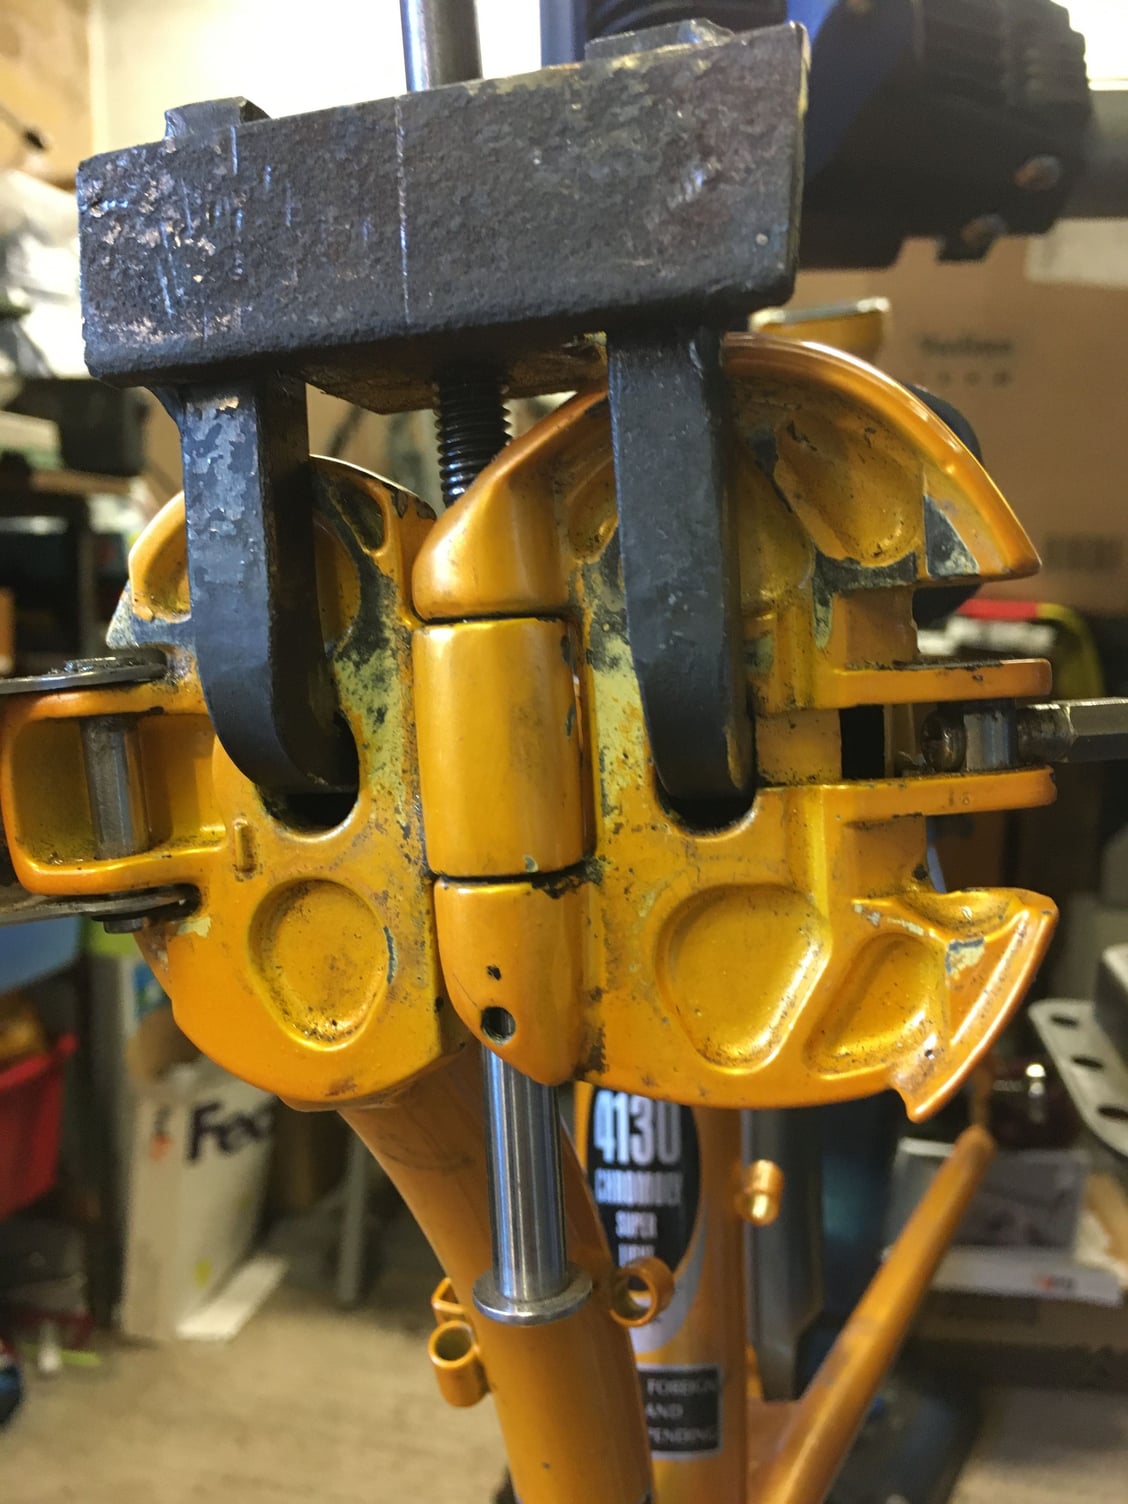
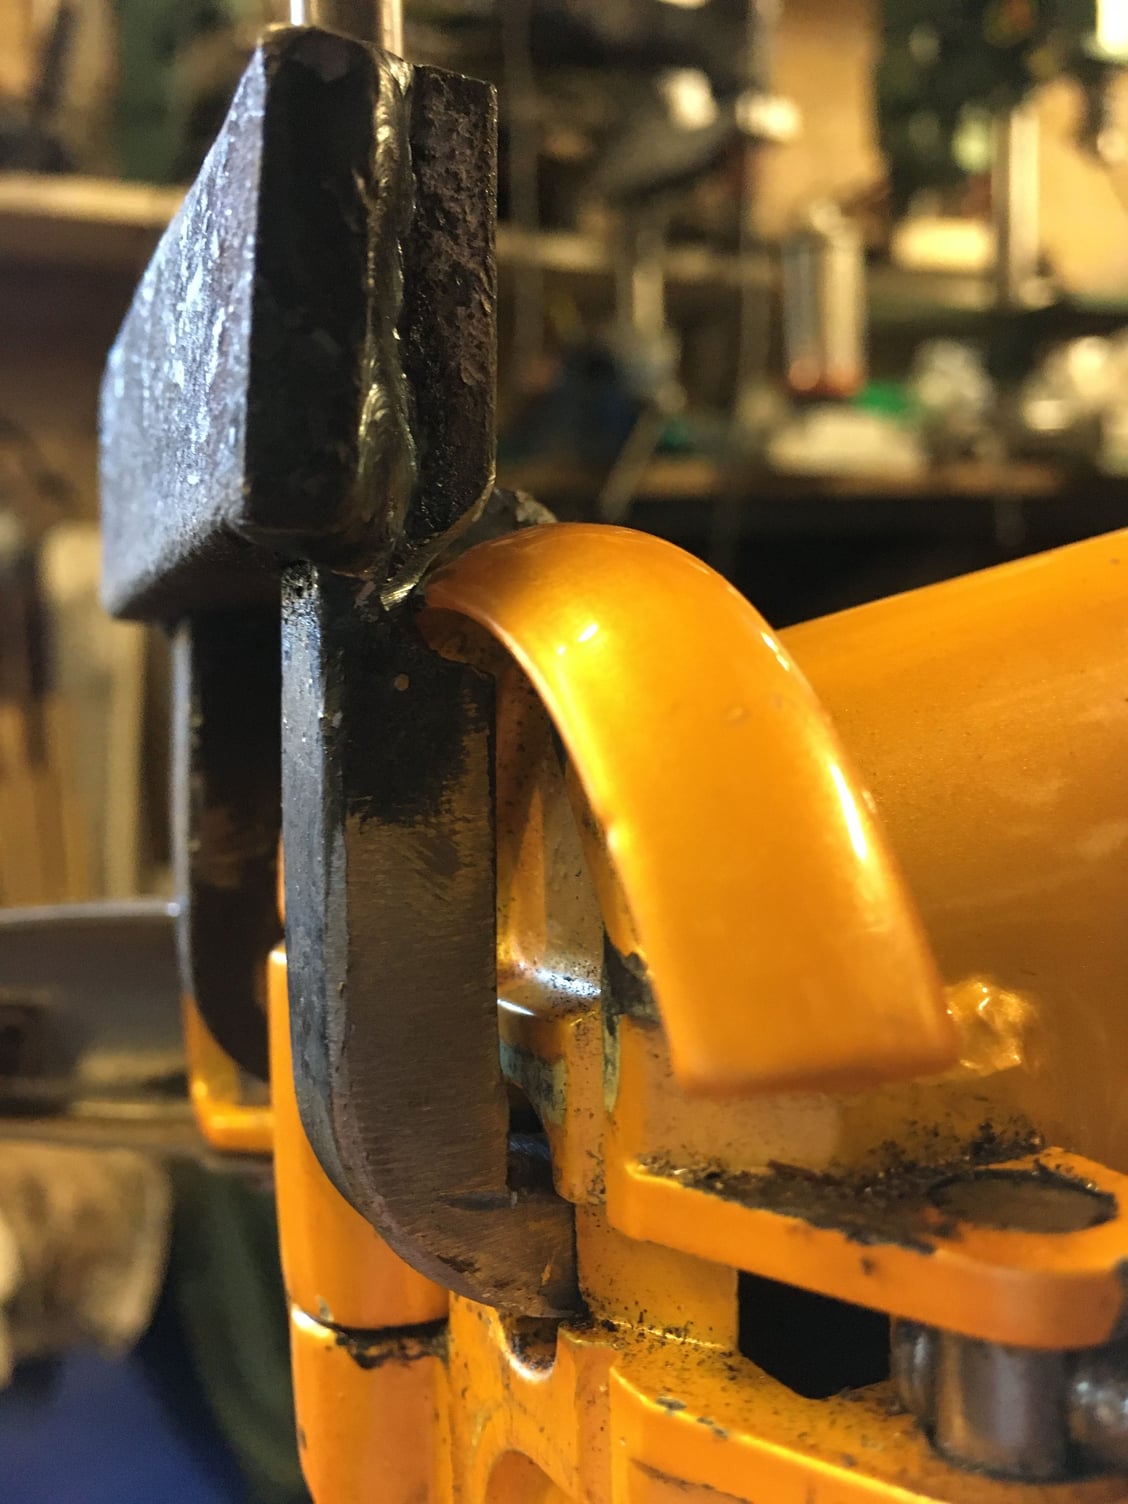
When using the tool the pressure from the screw on the pin caused the legs to bend, but shortly after that the pin yielded to the pressure and I was able to progressively jack the pin out by dropping ball bearings down the hole each time I ran out of travel on the screw thread of the press bolt.
The obvious improvement to my press would be to make the notched leg thicker behind the notched area to resist bending especially if the pin shows signs of being corroded. I was too in too much of a hurry (or too lazy) to make that amendment on this occasion.
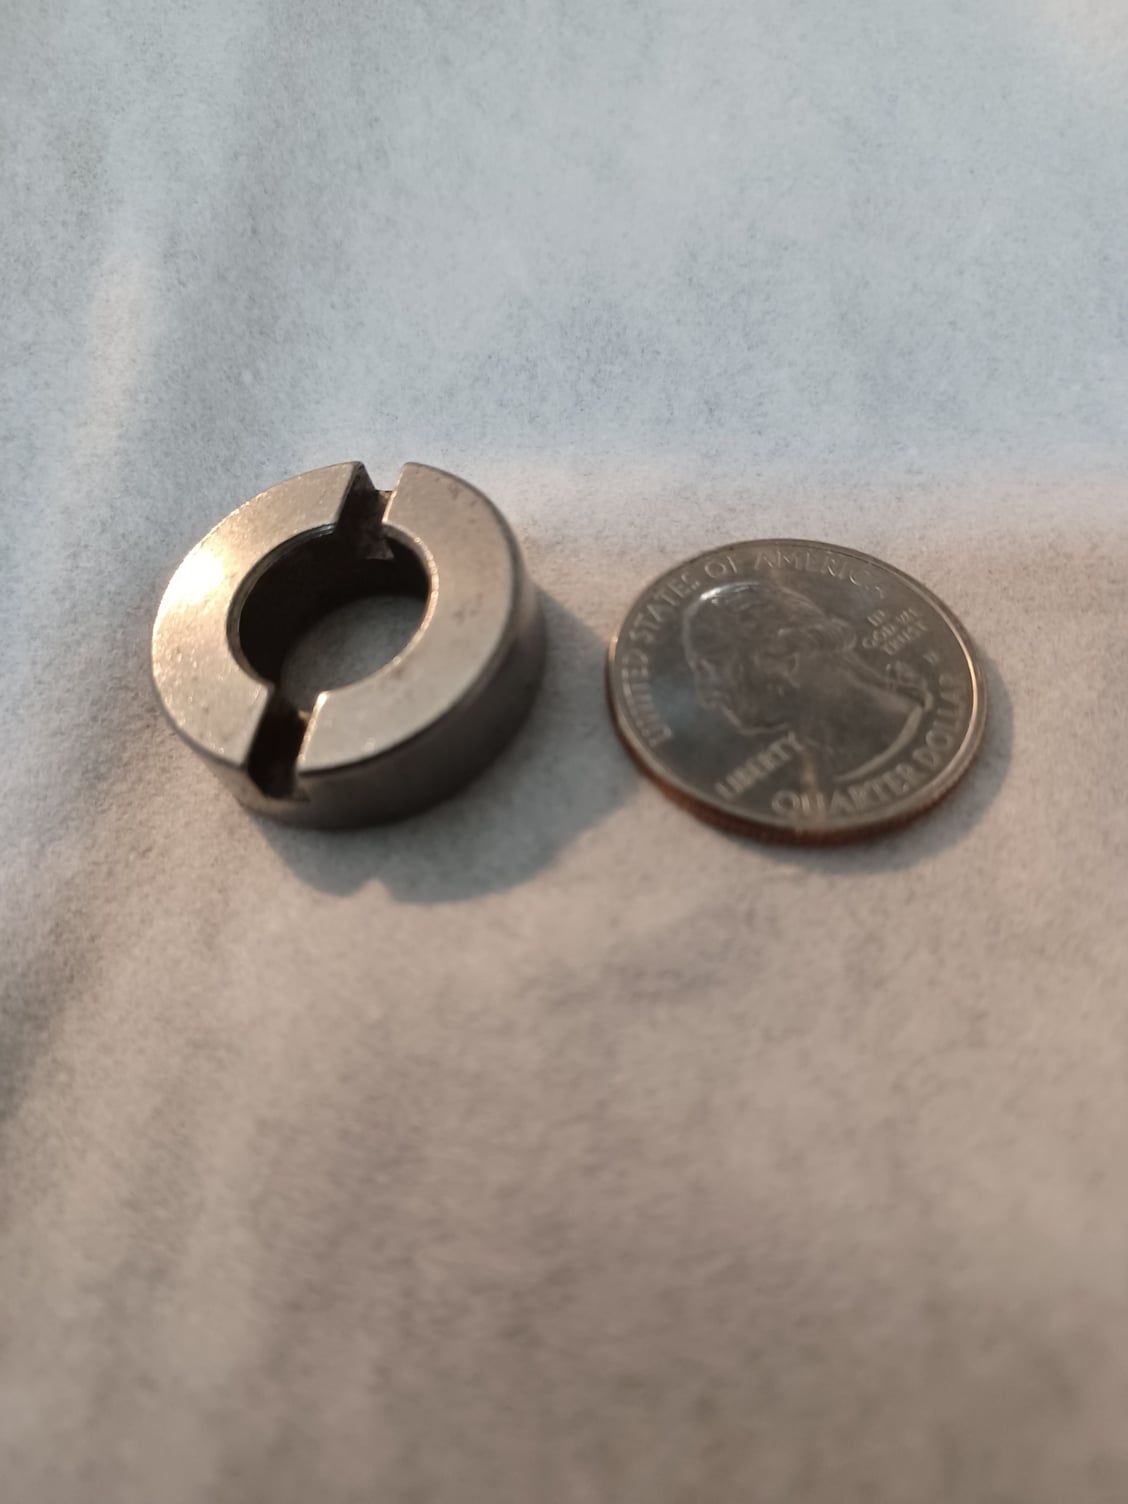
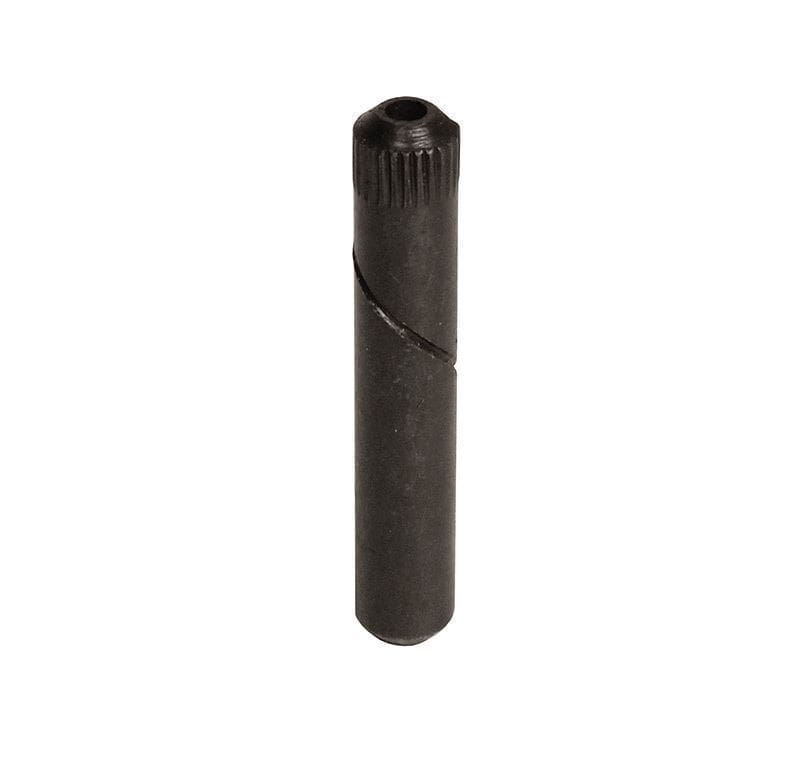
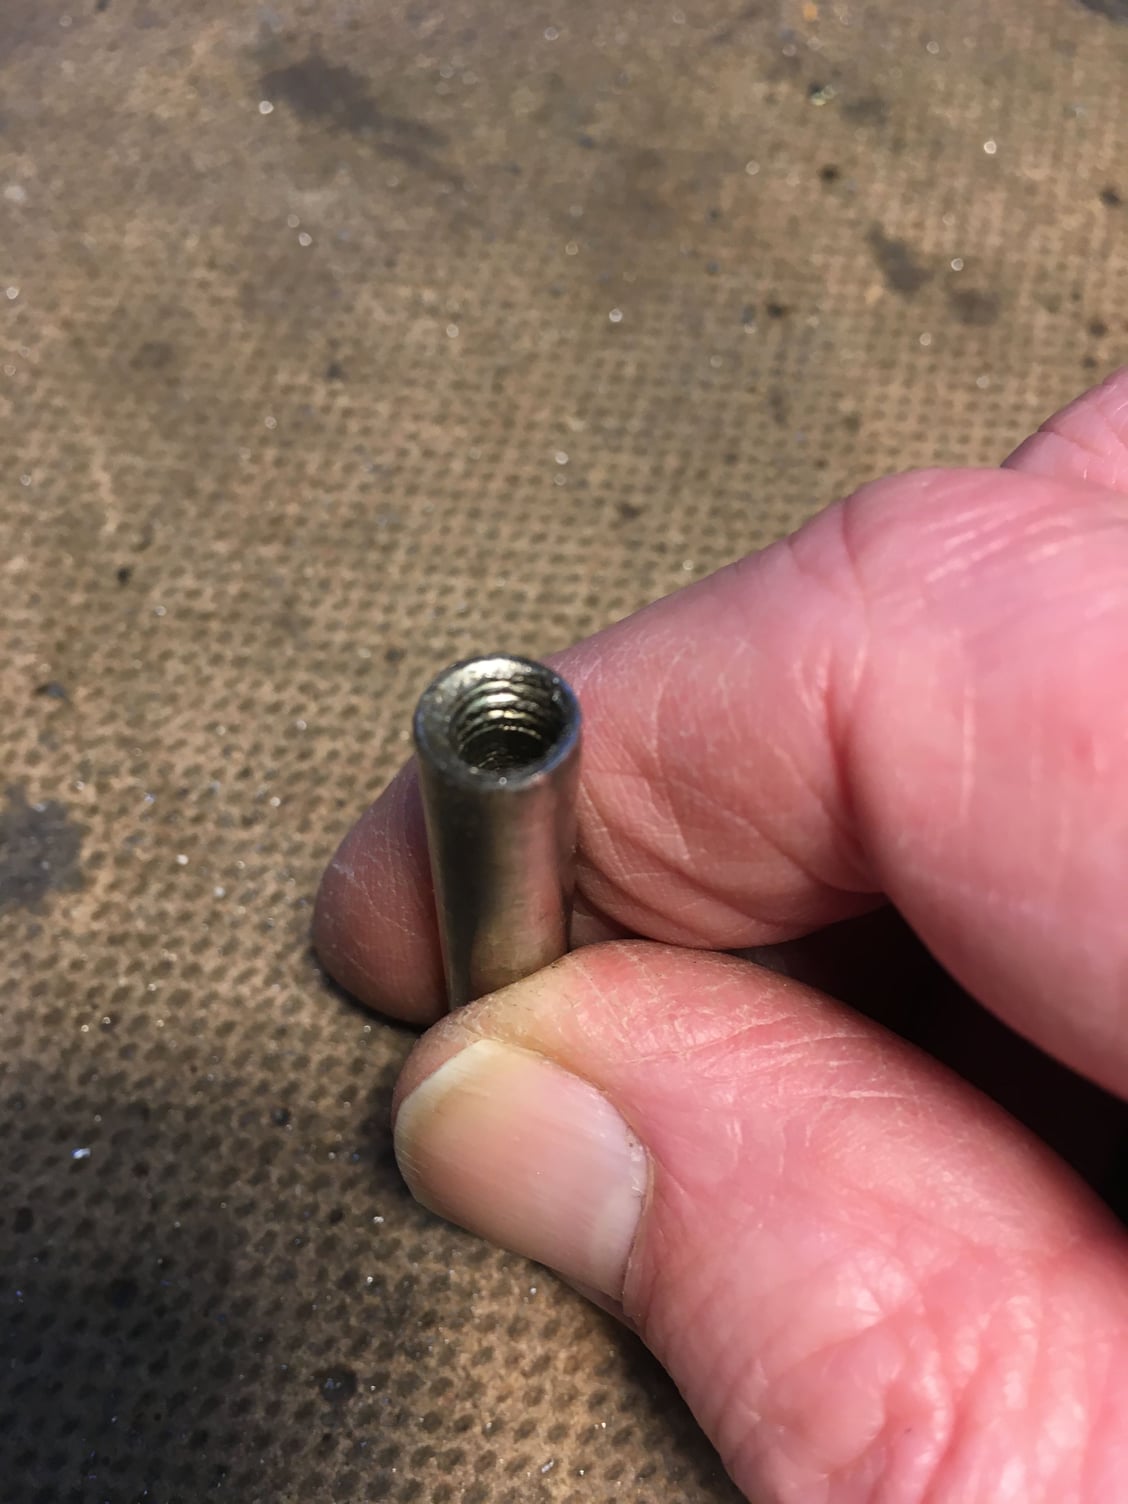
I’ve identified an oversize (8.1mm diameter) Volkswagen door hinge pin to replace the original pin with. The image shows a spiral lubrication groove cut into the surface of the pin. Seems like a good idea. I’m waiting for delivery of an 8.1mm dia reamer to finish the job.Edit: DO NOT USE this pin. It is not hardened and does not have a ground surface finish. See my update post #39 below.
As you can see from the old pin below, I failed to prevent the 6mm burr from cutting into the parent metal on one side. I’m optimistic that the splines on the head of the new pin will still bite into the now oversize hole in the top of the hinge.
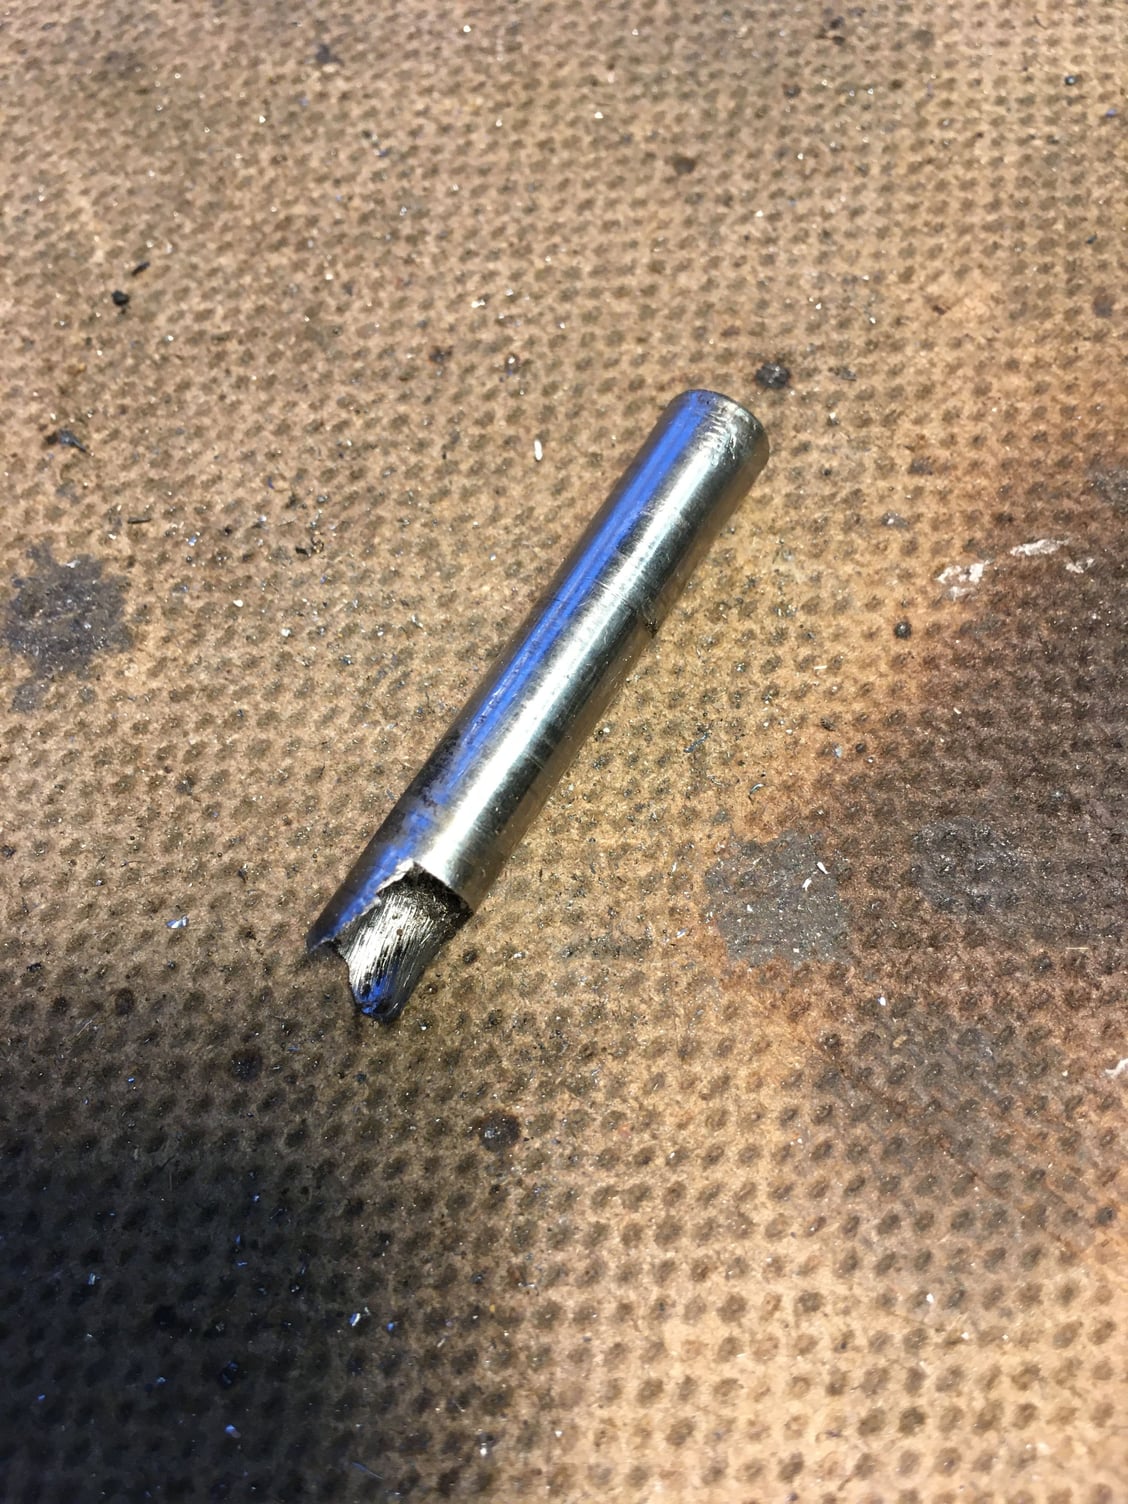
Below is the aborted tapped hole in the bottom of the old pin. Note that despite my best efforts the tapping drill wandered off centre too.
The cost for the rotary burrs, the reamer and the new pin will be 65 GBP but it’s definitely worth the spend in this case as the bike is in such good condition.
I plan try the DIY Deltech idea suggested above to give the new pin some support and prolong its useful life. I've was very disappointed how quickly play developed in the hinge so I'm hoping to get a lot more miles out of it this time.
Hope someone finds this helpful.
Last edited by Jonesandrew; 05-23-24 at 04:31 AM. Reason: CORRECTION
Likes For Jonesandrew:
01-15-24, 01:53 PM
#35
55+ Club,...
Join Date: Aug 2012
Location: Somewhere in New York, NY
Posts: 4,363
Bikes: 9+,...
Mentioned: 11 Post(s)
Tagged: 0 Thread(s)
Quoted: 1136 Post(s)
Liked 869 Times
in
609 Posts
See if replacing the pin and acquiring a deltec cable are options. Dahon makes it quite difficult nowadays to obtain replacement or upgrade parts. Here's the official link to the deltec cable on their website, but I didn't find a way to order it.
https://eu.dahon.com/gears/deltech/
https://eu.dahon.com/gears/deltech/
__________________
If it wasn't for you meddling kids,...
01-15-24, 07:53 PM
#36
Full Member
Good luck!
I have the same frame in aluminum (Vitesse), and it's almost like new, has no play, after 11 years of almost daily riding through NYC pot holes. (Not folded daily; knock on wood!)
I have the same frame in aluminum (Vitesse), and it's almost like new, has no play, after 11 years of almost daily riding through NYC pot holes. (Not folded daily; knock on wood!)
01-15-24, 11:14 PM
#37
Senior Member
See if replacing the pin and acquiring a deltec cable are options. Dahon makes it quite difficult nowadays to obtain replacement or upgrade parts. Here's the official link to the deltec cable on their website, but I didn't find a way to order it.
https://eu.dahon.com/gears/deltech/
https://eu.dahon.com/gears/deltech/
"Hello, and thanks for contacting Dahon Bicycles. USA availability on the Deltech is currently Summer 2024. Best Regards, Dahon"
I personally think the add-on Deltech may be superior to the OEM one, as the OEM welded tabs the cable attaches to, are small and I think may fatigue (crack) over time. The add-on envelops the bottom bracket tube and head tube, which to me, looks structually superior, assuming no collapse of either tube due to clamp loads, no fretting wear, etc.
Likes For Duragrouch:
01-15-24, 11:22 PM
#38
Senior Member
Jonesandrew,
Damned impressive tenacity and improvisation on your repair!
If I had to design this all from scratch, I would design it with a hard and replaceable pin, and it riding on replaceable hard bronze or stainless steel bushings. But this sort of thing is rarely designed for "maintainability", a big mantra in design for the military. I don't like the idea of an expensive folder for only occasional use and with a limited lifespan. The newish Dahon Launch appears to take pressure off the hinge pin and onto the locking jaws, the pin (I think) existing only to hold the two parts together when folded. I'll be curious to see the durability of the locking jaws, which are aluminum, same as the frame. Curiously, the Launch seems to be selling poorly compared to the Mariner, in fact recently, the Launch was discounted just below Mariner pricing; I don't know why, the Launch has discs, and perhaps a better folding joint. The Mariner comes with a rack and fenders that the Launch does not, and it's a more well-known name, points made to me by a local Dahon dealer. I can add a rack and fenders, I can't add disc brakes.
The whole steel vs aluminum debate is still open with me. All Dahon models in the upper range are now aluminum (and I hope the hinge has bushings, because even high-strength aluminum, does not approach the hardness of steel; my guess is no bushings, does anyone know?). I don't think there is much difference at all in ride, not on this style frame. Quality (chrome-moly) steel used to be king for ride quality (frame can have more flex, whereas on aluminum, too much flex drastically reduces fatigue life), but also expeditions overseas, as the frame could be welded competently nearly anywhere, however I don't know how much aluminum welding has expanded in the third world (my guess is, probably a lot), and any differences in weld repair durability between the two materials (heat affected zone in the welded parts, as well as strength of the weld filler material).
Last edited by Duragrouch; 01-15-24 at 11:44 PM.
05-23-24, 04:24 AM
#39
Junior Member
Correction to post #34
I need to make a correction to my post no. 34 above: https://www.bikeforums.net/23130002-post34.html
The Volkswagen hinge pin is not suitable for a folding bike hinge. It isn’t hardened and it doesn’t have a ground surface finish.
I also want to warn about the risk of buying low cost unbranded hand reamers for this kind of precision work. The one I bought at 8.1mm diameter generated a hole a couple of hundredths larger than it should and meant the assembled hinge still had unwanted play when it was tightly closed. When checking the reamer more carefully I found that the cutting edges of the flutes were not ground straight. There was a slight bulge in the diameter about 20mm from the tip which caused it to cut an oversize hole.
Not to be defeated, I discovered that precision made pin gauges (U.S. = gage pin) which are normally available in very expensive sets for use in metrology labs are also available individually:
https://www.cutwel.co.uk/catalogsear...%20pin%20gauge
These pin gauges are made from alloy steel and have a hardened, ground and polished surface finish. They are eminently suitable as a folding bike hinge pin and I bought one 50mm long at 8.2mm diameter.
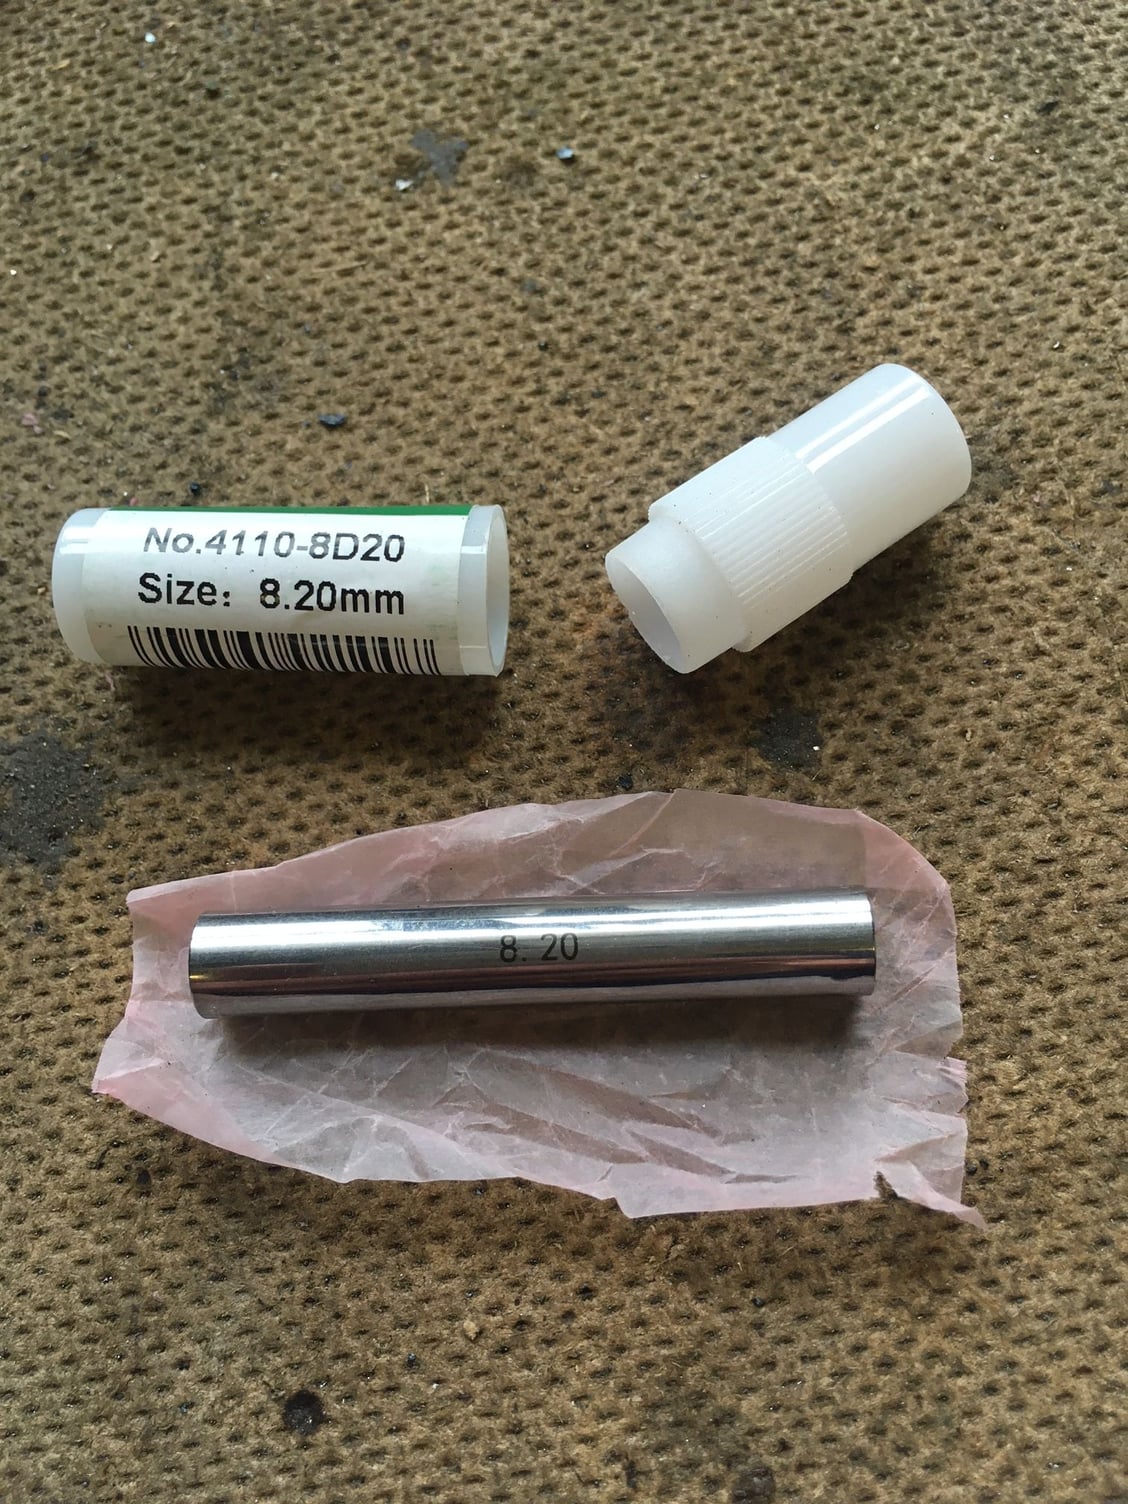
Gauge pin
I didn’t purchase another reamer to prepare the holes. Instead I ground one end flat in order to generate a sharp edge around the circumference. Then I pressed the pin right through the holes so that excess material was cut away by the sharp edge (“broached”) as I did so. This method generated the perfect fit for the pin when fully assembled.
I’m now satisfied that the hinge is in a fully serviceable condition.
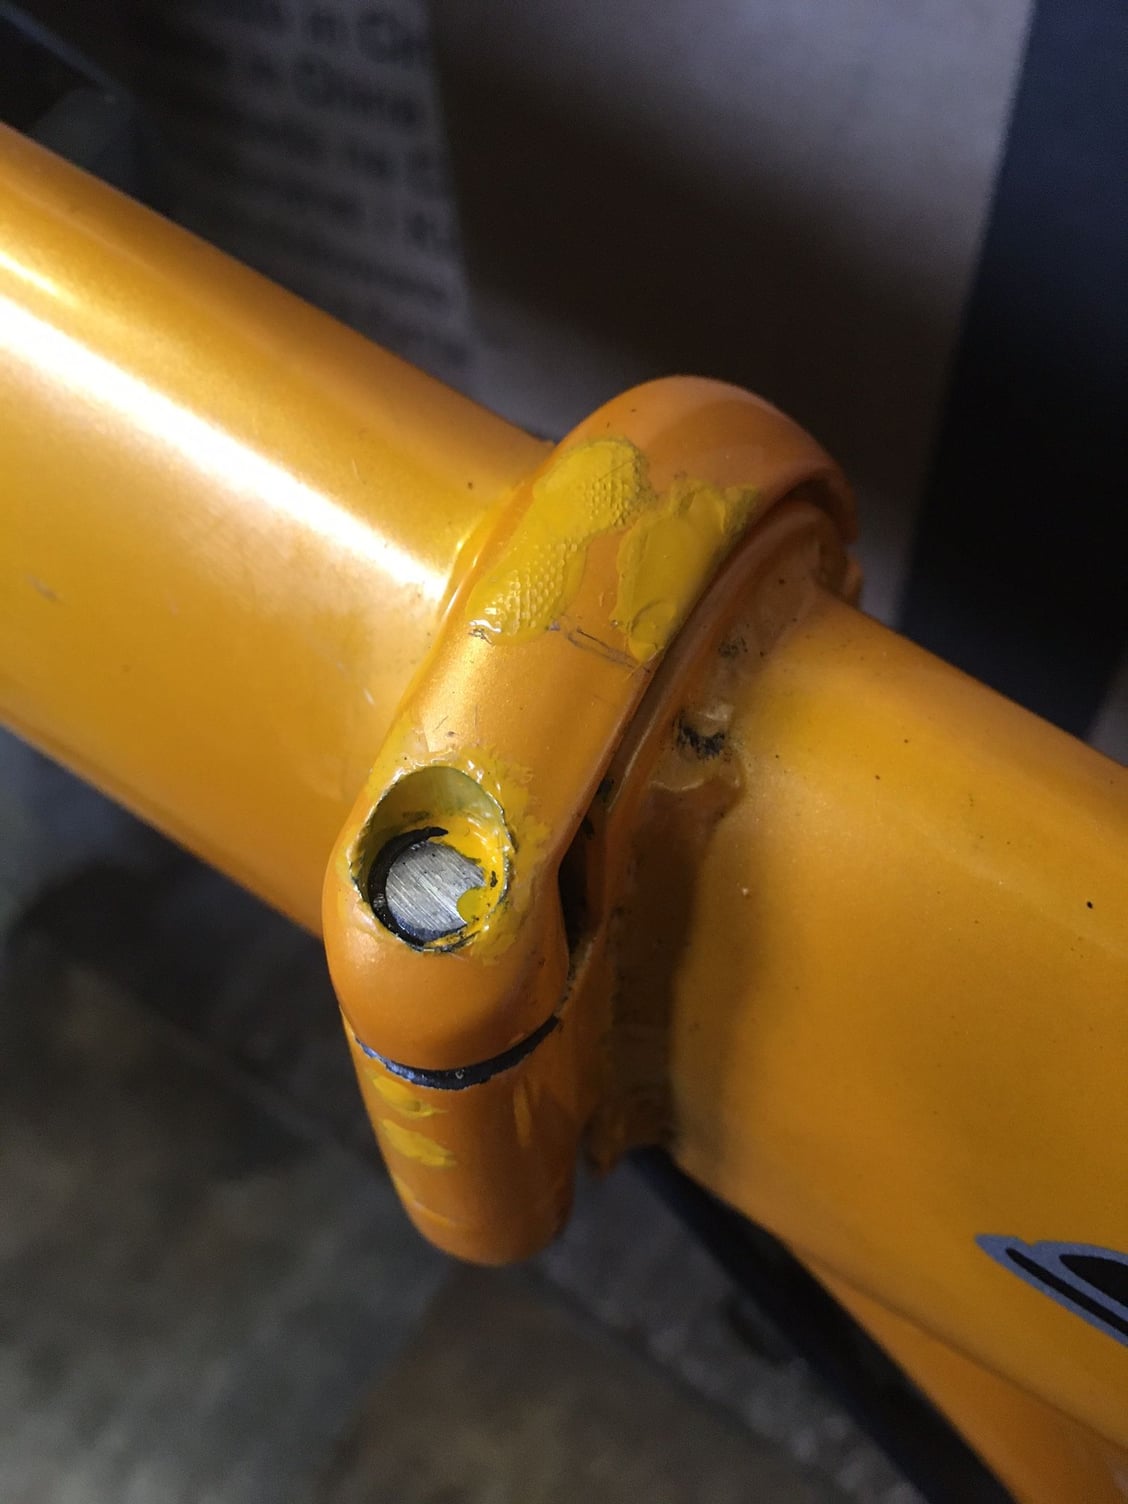
Completed gauge pin installation
What I’ve learned from all of this is that the play probably developed very rapidly originally because I set the hinge closing tension much too low. The bike was used by my wife and she was unable to unlatch the correctly tensioned hinge because there wasn’t enough space between the lever and frame to get a good purchase with fingers. (I’ve got strong fingers and I also struggled to undo the latch). I’ve added a tab to the end of the lever now to provide adequate purchase. During this process someone posted a link to the CH White website (maybe Duragrouch or Fentuz I’m not sure) showing a replacement lever with a similar tab to the one I made so it’s clear that Dahon have recognised the problem some time ago, but I wasn’t aware of the modified part.
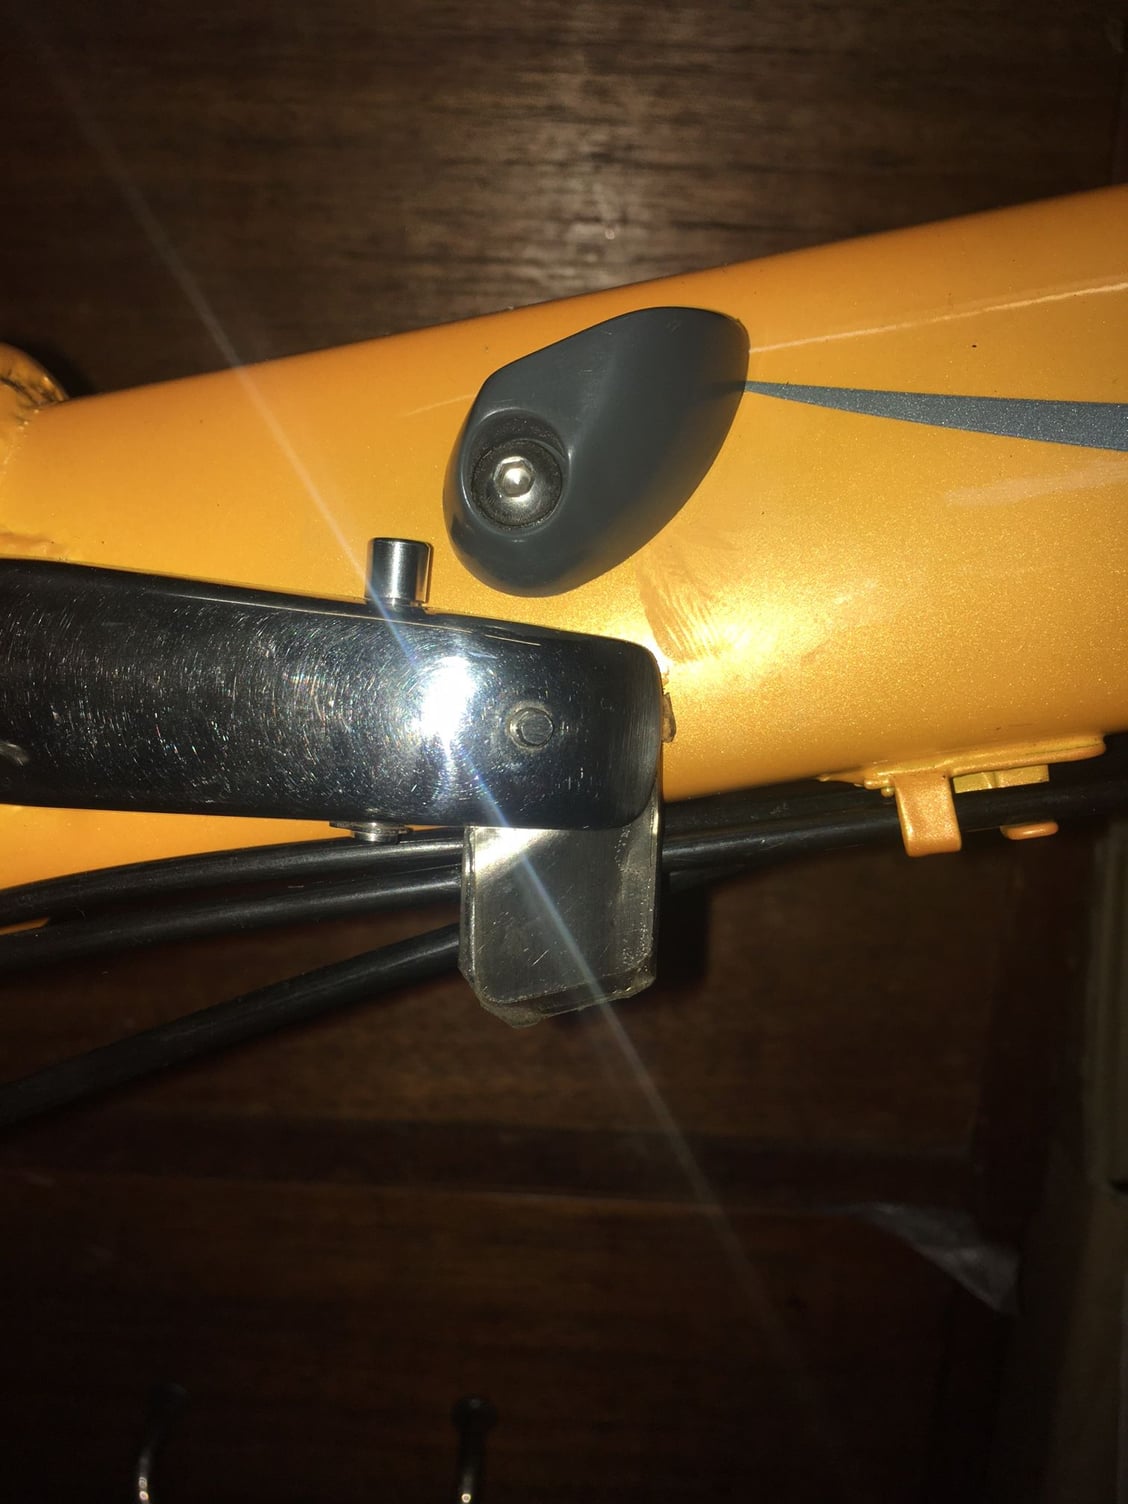
Tab added to lever
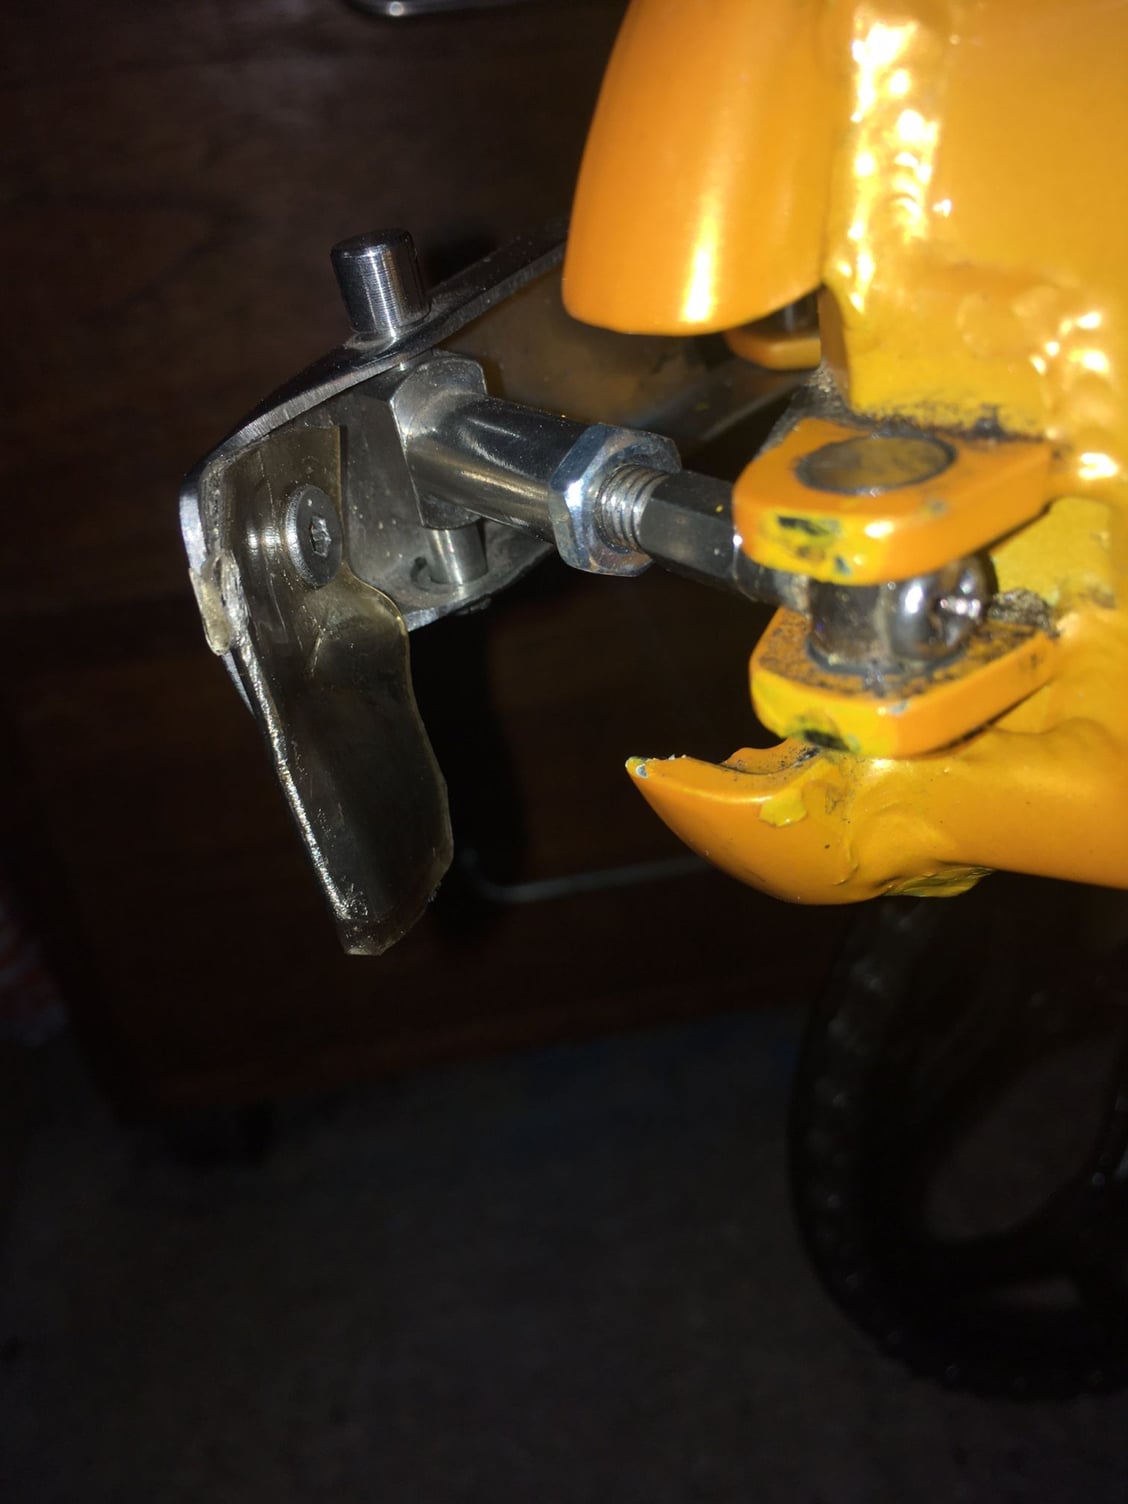
Single screw holding tab in place. Tab wrapped with helicopter tape to prevent damage to paintwork on the frame when snapping the lever closed.
The Volkswagen hinge pin is not suitable for a folding bike hinge. It isn’t hardened and it doesn’t have a ground surface finish.
I also want to warn about the risk of buying low cost unbranded hand reamers for this kind of precision work. The one I bought at 8.1mm diameter generated a hole a couple of hundredths larger than it should and meant the assembled hinge still had unwanted play when it was tightly closed. When checking the reamer more carefully I found that the cutting edges of the flutes were not ground straight. There was a slight bulge in the diameter about 20mm from the tip which caused it to cut an oversize hole.
Not to be defeated, I discovered that precision made pin gauges (U.S. = gage pin) which are normally available in very expensive sets for use in metrology labs are also available individually:
https://www.cutwel.co.uk/catalogsear...%20pin%20gauge
These pin gauges are made from alloy steel and have a hardened, ground and polished surface finish. They are eminently suitable as a folding bike hinge pin and I bought one 50mm long at 8.2mm diameter.
Gauge pin
I didn’t purchase another reamer to prepare the holes. Instead I ground one end flat in order to generate a sharp edge around the circumference. Then I pressed the pin right through the holes so that excess material was cut away by the sharp edge (“broached”) as I did so. This method generated the perfect fit for the pin when fully assembled.
I’m now satisfied that the hinge is in a fully serviceable condition.
Completed gauge pin installation
What I’ve learned from all of this is that the play probably developed very rapidly originally because I set the hinge closing tension much too low. The bike was used by my wife and she was unable to unlatch the correctly tensioned hinge because there wasn’t enough space between the lever and frame to get a good purchase with fingers. (I’ve got strong fingers and I also struggled to undo the latch). I’ve added a tab to the end of the lever now to provide adequate purchase. During this process someone posted a link to the CH White website (maybe Duragrouch or Fentuz I’m not sure) showing a replacement lever with a similar tab to the one I made so it’s clear that Dahon have recognised the problem some time ago, but I wasn’t aware of the modified part.
Tab added to lever
Single screw holding tab in place. Tab wrapped with helicopter tape to prevent damage to paintwork on the frame when snapping the lever closed.
Last edited by Jonesandrew; 05-23-24 at 04:27 AM. Reason: spacing correction
05-23-24, 05:49 PM
#40
55+ Club,...
Join Date: Aug 2012
Location: Somewhere in New York, NY
Posts: 4,363
Bikes: 9+,...
Mentioned: 11 Post(s)
Tagged: 0 Thread(s)
Quoted: 1136 Post(s)
Liked 869 Times
in
609 Posts
Jonesandrew That is a fantastic repair... 
__________________
If it wasn't for you meddling kids,...
05-24-24, 03:28 AM
#41
Junior Member
Pic from my bike, before securing line ends with half hitches:
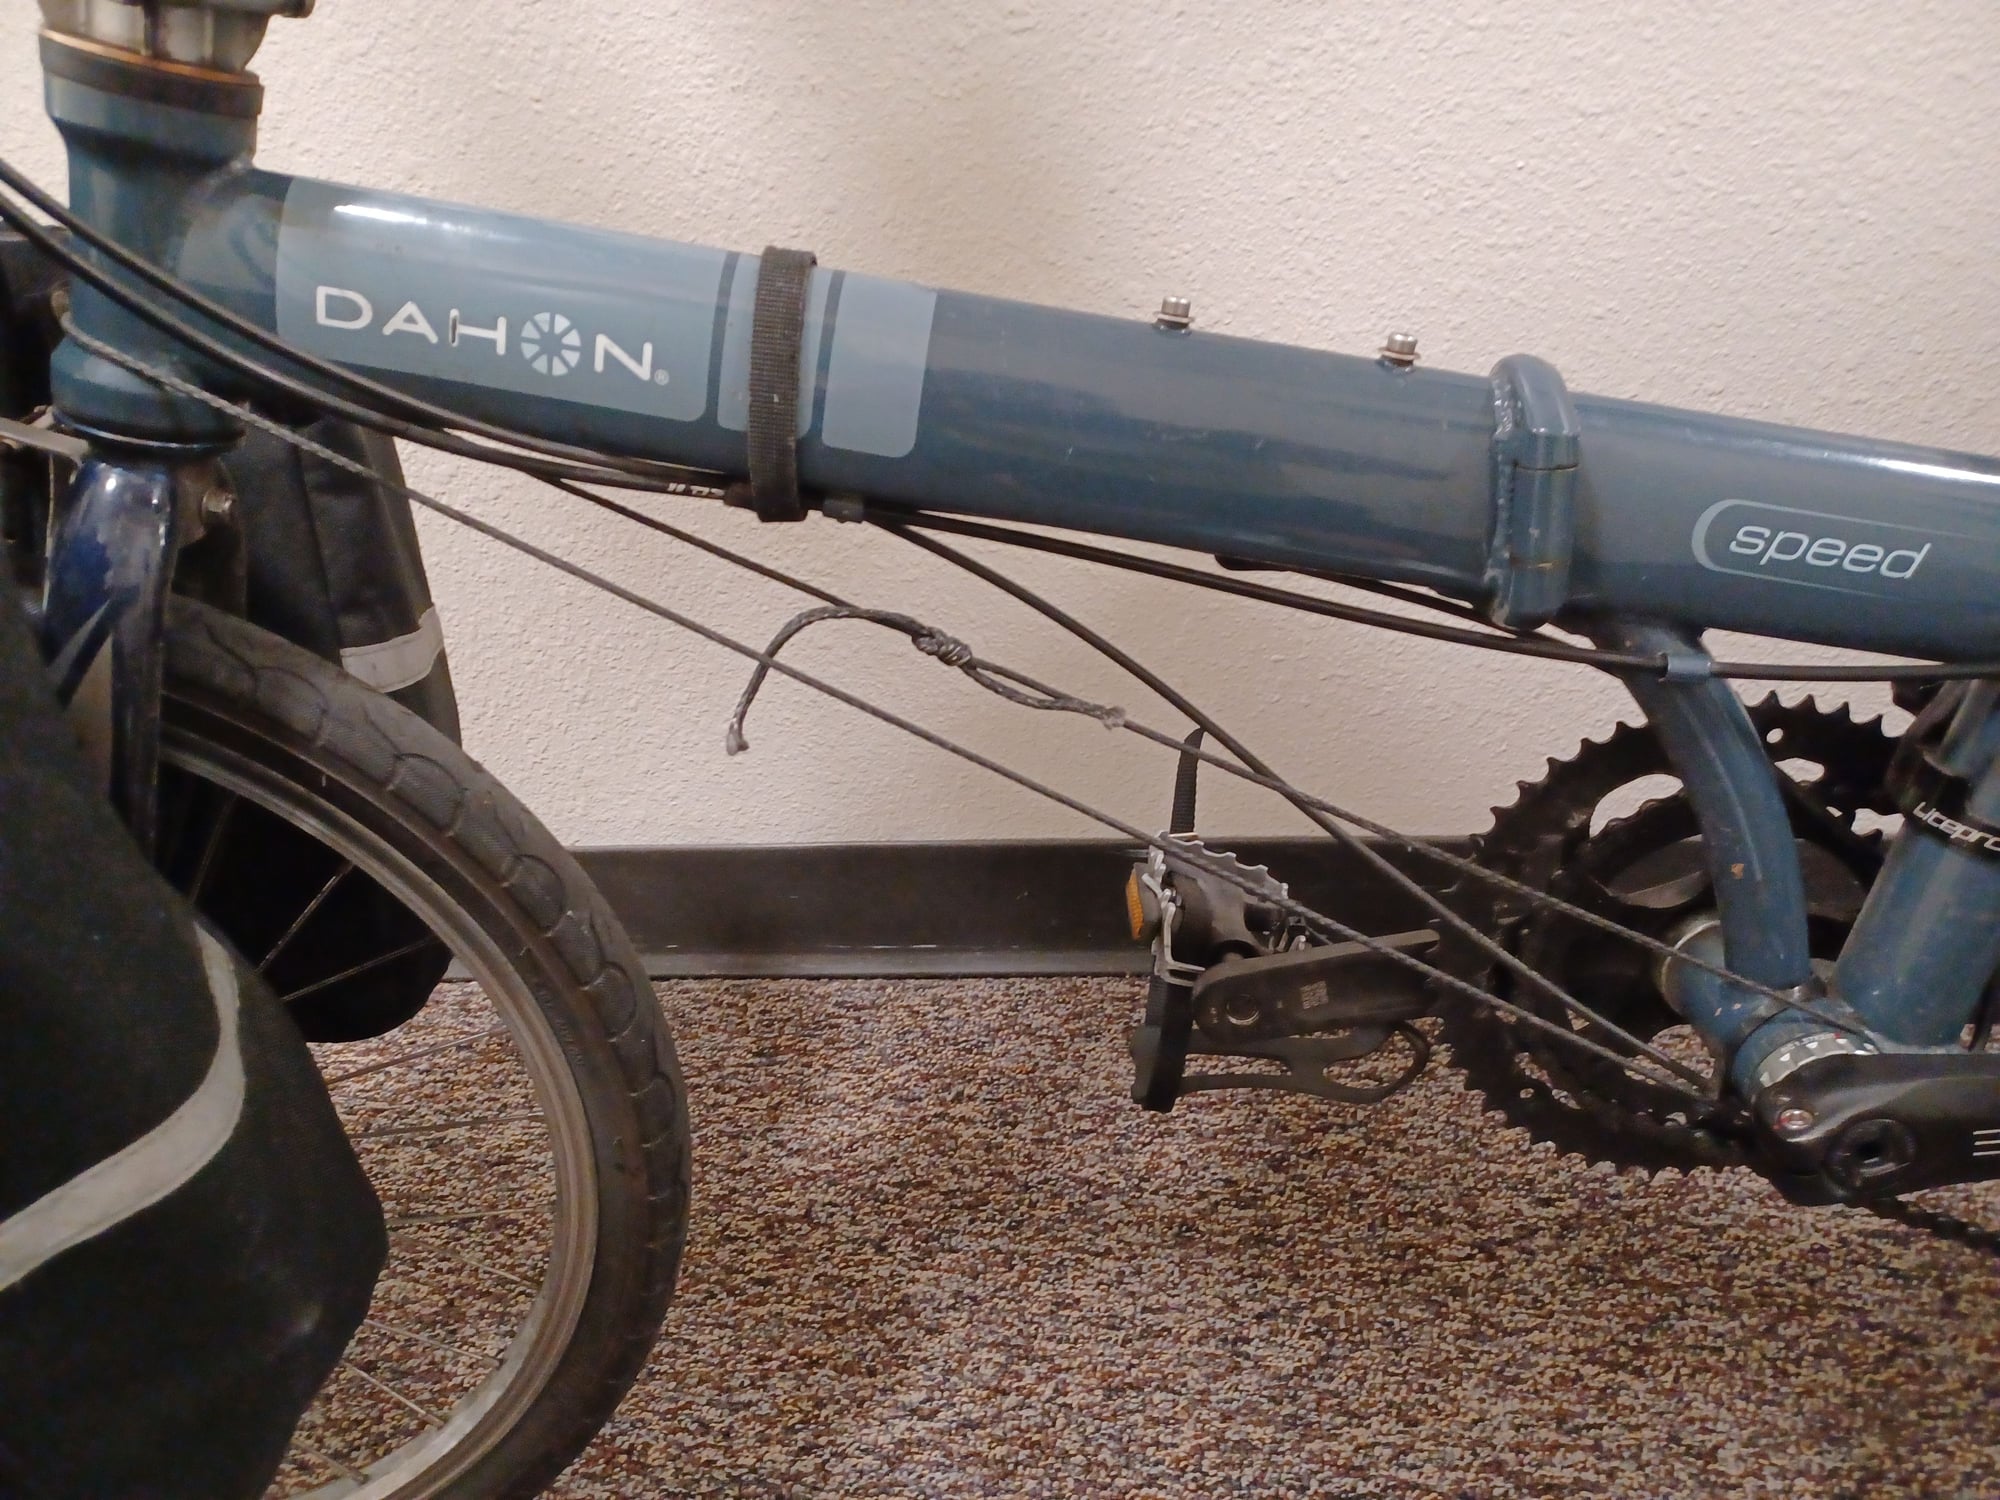
A friend says it's good theft-deterrence, appearing that my bike is held together with spit and baling wire.
Lest you think that line is not stiff or strong enough, those two strands of 1/8" kevlar will lift a good sized car.
A friend says it's good theft-deterrence, appearing that my bike is held together with spit and baling wire.
Lest you think that line is not stiff or strong enough, those two strands of 1/8" kevlar will lift a good sized car.

Cable passes under the bottom bracket in front of the seat tube
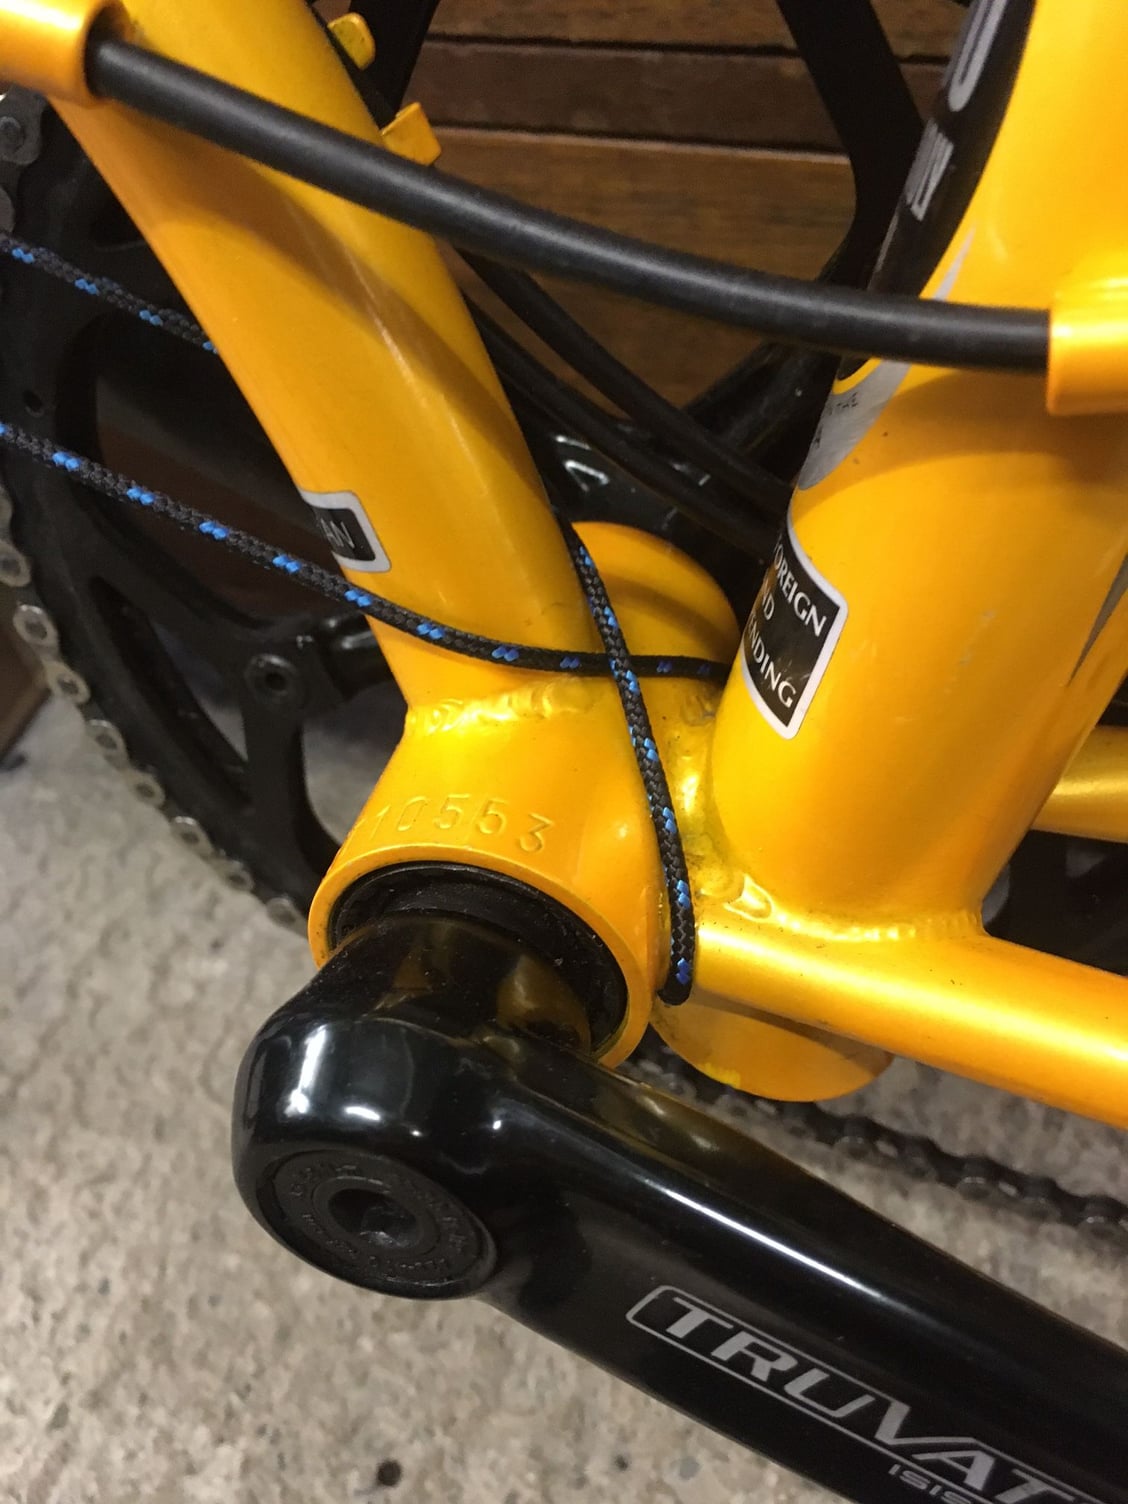
I crossed the strands above the bottom bracket to help them stay in place when the bike is folded.
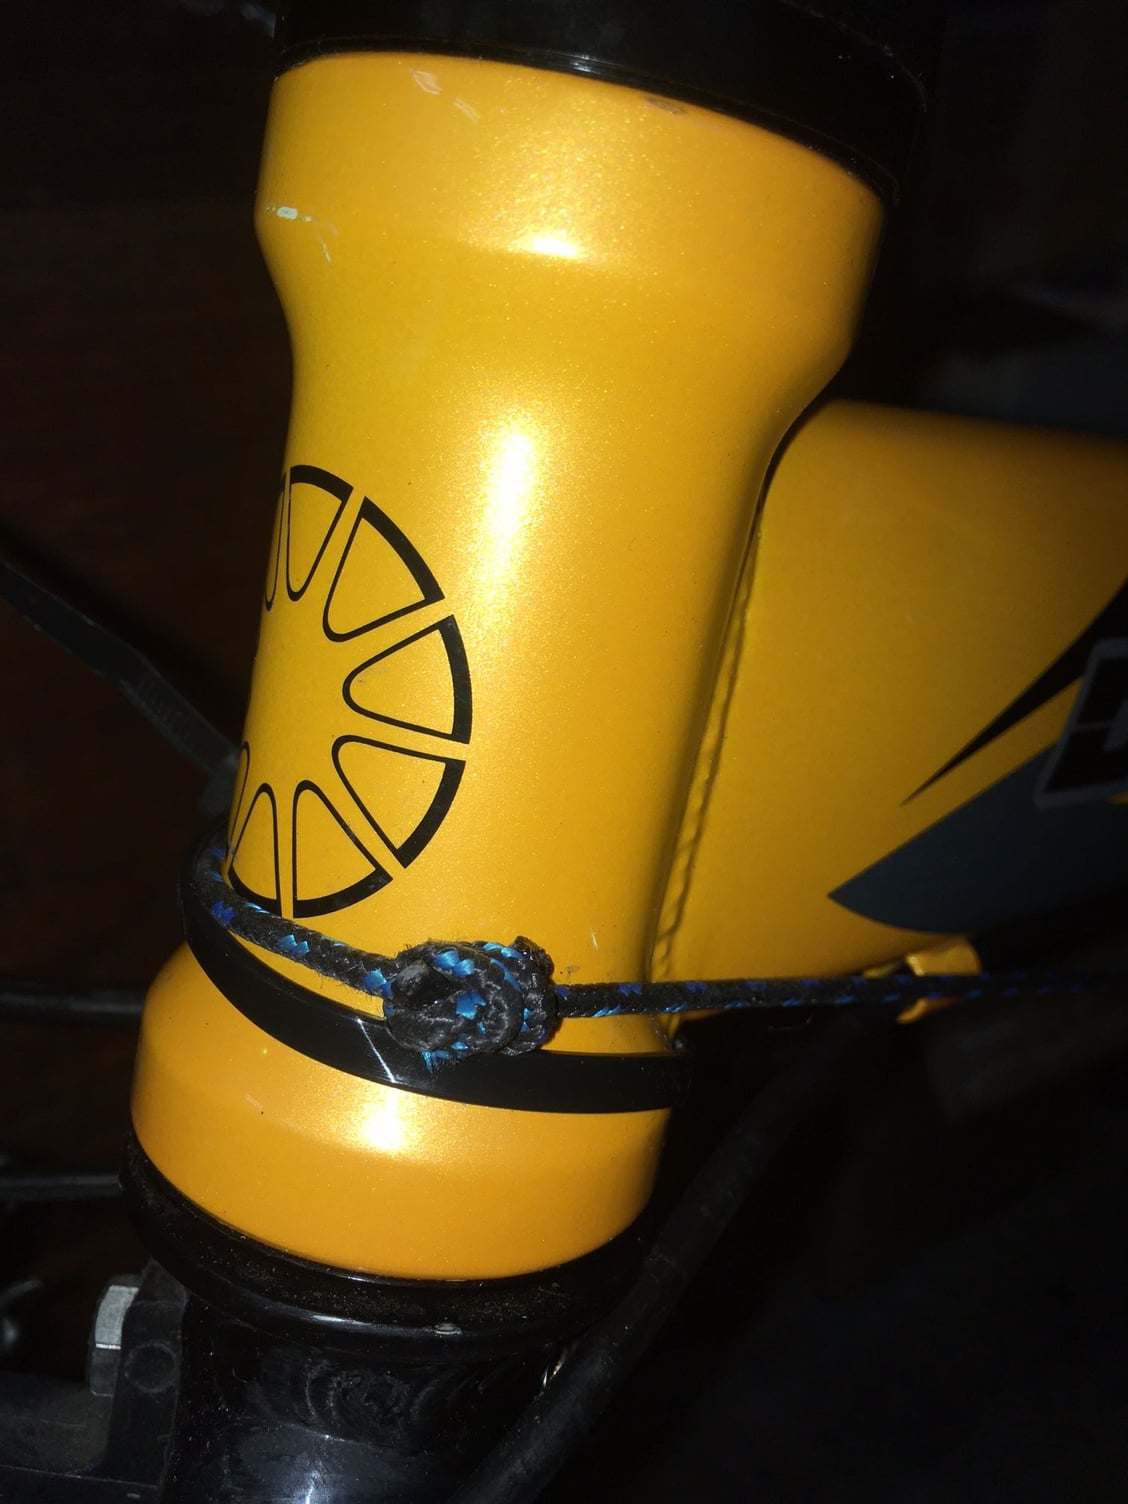
Fishermans knot on the left side of the head tube

Head of the cable tie on the Right side of the head tube.
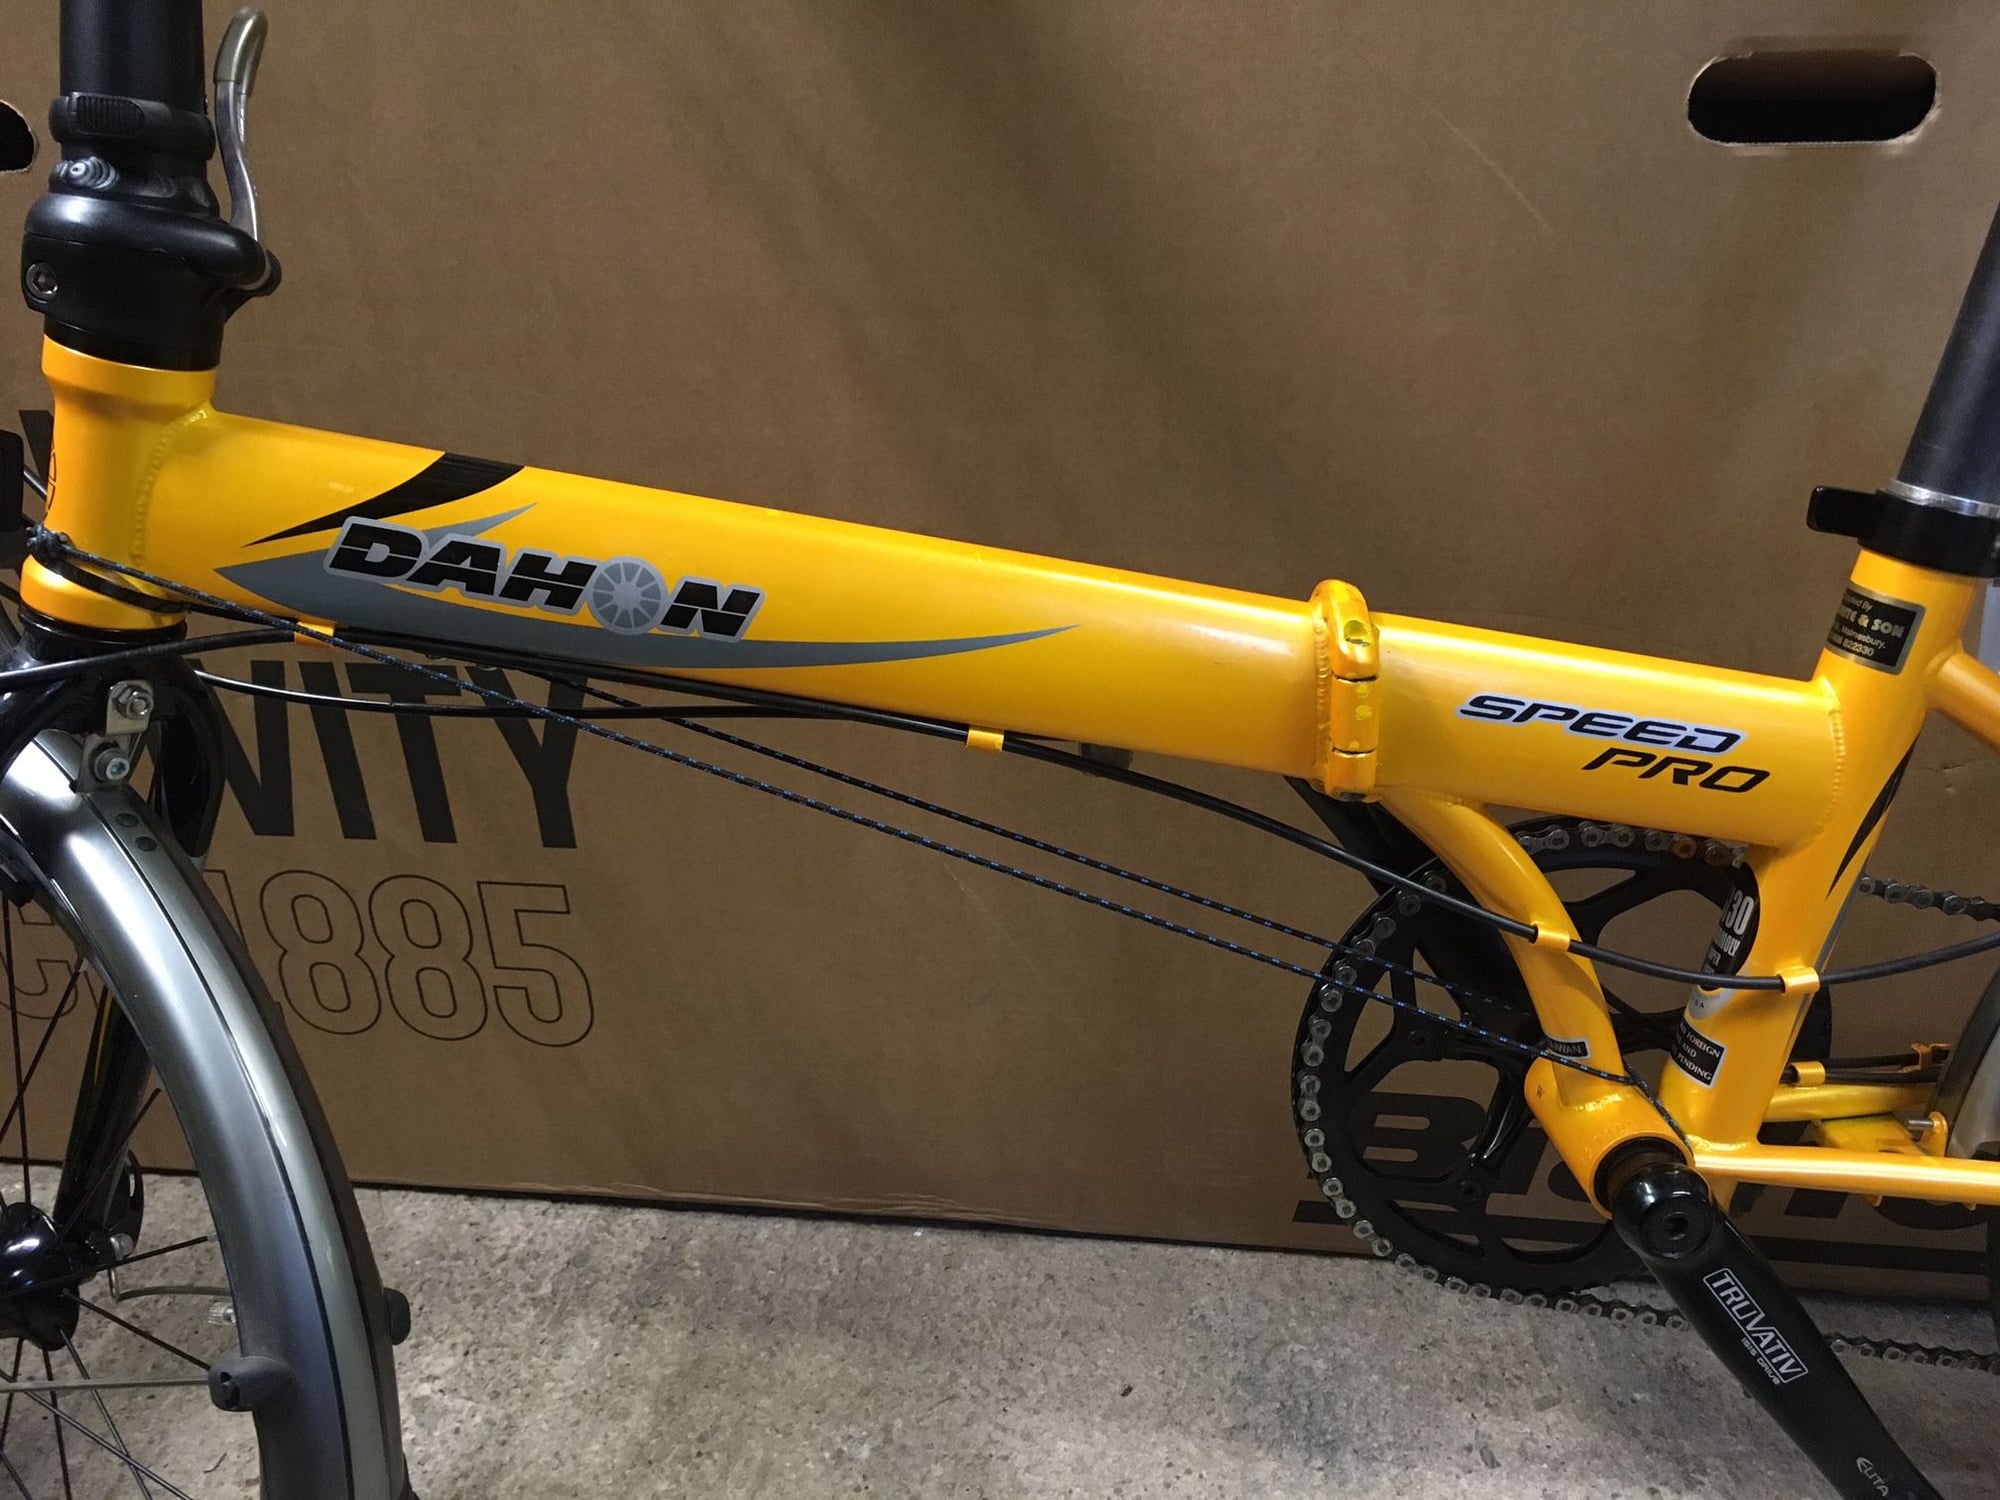
The "spit and baling wire" version above generates a slightly deeper triangle than this version but this was the only way I found to keep the cable in position when folded.
Likes For Jonesandrew:
05-24-24, 04:48 AM
#42
Senior Member
(above) Good looking repair! Thanks for the useful info!
Good price on the pin. Hard! Excellent choice, I'll have to remember that. EDIT: Uh, I hate to be the fly in the ointment on this, but the pin specs say hardness Rc62-65; This is *excellent* hardness, we're talking quality knife hardness. It's also very difficult to get that hard without being brittle, lack of toughness, with "conventional" steels; (They have achieved both of late with very expensive powder-metallurgy processes.) Gage pins are designed to minimize wear, so hard, but not designed for toughness. With the improvised deltec cable, that will put the pin more in shear than bending, that will help. The extremely smooth pin finish and hardness both improve fatigue life, that's not the issue. It's fracture under high load. Ride with caution in the early days after this fix.
I hadn't seen kevlar with nylon or dacron sheathing. Mine is very old kevlar that came painted for UV resistance, I had a piece barely long enough. If I ever replace it or do this on another bike, I'll try AmSteel or Dyneema (UHMWPE), I think similar properties but good UV resistance, and comes in multiple colors.
Yeah I hadn't considered the loop I made coming off easy when folding, I don't need to fold mine much. I had considered a symmetrical setup like yours versus my loop to one side of the bottom bracket shell, but decided the asymm angle was small and I wanted a large gentle radius for that tension. And, the latch side is plenty tight, it's the pin side I mostly need the compression (putting the pin in shear more than bending), so it's a perfect offset to the left
About the fisherman's knot (if you mean an overhand loop around each end), from online:
I used a figure 8 bend as it's rated well for maintaining line strength and also good for slippery line I think, it's held really well for almost a year on mine. I think I previously described my knot as a double-8, but looking online, that's an 8-bend with both lines from same direction and with loops, that's not what I used. 8-bends are hard to come apart once really tight, but if I need more tension I plan to just try a piece of leather under one of the ends (after slackening the loop just by folding), rather than try to undo the line. If I need to adjust often, it would be a double loop of kevlar around the head tube and bottom bracket shell, and then connect them with stainless rigging wire with a threaded adjuster at one end (like the retrofit Deltech if it makes it to market). But so far, my kevlar loop hasn't budged at all, not the knot, and zero stretch to the line, perfect.
I think this improvisation will save a lot of frames, especially if implemented early in the frame life.
I like your frame; Slot in back of seat tube, better. Cable guide locations, better. Color, better. EDIT: I like more cable guides on the underside of the main tube. But the additional cable guide on the seat tube for the rear brake, I think that'll interfere with a front derailleur mount adaptor like mine. But it could be ground off to flush easily if that was an issue. Love my front derailleur and 2X crank.
EDIT: My frame hinge lever is hard to undo too (when tightened enough for no wobble when seatpost and handlepost are moved laterally in opposite directions, hinge in torsion), even with the extra tab on mine. I use a very strong plastic tent stake that's been sharpened to a chisel point, gets under there easy to pry, doesn't scratch paint. Fortunately I don't need to fold and unfold mine often.
EDIT: My Speed hinge has set-screws (UK: grub-screws) top and bottom aft on the pin side. The lower screw totally crosses the hole so doesn't push on the pin, but rather blocks it from dropping out. I don't know about the top screw because that end of the pin hole is blind. I don't see those screws on your bike; Is there any means to keep the pin from dropping out as it wears loose? Because that could happen without warning. A grub screw in the middle of the hinge would be at lowest stress area of hinge, but that would rely on friction of a very small screw against a very hard pin, nope. I think like mine, a screw from the aft side of the lower hinge, pointing forward, below the pin; However my guess is the pin runs the whole length of the hinge now. If the pin is recessed at all in the lower hole, I think a ring of Loctite at the juncture of the pin and hole sides, should hold in place from just gravity dropping it. If you ever need to soften the Loctite, it does so with heat, just hit that pin end with soldering iron, doesn't need to get that hot to soften Loctite. Or a Q-tip with acetone should also dissolve the Loctite.
Good price on the pin. Hard! Excellent choice, I'll have to remember that. EDIT: Uh, I hate to be the fly in the ointment on this, but the pin specs say hardness Rc62-65; This is *excellent* hardness, we're talking quality knife hardness. It's also very difficult to get that hard without being brittle, lack of toughness, with "conventional" steels; (They have achieved both of late with very expensive powder-metallurgy processes.) Gage pins are designed to minimize wear, so hard, but not designed for toughness. With the improvised deltec cable, that will put the pin more in shear than bending, that will help. The extremely smooth pin finish and hardness both improve fatigue life, that's not the issue. It's fracture under high load. Ride with caution in the early days after this fix.
I hadn't seen kevlar with nylon or dacron sheathing. Mine is very old kevlar that came painted for UV resistance, I had a piece barely long enough. If I ever replace it or do this on another bike, I'll try AmSteel or Dyneema (UHMWPE), I think similar properties but good UV resistance, and comes in multiple colors.
Yeah I hadn't considered the loop I made coming off easy when folding, I don't need to fold mine much. I had considered a symmetrical setup like yours versus my loop to one side of the bottom bracket shell, but decided the asymm angle was small and I wanted a large gentle radius for that tension. And, the latch side is plenty tight, it's the pin side I mostly need the compression (putting the pin in shear more than bending), so it's a perfect offset to the left
About the fisherman's knot (if you mean an overhand loop around each end), from online:
The knot weakens the ropes with which it is tied and should not be trusted in critical applications, particularly when using slippery synthetic rope.
I think this improvisation will save a lot of frames, especially if implemented early in the frame life.
I like your frame; Slot in back of seat tube, better. Cable guide locations, better. Color, better.
EDIT: I like more cable guides on the underside of the main tube. But the additional cable guide on the seat tube for the rear brake, I think that'll interfere with a front derailleur mount adaptor like mine. But it could be ground off to flush easily if that was an issue. Love my front derailleur and 2X crank.EDIT: My frame hinge lever is hard to undo too (when tightened enough for no wobble when seatpost and handlepost are moved laterally in opposite directions, hinge in torsion), even with the extra tab on mine. I use a very strong plastic tent stake that's been sharpened to a chisel point, gets under there easy to pry, doesn't scratch paint. Fortunately I don't need to fold and unfold mine often.
EDIT: My Speed hinge has set-screws (UK: grub-screws) top and bottom aft on the pin side. The lower screw totally crosses the hole so doesn't push on the pin, but rather blocks it from dropping out. I don't know about the top screw because that end of the pin hole is blind. I don't see those screws on your bike; Is there any means to keep the pin from dropping out as it wears loose? Because that could happen without warning. A grub screw in the middle of the hinge would be at lowest stress area of hinge, but that would rely on friction of a very small screw against a very hard pin, nope. I think like mine, a screw from the aft side of the lower hinge, pointing forward, below the pin; However my guess is the pin runs the whole length of the hinge now. If the pin is recessed at all in the lower hole, I think a ring of Loctite at the juncture of the pin and hole sides, should hold in place from just gravity dropping it. If you ever need to soften the Loctite, it does so with heat, just hit that pin end with soldering iron, doesn't need to get that hot to soften Loctite. Or a Q-tip with acetone should also dissolve the Loctite.
Last edited by Duragrouch; 05-24-24 at 06:42 AM.
05-25-24, 02:26 PM
#43
Junior Member
Gauge pin
[/quote]
I hate to be the fly in the ointment on this, but the pin specs say hardness Rc62-65; This is *excellent* hardness, we're talking quality knife hardness. It's also very difficult to get that hard without being brittle, lack of toughness, with "conventional" steels; (They have achieved both of late with very expensive powder-metallurgy processes.) Gage pins are designed to minimize wear, so hard, but not designed for toughness. With the improvised deltec cable, that will put the pin more in shear than bending, that will help. The extremely smooth pin finish and hardness both improve fatigue life, that's not the issue. It's fracture under high load. Ride with caution in the early days after this fix.[quote]
Many thanks for your comments. I confess I had hadn't considered the possibility that the gauge pin would be too brittle for this application. I'm reassured that you don't think fatigue life will be an issue. ( just as well because it would be impossible for me to perform a physical fatigue test and I no longer have access to modelling or FEA software). Fracture under high load is a different matter. I decided to make a crude test using the original Dahon pin and a spare gauge pin. I clamped them solidly in my bench vice and hit them with a 2 pound hammer to bend them. The Dahon pin bent to approx 15� without showing any signs of fracture. The gauge pin bent to approx 4� before snapping like a carrot. The appearance of the fractured faces was consistent with the material being through hardened. Based on this crude test, can you draw any conclusions about the suitability of the pin in this application? I would add that the gauge pin displayed considerably more resistance to my hammer blows before bending than the original pin did.
My frame hinge has a single grub screw at the bottom to prevent the pin from falling out.
I haven't had the opportunity to test ride the bike for any distance with the DIY Deltec cable, but yes, the picture shows two overhand knots made with a single turn. This link shows a double or triple turn can improve security if needed: https://www.animatedknots.com/double...mans-bend-knot. I don't consider this to be a critical application. I can't think of a cable failure mode which would result in a catastrophic failure of the frame, can you?
05-26-24, 02:55 AM
#44
Senior Member
I hate to be the fly in the ointment on this, but the pin specs say hardness Rc62-65; This is *excellent* hardness, we're talking quality knife hardness. It's also very difficult to get that hard without being brittle, lack of toughness, with "conventional" steels; (They have achieved both of late with very expensive powder-metallurgy processes.) Gage pins are designed to minimize wear, so hard, but not designed for toughness. With the improvised deltec cable, that will put the pin more in shear than bending, that will help. The extremely smooth pin finish and hardness both improve fatigue life, that's not the issue. It's fracture under high load. Ride with caution in the early days after this fix.
Many thanks for your comments. I confess I had hadn't considered the possibility that the gauge pin would be too brittle for this application. I'm reassured that you don't think fatigue life will be an issue. ( just as well because it would be impossible for me to perform a physical fatigue test and I no longer have access to modelling or FEA software). Fracture under high load is a different matter. I decided to make a crude test using the original Dahon pin and a spare gauge pin. I clamped them solidly in my bench vice and hit them with a 2 pound hammer to bend them. The Dahon pin bent to approx 15� without showing any signs of fracture. The gauge pin bent to approx 4� before snapping like a carrot. The appearance of the fractured faces was consistent with the material being through hardened. Based on this crude test, can you draw any conclusions about the suitability of the pin in this application? I would add that the gauge pin displayed considerably more resistance to my hammer blows before bending than the original pin did.
My frame hinge has a single grub screw at the bottom to prevent the pin from falling out.
I haven't had the opportunity to test ride the bike for any distance with the DIY Deltec cable, but yes, the picture shows two overhand knots made with a single turn. This link shows a double or triple turn can improve security if needed: https://www.animatedknots.com/double...mans-bend-knot. I don't consider this to be a critical application. I can't think of a cable failure mode which would result in a catastrophic failure of the frame, can you?
I'm glad you took my comments in the spirit they were given, thank you for that.
Knot: I agree, not critical, but you don't want it loosening, as then you are not getting the benefits. At each ride I push gently sideways on my own, it always feels the same tension. That's all you need to do. To get that tightness I needed to tie the knot with the bike partly folded, then snap the bike into place, laying it flat and pushing with my foot, not a huge amount, it was almost unfolded, just a bit from completely in order to tension the line.
Gage pin: Yes, it would need more force to initially deform, due to the higher yield strength. Toughness comes into play in the spread between the yield strength and ultimate tensile strength, the amount of ductility reveals how much energy absorption before fracture. This may not matter in your case if the yield strength is high enough that you don't come close to it in operation, and you don't get stress concentration due to fretting wear. I'm not certain about fatigue not being a problem, good hardness and surfact finish help a lot. You may want to read on this and go deeper in the links contained about notch sensitivity:
https://en.m.wikipedia.org/wiki/Charpy_impact_test
But as I mentioned, having the pin loaded in shear as opposed to bending, especially with the added deltech, means a much better loading condition for the pin; In bending, one side is loaded in tension and acts as a crack initiation point at the high stress point at the surface; In shear, the entire pin is taking the load, way better. I think you'll be OK.
If the pin fractured brittle without much of a hit, I'd worry, but you said it took a big hit, greater than the original pin. It's akin to spring steel, which has a greater ability to elastically yield, always springing back, due to a greatly raised yield point. But if you stress it enough past the yield, it will snap, without as much deformation as mild steel. But that yield point is high. Again, I think you'll be fine. You don't want a very ductile pin there, you need strength.
Good to know you have a grub screw on the bottom.
All sounds good.
Many thanks for your comments. I confess I had hadn't considered the possibility that the gauge pin would be too brittle for this application. I'm reassured that you don't think fatigue life will be an issue. ( just as well because it would be impossible for me to perform a physical fatigue test and I no longer have access to modelling or FEA software). Fracture under high load is a different matter. I decided to make a crude test using the original Dahon pin and a spare gauge pin. I clamped them solidly in my bench vice and hit them with a 2 pound hammer to bend them. The Dahon pin bent to approx 15� without showing any signs of fracture. The gauge pin bent to approx 4� before snapping like a carrot. The appearance of the fractured faces was consistent with the material being through hardened. Based on this crude test, can you draw any conclusions about the suitability of the pin in this application? I would add that the gauge pin displayed considerably more resistance to my hammer blows before bending than the original pin did.
My frame hinge has a single grub screw at the bottom to prevent the pin from falling out.
I haven't had the opportunity to test ride the bike for any distance with the DIY Deltec cable, but yes, the picture shows two overhand knots made with a single turn. This link shows a double or triple turn can improve security if needed: https://www.animatedknots.com/double...mans-bend-knot. I don't consider this to be a critical application. I can't think of a cable failure mode which would result in a catastrophic failure of the frame, can you?
Knot: I agree, not critical, but you don't want it loosening, as then you are not getting the benefits. At each ride I push gently sideways on my own, it always feels the same tension. That's all you need to do. To get that tightness I needed to tie the knot with the bike partly folded, then snap the bike into place, laying it flat and pushing with my foot, not a huge amount, it was almost unfolded, just a bit from completely in order to tension the line.
Gage pin: Yes, it would need more force to initially deform, due to the higher yield strength. Toughness comes into play in the spread between the yield strength and ultimate tensile strength, the amount of ductility reveals how much energy absorption before fracture. This may not matter in your case if the yield strength is high enough that you don't come close to it in operation, and you don't get stress concentration due to fretting wear. I'm not certain about fatigue not being a problem, good hardness and surfact finish help a lot. You may want to read on this and go deeper in the links contained about notch sensitivity:
https://en.m.wikipedia.org/wiki/Charpy_impact_test
But as I mentioned, having the pin loaded in shear as opposed to bending, especially with the added deltech, means a much better loading condition for the pin; In bending, one side is loaded in tension and acts as a crack initiation point at the high stress point at the surface; In shear, the entire pin is taking the load, way better. I think you'll be OK.
If the pin fractured brittle without much of a hit, I'd worry, but you said it took a big hit, greater than the original pin. It's akin to spring steel, which has a greater ability to elastically yield, always springing back, due to a greatly raised yield point. But if you stress it enough past the yield, it will snap, without as much deformation as mild steel. But that yield point is high. Again, I think you'll be fine. You don't want a very ductile pin there, you need strength.
Good to know you have a grub screw on the bottom.
All sounds good.
05-26-24, 06:26 AM
#45
Schwinnasaur

I hate to be the fly in the ointment on this, but the pin specs say hardness Rc62-65; This is *excellent* hardness, we're talking quality knife hardness. It's also very difficult to get that hard without being brittle, lack of toughness, with "conventional" steels; (They have achieved both of late with very expensive powder-metallurgy processes.) Gage pins are designed to minimize wear, so hard, but not designed for toughness. With the improvised deltec cable, that will put the pin more in shear than bending, that will help. The extremely smooth pin finish and hardness both improve fatigue life, that's not the issue. It's fracture under high load. Ride with caution in the early days after this fix.
I'm glad you took my comments in the spirit they were given, thank you for that.
Knot: I agree, not critical, but you don't want it loosening, as then you are not getting the benefits. At each ride I push gently sideways on my own, it always feels the same tension. That's all you need to do. To get that tightness I needed to tie the knot with the bike partly folded, then snap the bike into place, laying it flat and pushing with my foot, not a huge amount, it was almost unfolded, just a bit from completely in order to tension the line.
Gage pin: Yes, it would need more force to initially deform, due to the higher yield strength. Toughness comes into play in the spread between the yield strength and ultimate tensile strength, the amount of ductility reveals how much energy absorption before fracture. This may not matter in your case if the yield strength is high enough that you don't come close to it in operation, and you don't get stress concentration due to fretting wear. I'm not certain about fatigue not being a problem, good hardness and surfact finish help a lot. You may want to read on this and go deeper in the links contained about notch sensitivity:
https://en.m.wikipedia.org/wiki/Charpy_impact_test
But as I mentioned, having the pin loaded in shear as opposed to bending, especially with the added deltech, means a much better loading condition for the pin; In bending, one side is loaded in tension and acts as a crack initiation point at the high stress point at the surface; In shear, the entire pin is taking the load, way better. I think you'll be OK.
If the pin fractured brittle without much of a hit, I'd worry, but you said it took a big hit, greater than the original pin. It's akin to spring steel, which has a greater ability to elastically yield, always springing back, due to a greatly raised yield point. But if you stress it enough past the yield, it will snap, without as much deformation as mild steel. But that yield point is high. Again, I think you'll be fine. You don't want a very ductile pin there, you need strength.
Good to know you have a grub screw on the bottom.
All sounds good.
A pin or a bolt are only used in tension and shear. Near never in bending. Bad day if you put a bolt or pin bending. If you want high strength and hardness, both good qualities in a pin, you will have to sacrifice toughness. Steel is a compromise. You can have high strength but you lose toughness.
05-26-24, 06:57 AM
#46
Senior Member
A pin or a bolt are only used in tension and shear. Near never in bending. Bad day if you put a bolt or pin bending. If you want high strength and hardness, both good qualities in a pin, you will have to sacrifice toughness. Steel is a compromise. You can have high strength but you lose toughness.
https://knifesteelnerds.com/2020/06/...t-knife-steel/
