


Hints and tricks thread
 05-21-12, 01:09 PM
#376
Cottered Crank

Join Date: Aug 2010
Location: Chicago
Posts: 3,401
Bikes: 1954 Raleigh Sports 1974 Raleigh Competition 1969 Raleigh Twenty 1964 Raleigh LTD-3
Mentioned: 0 Post(s)
Tagged: 0 Thread(s)
Quoted: 8 Post(s)
Likes: 0
Liked 11 Times
in
7 Posts
That really is the hard way.
I tie a loop in some red nylon binder twine, about in a 20cm Diameter circle.
Then double over the loop and loop that around the tire/wheel whatever and loop it through itself.
Hang the twine around a nail or hook in the rafters/ceiling.
Done.
Red binder twine costs about $20 for a mile of the stuff -lasts a lifetime and is plastic so it doesn't hold moisture much. It won't hurt the rim or tire or whatever you are hanging from it.
 05-24-12, 10:47 AM
#377
Senior Member
Join Date: Mar 2010
Posts: 158
Mentioned: 0 Post(s)
Tagged: 0 Thread(s)
Quoted: 0 Post(s)
Likes: 0
Liked 0 Times
in
0 Posts
Yakima rack bars are 1-1/8 od and electrical EMT thin wall 1" size have the same OD. I made some 92" for mine .10' section is less than $5 & a78" yak bar is about $40+
they are plenty strong as long as you don't hang a bike out over 20" passed the tower!
Cheers
they are plenty strong as long as you don't hang a bike out over 20" passed the tower!
Cheers
05-24-12, 11:48 AM
#379
Cottered Crank
Join Date: Aug 2010
Location: Chicago
Posts: 3,401
Bikes: 1954 Raleigh Sports 1974 Raleigh Competition 1969 Raleigh Twenty 1964 Raleigh LTD-3
Mentioned: 0 Post(s)
Tagged: 0 Thread(s)
Quoted: 8 Post(s)
Likes: 0
Liked 11 Times
in
7 Posts
EMT is quite malleable -to increase the PSI needed to deform and bend them fill them with "great stuff" self-expanding foam. It doesn't add much weight but makes them about 2x as resistant to bending as the foam needs to deform inside the conduit in order to allow the pipe to bend and the tightly-packed stuff does a good job of resisting deformation.
05-25-12, 11:11 AM
#380

aka Tom Reingold

Join Date: Jan 2009
Location: New York, NY, and High Falls, NY, USA
Posts: 40,481
Bikes: 1962 Rudge Sports, 1971 Raleigh Super Course, 1971 Raleigh Pro Track, 1974 Raleigh International, 1975 Viscount Fixie, 1982 McLean, 1996 Lemond (Ti), 2002 Burley Zydeco tandem
Mentioned: 511 Post(s)
Tagged: 0 Thread(s)
Quoted: 7333 Post(s)
Liked 2,430 Times
in
1,419 Posts
That really is the hard way.
I tie a loop in some red nylon binder twine, about in a 20cm Diameter circle.
Then double over the loop and loop that around the tire/wheel whatever and loop it through itself.
Hang the twine around a nail or hook in the rafters/ceiling.
Done.
Red binder twine costs about $20 for a mile of the stuff -lasts a lifetime and is plastic so it doesn't hold moisture much. It won't hurt the rim or tire or whatever you are hanging from it.
I tie a loop in some red nylon binder twine, about in a 20cm Diameter circle.
Then double over the loop and loop that around the tire/wheel whatever and loop it through itself.
Hang the twine around a nail or hook in the rafters/ceiling.
Done.
Red binder twine costs about $20 for a mile of the stuff -lasts a lifetime and is plastic so it doesn't hold moisture much. It won't hurt the rim or tire or whatever you are hanging from it.
__________________
Tom Reingold, tom@noglider.com
New York City and High Falls, NY
Blogs: The Experienced Cyclist; noglider's ride blog
�When man invented the bicycle he reached the peak of his attainments.� � Elizabeth West, US author
Please email me rather than PM'ing me. Thanks.
Tom Reingold, tom@noglider.com
New York City and High Falls, NY
Blogs: The Experienced Cyclist; noglider's ride blog
�When man invented the bicycle he reached the peak of his attainments.� � Elizabeth West, US author
Please email me rather than PM'ing me. Thanks.
05-25-12, 02:11 PM
#381
Cottered Crank
Join Date: Aug 2010
Location: Chicago
Posts: 3,401
Bikes: 1954 Raleigh Sports 1974 Raleigh Competition 1969 Raleigh Twenty 1964 Raleigh LTD-3
Mentioned: 0 Post(s)
Tagged: 0 Thread(s)
Quoted: 8 Post(s)
Likes: 0
Liked 11 Times
in
7 Posts
Sure, Tom!
Here are some tires and a rim that are on my project list in my shop. Usually I will hang each tire or wheel up individually but these are grouped by project here. Out in my garage I've got dozens of wheels and tires hung up like this from the rafters. It keeps them organized and up off the ground.
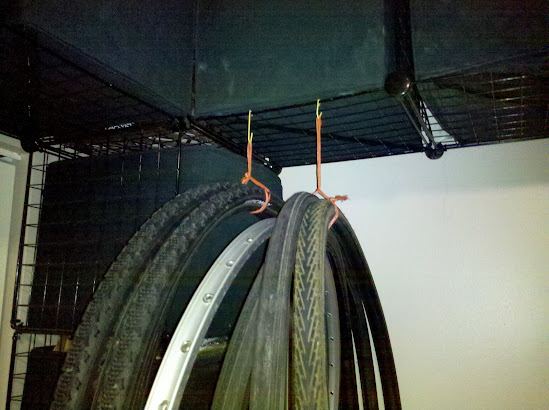
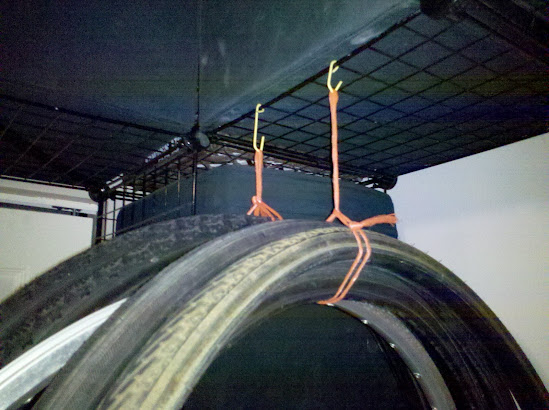
The next time I dig into my garage I should take a picture of all the stuff I've got hanging like this. It's quick and easy to loop them up. All you need is a bunch of twine and some nails or hooks.
Here are some tires and a rim that are on my project list in my shop. Usually I will hang each tire or wheel up individually but these are grouped by project here. Out in my garage I've got dozens of wheels and tires hung up like this from the rafters. It keeps them organized and up off the ground.
The next time I dig into my garage I should take a picture of all the stuff I've got hanging like this. It's quick and easy to loop them up. All you need is a bunch of twine and some nails or hooks.
05-28-12, 06:23 AM
#382
Full Member
Join Date: May 2008
Location: Incognito
Posts: 395
Mentioned: 0 Post(s)
Tagged: 0 Thread(s)
Quoted: 1 Post(s)
Liked 0 Times
in
0 Posts
That really is the hard way.
I tie a loop in some red nylon binder twine, about in a 20cm Diameter circle.
Then double over the loop and loop that around the tire/wheel whatever and loop it through itself.
Hang the twine around a nail or hook in the rafters/ceiling.
Done.
Red binder twine costs about $20 for a mile of the stuff -lasts a lifetime and is plastic so it doesn't hold moisture much. It won't hurt the rim or tire or whatever you are hanging from it.
I tie a loop in some red nylon binder twine, about in a 20cm Diameter circle.
Then double over the loop and loop that around the tire/wheel whatever and loop it through itself.
Hang the twine around a nail or hook in the rafters/ceiling.
Done.
Red binder twine costs about $20 for a mile of the stuff -lasts a lifetime and is plastic so it doesn't hold moisture much. It won't hurt the rim or tire or whatever you are hanging from it.
Your way, when you want one tire, you have to take them all down, unwrap the string then put the rest back up. Me, I just pull down the wheel I want. But the point is moot, because your way is for tires, mine is for wheels.
Ian
06-01-12, 04:08 PM
#383
Blamester
An old guy told me if your chain breaks while you are out tie it together with a lace and pedal then back pedal then pedal and so on till you get home.
I have never had to do it but you never know.Another tip he gave me was if you get a puncture you can't fix put the tire beads around the outside of the rim
and you can get home almost as quickly as normal.I have done this and it does work but not kind to the rim or tire.
I have never had to do it but you never know.Another tip he gave me was if you get a puncture you can't fix put the tire beads around the outside of the rim
and you can get home almost as quickly as normal.I have done this and it does work but not kind to the rim or tire.
06-01-12, 05:13 PM
#384
Cottered Crank
Join Date: Aug 2010
Location: Chicago
Posts: 3,401
Bikes: 1954 Raleigh Sports 1974 Raleigh Competition 1969 Raleigh Twenty 1964 Raleigh LTD-3
Mentioned: 0 Post(s)
Tagged: 0 Thread(s)
Quoted: 8 Post(s)
Likes: 0
Liked 11 Times
in
7 Posts
An old guy told me if your chain breaks while you are out tie it together with a lace and pedal then back pedal then pedal and so on till you get home.
I have never had to do it but you never know.Another tip he gave me was if you get a puncture you can't fix put the tire beads around the outside of the rim
and you can get home almost as quickly as normal.I have done this and it does work but not kind to the rim or tire.
I have never had to do it but you never know.Another tip he gave me was if you get a puncture you can't fix put the tire beads around the outside of the rim
and you can get home almost as quickly as normal.I have done this and it does work but not kind to the rim or tire.
Just sayin'
06-01-12, 08:17 PM
#385
Blamester
He was talking about coming from a dance late at night in the forties with a girl on the cross bar.Bit like i've run out of gas baby How will we keep warm?
06-23-12, 07:55 PM
#387
Junior Member
Join Date: Aug 2011
Location: New England
Posts: 16
Bikes: 2010 Norco Ceres Belt Drive IGH8, 1992? Bianchi Volpe, 1994 Bridgestone MB-3, 1985 Schwinn Cimarron, 1986? Shogun Prairie Breaker I, 2008 Kona Sutra, 2003 Trek 520, 80s? Univega Ital Sport, 90s Nishiki Ariel high chainstay, '92 Klein Rascal
Mentioned: 0 Post(s)
Tagged: 0 Thread(s)
Quoted: 0 Post(s)
Likes: 0
Liked 0 Times
in
0 Posts
Handlebar and frame protection tape
I have used 3M electrical tape for handlebar wrap jobs and protecting frames in various places in the past, but I had some of this stuff laying around and I thought "why not?". It is EPR tape, which has no adhesive. You stretch it around objects and it fuses to itself. It works great! It doesn't leave any sticky residue on cork tape, handlebars (if you use it to tie the brake cables) or on the frame--you just peel or cut it off and it's only stuck to itself. It holds its place by the pressure of the wrapping. It is slightly tacky-feeling at first (why I wouldn't wrap the entire handlebars in it) but I have used the same tape to wrap handles of other things and can report that the tackiness wears off over time. And as a bonus, it will protect you from up to 22,000 volts if you ever ride your bike into an electrical substation. Disadvantage is it's kind of expensive.
https://www.mcmaster.com/#epr-rubber-tape/=i3y3ho

https://www.mcmaster.com/#epr-rubber-tape/=i3y3ho
06-23-12, 08:33 PM
#388
Cottered Crank
Join Date: Aug 2010
Location: Chicago
Posts: 3,401
Bikes: 1954 Raleigh Sports 1974 Raleigh Competition 1969 Raleigh Twenty 1964 Raleigh LTD-3
Mentioned: 0 Post(s)
Tagged: 0 Thread(s)
Quoted: 8 Post(s)
Likes: 0
Liked 11 Times
in
7 Posts
+1 The self-fusing tape is pretty darn cool but it is darn expensive like you said -and not as easy to find. It's also harder to work with. You can find it at any electrical wholesale house though -not just McMaster Carr.
Here is an old electrician's trick to non-sticky electrical tape: Wrap it BACKWARDS (sticky side up) on the bar first -or whatever you are wrapping it around. Then wrap it again forward over the top of that. Make a tape sandwich with the stuff and the sticky stuff in the middle. Don't stretch it too much and it will stay put -or at least the nicer 3M super 33+ rubbery stuff will stay put. The cheaper vinyl tape is more slippery and will tend to migrate and slide around, but the good stuff will tack down and grip with the backside just as well as the self-fusing tape. And if you ever want to take it back off all you need to do is cut it carefully with an exacto knife from the inside out and it will cleanly come off without leaving a sticky mess beneath. Smart electricians back-wrap split-bolts and other large wire joints first so they can re-use the fastener someday when they take it apart instead of having a sticky gooey mess.
Make sure you don't over-stretch it as it will want to stretch back and pull and make a mess. And cut it at the end with a scissors carefully nice and straight. Don't just yank and tear it. That makes a crappy wrinkly end that will pull back up.
06-30-12, 05:55 AM
#389
Sir Fallalot
Thread Starter

Join Date: Jul 2006
Posts: 5,286
Mentioned: 1 Post(s)
Tagged: 0 Thread(s)
Quoted: 9 Post(s)
Likes: 0
Liked 13 Times
in
11 Posts
My issue with self-vulcanizing tape is that it tends to deform and becomes loose shortly after you put it on, and then it stays like that forever. Maybe I'm using the wrong brand.
07-02-12, 04:36 AM
#390
Junior Member
Join Date: Aug 2011
Location: New England
Posts: 16
Bikes: 2010 Norco Ceres Belt Drive IGH8, 1992? Bianchi Volpe, 1994 Bridgestone MB-3, 1985 Schwinn Cimarron, 1986? Shogun Prairie Breaker I, 2008 Kona Sutra, 2003 Trek 520, 80s? Univega Ital Sport, 90s Nishiki Ariel high chainstay, '92 Klein Rascal
Mentioned: 0 Post(s)
Tagged: 0 Thread(s)
Quoted: 0 Post(s)
Likes: 0
Liked 0 Times
in
0 Posts
I can see that happening with the brand I'm using. I think it just takes a lot of extra care before it fully cures/fuses to not loosen or wrinkle the cut edge. I have used it for a long time on handles of other things without any deformation.
07-02-12, 06:24 AM
#391
bike whisperer

Join Date: Dec 2009
Location: Melbourne, Oz
Posts: 9,537
Bikes: https://weightweenies.starbike.com/forum/viewtopic.php?f=10&t=152015&p=1404231
Mentioned: 15 Post(s)
Tagged: 0 Thread(s)
Quoted: 1523 Post(s)
Liked 716 Times
in
508 Posts
Totally depends on whether you occasionally hang up a pair of wheels, or if you're always doing it. In a shop, your way is the hard way and the broom holders are well worth the effort of installation.
__________________
Sheldon Brown's bike info ~~~ Park Tools repair help
Half-step triple, using double gear ~~~ 6400 STI rebuild walkthrough ~~~ Want 8/9/10s @126mm OLD? OCR. ~~~ Shimano cassette body overhaul ~~~ Ergopower Escape wear repair ~~~ PSA: drivetrain wear
List of US/Canada bike co-ops ~~~ Global list
Sheldon Brown's bike info ~~~ Park Tools repair help
Half-step triple, using double gear ~~~ 6400 STI rebuild walkthrough ~~~ Want 8/9/10s @126mm OLD? OCR. ~~~ Shimano cassette body overhaul ~~~ Ergopower Escape wear repair ~~~ PSA: drivetrain wear
List of US/Canada bike co-ops ~~~ Global list
Last edited by Kimmo; 07-02-12 at 06:28 AM.
07-17-12, 06:12 AM
#392
Full Member
Join Date: Dec 2006
Posts: 428
Mentioned: 0 Post(s)
Tagged: 0 Thread(s)
Quoted: 6 Post(s)
Likes: 0
Liked 4 Times
in
4 Posts
I cut short lengths of innertubes and pull them over handlebar grips. Gives extra padding and keeps grips like new. When they get grungy just toss and replace.Use thornless tubes for extra cushioning. Bike shops will give away old tubes.
07-23-12, 09:45 PM
#393
Senior Member
Join Date: Apr 2007
Location: Nolensville, TN
Posts: 141
Bikes: Nishiki Sport 10 spd, Trek 730 MultiTrack hybrid, 1987 Marin Muirwoods, Fuji MT-350, Fuji Sandblaster, Raleigh Sprite and several others
Mentioned: 0 Post(s)
Tagged: 0 Thread(s)
Quoted: 0 Post(s)
Likes: 0
Liked 0 Times
in
0 Posts
Excellent tip. I'll remember that one and hope I never have to use it. Thanks again.
07-23-12, 10:07 PM
#394
Senior Member
Join Date: Apr 2007
Location: Nolensville, TN
Posts: 141
Bikes: Nishiki Sport 10 spd, Trek 730 MultiTrack hybrid, 1987 Marin Muirwoods, Fuji MT-350, Fuji Sandblaster, Raleigh Sprite and several others
Mentioned: 0 Post(s)
Tagged: 0 Thread(s)
Quoted: 0 Post(s)
Likes: 0
Liked 0 Times
in
0 Posts
Smart Tip! I'll remember this and hope I don't have to use it.
 07-30-12, 10:47 PM
#396
Commuter Animal
Join Date: Jan 2006
Location: Cold Spring, NY
Posts: 104
Bikes: 2006 Burley Hudson, 2008 Specialized Globe
Mentioned: 0 Post(s)
Tagged: 0 Thread(s)
Quoted: 0 Post(s)
Likes: 0
Liked 0 Times
in
0 Posts
I have been installing the valve stem where the max tire pressure is stamped. I can still locate the source of flats but now when me or the owner is checking tire pressure, the max and minimums are right where the valve stem is.
Last edited by mike_khad1; 07-31-12 at 05:55 PM.
08-01-12, 08:51 AM
#397
just a guy with a bike
Join Date: Jul 2012
Location: DC & MD
Posts: 9
Bikes: Always changing. Right now I'm really into single speeds.
Mentioned: 0 Post(s)
Tagged: 0 Thread(s)
Quoted: 0 Post(s)
Likes: 0
Liked 0 Times
in
0 Posts
Grip removal: Use an air compressor with a blow gun to remove MTB or BMX grips without destroying them. Works best if you have a blow gun with a long nozzle.
Brake adjustment: For setting v brakes and u brakes without a third hand tool use a woodworking clamp to lock the brake pads against the rim. Insert thin cardboard scraps as shims between the brake pad and the rim if you want to create a perfect fit the first time. The $3 clamp/spreaders with the nylon covers that Harbor Freight often gives away work really great for this.
Brake adjustment: For setting v brakes and u brakes without a third hand tool use a woodworking clamp to lock the brake pads against the rim. Insert thin cardboard scraps as shims between the brake pad and the rim if you want to create a perfect fit the first time. The $3 clamp/spreaders with the nylon covers that Harbor Freight often gives away work really great for this.
08-01-12, 09:12 AM
#398
Cottered Crank
Join Date: Aug 2010
Location: Chicago
Posts: 3,401
Bikes: 1954 Raleigh Sports 1974 Raleigh Competition 1969 Raleigh Twenty 1964 Raleigh LTD-3
Mentioned: 0 Post(s)
Tagged: 0 Thread(s)
Quoted: 8 Post(s)
Likes: 0
Liked 11 Times
in
7 Posts
I take a long small control-wiring flat screwdriver to carefully insert into the front of the grip and slide back under it. Then I put the long red straw of the Tri-Flow in next to the screwdriver shaft as far back into the grip as I can and squirt in the oil. If you can do this 2-3 more times around the diameter of the grip you can pretty much get most of the grip lubricated. Then it is a simple matter to carefully work and twist the grip until it breaks free and just slides off.
Soak the oily grip in a pan o blue Dawn detergent and the Tri-Flow washes right off and you are left with a good undamaged vintage grip that is ready to be re-installed later.
08-01-12, 12:09 PM
#399
bike whisperer
Join Date: Dec 2009
Location: Melbourne, Oz
Posts: 9,537
Bikes: https://weightweenies.starbike.com/forum/viewtopic.php?f=10&t=152015&p=1404231
Mentioned: 15 Post(s)
Tagged: 0 Thread(s)
Quoted: 1523 Post(s)
Liked 716 Times
in
508 Posts
The screwdriver and lube trick is pretty obvious, done it a zillion times... but that compressor trick is a bloody beauty.
As for third hands... not worth the trouble if you're good enough with two.
As for third hands... not worth the trouble if you're good enough with two.
__________________
Sheldon Brown's bike info ~~~ Park Tools repair help
Half-step triple, using double gear ~~~ 6400 STI rebuild walkthrough ~~~ Want 8/9/10s @126mm OLD? OCR. ~~~ Shimano cassette body overhaul ~~~ Ergopower Escape wear repair ~~~ PSA: drivetrain wear
List of US/Canada bike co-ops ~~~ Global list
Sheldon Brown's bike info ~~~ Park Tools repair help
Half-step triple, using double gear ~~~ 6400 STI rebuild walkthrough ~~~ Want 8/9/10s @126mm OLD? OCR. ~~~ Shimano cassette body overhaul ~~~ Ergopower Escape wear repair ~~~ PSA: drivetrain wear
List of US/Canada bike co-ops ~~~ Global list
08-01-12, 03:09 PM
#400
Sir Fallalot
Thread Starter
Join Date: Jul 2006
Posts: 5,286
Mentioned: 1 Post(s)
Tagged: 0 Thread(s)
Quoted: 9 Post(s)
Likes: 0
Liked 13 Times
in
11 Posts
Another way to get grips off -especially old vintage grips that have "glued" themselves to the bars over time is to use Tri-Flow.
I take a long small control-wiring flat screwdriver to carefully insert into the front of the grip and slide back under it. Then I put the long red straw of the Tri-Flow in next to the screwdriver shaft as far back into the grip as I can and squirt in the oil. If you can do this 2-3 more times around the diameter of the grip you can pretty much get most of the grip lubricated. Then it is a simple matter to carefully work and twist the grip until it breaks free and just slides off.
Soak the oily grip in a pan o blue Dawn detergent and the Tri-Flow washes right off and you are left with a good undamaged vintage grip that is ready to be re-installed later.

