


building a fillet brazed frame
 07-30-10, 11:52 PM
#1


Randomhead
Thread Starter
Join Date: Aug 2008
Location: Happy Valley, Pennsylvania
Posts: 24,396
Mentioned: 0 Post(s)
Tagged: 0 Thread(s)
Quoted: 4 Post(s)
Liked 3,696 Times
in
2,517 Posts
building a fillet brazed frame
My daughter helped me at NAHBS, so I told her I would build her a bike. Here are some pictures
First, I'm brazing the seat tube to the bb because the down tube covers part of the seat tube.
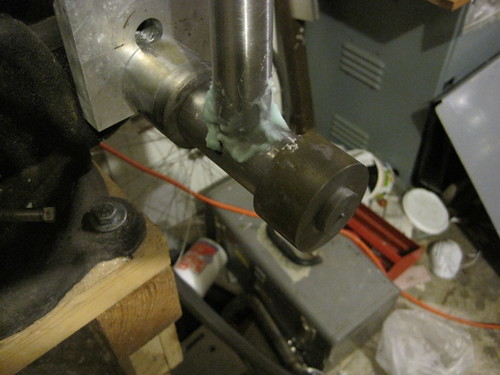
Checking the alignment after tacking

First, I'm brazing the seat tube to the bb because the down tube covers part of the seat tube.
Checking the alignment after tacking
 07-30-10, 11:59 PM
#2
Randomhead
Thread Starter
Join Date: Aug 2008
Location: Happy Valley, Pennsylvania
Posts: 24,396
Mentioned: 0 Post(s)
Tagged: 0 Thread(s)
Quoted: 4 Post(s)
Liked 3,696 Times
in
2,517 Posts
I should have spent some time cleaning up my work area, but brazing is more fun.
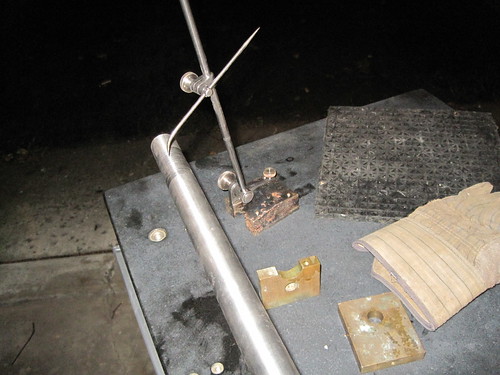
The seat tube is in a 1 1/4" piece of tubing held in a Park stand. That way I can rotate it -- with a gloved hand of course. I added some flux after this.

My goal is to have the brazing filler as smooth as possible, particularly where it hits the tubes. It's really easy to leave a small lip right at the edge of the filler. The trick is to get rid of that discontinuity while brazing instead of having to file and sand it off and risk cutting into the tube. I thought this looked good, but it will have to wait until I get a chance to soak the flux off.

The seat tube is in a 1 1/4" piece of tubing held in a Park stand. That way I can rotate it -- with a gloved hand of course. I added some flux after this.
My goal is to have the brazing filler as smooth as possible, particularly where it hits the tubes. It's really easy to leave a small lip right at the edge of the filler. The trick is to get rid of that discontinuity while brazing instead of having to file and sand it off and risk cutting into the tube. I thought this looked good, but it will have to wait until I get a chance to soak the flux off.
07-31-10, 12:03 AM
#3

Bicycle Repair Man !!!

Will be following this build... am enjoying my new work as an apprentice frame builder and have been working on some very nice frames and should be starting my first complete build very soon.
Most of the work we do at the shop is filet brazing...
Most of the work we do at the shop is filet brazing...
07-31-10, 12:08 AM
#4
Randomhead
Thread Starter
Join Date: Aug 2008
Location: Happy Valley, Pennsylvania
Posts: 24,396
Mentioned: 0 Post(s)
Tagged: 0 Thread(s)
Quoted: 4 Post(s)
Liked 3,696 Times
in
2,517 Posts
You can tell where the area I put flux on ends in that picture, there is a layer of carbon on the steel. What you want to avoid is a lot of carbon where the flux was applied, that means the flux was overcome by heat. This is pretty good.
I really like fillet brazed frames because there is so much freedom in what you can do. This bike is going to have a curved top tube. That's the problem in taking the kids to NAHBS, they get ideas.
I really like fillet brazed frames because there is so much freedom in what you can do. This bike is going to have a curved top tube. That's the problem in taking the kids to NAHBS, they get ideas.
Last edited by unterhausen; 07-31-10 at 12:16 AM.
07-31-10, 12:10 AM
#5
Bicycle Repair Man !!!
It looks very good.
07-31-10, 12:15 AM
#6
Bicycle Repair Man !!!
I have a short list of bike I want to build and besides one of my own (a touring bike) am looking to build a bicycle for my youngest daughter.
Next week I will be doing repair work to existing frames and doing some modifications to my folder.
Next week I will be doing repair work to existing frames and doing some modifications to my folder.
07-31-10, 05:51 AM
#7
Senior Member

Join Date: Sep 2008
Location: Collegeville, PA
Posts: 1,350
Bikes: Ruckelshaus Randonneur, Specialized Allez (early 90's, steel), Ruckelshaus Path Bomber currently being built
Mentioned: 1 Post(s)
Tagged: 0 Thread(s)
Quoted: 4 Post(s)
Likes: 0
Liked 1 Time
in
1 Post
Can I help you at NAHBS next year so you'll build me a frame?

07-31-10, 08:44 AM
#8
Senior Member
Great thread!
I don't know if this is too technical for the interwebs, but what sort of flame you're using for fillet brazing? I've had relative success with a soft flame and the sequence melt brass puddle, back away and let solidify, add on top, repeat going around... But my fillets are kinda small. Too strong a flame and the fillets melt away on the side, but even with the soft flame I can't stay long enough to build a large fillet...
I don't know if this is too technical for the interwebs, but what sort of flame you're using for fillet brazing? I've had relative success with a soft flame and the sequence melt brass puddle, back away and let solidify, add on top, repeat going around... But my fillets are kinda small. Too strong a flame and the fillets melt away on the side, but even with the soft flame I can't stay long enough to build a large fillet...
07-31-10, 09:27 AM
#9
legalize bikes
Join Date: May 2003
Location: bucks county, PA
Posts: 1,250
Bikes: too damn many
Mentioned: 0 Post(s)
Tagged: 0 Thread(s)
Quoted: 0 Post(s)
Likes: 0
Liked 1 Time
in
1 Post
Great thread!
I don't know if this is too technical for the interwebs, but what sort of flame you're using for fillet brazing? I've had relative success with a soft flame and the sequence melt brass puddle, back away and let solidify, add on top, repeat going around... But my fillets are kinda small. Too strong a flame and the fillets melt away on the side, but even with the soft flame I can't stay long enough to build a large fillet...
I don't know if this is too technical for the interwebs, but what sort of flame you're using for fillet brazing? I've had relative success with a soft flame and the sequence melt brass puddle, back away and let solidify, add on top, repeat going around... But my fillets are kinda small. Too strong a flame and the fillets melt away on the side, but even with the soft flame I can't stay long enough to build a large fillet...
as you get better a faster more neutral flame lets you get it done fast, which is important to maintain the strength of the tubes. also the neutral flame allows you to to have a bigger puddle which goes to the root of the joint, and will give you a fillet that requires less finishing.
07-31-10, 09:31 AM
#10
legalize bikes
Join Date: May 2003
Location: bucks county, PA
Posts: 1,250
Bikes: too damn many
Mentioned: 0 Post(s)
Tagged: 0 Thread(s)
Quoted: 0 Post(s)
Likes: 0
Liked 1 Time
in
1 Post
My goal is to have the brazing filler as smooth as possible, particularly where it hits the tubes. It's really easy to leave a small lip right at the edge of the filler. The trick is to get rid of that discontinuity while brazing instead of having to file and sand it off and risk cutting into the tube. I thought this looked good, but it will have to wait until I get a chance to soak the flux off.
when im doing fillets to avoid the lip i like to check buy wiping away excess flux with my rod, then if i need to feather out the edges i hit em with the torch real quick just enough to wash it out a little.
taking off those shoulders with a file, shop cloth, or bearing scraper is definitely to be avoided!
07-31-10, 09:41 AM
#11
Randomhead
Thread Starter
Join Date: Aug 2008
Location: Happy Valley, Pennsylvania
Posts: 24,396
Mentioned: 0 Post(s)
Tagged: 0 Thread(s)
Quoted: 4 Post(s)
Liked 3,696 Times
in
2,517 Posts
I don't know if this is too technical for the interwebs, but what sort of flame you're using for fillet brazing? I've had relative success with a soft flame and the sequence melt brass puddle, back away and let solidify, add on top, repeat going around... But my fillets are kinda small. Too strong a flame and the fillets melt away on the side, but even with the soft flame I can't stay long enough to build a large fillet...
That's what I do. I try to feather the edges as I'm going, but then when I'm done before I turn off the torch I go around the joint and look for problem areas. That's when it pays to have a fairly energetic flame. My goal is no sanding/polishing, but that hasn't happened yet.
Last edited by unterhausen; 07-31-10 at 09:50 AM.
 08-07-10, 02:13 AM
#13
Bicycle Repair Man !!!
That's what I do. I try to feather the edges as I'm going, but then when I'm done before I turn off the torch I go around the joint and look for problem areas. That's when it pays to have a fairly energetic flame. My goal is no sanding/polishing, but that hasn't happened yet.

A few more minutes of post build work and it should look like these brake posts are flowing out of the frame...

Still have a little touching up work to do here but am quite pleased... was looking for a smooth line / flow on my brake mounts and got the brass flowing very nicely with a fairly hot flame and am blessed with quick hands and apparently... not a bad set of eyes for this.
Will be cleaning up the frame and adding more in the way of cable stops and guides, a spoke holder, and will be smoothing out the original work, especially in the bb area as that looks like crap.
But that is really another thread.
08-07-10, 07:47 AM
#14
Banned
Join Date: Aug 2005
Posts: 5,115
Mentioned: 0 Post(s)
Tagged: 0 Thread(s)
Quoted: 0 Post(s)
Likes: 0
Liked 2 Times
in
1 Post
I thought when I got into frame building it would be great to build my girls some nice bikes. So far they aren't interested, and regular bikes seem to just fall into our laps. They were quite a bit smaller even 2 years ago, and I thought maybe a nice 20 inch bike with and IGH would allow me to just keep rolling top of the line components onto different frames until they left the home with a folder that would last them a lifetime. Best laid plans!

