Double butted seat tube?
 07-22-20, 08:32 PM
#1
Junior Member
Thread Starter
Join Date: Sep 2012
Posts: 141
Mentioned: 0 Post(s)
Tagged: 0 Thread(s)
Quoted: 12 Post(s)
Liked 0 Times
in
0 Posts
Double butted seat tube?
I have a double butted tube (Nova 650L 28.6OD 9x6x9) that I picked up for my bike's seat tube. I'm wondering if this is wrong. It seems incorrect to build a bike with a double butted seat tube, but I'm really unsure - the clamp might be enough.
Thanks in advance for any insight.
Thanks in advance for any insight.
 07-22-20, 08:49 PM
#2
Banned.

Join Date: Jun 2004
Location: Torrance, CA
Posts: 3,061
Bikes: Homebuilt steel
Mentioned: 18 Post(s)
Tagged: 0 Thread(s)
Quoted: 2193 Post(s)
Liked 425 Times
in
337 Posts
Not sure what you mean by "the clamp may be enough" but regardless, a double butted seat tube can work as long as you position the butt at the top of the seat tube such that your seat post is properly supported. You can use a few different sizes of seat posts depending on how much you ream the seat tube.
07-22-20, 08:59 PM
#3
Junior Member
Thread Starter
Join Date: Sep 2012
Posts: 141
Mentioned: 0 Post(s)
Tagged: 0 Thread(s)
Quoted: 12 Post(s)
Liked 0 Times
in
0 Posts
Cool - thanks - that's good to know. I suppose by "the clamp may be enough," I thought the seat post clamp/fixing bolt could potentially provide enough stability regardless of whether the tube is butted or not. It sounds like that's the case given the seat doesn't end up erroneously high off the frame, the clamping mechanism is properly secured to the frame, the seat tube is properly tightened, and nothing else is problematic.
I'll probably go pretty minimal on the reaming. The outer wall thickness is 1mm at the edge, so 26.8-ish width seat tube should be ok.
**updated to fix grammar, oops
I'll probably go pretty minimal on the reaming. The outer wall thickness is 1mm at the edge, so 26.8-ish width seat tube should be ok.
**updated to fix grammar, oops
Last edited by bikingman; 07-22-20 at 09:06 PM.
07-22-20, 09:31 PM
#4

Senior Member
Join Date: Feb 2012
Location: Rochester, NY
Posts: 18,075
Bikes: Stewart S&S coupled sport tourer, Stewart Sunday light, Stewart Commuting, Stewart Touring, Co Motion Tandem, Stewart 3-Spd, Stewart Track, Fuji Finest, Mongoose Tomac ATB, GT Bravado ATB, JCP Folder, Stewart 650B ATB
Mentioned: 0 Post(s)
Tagged: 0 Thread(s)
Quoted: 4201 Post(s)
Liked 3,859 Times
in
2,307 Posts
1mm is on the thin side for a top/binder section of a seat tube. But not wrong if your skills are up to the task. Heat tends to distort the portion of the ST where the post inserts into. Between the TT the stays and the binder brazings there's a lot of possible heat cycles to deform from a round ID. Using a slide on wrap around collar for the binder removes one heat cycle.
I prefer a brazed on collar with binder bolt boss to a removeable one. I have both don this collar before the TT and stays are done and after the TT is done with equal results.
How do you plan to attach the stays? Andy
I prefer a brazed on collar with binder bolt boss to a removeable one. I have both don this collar before the TT and stays are done and after the TT is done with equal results.
How do you plan to attach the stays? Andy
__________________
AndrewRStewart
AndrewRStewart
07-23-20, 05:22 AM
#5
Senior Member
Join Date: Jan 2013
Location: South Jersey
Posts: 2,266
Mentioned: 18 Post(s)
Tagged: 0 Thread(s)
Quoted: 714 Post(s)
Liked 800 Times
in
475 Posts
A 650mm long 28.6 9-6-9 tube is not intended to be a seat tube. That tube is meant to be used for a top tube or down tube. It could be used as a seat tube, as long as you can cut it to length and still have enough of the butted section left. That tube is listed as having 85mm and 165mm butts and you will want to keep at least 75mm(preferably 100mm) of that on the top and 25-30mm of it on the bottom bracket end. You will also need to use a 26.8mm seatpost.
If those numbers work out for you, I would not be too concerned about the .9mm thickness at the top. I would definitely expect more deformation from joining than with the external butted tubes that I use, so you will be reaming away more than you think. The fact that you are asking this question suggests that you are not experienced at this, so I would recommend putting that tube in a box for later use and ordering an external butted seat tube of the proper length. That will give you a thickness of 1.1 to 1.2mm at the top and a bit more material to ream away safely. It will also allow the use of the more common 27.2 seatpost.
If those numbers work out for you, I would not be too concerned about the .9mm thickness at the top. I would definitely expect more deformation from joining than with the external butted tubes that I use, so you will be reaming away more than you think. The fact that you are asking this question suggests that you are not experienced at this, so I would recommend putting that tube in a box for later use and ordering an external butted seat tube of the proper length. That will give you a thickness of 1.1 to 1.2mm at the top and a bit more material to ream away safely. It will also allow the use of the more common 27.2 seatpost.
Likes For dsaul:
07-23-20, 06:01 AM
#6
Junior Member
Thread Starter
Join Date: Sep 2012
Posts: 141
Mentioned: 0 Post(s)
Tagged: 0 Thread(s)
Quoted: 12 Post(s)
Liked 0 Times
in
0 Posts
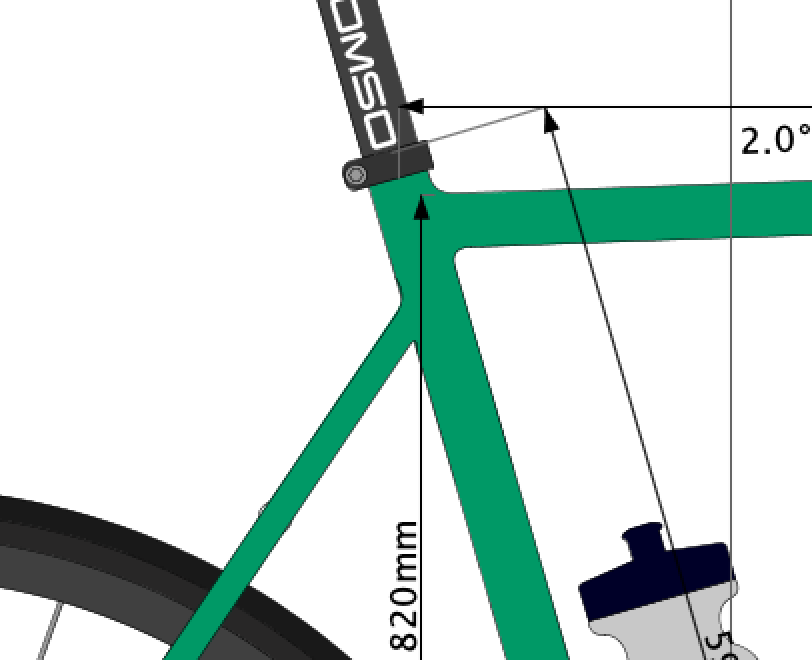
Andrew - Thank you so much for your insight. My design for this bike includes carved lugs all the way around with a 75-degree angle between the seat and top tube (planning to braze). I've decided to go with lugs because my skills are not really up for the task, and I thought lugs would provide additional reinforcement at each joint. I'm not entirely sure what a slide on wrap is or how that can remove one heat cycle, but I definitely want to learn more. I plan to join the SS to the ST ~77mm down the ST from its top point. I see this join as one of the trickiest pieces of the construction (image attached).
Seattube/tubetube lug - (https://framebuildersupply.com/colle...-4-top-tube-75)
Seattube/tubetube lug - (https://framebuildersupply.com/colle...-4-top-tube-75)
07-23-20, 06:17 AM
#7
Junior Member
Thread Starter
Join Date: Sep 2012
Posts: 141
Mentioned: 0 Post(s)
Tagged: 0 Thread(s)
Quoted: 12 Post(s)
Liked 0 Times
in
0 Posts
dsaul - Mind expanded - I just realized that I've not thought about butted tubes in relation to the cuts. And I don't know why, because that seems awfully obvious now...
Looking into externally butted seat tubes, I don't see one explicitly listed on Nova Supply, but I do see one that could work on Framebuilders Supply. I'm assuming that the external butt should be positioned at the top - but I'm a little worried about how that will fit together since I'm planning to use a lug between the ST/TT. It looks like the OD is a little larger than the lug ID. Perhaps a doubled butted tube intended as a ST, or a single or straight gauge tube would be a better choice?
Potential ST: https://framebuildersupply.com/colle...1-2-length-620
07-23-20, 08:18 AM
#8


Randomhead
Join Date: Aug 2008
Location: Happy Valley, Pennsylvania
Posts: 24,396
Mentioned: 0 Post(s)
Tagged: 0 Thread(s)
Quoted: 4 Post(s)
Liked 3,696 Times
in
2,517 Posts
If you are using lugs, you want to get a .8/.6 seat tube. You can also get a .8/.6 seat tube and put a sleeve at the top
Some means to mark the butts is pretty important.
Some means to mark the butts is pretty important.
Likes For unterhausen:
07-23-20, 12:31 PM
#9
Banned.
Join Date: Jun 2004
Location: Torrance, CA
Posts: 3,061
Bikes: Homebuilt steel
Mentioned: 18 Post(s)
Tagged: 0 Thread(s)
Quoted: 2193 Post(s)
Liked 425 Times
in
337 Posts
You can use a 27.2 seat post in that tube, but the tube will have to be reamed. It's easy to do just as long as it's not one of those super heat treated jobbies like TT Platinum. I say this because I did just that on one build.
07-23-20, 12:44 PM
#10
Randomhead
Join Date: Aug 2008
Location: Happy Valley, Pennsylvania
Posts: 24,396
Mentioned: 0 Post(s)
Tagged: 0 Thread(s)
Quoted: 4 Post(s)
Liked 3,696 Times
in
2,517 Posts
.6 is what gives you 27.2, so just cutting off the butting would do it. But it might not be long enough for that
Not clear if the OP is going to put a lug there though
Not clear if the OP is going to put a lug there though
07-23-20, 12:53 PM
#11
Banned
I have a double butted tube (Nova 650L 28.6OD 9x6x9) that I picked up for my bike's seat tube. I'm wondering if this is wrong. It seems incorrect to build a bike with a double butted seat tube, but I'm really unsure - the clamp might be enough.
Thanks in advance for any insight.
Thanks in advance for any insight.
I used such a reamer on a 27.0 seat post frame , shaved just enough out to fit a 27.2 seat post in.. then stopped.
that was taking out about 0.1mm from the tube wall thickness..
Otherwise you'd have a 26.8 seat post in there (26.8 - 1.8)
( I still have a frame with 0.9mm straight gauge Aelle with a 26.8mm seat post.. I built 45 years ago..)
....
07-23-20, 09:12 PM
#12
Senior Member
Join Date: Feb 2012
Location: Rochester, NY
Posts: 18,075
Bikes: Stewart S&S coupled sport tourer, Stewart Sunday light, Stewart Commuting, Stewart Touring, Co Motion Tandem, Stewart 3-Spd, Stewart Track, Fuji Finest, Mongoose Tomac ATB, GT Bravado ATB, JCP Folder, Stewart 650B ATB
Mentioned: 0 Post(s)
Tagged: 0 Thread(s)
Quoted: 4201 Post(s)
Liked 3,859 Times
in
2,307 Posts
bikingman- I would advise against the seat stay attachment design you mention if you are using a lug. Why? Because the lug won't extend down to where the stays butt into the ST and you'll have only the ST wall to handle the compressive loads stays place on the ST. If you go with a single butted ST then that will be a .6 (commonly) wall, not what a novice should be brazing a stay to. If you use an externally butted tube the what lug will slide over that tube end? You could extend the lug's "skirt" on the ST back side down from the lug to provide the platform for the stays to attach to, like the classy Raleigh Pros from the mid 1970s did.
Why the need to have the stays attach so far down the ST? In some miss belief that the rear end will be stiffer? Or fashion? Both are wrong or opinion.
Most common lugs have the binder bolt ears already formed so no added heat cycle there. But if you decide to make a sleeve or lug then braze the binder barrel on before doing the ST/TT joint to avoid having more heat cycles that involve the tubes. Your want of a lug and a separate binder collar is not the norm as lug ODs and binder collar ID's are not thought of being made to fit each other. Do your homework here well before continuing.
I'll end for now with the use of a double butted ST where the top butt in internal (what is usually had when a TT or DT is used for the ST). No big deal. But you will be reaming a lot off the ID if you want a 27.2 post to fit. Not wrong and the thicker wall at the joint is what newbies really should seek out. Just a lot of after brazing work with a reamer. Andy
__________________
AndrewRStewart
AndrewRStewart
Likes For Andrew R Stewart:
07-24-20, 04:35 AM
#13
Senior Member
Join Date: Jan 2013
Location: South Jersey
Posts: 2,266
Mentioned: 18 Post(s)
Tagged: 0 Thread(s)
Quoted: 714 Post(s)
Liked 800 Times
in
475 Posts
dsaul - Mind expanded - I just realized that I've not thought about butted tubes in relation to the cuts. And I don't know why, because that seems awfully obvious now...
Looking into externally butted seat tubes, I don't see one explicitly listed on Nova Supply, but I do see one that could work on Framebuilders Supply. I'm assuming that the external butt should be positioned at the top - but I'm a little worried about how that will fit together since I'm planning to use a lug between the ST/TT. It looks like the OD is a little larger than the lug ID. Perhaps a doubled butted tube intended as a ST, or a single or straight gauge tube would be a better choice?
Potential ST: https://framebuildersupply.com/colle...1-2-length-620
Looking into externally butted seat tubes, I don't see one explicitly listed on Nova Supply, but I do see one that could work on Framebuilders Supply. I'm assuming that the external butt should be positioned at the top - but I'm a little worried about how that will fit together since I'm planning to use a lug between the ST/TT. It looks like the OD is a little larger than the lug ID. Perhaps a doubled butted tube intended as a ST, or a single or straight gauge tube would be a better choice?
Potential ST: https://framebuildersupply.com/colle...1-2-length-620
It wasn't clear that you were using lugs, so the external butted seat tube is not an option. As already noted by others, a single butted seat tube with a .6mm wall at the top is usually used with a seat lug. I agree with Andy that the seatstay placement you have planned is a bad idea.
07-24-20, 07:15 AM
#14
Junior Member
Thread Starter
Join Date: Sep 2012
Posts: 141
Mentioned: 0 Post(s)
Tagged: 0 Thread(s)
Quoted: 12 Post(s)
Liked 0 Times
in
0 Posts
bikingman- I would advise against the seat stay attachment design you mention if you are using a lug. Why? Because the lug won't extend down to where the stays butt into the ST and you'll have only the ST wall to handle the compressive loads stays place on the ST. If you go with a single butted ST then that will be a .6 (commonly) wall, not what a novice should be brazing a stay to. If you use an externally butted tube the what lug will slide over that tube end? You could extend the lug's "skirt" on the ST back side down from the lug to provide the platform for the stays to attach to, like the classy Raleigh Pros from the mid 1970s did.
Why the need to have the stays attach so far down the ST? In some miss belief that the rear end will be stiffer? Or fashion? Both are wrong or opinion.
Most common lugs have the binder bolt ears already formed so no added heat cycle there. But if you decide to make a sleeve or lug then braze the binder barrel on before doing the ST/TT joint to avoid having more heat cycles that involve the tubes. Your want of a lug and a separate binder collar is not the norm as lug ODs and binder collar ID's are not thought of being made to fit each other. Do your homework here well before continuing.
I'll end for now with the use of a double butted ST where the top butt in internal (what is usually had when a TT or DT is used for the ST). No big deal. But you will be reaming a lot off the ID if you want a 27.2 post to fit. Not wrong and the thicker wall at the joint is what newbies really should seek out. Just a lot of after brazing work with a reamer. Andy
Why the need to have the stays attach so far down the ST? In some miss belief that the rear end will be stiffer? Or fashion? Both are wrong or opinion.
Most common lugs have the binder bolt ears already formed so no added heat cycle there. But if you decide to make a sleeve or lug then braze the binder barrel on before doing the ST/TT joint to avoid having more heat cycles that involve the tubes. Your want of a lug and a separate binder collar is not the norm as lug ODs and binder collar ID's are not thought of being made to fit each other. Do your homework here well before continuing.
I'll end for now with the use of a double butted ST where the top butt in internal (what is usually had when a TT or DT is used for the ST). No big deal. But you will be reaming a lot off the ID if you want a 27.2 post to fit. Not wrong and the thicker wall at the joint is what newbies really should seek out. Just a lot of after brazing work with a reamer. Andy
Hey Andy, thanks for the solid input here. Learning new things everyday.
Sorry if I misrepresented - my idea wasn't to have a seperate binding colar from the lug itself - I think I just hadn't put them together in speach perhaps. My intension is to use a lug with the binder bolt ears attached.
I'll redesign the bike to bring the seat stay/seat tube join closer to the top of the seattube. I placed it there because, simply, I like the look of the lower seat stay connection, but if I end up comprimising the structural integrety of the frame due to a poor braze job - we'll the frame becomes wall art.
07-24-20, 07:16 AM
#15
Junior Member
Thread Starter
Join Date: Sep 2012
Posts: 141
Mentioned: 0 Post(s)
Tagged: 0 Thread(s)
Quoted: 12 Post(s)
Liked 0 Times
in
0 Posts
It wasn't clear that you were using lugs, so the external butted seat tube is not an option. As already noted by others, a single butted seat tube with a .6mm wall at the top is usually used with a seat lug. I agree with Andy that the seatstay placement you have planned is a bad idea.
07-24-20, 11:07 AM
#16
Randomhead
Join Date: Aug 2008
Location: Happy Valley, Pennsylvania
Posts: 24,396
Mentioned: 0 Post(s)
Tagged: 0 Thread(s)
Quoted: 4 Post(s)
Liked 3,696 Times
in
2,517 Posts
It's always best to save the design flourishes for the 25th frame, not the first. People put the seat stay attachment very low on the seat tube seemingly without reinforcement. I am not sure how that works, plenty of anguish has been caused by doing this. Surly Pugsley comes to mind.