


Derailleur Replacement Advice please
 10-12-19, 01:10 PM
#1
Senior Member
Thread Starter

Derailleur Replacement Advice please
Well I got the broken rear derailer off and the new one on.
It was exciting learning to break a chain without a breaker.🤗
The bike is running aside from adjustments. One adjustment may be the axle nuts.
The derailer side nut barely fastens on to all the threads. The off side has several threads visible.
The questions are,could the unequal positioning have happened during the derailer getting caught up in the spokes? Does it affect performance? How do I fix it?
 10-12-19, 01:16 PM
#2
Senior Member

Join Date: Nov 2014
Location: Eugene, Oregon, USA
Posts: 27,547
Mentioned: 217 Post(s)
Tagged: 0 Thread(s)
Quoted: 18352 Post(s)
Liked 4,502 Times
in
3,346 Posts
How about some photos of what you're describing. I'm getting a bit lost.
As far as the damage from the derailleur getting caught in the spokes, the derailleur hangers can be bent, often inward toward the spokes.
The quickest test is to pull the derailleur cage straight down as long as it will go, perhaps adjust towards the spokes a bit, and look to see if the cage is parallel to the plane of the wheel.
You can often remove one jockey wheel to get a chain onto and off of a derailleur without breaking the chain.
10-12-19, 01:39 PM
#3
Blamester
Nothing wrong with that presuming the wheel is centered and the nuts torqued correctly.
But can you remember if it was like that before you worked on it. And if it wasn't what changed?
But can you remember if it was like that before you worked on it. And if it wasn't what changed?
10-12-19, 03:12 PM
#4
Senior Member
Join Date: Feb 2012
Location: Golden, CO and Tucson, AZ
Posts: 2,835
Bikes: 2016 Fuji Tread, 1983 Trek 520
Mentioned: 13 Post(s)
Tagged: 0 Thread(s)
Quoted: 674 Post(s)
Liked 738 Times
in
429 Posts
What is a "derailleur side nut?" Yes, a photo would help.
If you're talking about the main derailleur mounting bolt and it's not threading all the way into the hanger, that's not good at all. The threads in the hanger may need to be repaired or the hanger replaced.
If you're talking about the main derailleur mounting bolt and it's not threading all the way into the hanger, that's not good at all. The threads in the hanger may need to be repaired or the hanger replaced.
10-12-19, 03:21 PM
#5
Really Old Senior Member

Put something more descriptive in your thread title.
Imagine if every post started off-
Help!
Imagine if every post started off-
Help!
10-13-19, 09:23 AM
#7
Generally bewildered

Join Date: Aug 2015
Location: Eastern PA, USA
Posts: 3,037
Bikes: 2014 Trek Domane 6.9, 1999 LeMond Zurich, 1978 Schwinn Superior
Mentioned: 20 Post(s)
Tagged: 0 Thread(s)
Quoted: 1152 Post(s)
Liked 341 Times
in
251 Posts
Your concern is valid: your setup is not safe. See below.
First, with 612 posts you should be able to post a picture. Take your picture. Get it on the device you use to access Bike Forum. Click on the picture icon:

You can drag and drop your picture to the picture dialog box if its on your desktop. Or use the "Browse my Device" path. Once you see the picture on the dialog box, click the "Upload" button. Should be good.
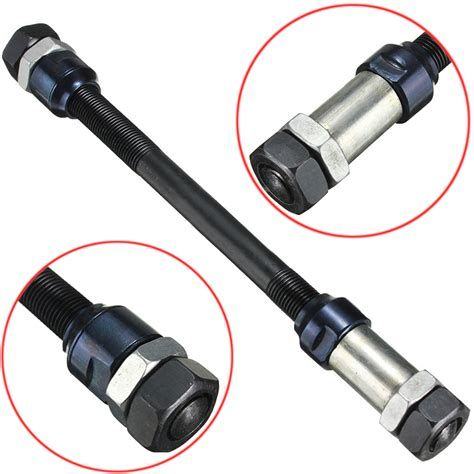
To your point, right now your bike is probably a little dangerous and you are risking stripping the axle with your setup, if I'm grokking it correctly. A cup and cone axle is threaded on both sides. Both sides have a cone, (hopefully) a washer, and a locknut. If you look at the pic below and think about it, you'll see that the distance between the cone/washer/locknut groups is set by the hub (the hub cups and ball bearings set this distance). But here's the thing: the axle position isn't defined by that distance. That is, with the cone/washer/locknut groups the right distance apart, the axle could be set up with the axle protruding on one side and not on the other, or vice versa. The wheel mechanic must choose the axle position. Ideally, for the front wheels you have about the same protrusion on either side. If the rear wheel clamps only on equally-thick dropouts on both sides (and it doesn't clamp onto the derailleur hanger) the rear wheel axle should also have equal protrusions on each side. But if the rear wheel axle clamps onto the derailleur hanger on the drive (right) side and not on the left, you have to adjust the axle protrusion to account for that: the axle has to stick out more on the drive side. The following picture gives you some idea of this. Note the equal protrusions: this is a pic of an axle setup for a bike that doesn't clamp onto a derailleur hanger. Actually, the pic below is not showing a good setup: the cones are too far apart and there's now allowance for dropouts! In practice, the cones on the axle below would be closer together.
I'm assuming that you set the axle up with equal protrusions (this is what a logical person would do, first time around). If so, yours is an easy fix. Take the wheel off the bike (you don't have to, but I find it easier). Figure out how thick the derailleur hanger (the bracket that the derailleur fastens onto) is. Loosen your locknuts. Goof around with the cones and such (initially, loose the drive side cone by about the thickness of the hanger) and fiddle with the cones and locknuts so that the axle sticks out more on the drive side, by about the thickness of that hanger. Adjust cones and locknuts so that 1) there is no play in the axle, and 2) the axle turns pretty freely. There should be a absolutely no play, and a little tension on the bearing but not too much. You can do operation this with just a crescent wrench (you leave the cone a little bit loose and tighten the locknut, redoing this if the axle is loose or too tight until you get it right) but the better path is to use what is called a cone wrench - a thin wrench that allows access to the flats on the cone.
Thinking abstractly, envision all parts of your bike floating in space in a fixed position. Then envision the rear axle position adjusted about (my estimate) 4 or 5 mm to the right, so that your axle nuts engage the axle over their full thread length. The goal of this is to allow full thread engagement on both axle nuts.
Check out: https://www.madegood.com/bikes/repai...one-front-hub/
Right now, if one rear nut is only tightened on a couple of threads, you can strip those threads, and the axle can come loose. Then, you'd need a new axle. I'd adjust that axle before riding any more.
First, with 612 posts you should be able to post a picture. Take your picture. Get it on the device you use to access Bike Forum. Click on the picture icon:
You can drag and drop your picture to the picture dialog box if its on your desktop. Or use the "Browse my Device" path. Once you see the picture on the dialog box, click the "Upload" button. Should be good.
To your point, right now your bike is probably a little dangerous and you are risking stripping the axle with your setup, if I'm grokking it correctly. A cup and cone axle is threaded on both sides. Both sides have a cone, (hopefully) a washer, and a locknut. If you look at the pic below and think about it, you'll see that the distance between the cone/washer/locknut groups is set by the hub (the hub cups and ball bearings set this distance). But here's the thing: the axle position isn't defined by that distance. That is, with the cone/washer/locknut groups the right distance apart, the axle could be set up with the axle protruding on one side and not on the other, or vice versa. The wheel mechanic must choose the axle position. Ideally, for the front wheels you have about the same protrusion on either side. If the rear wheel clamps only on equally-thick dropouts on both sides (and it doesn't clamp onto the derailleur hanger) the rear wheel axle should also have equal protrusions on each side. But if the rear wheel axle clamps onto the derailleur hanger on the drive (right) side and not on the left, you have to adjust the axle protrusion to account for that: the axle has to stick out more on the drive side. The following picture gives you some idea of this. Note the equal protrusions: this is a pic of an axle setup for a bike that doesn't clamp onto a derailleur hanger. Actually, the pic below is not showing a good setup: the cones are too far apart and there's now allowance for dropouts! In practice, the cones on the axle below would be closer together.
I'm assuming that you set the axle up with equal protrusions (this is what a logical person would do, first time around). If so, yours is an easy fix. Take the wheel off the bike (you don't have to, but I find it easier). Figure out how thick the derailleur hanger (the bracket that the derailleur fastens onto) is. Loosen your locknuts. Goof around with the cones and such (initially, loose the drive side cone by about the thickness of the hanger) and fiddle with the cones and locknuts so that the axle sticks out more on the drive side, by about the thickness of that hanger. Adjust cones and locknuts so that 1) there is no play in the axle, and 2) the axle turns pretty freely. There should be a absolutely no play, and a little tension on the bearing but not too much. You can do operation this with just a crescent wrench (you leave the cone a little bit loose and tighten the locknut, redoing this if the axle is loose or too tight until you get it right) but the better path is to use what is called a cone wrench - a thin wrench that allows access to the flats on the cone.
Thinking abstractly, envision all parts of your bike floating in space in a fixed position. Then envision the rear axle position adjusted about (my estimate) 4 or 5 mm to the right, so that your axle nuts engage the axle over their full thread length. The goal of this is to allow full thread engagement on both axle nuts.
Check out: https://www.madegood.com/bikes/repai...one-front-hub/
Right now, if one rear nut is only tightened on a couple of threads, you can strip those threads, and the axle can come loose. Then, you'd need a new axle. I'd adjust that axle before riding any more.
Last edited by WizardOfBoz; 10-13-19 at 09:40 AM.
10-13-19, 09:47 AM
#8
Sr Member on Sr bikes

Well I got the broken rear derailer off and the new one on.
It was exciting learning to break a chain without a breaker.🤗
The bike is running aside from adjustments. One adjustment may be the axle nuts.
The derailer side nut barely fastens on to all the threads. The off side has several threads visible.
The questions are,could the unequal positioning have happened during the derailer getting caught up in the spokes? Does it affect performance? How do I fix it?
It was exciting learning to break a chain without a breaker.🤗
The bike is running aside from adjustments. One adjustment may be the axle nuts.
The derailer side nut barely fastens on to all the threads. The off side has several threads visible.
The questions are,could the unequal positioning have happened during the derailer getting caught up in the spokes? Does it affect performance? How do I fix it?
Dan
10-13-19, 12:58 PM
#9
Senior Member
Thread Starter
10-13-19, 01:04 PM
#10
Senior Member
Thread Starter
Dan? It is the same stock deraileur that mounts on the frame.
I have been ill lately and so forgot my ownself That I had also gotten the rear wheel trued.
The bike mechanic admitted he had not trued many wheels.
I am thinking he either adjusted the axle sideways or
much less likely it shifted when the derailer broke.
Anyway the bike is running even if in need of adjustment.
I will look at a few G.C.N. videos and see if I can muddle through.
10-14-19, 08:36 AM
#11
Senior Member
Thread Starter
Your concern is valid: your setup is not safe. See below.
First, with 612 posts you should be able to post a picture. Take your picture. Get it on the device you use to access Bike Forum. Click on the picture icon:
You can drag and drop your picture to the picture dialog box if its on your desktop. Or use the "Browse my Device" path. Once you see the picture on the dialog box, click the "Upload" button. Should be good.
To your point, right now your bike is probably a little dangerous and you are risking stripping the axle with your setup, if I'm grokking it correctly. A cup and cone axle is threaded on both sides. Both sides have a cone, (hopefully) a washer, and a locknut. If you look at the pic below and think about it, you'll see that the distance between the cone/washer/locknut groups is set by the hub (the hub cups and ball bearings set this distance). But here's the thing: the axle position isn't defined by that distance. That is, with the cone/washer/locknut groups the right distance apart, the axle could be set up with the axle protruding on one side and not on the other, or vice versa. The wheel mechanic must choose the axle position. Ideally, for the front wheels you have about the same protrusion on either side. If the rear wheel clamps only on equally-thick dropouts on both sides (and it doesn't clamp onto the derailleur hanger) the rear wheel axle should also have equal protrusions on each side. But if the rear wheel axle clamps onto the derailleur hanger on the drive (right) side and not on the left, you have to adjust the axle protrusion to account for that: the axle has to stick out more on the drive side. The following picture gives you some idea of this. Note the equal protrusions: this is a pic of an axle setup for a bike that doesn't clamp onto a derailleur hanger. Actually, the pic below is not showing a good setup: the cones are too far apart and there's now allowance for dropouts! In practice, the cones on the axle below would be closer together.
I'm assuming that you set the axle up with equal protrusions (this is what a logical person would do, first time around). If so, yours is an easy fix. Take the wheel off the bike (you don't have to, but I find it easier). Figure out how thick the derailleur hanger (the bracket that the derailleur fastens onto) is. Loosen your locknuts. Goof around with the cones and such (initially, loose the drive side cone by about the thickness of the hanger) and fiddle with the cones and locknuts so that the axle sticks out more on the drive side, by about the thickness of that hanger. Adjust cones and locknuts so that 1) there is no play in the axle, and 2) the axle turns pretty freely. There should be a absolutely no play, and a little tension on the bearing but not too much. You can do operation this with just a crescent wrench (you leave the cone a little bit loose and tighten the locknut, redoing this if the axle is loose or too tight until you get it right) but the better path is to use what is called a cone wrench - a thin wrench that allows access to the flats on the cone.
Thinking abstractly, envision all parts of your bike floating in space in a fixed position. Then envision the rear axle position adjusted about (my estimate) 4 or 5 mm to the right, so that your axle nuts engage the axle over their full thread length. The goal of this is to allow full thread engagement on both axle nuts.
Check out: https://www.madegood.com/bikes/repai...one-front-hub/
Right now, if one rear nut is only tightened on a couple of threads, you can strip those threads, and the axle can come loose. Then, you'd need a new axle. I'd adjust that axle before riding any more.
That was a great explanation.😀
Thank you for your advice.
10-14-19, 08:56 AM
#12
Generally bewildered
Join Date: Aug 2015
Location: Eastern PA, USA
Posts: 3,037
Bikes: 2014 Trek Domane 6.9, 1999 LeMond Zurich, 1978 Schwinn Superior
Mentioned: 20 Post(s)
Tagged: 0 Thread(s)
Quoted: 1152 Post(s)
Liked 341 Times
in
251 Posts
PdalPowr, glad that all that writing was useful. Pretty hard for derailleur damage to cause an axle to shift - the cone-to-cone distance is fixed by the hub, and they are locked in place with the washer/locknut setup. It could be that the axle was bent or broken and was replaced, in which case the mechanic may not have adjusted the axle position left or right to get full nut engagement on both sides. Or a replacement axle might have been a few millimeters shorter than original. For best safety and durability, both sides of the axle should have full thread engagement (a thread or so extending from each nut is the goal).
If your derailleur mounts to the frame, or if the derailleur hanger is such that the axle doesn't clamp to it, then the ends protruding from the wheel both have to clamp to the same dropout thickness and should be about equal. Pretty easy to check with a ruler.
Good luck. Let us know how it works out.
Last edited by WizardOfBoz; 10-14-19 at 12:52 PM.
10-15-19, 11:46 AM
#13
Se�or Member

Join Date: Feb 2013
Posts: 5,066
Mentioned: 5 Post(s)
Tagged: 0 Thread(s)
Quoted: 649 Post(s)
Liked 292 Times
in
215 Posts
If all threads in both nuts are engaged (axle is not recessed into either) then it is fine. You would gain nothing by trying to get the same number of threads on both sides once the nut is fully engaged.
If one side has the end of the axle recessed by one thread or more, I would try to fix that.
If one side has the end of the axle recessed by one thread or more, I would try to fix that.
10-15-19, 02:56 PM
#14
Senior Member
Join Date: Jun 2014
Location: Ontario, Canada
Posts: 4,624
Bikes: iele Latina, Miele Suprema, Miele Uno LS, Miele Miele Beta, MMTB, Bianchi Model Unknown, Fiori Venezia, Fiori Napoli, VeloSport Adamas AX
Mentioned: 16 Post(s)
Tagged: 0 Thread(s)
Quoted: 1324 Post(s)
Liked 927 Times
in
640 Posts
How did you get your chain back together without a chain tool? Did you use a Quick-Link? If not you might have set yourself up for a chain breaking when under heavy load like going up a hill or starting off in a high gear.
Cheers
Cheers
10-16-19, 08:22 AM
#15

Super Moderator

Join Date: Jul 2004
Location: Ffld Cnty Connecticut
Posts: 21,843
Bikes: Old Steelies I made, Old Cannondales
Mentioned: 12 Post(s)
Tagged: 0 Thread(s)
Quoted: 1173 Post(s)
Liked 927 Times
in
612 Posts
Good point. I modified the thread title.
__________________
Bikes: Old steel race bikes, old Cannondale race bikes, less old Cannondale race bike, crappy old mtn bike.
FYI: https://www.bikeforums.net/forum-sugg...ad-please.html
Bikes: Old steel race bikes, old Cannondale race bikes, less old Cannondale race bike, crappy old mtn bike.
FYI: https://www.bikeforums.net/forum-sugg...ad-please.html
Likes For Homebrew01:
