


Has anyone dressed axle cones using a hand drill and sandpaper?
 02-26-19, 10:04 AM
#1

Junior Member
Thread Starter
Has anyone dressed axle cones using a hand drill and sandpaper?
I have a front hub with some light pitting on the bearing surface area of both cones. I see posts on here about people using a lathe and a special bit to get rid of the pitting. Has anyone done this by chucking the cone in a hand drill and using sandpaper? I would think it would work. I have every grade of sandpaper under the sun up to 2000 grit, Simichrome, and 4 grades of steel wool, I'm just not sure what grades of to start and end with.
Any tips would be greatly appreciated.
Any tips would be greatly appreciated.
Last edited by MB33; 02-26-19 at 10:08 AM.
 02-26-19, 10:15 AM
#2
Banned
More than sandpaper.... (have you tried your Idea yet, how did it work ?)
how it has been done ... 2 drill motors 1 has a cone shaped, grindstone bit, the other spins the cone on an axle..
don't let the heat of doing it take the temper out of the steel .. keep or cool, dipped in water often
how it has been done ... 2 drill motors 1 has a cone shaped, grindstone bit, the other spins the cone on an axle..
don't let the heat of doing it take the temper out of the steel .. keep or cool, dipped in water often
02-26-19, 10:15 AM
#3
aka Tom Reingold

Join Date: Jan 2009
Location: New York, NY, and High Falls, NY, USA
Posts: 40,502
Bikes: 1962 Rudge Sports, 1971 Raleigh Super Course, 1971 Raleigh Pro Track, 1974 Raleigh International, 1975 Viscount Fixie, 1982 McLean, 1996 Lemond (Ti), 2002 Burley Zydeco tandem
Mentioned: 511 Post(s)
Tagged: 0 Thread(s)
Quoted: 7348 Post(s)
Liked 2,460 Times
in
1,432 Posts
I don't think this is practical. Good cones are hardened very hard. If you make any progress at all, it will be with huge amounts of materials and labor, and they would exceed the cost of replacement cones. And you might not get anywhere. Or if you get somewhere, you might go through the hardened layer and end up with a soft outer layer, and that's no good. I have never heard of anyone succeeding at this, though I've heard the idea over the years.
__________________
Tom Reingold, tom@noglider.com
New York City and High Falls, NY
Blogs: The Experienced Cyclist; noglider's ride blog
�When man invented the bicycle he reached the peak of his attainments.� � Elizabeth West, US author
Please email me rather than PM'ing me. Thanks.
Tom Reingold, tom@noglider.com
New York City and High Falls, NY
Blogs: The Experienced Cyclist; noglider's ride blog
�When man invented the bicycle he reached the peak of his attainments.� � Elizabeth West, US author
Please email me rather than PM'ing me. Thanks.
02-26-19, 11:30 AM
#4
Senior Member
Join Date: Mar 2008
Posts: 8,688
Mentioned: 46 Post(s)
Tagged: 0 Thread(s)
Quoted: 1074 Post(s)
Liked 295 Times
in
222 Posts
I�ve ground a number of cones using a drill press and a Dremel. Or a drill press and a sand paper rolled around a screwdriver blade. Doing it with a hand drill seems tedious, but not impossible. Cone survival after grinding has not been a problem.
Don�t rightly remember which grits I�ve used. With the Dremel, I finish with a polishing stone that leaves near enough a mirror finish. With the sand paper, it�s a fine wet sanding one.
I�ve spoken to friends in the automotive business, and w/o taking a cone to the lab, their best guesstimate, based on truck transmission manufacturing, it that pieces of that size are most likely to end through-hardened.
Last edited by dabac; 02-26-19 at 11:34 AM.
Likes For dabac:
02-26-19, 11:39 AM
#5
aka Tom Reingold
Join Date: Jan 2009
Location: New York, NY, and High Falls, NY, USA
Posts: 40,502
Bikes: 1962 Rudge Sports, 1971 Raleigh Super Course, 1971 Raleigh Pro Track, 1974 Raleigh International, 1975 Viscount Fixie, 1982 McLean, 1996 Lemond (Ti), 2002 Burley Zydeco tandem
Mentioned: 511 Post(s)
Tagged: 0 Thread(s)
Quoted: 7348 Post(s)
Liked 2,460 Times
in
1,432 Posts
OK now I've heard of one person succeeding at it. I'm glad to know I'm wrong.
__________________
Tom Reingold, tom@noglider.com
New York City and High Falls, NY
Blogs: The Experienced Cyclist; noglider's ride blog
�When man invented the bicycle he reached the peak of his attainments.� � Elizabeth West, US author
Please email me rather than PM'ing me. Thanks.
Tom Reingold, tom@noglider.com
New York City and High Falls, NY
Blogs: The Experienced Cyclist; noglider's ride blog
�When man invented the bicycle he reached the peak of his attainments.� � Elizabeth West, US author
Please email me rather than PM'ing me. Thanks.
02-26-19, 01:01 PM
#6
SE Wis
Join Date: Apr 2005
Location: Milwaukee, WI
Posts: 10,505
Bikes: '68 Raleigh Sprite, '02 Raleigh C500, '84 Raleigh Gran Prix, '91 Trek 400, 2013 Novara Randonee, 1990 Trek 970
Mentioned: 40 Post(s)
Tagged: 0 Thread(s)
Quoted: 2743 Post(s)
Liked 3,390 Times
in
2,053 Posts

Likes For dedhed:
02-26-19, 01:14 PM
#7
Senior Member
Join Date: Dec 2016
Location: Long Island, NY
Posts: 2,109
Bikes: Trek 800 x 2, Schwinn Heavy Duti, Schwinn Traveler, Schwinn Le Tour Luxe, Schwinn Continental, Cannondale M400 and Lambert, Schwinn Super Sport
Mentioned: 14 Post(s)
Tagged: 0 Thread(s)
Quoted: 809 Post(s)
Liked 1,022 Times
in
665 Posts
With only light pitting the technique that i use is to clean out the race of any grease and debris, clean the bearings and cone. Then repack the race with lapping compound. Re-assemble with the old ball bearings, assuming they were good. Then connect a drill motor to the axle and hold onto the hub. Run the drill for a few minutes in both forward and reverse. Then dis-assemble and throw away the ball bearings. Clean everything real good and re-assemble with new ball bearings.
The technique described in the original post would be for for more serious pitting. I don't see why it wouldn't work, This diameter of the grinding tool must be real close to the diameter of the balls. It might be good to follow up with the lapping compound afterward.
Let us know how it goes. With pictures please.
Likes For Velo Mule:
02-26-19, 01:15 PM
#8
Senior Member

Join Date: Apr 2007
Location: Thunder Bay, Ontario, Canada - burrrrr!
Posts: 11,674
Bikes: 1958 Rabeneick 120D, 1968 Legnano Gran Premio, 196? Torpado Professional, 2000 Marinoni Piuma
Mentioned: 210 Post(s)
Tagged: 0 Thread(s)
Quoted: 1372 Post(s)
Likes: 0
Liked 1,751 Times
in
938 Posts
OK now I've heard of one person succeeding at it. I'm glad to know I'm wrong.
All that said, I have dressed bearing races and/or cups but only if a proper replacement set, in good shape, was not available at the time. And, I stayed close to home on any such steed. And, I never sold a bicycle with damaged bearings, just in case anyone is wondering.
__________________
"98% of the bikes I buy are projects".
"98% of the bikes I buy are projects".
02-26-19, 01:17 PM
#9
Senior Member

Join Date: Dec 2006
Location: Colorado
Posts: 568
Bikes: Forty of them
Mentioned: 10 Post(s)
Tagged: 0 Thread(s)
Quoted: 99 Post(s)
Likes: 0
Liked 33 Times
in
21 Posts
I've re-cut several Campy cones using a toolpost grinder on a lathe, but can't speak to the relative success of any other method. I tend to avoid messing with cones from other brands except in times of desperation.
02-26-19, 06:36 PM
#10
Junior Member
Thread Starter
Thanks for the advice so far folks. I'm going to give it a go, but it might be a couple days before I can get my "redneck lathe" set up. My plan is using a 3/16 drill bit for a block, start with 1000, then go to 1500, then 2000 (all with water), then 0000 steel wool with simichrome as the final polish.
02-27-19, 08:17 AM
#11
Eccentric Old Man

Join Date: Jan 2014
Location: BelleVegas, IL
Posts: 719
Bikes: 1986 Trek 520 Cirrus, 1979 Schwinn Traveler III, Trek T100, 1995 Trek 970, Fuji America
Mentioned: 31 Post(s)
Tagged: 0 Thread(s)
Quoted: 248 Post(s)
Likes: 0
Liked 173 Times
in
87 Posts
[QUOTE=dedhed;20813017]https://www.hemmings.com/magazine/hs...e/1282111.html
"But the advantages to Cherry Red compound are that it's not a cyanide-based compound"
A good thing, helps with repeat sales.
"But the advantages to Cherry Red compound are that it's not a cyanide-based compound"
A good thing, helps with repeat sales.
05-01-20, 12:06 PM
#12
Senior Member
I thought I would bump this old thread:
I came across this page on the web:
https://bicycleobsession.wordpress.c...ted-hub-cones/
And tried the technique with a pair of cones that were only slightly less pitted than the ones shown on the website, using a slightly simplified (and totally low budget dirtbag) setup:
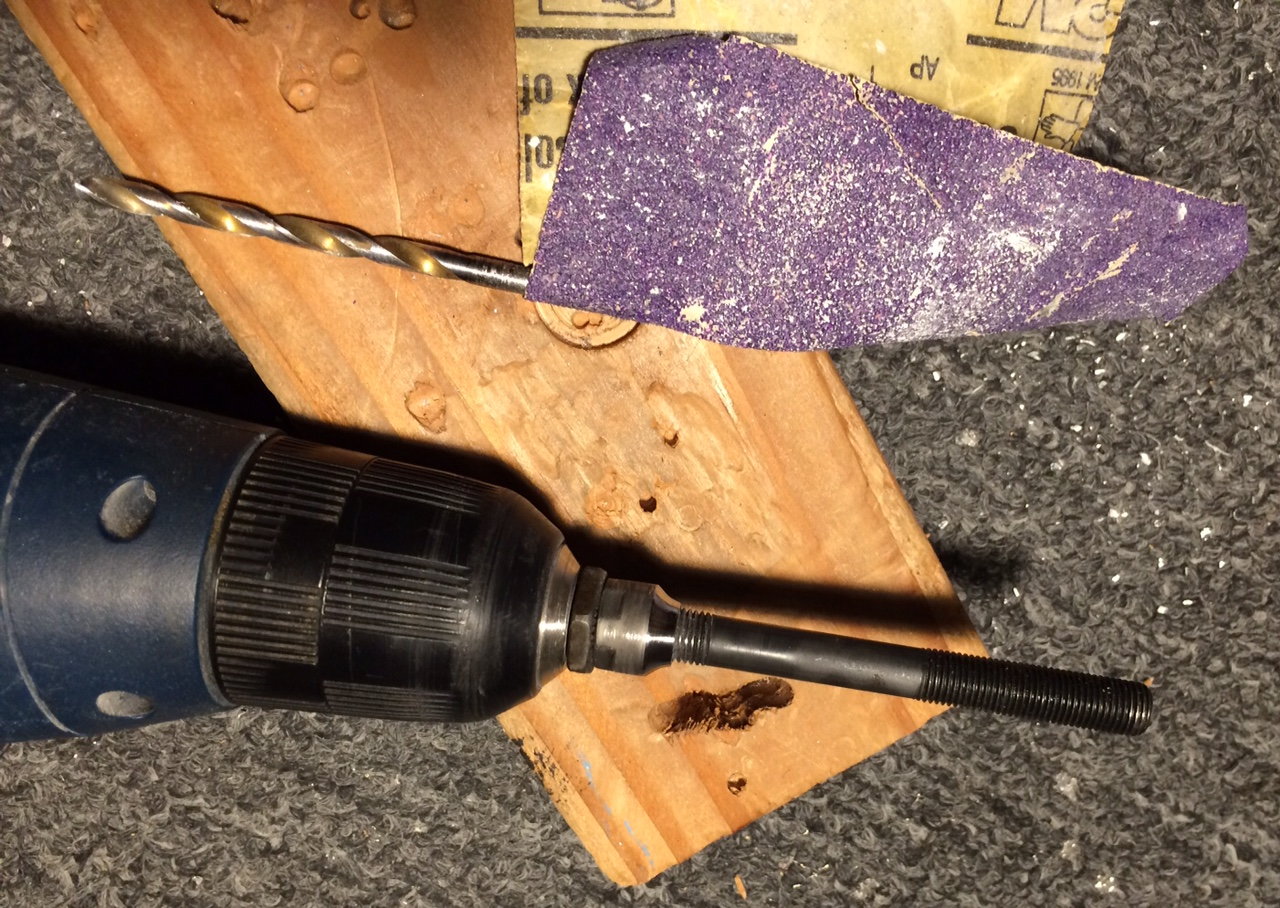
Even so, I was amazed at how well it worked. The only other thing I did was to spin them against this 3M metal polishing cloth I have. I wish I had taken "before" pictures, but they weren't really very old cones, just abused, with some mild pitting. Are they slightly out of round now? Possibly, but the reassembled wheel seems to spin quite smoothly. Not new-wheel-smoothly, but good enough so that, giving the axle the "hand test" now, I wouldn't feel the need to repack the bearings. Anyway, I'm really psyched to know about this, thanks.

I came across this page on the web:
https://bicycleobsession.wordpress.c...ted-hub-cones/
And tried the technique with a pair of cones that were only slightly less pitted than the ones shown on the website, using a slightly simplified (and totally low budget dirtbag) setup:
Even so, I was amazed at how well it worked. The only other thing I did was to spin them against this 3M metal polishing cloth I have. I wish I had taken "before" pictures, but they weren't really very old cones, just abused, with some mild pitting. Are they slightly out of round now? Possibly, but the reassembled wheel seems to spin quite smoothly. Not new-wheel-smoothly, but good enough so that, giving the axle the "hand test" now, I wouldn't feel the need to repack the bearings. Anyway, I'm really psyched to know about this, thanks.
Last edited by Headpost; 05-01-20 at 12:13 PM.
05-01-20, 12:38 PM
#13
WGB
Join Date: Jul 2017
Location: Niagara Region
Posts: 2,917
Bikes: Panasonic PT-4500
Mentioned: 46 Post(s)
Tagged: 0 Thread(s)
Quoted: 1799 Post(s)
Liked 2,334 Times
in
1,378 Posts
Headpost
Very impressive work!
Perhaps you should add to the "Hints and Tricks" thread on the mechanics forum. Might encourage someone else to try and save an irreplaceable part, especially during covid.
Very impressive work!
Perhaps you should add to the "Hints and Tricks" thread on the mechanics forum. Might encourage someone else to try and save an irreplaceable part, especially during covid.
05-02-20, 06:26 AM
#14
Senior Member
Join Date: Feb 2020
Posts: 2,814
Mentioned: 49 Post(s)
Tagged: 0 Thread(s)
Quoted: 1106 Post(s)
Likes: 0
Liked 1,326 Times
in
782 Posts
The race surface has a larger radius than that of the balls, but how much larger does not (within limits) matter, except that larger is marginally better [1]
What matters is that that the line between the points of contact on each side of the balls both
a) runs on a hard smooth surface; and
b) is at an angle correct for the kind of load expected. All you have to do is grind so that line is in the same relative position.
[1] Larger is marginally better because the balls do not make a perfect point contact, there is some elastic deformation, and so there is "skidding" of the parts in contact at the edges of the line of contact; this skidding is the source of wear, and a flatter base reduces the width of the line and the resultant wear.

