


Hub Dyno Wiring Examples Please?
 07-30-19, 11:37 PM
#1
Senior Member
Thread Starter
Join Date: Jun 2017
Posts: 64
Mentioned: 4 Post(s)
Tagged: 0 Thread(s)
Quoted: 11 Post(s)
Likes: 0
Liked 13 Times
in
9 Posts
Hub Dyno Wiring Examples Please?
I’ve got a shimano hub dyno on my bike for the last year and a half. It powers B&M front and rear lights.
The routing of my “wiring” particularly to the rear light is functional but not very attractive looking. Could anybody share some photos of how they have achieved a tidy installation so I can figure out how to make improvements.
The routing of my “wiring” particularly to the rear light is functional but not very attractive looking. Could anybody share some photos of how they have achieved a tidy installation so I can figure out how to make improvements.
 08-05-19, 09:18 AM
#3
Senior Member
Join Date: Dec 2010
Location: northern Deep South
Posts: 8,895
Bikes: Fuji Touring, Novara Randonee
Mentioned: 36 Post(s)
Tagged: 0 Thread(s)
Quoted: 2599 Post(s)
Liked 1,924 Times
in
1,208 Posts
I'm too proud to show a picture of my dyno wiring installations.
FWIW, imagine a wire very visible winding around the fork up to the headlight, looping a bit (for slack while turning) to a zip tie on the headtube, zipties along the top tube, underneath the rack (with a couple zipties to hold the extra wire) to the rear light. Would you want to brag about that?
FWIW, imagine a wire very visible winding around the fork up to the headlight, looping a bit (for slack while turning) to a zip tie on the headtube, zipties along the top tube, underneath the rack (with a couple zipties to hold the extra wire) to the rear light. Would you want to brag about that?
08-05-19, 09:47 AM
#4
Senior Member

Join Date: Feb 2008
Location: Peoria, IL
Posts: 4,469
Mentioned: 86 Post(s)
Tagged: 0 Thread(s)
Quoted: 1827 Post(s)
Liked 3,367 Times
in
1,573 Posts
for the sake of discussion, let me offer some photos of my commuting bike.
It's not tidy in the way that some rando bikes are, but perhaps it might show some options or ideas.
Let's discuss this bit by bit... and start at the fork. The bike uses a dyno hub, and the light attaches to the top of the fork blade, so there is a need to route wires from the bottom to the top of the fork blade. I relied primarily on the braze-on fittings for the fender mounts and the rack mounts as places to attach the wires.

I should probably note that I use a set of pins and sockets to make an easy disconnect for the Schmidt dynamo...

I have a dynamo powered tail light and run these wires along the top tube. The frame is custom, so I had the option of coming up with a really clever idea for routing the wires. The frame is also S&S coupled, so the method had to accomodate breaking the frame in half.
The result is a series of simple loops that I can tie the wires to.
Not particularly clever or clean, but functional and has kept the wires out of the way and out of trouble.

The tail light is mounted to a Tubus rack. I just run the wires along horizontal tube of the rack, securing them with electrical tape. I also use connector pins and sockets to be able to easily disconnect this section of wires from those attached to the top tube of the frame.


The ultimate in tidy wiring is to use the Schmidt SL fitting, IIRC, which allows the wires to be concealed in the fork blade. If the frame is equipped with a small hole on the underside of the top of the down tube, then wires for the tail light can be routed through the down tube and to the end of the chain stay. With another hole in the chain stay, the wires can then exit the frame and be routed to the tail light.
There must be pictures on the web of someone who has done this... maybe Peter Weigle??
Steve in Peoria
It's not tidy in the way that some rando bikes are, but perhaps it might show some options or ideas.
Let's discuss this bit by bit... and start at the fork. The bike uses a dyno hub, and the light attaches to the top of the fork blade, so there is a need to route wires from the bottom to the top of the fork blade. I relied primarily on the braze-on fittings for the fender mounts and the rack mounts as places to attach the wires.
I should probably note that I use a set of pins and sockets to make an easy disconnect for the Schmidt dynamo...
I have a dynamo powered tail light and run these wires along the top tube. The frame is custom, so I had the option of coming up with a really clever idea for routing the wires. The frame is also S&S coupled, so the method had to accomodate breaking the frame in half.
The result is a series of simple loops that I can tie the wires to.
Not particularly clever or clean, but functional and has kept the wires out of the way and out of trouble.
The tail light is mounted to a Tubus rack. I just run the wires along horizontal tube of the rack, securing them with electrical tape. I also use connector pins and sockets to be able to easily disconnect this section of wires from those attached to the top tube of the frame.
The ultimate in tidy wiring is to use the Schmidt SL fitting, IIRC, which allows the wires to be concealed in the fork blade. If the frame is equipped with a small hole on the underside of the top of the down tube, then wires for the tail light can be routed through the down tube and to the end of the chain stay. With another hole in the chain stay, the wires can then exit the frame and be routed to the tail light.
There must be pictures on the web of someone who has done this... maybe Peter Weigle??
Steve in Peoria
08-05-19, 10:20 AM
#5
Senior Member
Join Date: Aug 2010
Location: Madison, WI
Posts: 11,177
Bikes: 1961 Ideor, 1966 Perfekt 3 Speed AB Hub, 1994 Bridgestone MB-6, 2006 Airnimal Joey, 2009 Thorn Sherpa, 2013 Thorn Nomad MkII, 2015 VO Pass Hunter, 2017 Lynskey Backroad, 2017 Raleigh Gran Prix, 1980s Bianchi Mixte on a trainer. Others are now gone.
Mentioned: 47 Post(s)
Tagged: 0 Thread(s)
Quoted: 3453 Post(s)
Liked 1,453 Times
in
1,132 Posts
I offer this first photo in total humor only, only a headlamp and no taillamp. Both hub and light grounded to the fork, so only one wire about 5 inches long is needed.
Simplest wiring job I have ever done.
***
On my Lynskey I have glued the wire to the taillight inside of the fender. So the wire is not seen aft of the bottom bracket area. The wire comes out near the bottom bracket. There are a couple quick disconnects there. Then the wire is less than pretty because it is wrapped around the rear brake cable that is attached to the downtube up to the headlamp. I do not have any photos of the taillight wiring.
Others have used tape but I chose to use glue for the wire inside the fender.
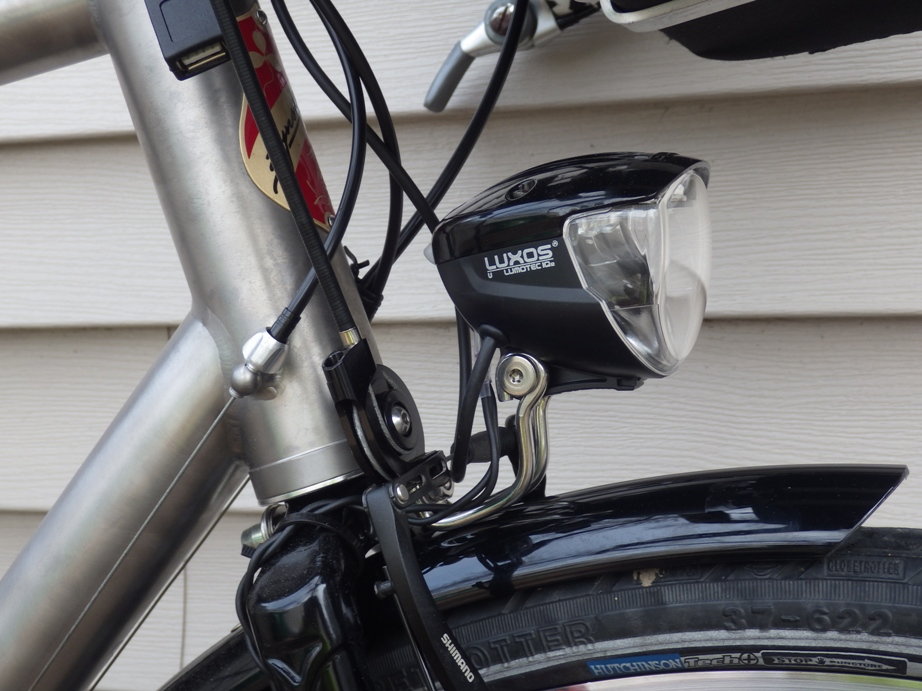
The headlight wiring on my Lynskey is zip tied to the fork blade from the tip of the fork up to the fork crown, then plugs into the light. I took this photo before I added the taillight wires that plug into the light. If the light wiring looks odd, it is a Luxos U that has an extra wire up to the handlebar for the switch and USB port.
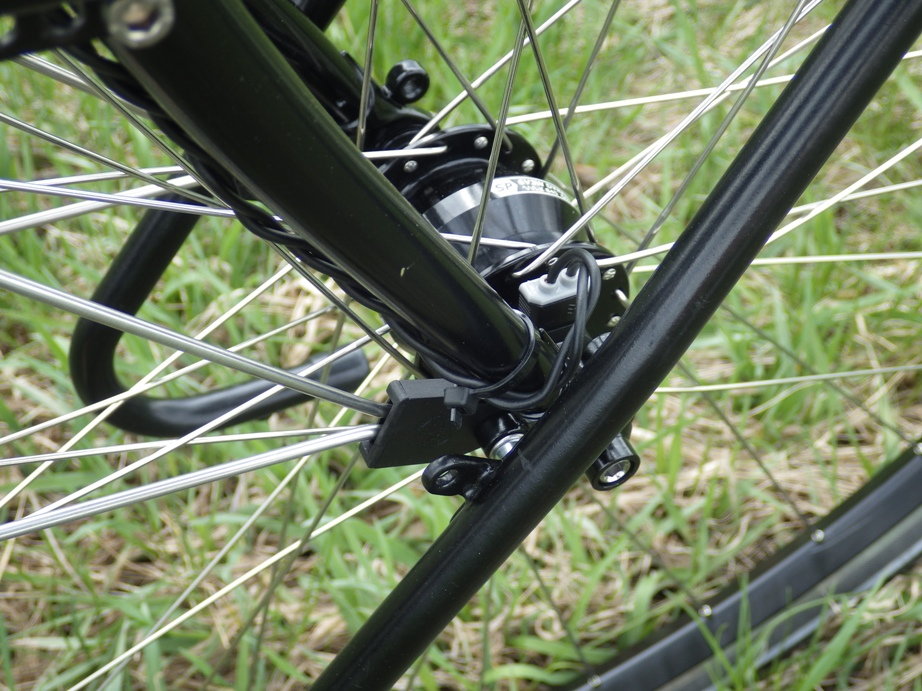
The photo below shows the wiring where it plugs into the hub. If the photo is a bit confusing, there is a Tubus Tara rack on the fork when the photo was taken.
Simplest wiring job I have ever done.
***
On my Lynskey I have glued the wire to the taillight inside of the fender. So the wire is not seen aft of the bottom bracket area. The wire comes out near the bottom bracket. There are a couple quick disconnects there. Then the wire is less than pretty because it is wrapped around the rear brake cable that is attached to the downtube up to the headlamp. I do not have any photos of the taillight wiring.
Others have used tape but I chose to use glue for the wire inside the fender.
The headlight wiring on my Lynskey is zip tied to the fork blade from the tip of the fork up to the fork crown, then plugs into the light. I took this photo before I added the taillight wires that plug into the light. If the light wiring looks odd, it is a Luxos U that has an extra wire up to the handlebar for the switch and USB port.
The photo below shows the wiring where it plugs into the hub. If the photo is a bit confusing, there is a Tubus Tara rack on the fork when the photo was taken.
Likes For Tourist in MSN:
08-05-19, 03:02 PM
#7
Senior Member
Join Date: Aug 2010
Location: Madison, WI
Posts: 11,177
Bikes: 1961 Ideor, 1966 Perfekt 3 Speed AB Hub, 1994 Bridgestone MB-6, 2006 Airnimal Joey, 2009 Thorn Sherpa, 2013 Thorn Nomad MkII, 2015 VO Pass Hunter, 2017 Lynskey Backroad, 2017 Raleigh Gran Prix, 1980s Bianchi Mixte on a trainer. Others are now gone.
Mentioned: 47 Post(s)
Tagged: 0 Thread(s)
Quoted: 3453 Post(s)
Liked 1,453 Times
in
1,132 Posts
This thread shamed me into cleaning up the ugly part of my wiring on my Lynskey Backroad, the taillight wiring along the downtube looked pretty ugly. It is no longer wrapped around the brake cable, I instead zip tied it to the downtube.
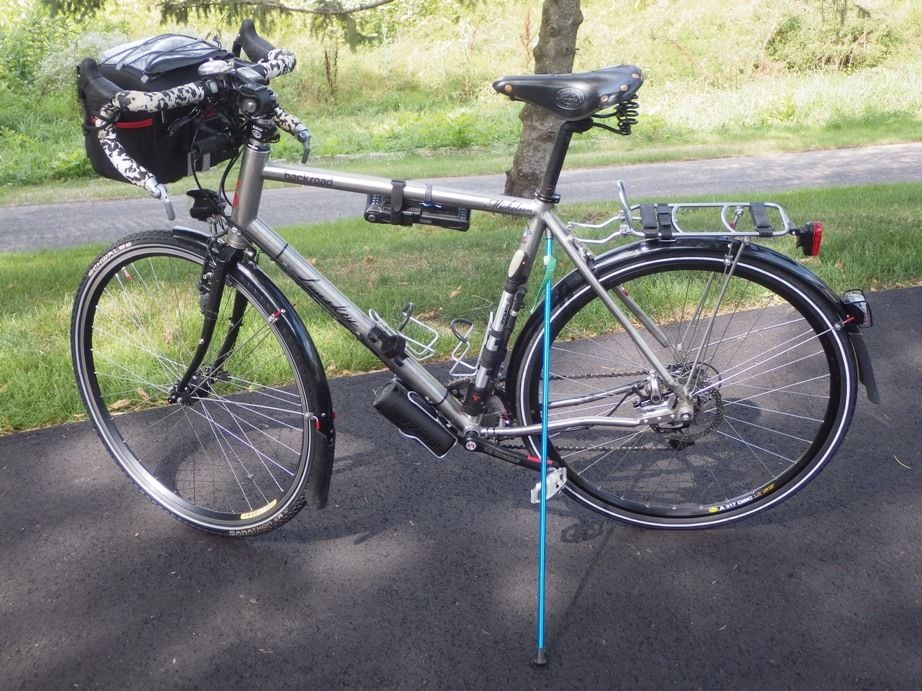
On most of my bikes the lighting wiring is temporary because I expect for one reason or another to change it. But, I do not have that excuse on the Lynskey, I have no plans for any changes, thus it should look like it was intended to stay this way. So, here are the photos of my Backroad.
The specifics are an SP PV-8 dynohub, Luxos U headlamp and USB charger, and Spaninga Pixeo taillight mounted on the rear fender. The wiring between the taillight and the bottom bracket area is glued inside the fender, no photos of that. I also have a rack mounted battery powered taillight so that I have a blinky.
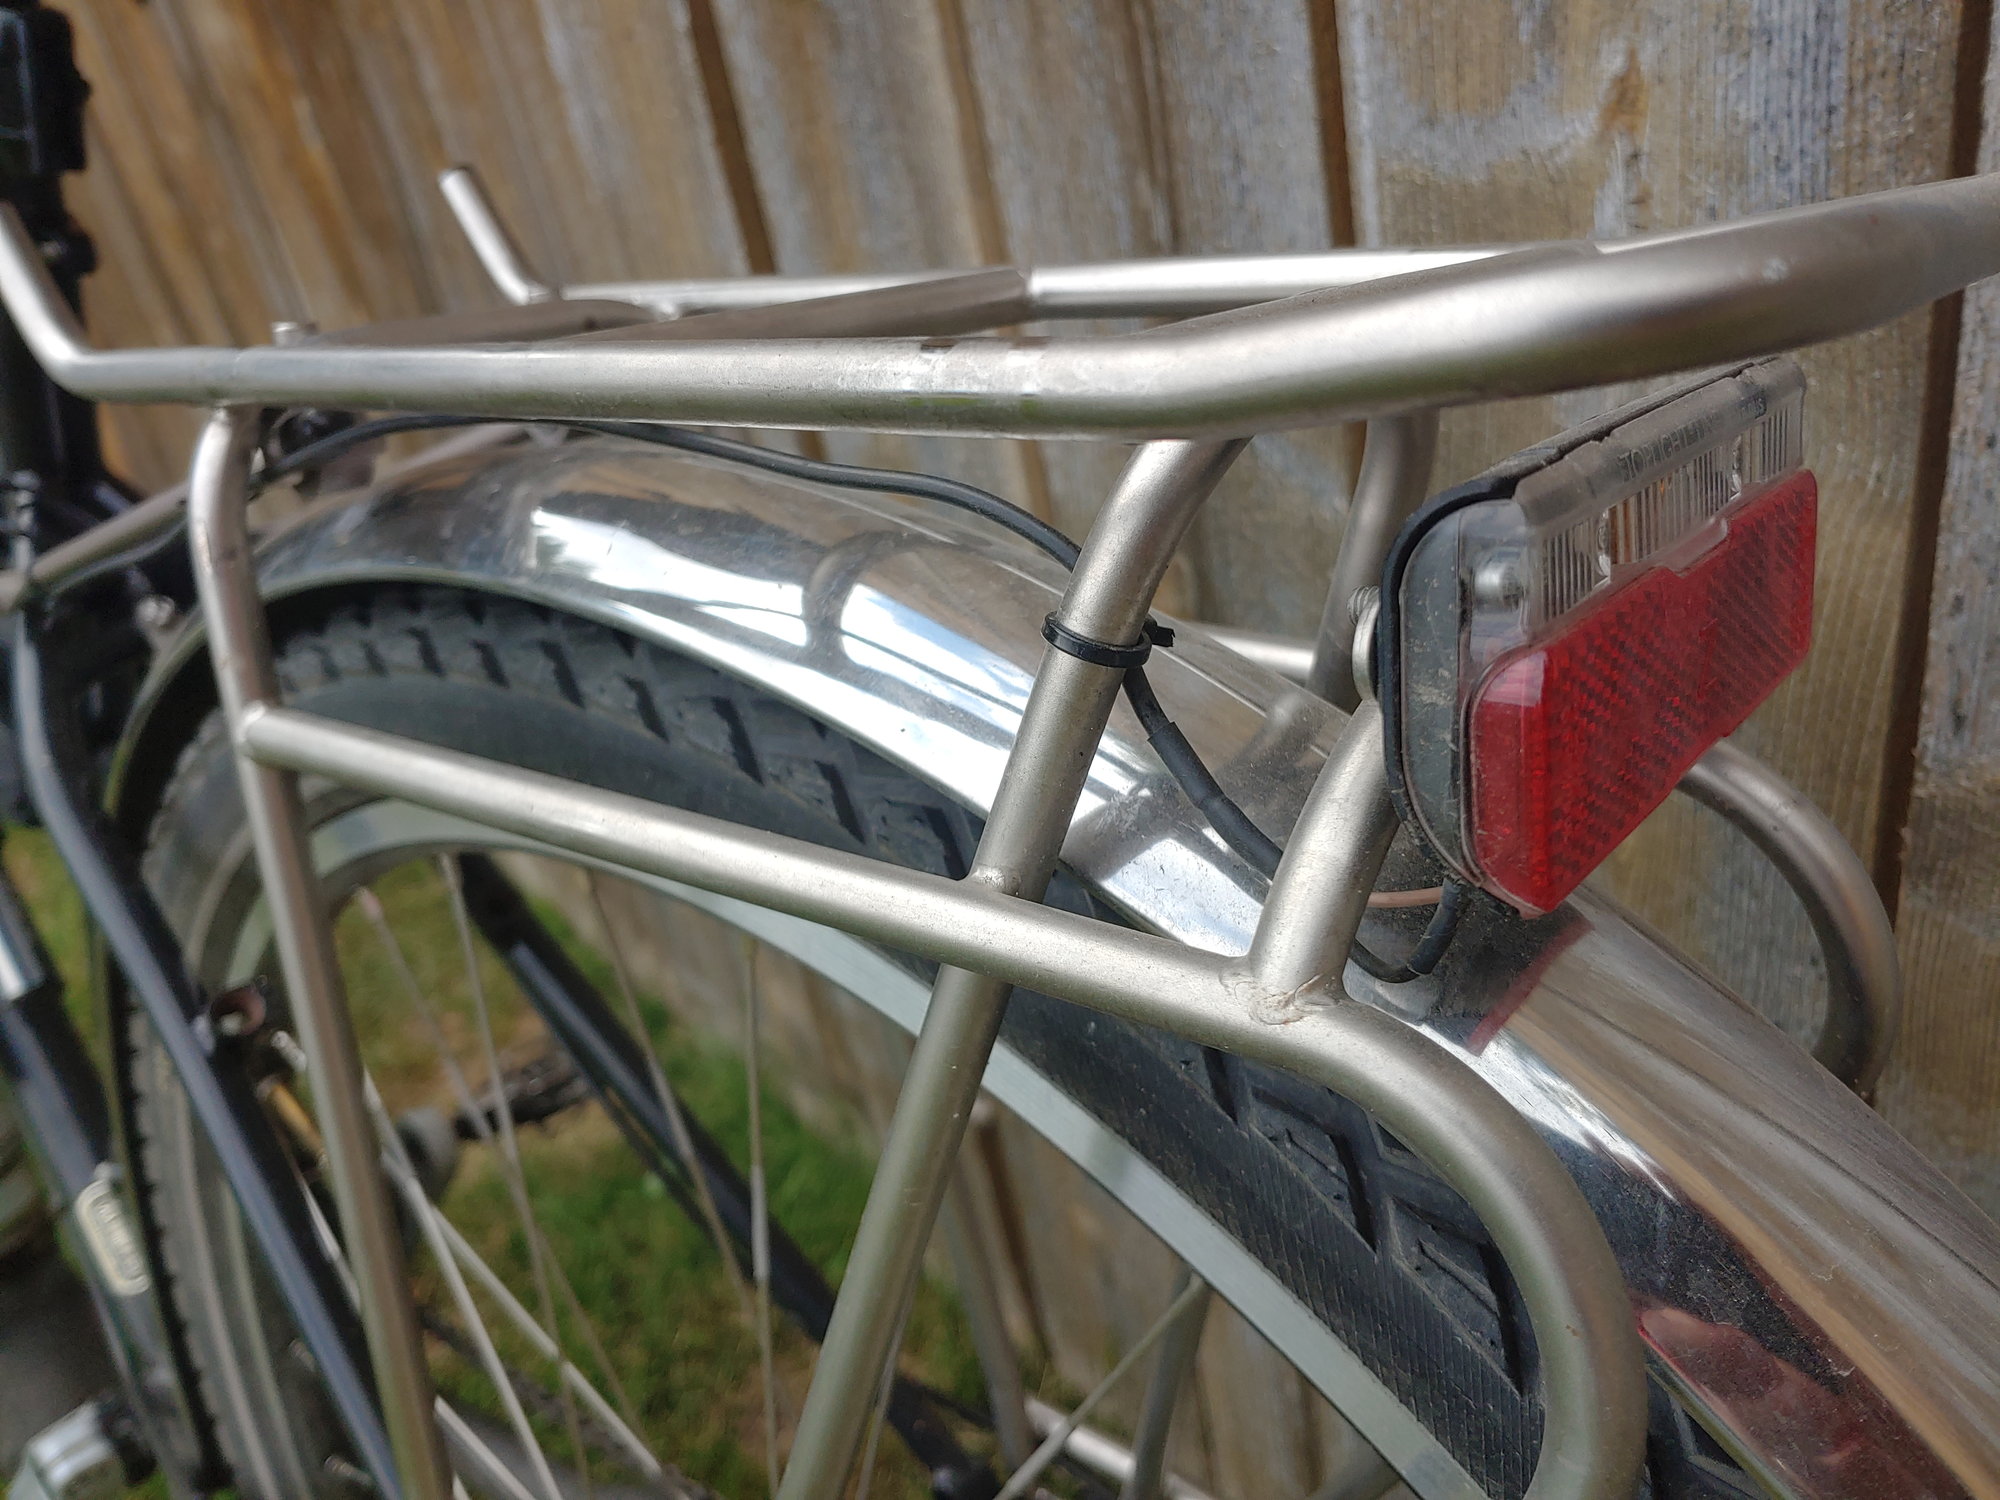
Rack mounted blinky (battery) and Spaninga Pixeo dyno powered taillight, wiring glued inside the fender.
Taillight wiring inside the fender is two conductor wire, one half is red, the other half black. I tried to paint the red part black, but the paint flakes off. There are quick connects (2.8mm spade connectors) at this point to different wires that run under the bottom bracket and then under the downtube.
Taillight wiring runs under the downtube, held to downtube at front and back with zip ties. I think it is 18 or 20 gauge wire, two black wires twisted together. From the front zip tie, the wire then runs between the fork crown and fender to the light where it connects to the light with 2.8mm spade connectors. Note how loose the wire looks behind the head tube, it has to be loose enough so that the handlebars can turn and not pull on any of the wiring.

The photo below shows the wire under the downtube better than the photo above. The photo below also shows the wire to the hub, it is two wires twisted together and zip tied to the fork blade, then it goes over the top of the fork crown.

Thats it, not much to it.
On most of my bikes the lighting wiring is temporary because I expect for one reason or another to change it. But, I do not have that excuse on the Lynskey, I have no plans for any changes, thus it should look like it was intended to stay this way. So, here are the photos of my Backroad.
The specifics are an SP PV-8 dynohub, Luxos U headlamp and USB charger, and Spaninga Pixeo taillight mounted on the rear fender. The wiring between the taillight and the bottom bracket area is glued inside the fender, no photos of that. I also have a rack mounted battery powered taillight so that I have a blinky.
Rack mounted blinky (battery) and Spaninga Pixeo dyno powered taillight, wiring glued inside the fender.
Taillight wiring inside the fender is two conductor wire, one half is red, the other half black. I tried to paint the red part black, but the paint flakes off. There are quick connects (2.8mm spade connectors) at this point to different wires that run under the bottom bracket and then under the downtube.
Taillight wiring runs under the downtube, held to downtube at front and back with zip ties. I think it is 18 or 20 gauge wire, two black wires twisted together. From the front zip tie, the wire then runs between the fork crown and fender to the light where it connects to the light with 2.8mm spade connectors. Note how loose the wire looks behind the head tube, it has to be loose enough so that the handlebars can turn and not pull on any of the wiring.
The photo below shows the wire under the downtube better than the photo above. The photo below also shows the wire to the hub, it is two wires twisted together and zip tied to the fork blade, then it goes over the top of the fork crown.
Thats it, not much to it.
Likes For Tourist in MSN:
08-05-19, 09:51 PM
#8


Randomhead
Join Date: Aug 2008
Location: Happy Valley, Pennsylvania
Posts: 24,386
Mentioned: 0 Post(s)
Tagged: 0 Thread(s)
Quoted: 4 Post(s)
Liked 3,687 Times
in
2,510 Posts
I like to use gorilla repair tape. Looks better to me than wire ties
08-07-19, 04:43 AM
#9
Senior Member
Thread Starter
Join Date: Jun 2017
Posts: 64
Mentioned: 4 Post(s)
Tagged: 0 Thread(s)
Quoted: 11 Post(s)
Likes: 0
Liked 13 Times
in
9 Posts
I suppose I could have started this thread with what has worked for me to date.
I didn’t shorten any of the original wires to give me flexibility for the future. Now the future is here.
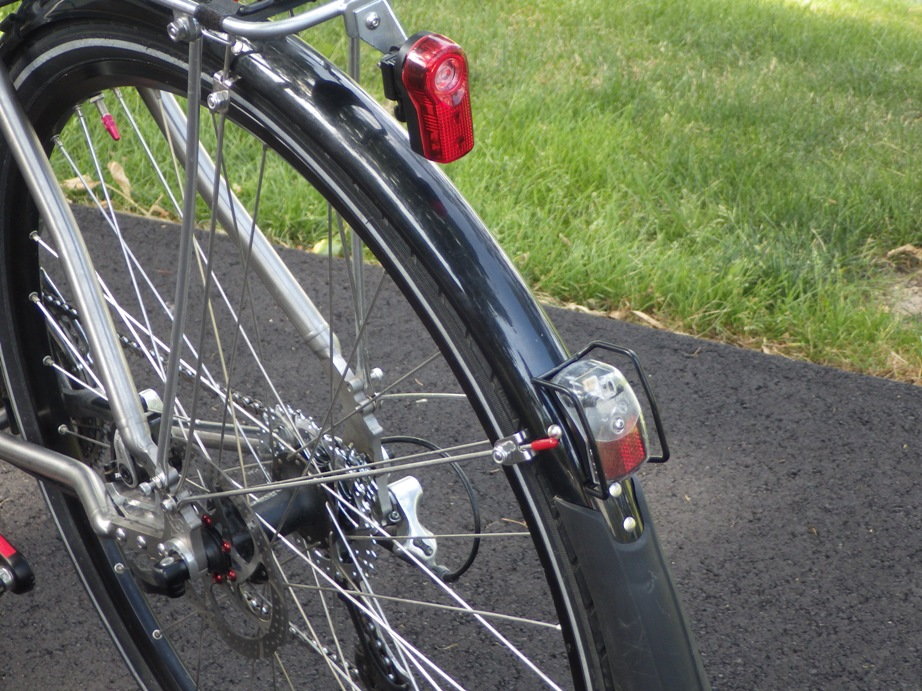
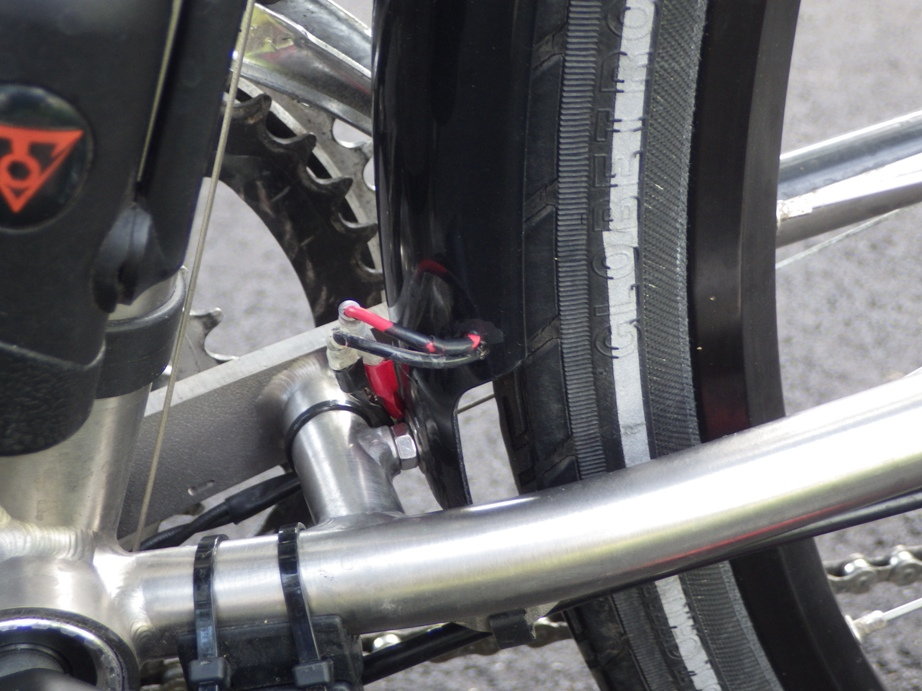
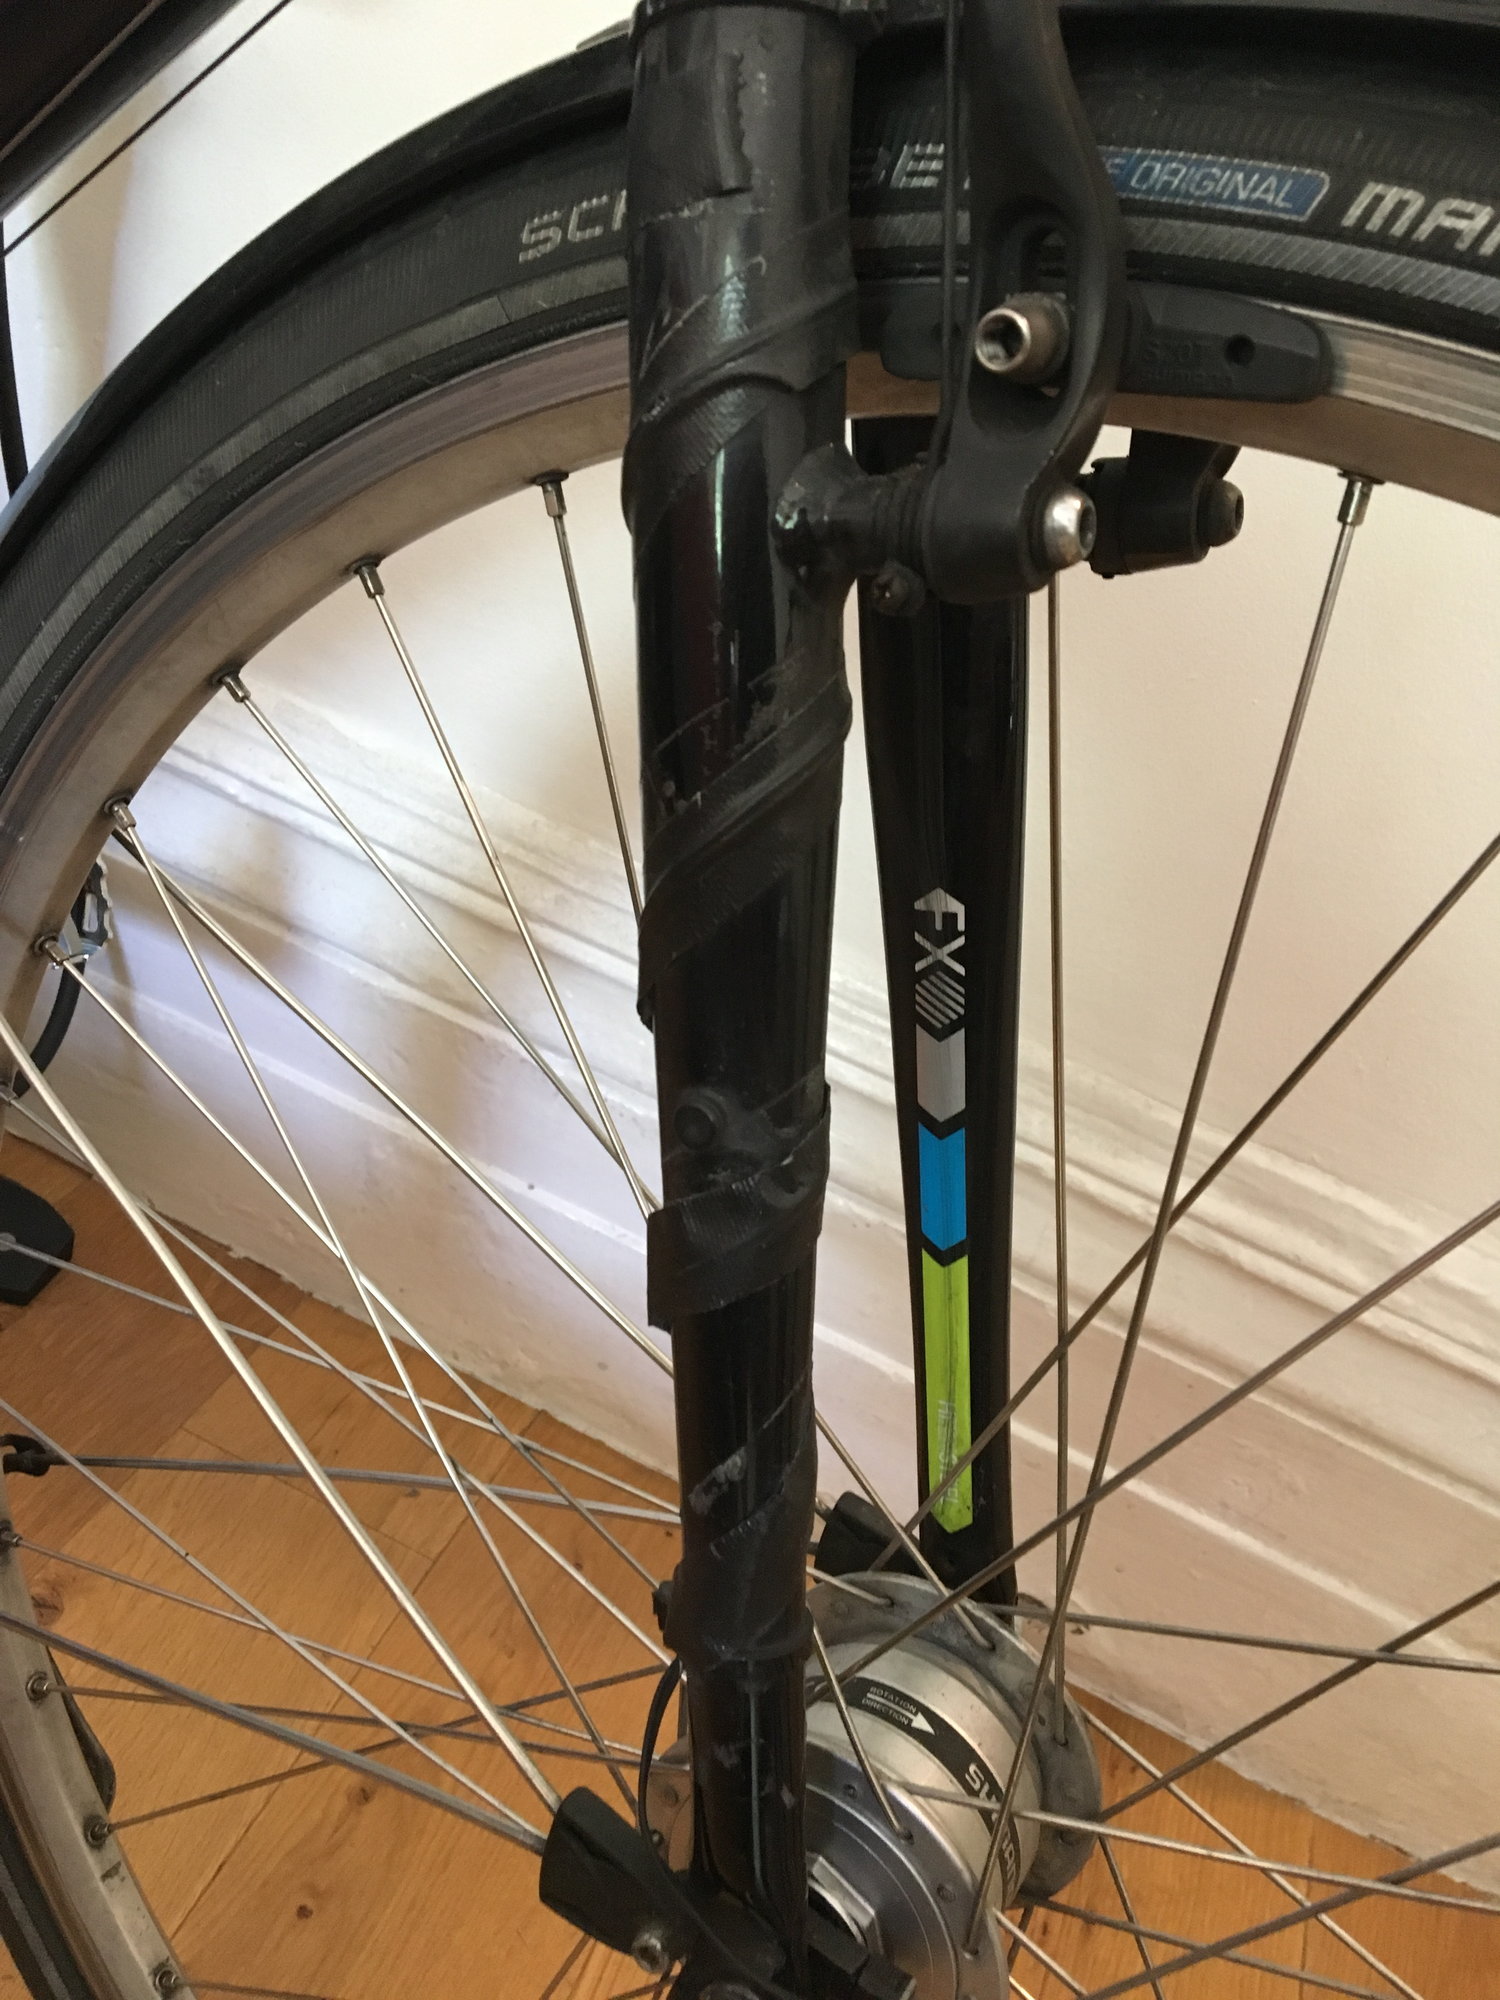
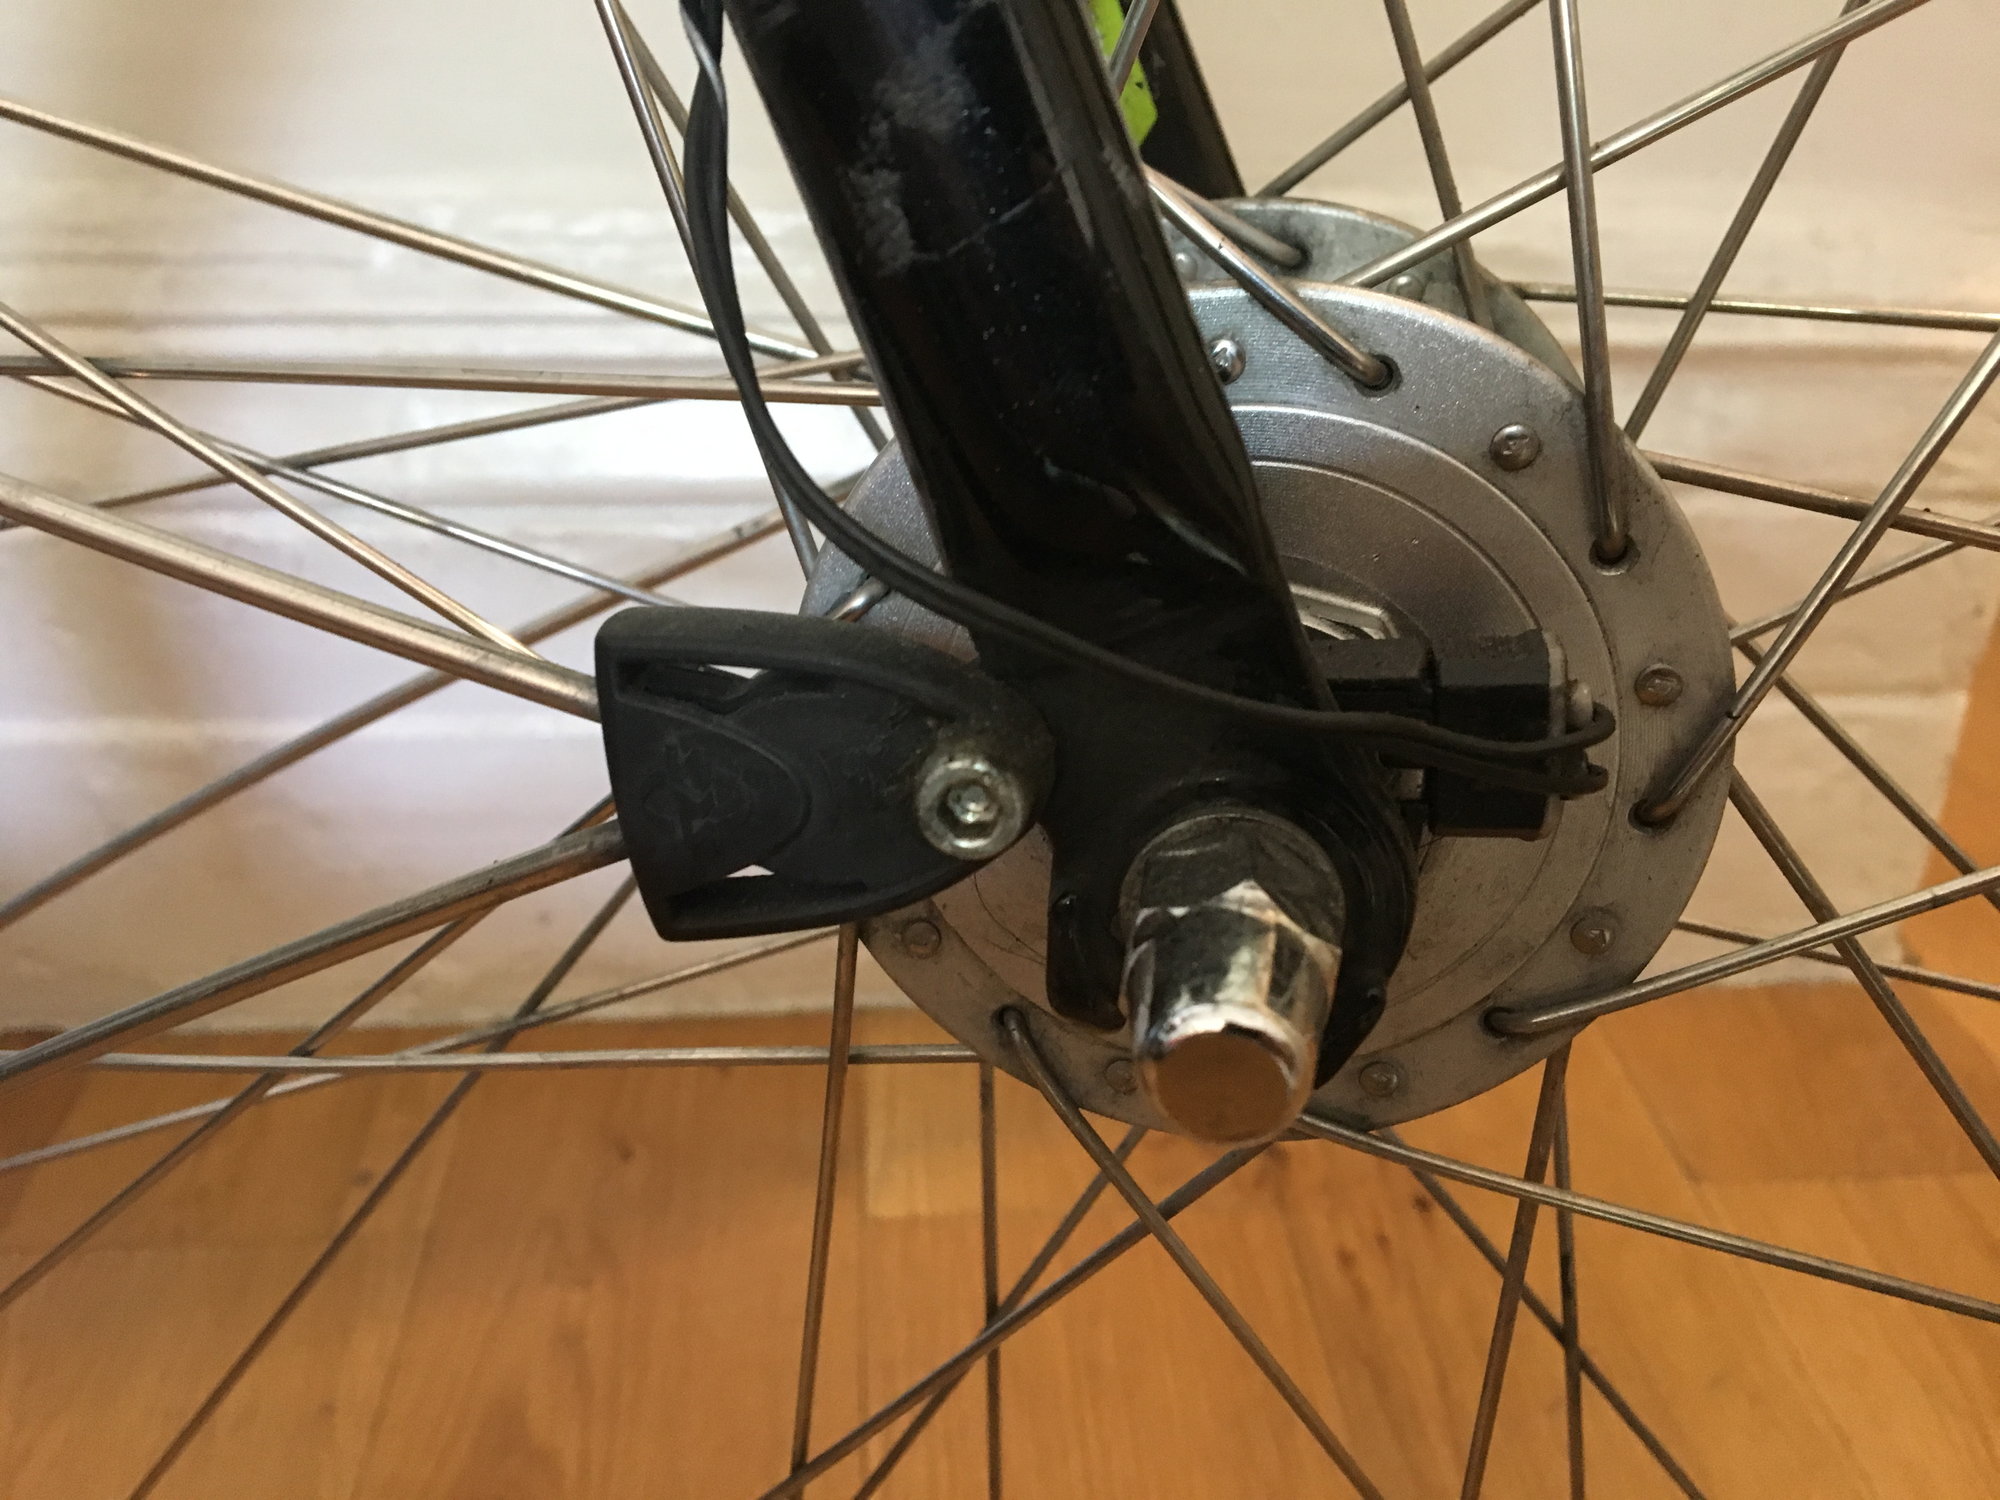
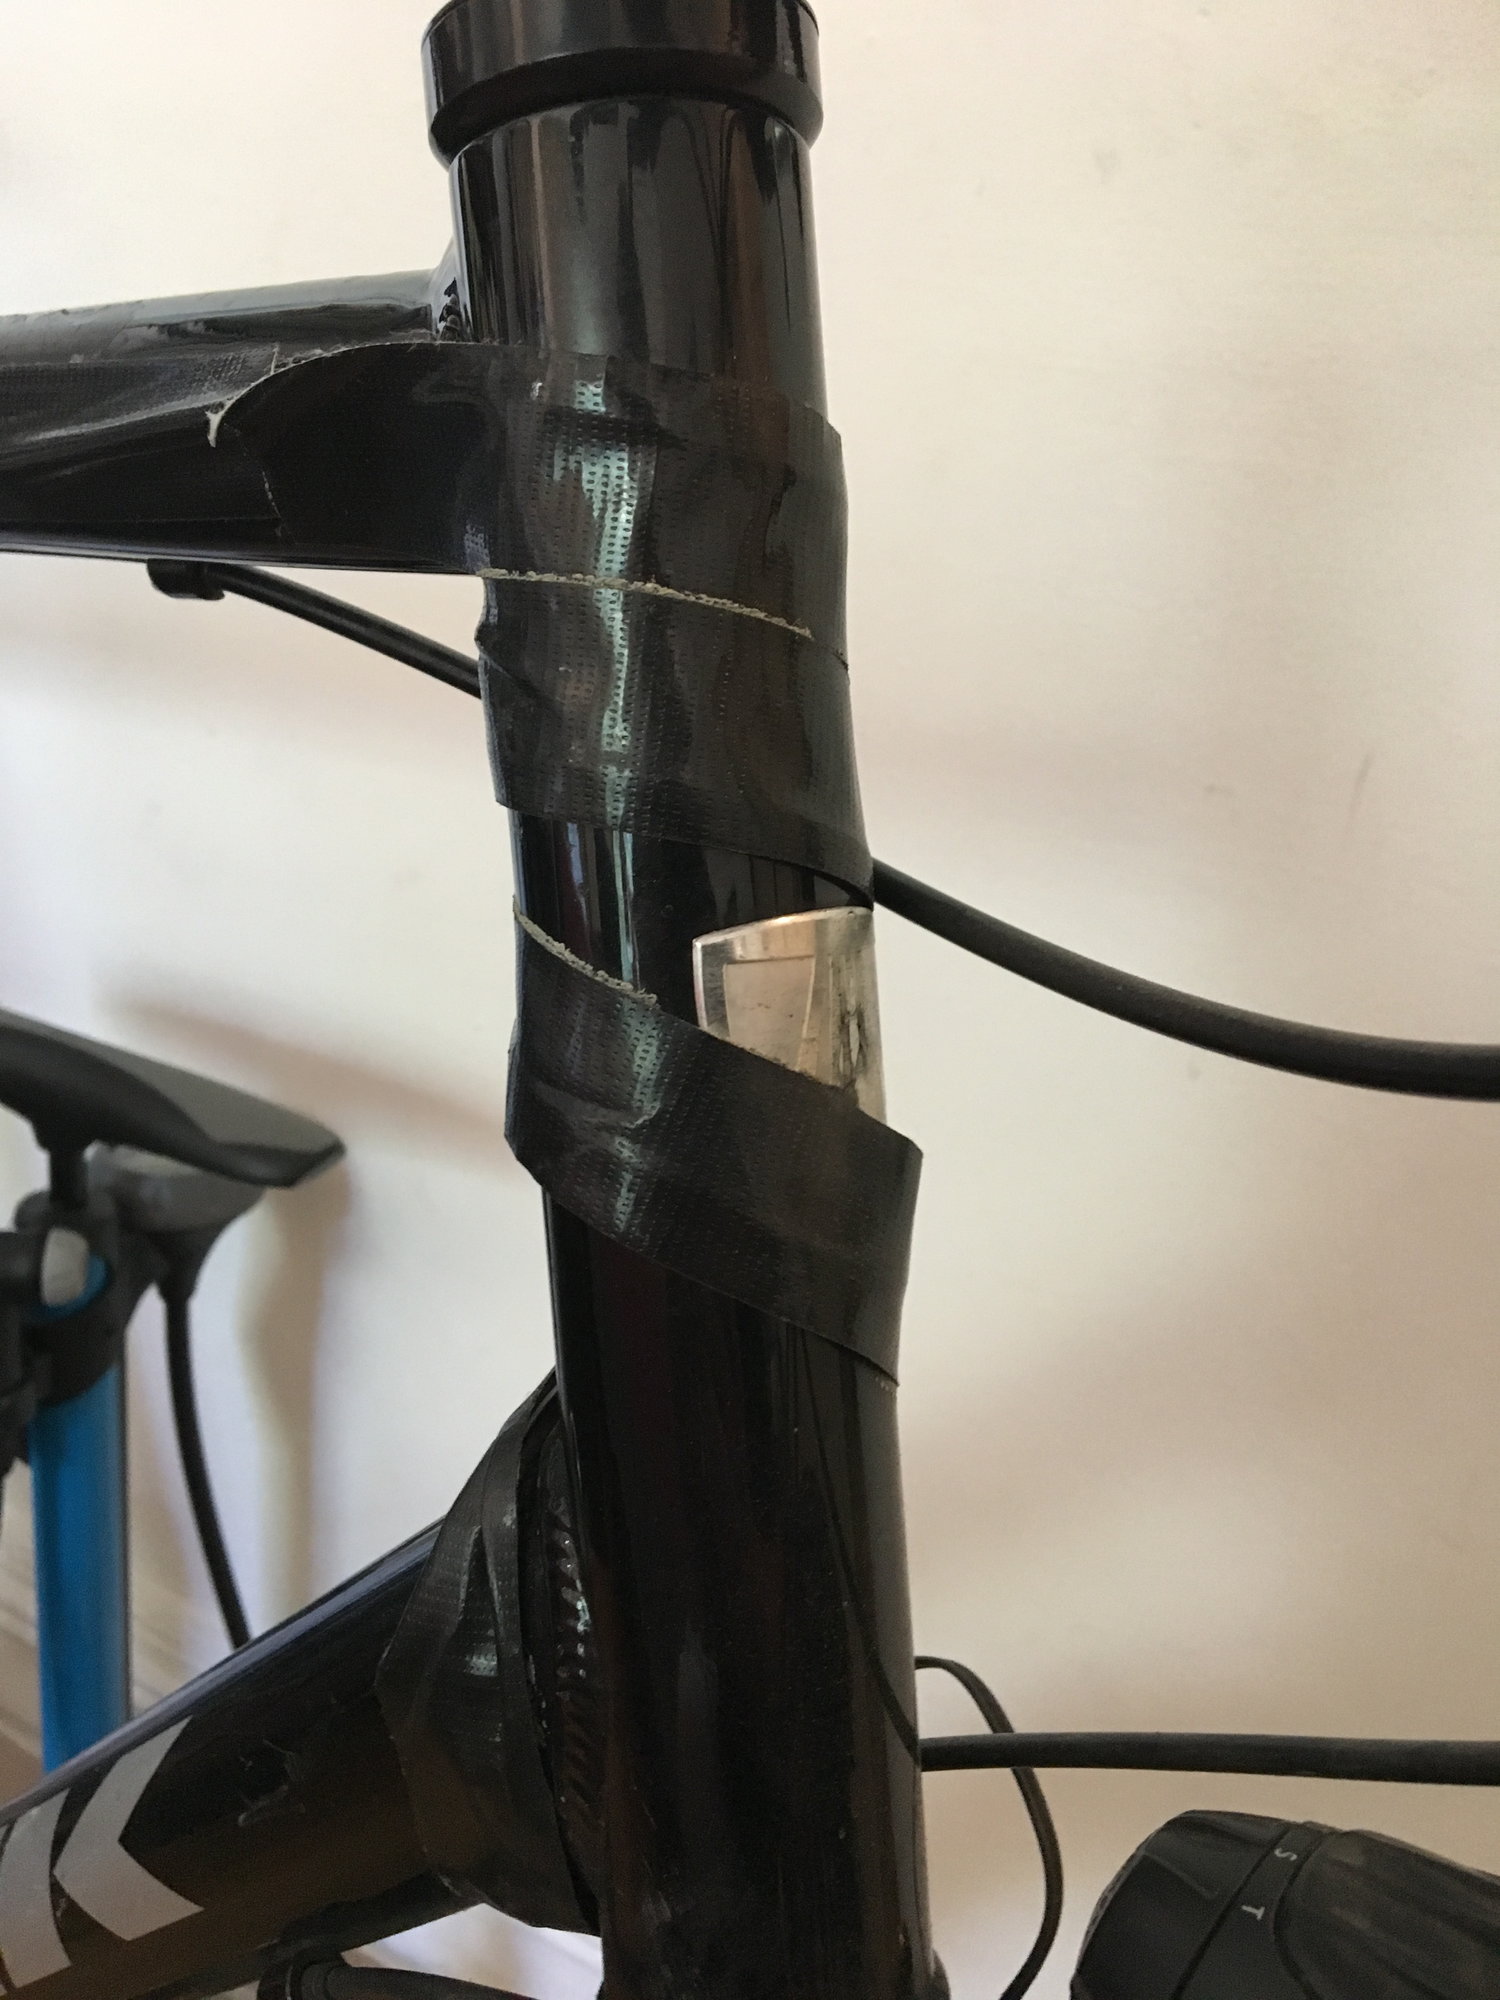
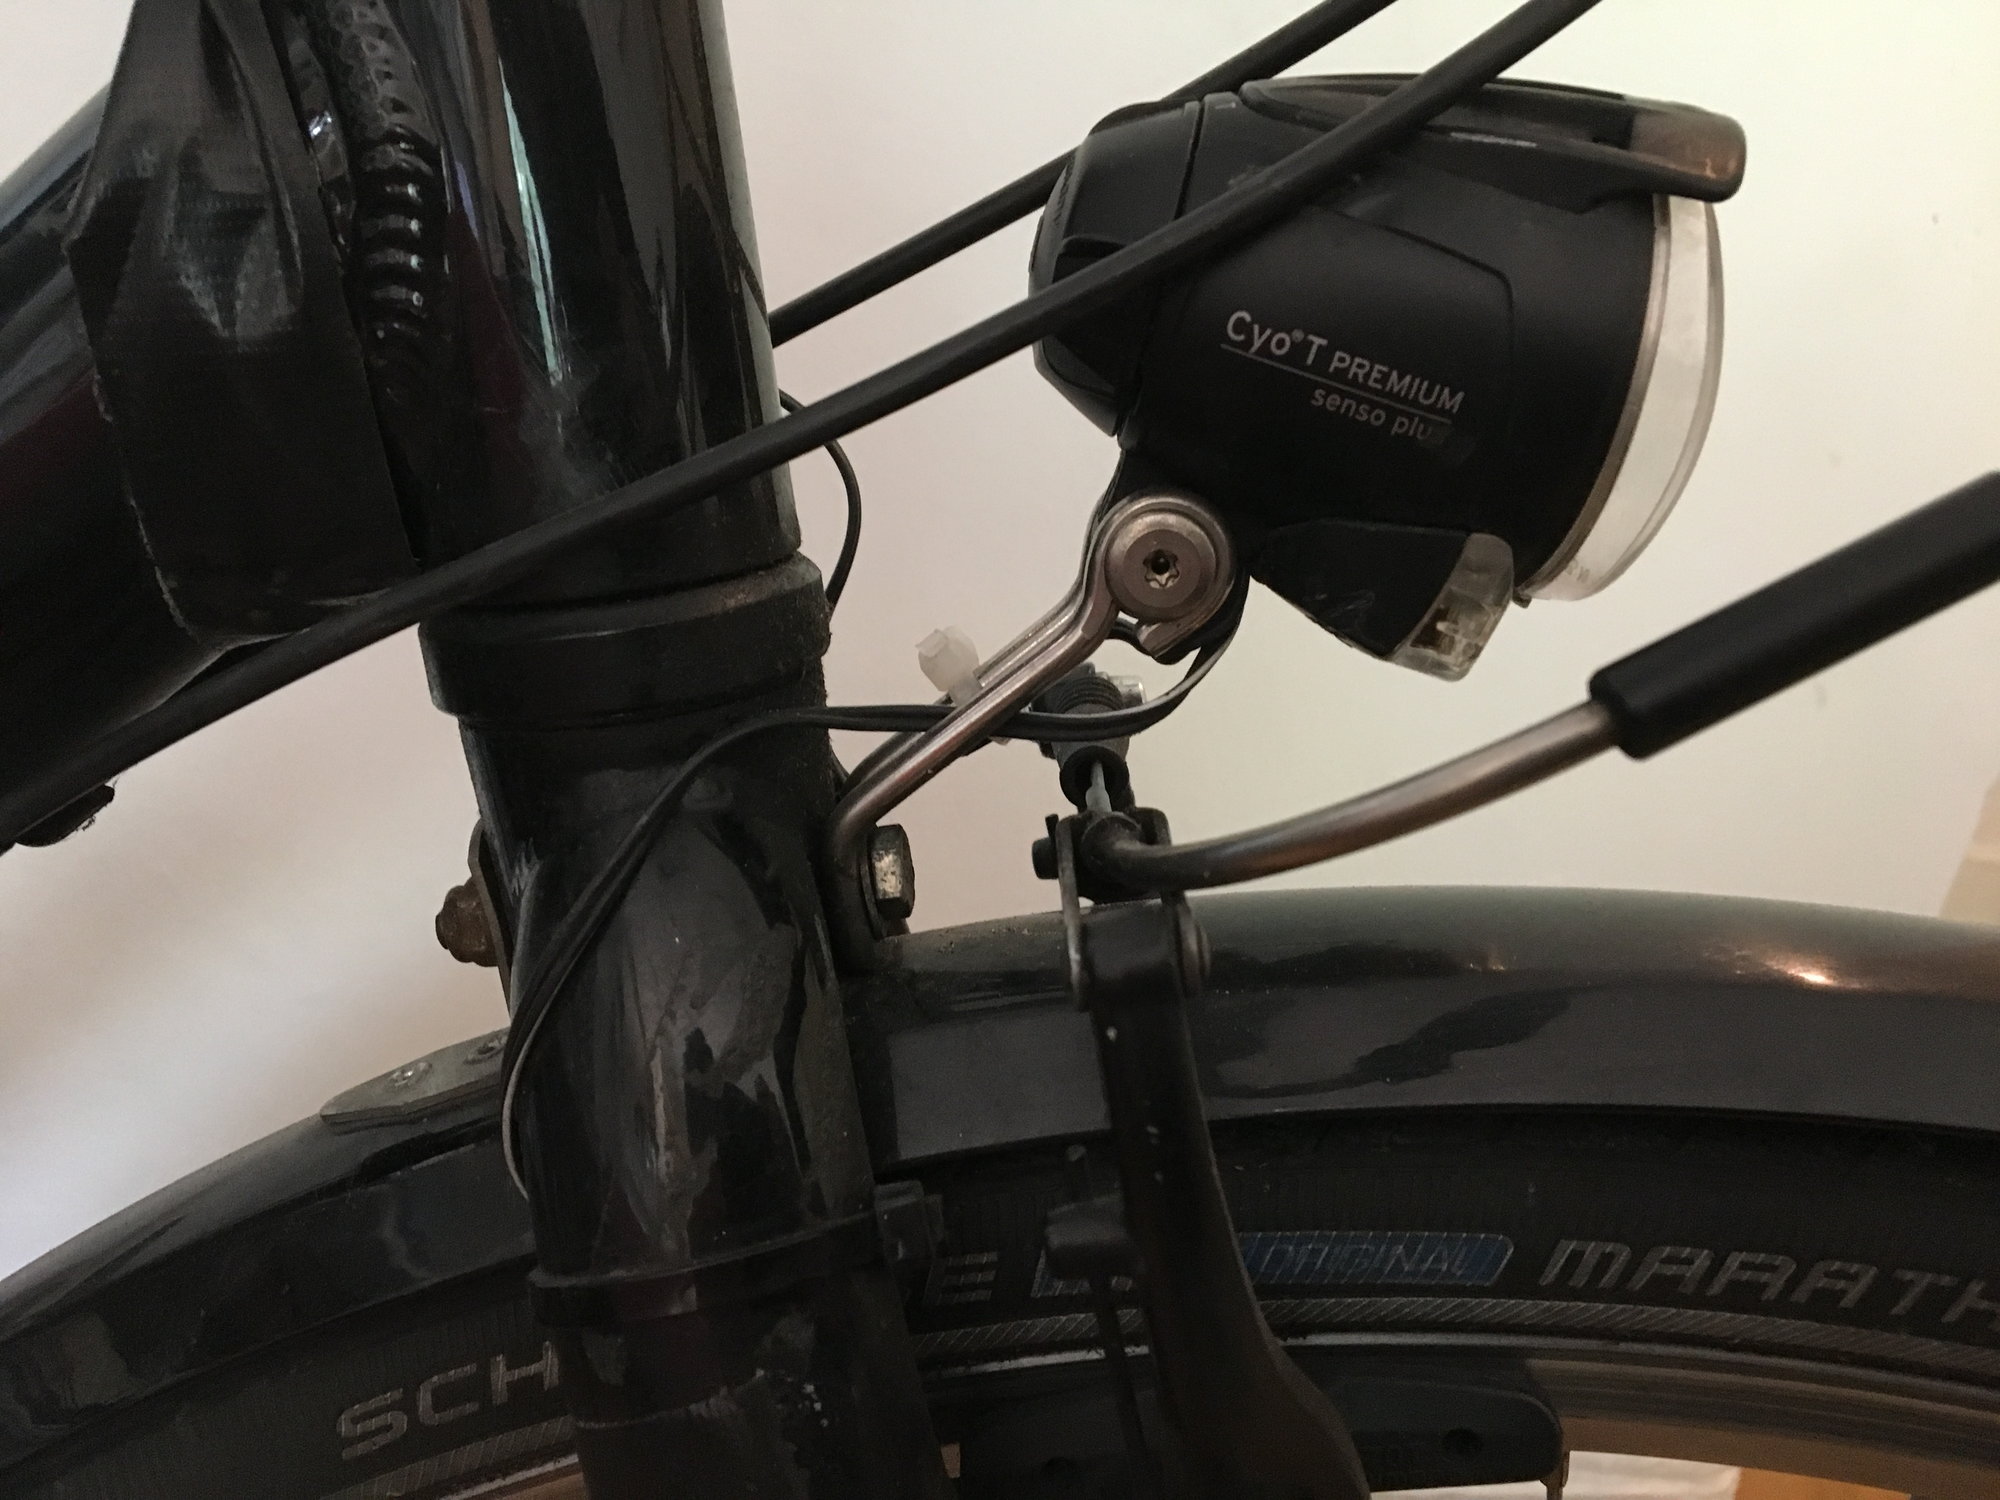
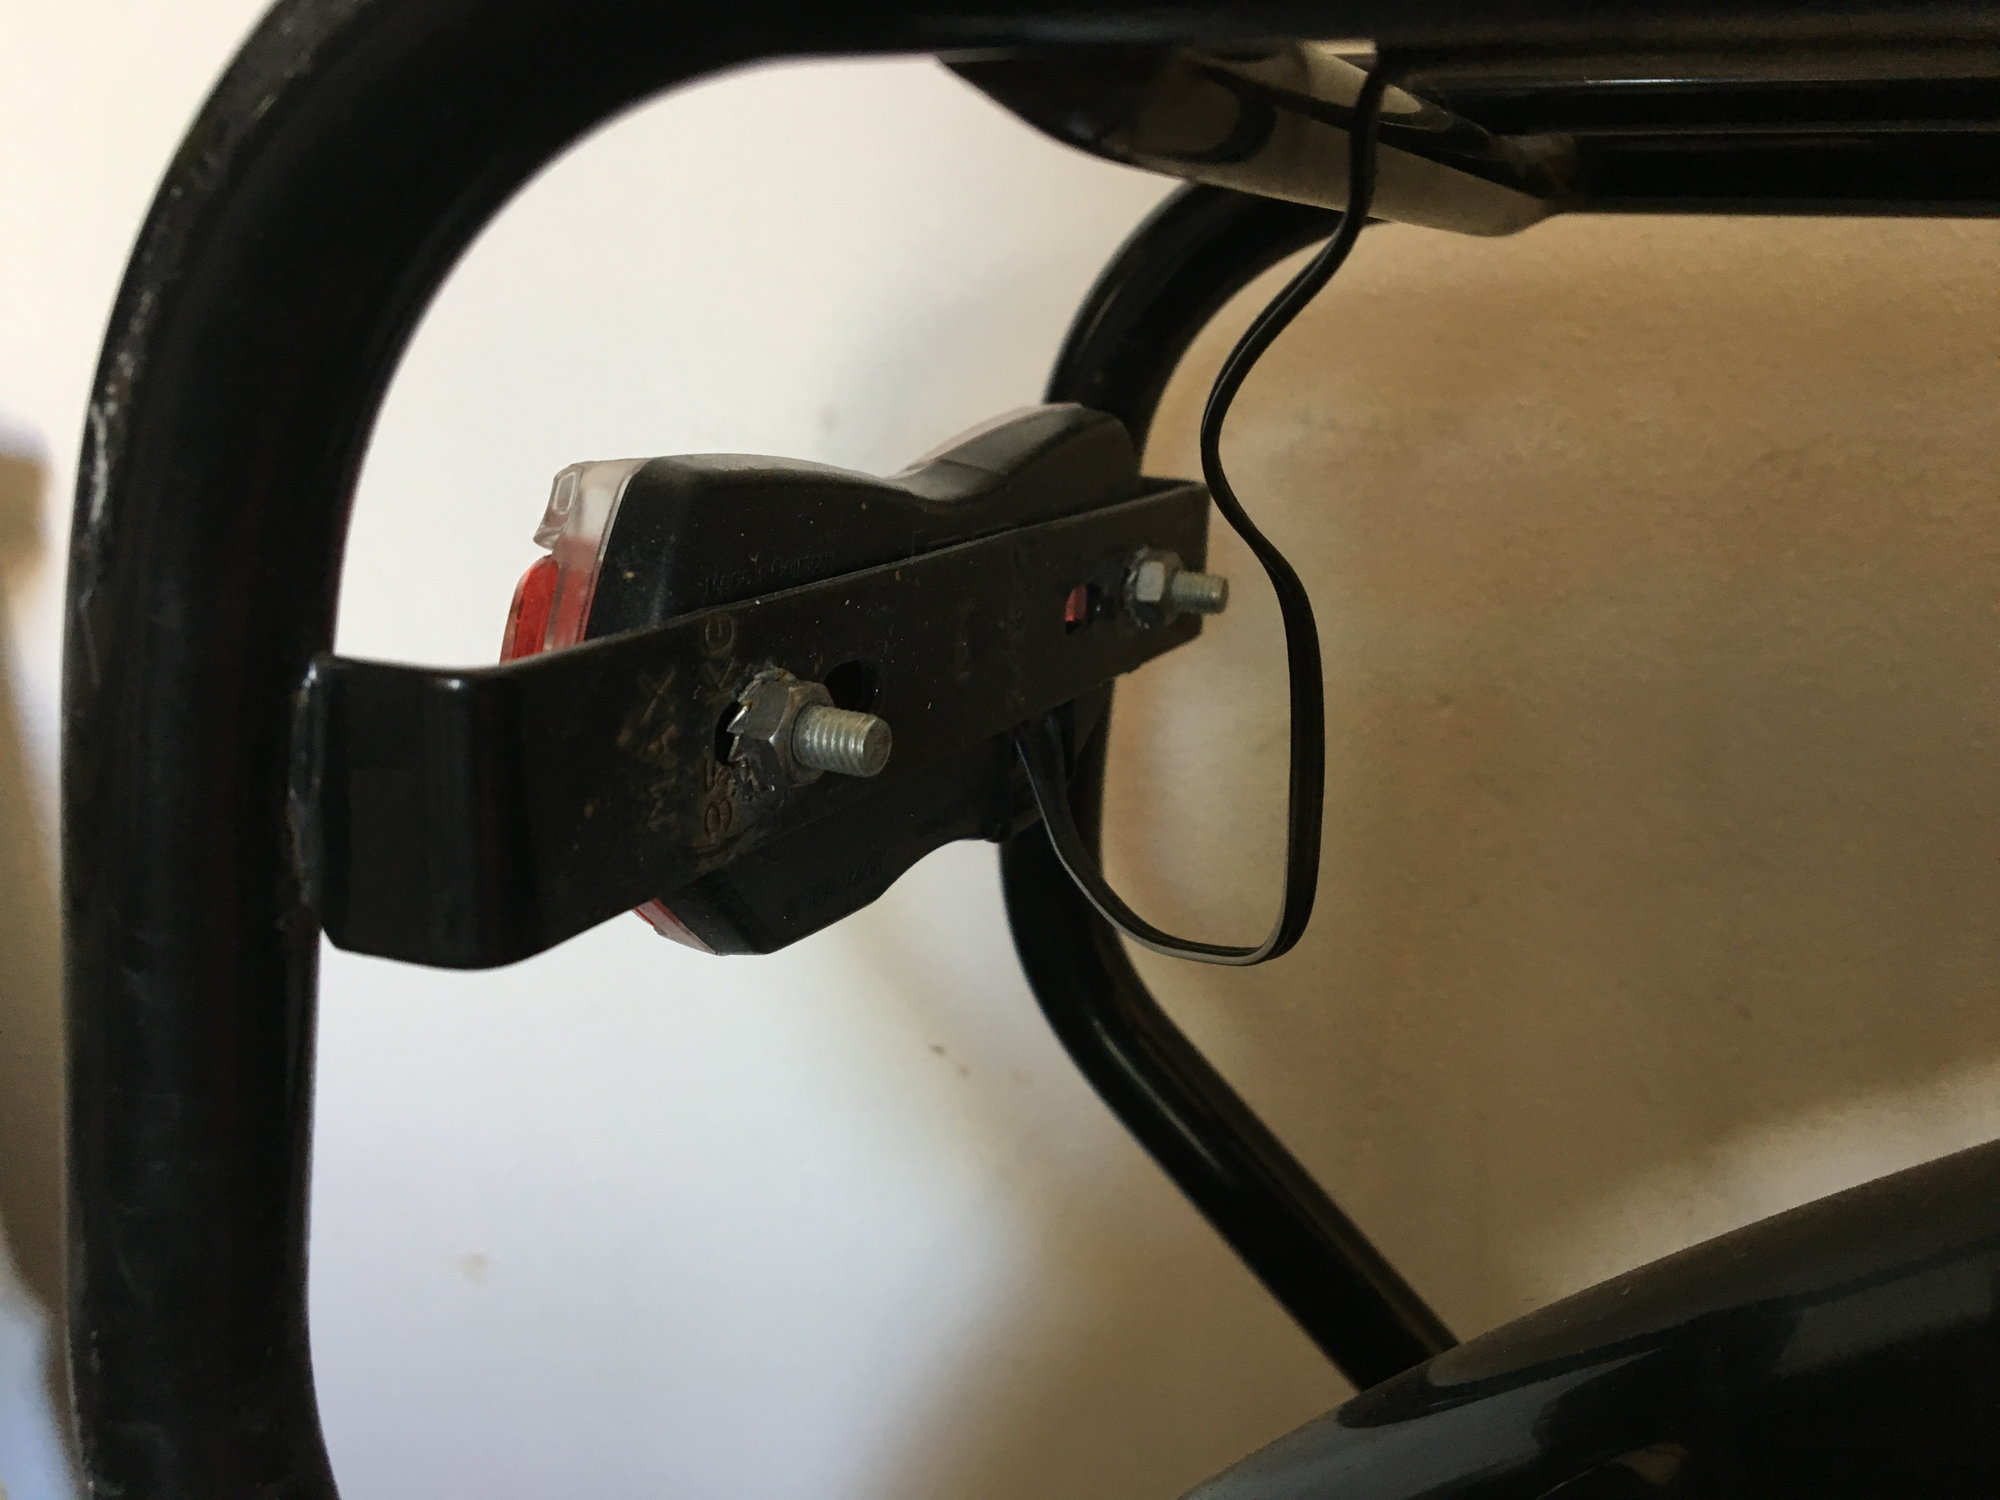
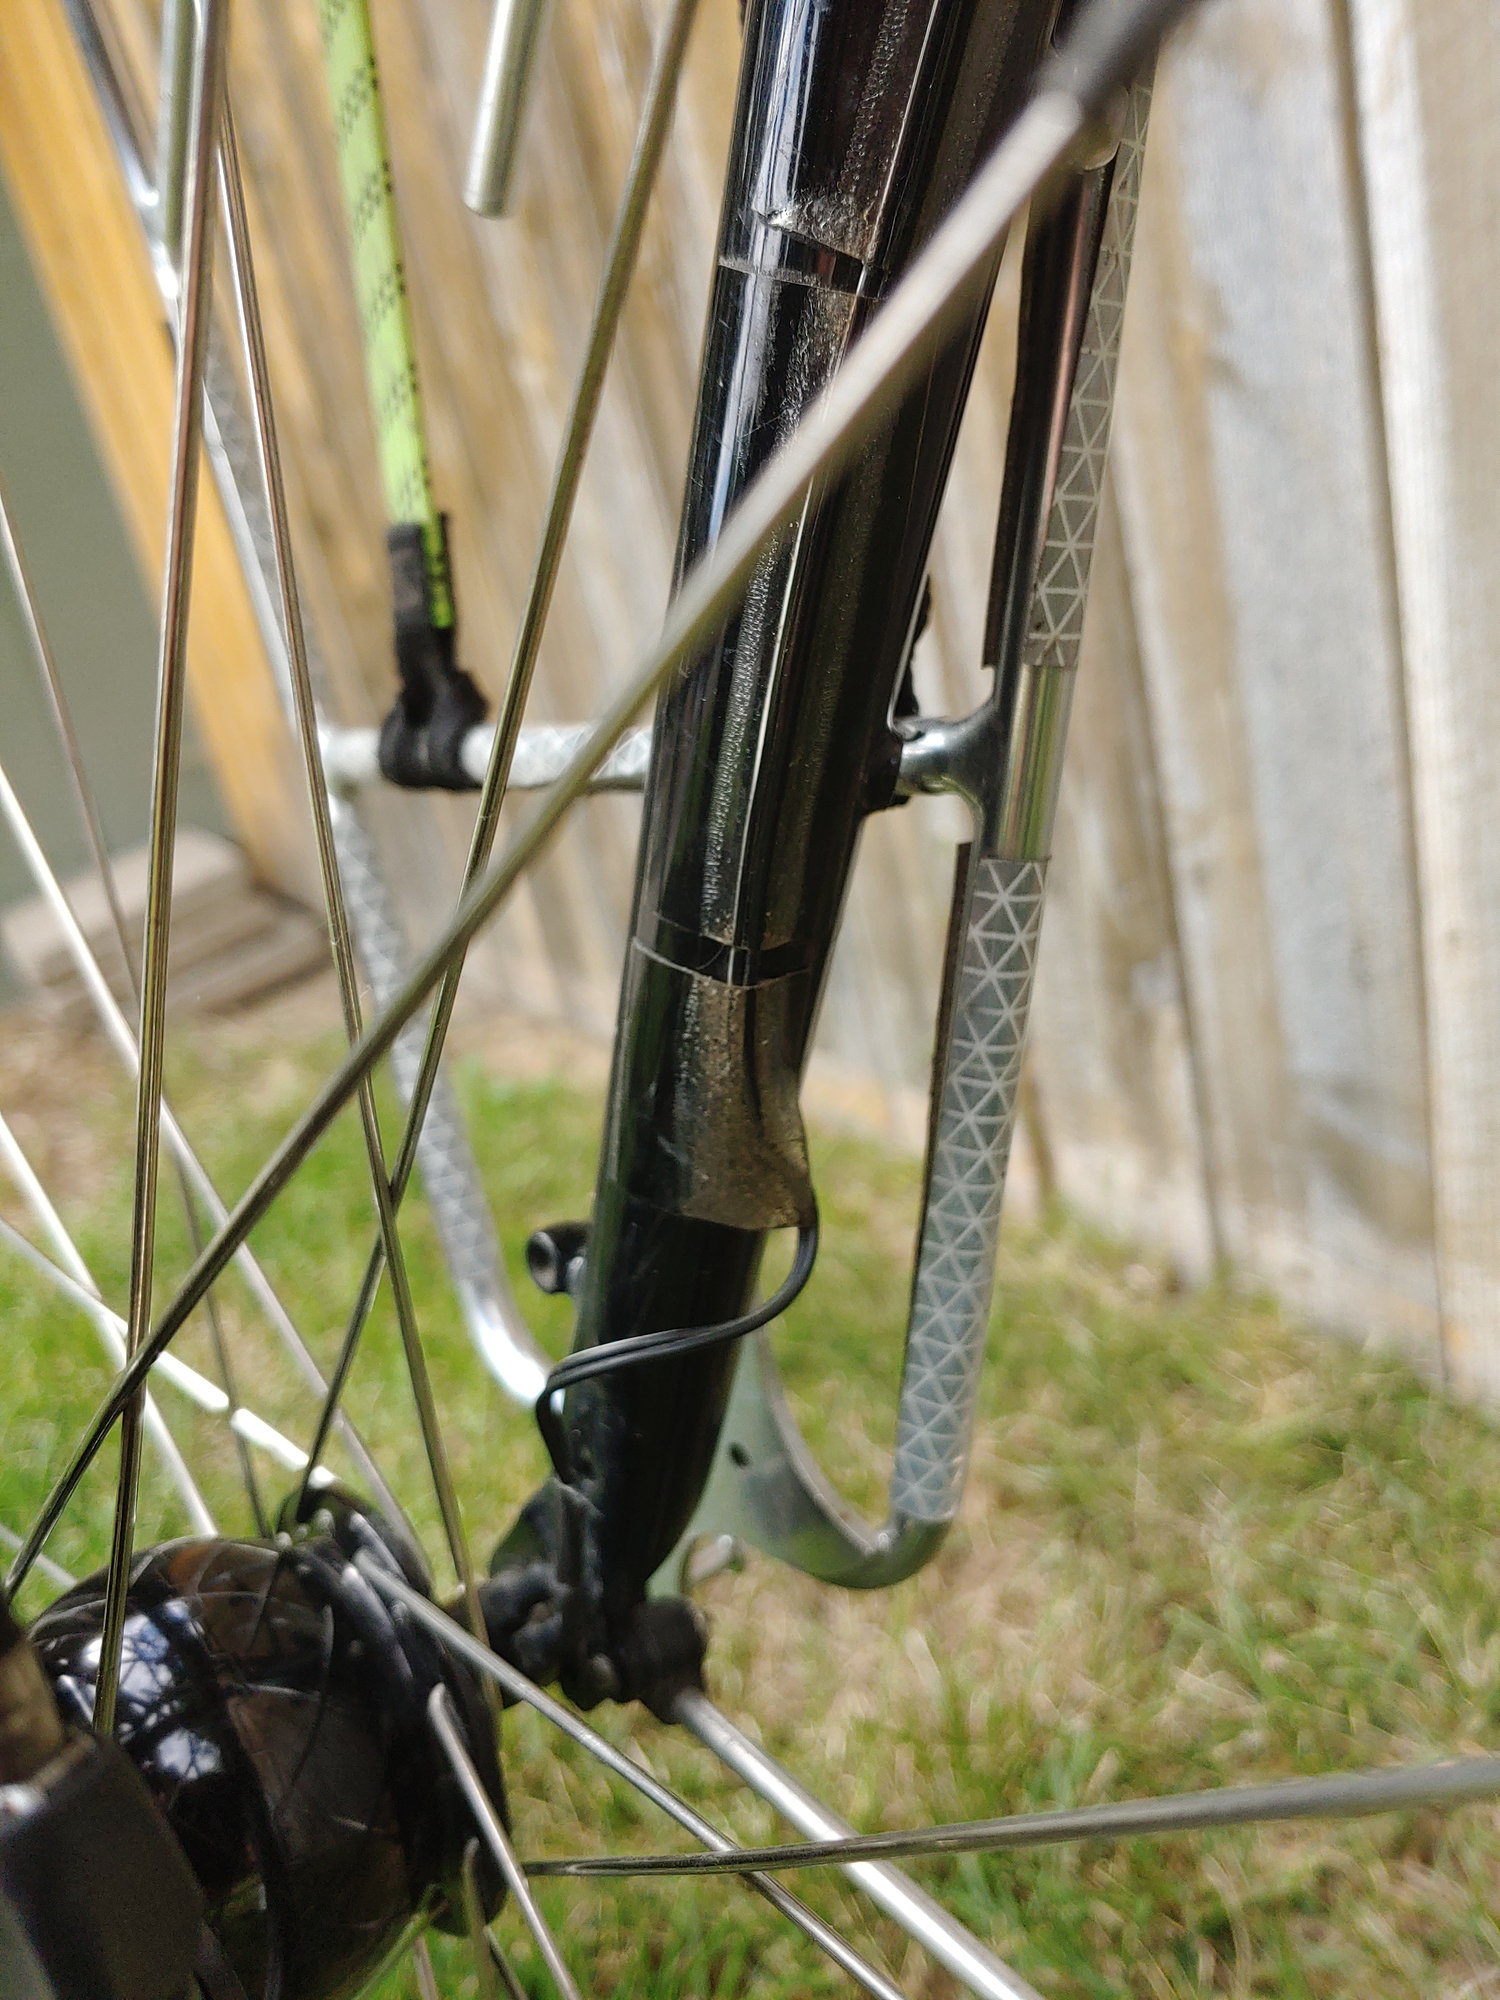
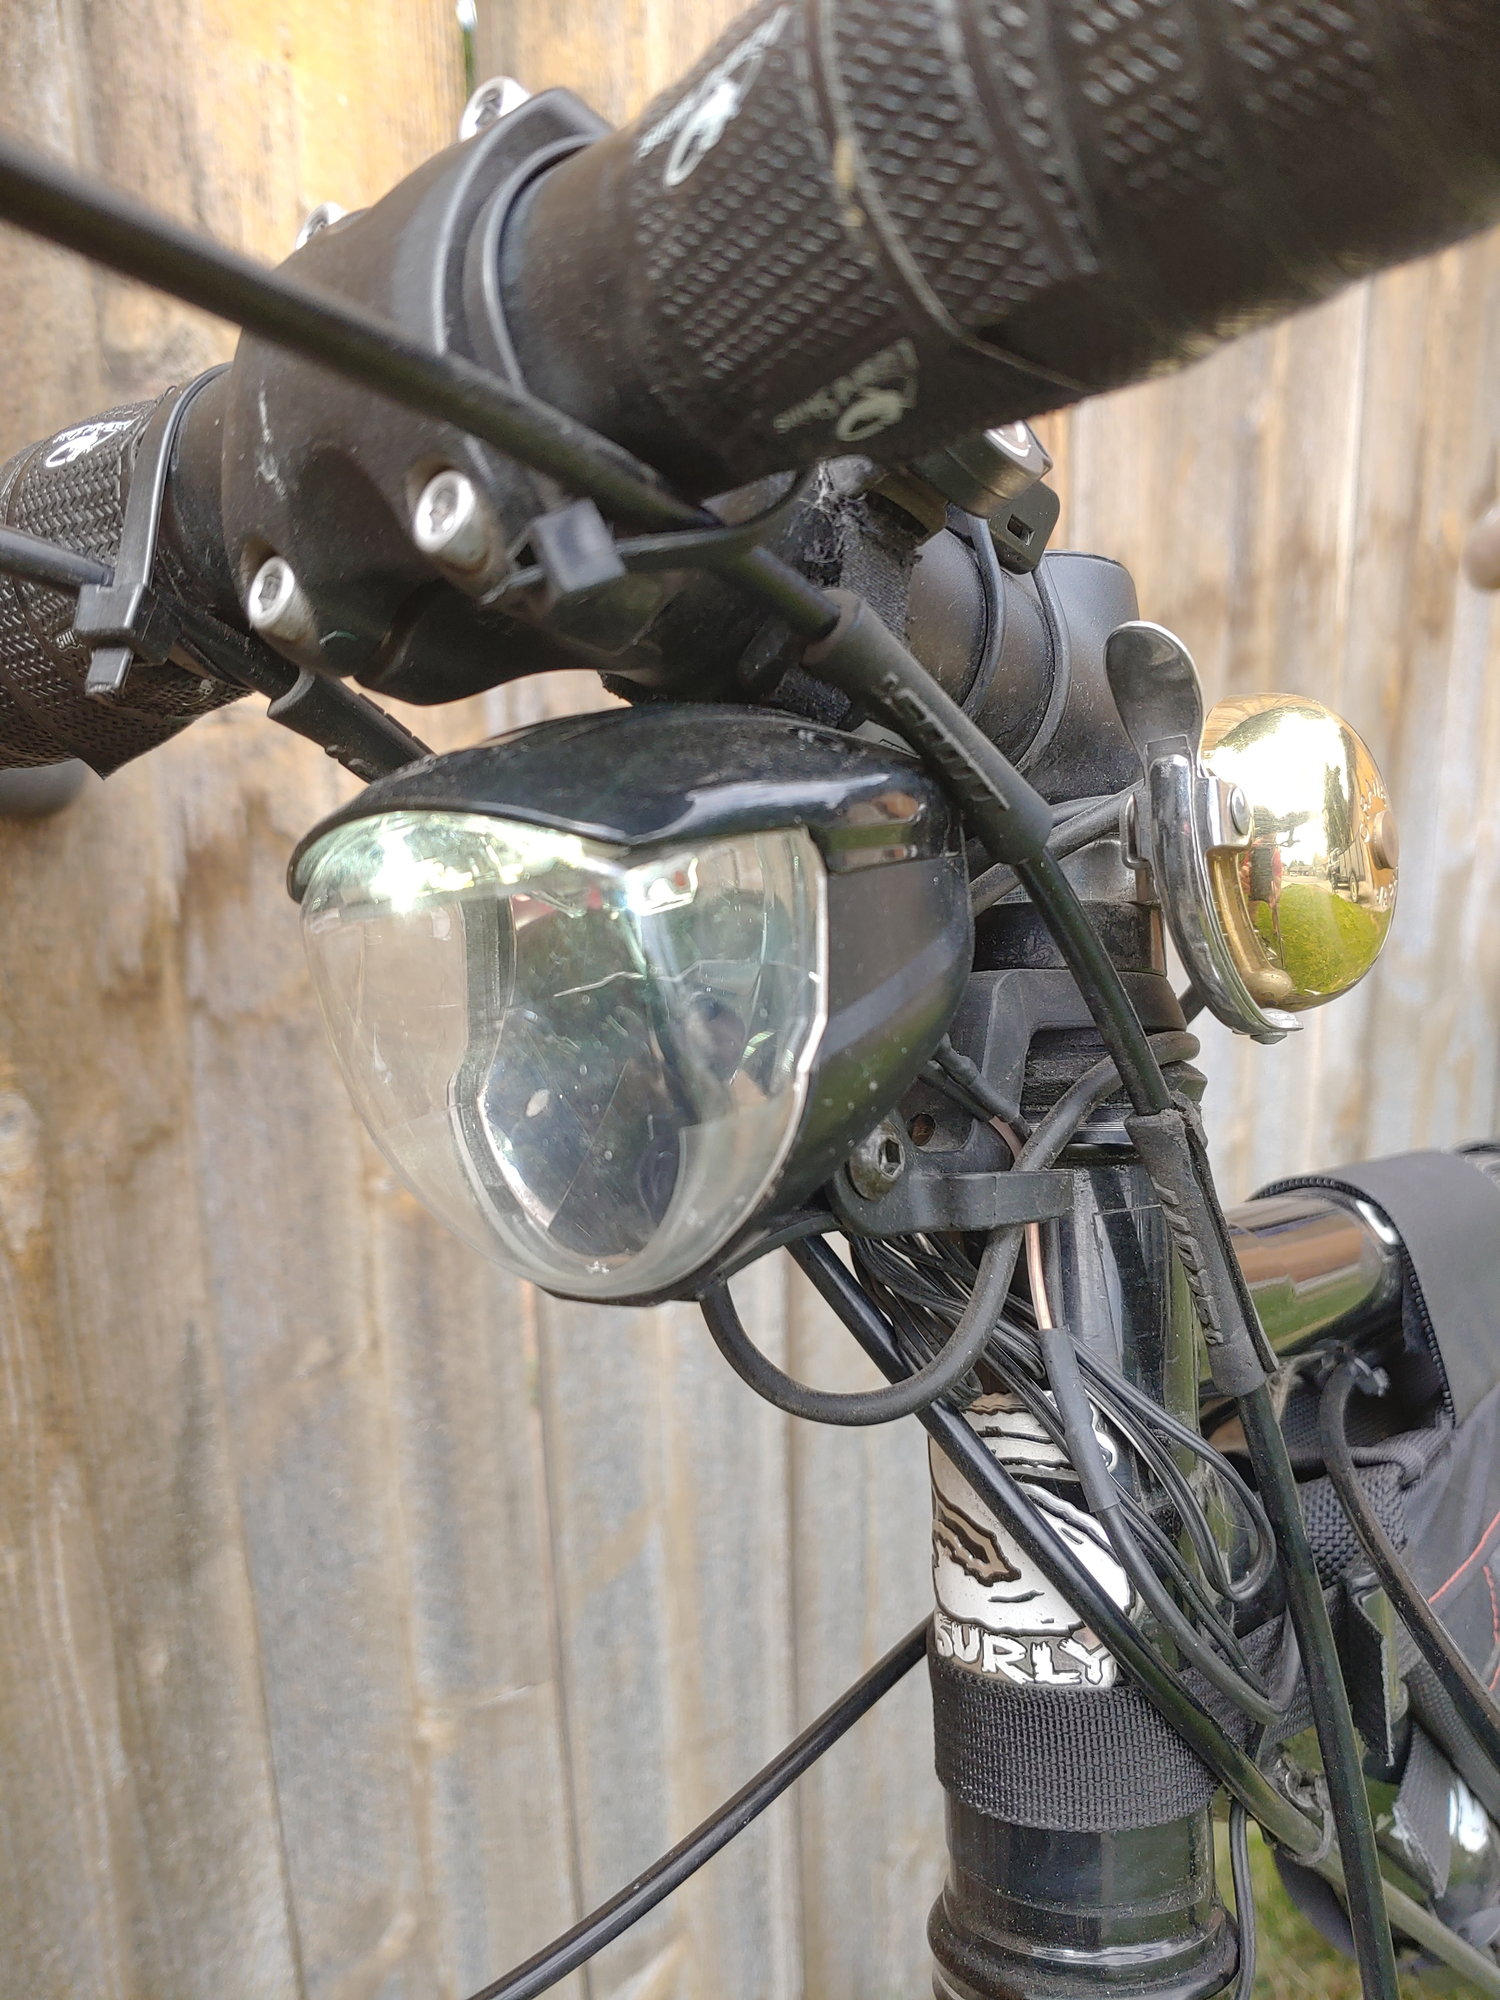
Photos below so the wire connecting to the dyno on the right hand side, wrapping around the fork held in place by both gorilla tape and 2x cable ties and then routed to the light itself.
The wire for the rear has 2 connectors close to the headlight. I opted to wrap around the headset, go down along the top tube and then travel the length of my carrier to the rear. All of this is with gorilla tape.
As I said, functional but not pretty. I’d even go so far as to call it an eye sore.
I didn’t shorten any of the original wires to give me flexibility for the future. Now the future is here.
Photos below so the wire connecting to the dyno on the right hand side, wrapping around the fork held in place by both gorilla tape and 2x cable ties and then routed to the light itself.
The wire for the rear has 2 connectors close to the headlight. I opted to wrap around the headset, go down along the top tube and then travel the length of my carrier to the rear. All of this is with gorilla tape.
As I said, functional but not pretty. I’d even go so far as to call it an eye sore.


 08-07-19, 04:51 AM
#11
Senior Member
Thread Starter
Join Date: Jun 2017
Posts: 64
Mentioned: 4 Post(s)
Tagged: 0 Thread(s)
Quoted: 11 Post(s)
Likes: 0
Liked 13 Times
in
9 Posts
I’m going to experiment with some heat shrink tubing. I guess I have the benefit of having a black frame in that regard. I’ve read that black heat shrink is one of the better ones for UV resistance.
I don’t believe I’ll be able to run the wires inside the mudguards due to clearance but will definitely consider going on the outside if I can make it subtle enough.
I don’t believe I’ll be able to run the wires inside the mudguards due to clearance but will definitely consider going on the outside if I can make it subtle enough.
08-07-19, 07:15 AM
#12
Senior Member
Join Date: Aug 2010
Location: Madison, WI
Posts: 11,177
Bikes: 1961 Ideor, 1966 Perfekt 3 Speed AB Hub, 1994 Bridgestone MB-6, 2006 Airnimal Joey, 2009 Thorn Sherpa, 2013 Thorn Nomad MkII, 2015 VO Pass Hunter, 2017 Lynskey Backroad, 2017 Raleigh Gran Prix, 1980s Bianchi Mixte on a trainer. Others are now gone.
Mentioned: 47 Post(s)
Tagged: 0 Thread(s)
Quoted: 3453 Post(s)
Liked 1,453 Times
in
1,132 Posts
One of my bikes, sometimes I use a rack with a rack mounted taillight, sometimes take the rack off and instead use a seatstay mounted light. Thus, I wire it quickly for temporary use. And wrap the wires around the frame tubing where there are no cables running along the tubing. But where there is a brake cable along the tubing (top tube or down tube) I wrap the wire around the brake cable. Looks similar to your wiring job, but without the tape. Quite frankly, I think it does not look to bad but would likely look worse with tape like you used.
A bit of history on my dyno usage:
- I bought my first dynohub in 2013, only used it with headlamp or USB charging, did not use it with a dyno powered taillight. Initially I chose to not use a dyno powered taillight for two reasons, I wanted to have flashing light capability during day time and it was going to be used on an S&S bike where I did not want more complications in splitting the frame and packing the bike. Thus battery taillight made sense.
- Later I decided I could use that one wheel on two different touring bikes, and one of those bikes could use either a solid fork or a suspension fork. Thus, that one wheel was used on three different forks. Thus, I zip tied wire to the fork blade from the fork crown to the dropouts on all three forks, so I could move the wheel from fork to fork without having to move any wiring. And bought spare hub connectors so all I had to do was plug in the hub when I switched which fork that wheel was on. In other words, each fork was wired with permanent, not temporary wiring. Used 18 or 20 or maybe 22 gauge two wires, twisted together.
- Four years later, bought my Lynskey frame. Decided to build that up with dynohub, headlight with USB (Luxos U) and also a dyno powered taillight on the fender. And decided to permanently wire that bike, as the wheel and other components on it would not be moved around from bike to bike. Photos of that are above.
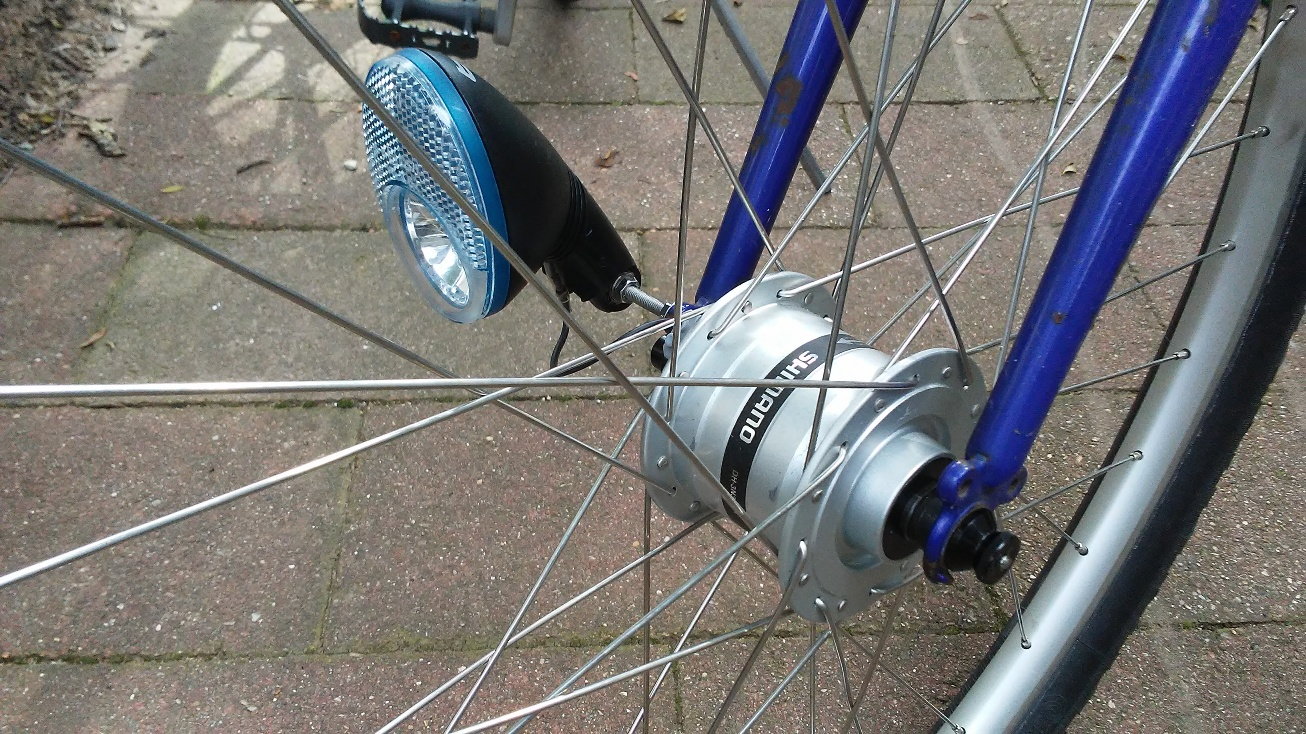
- After that, picked up a couple of used dynohub wheels at unbelievably low prices, they were donated to a bike charity that had too many wheels in stock so they were trying to get rid of some of their inventory. One of those wheels is the one you labeled above as the winner, I had a vintage headlight in storage so I wired it up with that hub on my errand bike.
- And one of those used wheels went on my rando bike. The headlight wiring to the fork dropout is permanent, but allows temporary addition of a USB charger. The taillight wiring on that bike is temporary.
Thus, my wiring is sometimes intended to be permanent but sometimes intended to be temporary. I will try to add a photo later of my rando bike headlamp wiring, that is a bit unique.
I got home about a month ago from a five week long bike tour in the Canadian Maritimes. On that trip, I wired a USB charger to the dynohub, but did not use any dyno powered lighting at all. The sole purpose of the hub was for charging a variety of batteries. Changed the AAA batteries in my battery powered taillights each week even though they still looked pretty bright, used NiMH rechargeable AAA batteries for taillights. Never rode at night so never needed my USB powered bike headlamp on that trip.
A bit of history on my dyno usage:
- I bought my first dynohub in 2013, only used it with headlamp or USB charging, did not use it with a dyno powered taillight. Initially I chose to not use a dyno powered taillight for two reasons, I wanted to have flashing light capability during day time and it was going to be used on an S&S bike where I did not want more complications in splitting the frame and packing the bike. Thus battery taillight made sense.
- Later I decided I could use that one wheel on two different touring bikes, and one of those bikes could use either a solid fork or a suspension fork. Thus, that one wheel was used on three different forks. Thus, I zip tied wire to the fork blade from the fork crown to the dropouts on all three forks, so I could move the wheel from fork to fork without having to move any wiring. And bought spare hub connectors so all I had to do was plug in the hub when I switched which fork that wheel was on. In other words, each fork was wired with permanent, not temporary wiring. Used 18 or 20 or maybe 22 gauge two wires, twisted together.
- Four years later, bought my Lynskey frame. Decided to build that up with dynohub, headlight with USB (Luxos U) and also a dyno powered taillight on the fender. And decided to permanently wire that bike, as the wheel and other components on it would not be moved around from bike to bike. Photos of that are above.
- After that, picked up a couple of used dynohub wheels at unbelievably low prices, they were donated to a bike charity that had too many wheels in stock so they were trying to get rid of some of their inventory. One of those wheels is the one you labeled above as the winner, I had a vintage headlight in storage so I wired it up with that hub on my errand bike.
- And one of those used wheels went on my rando bike. The headlight wiring to the fork dropout is permanent, but allows temporary addition of a USB charger. The taillight wiring on that bike is temporary.
Thus, my wiring is sometimes intended to be permanent but sometimes intended to be temporary. I will try to add a photo later of my rando bike headlamp wiring, that is a bit unique.
I got home about a month ago from a five week long bike tour in the Canadian Maritimes. On that trip, I wired a USB charger to the dynohub, but did not use any dyno powered lighting at all. The sole purpose of the hub was for charging a variety of batteries. Changed the AAA batteries in my battery powered taillights each week even though they still looked pretty bright, used NiMH rechargeable AAA batteries for taillights. Never rode at night so never needed my USB powered bike headlamp on that trip.
Last edited by Tourist in MSN; 08-07-19 at 07:20 AM.

 08-07-19, 07:59 AM
#14
Senior Member
Thread Starter
Join Date: Jun 2017
Posts: 64
Mentioned: 4 Post(s)
Tagged: 0 Thread(s)
Quoted: 11 Post(s)
Likes: 0
Liked 13 Times
in
9 Posts
Thanks for all the information.
Your Lynskey is a beautiful looking bike.
Personally I’m a one bike kinda guy so my goal is to get this one as good as possible.
That said I take your point about flexibility. One could do a “perfect” job of wiring only to find a tear down for a headset service being painful. I’m going to give that some proper consideration, thank you!
08-07-19, 08:03 AM
#15
Senior Member
Thread Starter
Join Date: Jun 2017
Posts: 64
Mentioned: 4 Post(s)
Tagged: 0 Thread(s)
Quoted: 11 Post(s)
Likes: 0
Liked 13 Times
in
9 Posts
My townie has very tidy wiring. A few of my other bikes have some nifty tricks too. I'll post some photos when I have a chance.
08-07-19, 08:32 AM
#16
aka Tom Reingold

Join Date: Jan 2009
Location: New York, NY, and High Falls, NY, USA
Posts: 40,498
Bikes: 1962 Rudge Sports, 1971 Raleigh Super Course, 1971 Raleigh Pro Track, 1974 Raleigh International, 1975 Viscount Fixie, 1982 McLean, 1996 Lemond (Ti), 2002 Burley Zydeco tandem
Mentioned: 511 Post(s)
Tagged: 0 Thread(s)
Quoted: 7345 Post(s)
Liked 2,452 Times
in
1,430 Posts
@WOT, your headlight appears to be pointing down. Is that right? That's a good idea with round-beam lights, but B&M lights have sharp cutoffs at the tops of the beams. To aim my light, I put the top of the beam level with the light or slightly below, while the bike is stationary. Then when I'm moving, I observe the light on the surface and bring it down or up, depending on how far I want it spread. Of course, spreading it out farther forward gives me an earlier view of the path, but that can weaken the light, so I find a compromise. I make sure the beam doesn't shine in any faces, and that's easier with a B&M light than an American light.
__________________
Tom Reingold, tom@noglider.com
New York City and High Falls, NY
Blogs: The Experienced Cyclist; noglider's ride blog
“When man invented the bicycle he reached the peak of his attainments.” — Elizabeth West, US author
Please email me rather than PM'ing me. Thanks.
Tom Reingold, tom@noglider.com
New York City and High Falls, NY
Blogs: The Experienced Cyclist; noglider's ride blog
“When man invented the bicycle he reached the peak of his attainments.” — Elizabeth West, US author
Please email me rather than PM'ing me. Thanks.
08-07-19, 09:24 AM
#17
Senior Member
Join Date: Feb 2008
Location: Peoria, IL
Posts: 4,469
Mentioned: 86 Post(s)
Tagged: 0 Thread(s)
Quoted: 1827 Post(s)
Liked 3,367 Times
in
1,573 Posts
Anton Tutter has done some nice work on a Weigle that incorporates a lot of the best practices....
https://www.flickr.com/photos/751621...8/in/photolist
here's his description of what was done:
Steve in Peoria
https://www.flickr.com/photos/751621...8/in/photolist
here's his description of what was done:
Elton, Peter and I collaborated on a custom-wired state of the art dynamo lighting system which includes:
- an inverted Schmidt Edelux that I custom wired to provide switch taillight power
- SON SL "connector-less" dynamo hub, customized for power on the left side
- wiring routed through the fork, frame and fenders
- custom waterproof, miniature quick release connectors throughout to enable complete bike disassembly without cutting wires
- vintage Luminox taillight retrofitted with a modern LED with standlight
and of course, Weigle's own custom seatpost battery LED taillight!
08-07-19, 12:15 PM
#18
Senior Member
Thread Starter
Join Date: Jun 2017
Posts: 64
Mentioned: 4 Post(s)
Tagged: 0 Thread(s)
Quoted: 11 Post(s)
Likes: 0
Liked 13 Times
in
9 Posts

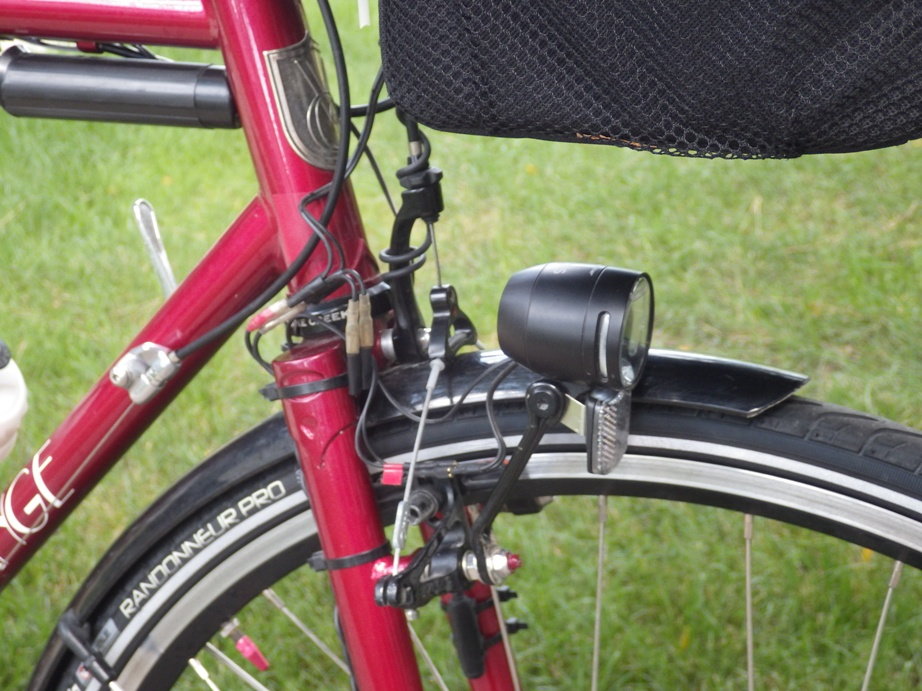
@WOT, your headlight appears to be pointing down. Is that right?
This works best for evening urban cycling, if I were out further I would raise it slightly.
Actually I’m going to reposition it higher as the light is catching to top of my mudguard and throwing a large shadow. I may even mount it on the handlebars.
08-07-19, 12:20 PM
#19
Senior Member
Thread Starter
Join Date: Jun 2017
Posts: 64
Mentioned: 4 Post(s)
Tagged: 0 Thread(s)
Quoted: 11 Post(s)
Likes: 0
Liked 13 Times
in
9 Posts
Anton Tutter has done some nice work on a Weigle that incorporates a lot of the best practices....
https://www.flickr.com/photos/751621...8/in/photolist
here's his description of what was done:
Steve in Peoria
https://www.flickr.com/photos/751621...8/in/photolist
here's his description of what was done:
Steve in Peoria
There is a good argument for using the seatpost in fairness.
08-07-19, 12:51 PM
#20
aka Tom Reingold
Join Date: Jan 2009
Location: New York, NY, and High Falls, NY, USA
Posts: 40,498
Bikes: 1962 Rudge Sports, 1971 Raleigh Super Course, 1971 Raleigh Pro Track, 1974 Raleigh International, 1975 Viscount Fixie, 1982 McLean, 1996 Lemond (Ti), 2002 Burley Zydeco tandem
Mentioned: 511 Post(s)
Tagged: 0 Thread(s)
Quoted: 7345 Post(s)
Liked 2,452 Times
in
1,430 Posts
@WOT, it looks good!
__________________
Tom Reingold, tom@noglider.com
New York City and High Falls, NY
Blogs: The Experienced Cyclist; noglider's ride blog
“When man invented the bicycle he reached the peak of his attainments.” — Elizabeth West, US author
Please email me rather than PM'ing me. Thanks.
Tom Reingold, tom@noglider.com
New York City and High Falls, NY
Blogs: The Experienced Cyclist; noglider's ride blog
“When man invented the bicycle he reached the peak of his attainments.” — Elizabeth West, US author
Please email me rather than PM'ing me. Thanks.
08-07-19, 03:45 PM
#21
Senior Member
Join Date: Feb 2008
Location: Peoria, IL
Posts: 4,469
Mentioned: 86 Post(s)
Tagged: 0 Thread(s)
Quoted: 1827 Post(s)
Liked 3,367 Times
in
1,573 Posts
He does sell a handful of items on his web site, which includes some little banana-style connectors....
Installation hardware
Practically speaking, you can use many types of connector pins. In my photos, I show how I use some Amp (formerly Deutsch) pins and sockets. They use a nickel plating and have been very tolerant of the lousy winter conditions that I subject them to.
There are some low cost connectors made by Molex that are popular with consumer products and use tin plating. These are not as durable, and I can't recommend them. OTOH, they are relatively cheap and available through places like hobby shops (some are used in RC toys) and Radio Shack (if you can still find one).
Steve in Peoria
08-07-19, 04:25 PM
#22
Senior Member
Join Date: Aug 2010
Location: Madison, WI
Posts: 11,177
Bikes: 1961 Ideor, 1966 Perfekt 3 Speed AB Hub, 1994 Bridgestone MB-6, 2006 Airnimal Joey, 2009 Thorn Sherpa, 2013 Thorn Nomad MkII, 2015 VO Pass Hunter, 2017 Lynskey Backroad, 2017 Raleigh Gran Prix, 1980s Bianchi Mixte on a trainer. Others are now gone.
Mentioned: 47 Post(s)
Tagged: 0 Thread(s)
Quoted: 3453 Post(s)
Liked 1,453 Times
in
1,132 Posts
That bracket can be bent if you have some large tools and a big vice. You could raise it up a bit if you really want to but it looks fine to me.
08-07-19, 04:52 PM
#24
Junior Member

I'm too proud to show a picture of my dyno wiring installations.
FWIW, imagine a wire very visible winding around the fork up to the headlight, looping a bit (for slack while turning) to a zip tie on the headtube, zipties along the top tube, underneath the rack (with a couple zipties to hold the extra wire) to the rear light. Would you want to brag about that?
FWIW, imagine a wire very visible winding around the fork up to the headlight, looping a bit (for slack while turning) to a zip tie on the headtube, zipties along the top tube, underneath the rack (with a couple zipties to hold the extra wire) to the rear light. Would you want to brag about that?
 08-07-19, 04:53 PM
#25
Senior Member
Join Date: Aug 2010
Location: Madison, WI
Posts: 11,177
Bikes: 1961 Ideor, 1966 Perfekt 3 Speed AB Hub, 1994 Bridgestone MB-6, 2006 Airnimal Joey, 2009 Thorn Sherpa, 2013 Thorn Nomad MkII, 2015 VO Pass Hunter, 2017 Lynskey Backroad, 2017 Raleigh Gran Prix, 1980s Bianchi Mixte on a trainer. Others are now gone.
Mentioned: 47 Post(s)
Tagged: 0 Thread(s)
Quoted: 3453 Post(s)
Liked 1,453 Times
in
1,132 Posts
Regarding connectors, when I first wired up my first dyno powered light, it was a B&M light and it used the 2.8mm spade connectors. So, I bought more of the 2.8m spade connectors, both male and female, that is what I use for all my dyno powered connectors wherever I want to put in any quick connectors.
***
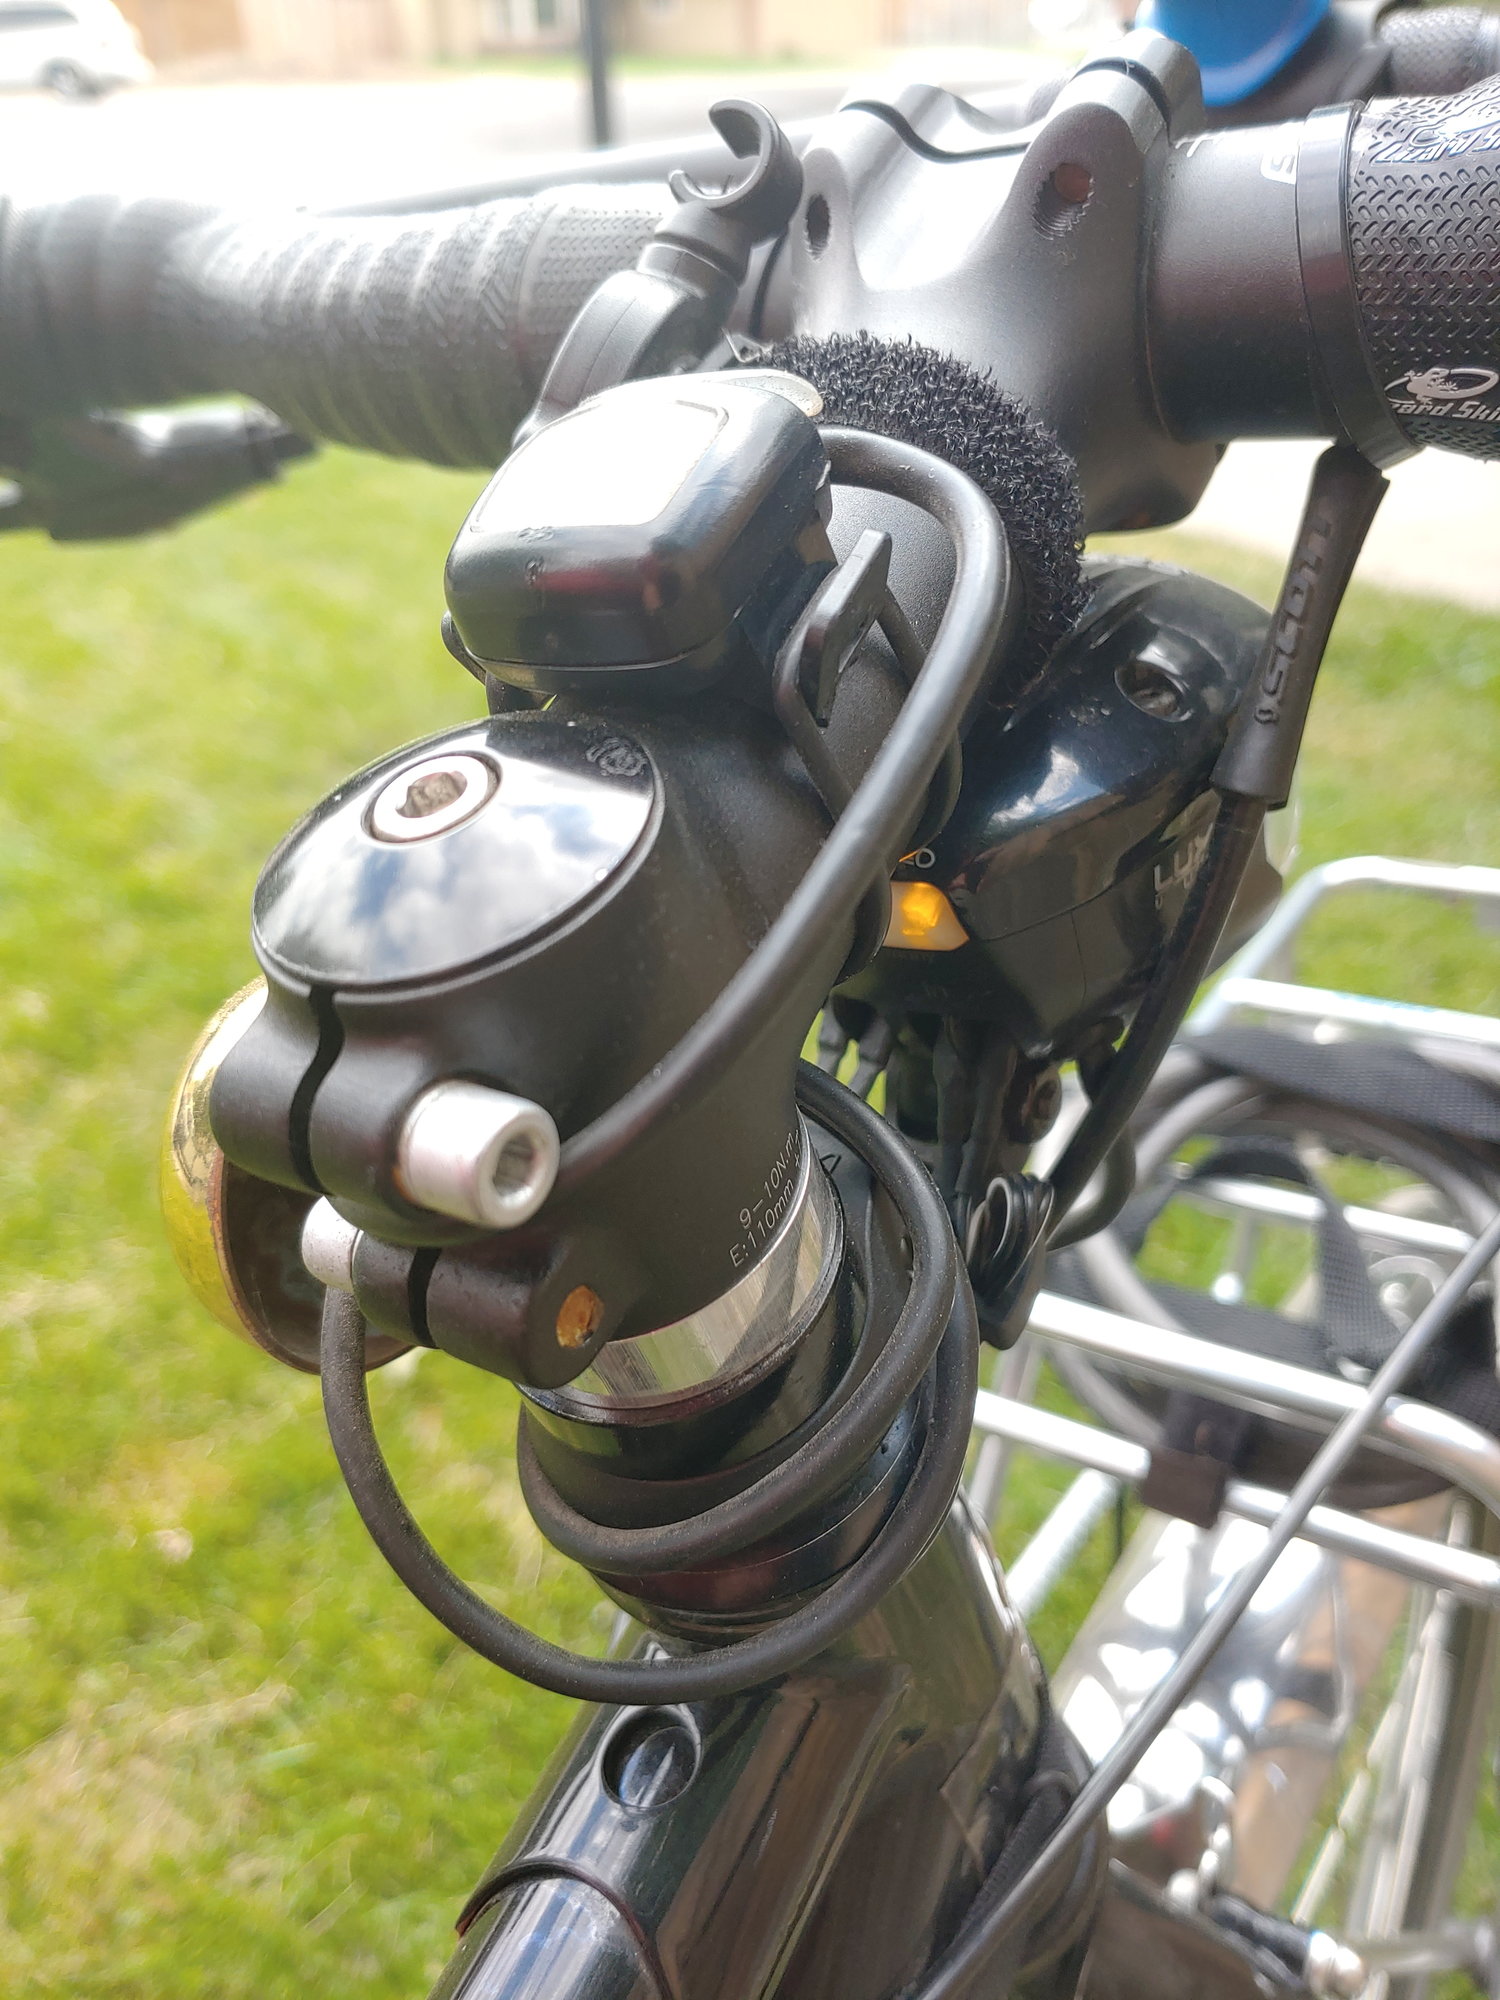
In the photos below I have the headlight on my rando bike. The mounting bracket is the extra long one, I bent it straighter to raise the light up higher so that the fender causes less shadow. And yes, it is mounted off to one side being on my right side canti brake mount, but I see no problem with that, it works fine. My fork crown area is already pretty busy because I am using a canti brake hanger on the fork crown. I used some M6 threaded rod to mount the light bracket to the canti brake post to make sure I had adequate threads in the post, used blue loctite on all of the fittings to make sure nothing comes loose. It is after all part of the brakes so I really do not want anything to come loose.
The Sinewave Revolution is zip tied to my handlebar bag bracket, that is a USB charger powered from the dynohub. The way this is wired, I can add or remove the Sinewave from the light wiring, it is wired in parallel. When the light is on, minimal power goes to the USB charger, turning off the light puts full power to the charger. And I also have a taillight wired into the system, but the taillight wiring is temporary so I am not showing that.
Wires from the hub are black, zip tied to the fork blade with 2.8mm connectors at the fork crown.
The wiring is a bit busy because I also have a wired computer on the bike, the wire that is wrapped around the canti cable hanger is the computer wire.
I have plenty of clearance between my handlebar bag and the light, more than I need.
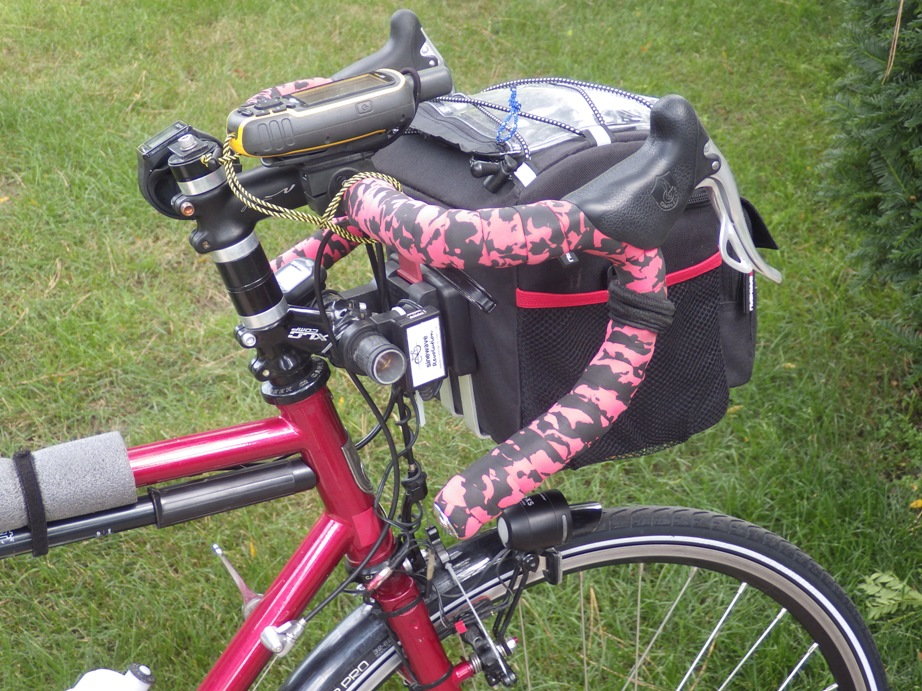
The bikes with internal wiring look pretty nice, but quite frankly I do not mind having external wiring. I have no desire to get out an electric drill and start working on the frame.
***
In the photos below I have the headlight on my rando bike. The mounting bracket is the extra long one, I bent it straighter to raise the light up higher so that the fender causes less shadow. And yes, it is mounted off to one side being on my right side canti brake mount, but I see no problem with that, it works fine. My fork crown area is already pretty busy because I am using a canti brake hanger on the fork crown. I used some M6 threaded rod to mount the light bracket to the canti brake post to make sure I had adequate threads in the post, used blue loctite on all of the fittings to make sure nothing comes loose. It is after all part of the brakes so I really do not want anything to come loose.
The Sinewave Revolution is zip tied to my handlebar bag bracket, that is a USB charger powered from the dynohub. The way this is wired, I can add or remove the Sinewave from the light wiring, it is wired in parallel. When the light is on, minimal power goes to the USB charger, turning off the light puts full power to the charger. And I also have a taillight wired into the system, but the taillight wiring is temporary so I am not showing that.
Wires from the hub are black, zip tied to the fork blade with 2.8mm connectors at the fork crown.
The wiring is a bit busy because I also have a wired computer on the bike, the wire that is wrapped around the canti cable hanger is the computer wire.
I have plenty of clearance between my handlebar bag and the light, more than I need.
The bikes with internal wiring look pretty nice, but quite frankly I do not mind having external wiring. I have no desire to get out an electric drill and start working on the frame.