


Suntour Barcons Very tight
 03-18-20, 11:54 AM
#1
Full Member
Thread Starter
Join Date: Oct 2017
Location: Rotterdam, The Netherlands
Posts: 361
Mentioned: 9 Post(s)
Tagged: 0 Thread(s)
Quoted: 157 Post(s)
Liked 113 Times
in
64 Posts
Suntour Barcons Very tight
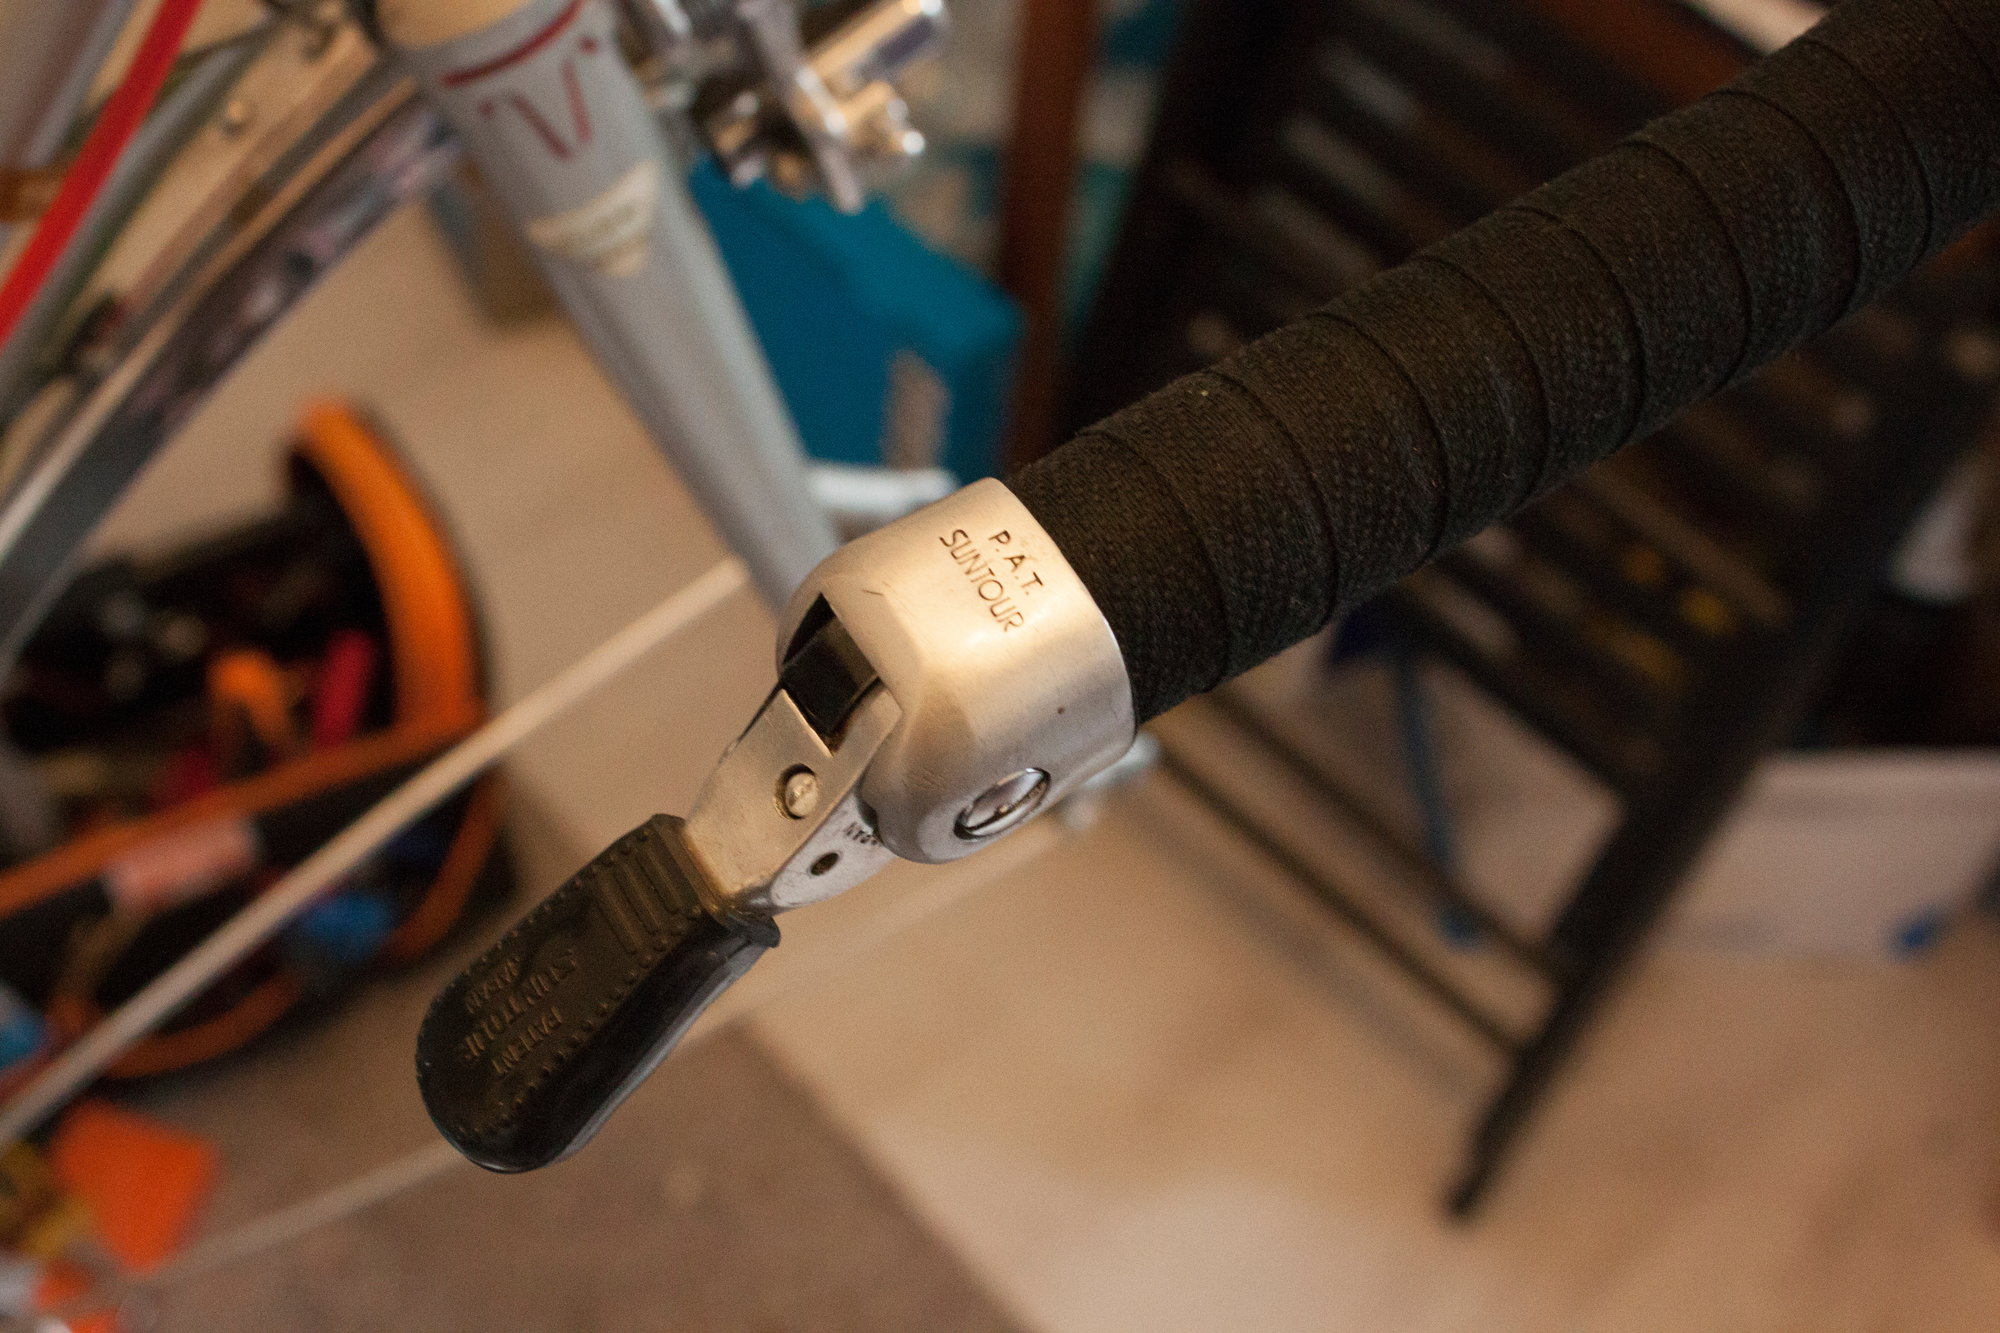
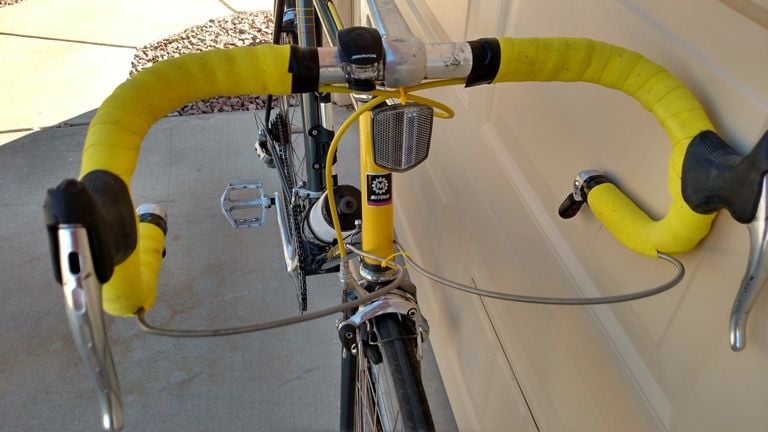
I am rebuilding my Gazelle CM Semi Race and trying Suntour barcons for the first time. I decided to run the cable housing under the bar tape and I actually went ahead and wrapped the bars even before checking how the shifters gonna work, my bad, shouldn't have done that. 
So once I installed the shifters and inner cables, I realized that the shifters (or cables?) are very tight. I have to pull the right-hand shifter with a lot of force to move the rear derailleur. That doesn't seem right. Loosing the little nut doesn't help because the shifter won't hold the spring of the derailleur anymore. Also, when I move the shifter it feels a bit gritty, not very smooth and the cable actually makes some noise. But of course the ammount of force I have to apply is a bit too much..
The left-hand shifter is acceptable but also a bit on a tight side.
I am running Campagnolo NR derailleurs, by the way.
So what do you reckon the problem is? Cable housing routing? I am using brake cable housing, by the way. The shifters? I haven't rebuilt them, I just splashed some WD40 in them and that's it. They ratchet nicely without cables installed. Derailleurs? Shifting was quite good before with NR shifters.
 03-18-20, 12:25 PM
#2

Senior Member

Sorry but I would unwrap the bars. If you use a short piece of dowel, you should be able to wrap the tape onto that, and re-use.
File all the ends of the housing and squirt a little tri-flow on the cables. And of course don�t re-wrap until all is reconnected and performance is satisfactory. Even then, I like to ride a few miles and zero in the lever placement before wrapping.
File all the ends of the housing and squirt a little tri-flow on the cables. And of course don�t re-wrap until all is reconnected and performance is satisfactory. Even then, I like to ride a few miles and zero in the lever placement before wrapping.
03-18-20, 12:31 PM
#3
Senior Member

Join Date: Jul 2018
Location: Eugene, OR
Posts: 1,326
Mentioned: 64 Post(s)
Tagged: 0 Thread(s)
Quoted: 535 Post(s)
Liked 346 Times
in
196 Posts
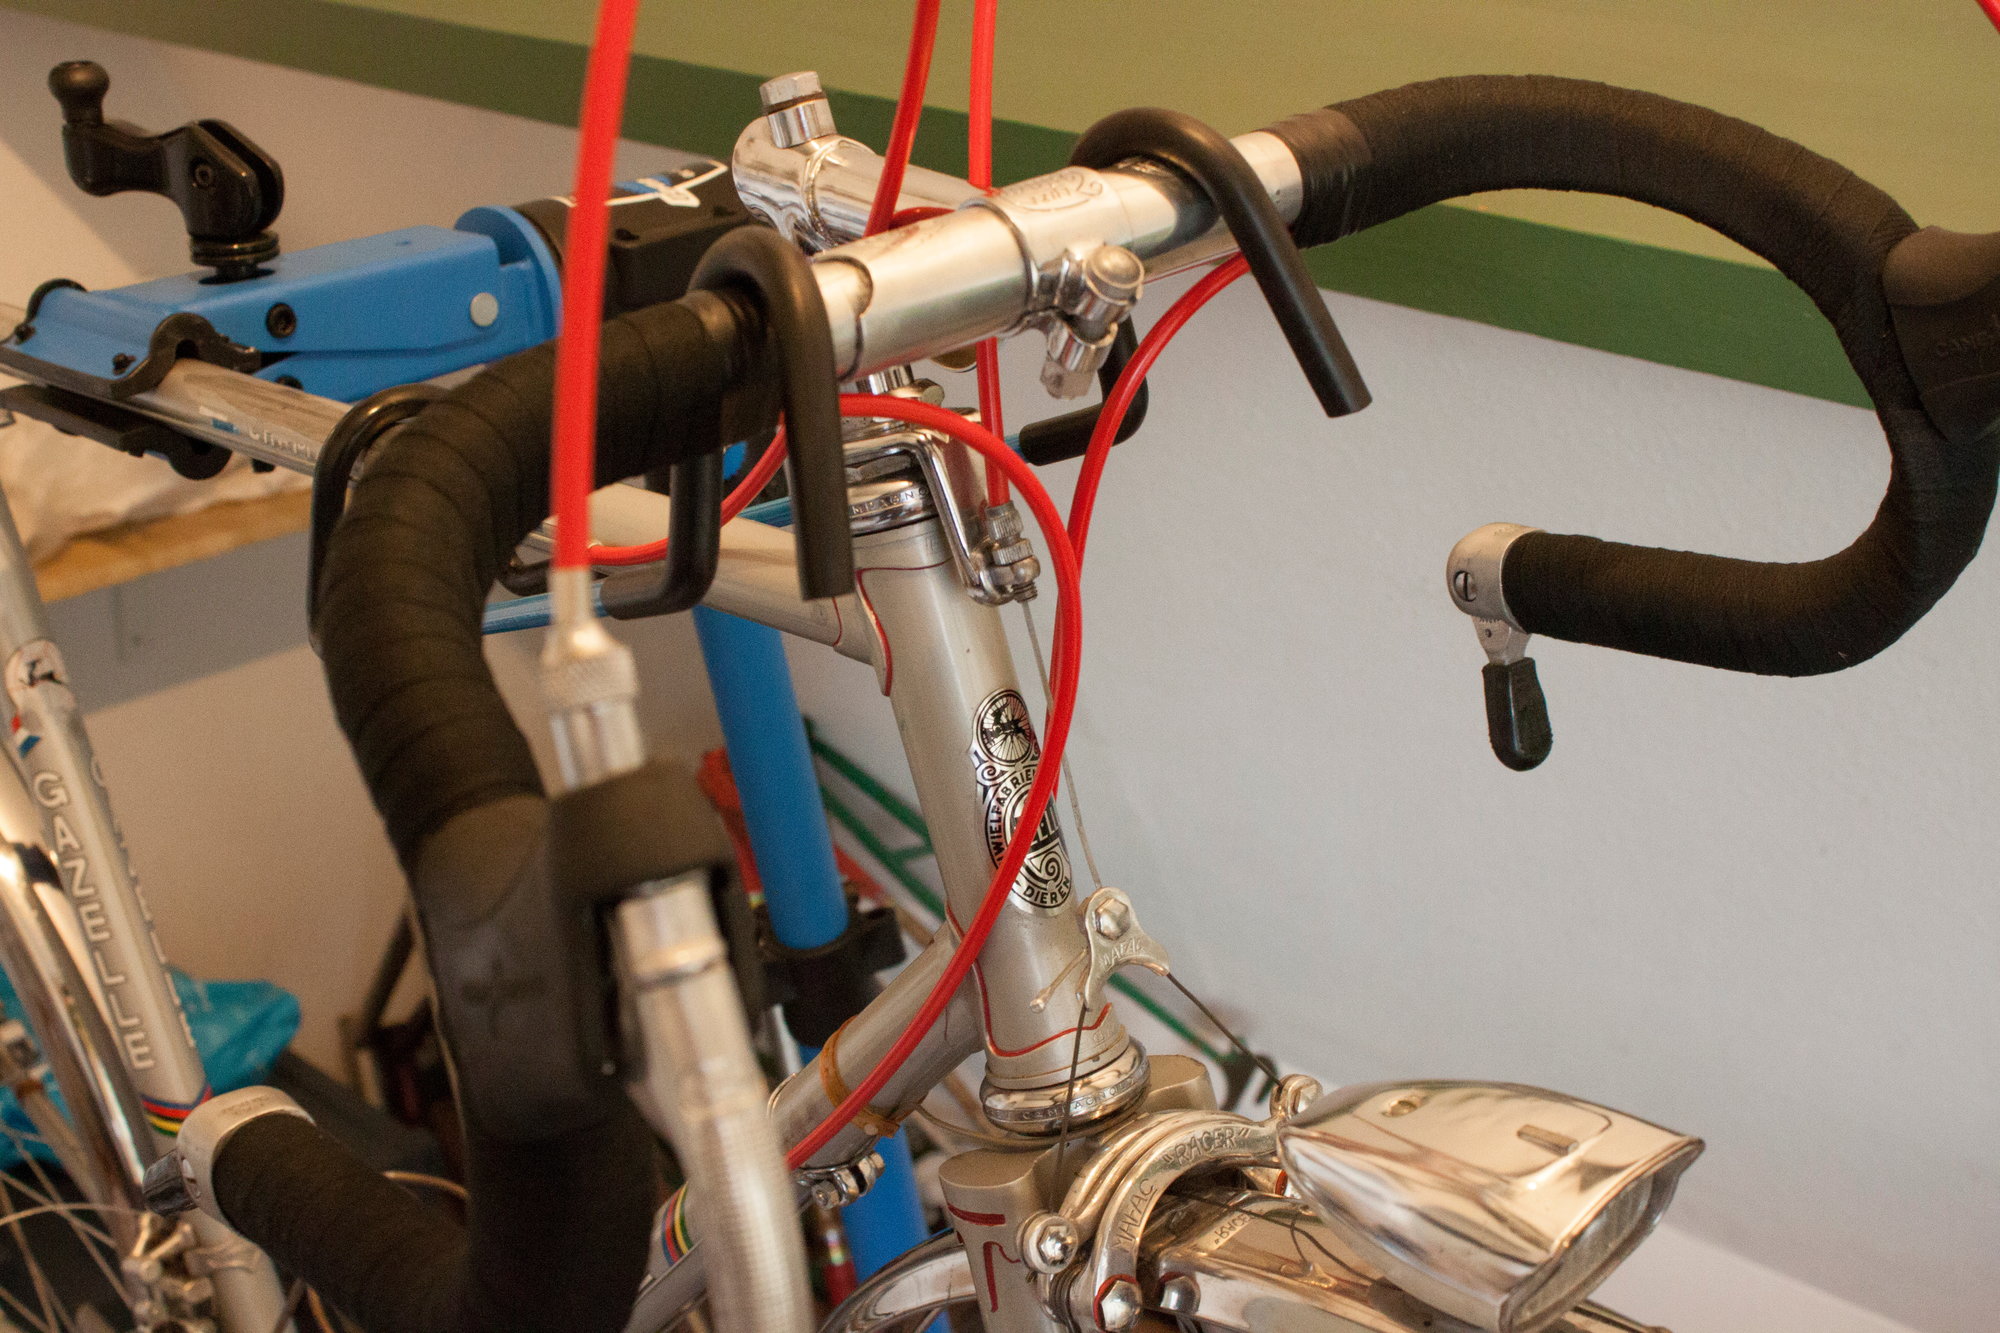
Ran mine under the tape too. Gave the cable/housing as much slack as I could between where they leave the bars near the stem and travel towards the downtube.
The cable/housing is from Porkchops, �vintage style.� I�ve never used it before, so I�m not sure what type of performance to expect from it. Also, never used barcons before, so once again, not sure what they�re �supposed� to feel like.
I did disassemble the levers first cleaning and lube prior to installing them.
That said, the shifters do feel tighter than any downtube shifter I�ve ever used. Takes a bit of force to move them, but not so much that I find it problematic. And like you, I have the friction adjustment set so that it�s as slack as can be while still holding it�s place in gear without slipping.
03-18-20, 12:41 PM
#4
Full Member
Thread Starter
Join Date: Oct 2017
Location: Rotterdam, The Netherlands
Posts: 361
Mentioned: 9 Post(s)
Tagged: 0 Thread(s)
Quoted: 157 Post(s)
Liked 113 Times
in
64 Posts
Sorry but I would unwrap the bars. If you use a short piece of dowel, you should be able to wrap the tape onto that, and re-use.
File all the ends of the housing and squirt a little tri-flow on the cables. And of course don�t re-wrap until all is reconnected and performance is satisfactory. Even then, I like to ride a few miles and zero in the lever placement before wrapping.
File all the ends of the housing and squirt a little tri-flow on the cables. And of course don�t re-wrap until all is reconnected and performance is satisfactory. Even then, I like to ride a few miles and zero in the lever placement before wrapping.
03-18-20, 12:47 PM
#5
Full Member
Thread Starter
Join Date: Oct 2017
Location: Rotterdam, The Netherlands
Posts: 361
Mentioned: 9 Post(s)
Tagged: 0 Thread(s)
Quoted: 157 Post(s)
Liked 113 Times
in
64 Posts
Ran mine under the tape too. Gave the cable/housing as much slack as I could between where they leave the bars near the stem and travel towards the downtube.
The cable/housing is from Porkchops, �vintage style.� I�ve never used it before, so I�m not sure what type of performance to expect from it. Also, never used barcons before, so once again, not sure what they�re �supposed� to feel like.
I did disassemble the levers first cleaning and lube prior to installing them.
That said, the shifters do feel tighter than any downtube shifter I�ve ever used. Takes a bit of force to move them, but not so much that I find it problematic. And like you, I have the friction adjustment set so that it�s as slack as can be while still holding it�s place in gear without slipping.
The cable/housing is from Porkchops, �vintage style.� I�ve never used it before, so I�m not sure what type of performance to expect from it. Also, never used barcons before, so once again, not sure what they�re �supposed� to feel like.
I did disassemble the levers first cleaning and lube prior to installing them.
That said, the shifters do feel tighter than any downtube shifter I�ve ever used. Takes a bit of force to move them, but not so much that I find it problematic. And like you, I have the friction adjustment set so that it�s as slack as can be while still holding it�s place in gear without slipping.
The fact that you say that they're tighter than DT shifters does make sense because the levers are shorter than the ones on typical DT shifters.
By the way, I really like Simplex Retrofriction shifters on my other bike, so let's see..
03-18-20, 01:13 PM
#7
Senior Member
Join Date: Jul 2018
Location: Eugene, OR
Posts: 1,326
Mentioned: 64 Post(s)
Tagged: 0 Thread(s)
Quoted: 535 Post(s)
Liked 346 Times
in
196 Posts
It may or may not make a difference for you. Even though I didn�t use mine prior to cleaning/lubing, I do believe it was helpful. Primarily because I discovered a lot of internal grime upon disassembly which I�m certain would have been felt in operation. I�d recommend rebuilding. If there�s no benefit, at least there�d be no harm either.
Likes For deux jambes:
03-18-20, 02:18 PM
#8
Senior Member
Join Date: Apr 2017
Location: Los Angeles, CA
Posts: 2,249
Bikes: 1964 Legnano Roma Olympiade, 1973 Raleigh Super Course, 1978 Raleigh Super Course, 1978 Peugeot PR10, 2002 Specialized Allez, 2007 Specialized Roubaix, 2013 Culprit Croz Blade
Mentioned: 68 Post(s)
Tagged: 0 Thread(s)
Quoted: 741 Post(s)
Liked 818 Times
in
421 Posts
I have Suntour bar cons on two different Raleigh Super Courses. One shifts very smooth and easy, yet still holds gear position, the other is tight and sticky. Both have Pork Chop cables and housings wrapped under the bar tape. Let us know what you find out. Its been bugging me too.
Likes For Slightspeed:
03-18-20, 02:23 PM
#9
Full Member
Thread Starter
Join Date: Oct 2017
Location: Rotterdam, The Netherlands
Posts: 361
Mentioned: 9 Post(s)
Tagged: 0 Thread(s)
Quoted: 157 Post(s)
Liked 113 Times
in
64 Posts
I have Suntour bar cons on two different Raleigh Super Courses. One shifts very smooth and easy, yet still holds gear position, the other is tight and sticky. Both have Pork Chop cables and housings wrapped under the bar tape. Let us know what you find out. Its been bugging me too.
03-18-20, 02:30 PM
#10
Full Member
Thread Starter
Join Date: Oct 2017
Location: Rotterdam, The Netherlands
Posts: 361
Mentioned: 9 Post(s)
Tagged: 0 Thread(s)
Quoted: 157 Post(s)
Liked 113 Times
in
64 Posts
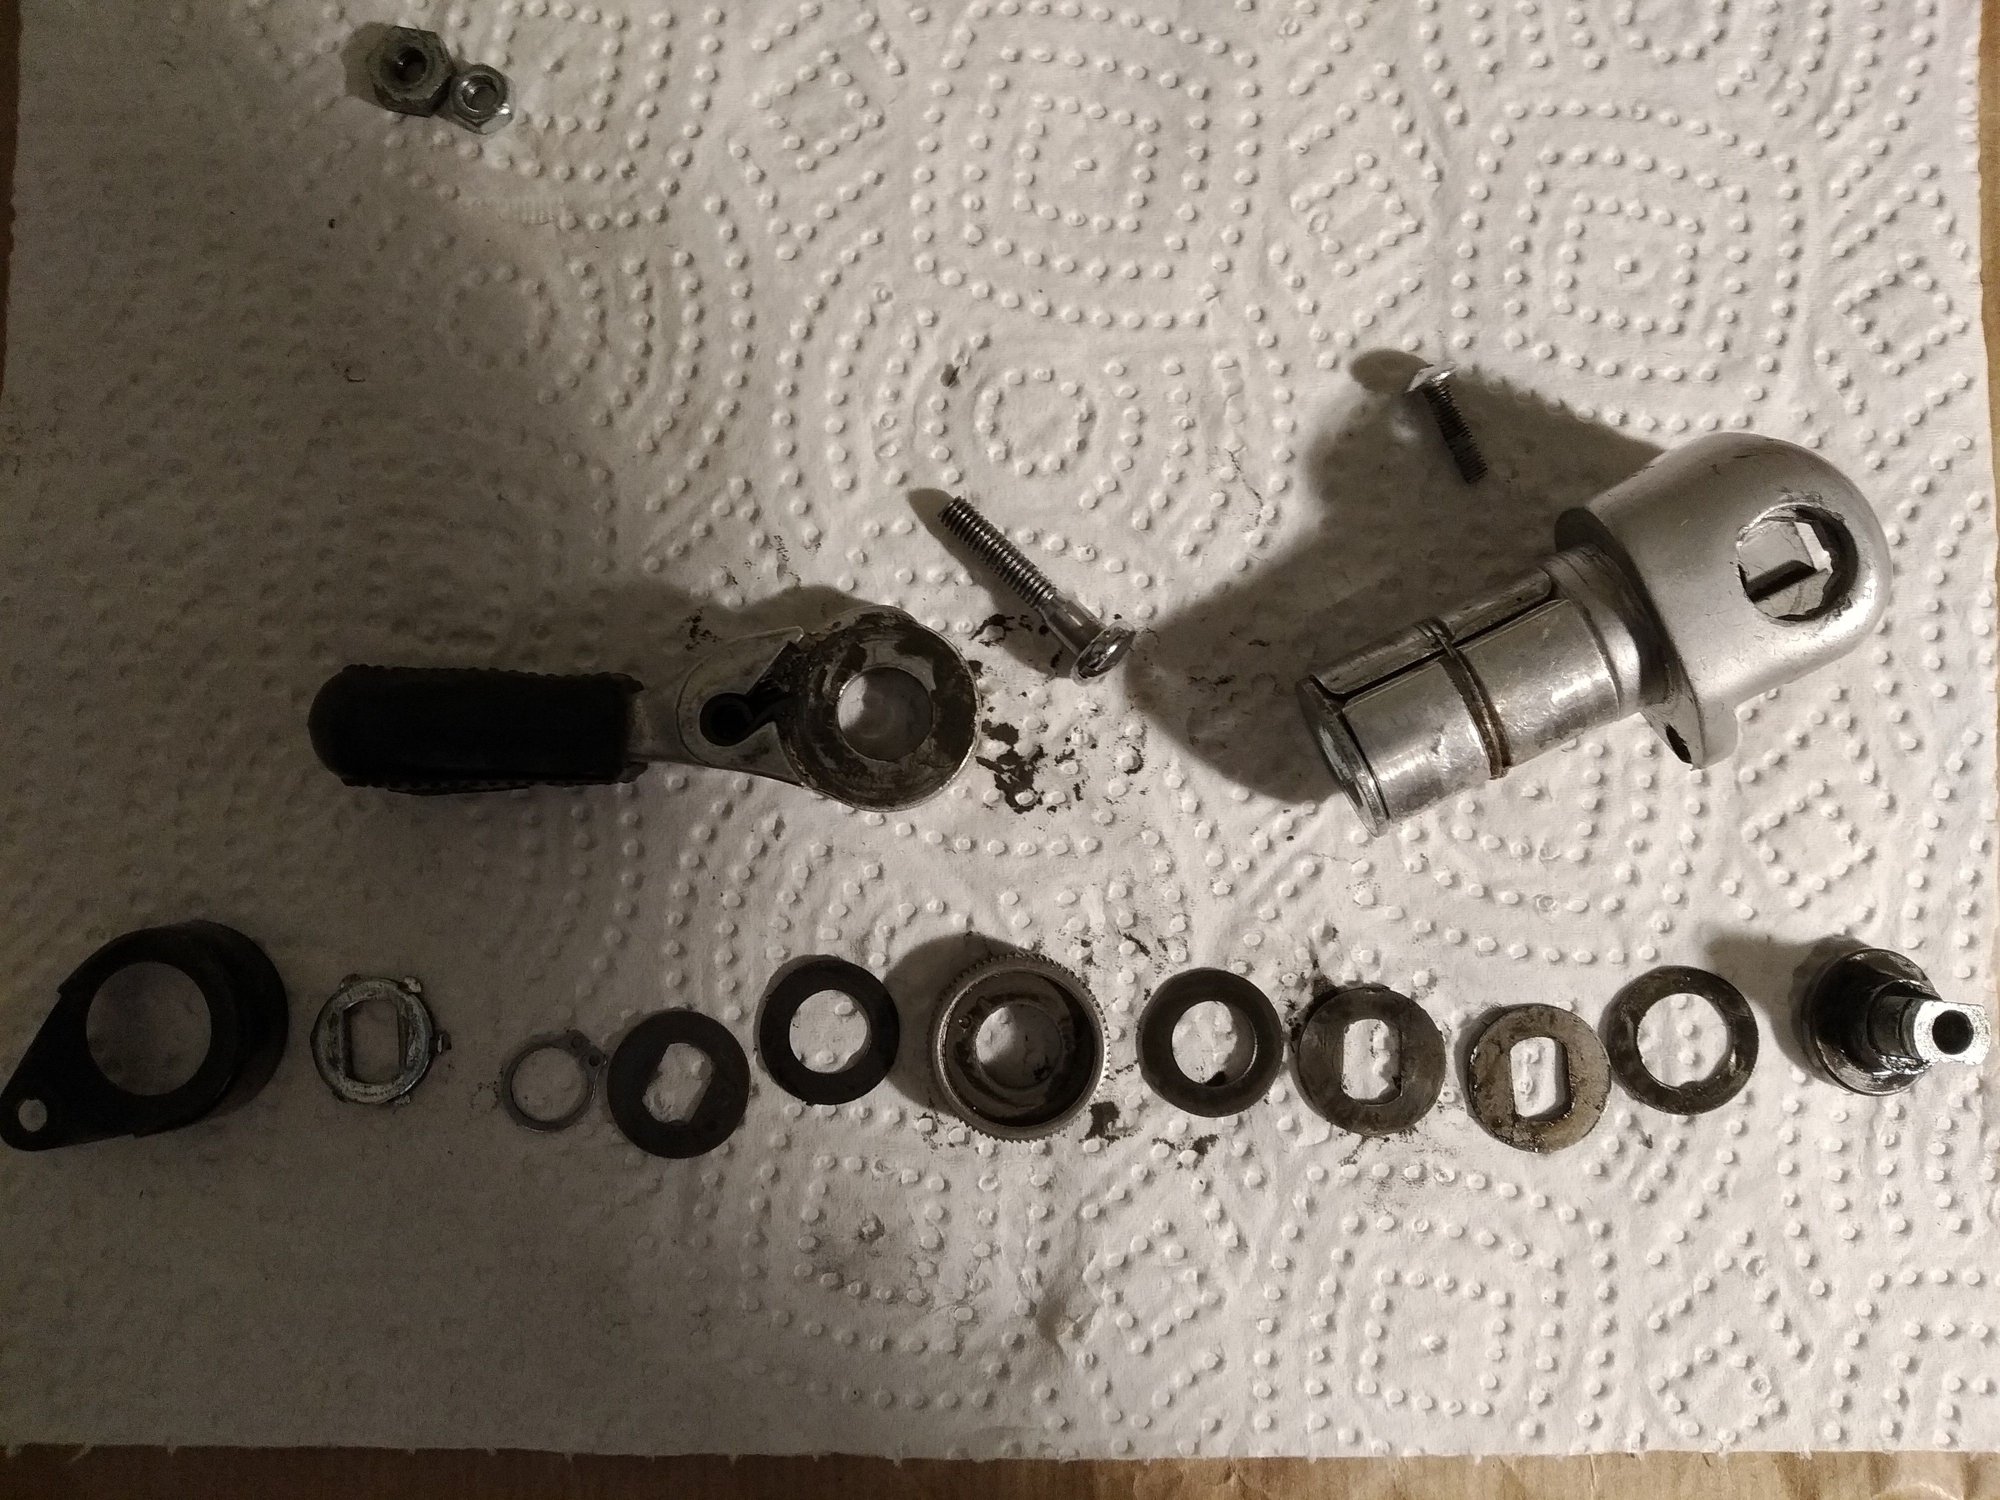
Okay, I disassembled one of the shifters and I am a bit confused. It seems that there is an extra spacer (6) which is not shown in the scheme I found on the internet. I have three of those instead of two, I mean. Also, bushing 5, which sits on part 4, is different from the other two bushings. It has larger inner diameter.
Strange...

Strange...
03-18-20, 02:32 PM
#11
Full Member
Thread Starter
Join Date: Oct 2017
Location: Rotterdam, The Netherlands
Posts: 361
Mentioned: 9 Post(s)
Tagged: 0 Thread(s)
Quoted: 157 Post(s)
Liked 113 Times
in
64 Posts
That is the front derailleur shifter, by the way. I am gonna disassemble the other one now and see if it's the same
03-18-20, 03:39 PM
#12
Senior Member
Join Date: Mar 2013
Location: Maryland
Posts: 3,799
Bikes: Lots of English 3-speeds, a couple of old road bikes, 3 mountain bikes, 1 hybrid, and a couple of mash-ups
Mentioned: 53 Post(s)
Tagged: 0 Thread(s)
Quoted: 887 Post(s)
Liked 335 Times
in
225 Posts
If they are the old friction barcons they are both the same.
Likes For dweenk:
03-18-20, 04:03 PM
#13
Full Member
Thread Starter
Join Date: Oct 2017
Location: Rotterdam, The Netherlands
Posts: 361
Mentioned: 9 Post(s)
Tagged: 0 Thread(s)
Quoted: 157 Post(s)
Liked 113 Times
in
64 Posts
Yeah, I know! The one which I put on the left in the first place operated way better. I rebuilt it now I put on the right and it's an improvement! Much less force needed to move the rear derailleur.
Gonna rebuild the other one and put it back.
They are quite straightforward to overhaul, by the way. Good to know for future tinkering.
Gonna rebuild the other one and put it back.
They are quite straightforward to overhaul, by the way. Good to know for future tinkering.
03-18-20, 04:09 PM
#14
Senior Member

I've never run the cables on any of my bikes with SunTour barcons under the tape all the way to the handlebar stem. I attempted that method once, and there was just too much friction, so I unwrapped the bars and did it 'classic style' -- looping out of the tape at the front of the drops before the bars start to bend upwards. I never tried it with Teflon-lined housing. Oh, and I am still using the original SunTour bare coiled stainless steel housing. Even at that, I use slick stainless inner wire, and sometimes they'll need a drop or two of 'dry lube' (high VOC graphite/teflon lube) to make them slide easier.
Installed on the '86 Miyata 710
And an older photo of the Fuji. Since this photo, the bars were re-wrapped and the cable loop is a bit higher - straighter to the downtube stop
No good pics of the installation on either of the Univegas...
Installed on the '86 Miyata 710
And an older photo of the Fuji. Since this photo, the bars were re-wrapped and the cable loop is a bit higher - straighter to the downtube stop
No good pics of the installation on either of the Univegas...
03-18-20, 04:16 PM
#15
Bike Butcher of Portland

Join Date: Jul 2014
Location: Portland, OR
Posts: 11,630
Bikes: It's complicated.
Mentioned: 1299 Post(s)
Tagged: 0 Thread(s)
Quoted: 4677 Post(s)
Liked 5,790 Times
in
2,279 Posts
Looks like you're well on the way to fixing your issue, but I have an old cyclocross trick to offer.
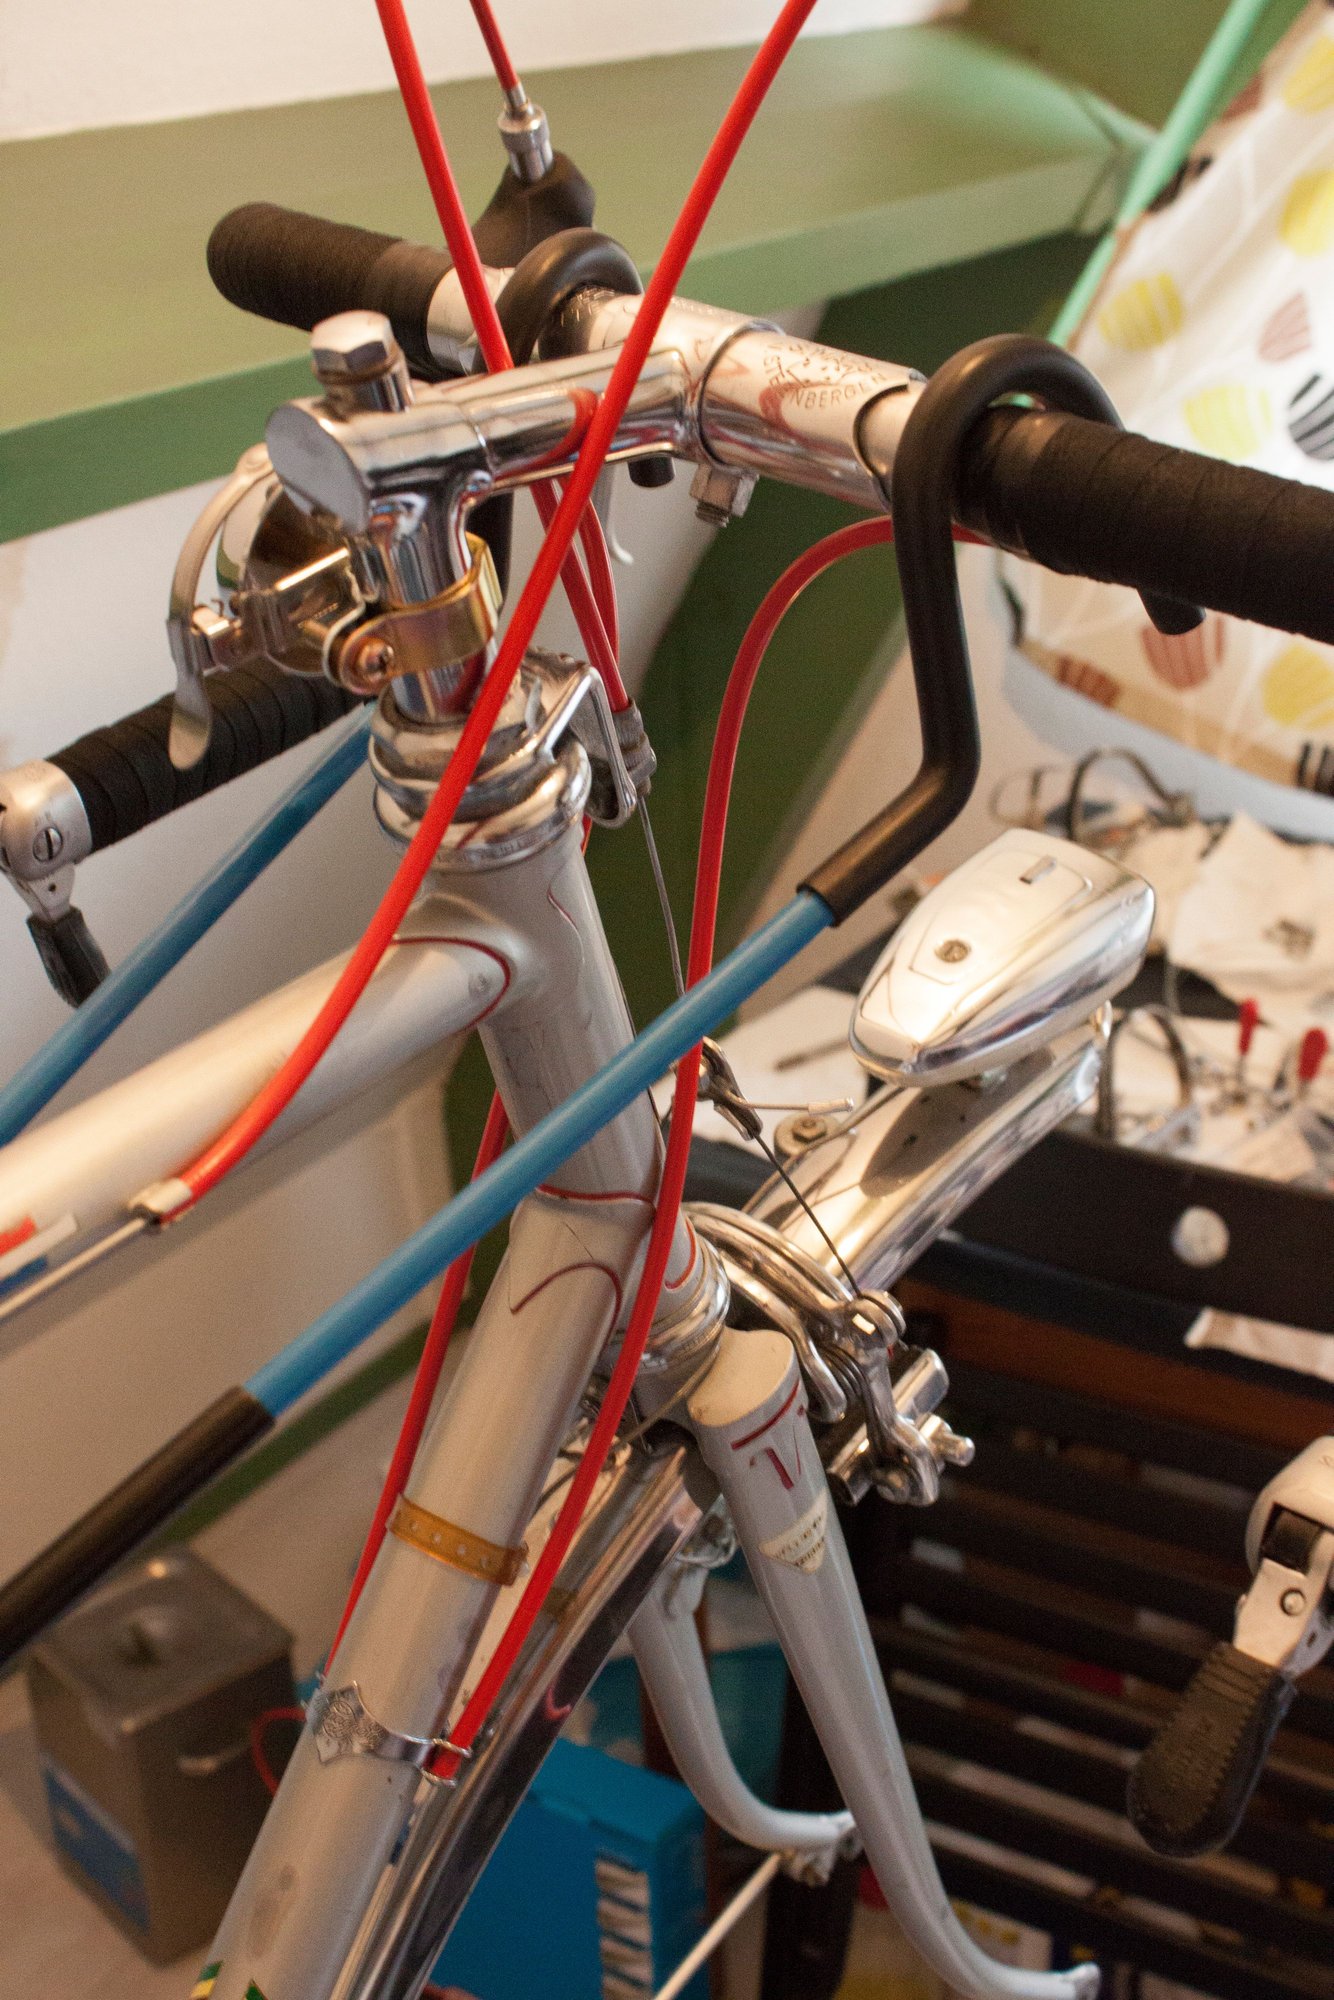
I see you've got the right shifter going to the right side cable stop (drive side). That gives the housing a pretty tight radius bend, which results in more friction. Instead, reverse them, so right goes to the left side, and left to the right side, then cross them back over under the down tube. Even though the two cables are now rubbing, the overall effect is less cable friction.
Of course, this assumes that you have under the bottom bracket cable guides. If you don't, it's a simple matter to drill and tap an M5 hole in the bottom bracket and put a plastic under the bottom bracket cable guide in.
__________________
If someone tells you that you have enough bicycles and you don't need any more, stop talking to them. You don't need that kind of negativity in your life.
If someone tells you that you have enough bicycles and you don't need any more, stop talking to them. You don't need that kind of negativity in your life.
Likes For gugie:
03-18-20, 04:31 PM
#16
Ride, Wrench, Swap, Race

Join Date: Jan 2010
Location: Northern California
Posts: 9,181
Bikes: Cheltenham-Pedersen racer, Boulder F/S Paris-Roubaix, Varsity racer, '52 Christophe, '62 Continental, '92 Merckx, '75 Limongi, '76 Presto, '72 Gitane SC, '71 Schwinn SS, etc.
Mentioned: 132 Post(s)
Tagged: 0 Thread(s)
Quoted: 1562 Post(s)
Liked 1,285 Times
in
856 Posts
The worst cable friction problems I've encountered weren't the ends of the housings but instead were cases where stainless inner wire was used in the stainless housings and/or run across a stainless cable guide under the bb shell (Trek's big mistake on early OCLV frames).
Stainless steel microscopically cold-welds to itself, producing the highest coefficient of static friction imaginable!
The old stainless housings also are quite elastic in compression, which only further degrades friction or indexed shifting.
Choice of lubrication will be optimal with plastic-lined housings with a non-petroleum Silicone/PTFE grease applied. The very best housings from Shimano and Yokozuna are pre-lubricated along their entire length with low-viscosity Silicone/PTFE grease. SRAM's Jonnisnot cable lubricant is similarly a Silicone/PTFE formulation, but made for localized cable path guides found in GripShift and DoubleTap shifters. But it is also really excellent applied lightly to the entire inner wire, especially after perhaps having scrubbed out the old housings using PTFE/solvent-based Dri-Lube spray, a bent-up cable and compressed air. I still use this (my old self-taught method) to refurb vintage bike's original housings because the SRAM grease is so very slippery inside of a clean, plastic-lined housing.
One more thing about silicone-based lubes is that they do not evaporate, oxidize, thicken or permeate the housing's plastic liner. So the cable housings that you tune up using silicone grease should still feel tuned up thirty years later after sitting all that time in your garage.

Lastly, after refurbing my dumpster-sourced Pro-Tour in December, and after having worked on and ridden it almost every day since then, I finally realized that in order to get the smoothest shifting that I was after using the bar-cons, in addition to my other cabling efforts, I had to put a piece of plastic tubing into the groove of the clamped-on cable guide at the bottom bracket. I used an inch of housing liner tubing and after fitting up the cables I put a dab of epoxy glue in the groove to keep the housing liner segment from sliding out. After doing this and completely removing the Suntour rear derailer's B-tension adjustment screw, the shifting finally is quite good enough for sporting use in our rolling foothills environment!
Bar end shifters will always benefit (per Gugie's advice above) from any extra bit of setup care especially because the cable to the rear derailer is so very long. Friction forces effectively are multiplied by the long cable's (and housing's) elasticity to produce high error between shifter and derailer movements (i.e. vague shifting response) unless real effort is made to improve the housings and overall cable path.
(cable + housing elasticity) X (bi-directional friction force along the cable's path) = (hysteresis or motion error between shifter and derailer)

Stainless steel microscopically cold-welds to itself, producing the highest coefficient of static friction imaginable!
The old stainless housings also are quite elastic in compression, which only further degrades friction or indexed shifting.
Choice of lubrication will be optimal with plastic-lined housings with a non-petroleum Silicone/PTFE grease applied. The very best housings from Shimano and Yokozuna are pre-lubricated along their entire length with low-viscosity Silicone/PTFE grease. SRAM's Jonnisnot cable lubricant is similarly a Silicone/PTFE formulation, but made for localized cable path guides found in GripShift and DoubleTap shifters. But it is also really excellent applied lightly to the entire inner wire, especially after perhaps having scrubbed out the old housings using PTFE/solvent-based Dri-Lube spray, a bent-up cable and compressed air. I still use this (my old self-taught method) to refurb vintage bike's original housings because the SRAM grease is so very slippery inside of a clean, plastic-lined housing.
One more thing about silicone-based lubes is that they do not evaporate, oxidize, thicken or permeate the housing's plastic liner. So the cable housings that you tune up using silicone grease should still feel tuned up thirty years later after sitting all that time in your garage.
Lastly, after refurbing my dumpster-sourced Pro-Tour in December, and after having worked on and ridden it almost every day since then, I finally realized that in order to get the smoothest shifting that I was after using the bar-cons, in addition to my other cabling efforts, I had to put a piece of plastic tubing into the groove of the clamped-on cable guide at the bottom bracket. I used an inch of housing liner tubing and after fitting up the cables I put a dab of epoxy glue in the groove to keep the housing liner segment from sliding out. After doing this and completely removing the Suntour rear derailer's B-tension adjustment screw, the shifting finally is quite good enough for sporting use in our rolling foothills environment!
Bar end shifters will always benefit (per Gugie's advice above) from any extra bit of setup care especially because the cable to the rear derailer is so very long. Friction forces effectively are multiplied by the long cable's (and housing's) elasticity to produce high error between shifter and derailer movements (i.e. vague shifting response) unless real effort is made to improve the housings and overall cable path.
(cable + housing elasticity) X (bi-directional friction force along the cable's path) = (hysteresis or motion error between shifter and derailer)
Last edited by dddd; 03-18-20 at 04:59 PM.
Likes For dddd:
03-18-20, 04:37 PM
#17
Senior Member
Join Date: Oct 2010
Posts: 8,515
Mentioned: 69 Post(s)
Tagged: 0 Thread(s)
Quoted: 3241 Post(s)
Liked 2,512 Times
in
1,510 Posts
Do you have the cables taped to the bars under the wrap? When you get the wrap off and the cables are free, take a ride. If the shifting is still bad with everything loose and free, then the problem is in the shifters/cable. If the shifting is great with no bar tape, then it's your wrapping job.
03-18-20, 04:55 PM
#18
Full Member
Thread Starter
Join Date: Oct 2017
Location: Rotterdam, The Netherlands
Posts: 361
Mentioned: 9 Post(s)
Tagged: 0 Thread(s)
Quoted: 157 Post(s)
Liked 113 Times
in
64 Posts
Looks like you're well on the way to fixing your issue, but I have an old cyclocross trick to offer.
I see you've got the right shifter going to the right side cable stop (drive side). That gives the housing a pretty tight radius bend, which results in more friction. Instead, reverse them, so right goes to the left side, and left to the right side, then cross them back over under the down tube. Even though the two cables are now rubbing, the overall effect is less cable friction.
Of course, this assumes that you have under the bottom bracket cable guides. If you don't, it's a simple matter to drill and tap an M5 hole in the bottom bracket and put a plastic under the bottom bracket cable guide in.
03-18-20, 05:01 PM
#19
Full Member
Thread Starter
Join Date: Oct 2017
Location: Rotterdam, The Netherlands
Posts: 361
Mentioned: 9 Post(s)
Tagged: 0 Thread(s)
Quoted: 157 Post(s)
Liked 113 Times
in
64 Posts
The worst cable friction problems I've encountered weren't the ends of the housings but instead were cases where stainless inner wire was used in the stainless housings and/or run across a stainless cable guide under the bb shell (Trek's big mistake on early OCLV frames).
Stainless steel microscopically cold-welds to itself, producing the highest coefficient of static friction imaginable!
The old stainless housings also are quite elastic in compression, which only further degrades friction or indexed shifting.
Choice of lubrication will be optimal with plastic-lined housings with a non-petroleum Silicone/PTFE grease applied. The very best housings from Shimano and Yokozuna are pre-lubricated along their entire length with low-viscosity Silicone/PTFE grease. SRAM's Jonnisnot cable lubricant is similarly a Silicone/PTFE formulation, but made for localized cable path guides found in GripShift and DoubleTap shifters. But it is also really excellent applied lightly to the entire inner wire, especially after perhaps having scrubbed out the old housings using PTFE/solvent-based Dri-Lube spray, a bent-up cable and compressed air. I still use this (my old self-taught method) to refurb vintage bike's original housings because the SRAM grease is so very slippery inside of a clean, plastic-lined housing.
One more thing about silicone-based lubes is that they do not evaporate, oxidize, thicken or permeate the housing's plastic liner. So the cable housings that you tune up using silicone grease should still feel tuned up thirty years later after sitting all that time in your garage.
Lastly, after refurbing my dumpster-sourced Pro-Tour in December, and after having worked on and ridden it since then, I finally realized that to get the smoothest shifting I was after using the bar-cons, that in addition to my other cabling efforts I had to put a piece of plastic tubing into the groove of the clamped-on cable guide at the bottom bracket. I used an inch of housing liner tubing and after fitting up the cables I put a dab of epoxy glue in the groove to keep the housing liner segment from sliding out. After doing this and completely removing the Suntour B-tension adjustment screw, the shifting is quite good enough for sporting use in our rolling foothills environment!
Bar end shifters will always benefit (per Gugie's advice above) from any extra bit of setup care especially because the cable to the rear derailer is so very long. Friction forces effectively are multiplied by the long cable's (and housing's) elasticity to produce high error between shifter and derailer movements (i.e. vague shifting response) unless real effort is made to improve the housings and overall cable path.
(cable + housing elasticity) X (bi-directional friction force along the cable's path) = (hysteresis or motion error between shifter and derailer)
For now after rebuilding the shifters, the shifting seems to be quite acceptable. I'll have to check it on the road.
Likes For alexnagui:
03-18-20, 05:03 PM
#20
Senior Member
03-18-20, 05:05 PM
#21
Full Member
Thread Starter
Join Date: Oct 2017
Location: Rotterdam, The Netherlands
Posts: 361
Mentioned: 9 Post(s)
Tagged: 0 Thread(s)
Quoted: 157 Post(s)
Liked 113 Times
in
64 Posts
I've never run the cables on any of my bikes with SunTour barcons under the tape all the way to the handlebar stem. I attempted that method once, and there was just too much friction, so I unwrapped the bars and did it 'classic style' -- looping out of the tape at the front of the drops before the bars start to bend upwards. I never tried it with Teflon-lined housing. Oh, and I am still using the original SunTour bare coiled stainless steel housing. Even at that, I use slick stainless inner wire, and sometimes they'll need a drop or two of 'dry lube' (high VOC graphite/teflon lube) to make them slide easier.
Installed on the '86 Miyata 710
And an older photo of the Fuji. Since this photo, the bars were re-wrapped and the cable loop is a bit higher - straighter to the downtube stop
No good pics of the installation on either of the Univegas...
Installed on the '86 Miyata 710
And an older photo of the Fuji. Since this photo, the bars were re-wrapped and the cable loop is a bit higher - straighter to the downtube stop
No good pics of the installation on either of the Univegas...
03-18-20, 05:07 PM
#22
Full Member
Thread Starter
Join Date: Oct 2017
Location: Rotterdam, The Netherlands
Posts: 361
Mentioned: 9 Post(s)
Tagged: 0 Thread(s)
Quoted: 157 Post(s)
Liked 113 Times
in
64 Posts
Do you have the cables taped to the bars under the wrap? When you get the wrap off and the cables are free, take a ride. If the shifting is still bad with everything loose and free, then the problem is in the shifters/cable. If the shifting is great with no bar tape, then it's your wrapping job.
Yeah, they were quite dirty so it was a good idea!
03-18-20, 05:10 PM
#23
Full Member
Thread Starter
Join Date: Oct 2017
Location: Rotterdam, The Netherlands
Posts: 361
Mentioned: 9 Post(s)
Tagged: 0 Thread(s)
Quoted: 157 Post(s)
Liked 113 Times
in
64 Posts
Okay, I disassembled one of the shifters and I am a bit confused. It seems that there is an extra spacer (6) which is not shown in the scheme I found on the internet. I have three of those instead of two, I mean. Also, bushing 5, which sits on part 4, is different from the other two bushings. It has larger inner diameter.
Strange...
Strange...
03-18-20, 05:15 PM
#24
Bike Butcher of Portland
Join Date: Jul 2014
Location: Portland, OR
Posts: 11,630
Bikes: It's complicated.
Mentioned: 1299 Post(s)
Tagged: 0 Thread(s)
Quoted: 4677 Post(s)
Liked 5,790 Times
in
2,279 Posts
It's probably the easiest frame mode one can do, and it's out of sight, out of mind.
__________________
If someone tells you that you have enough bicycles and you don't need any more, stop talking to them. You don't need that kind of negativity in your life.
If someone tells you that you have enough bicycles and you don't need any more, stop talking to them. You don't need that kind of negativity in your life.

