


I don't like doing the bottom bracket
 03-20-20, 06:45 PM
#1
Recreational Road Cyclist
Thread Starter
Join Date: Sep 2013
Location: MetroWest, Mass.
Posts: 547
Bikes: 1990 Peter Mooney road bike
Mentioned: 7 Post(s)
Tagged: 0 Thread(s)
Quoted: 256 Post(s)
Liked 252 Times
in
134 Posts
I don't like doing the bottom bracket
Somewhere in the '90s, I stopped maintaining the bottom bracket of my bike and let the LBS do it. When I did the work, it always ended up with ball bearings all over the floor, too much play, and grease on every available surface and object.
But today I did my own service, on a '90s Shimano Cup 'n' Cone bottom bracket. Here are my observations.
I had the right tools; a Park crank puller, a Sugino lock-ring/fixed cup wrench, some grade-25 ball bearings, and some fresh slippery grease. I had a Park pin-spanner for the adjustable cup. I had Cabernet for the afterparty.
The cranks came off lickety-split, with a crank bolt wrench and a crank puller from our friends at Park Tools. Then, the grease hit the fan.
I spent more than a half-hour trying to remove the lock ring for the adjustable cup. I had a Sugino lock ring wrench from the Bush administration, but the lock ring said no. I applied PB Blaster penetrating oil and heat from an old hair dryer, more than once. I beat on the wrench with a block of wood. Used a hammer and screwdriver in a notch. Finally, I attacked the lock-ring wrench with a claw hammer, and the ring moved.
Lunchtime.
Feeling omnipotent after humiliating the lock ring, I went after the fixed cup. I assaulted it with the Sugino wrench, a block of wood, some coarse language, and finally the claw hammer. I fought the law, and the law won. I was forced to leave it in place, and clean and grease it from the exterior. Humbling.
I spent some time cleaning the BB parts, and the drive-side crank arm, color of natural aluminum. Three chain rings, no waiting. I used Simple Green, and I was amazed at how good it looked after some vigorous brushing. Really. I want to go to a biker coffee shop and fish for compliments on it.
I used Lucas Marine Grease in generous amounts in the re-pack. It looks like Phil and Park grease, but is less expensive. It is wicked smooth. As usual, I was shooting BBs all over the place. If I ever do this again, will consider caged bearings; they know their place.
Reassembly was pretty quick, compared to removing the lock ring and not removing the fixed cup. I had watched a couple of good videos on Bottom Brackets, from RJ the Bike Guy and Calvin at Park Tools. I put both crank arms onto the spindle before setting the adjustable cup. I used the crank arms to judge the pre-load on the bearings. When I learned to adjust the cup back in yesteryear, I recall that you could do this with the NDS crank arm already mounted, which gave you a good feel for the play. Neither video used that method, but I did. I got the adjustable cup set for no play and no drag, so I thought.
I took the bike for a ride, and then re-checked the bolts and bearing play. The grease and the bearings had become intimate, and now there is a little play, not much, but enough to chase. Tomorrow I will readjust the adjustable cup for optimum play.
I was appalled at how tight my LBS had set the adjustable cup lock ring and the fixed cup. I am not Herculean, but I should be able to remove these parts without nuclear assistance. But I did get the job done, and when I took the bike for a ride, it felt really, really—
the same as before.
Last edited by BCDrums; 03-20-20 at 09:29 PM.
 03-20-20, 07:00 PM
#2

Senior Member
Join Date: May 2019
Location: Bloomington, IN
Posts: 2,945
Bikes: Paramount, Faggin, Ochsner, Ciocc, Basso
Mentioned: 116 Post(s)
Tagged: 0 Thread(s)
Quoted: 1303 Post(s)
Liked 1,908 Times
in
1,139 Posts
I think the bottom bracket is the hardest dance to master! Doing the crank arm wrangle is hard enough in itself, but then you have to go through the lock ring two step. Same thing for a tight adjustable cup, and then the bearing pick-up move. Removing the fixed cup is the most difficult part of the dance. Turn left (or turn right?) then dosey- doe and repeat until it moves. Cleaning and re-assembly is like doing the dance backwards. Make sure the fixed cup is tight, find the bearings or get new ones, and make sure you have the right number, then set the pre-load and then re attach the arms. Almost as difficult as the "macarina"! Smiles, MH
Likes For Mad Honk:
03-20-20, 07:37 PM
#3
Really Old Senior Member

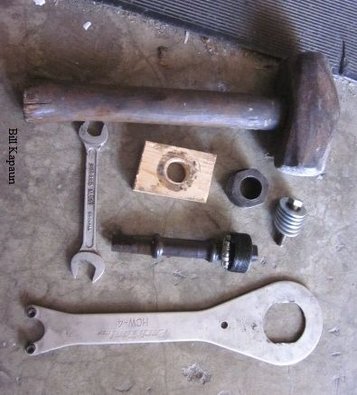
This is what I use.
4 lb. hammer.

4 lb. hammer.
03-20-20, 08:01 PM
#5
Senior Member
Join Date: May 2019
Location: Bloomington, IN
Posts: 2,945
Bikes: Paramount, Faggin, Ochsner, Ciocc, Basso
Mentioned: 116 Post(s)
Tagged: 0 Thread(s)
Quoted: 1303 Post(s)
Liked 1,908 Times
in
1,139 Posts
03-20-20, 08:05 PM
#6
Really Old Senior Member
It's never failed me.
I should add a can pf Penetrating Oil to the pic.
Lay the bike on its side, cup down, and drip PO in from the top. Let it run down the sides of the shell and "puddle" slightly on the top threads, like filling a reservoir.
When the puddle disappears, add more, couple/several drops until you refill the reservoir. repeat several times. If it ain't leaking out the bottom, there's room for more.
03-20-20, 08:13 PM
#8
Senior Member
Everyone except big box stores use sealed (cartridge or external) BB. Just nothing to maintain besides replacement of the $15 BB. imagine how much an LBS would charge for servicing cup/cone BB.
Likes For HerrKaLeun:
03-20-20, 08:19 PM
#9
Senior Member
Isn't the point of the FIXED cup that it is FIXED? Aren't you supposed to leave that alone except when replacing the entire unit? Isn't that why it is on so friggin' tight?
Likes For zacster:
03-20-20, 08:35 PM
#10
Disco Infiltrator

Join Date: May 2013
Location: Folsom CA
Posts: 13,446
Bikes: Stormchaser, Paramount, Tilt, Samba tandem
Mentioned: 72 Post(s)
Tagged: 0 Thread(s)
Quoted: 3126 Post(s)
Liked 2,103 Times
in
1,367 Posts
...or because the LBS has not even tried to touch it since somewhere in the 90's.
Frankly I'm kind of surprised he didn't go down there with the lock ring wrench and discover they'd put in a cartridge some decades ago
Frankly I'm kind of surprised he didn't go down there with the lock ring wrench and discover they'd put in a cartridge some decades ago
__________________
Genesis 49:16-17
Genesis 49:16-17
03-20-20, 08:48 PM
#11
Senior Member
Join Date: Aug 2005
Location: Pittsburgh, PA
Posts: 33,656
Bikes: '96 Litespeed Catalyst, '05 Litespeed Firenze, '06 Litespeed Tuscany, '20 Surly Midnight Special, All are 3x10. It is hilly around here!
Mentioned: 39 Post(s)
Tagged: 0 Thread(s)
Quoted: 2026 Post(s)
Likes: 0
Liked 1,096 Times
in
742 Posts
It's a bit late to ask but were you trying to turn the fixed cup in the correct direction? For the most common English bottom brackets it's left-hand threaded and unthreads clockwise. Is that what you did?
I use a similar bolt-type fixed cup tool clamp Bill showed in his photo. It assures the tool can't slip and damage the wrench or round the flats on the cup. If you turn it the right way I've never had a fixes cup that couldn't be removed.
Having spent many years maintaining cup-and-cone bottom brackets on numerous bikes, I gratefully went to cartridges and never looked back.
Likes For HillRider:
03-20-20, 08:58 PM
#13
Really Old Senior Member
Contrary to popular belief by the youngsters here, it's called the FIXED cup because it's the NON ADJUSTABLE cup.
Likes For Bill Kapaun:
03-20-20, 09:01 PM
#14
Recreational Road Cyclist
Thread Starter
Join Date: Sep 2013
Location: MetroWest, Mass.
Posts: 547
Bikes: 1990 Peter Mooney road bike
Mentioned: 7 Post(s)
Tagged: 0 Thread(s)
Quoted: 256 Post(s)
Liked 252 Times
in
134 Posts
My interest in removing it today was because I could deal with it more easily; clean it, pack it, place the bearings, screw it back in ready to go, instead of doing it through the shell. But the job can be done that way, and I did it.
Plus I want to dominate the bottom bracket.
 03-20-20, 09:09 PM
#15
Senior Member
03-20-20, 09:13 PM
#16
Recreational Road Cyclist
Thread Starter
Join Date: Sep 2013
Location: MetroWest, Mass.
Posts: 547
Bikes: 1990 Peter Mooney road bike
Mentioned: 7 Post(s)
Tagged: 0 Thread(s)
Quoted: 256 Post(s)
Liked 252 Times
in
134 Posts
Frankly I'm kind of surprised he didn't go down there with the lock ring wrench and discover they'd put in a cartridge some decades ago
By he you mean me. I am actually much more in touch with my bike than you suppose. It was custom built for me, and I know every part on it, and what parts preceded them. The only original parts on the frame are the cranks (and one of the three the rings), this bottom bracket, and the seat post bolt. I recently removed the dropout screws to slide the rear wheel back and get a little more room between the chainstays for the fat-ish tires I'm using.
Last edited by BCDrums; 03-20-20 at 09:27 PM.
03-20-20, 09:21 PM
#17
Recreational Road Cyclist
Thread Starter
Join Date: Sep 2013
Location: MetroWest, Mass.
Posts: 547
Bikes: 1990 Peter Mooney road bike
Mentioned: 7 Post(s)
Tagged: 0 Thread(s)
Quoted: 256 Post(s)
Liked 252 Times
in
134 Posts
I use a similar bolt-type fixed cup tool clamp Bill showed in his photo. It assures the tool can't slip and damage the wrench or round the flats on the cup. If you turn it the right way I've never had a fixes cup that couldn't be removed.
Having spent many years maintaining cup-and-cone bottom brackets on numerous bikes, I gratefully went to cartridges and never looked back.
Having spent many years maintaining cup-and-cone bottom brackets on numerous bikes, I gratefully went to cartridges and never looked back.
I know nothing about bottom brackets with cartridge bearings. Do they come in different spindle lengths, say, for a triple?
03-20-20, 09:47 PM
#18
Senior Member
Join Date: Dec 2019
Location: South Shore of Long Island
Posts: 2,799
Bikes: 2010 Carrera Volans, 2015 C-Dale Trail 2sl, 2017 Raleigh Rush Hour, 2017 Blue Proseccio, 1992 Giant Perigee, 80s Gitane Rallye Tandem
Mentioned: 12 Post(s)
Tagged: 0 Thread(s)
Quoted: 1088 Post(s)
Liked 1,022 Times
in
722 Posts
Grab the crank arm and yank it from side to side, if it moves then the BB is no good. If it doesn't drop the chain onto the frame and spin the crank, does it move freely and without a notchy feeling or a gritty sound. If so, reinstall chain and ride on, if not take the 15 minutes to install the new one. Biggest issue with cup and cone is the need for a pin spanner if something is corroded. But I use a really big wrench to remove the fixed cup, basically an American made industrial wrench that will tear apart of the fixed cup long before it will ever let go and only once did I have to use a pipe wrench to take out an adjustable cup but it wasn't any good anymore either way.
03-20-20, 09:52 PM
#19
Really Old Senior Member
........
My interest in removing it today was because I could deal with it more easily; clean it, pack it, place the bearings, screw it back in ready to go, instead of doing it through the shell. But the job can be done that way, and I did it.
Plus I want to dominate the bottom bracket.
My interest in removing it today was because I could deal with it more easily; clean it, pack it, place the bearings, screw it back in ready to go, instead of doing it through the shell. But the job can be done that way, and I did it.
Plus I want to dominate the bottom bracket.
It's the cup that gets the most abuse. Servicing it now, reinstalling with some grease or anti seize will make the future cartridge install easier then. Corrosion isn't going to loosen its grip over time. It just gets more frozen.
I used to flip bikes. Sometimes you simply have to remove the fixed cup no matter what and I needed something that didn't destroy the more rare good DS cup. If nothing else, it went in the parts bin to get used later.
Some older cranks used an extremely long spindle that can't be duplicated with a cartridge.
03-20-20, 10:37 PM
#20
Senior Member
Somewhere in the '90s, I stopped maintaining the bottom bracket of my bike and let the LBS do it. When I did the work, it always ended up with ball bearings all over the floor, too much play, and grease on every available surface and object.
But today I did my own service, on a '90s Shimano Cup 'n' Cone bottom bracket. Here are my observations.
I had the right tools; a Park crank puller, a Sugino lock-ring/fixed cup wrench, some grade-25 ball bearings, and some fresh slippery grease. I had a Park pin-spanner for the adjustable cup. I had Cabernet for the afterparty.
The cranks came off lickety-split, with a crank bolt wrench and a crank puller from our friends at Park Tools. Then, the grease hit the fan.
I spent more than a half-hour trying to remove the lock ring for the adjustable cup. I had a Sugino lock ring wrench from the Bush administration, but the lock ring said no. I applied PB Blaster penetrating oil and heat from an old hair dryer, more than once. I beat on the wrench with a block of wood. Used a hammer and screwdriver in a notch. Finally, I attacked the lock-ring wrench with a claw hammer, and the ring moved.
Lunchtime.
Feeling omnipotent after humiliating the lock ring, I went after the fixed cup. I assaulted it with the Sugino wrench, a block of wood, some coarse language, and finally the claw hammer. I fought the law, and the law won. I was forced to leave it in place, and clean and grease it from the exterior. Humbling.
I spent some time cleaning the BB parts, and the drive-side crank arm, color of natural aluminum. Three chain rings, no waiting. I used Simple Green, and I was amazed at how good it looked after some vigorous brushing. Really. I want to go to a biker coffee shop and fish for compliments on it.
I used Lucas Marine Grease in generous amounts in the re-pack. It looks like Phil and Park grease, but is less expensive. It is wicked smooth. As usual, I was shooting BBs all over the place. If I ever do this again, will consider caged bearings; they know their place.
Reassembly was pretty quick, compared to removing the lock ring and not removing the fixed cup. I had watched a couple of good videos on Bottom Brackets, from RJ the Bike Guy and Calvin at Park Tools. I put both crank arms onto the spindle before setting the adjustable cup. I used the crank arms to judge the pre-load on the bearings. When I learned to adjust the cup back in yesteryear, I recall that you could do this with the NDS crank arm already mounted, which gave you a good feel for the play. Neither video used that method, but I did. I got the adjustable cup set for no play and no drag, so I thought.
I took the bike for a ride, and then re-checked the bolts and bearing play. The grease and the bearings had become intimate, and now there is a little play, not much, but enough to chase. Tomorrow I will readjust the adjustable cup for optimum play.
I was appalled at how tight my LBS had set the adjustable cup lock ring and the fixed cup. I am not Herculean, but I should be able to remove these parts without nuclear assistance. But I did get the job done, and when I took the bike for a ride, it felt really, really�
the same as before.
Likes For davidad:
03-21-20, 05:34 AM
#21
Senior Member
Join Date: Feb 2012
Location: Golden, CO and Tucson, AZ
Posts: 2,836
Bikes: 2016 Fuji Tread, 1983 Trek 520
Mentioned: 13 Post(s)
Tagged: 0 Thread(s)
Quoted: 675 Post(s)
Liked 741 Times
in
430 Posts
Two observations:
1) Tightening the lock ring will often change the bearing adjustment. There's a bit of play in the adjustable cup and shell threads and the lock ring pulls out against that play, loosening the bearing.
2) Penetrating oil, a heat gun, and an impact with a mallet has always worked for me on the fixed up.
03-21-20, 05:13 PM
#23

Senior Member
Join Date: Jul 2005
Posts: 5,992
Mentioned: 26 Post(s)
Tagged: 0 Thread(s)
Quoted: 2494 Post(s)
Liked 738 Times
in
522 Posts
Engaging writing is a lost art. If for no other reason than that the o.p.'s account of their quality time with bike tools was delivered with style and no small amount of wit, I for one was pleased to have spent the time reading it. Chapeau!
03-21-20, 05:20 PM
#24
SE Wis
Join Date: Apr 2005
Location: Milwaukee, WI
Posts: 10,507
Bikes: '68 Raleigh Sprite, '02 Raleigh C500, '84 Raleigh Gran Prix, '91 Trek 400, 2013 Novara Randonee, 1990 Trek 970
Mentioned: 40 Post(s)
Tagged: 0 Thread(s)
Quoted: 2743 Post(s)
Liked 3,390 Times
in
2,053 Posts
 03-21-20, 07:39 PM
#25
Recreational Road Cyclist
Thread Starter
Join Date: Sep 2013
Location: MetroWest, Mass.
Posts: 547
Bikes: 1990 Peter Mooney road bike
Mentioned: 7 Post(s)
Tagged: 0 Thread(s)
Quoted: 256 Post(s)
Liked 252 Times
in
134 Posts