


Thoughts on Diamondback Podium Vitesse Disc?
 06-17-18, 12:08 PM
#76
Senior Member
Join Date: Jul 2008
Location: Minas Ithil
Posts: 9,173
Mentioned: 66 Post(s)
Tagged: 0 Thread(s)
Quoted: 2432 Post(s)
Liked 638 Times
in
395 Posts
Those wheels are alright but I wouldn't want them in a crosswind. I was surprised how light the stock wheels felt even with the tires and rotors on them when I took them off. Whenever I replace the tires I'll take the rotors off and put them on the scale. For clinchers they're more than good enough for me. If I replace them it will be for tubulars and I have the build planned. Alu HED Belgium Dics rims, 105 R7000 disc hubs and DT Comp spokes. I might even get a complete R7000 hydro group and use the parts on it now for a CX build.
 06-17-18, 02:55 PM
#77
Banned.
Those wheels are alright but I wouldn't want them in a crosswind. I was surprised how light the stock wheels felt even with the tires and rotors on them when I took them off. Whenever I replace the tires I'll take the rotors off and put them on the scale. For clinchers they're more than good enough for me. If I replace them it will be for tubulars and I have the build planned. Alu HED Belgium Dics rims, 105 R7000 disc hubs and DT Comp spokes. I might even get a complete R7000 hydro group and use the parts on it now for a CX build.
I rode in heavy winds yesterday and surprising they do very well in the wind. Not as bad as one would imagine.
06-17-18, 05:22 PM
#80
Senior Member
Join Date: Jan 2010
Location: TC, MN
Posts: 39,520
Bikes: R3 Disc, Haanjo
Mentioned: 354 Post(s)
Tagged: 1 Thread(s)
Quoted: 20810 Post(s)
Liked 9,456 Times
in
4,672 Posts
Keep an eye on those wheels, though. I think that they're the same as what came on my Haanjo - HED Tomcat rims, nothing special hubs and straight gauge spokes. I've had both the front and rear pop way out of true only to find one or more spokes completely untensioned. A quick and dirty truing didn't hold although they've been fine since I really spent some quality time with them and a tension meter. Tension was all over the place and I think that some of the spokes were a bit wound up. HED doesn't make them, BTW - I contacted them and they said that the rims were made to their spec but the whole process was farmed out to whomever by DB.
06-18-18, 06:32 AM
#81
Senior Member
Join Date: Jul 2008
Location: Minas Ithil
Posts: 9,173
Mentioned: 66 Post(s)
Tagged: 0 Thread(s)
Quoted: 2432 Post(s)
Liked 638 Times
in
395 Posts
Keep an eye on those wheels, though. I think that they're the same as what came on my Haanjo - HED Tomcat rims, nothing special hubs and straight gauge spokes. I've had both the front and rear pop way out of true only to find one or more spokes completely untensioned. A quick and dirty truing didn't hold although they've been fine since I really spent some quality time with them and a tension meter. Tension was all over the place and I think that some of the spokes were a bit wound up. HED doesn't make them, BTW - I contacted them and they said that the rims were made to their spec but the whole process was farmed out to whomever by DB.
06-18-18, 07:24 AM
#82
Senior Member
Join Date: Jan 2010
Location: TC, MN
Posts: 39,520
Bikes: R3 Disc, Haanjo
Mentioned: 354 Post(s)
Tagged: 1 Thread(s)
Quoted: 20810 Post(s)
Liked 9,456 Times
in
4,672 Posts
The ones on my E'Tape have Flanders rims. When I pull the cassette off I'll try to see who made the hub. Although not listed in the specs, the spokes are clearly butted at both ends. Going off the spoke head ID chart, they are Mac Elite spokes. If I had a digital gauge (my cheapo one is mechanical) I would be able to tell if they are the double or triple butted version. Probably double.
06-18-18, 08:30 AM
#83
Senior Member
Join Date: Jul 2008
Location: Minas Ithil
Posts: 9,173
Mentioned: 66 Post(s)
Tagged: 0 Thread(s)
Quoted: 2432 Post(s)
Liked 638 Times
in
395 Posts
These are the mac Elite's.
 06-19-18, 04:55 AM
#84
Banned.
Stock wheels are light but I will say as soon as I swapped them out , a good set of wheels made a huge difference. Mainly with the hub.
The stock wheels were a PITA to change tires. I would Dread getting a flat on the stock wheels .I kept getting flats with my stock Flanders and has to install a thicker rim tape.
Loving the new wheels.so far.
The stock wheels were a PITA to change tires. I would Dread getting a flat on the stock wheels .I kept getting flats with my stock Flanders and has to install a thicker rim tape.
Loving the new wheels.so far.
06-23-18, 01:31 PM
#85
Senior Member
Join Date: Jul 2008
Location: Minas Ithil
Posts: 9,173
Mentioned: 66 Post(s)
Tagged: 0 Thread(s)
Quoted: 2432 Post(s)
Liked 638 Times
in
395 Posts
Has anyone removed/installed the derailleur cables yet? I want to shorten the housings but I'm wondering if it's a PIA to route the cables through the frame. Looks like it could be. I just finished shortening my brake hoses.
06-23-18, 02:18 PM
#86
Kit doesn't match

Any chance it has sleeves inside the frame for the cables? I ask, because I've changed shifter cables on two bikes with internal cables. One, a Ridley, had a set of sleeves, so routing cables was trivial. The other, a Specialized, did not. Do-able, but a minor pain in the ass to ensure that I didn't cross the cables.
06-23-18, 02:46 PM
#87
Senior Member
Join Date: Jul 2008
Location: Minas Ithil
Posts: 9,173
Mentioned: 66 Post(s)
Tagged: 0 Thread(s)
Quoted: 2432 Post(s)
Liked 638 Times
in
395 Posts
Any chance it has sleeves inside the frame for the cables? I ask, because I've changed shifter cables on two bikes with internal cables. One, a Ridley, had a set of sleeves, so routing cables was trivial. The other, a Specialized, did not. Do-able, but a minor pain in the ass to ensure that I didn't cross the cables.
 06-23-18, 03:01 PM
#88
Kit doesn't match
On the Ridley, the cable sheath is visible -- at first I wondered what it was. If you trace the FD cable around the bottom bracket to where it exits the frame and heads to the FD, you might see it there. On the Ridley, a white tube surrounding the cable sticks out of the frame about 1/4". On the Specialized, there is a plastic guide in the same spot, but it's part of the plastic cover (like you're showing), and not a separate sheath.
Good luck.
Good luck.
06-23-18, 08:43 PM
#89
Senior Member
Join Date: Nov 2015
Posts: 8,922
Mentioned: 20 Post(s)
Tagged: 0 Thread(s)
Quoted: 4717 Post(s)
Liked 1,882 Times
in
998 Posts
I don't know, I think it must but that's what I was hoping to find out. The cable guide on the bottom of the BB shell is covered with a little door secured with an allen bolt. When you remove it you can see there is no room to use fingers to pull and guide a cable through. If it does have sleeves it should be a no brainer.
06-26-18, 09:04 AM
#91
Senior Member
Join Date: Jul 2008
Location: Minas Ithil
Posts: 9,173
Mentioned: 66 Post(s)
Tagged: 0 Thread(s)
Quoted: 2432 Post(s)
Liked 638 Times
in
395 Posts
Okay, I shortened the cable housings. It was pretty easy. First, I suggest to place a drop of super glue on the tips of the cables so they don't fray when you're routing them through (I always do that anyway).
There is no sleeve inside the downtube for the cables but that's okay because when you remove the "door" on the BB shell covering the cable guide you'll see there's an open slit that the cables come out of. Hard to describe it but you'll see it when you do it. So my cables came right out so I could put them in the guides.
When you get the cables in the guides you'll see two tiny holes you route the cables through to get them all the way to the derailleurs. The only somewhat tricky part is for the rear cable. Where it comes out of the chainstay you need to unbolt and remove that little plate the rear housing attaches to. When you do you'll see the cable inside of the chainstay, so just get a pair of needle nose pliers to grab it and pull it up. Then route it through the plate you removed and bolt it back on. Then you're basically done.
06-26-18, 09:08 AM
#92
Senior Member
Join Date: Nov 2015
Posts: 8,922
Mentioned: 20 Post(s)
Tagged: 0 Thread(s)
Quoted: 4717 Post(s)
Liked 1,882 Times
in
998 Posts
Okay, I shortened the cable housings. It was pretty easy. First, I suggest to place a drop of super glue on the tips of the cables so they don't fray when you're routing them through (I always do that anyway).
There is no sleeve inside the downtube for the cables but that's okay because when you remove the "door" on the BB shell covering the cable guide you'll see there's an open slit that the cables come out of. Hard to describe it but you'll see it when you do it. So my cables came right out so I could put them in the guides.
When you get the cables in the guides you'll see two tiny holes you route the cables through to get them all the way to the derailleurs. The only somewhat tricky part is for the rear cable. Where it comes out of the chainstay you need to unbolt and remove that little plate the rear housing attaches to. When you do you'll see the cable inside of the chainstay, so just get a pair of needle nose pliers to grab it and pull it up. Then route it through the plate you removed and bolt it back on. Then you're basically done.
There is no sleeve inside the downtube for the cables but that's okay because when you remove the "door" on the BB shell covering the cable guide you'll see there's an open slit that the cables come out of. Hard to describe it but you'll see it when you do it. So my cables came right out so I could put them in the guides.
When you get the cables in the guides you'll see two tiny holes you route the cables through to get them all the way to the derailleurs. The only somewhat tricky part is for the rear cable. Where it comes out of the chainstay you need to unbolt and remove that little plate the rear housing attaches to. When you do you'll see the cable inside of the chainstay, so just get a pair of needle nose pliers to grab it and pull it up. Then route it through the plate you removed and bolt it back on. Then you're basically done.
 07-10-18, 03:43 PM
#93
MSignore
Join Date: Aug 2012
Location: Hightstown, NJ USA
Posts: 37
Bikes: 2012 Diamondback Podium 1 as my starter. Saving up for something better.
Mentioned: 0 Post(s)
Tagged: 0 Thread(s)
Quoted: 10 Post(s)
Likes: 0
Liked 0 Times
in
0 Posts
Here is my rim brake version. Weighs 17.5 with pedals. Ride is great and fit feels good. Swapped out saddle, seatpost and wheels. Stock seatpost was over 100 grams heavier than the carbon one I had sitting around. Stock wheels were not built well. Had re-trued after 100 miles and then they quickly went back out . Think they need to be properly stress relieved. 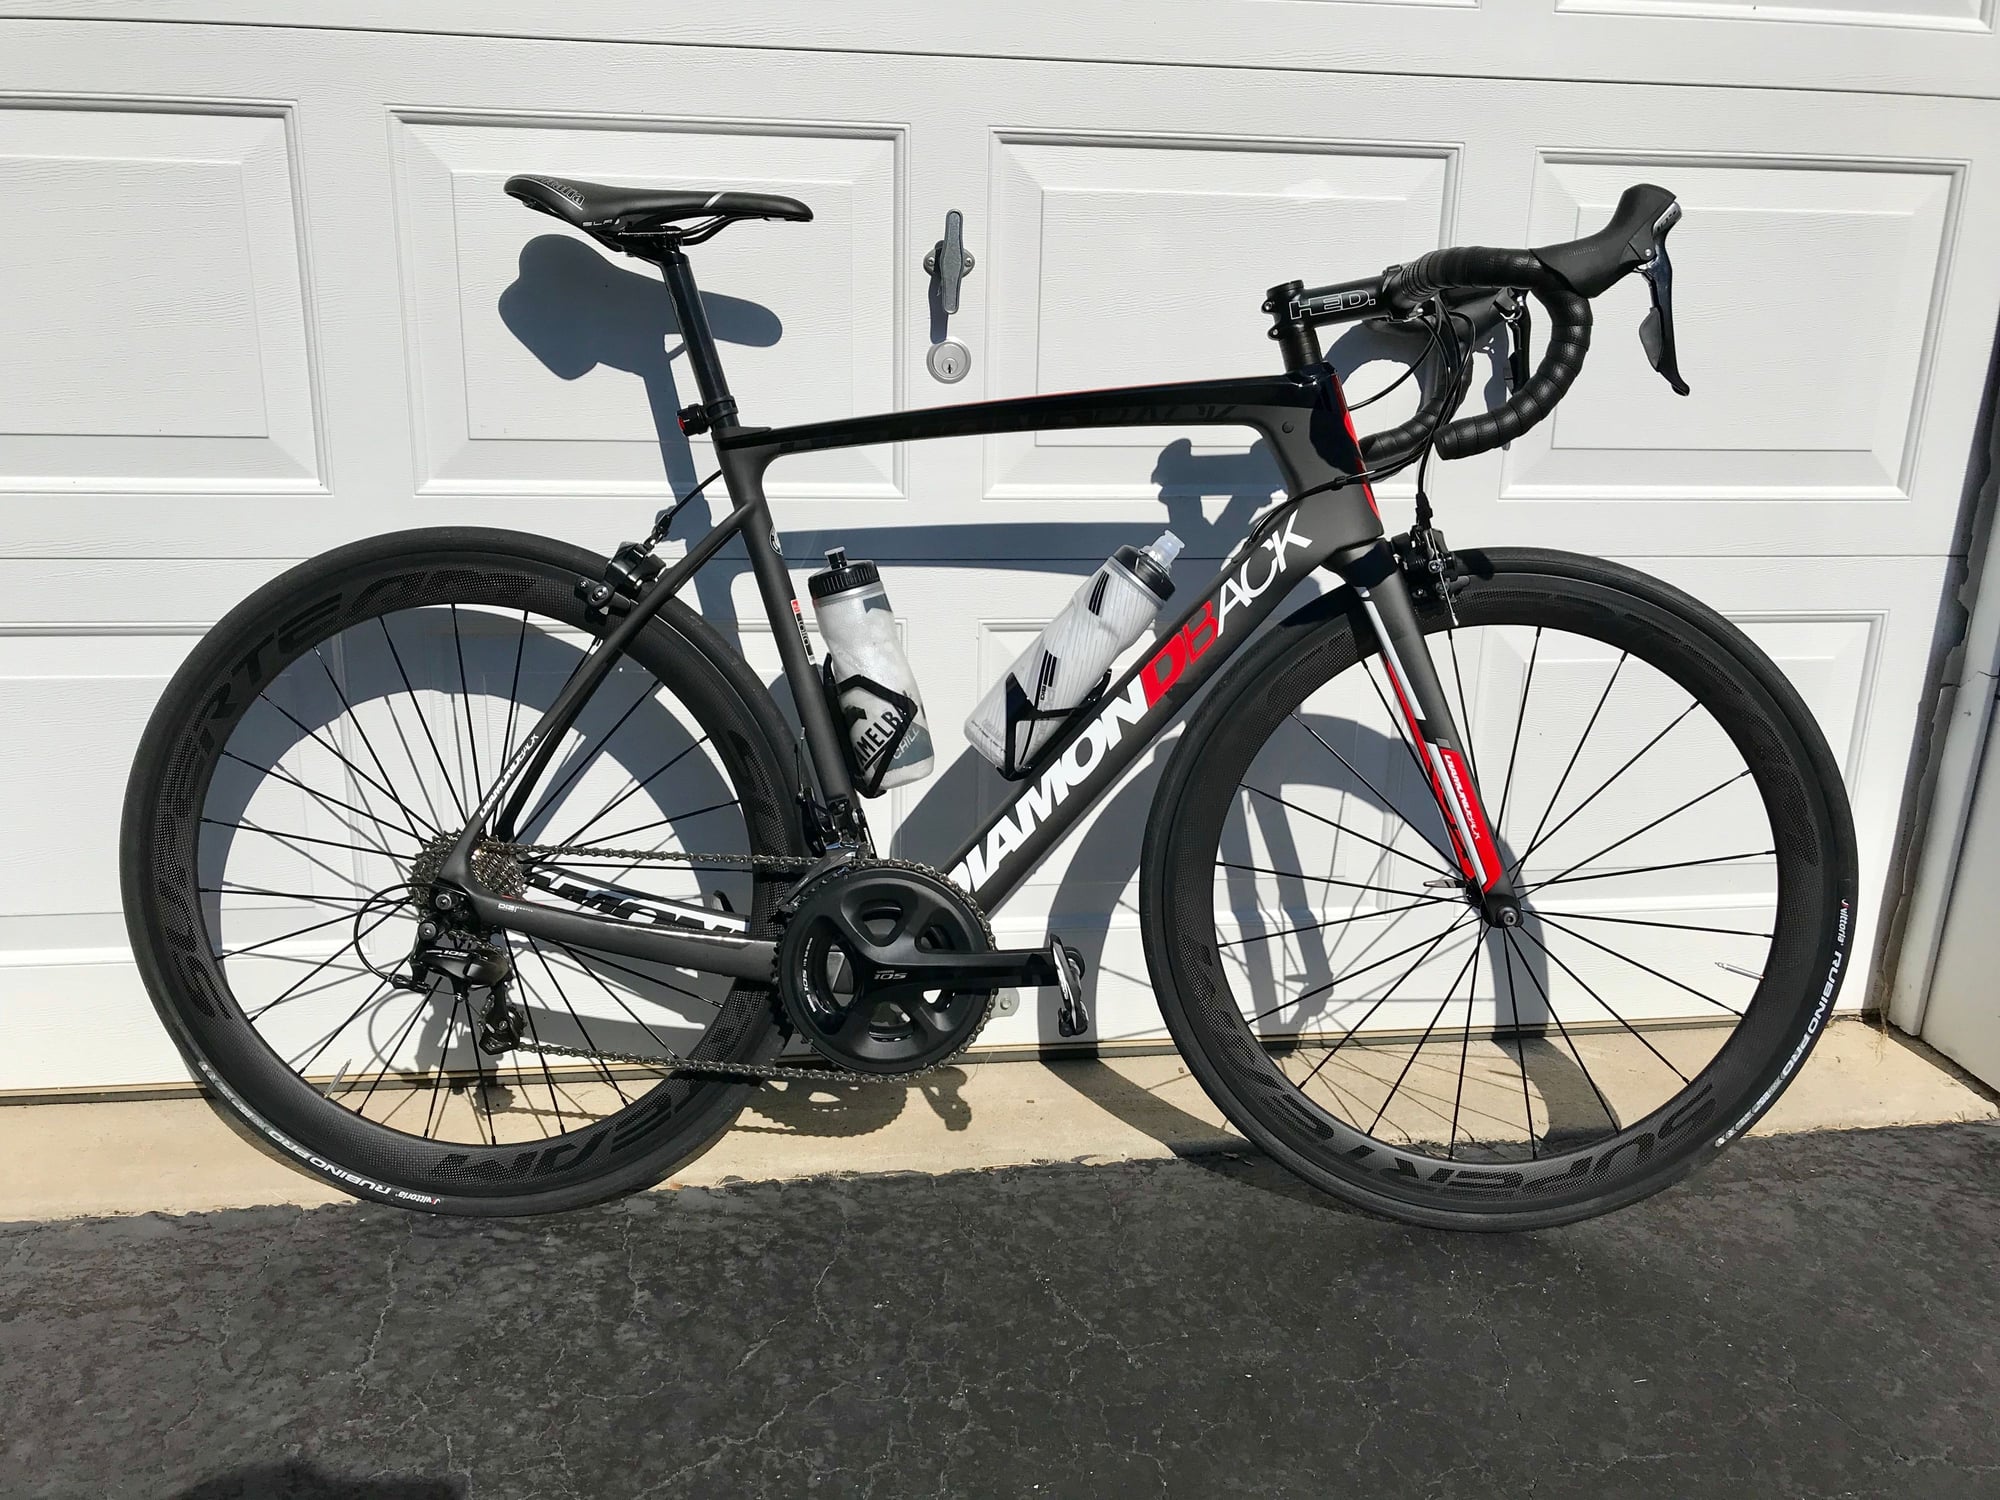
Last edited by MSignore; 07-10-18 at 04:06 PM.
 07-10-18, 04:13 PM
#95
Senior Member
Join Date: Jul 2008
Location: Minas Ithil
Posts: 9,173
Mentioned: 66 Post(s)
Tagged: 0 Thread(s)
Quoted: 2432 Post(s)
Liked 638 Times
in
395 Posts
It's pretty crazy how the rim brake version is $500 more than the disc, but most sizes are out of stock now. The Ultegra Vitesse Disc is only $80 more than the regular E'Tape. I'm actually tempted to get the Vitesse. I'm 50 years old and want to make sure I have this exact frame under me for the rest of my life, I don't want anything else and at some point it will be discontinued. Hopefully the one I have lasts forever.
07-10-18, 04:13 PM
#96
MSignore
Join Date: Aug 2012
Location: Hightstown, NJ USA
Posts: 37
Bikes: 2012 Diamondback Podium 1 as my starter. Saving up for something better.
Mentioned: 0 Post(s)
Tagged: 0 Thread(s)
Quoted: 10 Post(s)
Likes: 0
Liked 0 Times
in
0 Posts
thanks. One thing to note on the rim brake version in case deals pop up again and people are considering. The rim brake version couldn�t fit 28mm Conti 4ks on the rear with the wide wheels. Even the 25mm barely brushed when the wheel had some wobble in it but would have been ok if wheel was perfectly true. The 25mm rubino pros fit with enough room though as that tire doesn�t sit as tall as the Continental.
07-10-18, 04:19 PM
#97
MSignore
Join Date: Aug 2012
Location: Hightstown, NJ USA
Posts: 37
Bikes: 2012 Diamondback Podium 1 as my starter. Saving up for something better.
Mentioned: 0 Post(s)
Tagged: 0 Thread(s)
Quoted: 10 Post(s)
Likes: 0
Liked 0 Times
in
0 Posts
It's pretty crazy how the rim brake version is $500 more than the disc, but most sizes are out of stock now. The Ultegra Vitesse Disc is only $80 more than the regular E'Tape. I'm actually tempted to get the Vitesse. I'm 50 years old and want to make sure I have this exact frame under me for the rest of my life, I don't want anything else and at some point it will be discontinued. Hopefully the one I have lasts forever.
07-10-18, 05:21 PM
#98
Senior Member
Join Date: Jul 2008
Location: Minas Ithil
Posts: 9,173
Mentioned: 66 Post(s)
Tagged: 0 Thread(s)
Quoted: 2432 Post(s)
Liked 638 Times
in
395 Posts
Did you actually measure the tire? The stock 25mm Conti Ultrasport on my HED rims measure exactly 28. A 28 version would probably be huge. I don't know if they normally run wide or if it's the rim. On my frame I still have 5mm of clearance on each side of the tire at the tightest point of the chainstays.
07-10-18, 05:57 PM
#99
MSignore
Join Date: Aug 2012
Location: Hightstown, NJ USA
Posts: 37
Bikes: 2012 Diamondback Podium 1 as my starter. Saving up for something better.
Mentioned: 0 Post(s)
Tagged: 0 Thread(s)
Quoted: 10 Post(s)
Likes: 0
Liked 0 Times
in
0 Posts
The fit issue is actually the height of the tire on the rear brake bridge. I didn�t measure them but the general consensus is that the Contis run wide. And the 4000s are usually one of the widest tires out there. Also measured to be taller than most per bicyclerollingresistabce.com. Pairing that with a very wide rim like the HED, Results in an even taller tire profile as the sidewalls sit straighter on a wide rim. I had a few sidewall cuts on my 4000�s anyways so I am going back to the rubinos which I have been pleased with. The rubino 25mm has a noticeably shorter profile and gives plenty of clearance to the brake bridge.
07-10-18, 07:06 PM
#100
serious cyclist

Join Date: Apr 2009
Location: Austin
Posts: 21,147
Bikes: S1, R2, P2
Mentioned: 115 Post(s)
Tagged: 1 Thread(s)
Quoted: 9334 Post(s)
Liked 3,679 Times
in
2,026 Posts