


3 Chainrings on Brompton
 10-24-18, 04:47 PM
#26

Senior Member
Thread Starter
Join Date: Sep 2005
Location: Michigan
Posts: 3,706
Bikes: Trek 730 (quad), 720 & 830, Bike Friday NWT, Brompton M36R & M6R, Dahon HAT060 & HT060, ...
Mentioned: 10 Post(s)
Tagged: 0 Thread(s)
Quoted: 840 Post(s)
Liked 336 Times
in
251 Posts
How did you manage to fit the triple derailleur? I tried it on my Dahon, but it didn't fit. I don't remember what the problem was but I think the swing mechanism was thicker or the swing starts further in, causing interference from the seat tube or making the derailleur start further out when compared to the double.
I 3D printed my own out of stainless steel bronze, with the clamp mounted from above. I used 2 clamps, one lower with a cable stop. The stainless steel bronze was almost 150-200g, because I made them very thick since the material tends to be brittle. Aluminum is stronger and could be half the thickness at 40-50g, but costs twice as much to print.
I have a 26/46 and I found 20t jump to be the limit, with 8mm chainring spacing. If I spaced it wider, it won't shift. If I space it closer, the chain while on the inner ring will rub on the outer ring when trying to go higher than 6th gear. With 8mm spacing I can run it up to 7th gear. I used 8mm and 10mm DIN 988 shim washers, 0.2mm thickness, to adjust the spacing, you can buy a 100 pack for $3 on ebay. It needed a chain catcher, without one the chain would drop once every couple days.
I've been using a Shimano Triaga derailleur + Stronlight double chainring + Litepro Clamp Adapter for K Series Frame for over two years now, with no problem whatsoever.
Here, apparently, you used a triple chainring and a double derailleur you pushed ot its limits, so it's quite a different setup.
Here, apparently, you used a triple chainring and a double derailleur you pushed ot its limits, so it's quite a different setup.
 10-24-18, 05:57 PM
#27
Senior Member
Join Date: Jan 2017
Posts: 1,064
Mentioned: 6 Post(s)
Tagged: 0 Thread(s)
Quoted: 350 Post(s)
Likes: 0
Liked 122 Times
in
90 Posts
The P-frame clamp is 41mm diameter for Alu whlie K-frame clamp is 40mm for steel, so you have to see if it will fit on your bike.
The bracket on the P type doesn't even fit any of the Shimano derailleurs I tested. For some reason, Litepro made the lower part angle backwards, and it hits the swing arm. Really bad design. I don't know, but perhaps you could test SRAM derailleurs. Photos I've seen seem to show the swing arm further back, so it may clear the P bracket.
Next time if you want a P clamp, you should ask the seller to switch for a K bracket.
You don't need to program a 3D printer, you only have to make the model and upload it to the printing companies. I did my metal printing with Shapeways.com
I first tested it with my own small FDM ABS printer to test different shapes, positions, and angles. Then I ordered a stronger nylon print from Shapeways. After a few modifications, I ordered the final metal print.
10-24-18, 08:53 PM
#28
Senior Member
Thread Starter
Join Date: Sep 2005
Location: Michigan
Posts: 3,706
Bikes: Trek 730 (quad), 720 & 830, Bike Friday NWT, Brompton M36R & M6R, Dahon HAT060 & HT060, ...
Mentioned: 10 Post(s)
Tagged: 0 Thread(s)
Quoted: 840 Post(s)
Liked 336 Times
in
251 Posts
 .
.The bracket on the P type doesn't even fit any of the Shimano derailleurs I tested. For some reason, Litepro made the lower part angle backwards, and it hits the swing arm. Really bad design. I don't know, but perhaps you could test SRAM derailleurs. Photos I've seen seem to show the swing arm further back, so it may clear the P bracket.
Next time if you want a P clamp, you should ask the seller to switch for a K bracket.
Next time if you want a P clamp, you should ask the seller to switch for a K bracket.
You don't need to program a 3D printer, you only have to make the model and upload it to the printing companies. I did my metal printing with Shapeways.com
I first tested it with my own small FDM ABS printer to test different shapes, positions, and angles. Then I ordered a stronger nylon print from Shapeways. After a few modifications, I ordered the final metal print.
I first tested it with my own small FDM ABS printer to test different shapes, positions, and angles. Then I ordered a stronger nylon print from Shapeways. After a few modifications, I ordered the final metal print.
Come to think of it, I did manage to put a triple derailleur on Brompton early on in the 2 chainring project and it worked OK there. However, it would be out of question to get it to work with 3 rings and have the bike fold in a standard manner.
10-25-18, 10:02 AM
#29
Senior Member
Join Date: Jan 2017
Posts: 1,064
Mentioned: 6 Post(s)
Tagged: 0 Thread(s)
Quoted: 350 Post(s)
Likes: 0
Liked 122 Times
in
90 Posts
The 3D model I made was specifically for my Dahon bike. I took a photo of my bike from the side and measured the angles in a photo editing software like Photoshop. The values would be within +/- 3 or 5 degrees. I angled it as far forward as possible to the derailleur spec, positioned as forward as possible to the recommended position from the Shimano framebuilder book. This would make the chain align with the rear of the derailleur cage for widest cross section to minimize chain rubbing. I can't remember the handbook, but I think Shimano says to position the mounting block 10-15mm forward of the axis from the BB. My derailleur spec is 61-66 angle to the chainstay-BB axis. I have it at 66 degrees.
Using the same model for your bike might not give you the right angles that you need since you've got a smaller rim and possibly different seatpost angle. I assume that you'll need to angle your FD further back by a few degrees since your dropout will be lower than mine. I don't know about your seatpost angle. Also, since the axis of the FD is not the same as the seat tube, if you adjust the FD height from the BB, it's forward/rearward position will change. I designed mine for 44, 46, 48 outside chainring. If you use a larger chainring and move your FD upward, then you'll need to push it backward.

Using the same model for your bike might not give you the right angles that you need since you've got a smaller rim and possibly different seatpost angle. I assume that you'll need to angle your FD further back by a few degrees since your dropout will be lower than mine. I don't know about your seatpost angle. Also, since the axis of the FD is not the same as the seat tube, if you adjust the FD height from the BB, it's forward/rearward position will change. I designed mine for 44, 46, 48 outside chainring. If you use a larger chainring and move your FD upward, then you'll need to push it backward.
Last edited by tomtomtom123; 10-25-18 at 10:12 AM.
10-25-18, 11:37 AM
#30
Senior Member
Thread Starter
Join Date: Sep 2005
Location: Michigan
Posts: 3,706
Bikes: Trek 730 (quad), 720 & 830, Bike Friday NWT, Brompton M36R & M6R, Dahon HAT060 & HT060, ...
Mentioned: 10 Post(s)
Tagged: 0 Thread(s)
Quoted: 840 Post(s)
Liked 336 Times
in
251 Posts
Thanks, this is definitely very useful. I presume I am more of a hands-on person, try this and that, bang it, bend it, shim it and make it work one way or another or decide no such action can succeed. In the short-term I will limp with what I have and look whether no other unforeseen problems emerge. In the meantime I carefully straightened the arched stub in the K frame mount and managed to position the derailleur lower on that stub, hopefully stressing it less. If the setup turns out to be stable over time, I will look either into a printing such as yours or just get the respective pieces brazed on onto the seatpost, in the end saving weight and complexity.
10-26-18, 06:59 AM
#31
Senior Member
Thread Starter
Join Date: Sep 2005
Location: Michigan
Posts: 3,706
Bikes: Trek 730 (quad), 720 & 830, Bike Friday NWT, Brompton M36R & M6R, Dahon HAT060 & HT060, ...
Mentioned: 10 Post(s)
Tagged: 0 Thread(s)
Quoted: 840 Post(s)
Liked 336 Times
in
251 Posts
Given the amount of flexing and twisting I observed for the K-frame mount's finger on occasions, with the setup still surviving, I will look next into more improvised derailleur mounting, combining a hanger for carbon frames with hose clamps, but this will have to wait until after my trip. I do not like the flexing, but if the shifting can somehow tolerate it, so be it. After all, the cages both for the front and rear derailleurs on bikes undergo horrors and all that still functions.
10-26-18, 08:14 AM
#32
Senior Member
Join Date: Jan 2017
Posts: 1,064
Mentioned: 6 Post(s)
Tagged: 0 Thread(s)
Quoted: 350 Post(s)
Likes: 0
Liked 122 Times
in
90 Posts
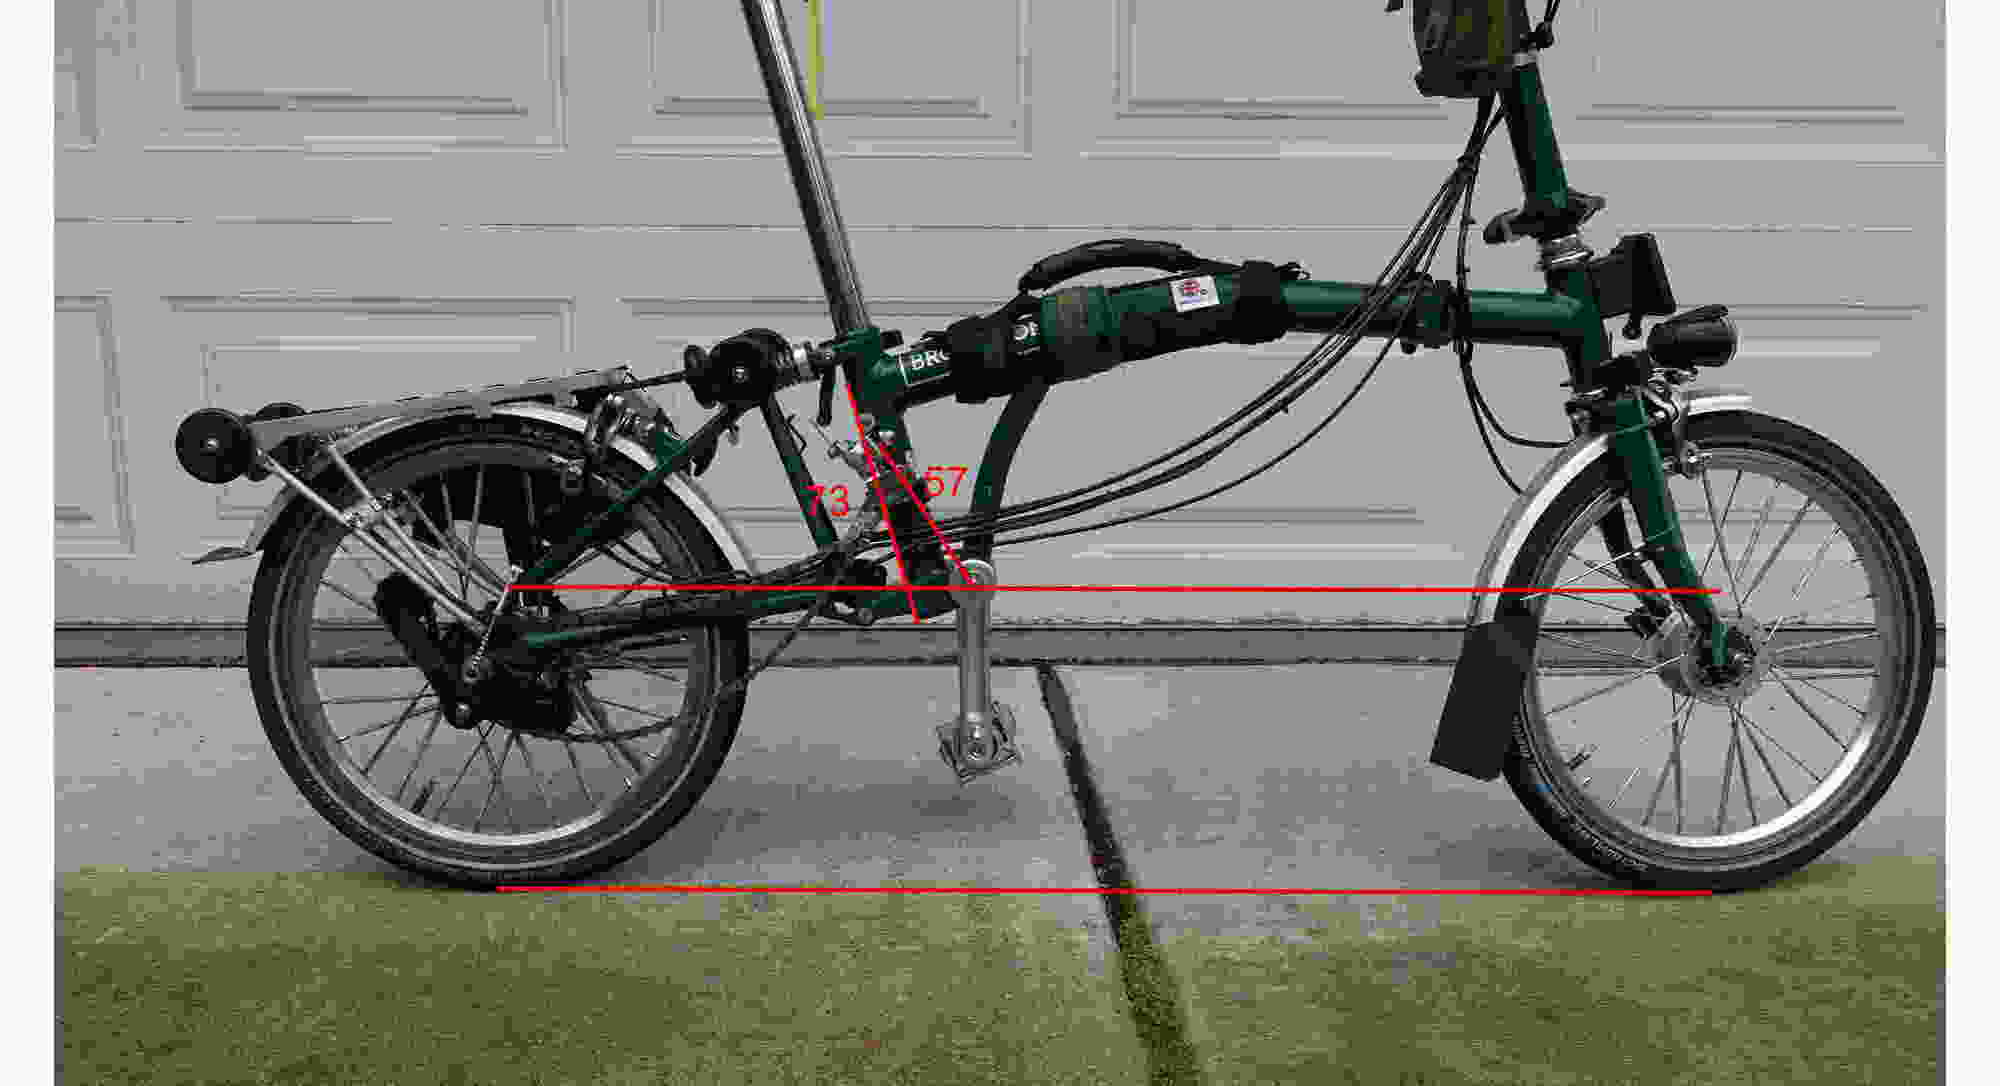
If you take a photo, you should put the camera on the tripod, use the level function if your camera has it, put your bike on a workstand and have it as vertical as possible, point the camera perpendicular to the bike and center it slightly to the left of the middle of the axis between the FD and BB. This will help to make your angle measurements in photo editing software more accurate. If your camera has inbody lens correction, you should use it too, since most camera lenses have barrel distortion. It will warp your angles out of alignment in the image.
10-27-18, 10:53 PM
#33
Senior Member
Thread Starter
Join Date: Sep 2005
Location: Michigan
Posts: 3,706
Bikes: Trek 730 (quad), 720 & 830, Bike Friday NWT, Brompton M36R & M6R, Dahon HAT060 & HT060, ...
Mentioned: 10 Post(s)
Tagged: 0 Thread(s)
Quoted: 840 Post(s)
Liked 336 Times
in
251 Posts
OK, my photos are below. The angles for the Brompton seatpost and my current derailleur mount point are more relaxed. However the angle difference of 73-57=16 is about the same as in your Dahon. I applied some minor distortion correction for the photo, but angles changed by less then 0.5 degree. Since my photo measurement gave a lower angle than original measurement on the bike, I went back and repeated the measurement on the bike, but now in my organized manner and it gave the same value of 57 deg for derailleur mounting point.

10-28-18, 06:43 AM
#34
Senior Member
Join Date: Jan 2017
Posts: 1,064
Mentioned: 6 Post(s)
Tagged: 0 Thread(s)
Quoted: 350 Post(s)
Likes: 0
Liked 122 Times
in
90 Posts
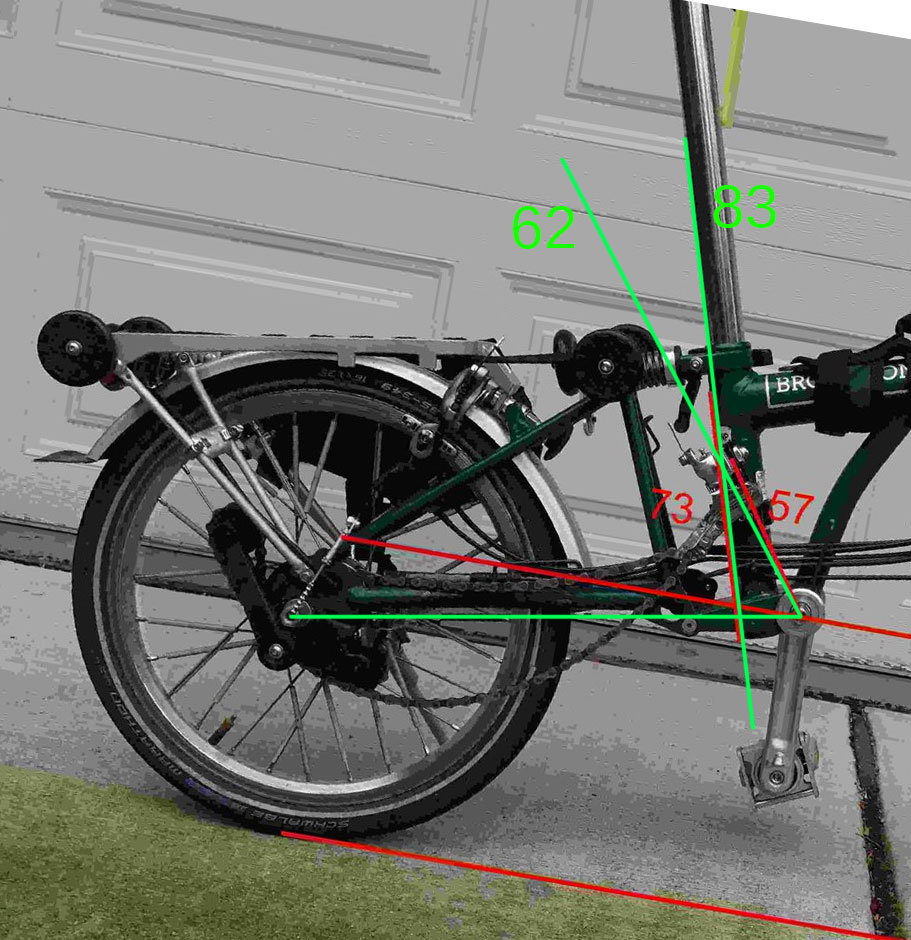
The angle in the specs is the seat tube to chainstay angle, so you should measure from the axis between the dropout and BB.
Also the axis between the FD and BB is a little bit behind the FD mounting block.
With this, I got 83 degrees to the seat tube, and 62 degrees to your FD. Which means your K-type bracket is most likely somewhere around 20-21 degrees.
They state the seat tube to chainstay angle because normally the seat tube is directly on top of the BB on normal bikes and the braze on is usually parallel to the seat tube. But on folding bikes with seat posts that pass behind the BB, the seat tube is no longer in line with the BB, so that's why you get an angled braze on (plus the smaller wheel with shallower chainstay angle to the ground).
Last edited by tomtomtom123; 10-28-18 at 06:46 AM.
10-28-18, 10:30 AM
#35
Senior Member
Thread Starter
Join Date: Sep 2005
Location: Michigan
Posts: 3,706
Bikes: Trek 730 (quad), 720 & 830, Bike Friday NWT, Brompton M36R & M6R, Dahon HAT060 & HT060, ...
Mentioned: 10 Post(s)
Tagged: 0 Thread(s)
Quoted: 840 Post(s)
Liked 336 Times
in
251 Posts
The angle in the specs is the seat tube to chainstay angle, so you should measure from the axis between the dropout and BB.
Also the axis between the FD and BB is a little bit behind the FD mounting block.
With this, I got 83 degrees to the seat tube, and 62 degrees to your FD. Which means your K-type bracket is most likely somewhere around 20-21 degrees.
They state the seat tube to chainstay angle because normally the seat tube is directly on top of the BB on normal bikes and the braze on is usually parallel to the seat tube. But on folding bikes with seat posts that pass behind the BB, the seat tube is no longer in line with the BB, so that's why you get an angled braze on (plus the smaller wheel with shallower chainstay angle to the ground).
Also the axis between the FD and BB is a little bit behind the FD mounting block.
With this, I got 83 degrees to the seat tube, and 62 degrees to your FD. Which means your K-type bracket is most likely somewhere around 20-21 degrees.
They state the seat tube to chainstay angle because normally the seat tube is directly on top of the BB on normal bikes and the braze on is usually parallel to the seat tube. But on folding bikes with seat posts that pass behind the BB, the seat tube is no longer in line with the BB, so that's why you get an angled braze on (plus the smaller wheel with shallower chainstay angle to the ground).
As to the K bracket angle, it continues to be a bit flaky. While I straightened the adapter's finger, there is still some 1-2 degree arch there - I did not want to overdo the straightening and provoke eventual snapping. I left a larger gap between the cage and the outer ring to prevent the cage from rubbing against the ring in case of the finger bending.
Last edited by 2_i; 10-28-18 at 11:19 AM.
10-28-18, 11:05 AM
#36
Banned
Of course the issue is because; to fold the seat post has to pass behind the bb, as it telescopes down..
so FD gets shifted to behave as if it were on a normal frame.. by angle,
.. or displacement.. or a combination ..
....
so FD gets shifted to behave as if it were on a normal frame.. by angle,
.. or displacement.. or a combination ..
....
10-28-18, 11:16 PM
#37
Senior Member
Thread Starter
Join Date: Sep 2005
Location: Michigan
Posts: 3,706
Bikes: Trek 730 (quad), 720 & 830, Bike Friday NWT, Brompton M36R & M6R, Dahon HAT060 & HT060, ...
Mentioned: 10 Post(s)
Tagged: 0 Thread(s)
Quoted: 840 Post(s)
Liked 336 Times
in
251 Posts
I think I solved the bending finger problem by putting in a stainless steel shim between the derailleur and the finger of the K-frame adapter. The shim is out of a sheet of moderate thickness and it acts to spread stresses over the finger and moves them towards the bottom of the finger where it mounts onto the clamp of the adapter.
The bending problem seems to be gone now and I was already getting desperate. Namely after taking my setup apart for the photos and some marginal adjustments, the tuning had to be redone. In the meantime I was trying to ride around to make sure that things do not blow into my face in travel. All this led to some glitches, even due to bolts not being fully tightened, When there was a glitch things seemed to be getting out of hand and it again got traced back to the alu finger of the adapter getting deformed. The shim was an act of desperation but it seems to have fixed the problem, The disadvantage is that the derailleur got pushed back, but is still OK,


The bending problem seems to be gone now and I was already getting desperate. Namely after taking my setup apart for the photos and some marginal adjustments, the tuning had to be redone. In the meantime I was trying to ride around to make sure that things do not blow into my face in travel. All this led to some glitches, even due to bolts not being fully tightened, When there was a glitch things seemed to be getting out of hand and it again got traced back to the alu finger of the adapter getting deformed. The shim was an act of desperation but it seems to have fixed the problem, The disadvantage is that the derailleur got pushed back, but is still OK,
10-29-18, 05:53 AM
#38
Senior Member
Join Date: Jan 2017
Posts: 1,064
Mentioned: 6 Post(s)
Tagged: 0 Thread(s)
Quoted: 350 Post(s)
Likes: 0
Liked 122 Times
in
90 Posts
if you want a shim, you can use these angled ones from SRAM, I can't remember the angle, perhaps 5 degrees.
https://www.amazon.com/SRAM-Braze-De.../dp/B003RLK1WQ
https://www.amazon.com/SRAM-Braze-De.../dp/B003RLK1WQ
10-29-18, 07:23 AM
#39
Senior Member
Thread Starter
Join Date: Sep 2005
Location: Michigan
Posts: 3,706
Bikes: Trek 730 (quad), 720 & 830, Bike Friday NWT, Brompton M36R & M6R, Dahon HAT060 & HT060, ...
Mentioned: 10 Post(s)
Tagged: 0 Thread(s)
Quoted: 840 Post(s)
Liked 336 Times
in
251 Posts
if you want a shim, you can use these angled ones from SRAM, I can't remember the angle, perhaps 5 degrees.
https://www.amazon.com/SRAM-Braze-De.../dp/B003RLK1WQ
https://www.amazon.com/SRAM-Braze-De.../dp/B003RLK1WQ
Last edited by 2_i; 10-29-18 at 07:34 AM.
10-30-18, 12:33 PM
#40
Senior Member
Thread Starter
Join Date: Sep 2005
Location: Michigan
Posts: 3,706
Bikes: Trek 730 (quad), 720 & 830, Bike Friday NWT, Brompton M36R & M6R, Dahon HAT060 & HT060, ...
Mentioned: 10 Post(s)
Tagged: 0 Thread(s)
Quoted: 840 Post(s)
Liked 336 Times
in
251 Posts
Thanks !
@tomtomtom123, regarding your setup in the photos, could you comment on the cage with cut off bottom? Is it working fine? Is there any benefit to it other than getting the derailleur into the space? After all you could have presumably close it up. After stabilizing the mount my attention now is back onto the cage. I put a lip now on the inner side of the cage to stabilize small-to-middle ring shift.
!@tomtomtom123, regarding your setup in the photos, could you comment on the cage with cut off bottom? Is it working fine? Is there any benefit to it other than getting the derailleur into the space? After all you could have presumably close it up. After stabilizing the mount my attention now is back onto the cage. I put a lip now on the inner side of the cage to stabilize small-to-middle ring shift.
10-30-18, 03:53 PM
#41
Senior Member
Join Date: Jan 2017
Posts: 1,064
Mentioned: 6 Post(s)
Tagged: 0 Thread(s)
Quoted: 350 Post(s)
Likes: 0
Liked 122 Times
in
90 Posts
The bottom bit broke off from the cage when I was widening the sides, it wasn't intentional, however it does make it easy to remove the FD without having to disassemble the chain. I'm not sure how it affects the stability of the cage when shifting, but I haven't had problems so far.
At first, I was struggling to widen the cage, by bending the inner plate inwards, but then I figured the easiest way was to take 2 adjustable wrenches, fix one in a vice or clamp one to a table, stick the front half of the inner plate into that wrench, then take the 2nd wrench and close it over the rear half of the inner plate and bend it.
The cage needed to be wider because the chain kept rubbing on the cage on either lowest or highest gear. This is because the chainstay is only 40cm on my dahon, and the thick 41mm seat tube pushes the FD further out than where it should be by a few millimeters, causing sharp chain angles. I also removed the nylon bit from the inner plate to give an extra millimeter of clearance.
I was thinking next time I may try the SRAM force 11 FD, which pivots the cage when shifting to give sharper angles. The SRAM force 11 shifter has no trim, only low and high. The product description says the pivoting action makes the trim unnecessary. But the specs drawing shows it needing more seat tube clearance for the swing mechanism than Shiman FDs so I'm not sure if it would actually work.
Last edited by tomtomtom123; 10-30-18 at 04:01 PM.
10-31-18, 11:51 AM
#42
Senior Member
Thread Starter
Join Date: Sep 2005
Location: Michigan
Posts: 3,706
Bikes: Trek 730 (quad), 720 & 830, Bike Friday NWT, Brompton M36R & M6R, Dahon HAT060 & HT060, ...
Mentioned: 10 Post(s)
Tagged: 0 Thread(s)
Quoted: 840 Post(s)
Liked 336 Times
in
251 Posts
At first, I was struggling to widen the cage, by bending the inner plate inwards, but then I figured the easiest way was to take 2 adjustable wrenches, fix one in a vice or clamp one to a table, stick the front half of the inner plate into that wrench, then take the 2nd wrench and close it over the rear half of the inner plate and bend it.
I was thinking next time I may try the SRAM force 11 FD, which pivots the cage when shifting to give sharper angles. The SRAM force 11 shifter has no trim, only low and high. The product description says the pivoting action makes the trim unnecessary. But the specs drawing shows it needing more seat tube clearance for the swing mechanism than Shiman FDs so I'm not sure if it would actually work.
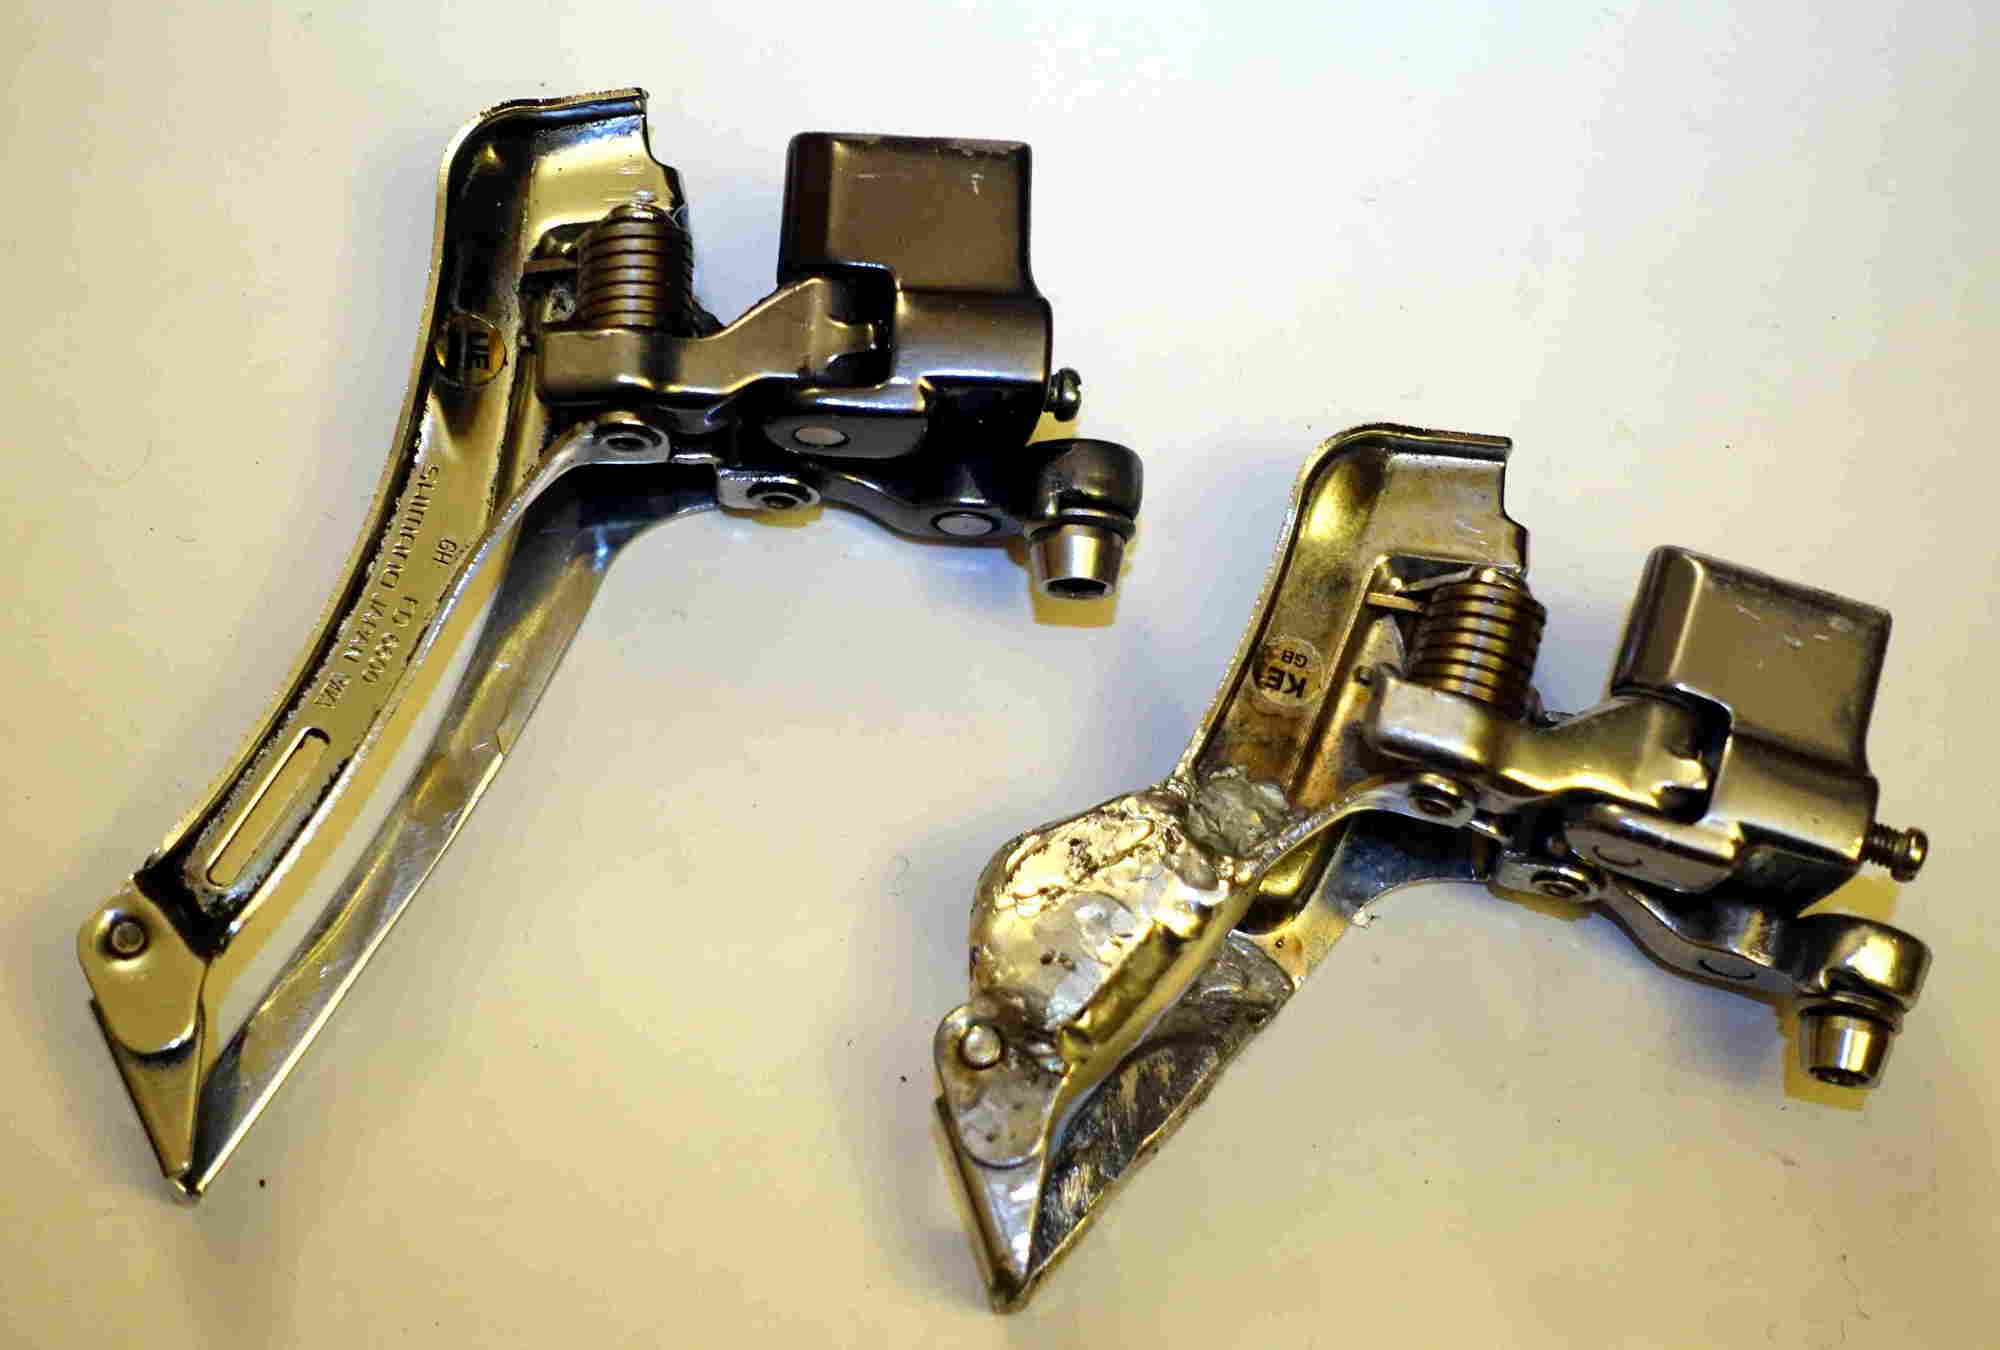
On my side I am running out of time for tweaking as I depart tomorrow. I already declared a complete victory several times but those victories did not stick for long as tolerances for satisfactory operation were too narrow. I.e. now this has been after widening those tolerances to the level that one can live with. Again all is good and and I can take the derailleur off and on and get everything tuned to work but ultimately only the trip will tell how it all pans out. Following the discussion about shim profiles, I ramped my shim longitudinally to improve the derailleur angle. I also added a lip to the bottom of left side of the cage to improve upshift from the small to middle ring. The photos include a comparison of my current 105 to Ultegra with nearly identical shape to 105.


 10-31-18, 06:41 PM
#43
Senior Member
Join Date: Jan 2017
Posts: 1,064
Mentioned: 6 Post(s)
Tagged: 0 Thread(s)
Quoted: 350 Post(s)
Likes: 0
Liked 122 Times
in
90 Posts
I won't be changing my setup since it works fine at the moment. I might test the SRAM force 11 in the future if I have to replace my FD or build a new bike, but I normally only own 1 bike at a time until it becomes unusable. The last bike I had was a Dahon Speed TR with SRAM dual drive, but the hinge wore out after a couple years. I kept riding it loose for several more years but the lever started cracking so I had it welded permanently.
Also you might want to put an end cap on your shift cable to prevent getting cut by it.
Also you might want to put an end cap on your shift cable to prevent getting cut by it.
11-01-18, 10:42 AM
#44
Senior Member
Join Date: Feb 2012
Location: Bangkok: hottest average temperature :(
Posts: 628
Bikes: *1998 GT Forte Ti 700c, Totem KDS-D 26" fatbike, BirdyGT 18", Brompton M2LX 16"
Mentioned: 3 Post(s)
Tagged: 0 Thread(s)
Quoted: 88 Post(s)
Likes: 0
Liked 5 Times
in
4 Posts
Wow, this is an entertaining thread with all the engineering. The handlebar cross brace; Bromptons should have that as standard since the stock bars are so flexy. Then a triple chainring, custom FD, and 3D parts are just great.
Yes, anyone can sell designs on Shapeways as long as they have Paypal, and you can set any profit you want on your designs. Their website is anti-user friendly for sellers, but it's still a good portal to sell CAD designs.
Yes, anyone can sell designs on Shapeways as long as they have Paypal, and you can set any profit you want on your designs. Their website is anti-user friendly for sellers, but it's still a good portal to sell CAD designs.
11-01-18, 11:25 AM
#45
Banned
Bromptons should have that as standard since the stock bars are so flexy
I used to own a Mk2, the black one in above picture
not the newer Mk4 M bars, *
the post 2017 M bars are a lower rise..
( I now own a green pre '17 Mk4 M3L )
*IDK what thrashing your riding style puts on your bike .
....
Last edited by fietsbob; 11-01-18 at 11:35 AM.
11-01-18, 01:41 PM
#46
Senior Member
Thread Starter
Join Date: Sep 2005
Location: Michigan
Posts: 3,706
Bikes: Trek 730 (quad), 720 & 830, Bike Friday NWT, Brompton M36R & M6R, Dahon HAT060 & HT060, ...
Mentioned: 10 Post(s)
Tagged: 0 Thread(s)
Quoted: 840 Post(s)
Liked 336 Times
in
251 Posts
Sure, if the current setup meets your needs there is no real incentive to spend time on rearranging. I have been using different bikes in different situations, so even when one bike is good there may be a reason to work on another. My previous derailleur project was on my commuting bike, where I made a triple work as a quad in sync with an indexed shifter also made into a quad. In some ways the current project is harder because the folding space limitations come in.
In the Brompton project I have not even bothered yet to pay attention to chain rubbing in tweaking the cage. The rubbing/drag is bad now in the middle ring gear and somewhat bad in small. Only the large ring works drag-free. When I had the double, both gears were working fine and you often had to look to check which gear you were in as there was no striking difference in gear operation. Oh well, first you need to demonstrate that indexed triple shifting is possible and hopefully refine it later. The rubbing can also solve itself, at least in part, with the chain smoothing out any protrusions in the derailleur cage that get in the way. Over the next month I will lack any infrastructure beyond basic bike tools, so I will only be able to observe and/or retighten something. Else, given the space limitations, the rubbing may be inherent in such a setup.
Thanks. I normally solder the ends and like to keep them open to allow for pulling the cable out of housing and threading it back in a blink, if some rework is needed. Here, I was on the edge whether to go back to friction shifting. It is always a compromise.
Thanks. I normally solder the ends and like to keep them open to allow for pulling the cable out of housing and threading it back in a blink, if some rework is needed. Here, I was on the edge whether to go back to friction shifting. It is always a compromise.
Last edited by 2_i; 11-01-18 at 03:02 PM.
11-03-18, 07:23 AM
#47
Full Member
Join Date: Dec 2016
Posts: 248
Bikes: Tyrell CSI, Dahon Mu LT11, Doppelganger Aurora 219
Mentioned: 0 Post(s)
Tagged: 0 Thread(s)
Quoted: 150 Post(s)
Likes: 0
Liked 2 Times
in
2 Posts
3 chainrings?... pffft. Today I saw a Brampton with 3 wheels. Really should have taken a photo... It was a tandem Brampton, never know they existed.
Cant find a mention of it online either... ;( Really really should have snapped it. The two rear wheels were next to each other like on trucks, really rare design for a bike.
Cant find a mention of it online either... ;( Really really should have snapped it. The two rear wheels were next to each other like on trucks, really rare design for a bike.
Last edited by kidshibuya; 11-03-18 at 07:26 AM.
11-03-18, 10:37 AM
#48
Banned
Your mentioning, BrAmpton , is a completely different color of Herring..
Another company, entirely..
try to pay better attention...
Another company, entirely..
try to pay better attention...