


Installation Experience Always-On Reelight RL 721
 07-21-20, 01:58 PM
#1
Senior Member
Thread Starter
Join Date: Jun 2015
Location: Low Country, SC, USA
Posts: 99
Bikes: Trek Madone 2.5, single speed
Mentioned: 0 Post(s)
Tagged: 0 Thread(s)
Quoted: 30 Post(s)
Likes: 0
Liked 29 Times
in
13 Posts
Installation Experience Always-On Reelight RL 721
My wife and I have battery LED lights on our bikes. These work well, except obviously when the batteries die halfway into a ride. I researched battery packs, and that seemed interesting, but with the same problem ultimately.
Next I researched hub dynamos. While this appeared to be the best way to have battery-free, always-on lights, the cost of $250 per bike scared me off.
The idea of the Reelight is almost the same idea, at almost $200 less. A transformer is attached to the rear seat stay, and three magnet assemblies are attached to the spokes. When the wheel turns, the magnetic field intersects the coil in the transformer, causing an electrical current to flow, which lights the attached lights. Science is truly grand.
I mounted the front light and rear light without any problems. (See Pix)
But when I tried to attach the magnet assemblies on the spokes, I could not figure out any way to mount them so that both magnets on an assembly would come anywhere near the transformer in the same orientation. I have 24-spoke wheels, and that made the job more challenging.
(See pix of Magnet Assembly)
So I decided to cut each two-magnet assembly in half to make them individual magnets. I attached each these with a 10-24 socket head bolt and nut and a fender washer. (see picture)
I attached the transformer with included hose clamps and some rubber from an old tube in such a way, that the face of the transformer is near- parallel to the magnets. (see picture).
I temporarily attached the wires from the lights to the transformer, and spun the rear wheel, and that lit the lights. Magic. So I soldered the wire connections, buttoned it up, and called it a day (well, part of two days actually).
Would I do it again? Yes, now that I know how to do it�my wife�s bike is next. The biggest pain was modification of those magnet assemblies. I gave my Dremel tool and my electric drill a workout. The Reelight company really should provide those magnets as individual assemblies, and make life easier. But they have a clever idea, and it works. I hope these lights last forever.

Front Light

Rear Light (Teardrop Shape)

Magnet Assembly

Rear Wheel Non-Drive Side

Transformer to Magnet Clearance
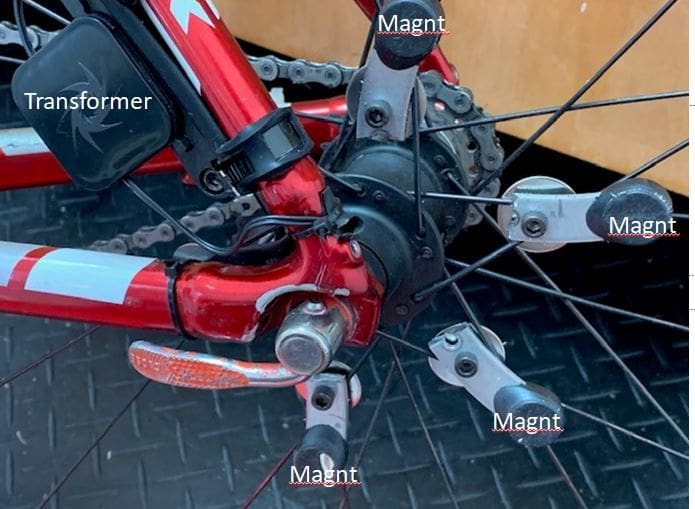
Transformer/Magnet Locations
Next I researched hub dynamos. While this appeared to be the best way to have battery-free, always-on lights, the cost of $250 per bike scared me off.
The idea of the Reelight is almost the same idea, at almost $200 less. A transformer is attached to the rear seat stay, and three magnet assemblies are attached to the spokes. When the wheel turns, the magnetic field intersects the coil in the transformer, causing an electrical current to flow, which lights the attached lights. Science is truly grand.
I mounted the front light and rear light without any problems. (See Pix)
But when I tried to attach the magnet assemblies on the spokes, I could not figure out any way to mount them so that both magnets on an assembly would come anywhere near the transformer in the same orientation. I have 24-spoke wheels, and that made the job more challenging.
(See pix of Magnet Assembly)
So I decided to cut each two-magnet assembly in half to make them individual magnets. I attached each these with a 10-24 socket head bolt and nut and a fender washer. (see picture)
I attached the transformer with included hose clamps and some rubber from an old tube in such a way, that the face of the transformer is near- parallel to the magnets. (see picture).
I temporarily attached the wires from the lights to the transformer, and spun the rear wheel, and that lit the lights. Magic. So I soldered the wire connections, buttoned it up, and called it a day (well, part of two days actually).
Would I do it again? Yes, now that I know how to do it�my wife�s bike is next. The biggest pain was modification of those magnet assemblies. I gave my Dremel tool and my electric drill a workout. The Reelight company really should provide those magnets as individual assemblies, and make life easier. But they have a clever idea, and it works. I hope these lights last forever.
Front Light
Rear Light (Teardrop Shape)
Magnet Assembly
Rear Wheel Non-Drive Side
Transformer to Magnet Clearance
Transformer/Magnet Locations
 07-21-20, 04:03 PM
#2
Banned
why did you cut it in 2? That was probably a mistake..
(I've only dealt with the basic model 100 and the magnets followed each other.. that's why they made that curved arc mount
mounted on opposite sides of the wheel.. ala 6:00 & 12:00
https://www.reelight.com/collections...nt=34453441041
'steady on' is charging a capacitor in the scheme.. its an induction dynamo..
07-21-20, 06:03 PM
#3
Senior Member
Thread Starter
Join Date: Jun 2015
Location: Low Country, SC, USA
Posts: 99
Bikes: Trek Madone 2.5, single speed
Mentioned: 0 Post(s)
Tagged: 0 Thread(s)
Quoted: 30 Post(s)
Likes: 0
Liked 29 Times
in
13 Posts
[QUOTE=fietsbob;21599927]why did you cut it in 2? That was probably a mistake../[QUOTE]
I cut them because when they were an assembly, there was no spot on the spokes where both magnets were reasonably parallel to the transformer (induction dynamo). I figured the induced current would be stronger if the magnets were closer to the dynamo and that meant placing them in a position where they each were close and parallel.
The magnets in the model 100 look very different that the photo above.
07-21-20, 09:53 PM
#4
Banned
Personally, a front wheel hub dynamo gets the job done for me,,
I got the Reelight 100 for a friend who rode ninja, it proved a wasted effort..
I got the Reelight 100 for a friend who rode ninja, it proved a wasted effort..


