


Modifying a frame as a prototype
 01-21-24, 04:31 PM
#26

Senior Member
Join Date: Aug 2007
Location: Evanston, IL
Posts: 5,096
Bikes: many
Mentioned: 63 Post(s)
Tagged: 0 Thread(s)
Quoted: 1446 Post(s)
Liked 1,395 Times
in
762 Posts
Sorry but the last time I dealt with Owen was back in 2012 or so. I bought the old jig from Cyclery North and visited with him and other guys in the building. Is Blue City Cycles no longer even open? I just pulled up their website and it looked like it was still open for business.
 01-21-24, 05:28 PM
#27
blahblahblah chrome moly

Join Date: Apr 2009
Location: Seattle
Posts: 1,994
Mentioned: 92 Post(s)
Tagged: 0 Thread(s)
Quoted: 1181 Post(s)
Liked 2,576 Times
in
1,076 Posts
@Doug Fattic often repairs seriously dented tubes by splicing in a new chunk of tube instead of completely replacing it.
Never done it on a top tube, so I wonder how you get the internal sleeves centered under both ends of the splice. Tack braze or pin one side of each joint to keep the sleeves from sliding out of position while you assemble it? I imagine prying the frame open enough to get the sleeves in isn't too hard, the frame has very little rigidity in that direction once the toptube has been cut. Maybe drill a little hole near each cut as a window for adding brazing filler?
Now I want to try that! I imagine it can repair a frame with a dent that's too deep for any sort of re-rounding, filling and filing sort of repair. Full tube replacement is such a Big Hairy Deal that most frames aren't worth it, but this simpler repair opens up a wider range of frames worth repairing.
I'll add my name along with Andy, as a hobbyist with a lathe, willing to make some custom-sized inner sleeves for this type repair. Just give me the dimensions you need, I have plenty of tube drops to make them from. I don't imagine I'll get inundated with requests, but I reserve the right to say "no m�s" if the novelty wears off. For what I charge (zero), it's gotta be fun for me.
Mark in Seattle
 01-21-24, 05:36 PM
#28
blahblahblah chrome moly
Join Date: Apr 2009
Location: Seattle
Posts: 1,994
Mentioned: 92 Post(s)
Tagged: 0 Thread(s)
Quoted: 1181 Post(s)
Liked 2,576 Times
in
1,076 Posts
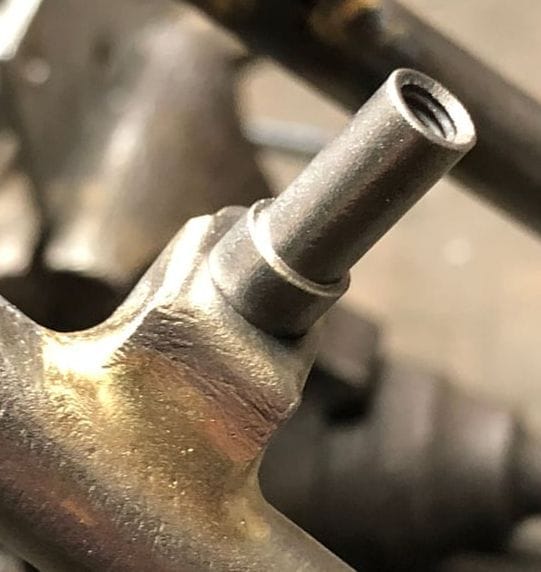
Excellent work, but I have a suggestion. Sorry, it involves fluxing and heating again, but I think it's important to braze the cylindrical part of the canti boss to the square sheetmetal part.
Those are only sort of staked or peened on, and they do come loose sometimes, not just a theoretical concern.
Mafac's instructions BITD even said to braze there, sorry I don't have a link or a scan to show you, this is from memory. On the plus side, it's such a quick braze, no cleanup needed afterward other than soaking the flux off.
Likes For bulgie:
01-21-24, 06:38 PM
#29


Randomhead
Join Date: Aug 2008
Location: Happy Valley, Pennsylvania
Posts: 24,399
Mentioned: 0 Post(s)
Tagged: 0 Thread(s)
Quoted: 4 Post(s)
Liked 3,699 Times
in
2,519 Posts
That's interesting. I had a Gitane with Mafac cantilevers, and one of the bosses was loose. Probably wouldn't have happened if Gitane had brazed it.
01-21-24, 06:48 PM
#30
Junior Member
Thread Starter
Excellent work, but I have a suggestion. Sorry, it involves fluxing and heating again, but I think it's important to braze the cylindrical part of the canti boss to the square sheetmetal part.
Those are only sort of staked or peened on, and they do come loose sometimes, not just a theoretical concern.
Mafac's instructions BITD even said to braze there, sorry I don't have a link or a scan to show you, this is from memory. On the plus side, it's such a quick braze, no cleanup needed afterward other than soaking the flux off.
Those are only sort of staked or peened on, and they do come loose sometimes, not just a theoretical concern.
Mafac's instructions BITD even said to braze there, sorry I don't have a link or a scan to show you, this is from memory. On the plus side, it's such a quick braze, no cleanup needed afterward other than soaking the flux off.
I will recheck, and perhaps touch them up.
Thanks for the suggestion!
01-21-24, 06:51 PM
#31
blahblahblah chrome moly
Join Date: Apr 2009
Location: Seattle
Posts: 1,994
Mentioned: 92 Post(s)
Tagged: 0 Thread(s)
Quoted: 1181 Post(s)
Liked 2,576 Times
in
1,076 Posts
01-21-24, 07:27 PM
#32
Junior Member
Thread Starter
What probably makes more sense is that they would have someone zapping a whole box of them together prior to passing them out for frame assembly, so a different assembly process. And arc welding would be a lot better for that sort of assembly-line activity.
I will see if I can determine what it was tomorrow.
01-21-24, 08:38 PM
#33
Senior Member
Join Date: Feb 2012
Location: Rochester, NY
Posts: 18,095
Bikes: Stewart S&S coupled sport tourer, Stewart Sunday light, Stewart Commuting, Stewart Touring, Co Motion Tandem, Stewart 3-Spd, Stewart Track, Fuji Finest, Mongoose Tomac ATB, GT Bravado ATB, JCP Folder, Stewart 650B ATB
Mentioned: 0 Post(s)
Tagged: 0 Thread(s)
Quoted: 4210 Post(s)
Liked 3,875 Times
in
2,315 Posts
I've seen what was either a way high heated bronze/brass flow between the base and post or a copper one. The filler line on the top side of the bases were so slim it was hard to see. But looking inside the base I could see very copper colored filler wetting out on both the base and the posts' ends.
I've also seen posts loose on bases on production bikes... Andy
I've also seen posts loose on bases on production bikes... Andy
__________________
AndrewRStewart
AndrewRStewart
01-22-24, 06:32 PM
#34
Junior Member
Thread Starter
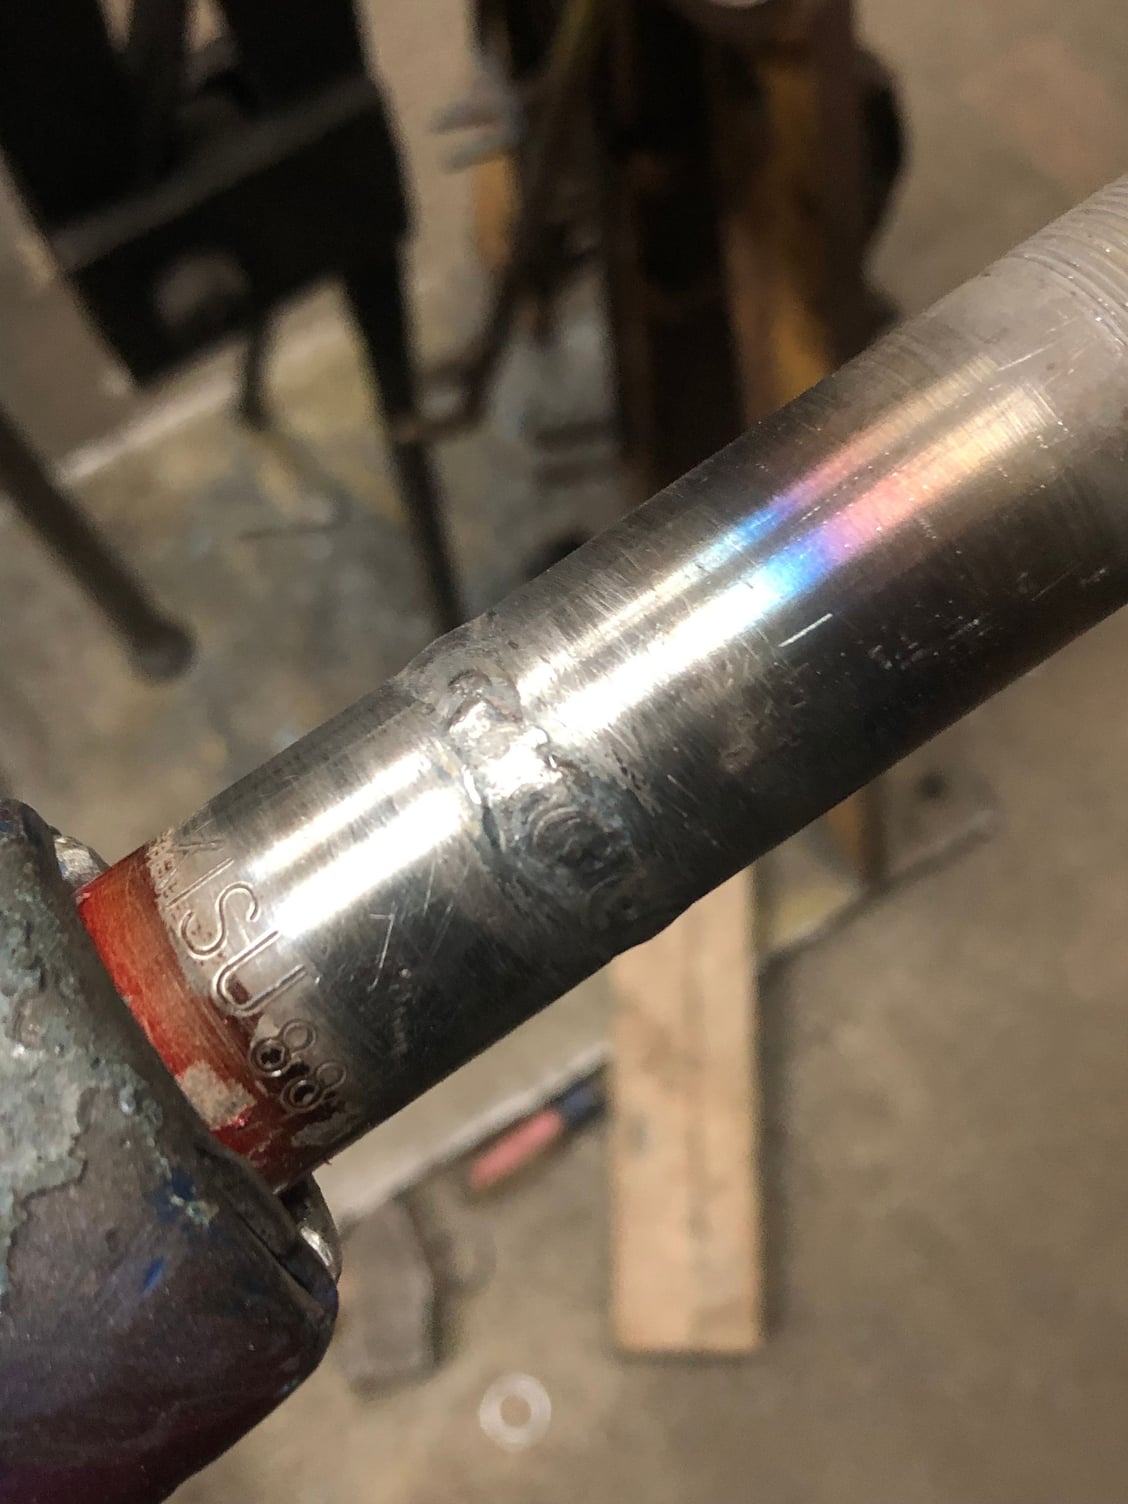
It is not terribly photogenic, but I think this is actually a weld. I scratched it up a bit, and it is steely colored, and it looks like it has melted the stud also.
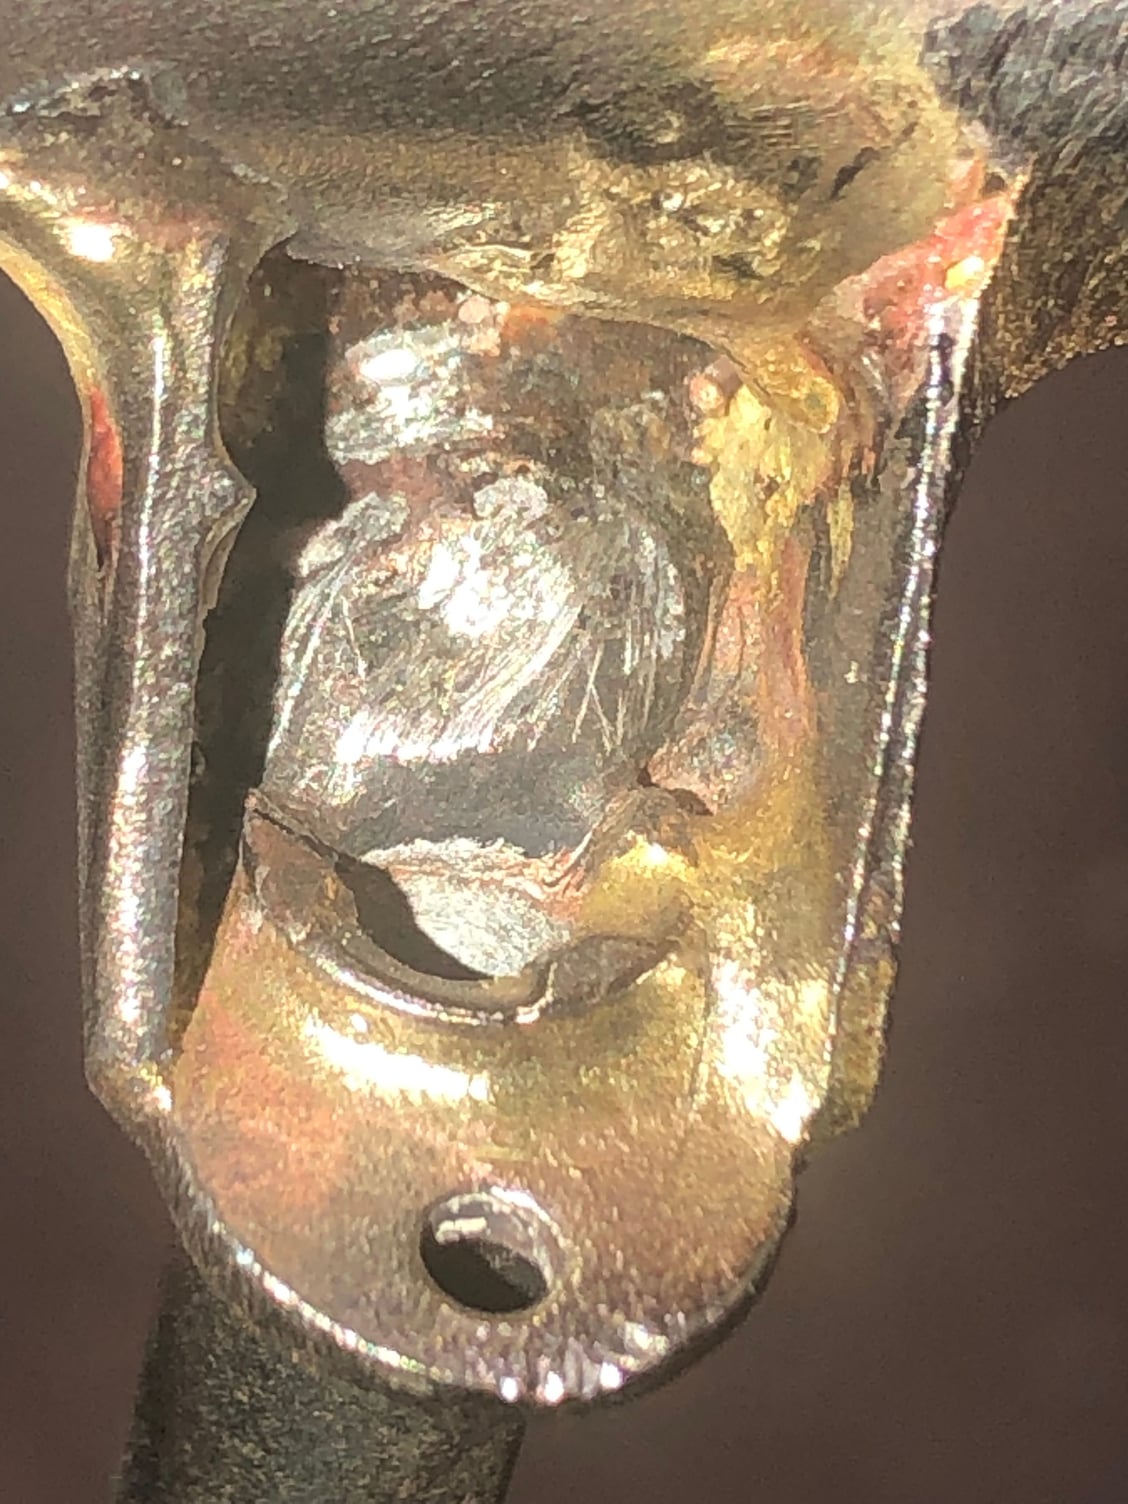
It also seems that I inadvertently also brazed it to the boss, as a bonus.
It also seems that I inadvertently also brazed it to the boss, as a bonus.
01-29-24, 08:48 PM
#35
Junior Member
Thread Starter
Fork progress; should be on the road by the weekend.
I needed to go from a steerer of about 140mm to 290ish, so I took two forks and 2" of 7/8 x 065 tube and made a long-steerer version for my project bike. I followed the lead of Paul Brodie from a video on YouTube (
).
Fortunately I had a donor fork with a really long steerer which worked with a few mm to spare:
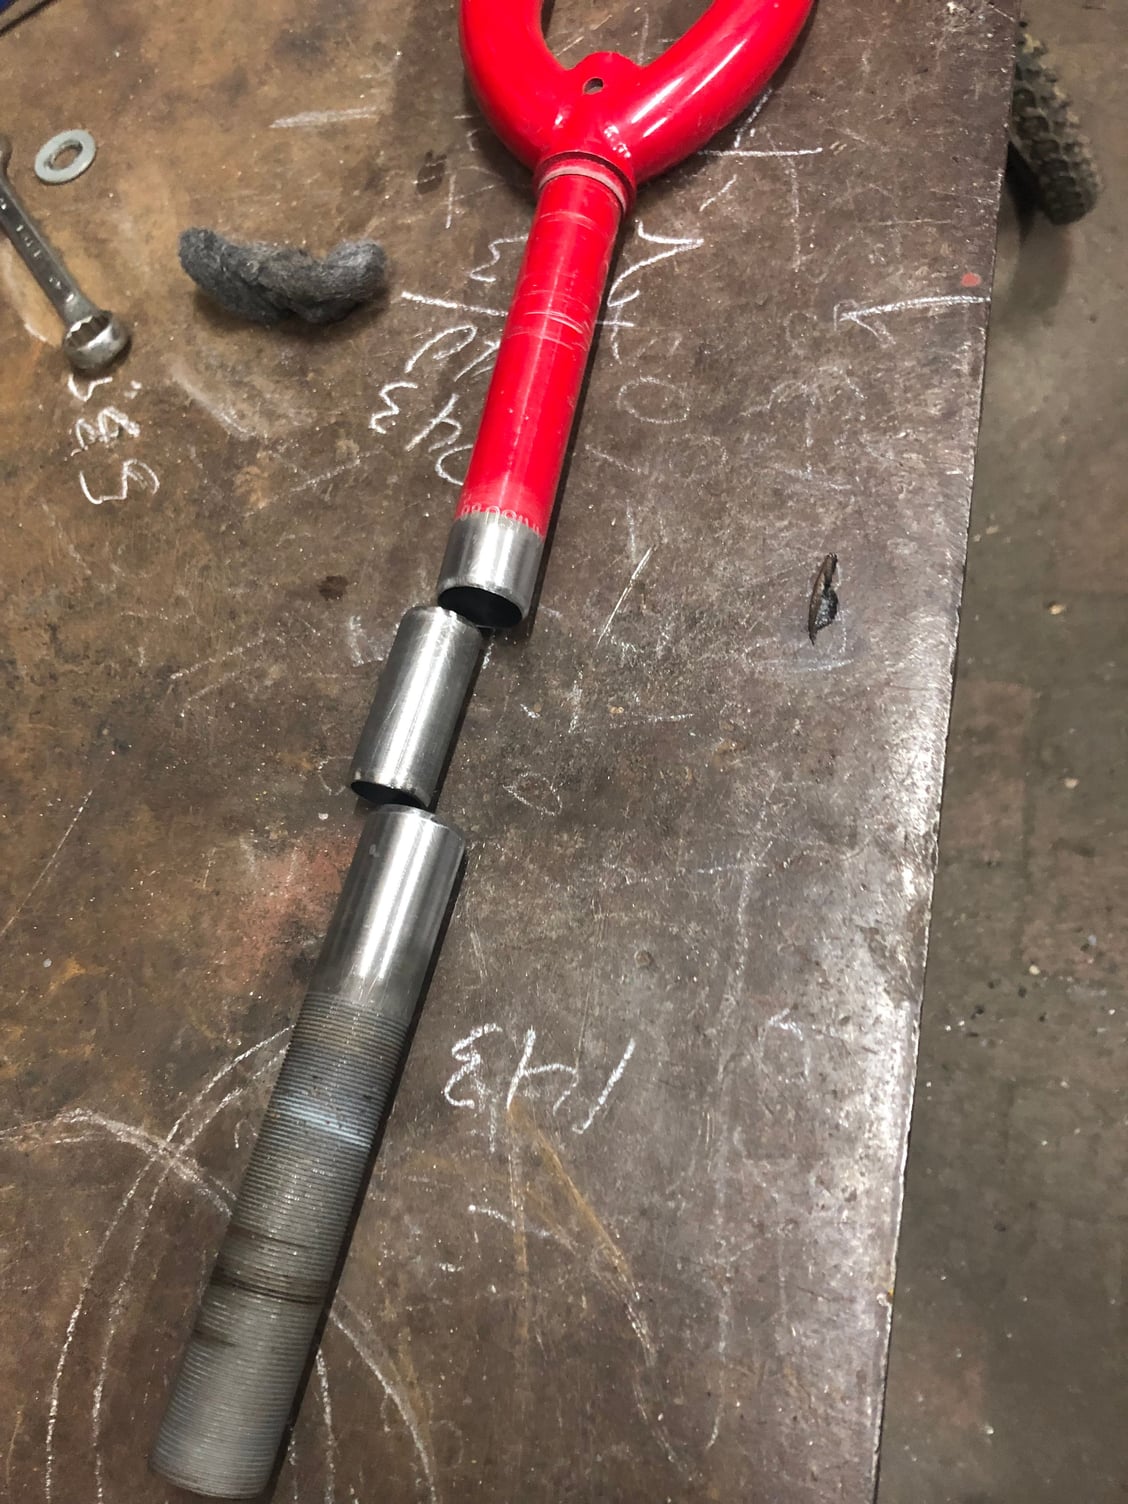
There will be a 1" overlap at the weld, which will leave close to 5" of stem insert space, which should be plenty:
My TIGing is not quite up to nuclear standards, but it should hold. I did it in short run at opposite sides to try to keep it straight...which seemed to work out in the end.
That said, I'm thinking that a loose ball (or caged) headset will be a better choice than a cartridge to handle any slight offset? Is that a reasonable thought?
The day after tomorrow I am going to get my HT reamed/faced, as well as the ST, so now I'm getting really close. Assuming that goes fine, I'll be on the road in no-time.
Fortunately I had a donor fork with a really long steerer which worked with a few mm to spare:
There will be a 1" overlap at the weld, which will leave close to 5" of stem insert space, which should be plenty:
My TIGing is not quite up to nuclear standards, but it should hold. I did it in short run at opposite sides to try to keep it straight...which seemed to work out in the end.
That said, I'm thinking that a loose ball (or caged) headset will be a better choice than a cartridge to handle any slight offset? Is that a reasonable thought?
The day after tomorrow I am going to get my HT reamed/faced, as well as the ST, so now I'm getting really close. Assuming that goes fine, I'll be on the road in no-time.
Likes For dschad:
01-30-24, 11:19 AM
#36
Senior Member
Join Date: Feb 2012
Location: Rochester, NY
Posts: 18,095
Bikes: Stewart S&S coupled sport tourer, Stewart Sunday light, Stewart Commuting, Stewart Touring, Co Motion Tandem, Stewart 3-Spd, Stewart Track, Fuji Finest, Mongoose Tomac ATB, GT Bravado ATB, JCP Folder, Stewart 650B ATB
Mentioned: 0 Post(s)
Tagged: 0 Thread(s)
Quoted: 4210 Post(s)
Liked 3,875 Times
in
2,315 Posts
Yes, an angular contact bearing (which most all loose ball headsets are) will better handle off axis fit, as will one with larger ball diameters too.
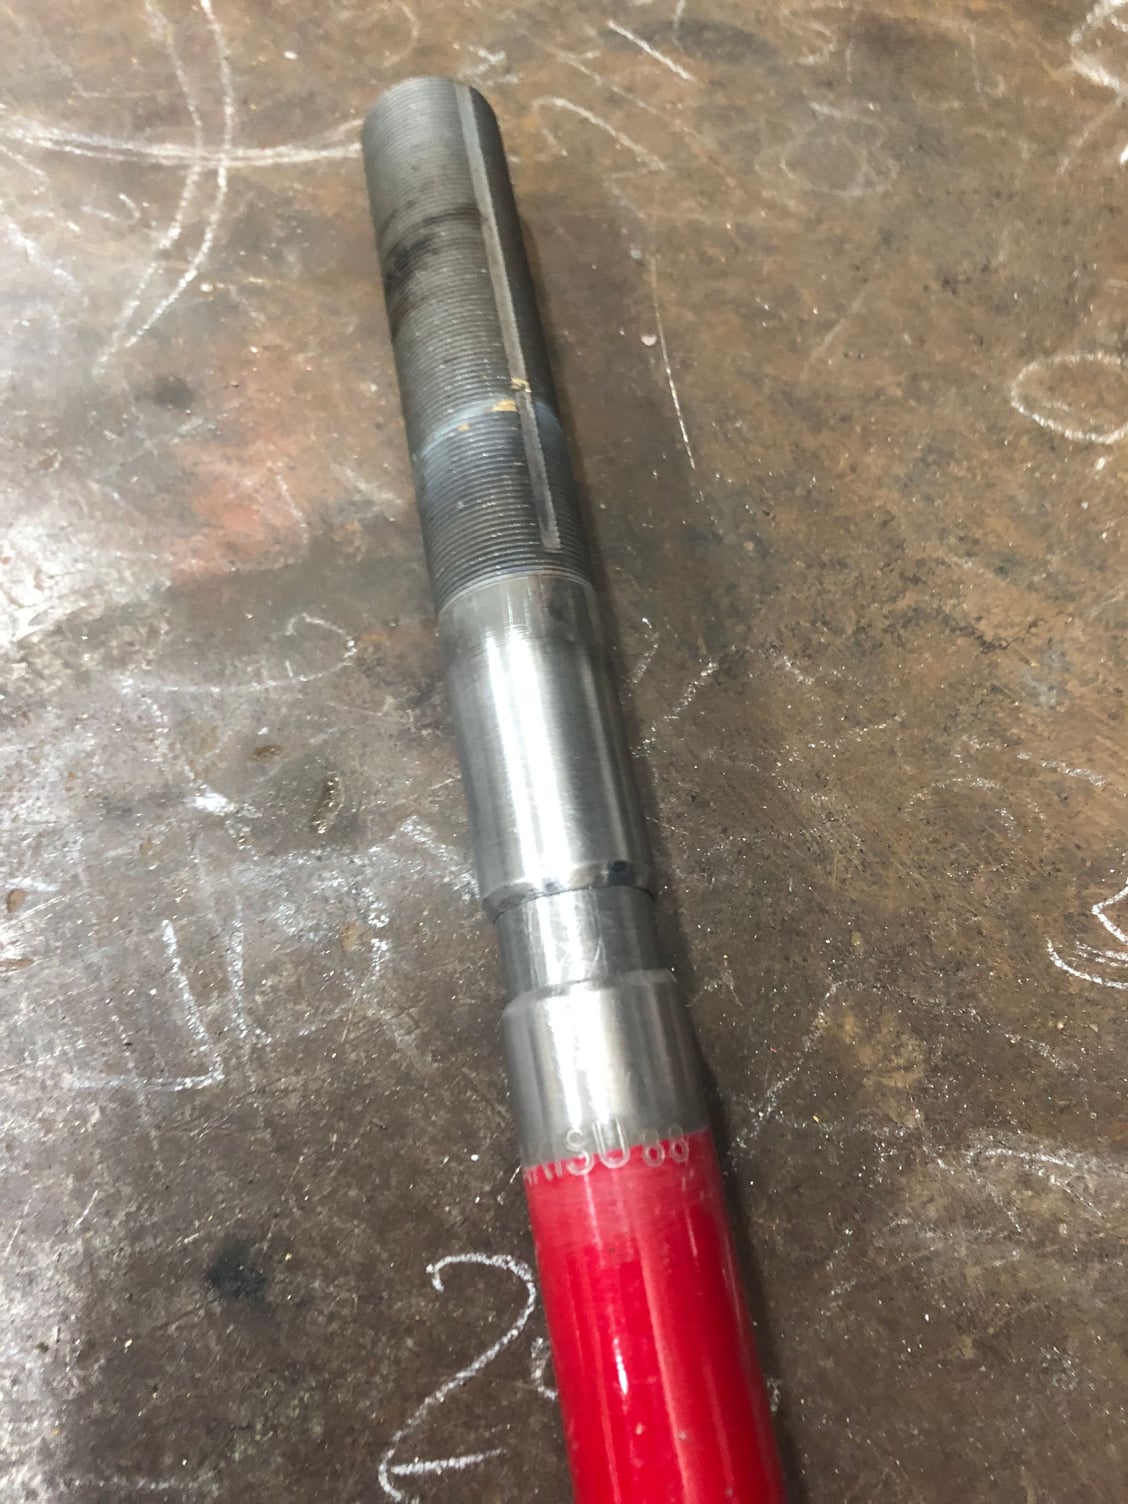
One concern that I have, and I don't know if this was addressed before, is the added steerer threaded portion is so long that the stem's wedge will end up where the threads are too. If so this is a REAL deal killer! Andy
One concern that I have, and I don't know if this was addressed before, is the added steerer threaded portion is so long that the stem's wedge will end up where the threads are too. If so this is a REAL deal killer! Andy
__________________
AndrewRStewart
AndrewRStewart
Likes For Andrew R Stewart:
01-30-24, 12:42 PM
#37
Junior Member
Thread Starter

I am assuming that the sub-text is that the threading weakens the steerer, which will then distort and/or crack when tightening up the wedge? And the sub-sub-text is

This is an unfortunate turn of events, although not necessarily catastrophic (since I still have my hack-saw). I need to measure in how much space there is, but I do have a long quill to threadless stem adapter which will surely fit deep enough, albeit without much adjustability.
[Edit: I measured the non-threaded space above the splice, it is exactly 1" above the 5" mark. So a regular stem will not fit below the threading. Wedges seem to be slightly taller than this, so blaah...]
Bugger.
Interesting that the old fork (a 24) had such a long threaded portion.
Thanks for this information.

Last edited by dschad; 01-30-24 at 02:36 PM.
01-31-24, 06:19 AM
#38
blahblahblah chrome moly
Join Date: Apr 2009
Location: Seattle
Posts: 1,994
Mentioned: 92 Post(s)
Tagged: 0 Thread(s)
Quoted: 1181 Post(s)
Liked 2,576 Times
in
1,076 Posts
Steerers with that much thread are malpractice and should be illegal. I'm not joking, I'm talking jail time. The manu knows or should bloody well know that they're unsafe, but they save a few bucks by having one fork fit multiple frame sizes. If not jail, then at least I hope they get punishment for all eternity in the afterlife! 
Yes if I were dschad , I'd deploy the hacksaw and do it over, with a steerer that is not trying to kill you. Shoot for about 20 mm of threads ideally; 30 to 40 max. Never a need for more thread than that on a custom fork, and extending a steerer fully counts as custom.
Yes if I were dschad , I'd deploy the hacksaw and do it over, with a steerer that is not trying to kill you. Shoot for about 20 mm of threads ideally; 30 to 40 max. Never a need for more thread than that on a custom fork, and extending a steerer fully counts as custom.
Likes For bulgie:
01-31-24, 08:37 AM
#39
Randomhead
Join Date: Aug 2008
Location: Happy Valley, Pennsylvania
Posts: 24,399
Mentioned: 0 Post(s)
Tagged: 0 Thread(s)
Quoted: 4 Post(s)
Liked 3,699 Times
in
2,519 Posts
I'd just like to note that on the danger scale from zero to Mr. Bulgier wouldn't do it, this mod has failed.
Likes For unterhausen:
01-31-24, 10:30 AM
#40
Junior Member
Thread Starter
In the meantime, what do you guys think about applying an external sleeve to the steerer, like a 1.125 with an id of 1.0, over the threads? I'm thinking - put the race on, then tack a sleeve in place. Or braze it. Once the part arrives cut it off and start again.
I'm itching to build this up and ride it now that I'm fresh back from getting the HT faced/reamed.
Thanks again to Andrew R Stewart for pointing this issue out initially, and everyone else for chiming in.
Likes For dschad:
02-04-24, 07:11 PM
#41
Junior Member
Thread Starter
Hi all. I put it together and had a successful test ride, and I'm pretty happy with it:
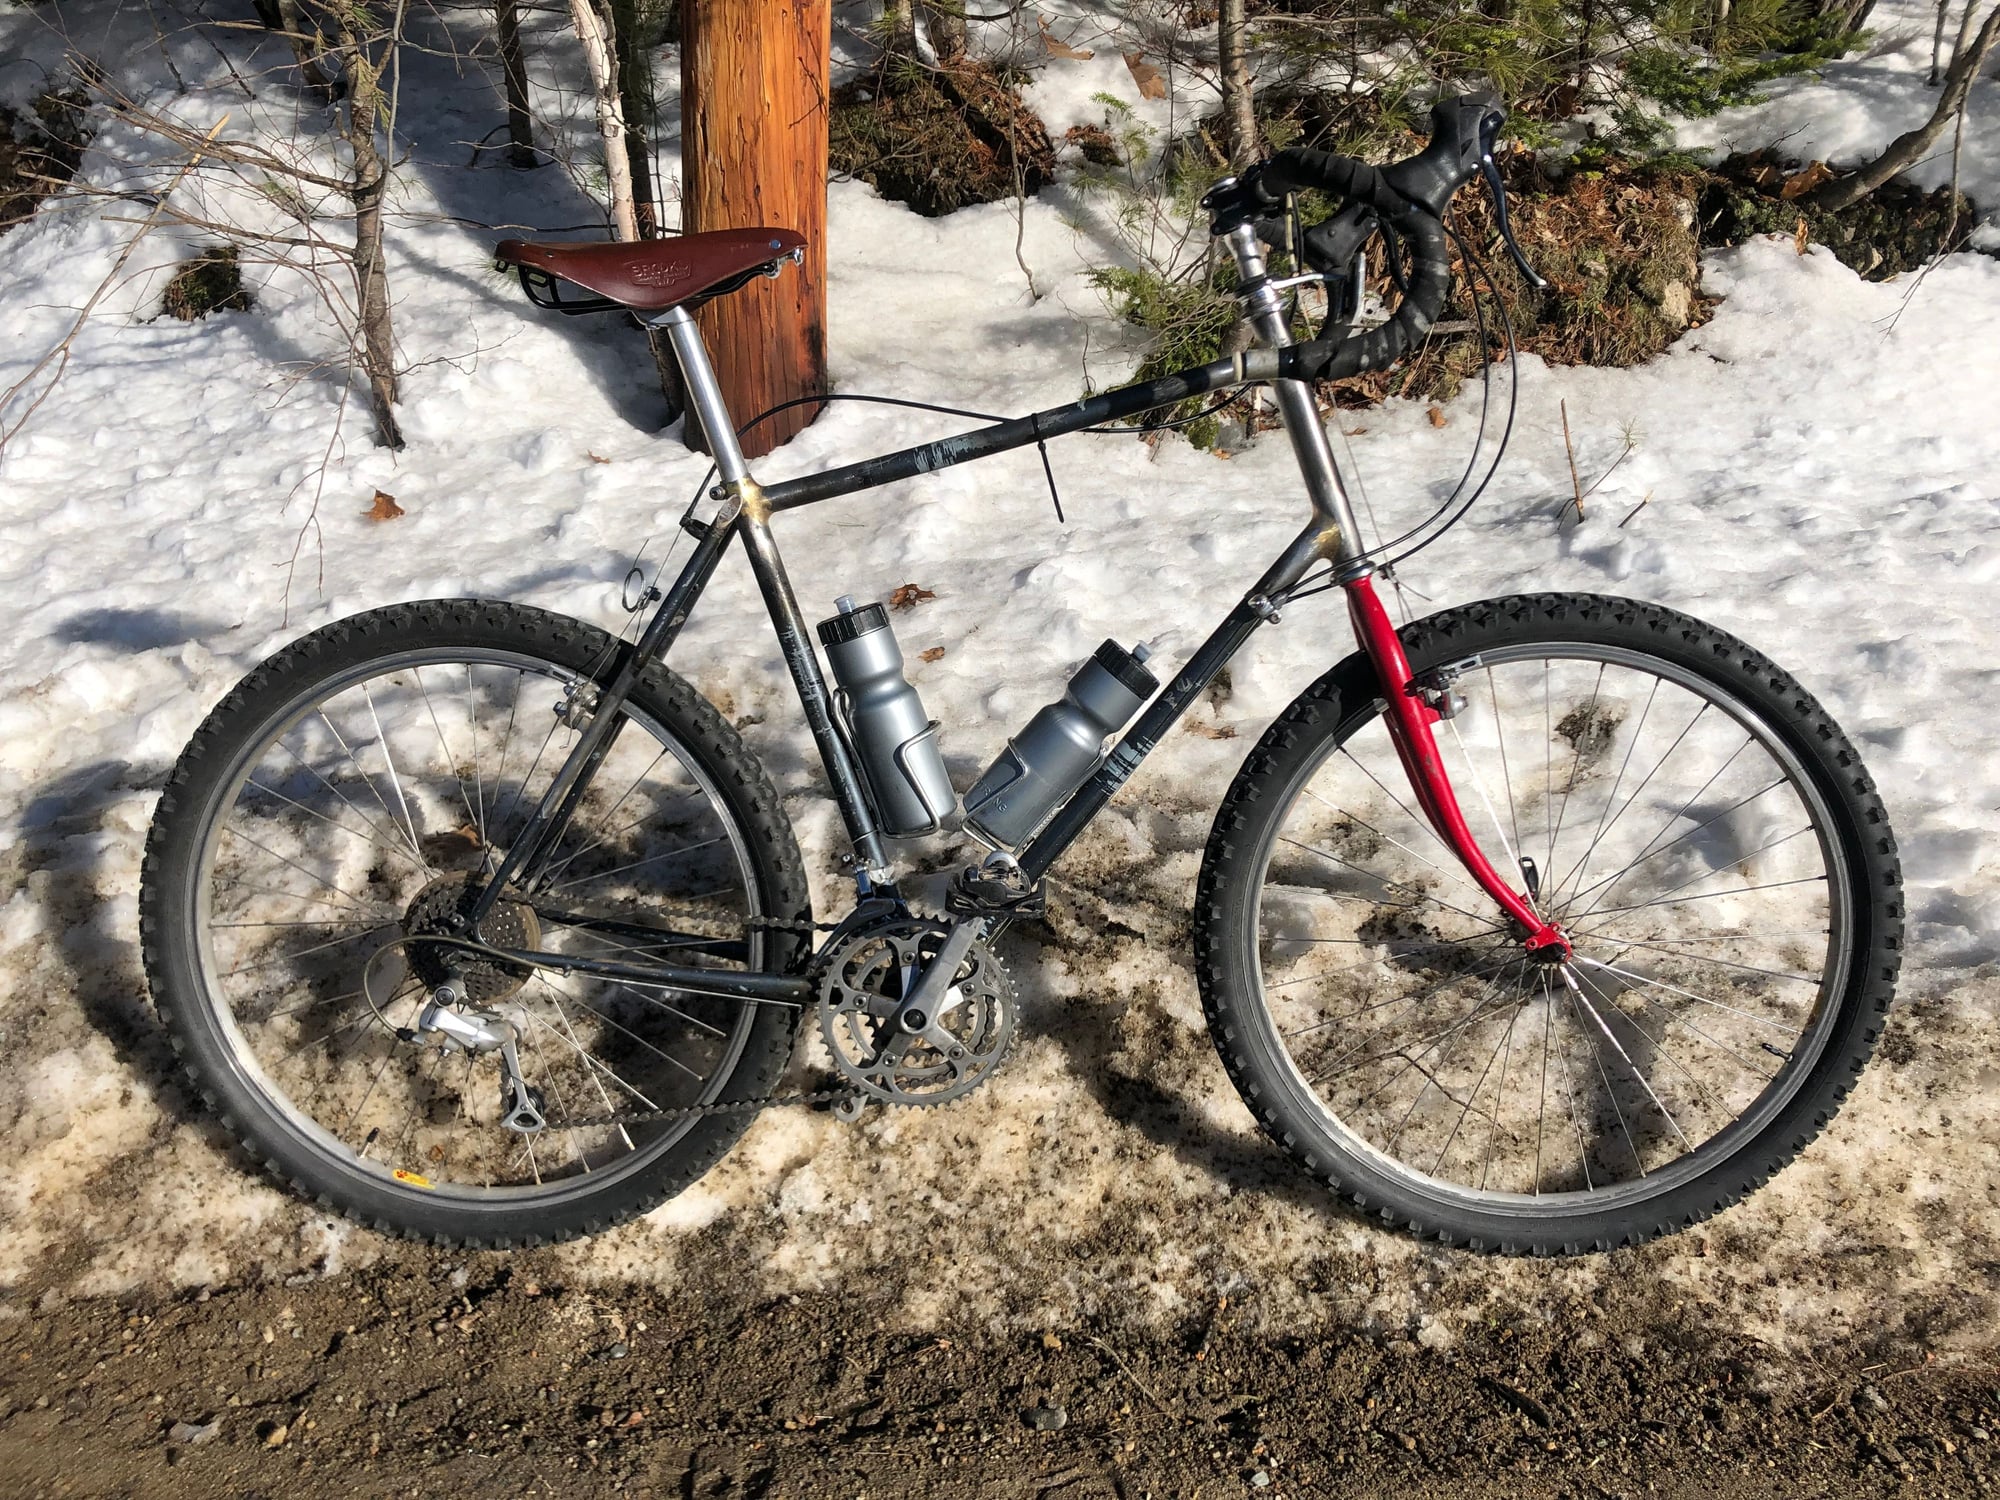
It has held together for about 25 miles, but still needs a lot of odd and ends (and cable trimmings and dialing in), but I think I did well on the geometry. The tires are nasty old knobbies from a mtn bike, but overall it rides and tracks well. I can ride it no-handed down to very-slow pretty confidently, and no-handed up to pretty-quick is very stable. No toe overlap while pedaling through single lane 180s, although it obviously doesn't have fenders, there is plenty of room left.

Really enjoyable to ride something you cobbled together.
Thanks for all the help and advise getting here. Can't wait to do it for real.
It has held together for about 25 miles, but still needs a lot of odd and ends (and cable trimmings and dialing in), but I think I did well on the geometry. The tires are nasty old knobbies from a mtn bike, but overall it rides and tracks well. I can ride it no-handed down to very-slow pretty confidently, and no-handed up to pretty-quick is very stable. No toe overlap while pedaling through single lane 180s, although it obviously doesn't have fenders, there is plenty of room left.
Really enjoyable to ride something you cobbled together.
Thanks for all the help and advise getting here. Can't wait to do it for real.
Likes For dschad:
02-25-24, 07:09 PM
#42
Junior Member
Thread Starter
It's not rocket science!
So, I have a couple hundred miles on the bike after putting some better road tires (Maxxis DTH 2.1 x 26). When playing around with the inflation level of the tires, I noticed pretty significant issue with wheel-flop when running around 60psi, in the 40s it was crazy. So I was generally running at around 80 - the bounced like basketballs! Still seemed pretty good overall, but I wanted to see if I could address it. To that end, I re-raked my fork. I built a jig initially, but I didn't like the test bends on my practice fork, so I ended up doing it by eye using my fly press. I also wanted to focus the bend at the ends, to give a nice smooth curve, so the press allowed this much easier than my jig (due to the dropouts, but also leverage in the bending):
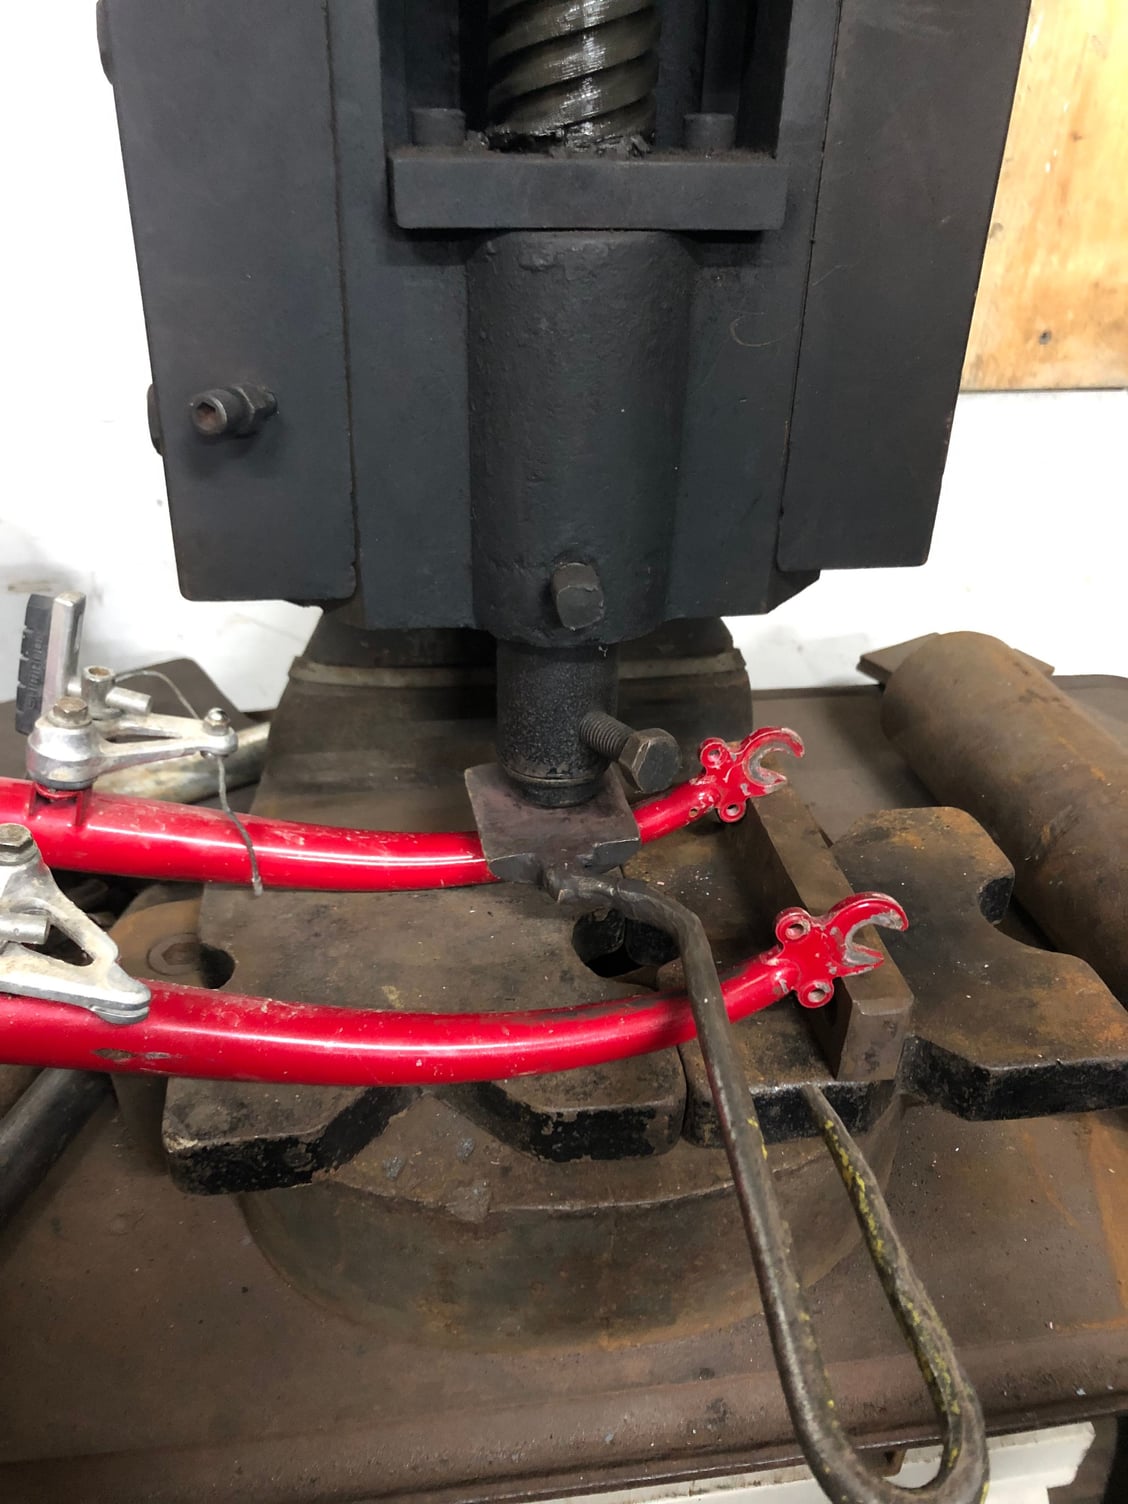
I added 20mm to the rake (from 54mm), and it looks pretty good:
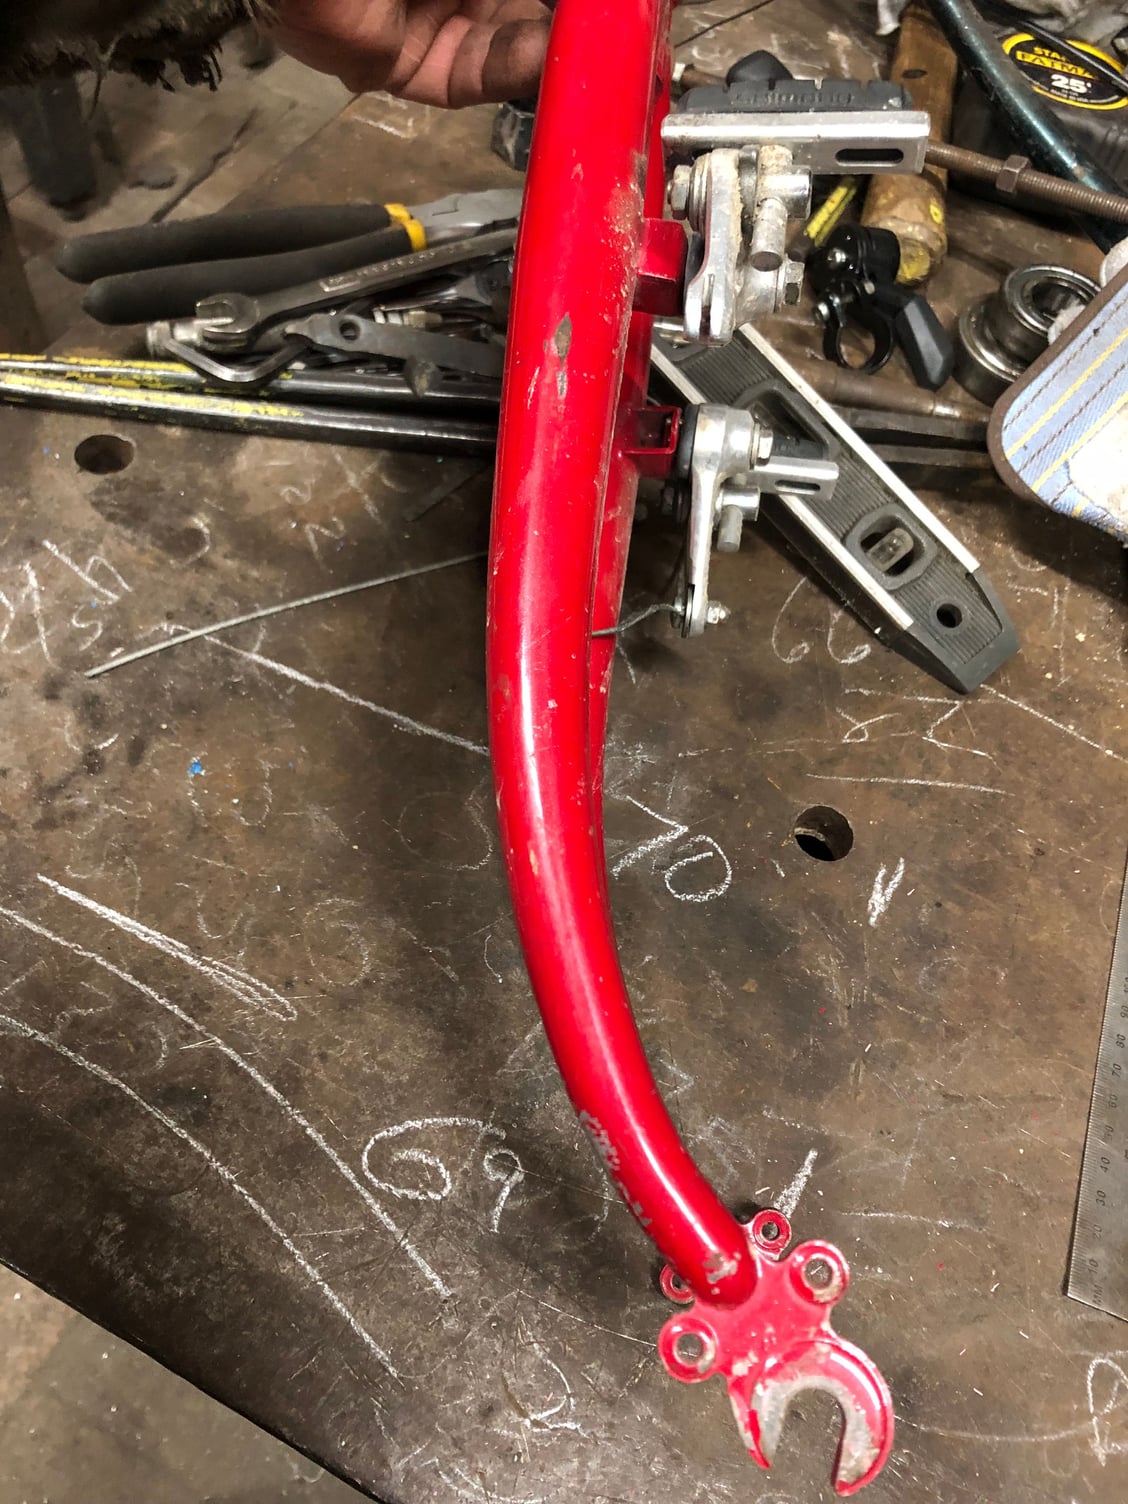
But, when I went to reinstall the wheel, I was a bit surprised by how far off the brakes were. The rim really moved up relative to the brakes, and the pads are at a bit of an unpleasant angle:
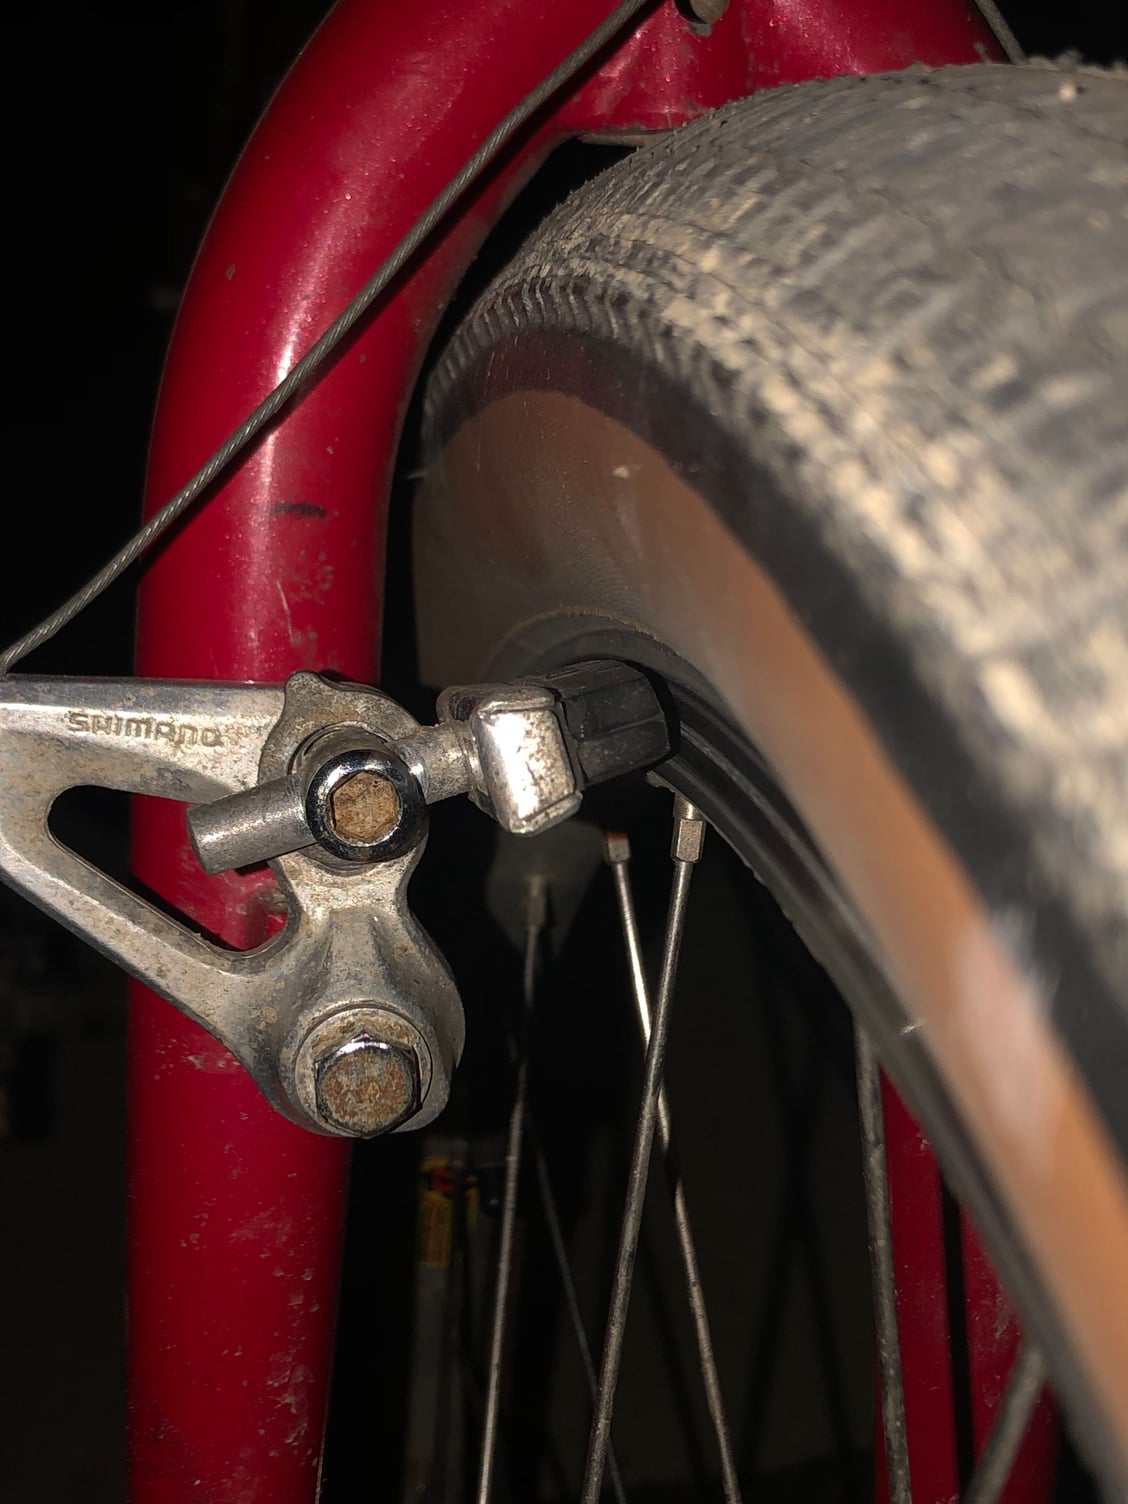
(seems to look worse in person).
But the real problem - note how close the tire is to the fork....ugh! No room for fenders, which are really pretty necessary at this time of year. Not sure if I can cut up the fender to make them work (and not sure if I want to, even if I can). These are things to consider when reraking. Good lesson to learn.
The end result is moving into the "low trail" camp, I think, with 41mm trail (from 65). The modification also gave me about 0.75* steeper HTA (from 70), and more front-center. Ten miles or so of test riding indicates much, much less wheel flop. I can air the tires way down and it isn't too noticeable, and when it is detectable, I probably don't want to be riding on such mushy tires anyway.
With respect to the overall low-trail, I'm not sure that I can detect any performance changes. I tried slow turns, up hill tracking, quick descents, etc, but I don't think I detect much difference in general, although it may be harder to ride no-handed at slow speeds. Seems about the same, and maybe a good way to get some more FC, and improve the aesthetics of the fork if the impact isn't detectable. Perhaps a less-shallow HTA would provide a different experience, as many people report different results wrt lower trail.
Anyway, a proper fork build is on my list, and bumped up in priority a bit.
I added 20mm to the rake (from 54mm), and it looks pretty good:
But, when I went to reinstall the wheel, I was a bit surprised by how far off the brakes were. The rim really moved up relative to the brakes, and the pads are at a bit of an unpleasant angle:
(seems to look worse in person).
But the real problem - note how close the tire is to the fork....ugh! No room for fenders, which are really pretty necessary at this time of year. Not sure if I can cut up the fender to make them work (and not sure if I want to, even if I can). These are things to consider when reraking. Good lesson to learn.
The end result is moving into the "low trail" camp, I think, with 41mm trail (from 65). The modification also gave me about 0.75* steeper HTA (from 70), and more front-center. Ten miles or so of test riding indicates much, much less wheel flop. I can air the tires way down and it isn't too noticeable, and when it is detectable, I probably don't want to be riding on such mushy tires anyway.
With respect to the overall low-trail, I'm not sure that I can detect any performance changes. I tried slow turns, up hill tracking, quick descents, etc, but I don't think I detect much difference in general, although it may be harder to ride no-handed at slow speeds. Seems about the same, and maybe a good way to get some more FC, and improve the aesthetics of the fork if the impact isn't detectable. Perhaps a less-shallow HTA would provide a different experience, as many people report different results wrt lower trail.
Anyway, a proper fork build is on my list, and bumped up in priority a bit.
Last edited by dschad; 02-25-24 at 07:13 PM.
Likes For dschad:
02-25-24, 07:28 PM
#43
blahblahblah chrome moly
Join Date: Apr 2009
Location: Seattle
Posts: 1,994
Mentioned: 92 Post(s)
Tagged: 0 Thread(s)
Quoted: 1181 Post(s)
Liked 2,576 Times
in
1,076 Posts
Pro tip, you can add offset without shortening the fork (much) if you bend the blades up top, near the steerer. Some shortening is unavoidable but adding curve down near the bottom results in the maximum possible amount of shortening.
Bending the blades forward near the crown may result in someone thinking it was an accident, so this is only for people who are confident enough to ignore the haters.
The amount of bend needed is usually too small to be noticeable though.
Mama's little baby loves shortnin', shortnin'...
Bending the blades forward near the crown may result in someone thinking it was an accident, so this is only for people who are confident enough to ignore the haters.
The amount of bend needed is usually too small to be noticeable though.
Mama's little baby loves shortnin', shortnin'...
Last edited by bulgie; 02-26-24 at 02:21 PM. Reason: URL
Likes For bulgie:
02-26-24, 07:09 AM
#44
Junior Member
Thread Starter
Pro tip, you can add offset without shortening the fork (much) if you bend the blades up top, near the steerer. Some shortening is unavoidable but adding curve down near the bottom results in the maximum possible amount of shortening.
Bending the blades forward near the crown may result in someone thinking it was an accident, so this is only for people who are confident enough to ignore the haters.
The amount of bend needed is usually too small to be noticeable though.
Mama's little baby loves shortnin', shortnin'...
Bending the blades forward near the crown may result in someone thinking it was an accident, so this is only for people who are confident enough to ignore the haters.
The amount of bend needed is usually too small to be noticeable though.
Mama's little baby loves shortnin', shortnin'...
So I played around with some CAD to illustrate your point (and prove it to myself, because I initially convinced myself that radius of bend shouldn't make a difference because the fork length was fixed (oh well!)):
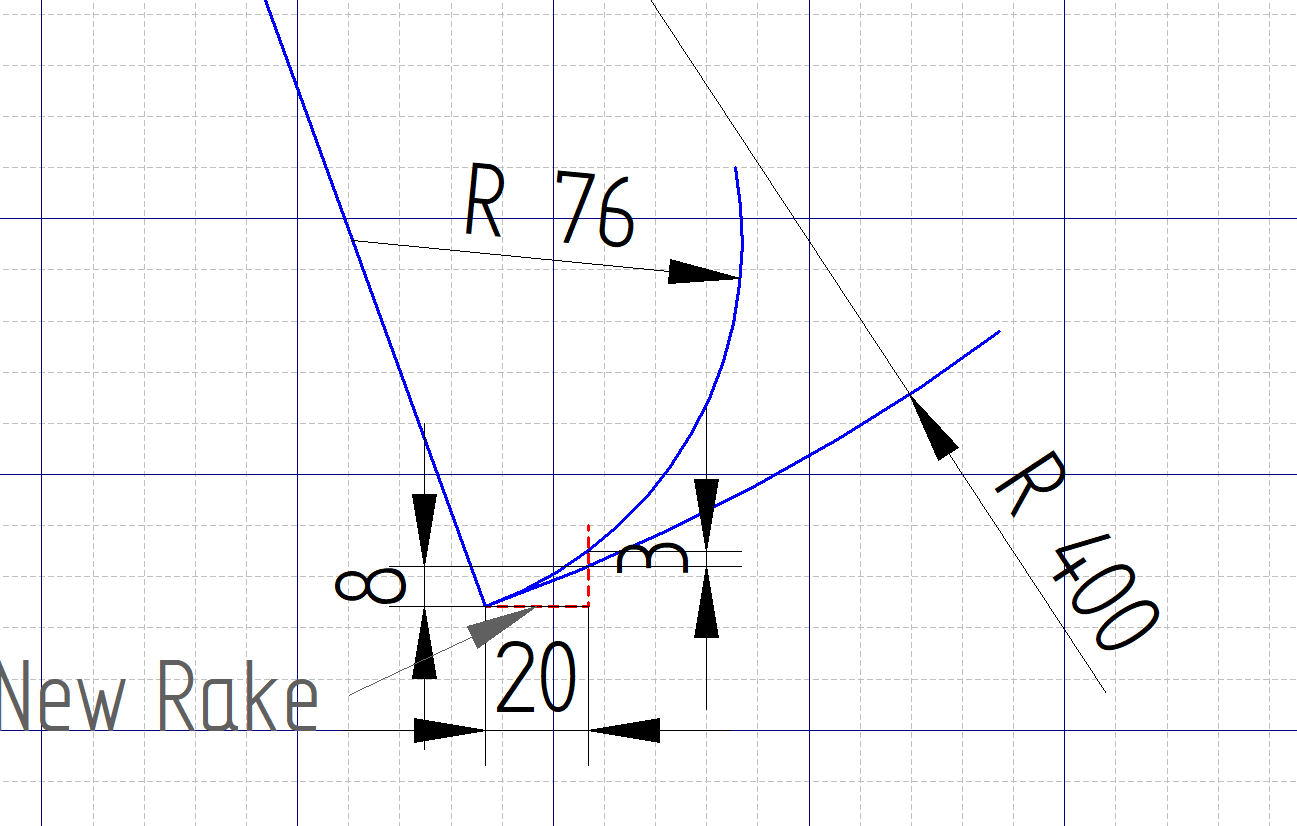
Two different radius bends (400mm, 76mm), with the tighter rising 40% more. My poking was probably more of a spiral (decreasing R), but 76 seems like a reasonable approximation.
[Note: your link above doesn't go anywhere, I'm interested to see what that might be].
