


First Filet Joint
 10-03-19, 11:57 AM
#1
Senior Member
Thread Starter
First Filet Joint
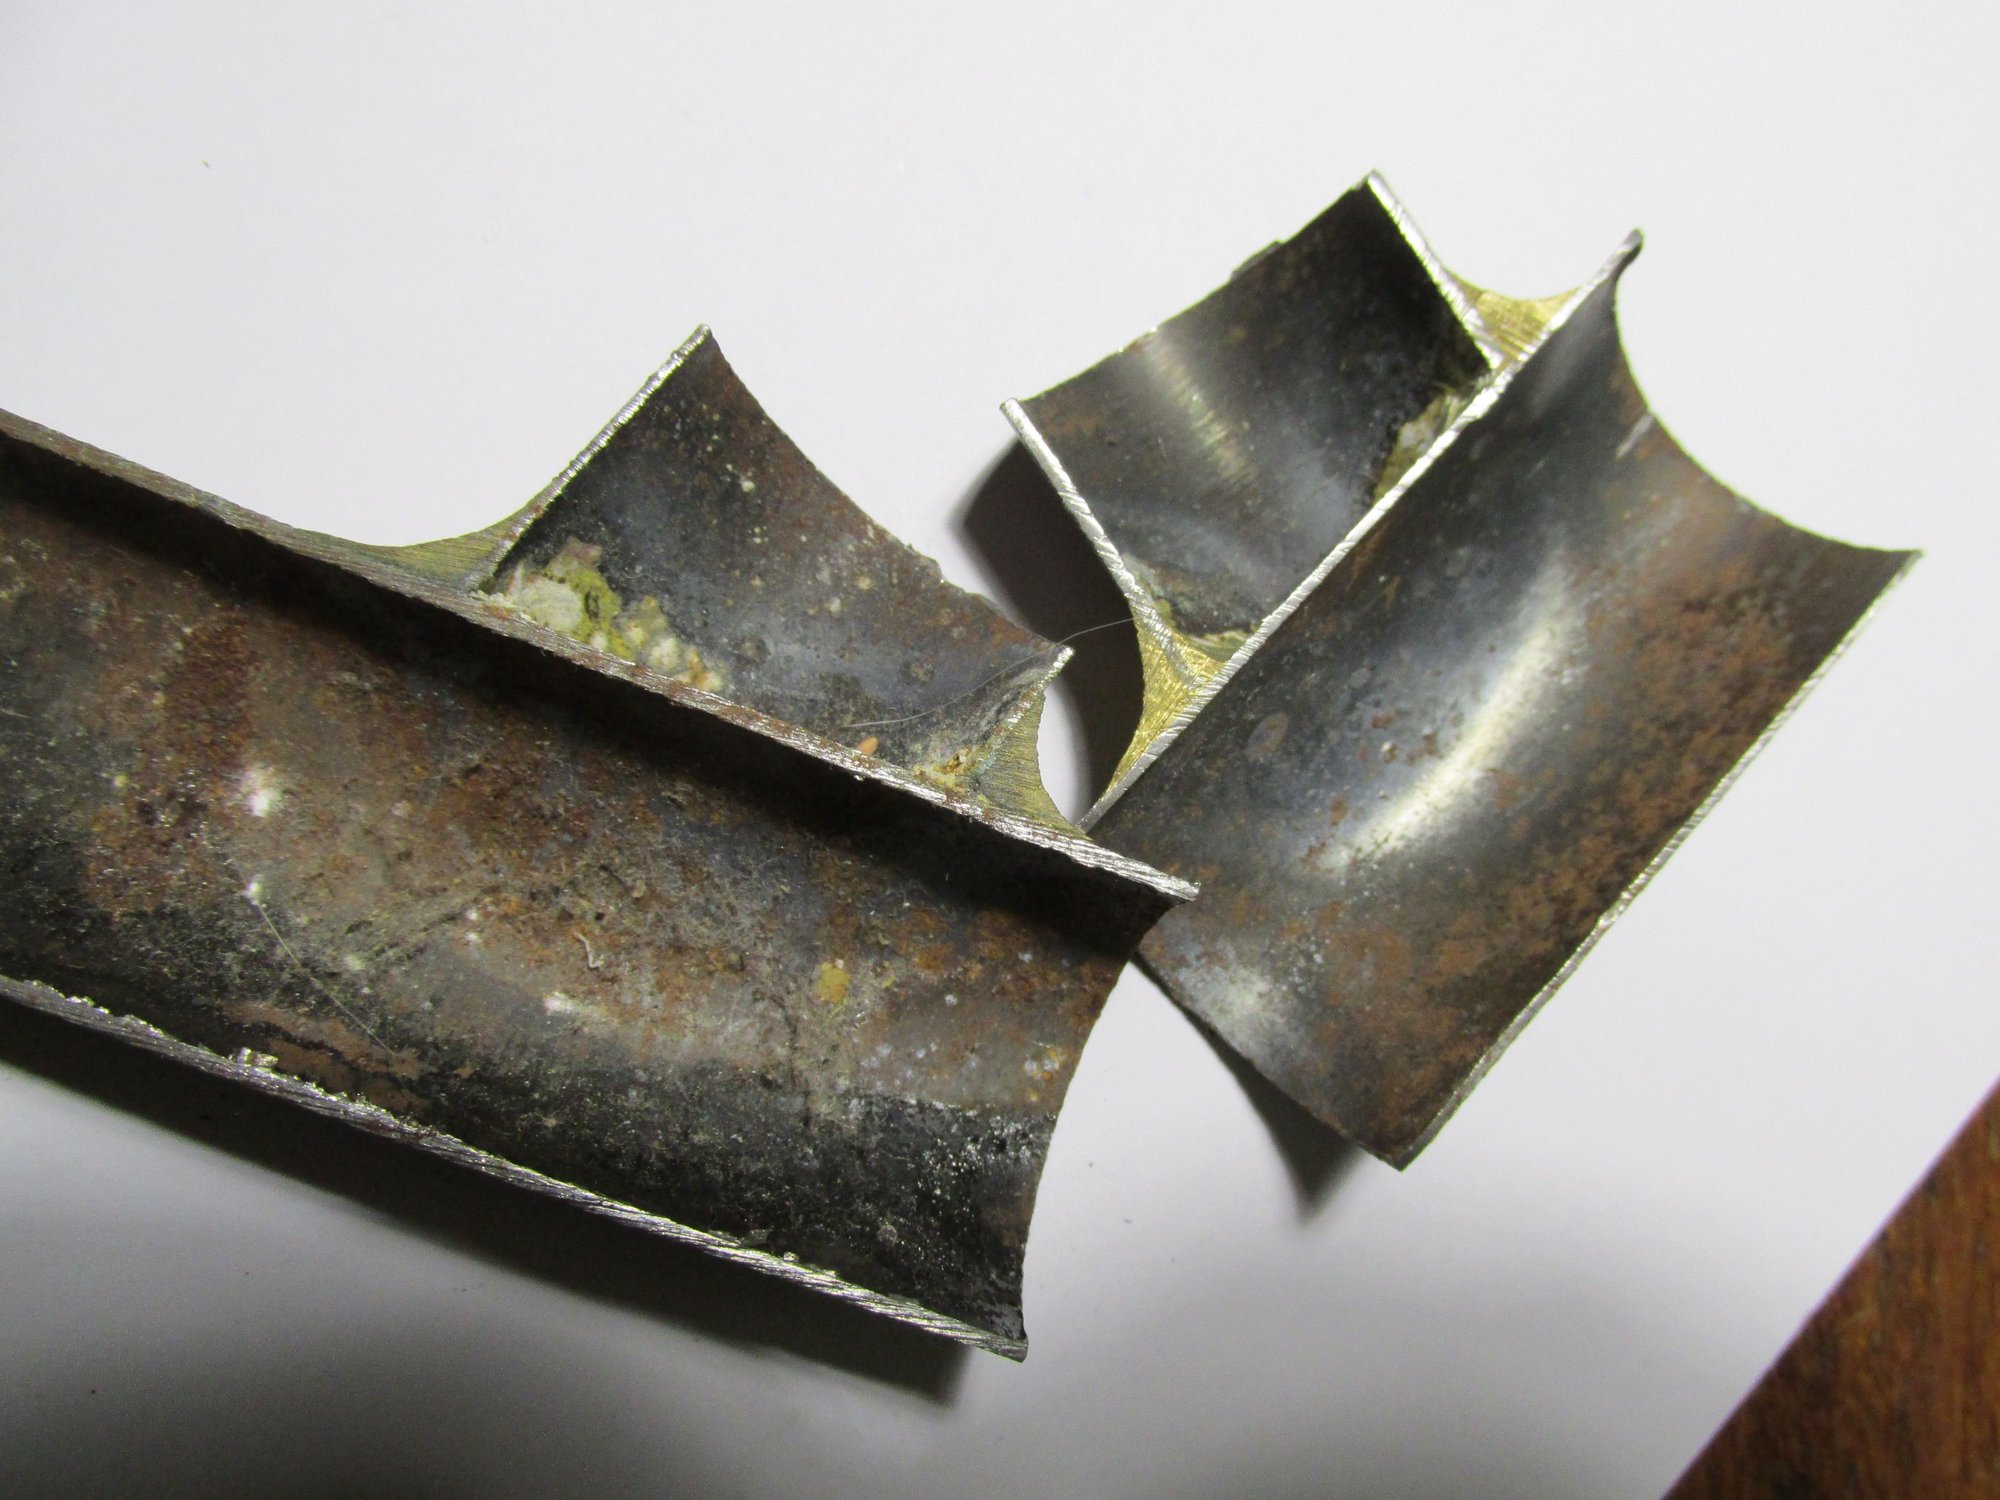
Today I practiced a fillet(corrected spelling!) joint with bronze. It was very difficult with heat control and I feared of overheating the tubes. Not sure how to know it is done correctly. Any ideas outside of cutting the joint?
Last edited by TiHabanero; 10-04-19 at 11:07 AM.
 10-03-19, 05:14 PM
#2


Randomhead
Join Date: Aug 2008
Location: Happy Valley, Pennsylvania
Posts: 24,392
Mentioned: 0 Post(s)
Tagged: 0 Thread(s)
Quoted: 4 Post(s)
Liked 3,693 Times
in
2,515 Posts
so your first shot at this was on a frame? Can you see if there is any internal fillet?
10-03-19, 05:39 PM
#3

Senior Member
Join Date: Feb 2012
Location: Rochester, NY
Posts: 18,066
Bikes: Stewart S&S coupled sport tourer, Stewart Sunday light, Stewart Commuting, Stewart Touring, Co Motion Tandem, Stewart 3-Spd, Stewart Track, Fuji Finest, Mongoose Tomac ATB, GT Bravado ATB, JCP Folder, Stewart 650B ATB
Mentioned: 0 Post(s)
Tagged: 0 Thread(s)
Quoted: 4197 Post(s)
Liked 3,849 Times
in
2,300 Posts
For initial fillet practice I like to use what we consider the be thick walled tubes. .049-.058"
Did you try to build up the fillet in one step with the flowing into the tube contact surface? I mean did you insure tube to tube flow and then try the fillet of do both steps at the same time? I find doing separate steps to be easier to control. If you did two separate steps when was the heat control the worst? There are practice methods that can help get a handle on the fine line between liquid and clay filler.
I've done many practice joints using a length of tube and a number of short, mitered, stubs. Maybe 5 or more stubs get minimally tacked on the length. Then go back and complete one after the other. Initially each stub will have it's problems but after a few lengths (of stubs) you start to get some things righter. Important to practice is to sleep and repeat the sessions a day or two later, not a week or two later.
Can you post photos of the joint? You really do want to be able to cut a joint if the tubes are too long to sight down inside. But practice should be just that, not something you hope goes well enough to use. Andy
__________________
AndrewRStewart
AndrewRStewart
 10-04-19, 11:14 AM
#4
Senior Member
Thread Starter
My apologies for the misspelled "fillet". Got fishing on the mind I suppose. The fillet was not done exactly in steps. I lay down filler on one side of joint, went to other side of joint and lay some down, then went 90 degrees from that and lay some down and to the other side of the joint and did the same. Essentially 4 tacks on the joint at this point. Then I layed it in there between tacks. Very lumpy, and I did miss a spot, which got me thinking about penetration to the inside of the tube.
This morning I worked it again and it became a mess. At this point I will cut the joint to see what is inside. There is no doubt in my mind that this skill will be fun to develop and will take a long time! Hats off to those of you that have got it down.
This morning I worked it again and it became a mess. At this point I will cut the joint to see what is inside. There is no doubt in my mind that this skill will be fun to develop and will take a long time! Hats off to those of you that have got it down.
10-04-19, 03:27 PM
#5
Senior Member
Join Date: Feb 2012
Location: Rochester, NY
Posts: 18,066
Bikes: Stewart S&S coupled sport tourer, Stewart Sunday light, Stewart Commuting, Stewart Touring, Co Motion Tandem, Stewart 3-Spd, Stewart Track, Fuji Finest, Mongoose Tomac ATB, GT Bravado ATB, JCP Folder, Stewart 650B ATB
Mentioned: 0 Post(s)
Tagged: 0 Thread(s)
Quoted: 4197 Post(s)
Liked 3,849 Times
in
2,300 Posts
So it sounds like that after you placed 4 tacks you tried to do both the flowing and the fillet at the same time, in portions of the joint. Nothing wrong with this and if done well is as good as other sequences.
A few comments= I like as small tacks as reasonable. Actual filler/tack might not be more wide then 1/4" . Care to be taken on the sides as to not cook the mitered tube's thin wrapped around ends. I do like insuring the joint's root is flowed and will do this all around the joint, is steps to balance heat side to side before the fillet is added. For me it's one less thing to pay attention, doing either the root flow or the additional fillet later. When the fillet step is being done the flame it smaller and tighter to the surface to better only heat up the surface and not the depth of the joint. The flame's cone tip gets right on the surface but flicks off quickly to let the blob of added filler cool/solidify somewhat. Then back down and surface focused a little bit along the joint. The flame is pointed in the direction of the yet to be done fillet, offering some preheat and allowing finished fillet to cool more. The flame is aimed about 45* to 60* to the surface. For the fillet I try to run cooler then some would think is right. If the tube is getting red hot flick off and wait a few seconds. Remember the bronze will flow to the heat if still liquid, this is why so many end up with globes away from the joint. Rotating the joint frequently so that you are working horizontal of slightly down hill is preferred by many. Ideally the start of the "stack of dimes" is beginning.
I strongly suggest you spend a session in the shop with just preparing 10 to 20 practice pieces. Get the prep out of the way in batches so you can braze a batch or practice joints in one session. If nothing else you will get more proficient at mitering and such too. Andy
Starting with relatively thick walled tubes slows down the heat/cooking quickness and one can focus on the laying down of filler more. After a bunch of these going to a thinner walled practice lets you get use to the faster speed of heating with less problems maintaining filler placement.
__________________
AndrewRStewart
AndrewRStewart
10-04-19, 05:45 PM
#6
Senior Member
Thread Starter
Andy, there is no question in my mind why you are so well respected. You not only do, but analyze what has been done and piece it together for understanding. Doug Fattic is the same way. A master I will never be, as I just do what seems to make sense, and never look at it any other way. Thanks!
10-05-19, 07:25 AM
#7
Junior Member
Join Date: Nov 2015
Posts: 185
Mentioned: 0 Post(s)
Tagged: 0 Thread(s)
Quoted: 45 Post(s)
Likes: 0
Liked 44 Times
in
23 Posts
I fillet brazed my first frame and from somewhere ( I cannot remember where) I was advised to use a specific grade of brazing rod.
This rod was I believe 'low eutectoid', I cannot remember the exact terminology. The important property of this rod was that it turned from solid to liquid over a larger temperature range than normal braze and in this temperature window it was semi- runny and therefore easier to form into a fillet.
Maybe this is common knowledge and what everyone is using? I have done quite a bit of googling on fillet brazing recently and have not come across any mention of this type of braze material.
I bought some of this rod and with no instuction, just a few hints gleaned from I cannot remember where (pre-internet days) I found it pretty easy to do half decent fillets. Even the first one I ever did would have been OK. In fact I just did a couple of practice joints and then built the frame, below are my two practice joints.
I still have a load of the rod left over, if you need any more info on it I will have a dig around and see what I can find.
10-05-19, 08:22 AM
#8
Randomhead
Join Date: Aug 2008
Location: Happy Valley, Pennsylvania
Posts: 24,392
Mentioned: 0 Post(s)
Tagged: 0 Thread(s)
Quoted: 4 Post(s)
Liked 3,693 Times
in
2,515 Posts
those practice joints look good.
In the U.S., you can just buy LFB from Cycles Design, or Gasflux C-04 and it will work fine. I bought some LFB from the local welding supply and it was not great. I think it's mostly inconsistent metallurgy. And it's also filthy, but that can be fixed with some sandpaper.
In the U.S., you can just buy LFB from Cycles Design, or Gasflux C-04 and it will work fine. I bought some LFB from the local welding supply and it was not great. I think it's mostly inconsistent metallurgy. And it's also filthy, but that can be fixed with some sandpaper.
Likes For unterhausen:
10-06-19, 03:50 AM
#9
Senior Member
Join Date: Jan 2013
Location: South Jersey
Posts: 2,265
Mentioned: 18 Post(s)
Tagged: 0 Thread(s)
Quoted: 713 Post(s)
Liked 797 Times
in
474 Posts
When I was fillet brazing, I liked the Cycle Design rod with Gasflux Type B flux. I was not a fan of the Cycle Design flux. No matter where you source your filler material, you should always clean it before use with some scotch brite or sandpaper and a wipe down with acetone or alcohol.
10-06-19, 09:37 AM
#10
Senior Member
Join Date: Feb 2012
Location: Rochester, NY
Posts: 18,066
Bikes: Stewart S&S coupled sport tourer, Stewart Sunday light, Stewart Commuting, Stewart Touring, Co Motion Tandem, Stewart 3-Spd, Stewart Track, Fuji Finest, Mongoose Tomac ATB, GT Bravado ATB, JCP Folder, Stewart 650B ATB
Mentioned: 0 Post(s)
Tagged: 0 Thread(s)
Quoted: 4197 Post(s)
Liked 3,849 Times
in
2,300 Posts
My vote goes to Gasflux CO4 filler and their Type B flux. As long as you don't burn the flux it dissolves off in hot water. The flux is available in powder as well as paste (I sprinkle on powder when the paste is getting "weak"). While Henry James has carried the rods and paste flux I went directly to Gasflux for the powder. Andy
__________________
AndrewRStewart
AndrewRStewart
10-06-19, 10:19 AM
#11
framebuilder
Just to add a bit of detail to what Andy said, for fillet brazing practice materials I would use a 2 foot length of 1 �� as a foundation. For short stubs mitered to fit on the end of the long piece, I would get 1� OD tubing. This difference in size makes it easier to fillet around the ears of the miter. The long length allows you to constantly move it without burning your hands while you are brazing so the angles of the 2 walls of the tubing are always equidistant from straight up so the brass doesn�t flow away from the crease. .049� wall thickness is good to start with because as Andy says it slows down your reaction time but you will want to switch to lighter 035� and get that right before brazing a real frame. And probably you will want to use only a 1/8th inch OD difference between tubes to practice brazing around the ears � that is the most challenging part of the circle.
I�ll give a couple of other tips but remember that the way I pay my bills is by teaching short brazing and longer framebuilding classes so it isn�t smart for me to give away for free all my knowledge of how I make money. For example I�ve observed almost all rookies make similar beginning mistakes that interfere with their success. Knowing what they are and how to avoid them really speeds up their learning curve. How well someone does has a lot to do with his or her hand skills. The most talented catch on right away and the worst never do. For a normal person with proper instruction it should only take 2 or 3 practice joints to braze an acceptable fillet.
Fundamentally you are controlling the position of the melting brass with your flame by keeping its temperature between its liquid and solid state. Most experienced brazers do this by flicking the flame on and off the joint like flipping a light switch. The bronze has to be hot enough to wet out and flow into the inside of the tubes and begin to stack up. But it can�t be so hot it starts to run away from where you want it to stay.
Flicking the flame on and off is the way I fillet braze but it isn�t the only way. I had a student from England that had attended the Bicycle Academy in the UK. He took a few days to learn how we brazed fillet brazed transportation frames in our shop in Ukraine. He has dedicated himself to be as good a framebuilder as possible. He demonstrated to me how the Bicycle Academy found a way for beginners to get an acceptable result. He started with a very small tip that produced an almost tiny flame. Because this greatly slowed down the melting process it doesn�t demand great hand coordination to keep the brass in the putty state. Heat control is based on moving the joint rather than the flame when the right amount of brass has accumulated.
Learning to fillet braze is somewhat like learning to cross country ski. One can do an okay job early in the learning process but it can take lots of time with a torch to be really skilled.
10-06-19, 04:53 PM
#12
Randomhead
Join Date: Aug 2008
Location: Happy Valley, Pennsylvania
Posts: 24,392
Mentioned: 0 Post(s)
Tagged: 0 Thread(s)
Quoted: 4 Post(s)
Liked 3,693 Times
in
2,515 Posts
I've always wondered how to get dimes with fillet brazing, is it the small flame method? Might be fun occasionally, but I would rather have smooth fillets that don't require much in the way of filing. I particularly hate it when there is a lip at the edge of the fillet.
