


Seat post binder woe: powder coat content
 06-30-20, 02:03 AM
#1
Senior Member
Thread Starter

Join Date: Aug 2011
Location: NYC+NNJ
Posts: 1,302
Bikes: i don't have a bike. a few frames, forks and some parts. that's all
Mentioned: 6 Post(s)
Tagged: 0 Thread(s)
Quoted: 54 Post(s)
Liked 52 Times
in
33 Posts
Seat post binder woe: powder coat content
Masi 3V, with those infamous internal lugs. powder coated with metallic orange about a 5 years ago. finally having a chance to give it some love, found that the seatpost wouldn't get in. 27.2mm, it was 'smooth' in/out before repaint. did quick caliper-ing, freaked out to find out the seatpost binder ID now is like 26.9mm. WTH... then see it's inner wall opening—about 1/4" depth—has also nicely gotten powder coated. thanks to such a thorough masking job. (i mean, i should have caught it when i had gotten it back from the painter). uggggghhhhh.
did a quick google-ing, learnt the thickness of powder coating runs between 6mils to 12mils. aka thick AF. assuming it's 6mils = 0.15mm on both walls, so x 2 = 0.3mm. 27.2 - 0.3 = 26.9. makes sense. gonna be a good ol' fun of sanding. good news is that it's not the delicate tube part, just the opening of the thick lug. tellin' ya tho, sanding out powder coating is no joke...
not that i'm stuck seeking a solution or anything. just wanted to share. when you get your frame powder coated, make sure asking to mask all the holes & appropriate parts double well.
 06-30-20, 03:06 AM
#2
Senior Member
Pretty standard to use a flex-hone on seat tubes.
https://www.ebay.com/itm/Flex-Hone-1...QAAOSw7WBe4pRb
https://www.ebay.com/itm/Flex-Hone-1...QAAOSw7WBe4pRb
Likes For wesmamyke:

Likes For Mr. 66:
06-30-20, 07:54 AM
#4

www.theheadbadge.com

Join Date: Sep 2005
Location: Southern Florida
Posts: 28,510
Bikes: https://www.theheadbadge.com
Mentioned: 124 Post(s)
Tagged: 0 Thread(s)
Quoted: 2420 Post(s)
Liked 4,381 Times
in
2,090 Posts
Brake cylinder hone. You may have to bend it to fit.

If it's extremely bad, a reamer set to 27.1mm. From the looks of it though, that frame shouldn't require anything but that powder knocked off on the inside of the tube.
-Kurt
If it's extremely bad, a reamer set to 27.1mm. From the looks of it though, that frame shouldn't require anything but that powder knocked off on the inside of the tube.
-Kurt
__________________


Likes For cudak888:
06-30-20, 10:03 AM
#5
Senior Member
Join Date: Apr 2007
Location: Thunder Bay, Ontario, Canada - burrrrr!
Posts: 11,674
Bikes: 1958 Rabeneick 120D, 1968 Legnano Gran Premio, 196? Torpado Professional, 2000 Marinoni Piuma
Mentioned: 210 Post(s)
Tagged: 0 Thread(s)
Quoted: 1372 Post(s)
Likes: 0
Liked 1,749 Times
in
937 Posts
A bit of fine sand paper or emery cloth, used in small folded pieces and with finger insertion applied pressure, just rotate and rotate, checking frequently for result. Been there before, only with chrome plating. Anyway, were it me, I would stay away from chemicals.
__________________
"98% of the bikes I buy are projects".
"98% of the bikes I buy are projects".
Likes For randyjawa:
06-30-20, 10:11 AM
#6
SE Wis
Join Date: Apr 2005
Location: Milwaukee, WI
Posts: 10,503
Bikes: '68 Raleigh Sprite, '02 Raleigh C500, '84 Raleigh Gran Prix, '91 Trek 400, 2013 Novara Randonee, 1990 Trek 970
Mentioned: 40 Post(s)
Tagged: 0 Thread(s)
Quoted: 2743 Post(s)
Liked 3,390 Times
in
2,053 Posts
Split a dowel, insert emery cloth, chuck in drill to hack a hone. Stuff a rag down first to catch material.
Likes For dedhed:
06-30-20, 10:34 AM
#7
Senior Member
Thread Starter
Join Date: Aug 2011
Location: NYC+NNJ
Posts: 1,302
Bikes: i don't have a bike. a few frames, forks and some parts. that's all
Mentioned: 6 Post(s)
Tagged: 0 Thread(s)
Quoted: 54 Post(s)
Liked 52 Times
in
33 Posts
gonna start with acetone (brilliant!) first, then move to good ole' sanding, then pro'ly some hone or reamer hack. thanks for all the suggestions and insights.
06-30-20, 10:49 AM
#8
Senior Member
Thread Starter
Join Date: Aug 2011
Location: NYC+NNJ
Posts: 1,302
Bikes: i don't have a bike. a few frames, forks and some parts. that's all
Mentioned: 6 Post(s)
Tagged: 0 Thread(s)
Quoted: 54 Post(s)
Liked 52 Times
in
33 Posts
as much scary as it sounds, i had indeed a bit of suspicion that the binder part might have been pinched in a bit. in case, what's the best method to 'pry' the opening? tried to stick and twist a screw driver (carefully) in between the binder opening, didn't seem a right thing to do so i stopped. 1. not enough leverage 2. might well just leave a pitting with no result.
what's C&V standard of 'prying the opening' when necessarily?
i understand it's cast metal that i shouldn't mess with too much wedging or prying...
Last edited by orangeology; 06-30-20 at 10:52 AM.
06-30-20, 10:57 AM
#9

Senior Member
Join Date: Dec 2005
Posts: 17,146
Mentioned: 481 Post(s)
Tagged: 0 Thread(s)
Quoted: 3804 Post(s)
Liked 6,643 Times
in
2,602 Posts
I’d knock a hardwood wedge in gently to pry it open a bit.
Likes For nlerner:
06-30-20, 12:00 PM
#10
weapons-grade bolognium

Join Date: Dec 2008
Location: Across the street from Chicago
Posts: 6,344
Bikes: Battaglin Cromor, Ciocc Designer 84, Schwinn Superior 1981
Mentioned: 44 Post(s)
Tagged: 0 Thread(s)
Quoted: 985 Post(s)
Liked 2,376 Times
in
891 Posts
Flap sander with extension. Worked well for me when I had to remove corrosion. Go slow and measure frequently.
Likes For thinktubes:
Likes For thinktubes:
06-30-20, 12:18 PM
#12
Senior Member
I use a 1" wooden dowel rod wrapped in paper and over wrapped with sand paper to give a good fit - loose enough for easy sanding but tight enough to sand more than just a single stripe. This allows me to sand away internal burrs and excess paint without the risk of damaging the underlying tube.
I'm not a shop, so buying a hone just seems unwarranted for this application.
I'm not a shop, so buying a hone just seems unwarranted for this application.
06-30-20, 12:53 PM
#13
Senior Member

Join Date: May 2008
Location: Fredericksburg, Va
Posts: 9,579
Bikes: '65 Frejus TDF, '73 Bottecchia Giro d'Italia, '83 Colnago Superissimo, '84 Trek 610, '84 Trek 760, '88 Pinarello Veneto, '88 De Rosa Pro, '89 Pinarello Montello, '94 Burley Duet, 97 Specialized RockHopper, 2010 Langster, Tern Link D8
Mentioned: 73 Post(s)
Tagged: 0 Thread(s)
Quoted: 1607 Post(s)
Liked 2,214 Times
in
1,103 Posts
My standard way to pry open is to use a large flat screw driver from the inside to outside to ensure to engage the seat binder boss. Go gently. It may not even require a hammer, tap with the palm of you hand. A mandrel would be ideal but I don't have one. My expereince is that once it is spread, the clamping of the post will round it out enough. The material is pretty soft so go easy, after all, it has to be flexible to form and hold the post.
__________________
Bikes don't stand alone. They are two tired.
Bikes don't stand alone. They are two tired.
Likes For SJX426:
06-30-20, 01:05 PM
#14
Bike Butcher of Portland

Join Date: Jul 2014
Location: Portland, OR
Posts: 11,631
Bikes: It's complicated.
Mentioned: 1299 Post(s)
Tagged: 0 Thread(s)
Quoted: 4678 Post(s)
Liked 5,790 Times
in
2,279 Posts
If the seatpost fit fine prior to powder coating do not use a screwdriver, or anything else to pry open the slot. It was fine before, remove the powder coat, it should slip right back in. If it didn't, then somewhere along the way it got pinched - but don't assume that!
Several appropriate methods of removing powder coat from the inside of the tube have been shown. I'd avoid acetone or other chemicals as it will be difficult to make sure it doesn't get on the outside finish.
If you have to ask a powder coater to mask a seatpost, you've got the wrong powder coater. Find someone who knows how to powder coat a bike.
__________________
If someone tells you that you have enough bicycles and you don't need any more, stop talking to them. You don't need that kind of negativity in your life.
If someone tells you that you have enough bicycles and you don't need any more, stop talking to them. You don't need that kind of negativity in your life.
Likes For gugie:
06-30-20, 02:15 PM
#15
Senior Member

Join Date: Jun 2010
Location: Medford MA
Posts: 2,089
Bikes: Ron Cooper touring, 1959 Jack Taylor 650b ladyback touring tandem, Vitus 979, Joe Bell painted Claud Butler Dalesman, Colin Laing curved tube tandem, heavily-Dilberted 1982 Trek 6xx, Ren� Herse tandem
Mentioned: 80 Post(s)
Tagged: 0 Thread(s)
Quoted: 964 Post(s)
Liked 1,451 Times
in
723 Posts
I think I spent $30 on my beat-up Chadwick adjustable reamer.
I do not regret it one bit, and it is a joy to use. You might feel the same if you ever have to fix a seat tube more than once!
As for prying, it is possibly appropriate when the seat binder ears seem like they have been smushed together (you can often see this if the binder bolt is bent or if the ears are visibly deformed). If the binder ears are brazed on or cast as part of the lug, as yours appear to be, often you can put a rod or long bolt through them to pry on them and to check if they're parallel. Having an old seatpost to use as a mandrel certainly helps. For stamped lug ears, it's not so easy and often the best course of action is to leave things alone.
__________________
Owner & co-founder, Cycles Ren� Hubris. Unfortunately attaching questionable braze-ons to perfectly good frames since about 2015. With style.
Owner & co-founder, Cycles Ren� Hubris. Unfortunately attaching questionable braze-ons to perfectly good frames since about 2015. With style.
Last edited by scarlson; 06-30-20 at 02:20 PM.
06-30-20, 02:41 PM
#16
www.theheadbadge.com
Join Date: Sep 2005
Location: Southern Florida
Posts: 28,510
Bikes: https://www.theheadbadge.com
Mentioned: 124 Post(s)
Tagged: 0 Thread(s)
Quoted: 2420 Post(s)
Liked 4,381 Times
in
2,090 Posts
No prying. It worked perfectly before the paint was there. That's how to improperly compensate for the paint thickness.
No chemicals. You're risking lifting the paint at the corners, because you've got to get up to the absolute edge for your seatpost to insert correctly. That's why the hones and sandpaper ideas make sense. Otherwise, you'll risk chipping the paint at the edge or causing it to peel. And if it was urethane and not PC, acetone might not even get the paint off...
-Kurt
__________________
Likes For cudak888:
06-30-20, 03:03 PM
#17
Senior Member
Thread Starter
Join Date: Aug 2011
Location: NYC+NNJ
Posts: 1,302
Bikes: i don't have a bike. a few frames, forks and some parts. that's all
Mentioned: 6 Post(s)
Tagged: 0 Thread(s)
Quoted: 54 Post(s)
Liked 52 Times
in
33 Posts
thanks for all the inputs, folks.
will try to remove the coat first, then will see if prying is needed (hope not). happy tinkering!
will try to remove the coat first, then will see if prying is needed (hope not). happy tinkering!
06-30-20, 05:06 PM
#18
small ring

Join Date: Jul 2012
Location: PNW
Posts: 1,024
Mentioned: 24 Post(s)
Tagged: 0 Thread(s)
Quoted: 437 Post(s)
Liked 925 Times
in
370 Posts
reverse pliers, but don't release your inner gorilla

__________________
59 Allegro Special -- 72 Bob Jackson -- 74 Motobecane Grand Jubile -- 74 Sekine SHS 271 -- 80 Nishiki International
85 Shogun 800 -- 86 Tommasini Super Prestige -- 92 Specialized Rockhopper -- 17 Colnago Arabesque
59 Allegro Special -- 72 Bob Jackson -- 74 Motobecane Grand Jubile -- 74 Sekine SHS 271 -- 80 Nishiki International
85 Shogun 800 -- 86 Tommasini Super Prestige -- 92 Specialized Rockhopper -- 17 Colnago Arabesque
Likes For droppedandlost:
06-30-20, 05:39 PM
#19
Senior Member
Join Date: May 2008
Location: Fredericksburg, Va
Posts: 9,579
Bikes: '65 Frejus TDF, '73 Bottecchia Giro d'Italia, '83 Colnago Superissimo, '84 Trek 610, '84 Trek 760, '88 Pinarello Veneto, '88 De Rosa Pro, '89 Pinarello Montello, '94 Burley Duet, 97 Specialized RockHopper, 2010 Langster, Tern Link D8
Mentioned: 73 Post(s)
Tagged: 0 Thread(s)
Quoted: 1607 Post(s)
Liked 2,214 Times
in
1,103 Posts
I actually agree with not spreading it until you validate that it won't go in. Work hardening is not a preferred outcome in this case.
Srorta related. I had a stuck seat post. Thought if I spread the ears out it would help. it didn't.
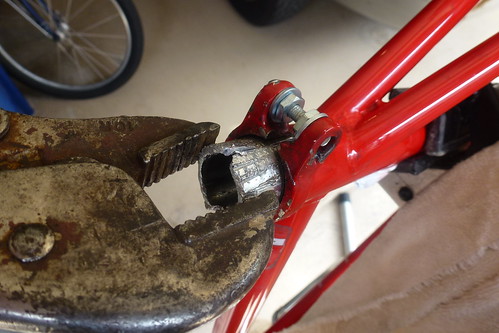 P1030267, on Flickr
Srorta related. I had a stuck seat post. Thought if I spread the ears out it would help. it didn't.
P1030267, on Flickr
__________________
Bikes don't stand alone. They are two tired.
Bikes don't stand alone. They are two tired.
Likes For SJX426:
06-30-20, 06:57 PM
#20
www.theheadbadge.com
Join Date: Sep 2005
Location: Southern Florida
Posts: 28,510
Bikes: https://www.theheadbadge.com
Mentioned: 124 Post(s)
Tagged: 0 Thread(s)
Quoted: 2420 Post(s)
Liked 4,381 Times
in
2,090 Posts
That alone proves the frame is in spec and no spreading is necessary at all. The paint is the problem.
-Kurt
__________________
Likes For cudak888:
 07-01-20, 07:39 PM
#22
Banned.

Join Date: Jul 2009
Location: PAZ
Posts: 12,294
Mentioned: 255 Post(s)
Tagged: 0 Thread(s)
Quoted: 2588 Post(s)
Liked 4,824 Times
in
1,709 Posts
Nothing to add but a question: have you tried to insert a binder bolt into the ears yet? I wonder if the PC has affected the installation of a properly-sized bolt as well.
DD
DD

Likes For Drillium Dude:
07-01-20, 07:43 PM
#23
www.theheadbadge.com
Join Date: Sep 2005
Location: Southern Florida
Posts: 28,510
Bikes: https://www.theheadbadge.com
Mentioned: 124 Post(s)
Tagged: 0 Thread(s)
Quoted: 2420 Post(s)
Liked 4,381 Times
in
2,090 Posts
-Kurt
__________________
Likes For cudak888:
07-01-20, 08:48 PM
#24
Senior Member
Thread Starter
Join Date: Aug 2011
Location: NYC+NNJ
Posts: 1,302
Bikes: i don't have a bike. a few frames, forks and some parts. that's all
Mentioned: 6 Post(s)
Tagged: 0 Thread(s)
Quoted: 54 Post(s)
Liked 52 Times
in
33 Posts
can't speak for the fork, i never had the fork for this frame—another reason why it took so long to resume the project. some story behind: had bought the frame from Ser Thrifty Bill, almost free with shipping due to the original frame 1. collision wrinkle on top & down tube 2. no fork. figured it was one of the last production of Masi 3V in their Cali shop, from the serial numbers and the markings. rode a bit after building it a SS, using some parts in the bins, really really liked it. wanted to give some 'proper' life, so i sent it to Franklin Frame OH. tremendous job he did—i had posted some photos back then somewhere here—replacing top & down tube with Deda Acciai Oversized. i also asked him to braze on cable stops instead of down tube shifter bosses, planning to do some modern build with thumb shifters.
original frame color was orange/black, so had it poweder coated with metallic orange at a local indi shop found on CL. been hunting the fork, was impossible to source the panto'd Masi original. now i have 2 forks incoming 1. a full chrome that i found on BST here last wk, 2. a chrome/orange aero Columbus tubing i found on an Austiran site. gonna have to see which one works better.

Last edited by orangeology; 07-01-20 at 08:59 PM.
