


'71 Raleigh International Garage Sale Find
 02-08-20, 02:05 PM
#76

Total Scrounge
Thread Starter
Join Date: Nov 2019
Location: Portland, Oregon
Posts: 884
Bikes: 71 International 72 Super Course 83 Gap
Mentioned: 15 Post(s)
Tagged: 0 Thread(s)
Quoted: 327 Post(s)
Liked 924 Times
in
310 Posts
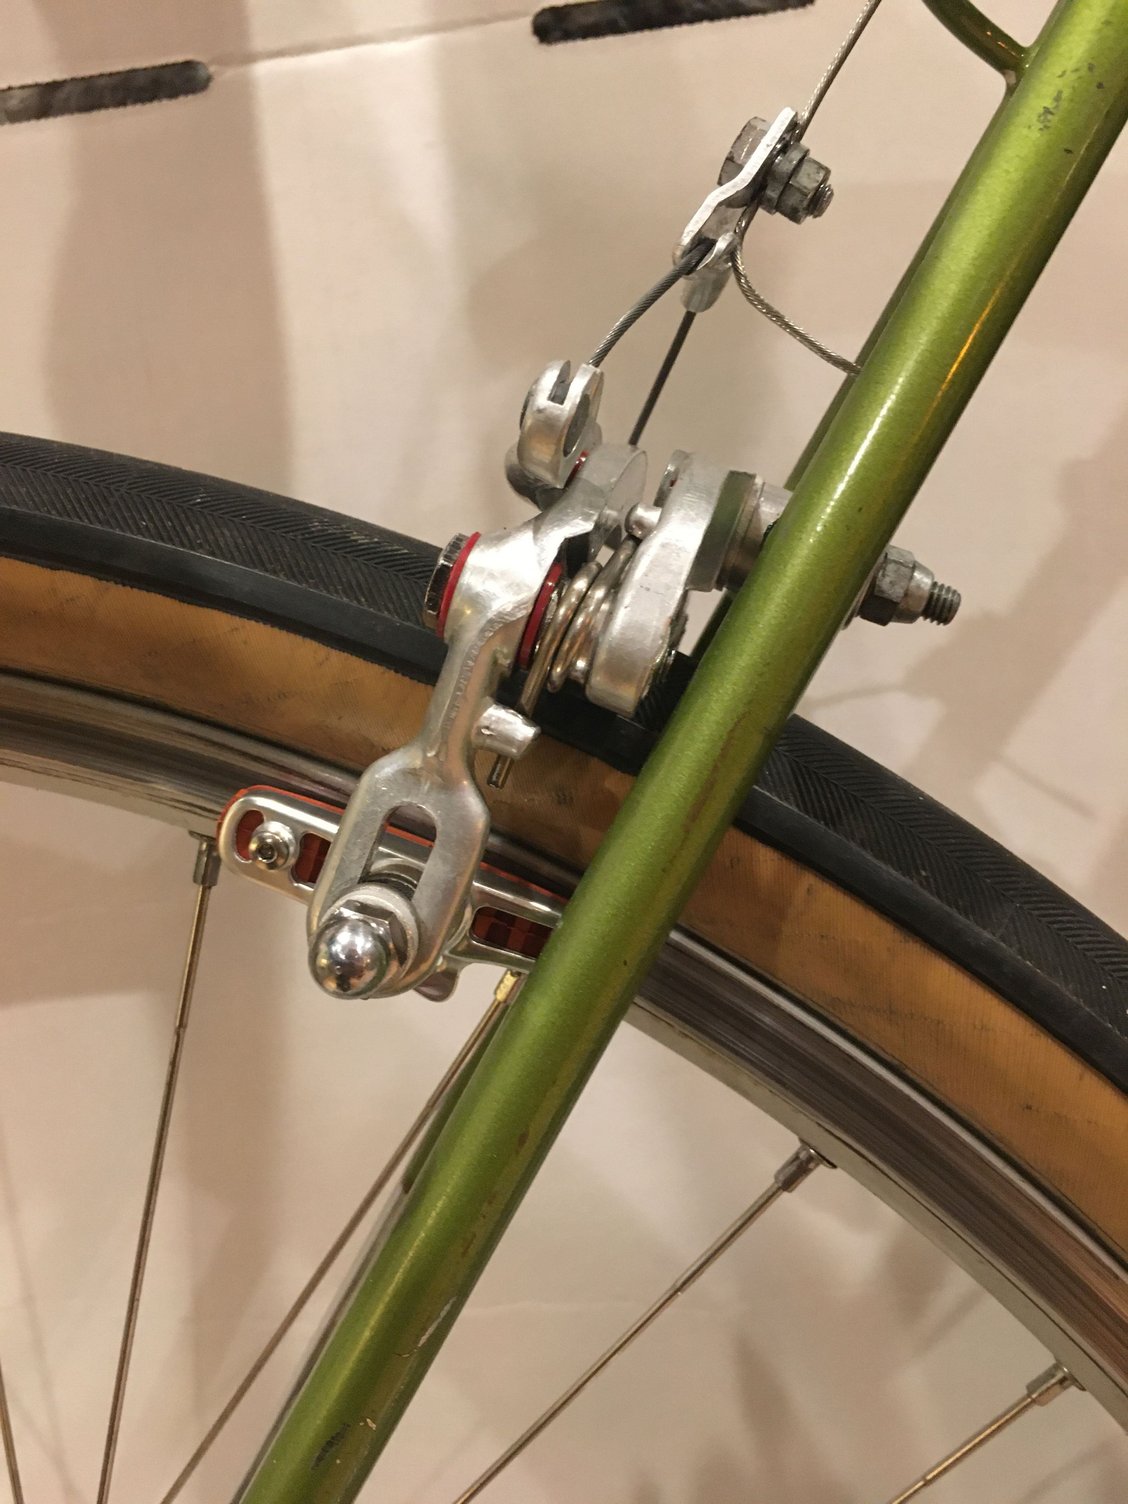
Better, but you are cheating. the dimension on the last image shows a pad/holder with much more dimension from the inside of the caliper arm to the rim.
Of course the caliper will look better when the pads are in contact with the rim.
The pads in the first image with black pads are upside down.
Of course the caliper will look better when the pads are in contact with the rim.
The pads in the first image with black pads are upside down.
So, just curious, what would be an example of not cheating in this situation?
 02-08-20, 02:39 PM
#77
Total Scrounge
Thread Starter
Join Date: Nov 2019
Location: Portland, Oregon
Posts: 884
Bikes: 71 International 72 Super Course 83 Gap
Mentioned: 15 Post(s)
Tagged: 0 Thread(s)
Quoted: 327 Post(s)
Liked 924 Times
in
310 Posts
Modern pads don't work too well with the weinmann 750 brakes, the brake bridge being so high on this era Raleigh certainly makes things worse. My alignment issues on my 72' Super Course are not as bad as yours, but I do wish the pads were a 1/4" thicker to keep the arms of the brake parallel when the brake is not engaged. The Jagwire holders make the brake geometry look correct!
02-08-20, 02:48 PM
#78
Senior Member
Join Date: Jun 2019
Location: Portland Oregon
Posts: 996
Mentioned: 7 Post(s)
Tagged: 0 Thread(s)
Quoted: 457 Post(s)
Liked 462 Times
in
270 Posts
I put 200 miles on mine with the ROCK hard original pads from 1972, so now that I have modern new pads on the brakes with fresh cables and housings I'm sure the brakes will work sooo much better!
 02-08-20, 06:50 PM
#80
Total Scrounge
Thread Starter
Join Date: Nov 2019
Location: Portland, Oregon
Posts: 884
Bikes: 71 International 72 Super Course 83 Gap
Mentioned: 15 Post(s)
Tagged: 0 Thread(s)
Quoted: 327 Post(s)
Liked 924 Times
in
310 Posts
I kid, I kid. They slipped back that way one day when I was working on it, and it made me chuckle. I hadn�t seen that in years!
Here she is, all cleaned up. The street is dry, so I try.


Here she is, all cleaned up. The street is dry, so I try.
02-08-20, 06:57 PM
#81
Senior Member
Join Date: Jun 2019
Location: Portland Oregon
Posts: 996
Mentioned: 7 Post(s)
Tagged: 0 Thread(s)
Quoted: 457 Post(s)
Liked 462 Times
in
270 Posts
I had the same kink in the rear derailleur cable at the cable stop on the top of the chain stay, I hated the look of it, and it can't make the bike shift better, so I used a small zip tie to hold it to the chain stay,

02-08-20, 07:08 PM
#82
Senior Member
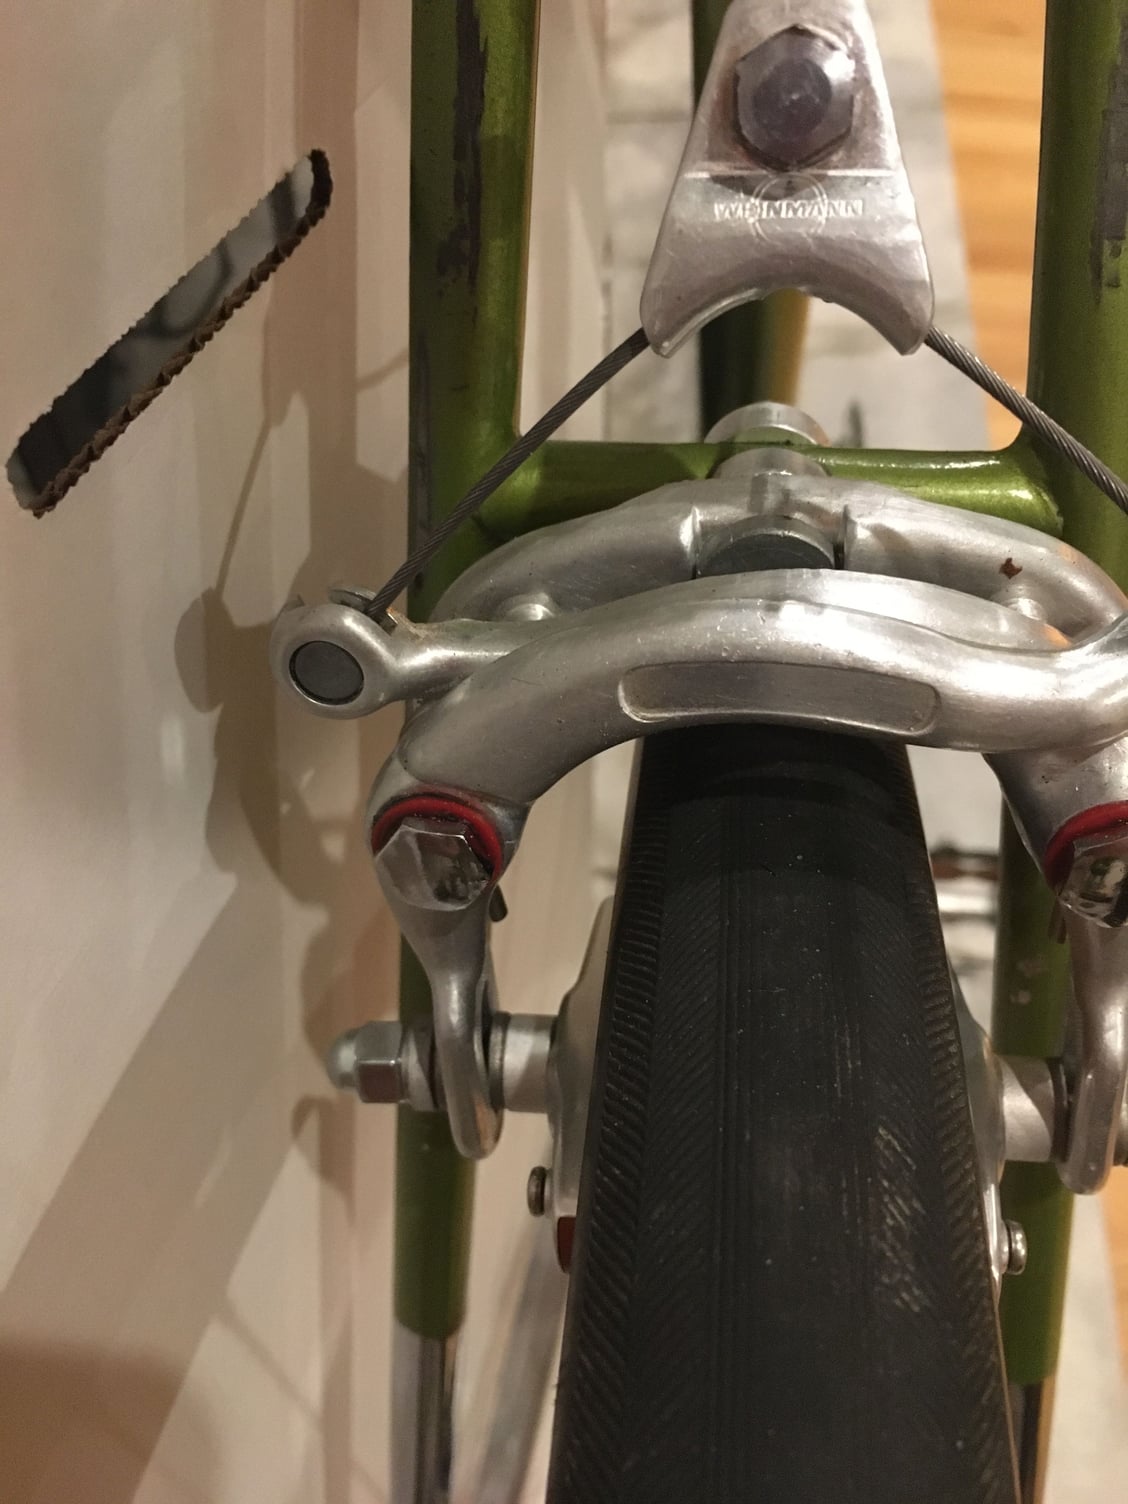
I think those brakes are 610 front and rear. Maybe I'm wrong, but that's what they look like. I think 750s would work with Koolstop inserts or Continentals.
edit: I think the 610s stop better than the 750s, but either will stop you if you have some good pads. Maybe the MAFACS are better, but the Weinmann center pulls are pretty effective.

edit: I think the 610s stop better than the 750s, but either will stop you if you have some good pads. Maybe the MAFACS are better, but the Weinmann center pulls are pretty effective.
Likes For desconhecido:
02-08-20, 07:19 PM
#83
Senior Member
Join Date: Jun 2019
Location: Portland Oregon
Posts: 996
Mentioned: 7 Post(s)
Tagged: 0 Thread(s)
Quoted: 457 Post(s)
Liked 462 Times
in
270 Posts
Now that you posted pics of the 610 and the 750 it looks like the rear is a 610 and the front is a 750, which I think was fairly common back then?
02-08-20, 07:39 PM
#84

Senior Member
Join Date: Jun 2006
Posts: 20,305
Mentioned: 130 Post(s)
Tagged: 0 Thread(s)
Quoted: 3464 Post(s)
Liked 2,829 Times
in
1,995 Posts
I jest a bit, the old Weinmann pads were quite deep. The Modern "orbital" adjustment pads and holder combo are a better way, provide for good brake geometry.
I have to go and look at my '71 International, Raleigh did modify things. Rear brake on my bike has a reach of 60 mm and uses the shorter reach caliper, stock Weinmann tubular rims of 21mm wide, they were known to be wide compared to many others.
02-08-20, 07:51 PM
#85
Total Scrounge
Thread Starter
Join Date: Nov 2019
Location: Portland, Oregon
Posts: 884
Bikes: 71 International 72 Super Course 83 Gap
Mentioned: 15 Post(s)
Tagged: 0 Thread(s)
Quoted: 327 Post(s)
Liked 924 Times
in
310 Posts
I think those brakes are 610 front and rear. Maybe I'm wrong, but that's what they look like. I think 750s would work with Koolstop inserts or Continentals.
edit: I think the 610s stop better than the 750s, but either will stop you if you have some good pads. Maybe the MAFACS are better, but the Weinmann center pulls are pretty effective.
edit: I think the 610s stop better than the 750s, but either will stop you if you have some good pads. Maybe the MAFACS are better, but the Weinmann center pulls are pretty effective.
The rear brake tightened the first time I rode it, which I thought was odd. I realized that the pads had enough grip to rotate the brake on the bridge, effectively tightening the cable. Is it possible for these to have more grip than they were designed for?
 02-08-20, 08:05 PM
#86
Senior Member

Join Date: Oct 2012
Location: Berkeley CA
Posts: 2,536
Bikes: 1981 Ron Cooper, 1974 Cinelli Speciale Corsa, 2000 Gary Fisher Sugar 1, 1986 Miyata 710, 1982 Raleigh "International"
Mentioned: 97 Post(s)
Tagged: 0 Thread(s)
Quoted: 930 Post(s)
Liked 1,291 Times
in
487 Posts
Yes, I think 610�s. They�re the same front and rear, and both stickers were gone, but I think they have the shorter arms. They�re pretty strong, in my opinion.
The rear brake tightened the first time I rode it, which I thought was odd. I realized that the pads had enough grip to rotate the brake on the bridge, effectively tightening the cable. Is it possible for these to have more grip than they were designed for?
The rear brake tightened the first time I rode it, which I thought was odd. I realized that the pads had enough grip to rotate the brake on the bridge, effectively tightening the cable. Is it possible for these to have more grip than they were designed for?
02-08-20, 08:21 PM
#87
Total Scrounge
Thread Starter
Join Date: Nov 2019
Location: Portland, Oregon
Posts: 884
Bikes: 71 International 72 Super Course 83 Gap
Mentioned: 15 Post(s)
Tagged: 0 Thread(s)
Quoted: 327 Post(s)
Liked 924 Times
in
310 Posts
No, I don't think so. More likely the mounting bolt isn't tightened down far enough. It also looks like you may be missing one of the spacers with a curved cutout in it to fit around the brake bridge (I believe there should be one both on the front and back of the brake bridge and it looks like you only have the one on the back). That would reduce the clamping force of the bolt. Also, the brake holders you have appear to be too long. Don't they collide with the rear stay?

 02-08-20, 10:41 PM
#88
Senior Member
If there's any doubt about whether they are 610 or 750, the number is marked on the back side of each caliper arm. I've recently been messing with a French frame that seems to be right at the top limit of the 750s and bottom limit of the 610s. Neither brake, in my opinion, is easy to set up near the limit of it's reach. What I have found to be useful for adjusting toe and pad angle is to use small bits of solid copper wire as shims. Peen the wire and it gets pretty thin and when you get a piece that's about the proper thickness to give you the adjustment you want, you can easily break off the wire as the peening makes it quite brittle. Unless you're looking for it, it's not easy to see and you won't break your arms doing it.
02-08-20, 10:54 PM
#89
Senior Member
Join Date: Jun 2006
Posts: 20,305
Mentioned: 130 Post(s)
Tagged: 0 Thread(s)
Quoted: 3464 Post(s)
Liked 2,829 Times
in
1,995 Posts
No, I don't think so. More likely the mounting bolt isn't tightened down far enough. It also looks like you may be missing one of the spacers with a curved cutout in it to fit around the brake bridge (I believe there should be one both on the front and back of the brake bridge and it looks like you only have the one on the back). That would reduce the clamping force of the bolt. Also, the brake holders you have appear to be too long. Don't they collide with the rear stay?
too big as well. I went to the hobby store and purchased some aluminum tubing to act as a shim, extended it back and into the curved washer - increased the bore of it to match and tightened it up. Poor mfg choice by Raleigh/ Carlton.
Likes For repechage:
02-09-20, 10:22 AM
#90
Total Scrounge
Thread Starter
Join Date: Nov 2019
Location: Portland, Oregon
Posts: 884
Bikes: 71 International 72 Super Course 83 Gap
Mentioned: 15 Post(s)
Tagged: 0 Thread(s)
Quoted: 327 Post(s)
Liked 924 Times
in
310 Posts
the bridge hole on my International is... sloppy
too big as well. I went to the hobby store and purchased some aluminum tubing to act as a shim, extended it back and into the curved washer - increased the bore of it to match and tightened it up. Poor mfg choice by Raleigh/ Carlton.
too big as well. I went to the hobby store and purchased some aluminum tubing to act as a shim, extended it back and into the curved washer - increased the bore of it to match and tightened it up. Poor mfg choice by Raleigh/ Carlton.
Likes For JacobLee:
02-09-20, 10:32 AM
#91
Total Scrounge
Thread Starter
Join Date: Nov 2019
Location: Portland, Oregon
Posts: 884
Bikes: 71 International 72 Super Course 83 Gap
Mentioned: 15 Post(s)
Tagged: 0 Thread(s)
Quoted: 327 Post(s)
Liked 924 Times
in
310 Posts
If there's any doubt about whether they are 610 or 750, the number is marked on the back side of each caliper arm. I've recently been messing with a French frame that seems to be right at the top limit of the 750s and bottom limit of the 610s. Neither brake, in my opinion, is easy to set up near the limit of it's reach. What I have found to be useful for adjusting toe and pad angle is to use small bits of solid copper wire as shims. Peen the wire and it gets pretty thin and when you get a piece that's about the proper thickness to give you the adjustment you want, you can easily break off the wire as the peening makes it quite brittle. Unless you're looking for it, it's not easy to see and you won't break your arms doing it.
02-09-20, 12:50 PM
#92
Total Scrounge
Thread Starter
Join Date: Nov 2019
Location: Portland, Oregon
Posts: 884
Bikes: 71 International 72 Super Course 83 Gap
Mentioned: 15 Post(s)
Tagged: 0 Thread(s)
Quoted: 327 Post(s)
Liked 924 Times
in
310 Posts
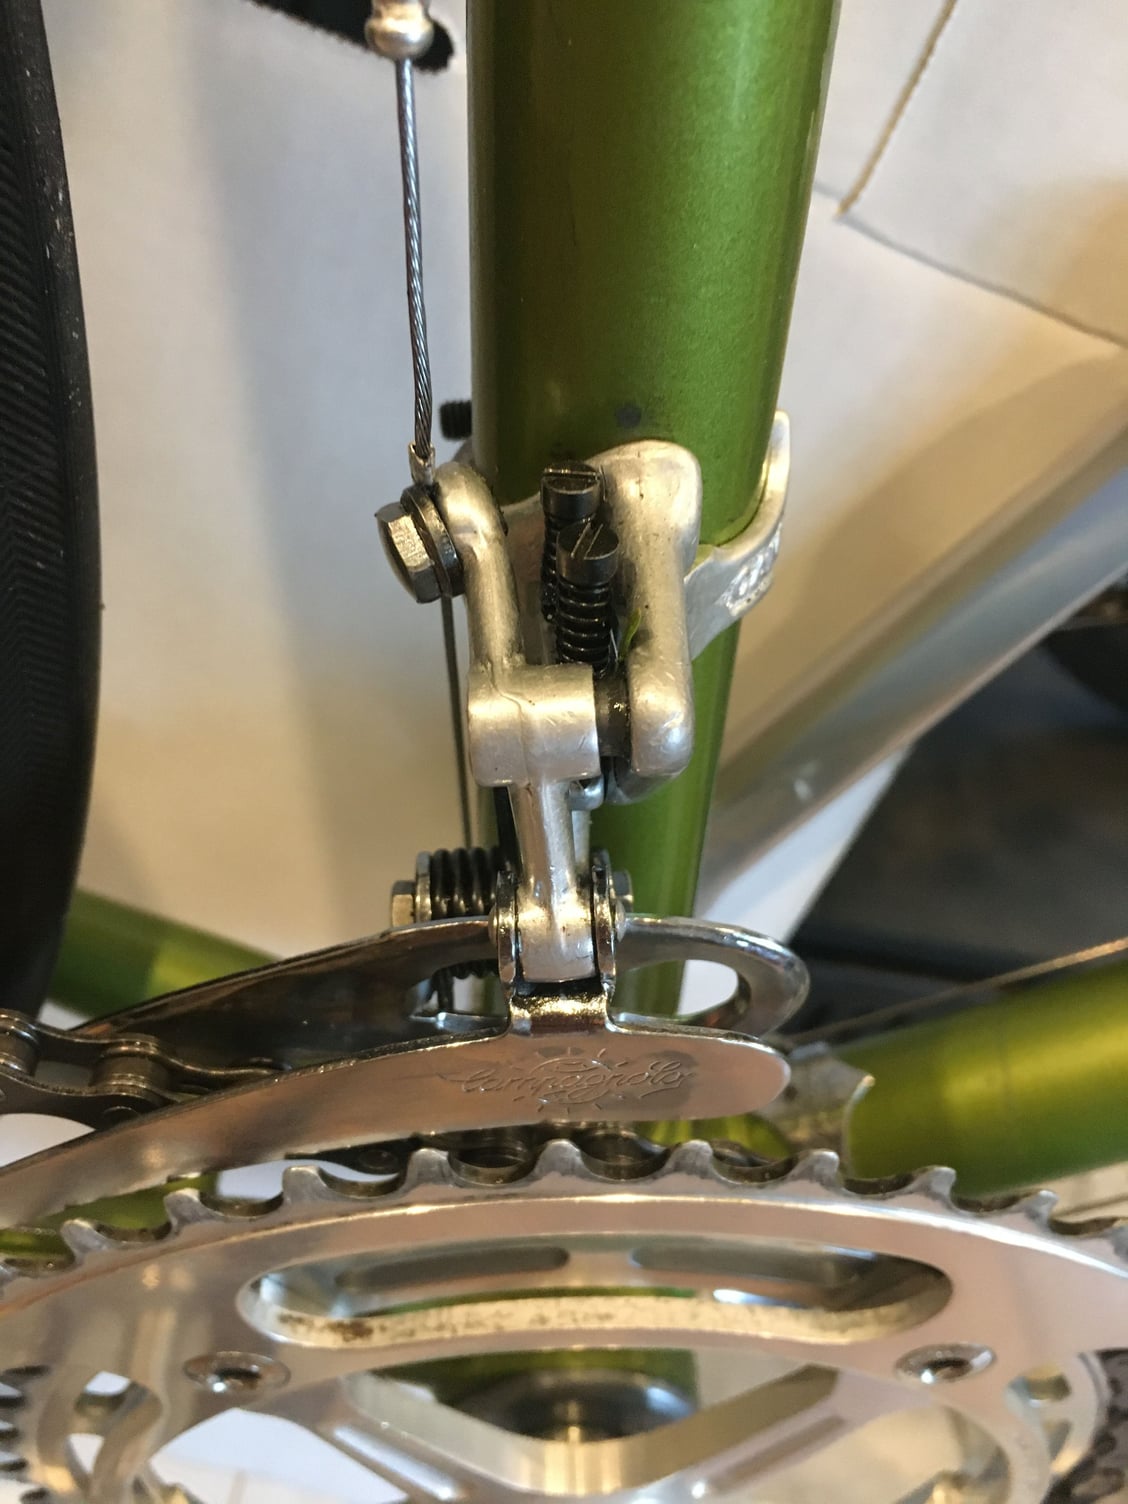
I�ve got another question, or two, about the Campy NR front derailleur. First, it seems to want to ride back on the upper, outer pivot. Am I missing something, or is it just a wear issue? Second, the cable clamp wouldn�t grip the cable tightly enough, so I had to make a little sleeve out of a cable tip to give it enough meat to clamp. Did der. cables get skinnier? Thanks!
02-09-20, 06:46 PM
#93
Senior Member
Join Date: Oct 2012
Location: Berkeley CA
Posts: 2,536
Bikes: 1981 Ron Cooper, 1974 Cinelli Speciale Corsa, 2000 Gary Fisher Sugar 1, 1986 Miyata 710, 1982 Raleigh "International"
Mentioned: 97 Post(s)
Tagged: 0 Thread(s)
Quoted: 930 Post(s)
Liked 1,291 Times
in
487 Posts
I�ve got another question, or two, about the Campy NR front derailleur. First, it seems to want to ride back on the upper, outer pivot. Am I missing something, or is it just a wear issue? Second, the cable clamp wouldn�t grip the cable tightly enough, so I had to make a little sleeve out of a cable tip to give it enough meat to clamp. Did der. cables get skinnier? Thanks!
2. Yes, the cables got skinnier. You can get the fatter cables but I have been buying them from a local vintage-friendly bike shop. I don't know a good source online.
Likes For davester:
02-09-20, 07:15 PM
#94
Senior Member
Join Date: Jun 2006
Posts: 20,305
Mentioned: 130 Post(s)
Tagged: 0 Thread(s)
Quoted: 3464 Post(s)
Liked 2,829 Times
in
1,995 Posts
I�ve got another question, or two, about the Campy NR front derailleur. First, it seems to want to ride back on the upper, outer pivot. Am I missing something, or is it just a wear issue? Second, the cable clamp wouldn�t grip the cable tightly enough, so I had to make a little sleeve out of a cable tip to give it enough meat to clamp. Did der. cables get skinnier? Thanks!
or with a Very good drill press or Bridgeport mill drill through the pin from the back and then tap for a 3mm x .5 fastener and insert a screw like Campagnolo did when this derailleur was first released.
when that happened to me in 1973 I was quite disappointed. Then the circlip version arrived and I bought that as a replacement part in 1974.
some guys reversed the bolt and anchored the cable on the other side- not terrific but less offset
Likes For repechage:
02-09-20, 08:04 PM
#95
Total Scrounge
Thread Starter
Join Date: Nov 2019
Location: Portland, Oregon
Posts: 884
Bikes: 71 International 72 Super Course 83 Gap
Mentioned: 15 Post(s)
Tagged: 0 Thread(s)
Quoted: 327 Post(s)
Liked 924 Times
in
310 Posts
Campagnolo disease. The fix was the later body with the forward extension and the circlip.
or with a Very good drill press or Bridgeport mill drill through the pin from the back and then tap for a 3mm x .5 fastener and insert a screw like Campagnolo did when this derailleur was first released.
when that happened to me in 1973 I was quite disappointed. Then the circlip version arrived and I bought that as a replacement part in 1974.
some guys reversed the bolt and anchored the cable on the other side- not terrific but less offset
Also, thanks for the brake bolt tubing idea. I cut a cable ferule apart lengthwise and sat both halves on top of the bolt. Tightened it up, and voila! Made a bit of an eccentric shim to get the calipers .0001mm closer to the rim.
20 miles and 1,200 feet and zero issues. Thanks for all the help!

Likes For JacobLee:
02-10-20, 05:45 AM
#96
www.theheadbadge.com

Join Date: Sep 2005
Location: Southern Florida
Posts: 28,513
Bikes: https://www.theheadbadge.com
Mentioned: 124 Post(s)
Tagged: 0 Thread(s)
Quoted: 2422 Post(s)
Liked 4,393 Times
in
2,092 Posts
Better, but you are cheating. the dimension on the last image shows a pad/holder with much more dimension from the inside of the caliper arm to the rim.
Of course the caliper will look better when the pads are in contact with the rim.
The pads in the first image with black pads are upside down.
Of course the caliper will look better when the pads are in contact with the rim.
The pads in the first image with black pads are upside down.
Since most modern, block-style repop pads don't have enough thread on them to accommodate spacers, using modern, adjustable cantilever pads are an intelligent solution, even if not particularly original in appearance.
Some may argue the contrary, but they've probably never experienced one of these particular centerpulls running at their optimum level.
the bridge hole on my International is... sloppy
too big as well. I went to the hobby store and purchased some aluminum tubing to act as a shim, extended it back and into the curved washer - increased the bore of it to match and tightened it up. Poor mfg choice by Raleigh/ Carlton.
too big as well. I went to the hobby store and purchased some aluminum tubing to act as a shim, extended it back and into the curved washer - increased the bore of it to match and tightened it up. Poor mfg choice by Raleigh/ Carlton.
These shims look homespun, but I've seen enough that I'm convinced the shim was from the factory. They always look the same, and are ridiculously sloppy in fit. It is no surprise your frames didn't have them - probably took all of two minutes for the shim to fall out 20 years ago.
-Kurt
__________________


Last edited by cudak888; 02-10-20 at 05:55 AM.
Likes For cudak888:
02-10-20, 10:02 AM
#97
Senior Member
Join Date: Jun 2006
Posts: 20,305
Mentioned: 130 Post(s)
Tagged: 0 Thread(s)
Quoted: 3464 Post(s)
Liked 2,829 Times
in
1,995 Posts
Not cheating. Getting good braking performance from centerpulls requires that you get the distance between pad and arm dialed in (and the angle of attack square). In some cases - like the above example - not even the factory Weinmann pads did a good job of that.
Since most modern, block-style repop pads don't have enough thread on them to accommodate spacers, using modern, adjustable cantilever pads are an intelligent solution, even if not particularly original in appearance.
Some may argue the contrary, but they've probably never experienced one of these particular centerpulls running at their optimum level.
If the brake bridge appears too large on any 1970's Raleigh, chances are it had shim in it from the start. I've seen multiple examples with a very poorly cut piece of tubing with a slot in it shoved in the bridge.
These shims look homespun, but I've seen enough that I'm convinced the shim was from the factory. They always look the same, and are ridiculously sloppy in fit. It is no surprise your frames didn't have them - probably took all of two minutes for the shim to fall out 20 years ago.
-Kurt
Agree, a shim is needed. But from way back when we exchanged Weinmann's for Campagnolo brakes, (rear with a drop bolt)- never saw those shims. But I am sure they did exist, a assembly variable.
I will look for a set of these mod pads/holders for my International.
Will leave the aged and intact ones for the Concours circuit... wait, there is no vintage lightweight concours circuit...
Last edited by repechage; 02-10-20 at 10:07 AM.
Likes For repechage:
02-10-20, 10:58 AM
#98
Senior Member
Join Date: Oct 2012
Location: Berkeley CA
Posts: 2,536
Bikes: 1981 Ron Cooper, 1974 Cinelli Speciale Corsa, 2000 Gary Fisher Sugar 1, 1986 Miyata 710, 1982 Raleigh "International"
Mentioned: 97 Post(s)
Tagged: 0 Thread(s)
Quoted: 930 Post(s)
Liked 1,291 Times
in
487 Posts
02-10-20, 02:27 PM
#99
Total Scrounge
Thread Starter
Join Date: Nov 2019
Location: Portland, Oregon
Posts: 884
Bikes: 71 International 72 Super Course 83 Gap
Mentioned: 15 Post(s)
Tagged: 0 Thread(s)
Quoted: 327 Post(s)
Liked 924 Times
in
310 Posts
Not cheating. Getting good braking performance from centerpulls requires that you get the distance between pad and arm dialed in (and the angle of attack square). In some cases - like the above example - not even the factory Weinmann pads did a good job of that.
Since most modern, block-style repop pads don't have enough thread on them to accommodate spacers, using modern, adjustable cantilever pads are an intelligent solution, even if not particularly original in appearance.
Some may argue the contrary, but they've probably never experienced one of these particular centerpulls running at their optimum level.
If the brake bridge appears too large on any 1970's Raleigh, chances are it had shim in it from the start. I've seen multiple examples with a very poorly cut piece of tubing with a slot in it shoved in the bridge.
These shims look homespun, but I've seen enough that I'm convinced the shim was from the factory. They always look the same, and are ridiculously sloppy in fit. It is no surprise your frames didn't have them - probably took all of two minutes for the shim to fall out 20 years ago.
-Kurt
Since most modern, block-style repop pads don't have enough thread on them to accommodate spacers, using modern, adjustable cantilever pads are an intelligent solution, even if not particularly original in appearance.
Some may argue the contrary, but they've probably never experienced one of these particular centerpulls running at their optimum level.
If the brake bridge appears too large on any 1970's Raleigh, chances are it had shim in it from the start. I've seen multiple examples with a very poorly cut piece of tubing with a slot in it shoved in the bridge.
These shims look homespun, but I've seen enough that I'm convinced the shim was from the factory. They always look the same, and are ridiculously sloppy in fit. It is no surprise your frames didn't have them - probably took all of two minutes for the shim to fall out 20 years ago.
-Kurt
Likes For JacobLee:
02-10-20, 04:13 PM
#100
Senior Member
Join Date: Jun 2006
Posts: 20,305
Mentioned: 130 Post(s)
Tagged: 0 Thread(s)
Quoted: 3464 Post(s)
Liked 2,829 Times
in
1,995 Posts
Fun to look at, the price to display is a negative. I did not look at the cost this year, but a few year's ago, it was silly.
I know a few who have 10 if not dozens of bikes that could/should be shown.
Not economical and a logistic nightmare.