


Trouble removing vintage freewheel...
 08-30-20, 01:01 PM
#1

Senior Member
Thread Starter

Join Date: Aug 2016
Location: Chesterton, Indiana
Posts: 298
Bikes: 1984 Sekai 5000 Superbe, 1987 Raleigh Seneca Mountain Tour, 1984 Schwinn World Sport, 1978 Raleigh Grand Prix, 2021 Handsome She Devil, Mystery Vintage purple road bike
Mentioned: 2 Post(s)
Tagged: 0 Thread(s)
Quoted: 99 Post(s)
Liked 124 Times
in
61 Posts
Trouble removing vintage freewheel...
Trouble removing vintage freewheel help?
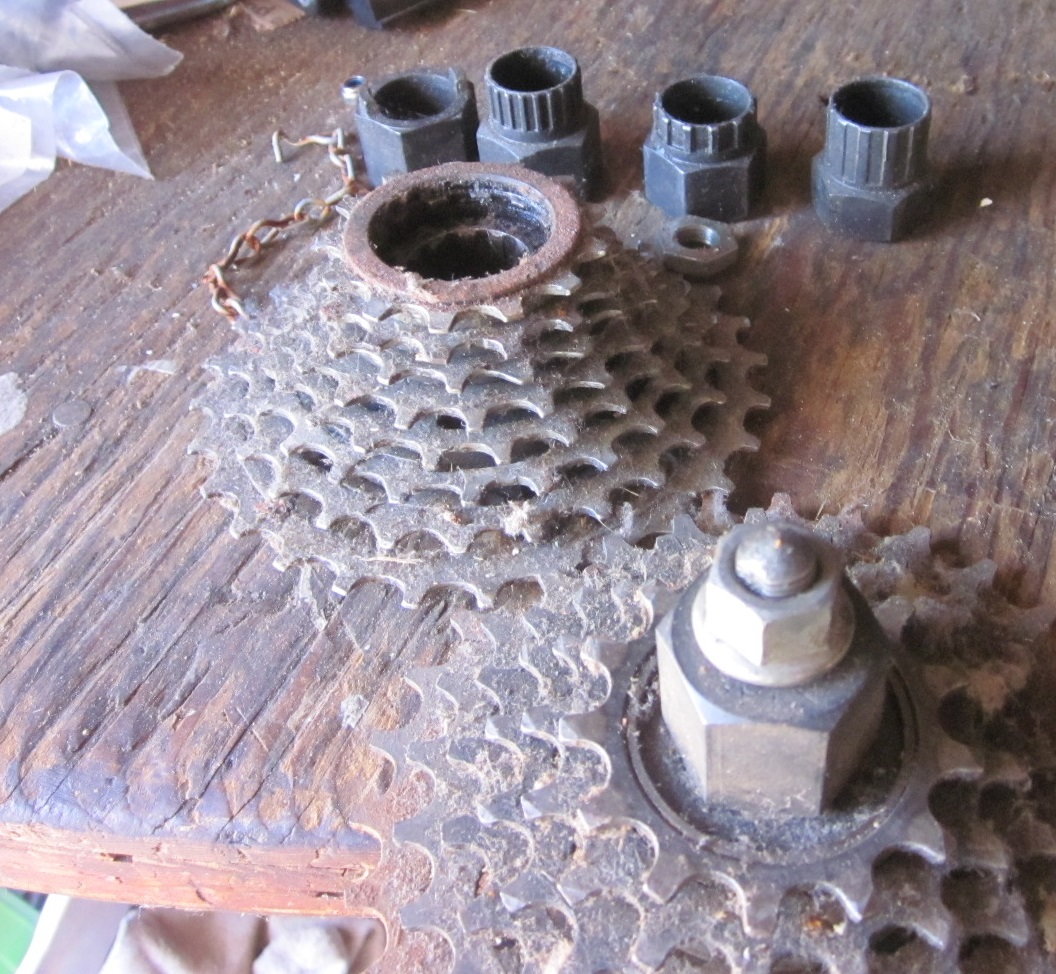
Can someone give me suggestions on how to get this to budge? I’m hammering the Allen tool like the guy in the video said to do clockwise but this just won’t move at all..I’ve sprayed lots of WD-40 on it. This is my first time attempting to do this. I’m a brand new newbie and I’m trying to watch the videos online.
I still don’t have my tool kit yet. I just ordered one a 44 piece off EBay. So I’m trying to see if I can get this off the way the guy in the video is doing it.
 08-30-20, 01:30 PM
#2
Really Old Senior Member

Not sure what you are trying to accomplish with the hex wrench? Do you have any idea how many tiny bearing balls you'll scatter if you realized that piece had a LH thread?
You need a Sun Tour 2 prong removal tool.
Park Tools FR-2
And use a QR skewer, axle or SOMETHING to hold the tool in place.
These are very prone to breaking the tool if misaligned.
https://www.parktool.com/product/freewheel-remover-fr-2
You need a Sun Tour 2 prong removal tool.
Park Tools FR-2
And use a QR skewer, axle or SOMETHING to hold the tool in place.
These are very prone to breaking the tool if misaligned.
https://www.parktool.com/product/freewheel-remover-fr-2
Last edited by Bill Kapaun; 08-30-20 at 01:40 PM.
08-30-20, 01:54 PM
#3
Newbie
not the correct tool but i used a 3/32 pin punch also L/H threads if i remember correct and all the wd40 in the world wont make a difference
good luck - and yes almost a bizillion little balls i used small magenet to catch them and placed wheel over a card board box to those that tride to escape also count them
peace Brian
my free wheel was shimmed for proper spacing too so look for that
good luck - and yes almost a bizillion little balls i used small magenet to catch them and placed wheel over a card board box to those that tride to escape also count them
peace Brian
my free wheel was shimmed for proper spacing too so look for that
Last edited by Iwas20Then; 08-30-20 at 01:58 PM. Reason: shims
Likes For Iwas20Then:
08-30-20, 01:59 PM
#4
Really Old Senior Member
not the correct tool but i used a 3/32 pin punch also L/H threads if i remember correct and all the wd40 in the world wont make a difference
good luck - and yes almost a bizillion little balls i used small magenet to catch them and placed wheel over a card board box to those that tride to escape also count them
peace Brian
good luck - and yes almost a bizillion little balls i used small magenet to catch them and placed wheel over a card board box to those that tride to escape also count them
peace Brian
Remove the FW from the hub first.
No idea what the OP is trying to accomplish?
It's just simpler to buy a new FW than service an old one.
Disassembling the actual part is beyond the knowledge level shown.
Likes For Bill Kapaun:
08-30-20, 02:15 PM
#5
Senior Member
Thread Starter
Join Date: Aug 2016
Location: Chesterton, Indiana
Posts: 298
Bikes: 1984 Sekai 5000 Superbe, 1987 Raleigh Seneca Mountain Tour, 1984 Schwinn World Sport, 1978 Raleigh Grand Prix, 2021 Handsome She Devil, Mystery Vintage purple road bike
Mentioned: 2 Post(s)
Tagged: 0 Thread(s)
Quoted: 99 Post(s)
Liked 124 Times
in
61 Posts
Only a fool would attempt disassembling a FW while still on the hub.
Remove the FW from the hub first.
No idea what the OP is trying to accomplish?
It's just simpler to buy a new FW than service an old one.
Disassembling the actual part is beyond the knowledge level shown.
Remove the FW from the hub first.
No idea what the OP is trying to accomplish?
It's just simpler to buy a new FW than service an old one.
Disassembling the actual part is beyond the knowledge level shown.
Ive already removed the bearings from the other side of the hub and now want to get the FW off so that is why I watched that video I linked to my post

 08-30-20, 02:56 PM
#6
Really Old Senior Member
It's much easier to remove the FW before removing the axle.
You pretty much need the axle to retain the removal tool on Sun Tour FW's.
IF the tool cocks slightly, the tangs are very prone to break off the tool. BTDT.
Reinstall the axle and then use an axle nut to retain the tool.
Not TOO SNUG, because when the FW starts to screw off, it tightens against the tool, big time.
You basically want the FW to just budge a little bit, back ff the axle nut a tiny bit more & repeat until the FW starts to come off easily.
Something THAT OLD, is likely to be VERY tight.
If this is your first, you might consider just paying an LBS to remove it. The Shimano type FW's with many splines are much easier for a 1st timer.
There would be no shame.
Having a little bit of experience with these Sun Tours, I still almost expect to break a tool 25% of the time.
Likes For Bill Kapaun:
08-30-20, 03:02 PM
#7
Senior Member
I am no expert here but I think it depends on what you want to do with the freewheel after. If you use the method in the video you will end up using a large pair of pliers or similar to take the central threaded piece of the freewheel off, therefore making it unusable by destroying the thread. If you don't need it then it doesn't matter. From the photo it looks like you are trying to unscrew in the wrong direction? Shouldn't it be counter-clockwise?
As someone else said - you need the specific tool. Or a local bike shop might do it for a small cost.
If you only want to take it off to access the bearings of your hub on that side you shouldn't need to remove it. Usually you can just remove the silver cone screw (it should just come out or unscrew by running a screwdriver around the edge on the flat section) you can see in the middle of your freewheel and you will be able to remove and repack the bearings with the freewheel in place.
If this isn't what you are trying to do and you really want to change the freewheel then you could do as in the video. If you are keeping it, spraying it with WD40 won't have done it any good. You can check online how to lubricate it.
Good luck!
Gill
Likes For Gillparis:
08-30-20, 03:04 PM
#8
seńor miembro

Join Date: Dec 2018
Location: Pac NW
Posts: 6,625
Bikes: '70s - '80s Campagnolo
Mentioned: 92 Post(s)
Tagged: 0 Thread(s)
Quoted: 3888 Post(s)
Liked 6,483 Times
in
3,207 Posts
Or, let's say the freewheel is damaged or stuck and cannot be removed with the proper tool. You can disassemble it from its body, then use channel locks on the body to free it from the hub.
It's just simpler to buy a new FW than service an old one.
Last edited by SurferRosa; 08-30-20 at 03:12 PM.
08-30-20, 03:25 PM
#9
Really Old Senior Member
This is the way I retain the tool with an axle nut. It's just a quick mock up I made with a Sun Tour 4 prong FW, with some assorted FW tools in the background.
Likes For Bill Kapaun:
08-30-20, 03:29 PM
#10
Senior Member
A question - I didn't have to touch the freewheel at all. I just left it in place as it was. Is there a reason the OP can't do this?
08-30-20, 03:31 PM
#11
Banned
those pin face spanner holes are to take the freewheel apart, releasing a hundred tiny bearing balls , not removing it.
08-30-20, 03:33 PM
#12
Really Old Senior Member
Not sure what the OP's actual goal is??
08-30-20, 03:39 PM
#13
Senior Member
My guess is he is trying to service the hubs - maybe he will tell us 😊
08-30-20, 03:41 PM
#14
I'm good to go!
Join Date: Jul 2017
Location: Mississippi
Posts: 14,987
Bikes: Tarmac Disc Comp Di2 - 2020
Mentioned: 51 Post(s)
Tagged: 0 Thread(s)
Quoted: 6193 Post(s)
Liked 4,809 Times
in
3,317 Posts
If your goal is to remove the freewheel from the wheel hub, then it's the two slots, roughly 11:30 and 5:30 in the first pic that you need to get a tool for. And you turn it counter clockwise.
Likes For fietsbob:
08-30-20, 03:49 PM
#16
seńor miembro
Join Date: Dec 2018
Location: Pac NW
Posts: 6,625
Bikes: '70s - '80s Campagnolo
Mentioned: 92 Post(s)
Tagged: 0 Thread(s)
Quoted: 3888 Post(s)
Liked 6,483 Times
in
3,207 Posts
08-30-20, 03:52 PM
#17
SE Wis
Join Date: Apr 2005
Location: Milwaukee, WI
Posts: 10,513
Bikes: '68 Raleigh Sprite, '02 Raleigh C500, '84 Raleigh Gran Prix, '91 Trek 400, 2013 Novara Randonee, 1990 Trek 970
Mentioned: 40 Post(s)
Tagged: 0 Thread(s)
Quoted: 2747 Post(s)
Liked 3,394 Times
in
2,056 Posts
Here are the videos you really should be watching to REMOVE a freewheel.

Likes For dedhed:
08-30-20, 04:00 PM
#18
I'm good to go!
Join Date: Jul 2017
Location: Mississippi
Posts: 14,987
Bikes: Tarmac Disc Comp Di2 - 2020
Mentioned: 51 Post(s)
Tagged: 0 Thread(s)
Quoted: 6193 Post(s)
Liked 4,809 Times
in
3,317 Posts
I too have never disassembled a freewheel. And my kids managed to provide me with plenty of frozen FW's to free up.
08-30-20, 04:01 PM
#19
Senior Member
I didn't have the tool to get it off and the bike is probably worth not much more than the tool! I had fear of a ball-bearing explosion if I took it apart. I had sore fingers from them rubbing on the edge of the freewheel centre whilst I was cleaning out the races 😊. And I had to work out how far the cone was going to turn once I tightened the nuts and then leave that tolerance in. So it took a long time. But it worked.
08-30-20, 04:08 PM
#20
Senior Member
Thread Starter
Join Date: Aug 2016
Location: Chesterton, Indiana
Posts: 298
Bikes: 1984 Sekai 5000 Superbe, 1987 Raleigh Seneca Mountain Tour, 1984 Schwinn World Sport, 1978 Raleigh Grand Prix, 2021 Handsome She Devil, Mystery Vintage purple road bike
Mentioned: 2 Post(s)
Tagged: 0 Thread(s)
Quoted: 99 Post(s)
Liked 124 Times
in
61 Posts
It's much easier to remove the FW before removing the axle.
You pretty much need the axle to retain the removal tool on Sun Tour FW's.
IF the tool cocks slightly, the tangs are very prone to break off the tool. BTDT.
Reinstall the axle and then use an axle nut to retain the tool.
Not TOO SNUG, because when the FW starts to screw off, it tightens against the tool, big time.
You basically want the FW to just budge a little bit, back ff the axle nut a tiny bit more & repeat until the FW starts to come off easily.
Something THAT OLD, is likely to be VERY tight.
If this is your first, you might consider just paying an LBS to remove it. The Shimano type FW's with many splines are much easier for a 1st timer.
There would be no shame.
Having a little bit of experience with these Sun Tours, I still almost expect to break a tool 25% of the time.
You pretty much need the axle to retain the removal tool on Sun Tour FW's.
IF the tool cocks slightly, the tangs are very prone to break off the tool. BTDT.
Reinstall the axle and then use an axle nut to retain the tool.
Not TOO SNUG, because when the FW starts to screw off, it tightens against the tool, big time.
You basically want the FW to just budge a little bit, back ff the axle nut a tiny bit more & repeat until the FW starts to come off easily.
Something THAT OLD, is likely to be VERY tight.
If this is your first, you might consider just paying an LBS to remove it. The Shimano type FW's with many splines are much easier for a 1st timer.
There would be no shame.
Having a little bit of experience with these Sun Tours, I still almost expect to break a tool 25% of the time.
I think I am going to take it to my LBS to have them help me with that. This is my first time trying to totally disassemble a bike and I’m still learning. I appreciate you not trying to make me feel stupid. I’m determined to learn as much as I can
 08-30-20, 04:09 PM
#21
Really Old Senior Member
08-30-20, 04:13 PM
#22
seńor miembro
Join Date: Dec 2018
Location: Pac NW
Posts: 6,625
Bikes: '70s - '80s Campagnolo
Mentioned: 92 Post(s)
Tagged: 0 Thread(s)
Quoted: 3888 Post(s)
Liked 6,483 Times
in
3,207 Posts
08-30-20, 04:34 PM
#23
Really Old Senior Member
IF it were a splined type, I'd encourage you to DIY.
I'd done a few splined type & still broke the tool on my first Sun Tour FW, because I let it cock ever so slightly.
You DON'T need a tool to reinstall, whatever brand. They just spin on and your legs do the final tightening.
a "strong" rider tightens them worse. Add a bunch of years of corrosion between a steel FW & aluminum hub......
Likes For Bill Kapaun:
08-30-20, 04:44 PM
#24
Senior Member
Thread Starter
Join Date: Aug 2016
Location: Chesterton, Indiana
Posts: 298
Bikes: 1984 Sekai 5000 Superbe, 1987 Raleigh Seneca Mountain Tour, 1984 Schwinn World Sport, 1978 Raleigh Grand Prix, 2021 Handsome She Devil, Mystery Vintage purple road bike
Mentioned: 2 Post(s)
Tagged: 0 Thread(s)
Quoted: 99 Post(s)
Liked 124 Times
in
61 Posts
Yes my goal was to service the hubs and re-grease them and put new bb in them. I decided I want to learn how to service and make repairs and possible restore vintage bikes. Just something fun for me to learn as I get back into riding. So I picked up a $10 1984 Schwinn World Sport that had been neglected and not very well taken care of. It was suggested to me that I service the hubs and make sure they have been cleaned and new grease and bearings. So that is what I was trying to do.
08-30-20, 04:58 PM
#25
Banned
Cogs not worn? NB: they were a low end freewheel when new./.
you need a pin spanner to engage both holes at once, I think its Left hand threaded
I'd take it off the hub first .. BITD there was a freewheel vise it had 4 pins to grab the big cog on opposite sides. to not move,,
you need a pin spanner to engage both holes at once, I think its Left hand threaded
I'd take it off the hub first .. BITD there was a freewheel vise it had 4 pins to grab the big cog on opposite sides. to not move,,