


1961 Holdsworth Cyclone build
 08-01-23, 04:25 AM
#1
Wheelman
Thread Starter
Join Date: Aug 2021
Location: Putney, London UK
Posts: 847
Bikes: 1982 Holdsworth Avanti (531), 1961 Holdsworth Cyclone
Mentioned: 4 Post(s)
Tagged: 0 Thread(s)
Quoted: 298 Post(s)
Liked 676 Times
in
341 Posts
1961 Holdsworth Cyclone build
Hiya Folks,
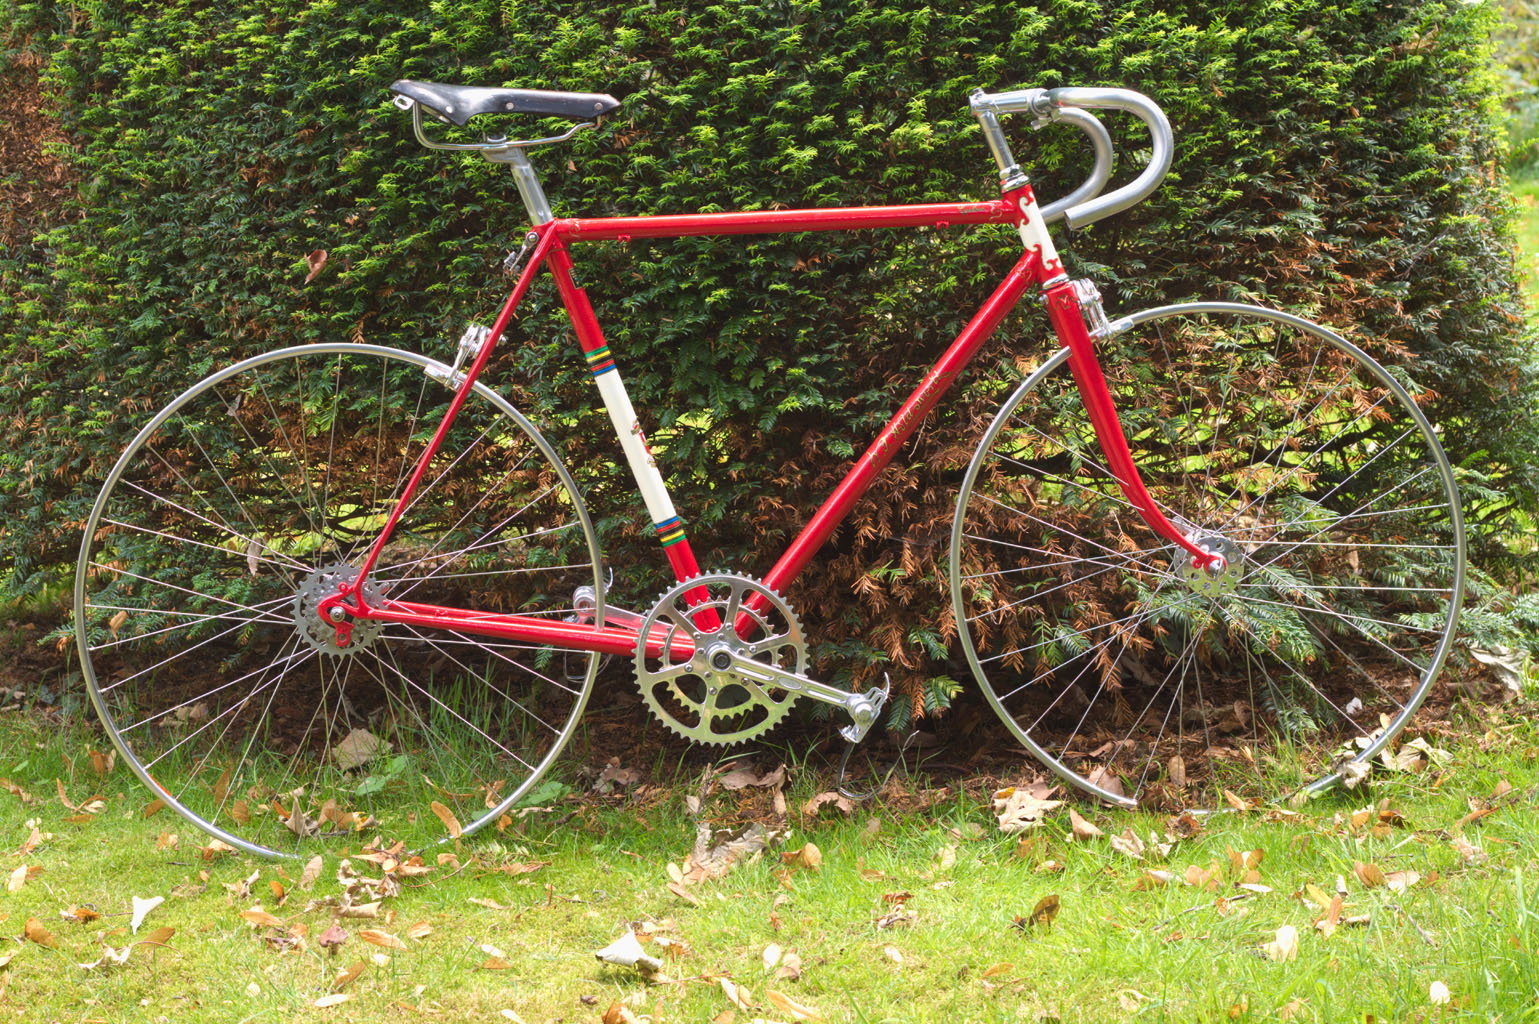
I've been working on this frame for a while and promised to post a build thread when I made some progress - and now I've (almost) finished painting.
It's a 1961 Holdsworth Cyclone, from the period (1959-1963) when they made their own fancy fishtail lugs.
From https://www.nkilgariff.com/HoldsModelPages/Cyclone.htm: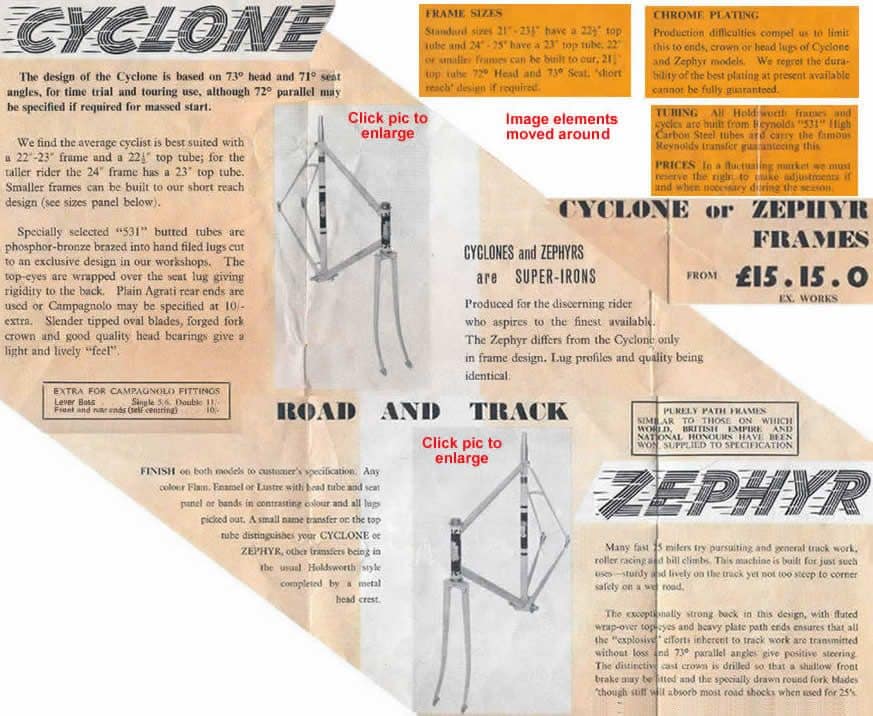
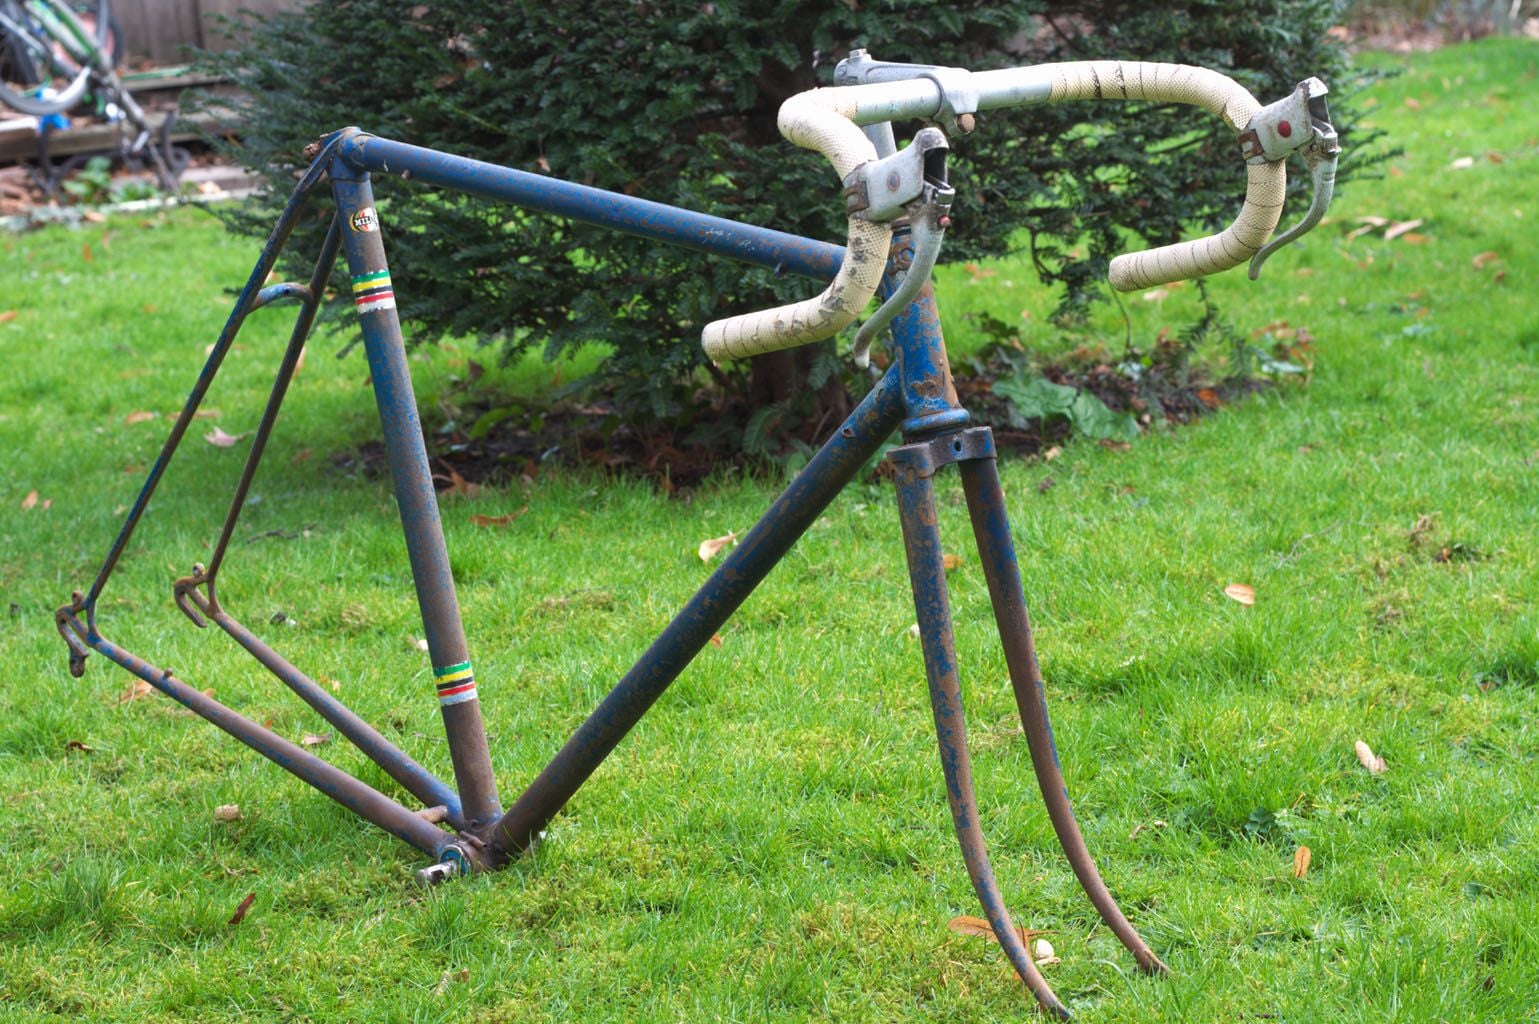
The one I've got is 22" and has the Campagnolo dropouts for an extra 10 shillings, it was originally flamboyant red (old paint under crown race).
Here it is as delivered:
The rear dropouts were 114mm for some reason, Holdsworth were definitely supplying 5 speeds in 1961 so I don't understand that.
It also had a Bayliss Wiley cottered crank, Brampton bottom bracket, and Stronglight headset.
I cleaned it back to the metal and had the rusty braze-ons fixed and the rear spread to 120mm (at Varonha Frameworks)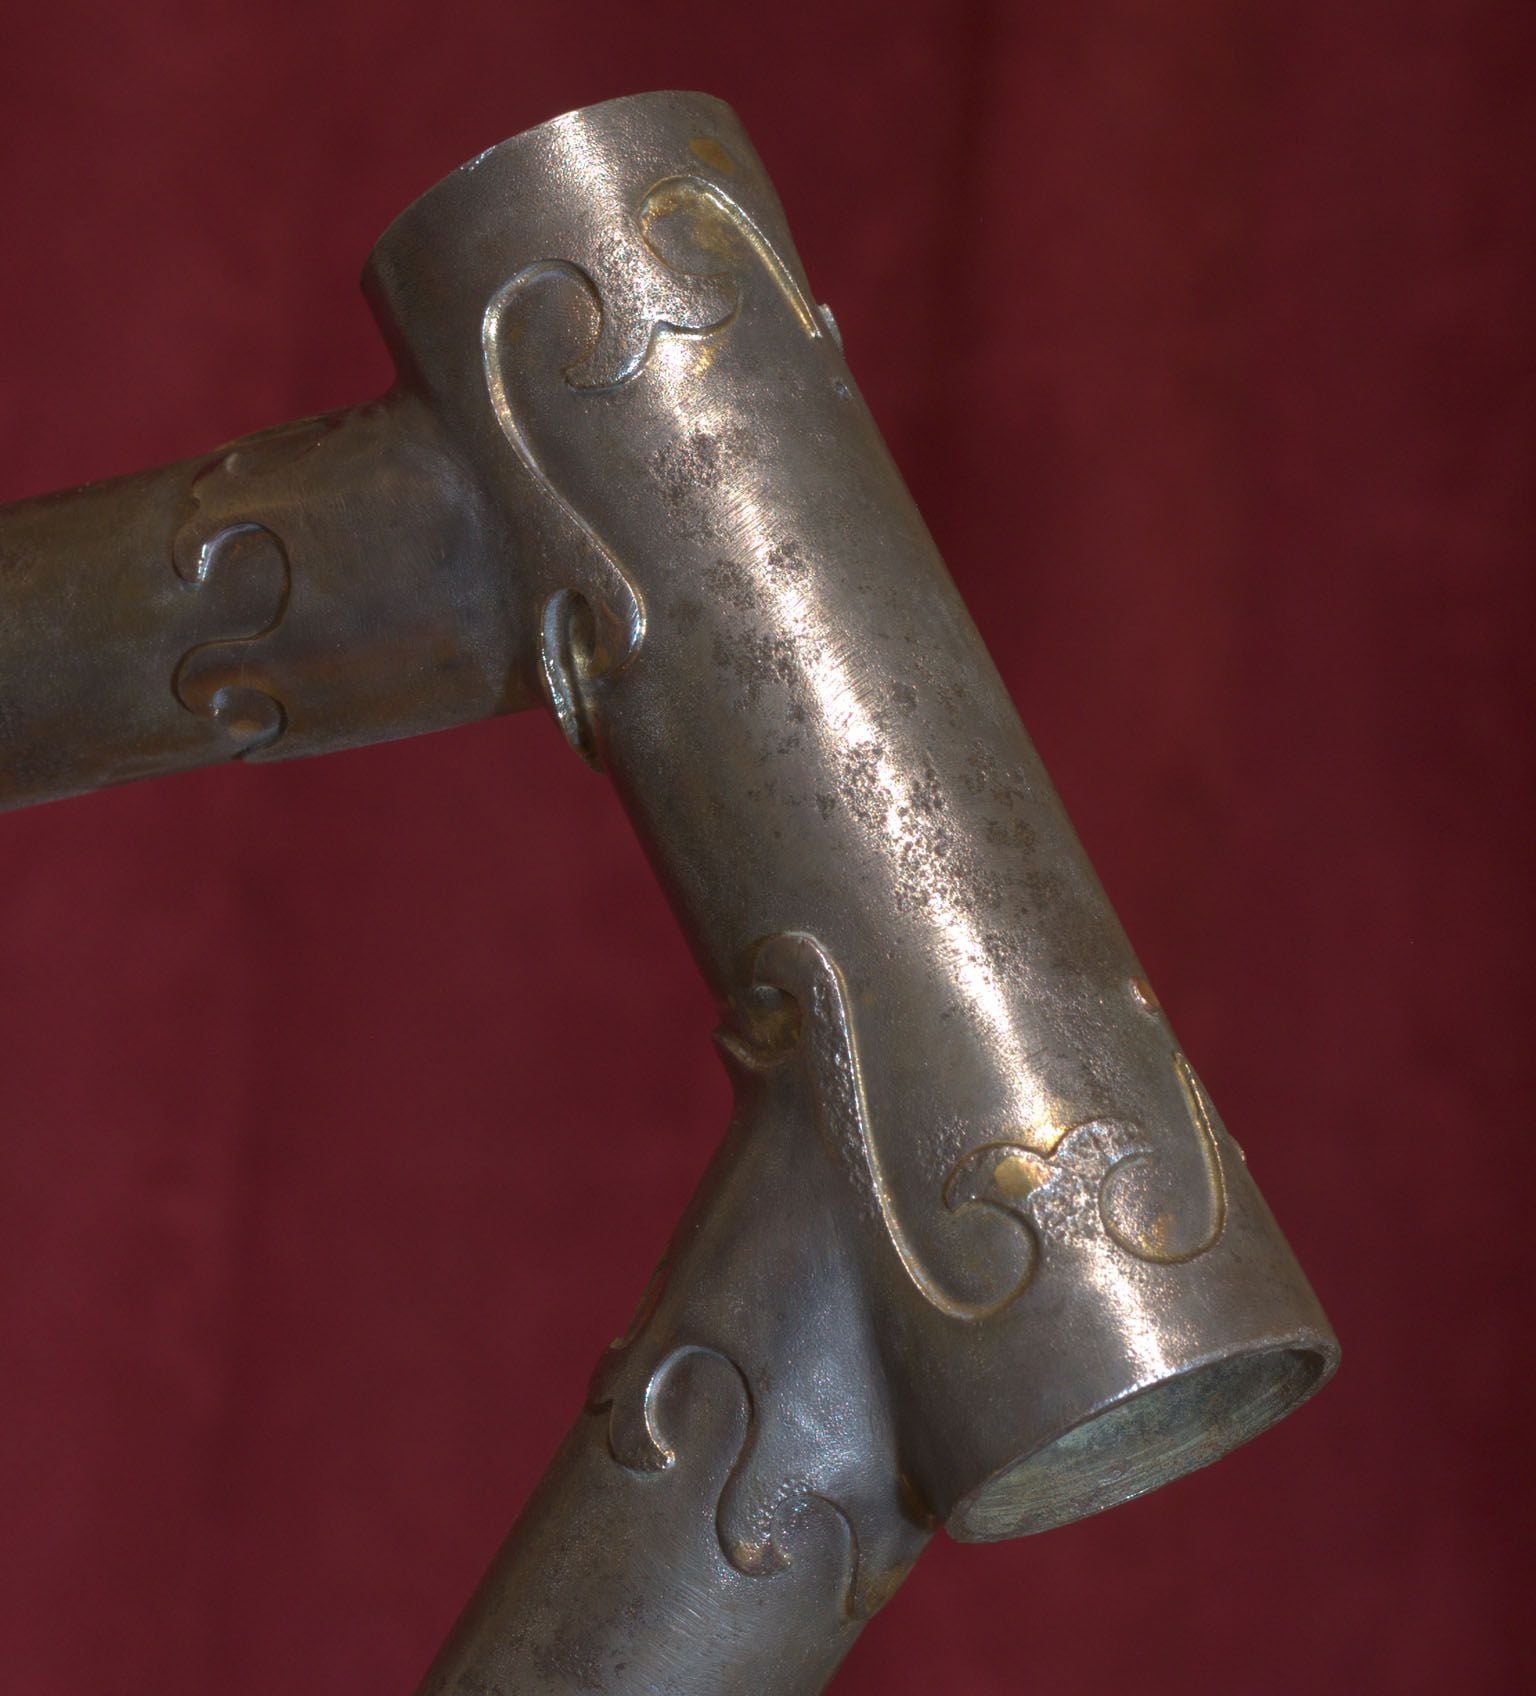
My painting plan was based on an expertly painted Holdsworth Whirlwind frame sold on Ebay, stupidly I didn't record who was selling it but I did save the images: gallery at https://www.bikeforums.net/g/album/28574862
Living in a London flat I don't really have room for spraying so I went for brush painting in the kitchen on a home made painting stand: https://www.bikeforums.net/classic-v...ing-stand.html
It was originally flamboyant red and I've got an Avanti in Holdsworth Red Pearl so I decided to make a version of the Holdsworth Red Pearl.
That turned out to be quite difficult - both the guys at Varonha Frameworks worked for Holdsworth in the 80s, one of them ran the paint shop I think,
he said the Red Pearl arrived in huge drums from Switzerland so unfortunately it's not a period car paint or similar.
Eventually I mixed something similar: https://www.bikeforums.net/classic-v...red-pearl.html.
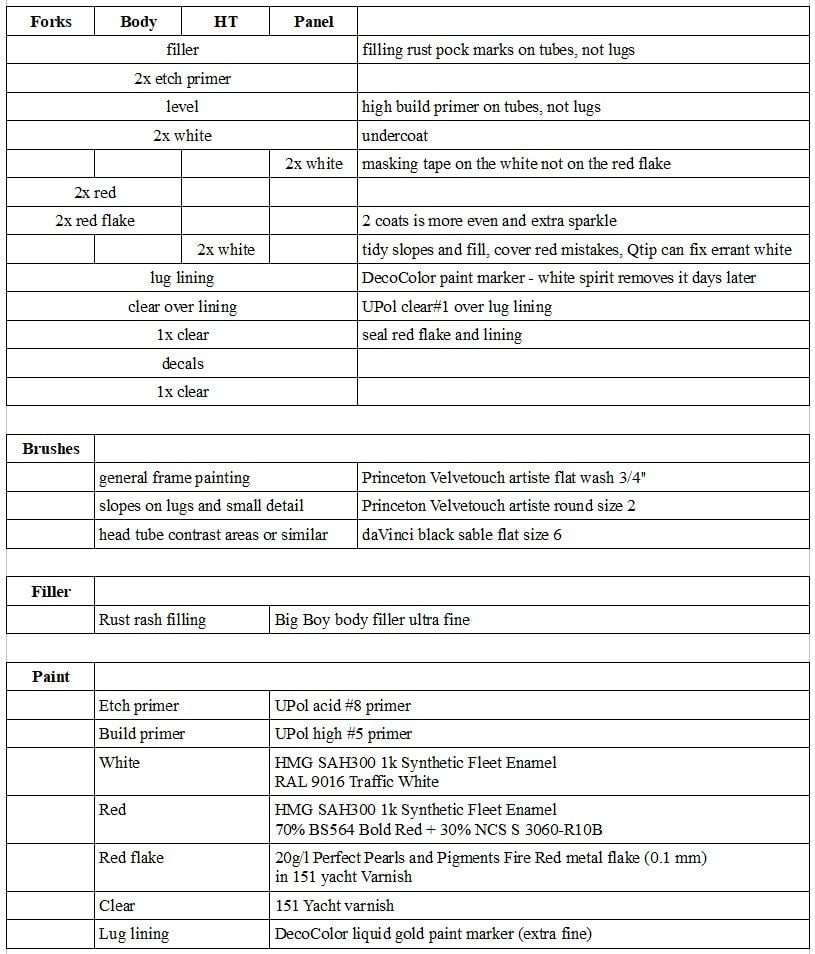
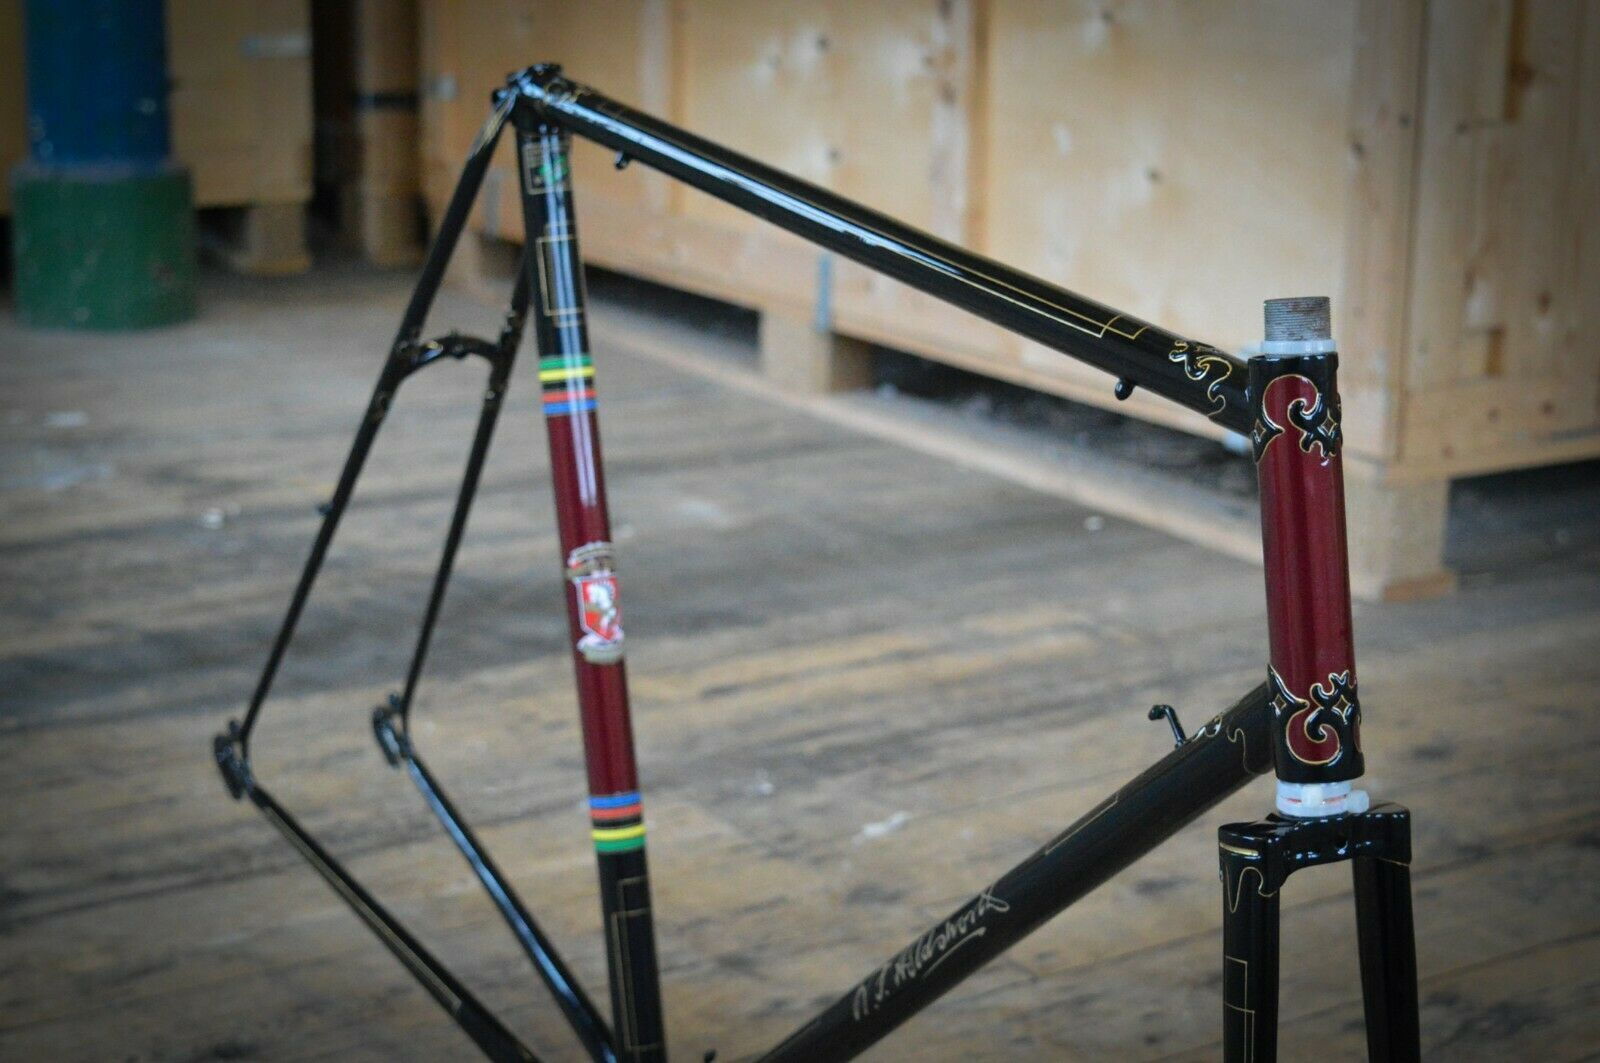
Here's the painting details:
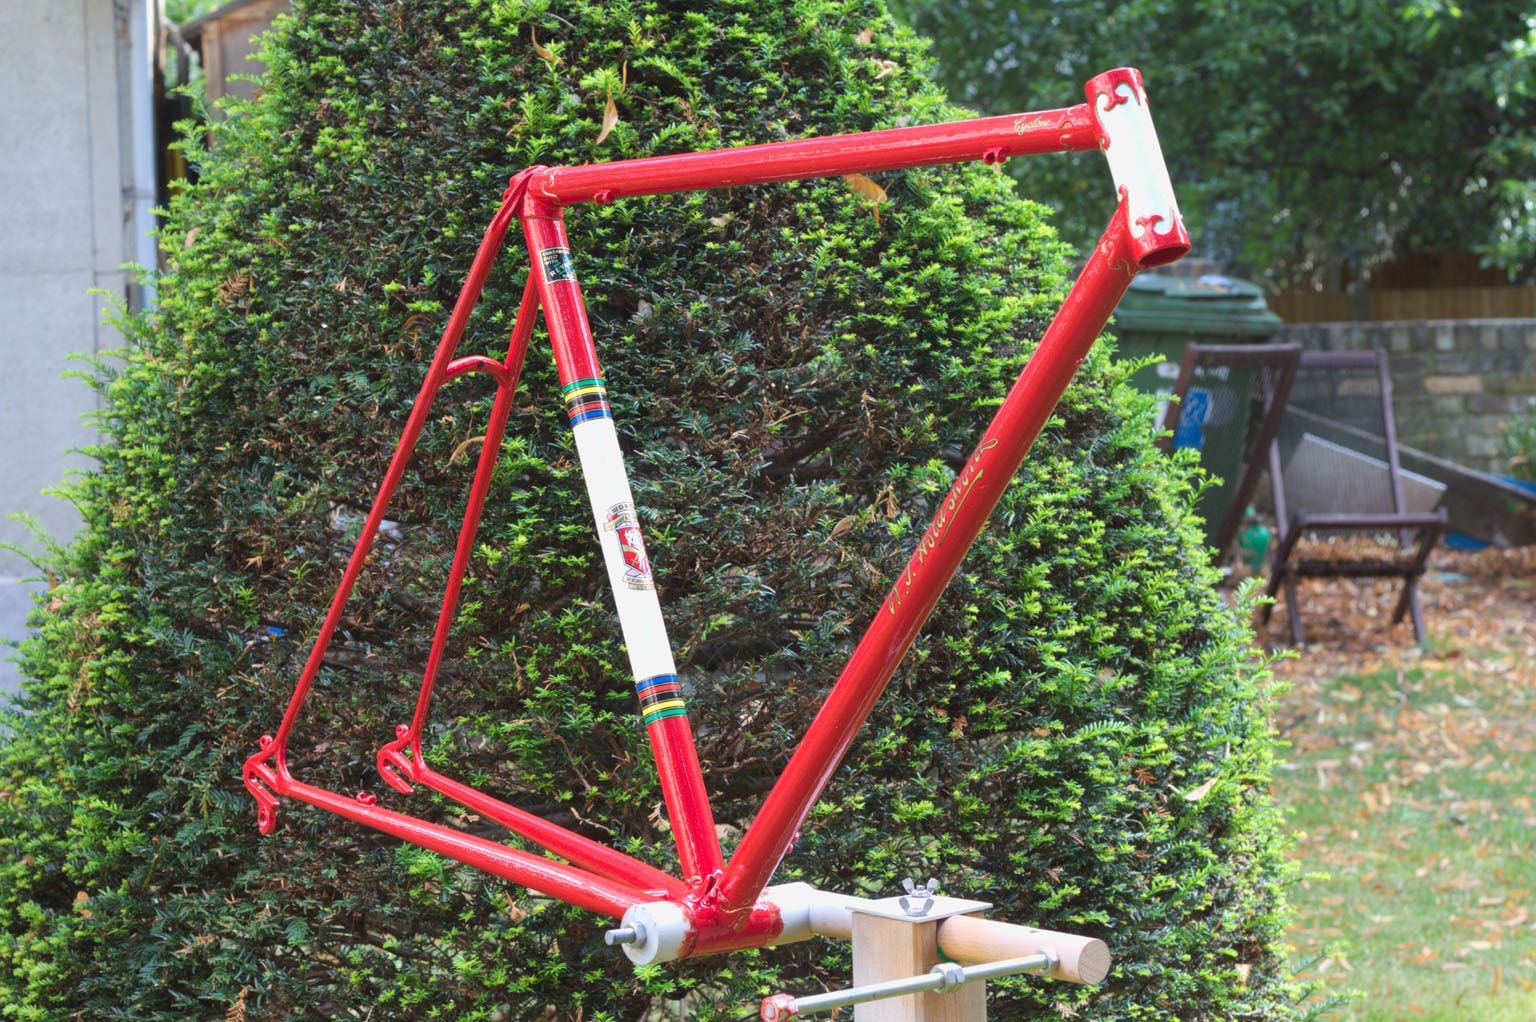
And here's the current state:
(Gallery at https://www.bikeforums.net/g/album/30321604)
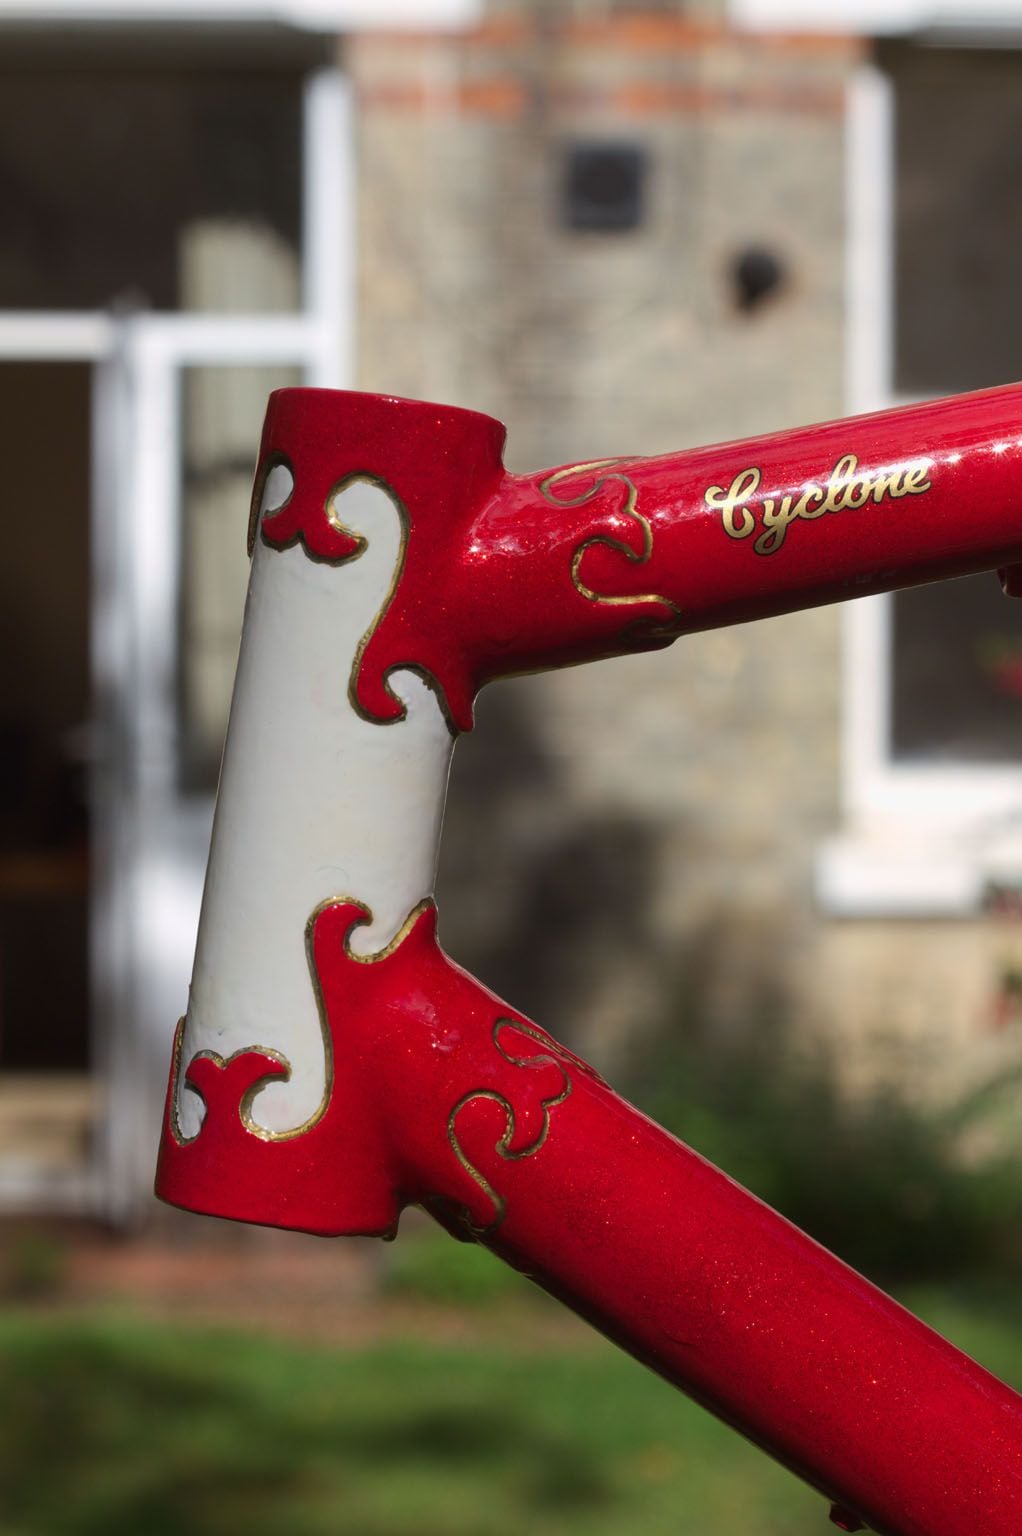
It's my first paint job and it has a few blemishes but I recon it's a 9/10
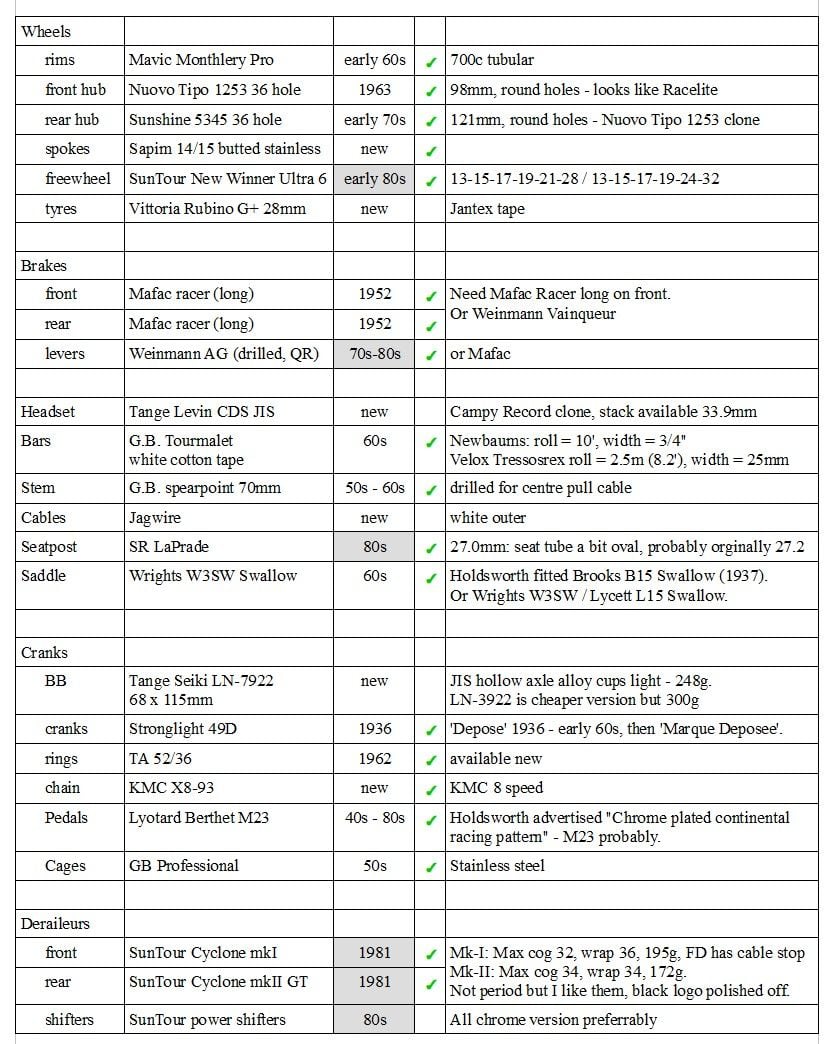
The painting took quite a while, but it did give me time to find parts on Ebay, so here's my almost period build plan:
(green tick means I've got the item)
That's probably more information than most people want, but some of the pics are quite nice
Comments and help most welcome.
I've been working on this frame for a while and promised to post a build thread when I made some progress - and now I've (almost) finished painting.
It's a 1961 Holdsworth Cyclone, from the period (1959-1963) when they made their own fancy fishtail lugs.
From https://www.nkilgariff.com/HoldsModelPages/Cyclone.htm:
1961 The Cyclone was top of the range with the Zephyr, but they are
now road and track versions of the same frame, quite unlike the previous
Cyclone. As usual the Cyclone has 71o seat and 73o head angles, but it
is available 72o parallel for massed start racing.
now road and track versions of the same frame, quite unlike the previous
Cyclone. As usual the Cyclone has 71o seat and 73o head angles, but it
is available 72o parallel for massed start racing.
The one I've got is 22" and has the Campagnolo dropouts for an extra 10 shillings, it was originally flamboyant red (old paint under crown race).
Here it is as delivered:
The rear dropouts were 114mm for some reason, Holdsworth were definitely supplying 5 speeds in 1961 so I don't understand that.
It also had a Bayliss Wiley cottered crank, Brampton bottom bracket, and Stronglight headset.
I cleaned it back to the metal and had the rusty braze-ons fixed and the rear spread to 120mm (at Varonha Frameworks)
Weight: frame 1940g, forks 775g, total 2715g (5.99 lbs)
Gallery: https://www.bikeforums.net/g/album/28595395
Gallery: https://www.bikeforums.net/g/album/28595395
My painting plan was based on an expertly painted Holdsworth Whirlwind frame sold on Ebay, stupidly I didn't record who was selling it but I did save the images: gallery at https://www.bikeforums.net/g/album/28574862
Living in a London flat I don't really have room for spraying so I went for brush painting in the kitchen on a home made painting stand: https://www.bikeforums.net/classic-v...ing-stand.html
It was originally flamboyant red and I've got an Avanti in Holdsworth Red Pearl so I decided to make a version of the Holdsworth Red Pearl.
That turned out to be quite difficult - both the guys at Varonha Frameworks worked for Holdsworth in the 80s, one of them ran the paint shop I think,
he said the Red Pearl arrived in huge drums from Switzerland so unfortunately it's not a period car paint or similar.
Eventually I mixed something similar: https://www.bikeforums.net/classic-v...red-pearl.html.
Here's the painting details:
And here's the current state:
(Gallery at https://www.bikeforums.net/g/album/30321604)
It's my first paint job and it has a few blemishes but I recon it's a 9/10
The painting took quite a while, but it did give me time to find parts on Ebay, so here's my almost period build plan:
(green tick means I've got the item)
That's probably more information than most people want, but some of the pics are quite nice
Comments and help most welcome.
Last edited by Aardwolf; 08-01-23 at 07:15 AM. Reason: typo
 08-01-23, 04:39 AM
#2

Tinker-er
Join Date: Oct 2007
Location: Mid-Atlantic
Posts: 450
Bikes: 1956 Rudge Sports; 1983 Univega Alpina Uno; 1981 Miyata 610; 1973 Raleigh Twenty; 1994 Breezer Lightning XTR; V4 Yuba Mundo aka "The Schlepper"; 1987 Raleigh "The Edge" Mountain Trials; 1952 R.O. Harrison "Madison"
Mentioned: 2 Post(s)
Tagged: 0 Thread(s)
Quoted: 165 Post(s)
Liked 267 Times
in
183 Posts
Outstanding!
08-01-23, 06:04 AM
#3
So it goes.

Join Date: Apr 2014
Location: W. Tennessee
Posts: 965
Bikes: A few. Quite a few.
Mentioned: 24 Post(s)
Tagged: 0 Thread(s)
Quoted: 432 Post(s)
Liked 639 Times
in
261 Posts
Very nice, following the thread so I can see what this looks like when you get it fully assembled and rolling. I have developed a bit of an obsession with British bikes of the 40s-60s era, fascinating things going on in that time period. That seller your gallery pics are from looks like TheVeloPages by the way, I've been following their listings for some time now.
__________________
Pohl's law: Nothing is so good that somebody, somewhere, will not hate it.
Pohl's law: Nothing is so good that somebody, somewhere, will not hate it.
Last edited by PilotFishBob; 08-01-23 at 06:06 AM. Reason: Typo
08-01-23, 06:19 AM
#4
Wheelman
Thread Starter
Join Date: Aug 2021
Location: Putney, London UK
Posts: 847
Bikes: 1982 Holdsworth Avanti (531), 1961 Holdsworth Cyclone
Mentioned: 4 Post(s)
Tagged: 0 Thread(s)
Quoted: 298 Post(s)
Liked 676 Times
in
341 Posts
Very nice, following the thread so I can see what this looks like when you get it fully assembled and rolling. I have developed a bit of an obsession with British bikes of the 40s-60s era, fascinating things going on in that time period. That seller your gallery pics are from looks like TheVeloPages by the way, I've been following their listings for some time now.
Current Ebay advert: https://www.ebay.co.uk/itm/195913010...0AAOSw5zFjIZdq
Whirlwind
Likes For Aardwolf:
08-01-23, 06:21 AM
#5
Senior Member

Join Date: Apr 2012
Location: Middle Earth (aka IA)
Posts: 20,435
Bikes: A bunch of old bikes and a few new ones
Mentioned: 178 Post(s)
Tagged: 0 Thread(s)
Quoted: 5888 Post(s)
Liked 3,471 Times
in
2,079 Posts
Hiya Folks,
snip . . .
Living in a London flat I don't really have room for spraying so I went for brush painting in the kitchen on a home made painting stand: https://www.bikeforums.net/classic-v...ing-stand.html
snip . .
That's probably more information than most people want, but some of the pics are quite nice
Comments and help most welcome.
Edit: you might want to think about different rings since you could run 50/34 or 48/32. That might let you shrink the freewheel a bit. With 2 x 5 gearing and hills, there are always trade offs in gearing.
Last edited by bikemig; 08-01-23 at 07:52 AM.
Likes For bikemig:
08-01-23, 06:25 AM
#6
I don't know.

Join Date: May 2003
Location: South Meriden, CT
Posts: 2,015
Bikes: '90 B'stone RB-1, '92 B'stone RB-2, '89 SuperGo Access Comp, '03 Access 69er, '23 Trek 520, '14 Ritchey Road Logic, '09 Kestrel Evoke, '08 Windsor Tourist, '17 Surly Wednesday, '89 Centurion Accordo, '15 CruX, '17 Ridley X-Night, '89 Marinoni
Mentioned: 2 Post(s)
Tagged: 0 Thread(s)
Quoted: 317 Post(s)
Liked 853 Times
in
446 Posts
looking forward to see this complete.
08-01-23, 06:26 AM
#7
Senior Member

Join Date: Feb 2013
Location: Alta California
Posts: 14,271
Mentioned: 415 Post(s)
Tagged: 1 Thread(s)
Quoted: 3814 Post(s)
Liked 3,345 Times
in
2,182 Posts
-----
thanks very much for this great report!
the 114 rear spacing it arrived with could also indicate that a previous owner ran it as a planetary
look forward to following along for the build
-----
thanks very much for this great report!
the 114 rear spacing it arrived with could also indicate that a previous owner ran it as a planetary
look forward to following along for the build
-----
08-01-23, 07:13 AM
#8
Senior Member

Join Date: Jan 2015
Location: Los Angeles
Posts: 4,707
Bikes: 82 Medici, 2011 Richard Sachs, 2011 Milwaukee Road
Mentioned: 55 Post(s)
Tagged: 0 Thread(s)
Quoted: 1952 Post(s)
Liked 2,013 Times
in
1,112 Posts
WOW!
To be clear: ALL done with a brush? I was much happier with my brushed PX-10 than any thing I had previously sprayed but that didn�t compare to your Holdsworth. I wonder if your enamels are near enough to products available over here in California. Did you �convert� the uPol Clear to a liquid and then brush on? And over which parts did you use this and which parts did you use the Yacht Varnish? You got me thinking about taking liberties with a Raleigh Competition that needs paint.
To be clear: ALL done with a brush? I was much happier with my brushed PX-10 than any thing I had previously sprayed but that didn�t compare to your Holdsworth. I wonder if your enamels are near enough to products available over here in California. Did you �convert� the uPol Clear to a liquid and then brush on? And over which parts did you use this and which parts did you use the Yacht Varnish? You got me thinking about taking liberties with a Raleigh Competition that needs paint.
__________________
I don't do: disks, tubeless, e-shifting, or bead head nymphs.
I don't do: disks, tubeless, e-shifting, or bead head nymphs.
Likes For Classtime:
08-01-23, 07:38 AM
#9
Wheelman
Thread Starter
Join Date: Aug 2021
Location: Putney, London UK
Posts: 847
Bikes: 1982 Holdsworth Avanti (531), 1961 Holdsworth Cyclone
Mentioned: 4 Post(s)
Tagged: 0 Thread(s)
Quoted: 298 Post(s)
Liked 676 Times
in
341 Posts
WOW!
To be clear: ALL done with a brush? I was much happier with my brushed PX-10 than any thing I had previously sprayed but that didn’t compare to your Holdsworth. I wonder if your enamels are near enough to products available over here in California. Did you “convert” the uPol Clear to a liquid and then brush on? And over which parts did you use this and which parts did you use the Yacht Varnish? You got me thinking about taking liberties with a Raleigh Competition that needs paint.
To be clear: ALL done with a brush? I was much happier with my brushed PX-10 than any thing I had previously sprayed but that didn’t compare to your Holdsworth. I wonder if your enamels are near enough to products available over here in California. Did you “convert” the uPol Clear to a liquid and then brush on? And over which parts did you use this and which parts did you use the Yacht Varnish? You got me thinking about taking liberties with a Raleigh Competition that needs paint.
That HMG SAH300 enamel is damn fine stuff:
https://www.hmgpaint.com/products/industrial/topcoat/280/sah300-enamel
https://www.rawlinspaints.com/home/m...00-enamel.html
"A high solids, gloss 1K Polyurethane alkyd designed for brush application. It affords excellent protection against harsh
weather conditions, atmospheric pollution, road dirt, sharp cleaning agents and mechanical car washes etc. SAH300 is
only available in a full gloss finish."
About �30 / litre including delivery in the UK
It takes about 12 hours to set and I tried and failed to leave a brush mark in it.https://www.rawlinspaints.com/home/m...00-enamel.html
"A high solids, gloss 1K Polyurethane alkyd designed for brush application. It affords excellent protection against harsh
weather conditions, atmospheric pollution, road dirt, sharp cleaning agents and mechanical car washes etc. SAH300 is
only available in a full gloss finish."
About �30 / litre including delivery in the UK
It's basically synthetic alkyd enamel formulated for brushing.
The UPol clear was used because it doesn't smear the DecoColor gold paint marker, whereas white spirits or 151 Yacht Varnish will just remove the gold
5 days later: https://www.bikeforums.net/classic-v...nt-marker.html
So it was only sprayed over the lug lining, waited 1 day and then varnished over that.
I didn't think to spray it into the cap and then paint it on, consequently I got some slight orange peal.
The 151 Yacht Varnish is I think alkyd based, it also doesn't yellow.
The frame is going to get 4 layers of varnish - it's the carrier for the red flake and it's the clear.
So the full frame is getting 2 coats, below and on top of the decals.
I'm not completely convinced on the 151 Yacht Varnish, I've had a couple of issues with it but nothing major,
and it's the best varnish I've found so far - tried 3 different 'solvent' based varnishes.
NB. I bought a 1952 Bertin frame for �20 and I've been practising paint combinations on that.
Edit: Forgot to mention, in retrospect the DecoColor liquid gold paint marker wiping off when white spirit or varnish is applied
isn't really a bad thing. Getting the lining right is quite difficult and with it wiping off you have at least 5 days to see if you like
what you've done. You can use a QTip and white spirit to redo bits you don't like.
Last edited by Aardwolf; 08-15-23 at 03:43 AM. Reason: typo
08-01-23, 08:16 AM
#10
Wheelman
Thread Starter
Join Date: Aug 2021
Location: Putney, London UK
Posts: 847
Bikes: 1982 Holdsworth Avanti (531), 1961 Holdsworth Cyclone
Mentioned: 4 Post(s)
Tagged: 0 Thread(s)
Quoted: 298 Post(s)
Liked 676 Times
in
341 Posts
Terrific job and no that's not more information than most people want, at least not among the C&V folks. The derailleurs may not be period correct but they are the best of the vintage derailleurs and will work nicely with the freewheels you've picked out. That will give you the gearing to cycle throughout the UK. I'm rebuilding an early 70s Raleigh Gran Sport and my gearing will be similar. The bike has been spread to 126 and I'm going to use 50/34 rings and a 13-32 7 speed freewheel.
Edit: you might want to think about different rings since you could run 50/34 or 48/32. That might let you shrink the freewheel a bit. With 2 x 5 gearing and hills, there are always trade offs in gearing.
Edit: you might want to think about different rings since you could run 50/34 or 48/32. That might let you shrink the freewheel a bit. With 2 x 5 gearing and hills, there are always trade offs in gearing.
Avanti gear inches: 107 - 39.9
Cyclone gear inches: 107-34.2 or 107-30
I've been noting what gear I'm in on the Avanti and I do use 107gi on the flat/down hill and there's 3 or 4 local 'hills' where I can use either of the bottom 2 gears.
Edit: And I've got the same SunTour Cyclone GT / Power Shifter combination on my Avanti and it's damn fine.
Last edited by Aardwolf; 08-01-23 at 08:24 AM.
08-01-23, 10:44 AM
#11
Senior Member
Excellent work and a beautiful color scheme. As you know, now that it's painted red, it WILL go faster.
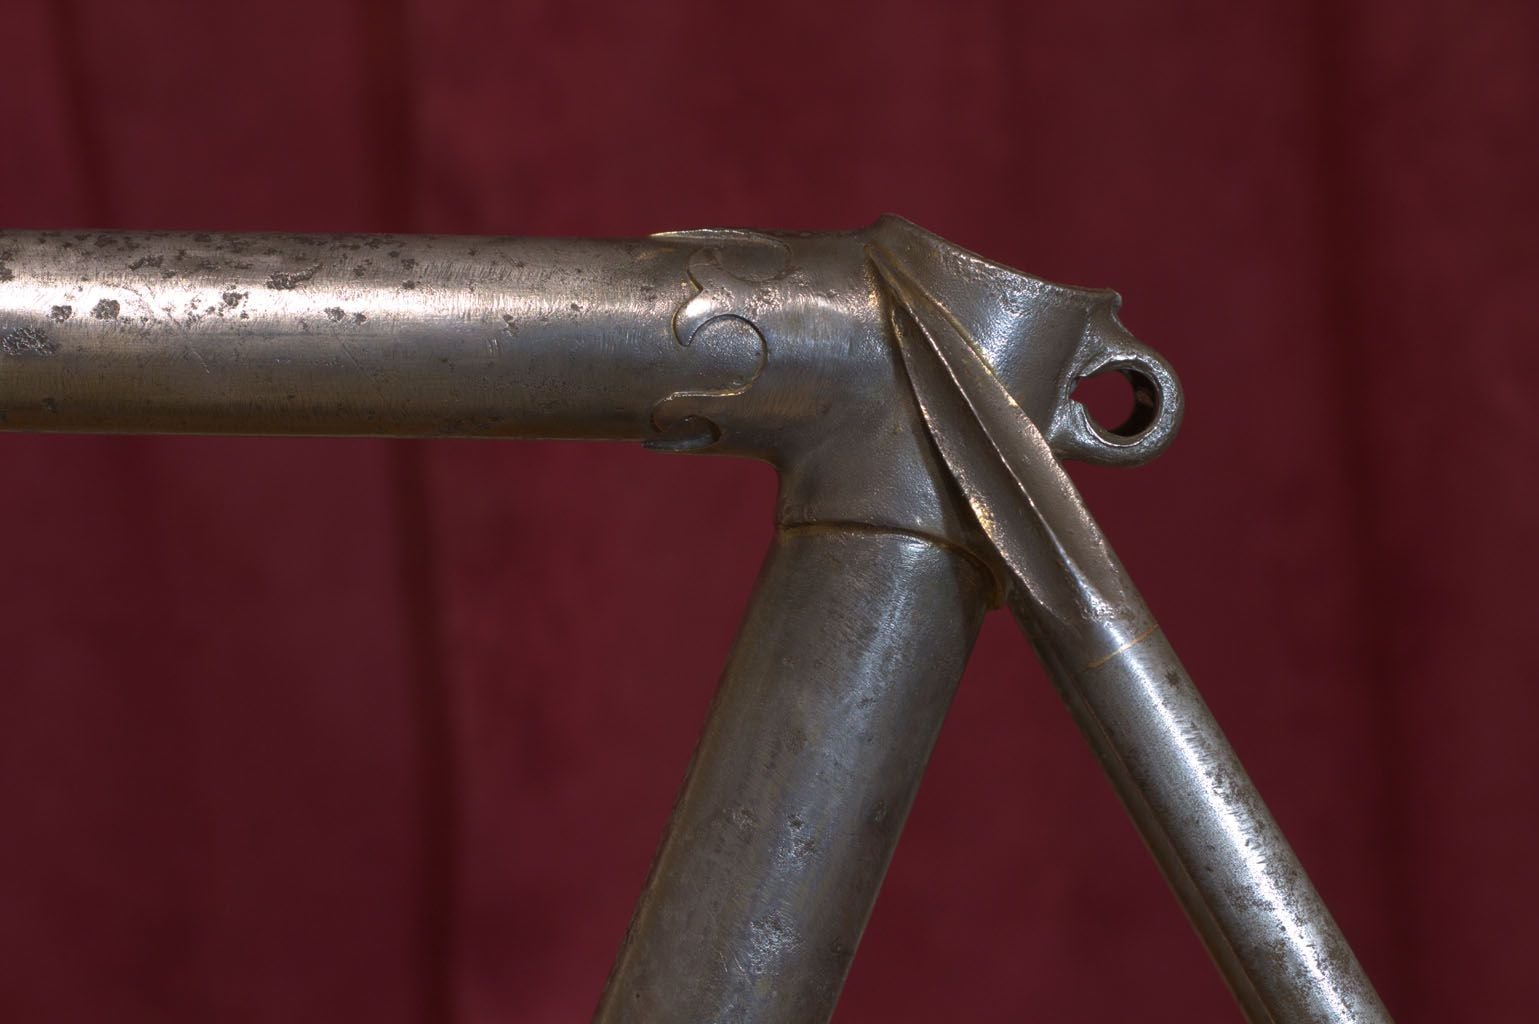
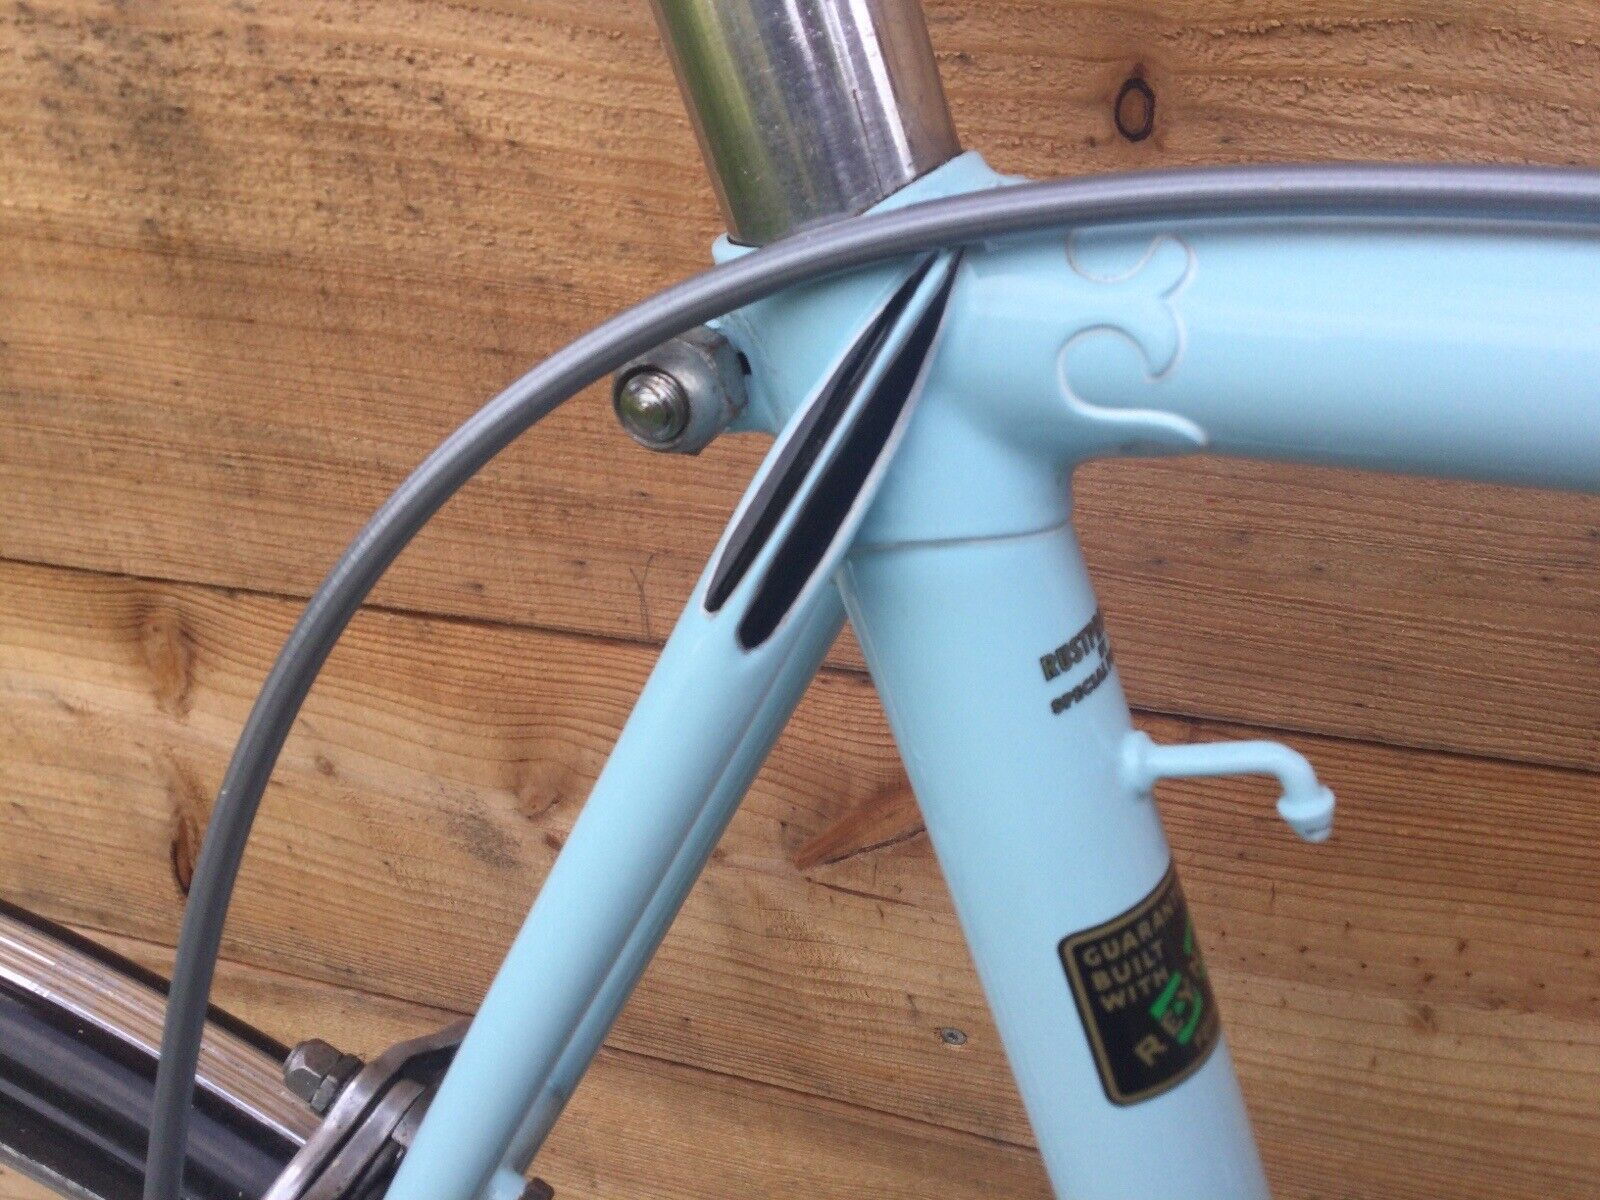
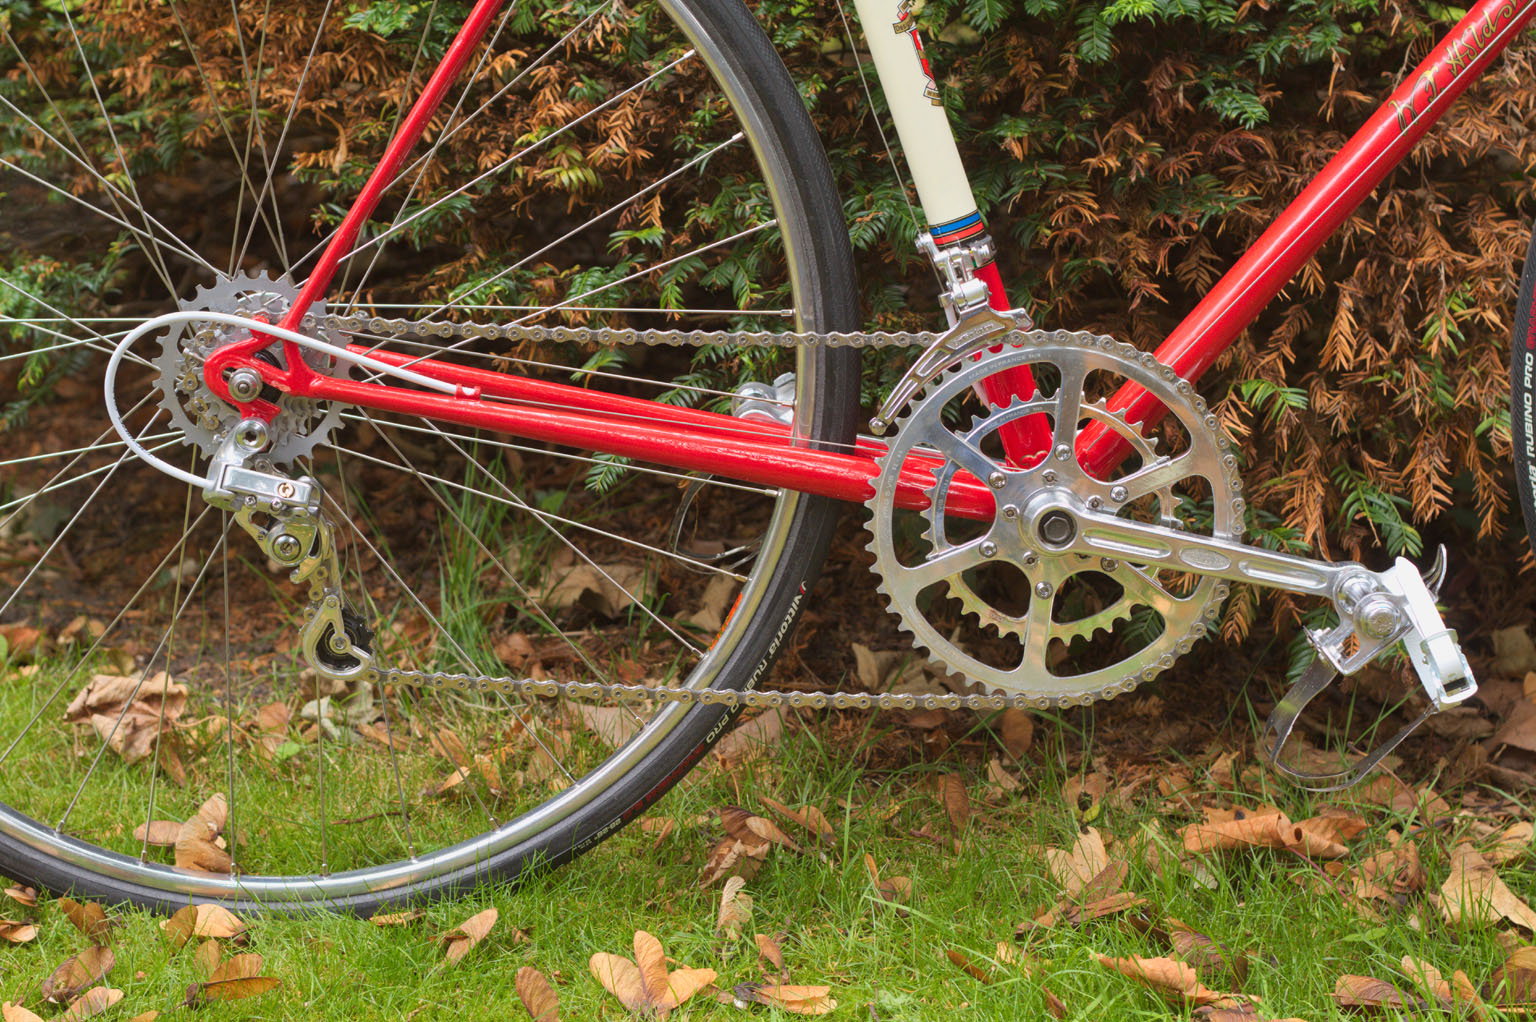
I love the spear point stay ends!
I love the spear point stay ends!
08-02-23, 04:00 PM
#12
Wheelman
Thread Starter
Join Date: Aug 2021
Location: Putney, London UK
Posts: 847
Bikes: 1982 Holdsworth Avanti (531), 1961 Holdsworth Cyclone
Mentioned: 4 Post(s)
Tagged: 0 Thread(s)
Quoted: 298 Post(s)
Liked 676 Times
in
341 Posts
I almost went for that, but decided my limited artistic skills were already being pushed far enough and I would just mess it up somehow.
08-09-23, 07:10 AM
#13
Wheelman
Thread Starter
Join Date: Aug 2021
Location: Putney, London UK
Posts: 847
Bikes: 1982 Holdsworth Avanti (531), 1961 Holdsworth Cyclone
Mentioned: 4 Post(s)
Tagged: 0 Thread(s)
Quoted: 298 Post(s)
Liked 676 Times
in
341 Posts
Having fun with the BB, ordered a Tange LN-3922 68x115 mm for �22.
Mostly because Sheldon got a Shimano UN52 115mm for a Hetchins (https://sheldonbrown.com/bbsize.html#ta)
and because the general approach seems to be to try something and work out where it doesn't fit.
I realise the UN52 is probably asymmetric but I have to start somewhere and I don't have a spare BB that isn't cracked.
First mistake was to tighten everything and remove some clear , fixable though.
Then I ordered some BB spacers to pad the DS so I could take measurements without any more damage.
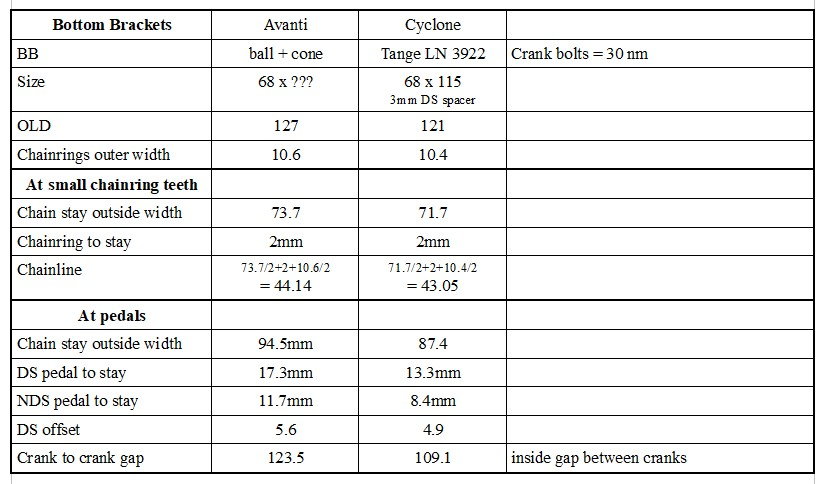
Comparing it to my Avanti which has the original 1982 cone+ball bottom bracket the LN-3922 115mm with a 3mm spacer actually looks quite good.
The options seem to be
Does anybody have a reason why that would be a bad thing to do ?
Mostly because Sheldon got a Shimano UN52 115mm for a Hetchins (https://sheldonbrown.com/bbsize.html#ta)
and because the general approach seems to be to try something and work out where it doesn't fit.
I realise the UN52 is probably asymmetric but I have to start somewhere and I don't have a spare BB that isn't cracked.
First mistake was to tighten everything and remove some clear
, fixable though.Then I ordered some BB spacers to pad the DS so I could take measurements without any more damage.
Comparing it to my Avanti which has the original 1982 cone+ball bottom bracket the LN-3922 115mm with a 3mm spacer actually looks quite good.
The options seem to be
- LN-3922 115mm with 3mm spacer - approx 2mm gap
- LN-3922 118mm with no spacers - approx 0.5mm gap
- LN-3922 122.5mm with no spacers - approx 2.75mm gap
Does anybody have a reason why that would be a bad thing to do ?
Last edited by Aardwolf; 08-10-23 at 12:56 AM. Reason: typos
Likes For Aardwolf:
08-11-23, 03:30 AM
#14
Wheelman
Thread Starter
Join Date: Aug 2021
Location: Putney, London UK
Posts: 847
Bikes: 1982 Holdsworth Avanti (531), 1961 Holdsworth Cyclone
Mentioned: 4 Post(s)
Tagged: 0 Thread(s)
Quoted: 298 Post(s)
Liked 676 Times
in
341 Posts
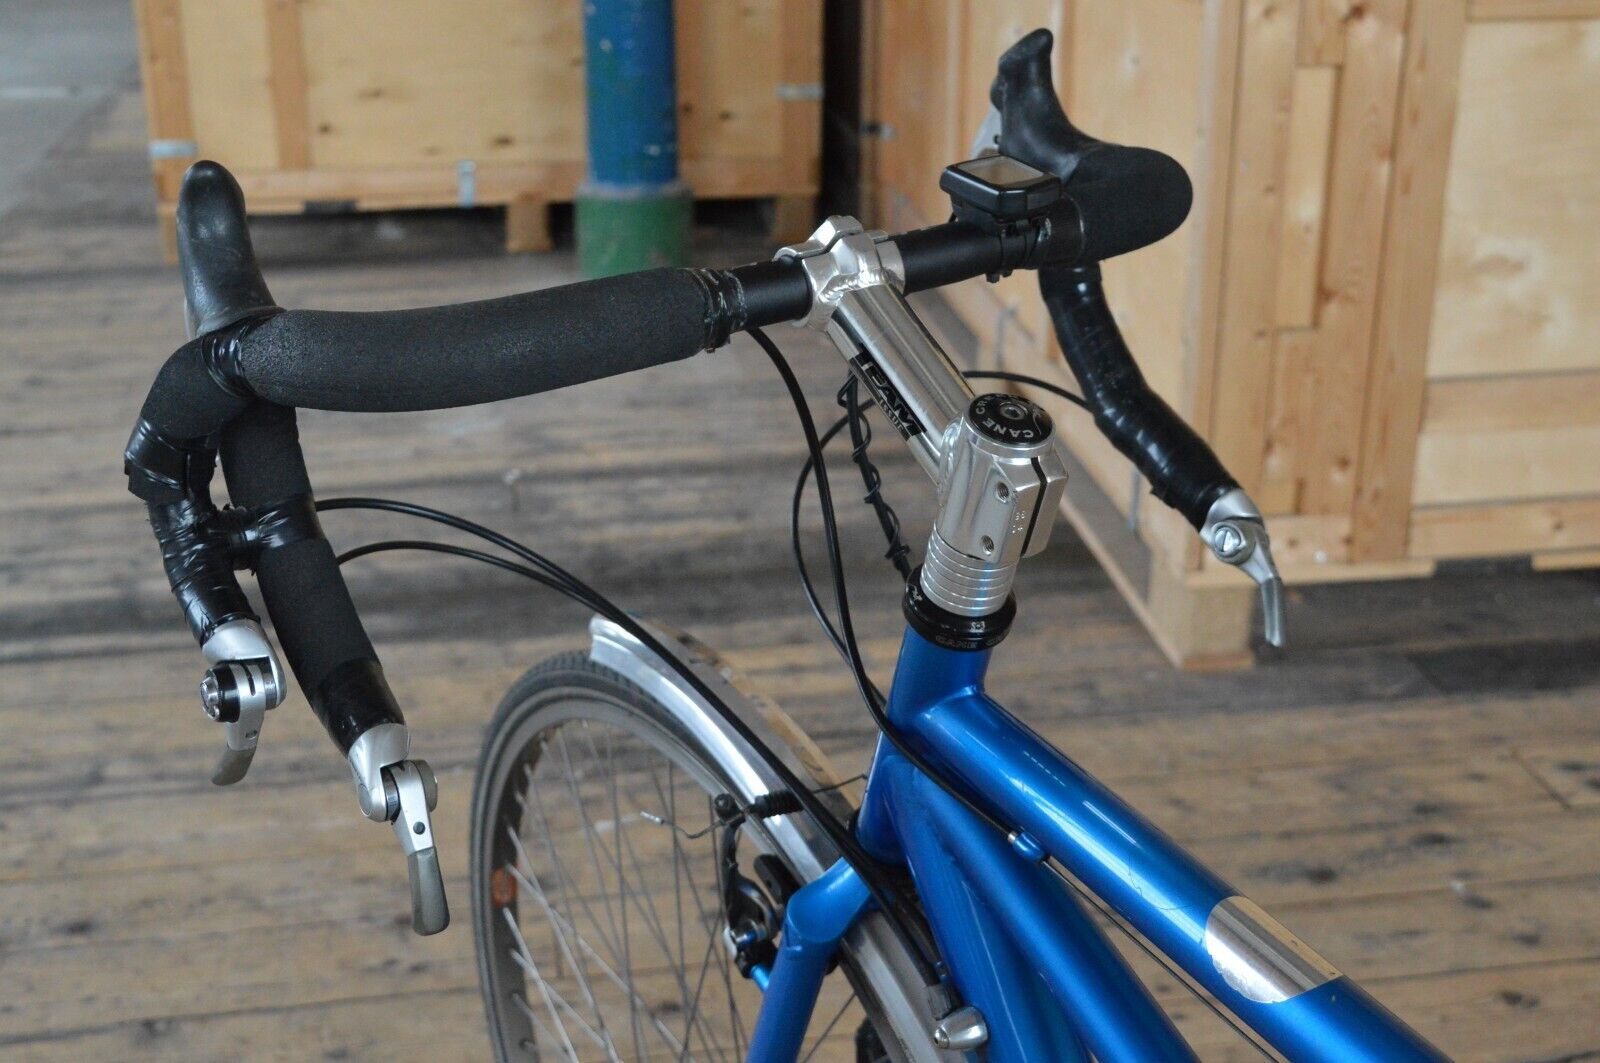
Time to check if the parts fit:
No problems so far.
Even the brakes are long enough (although the toe-in needs setting):
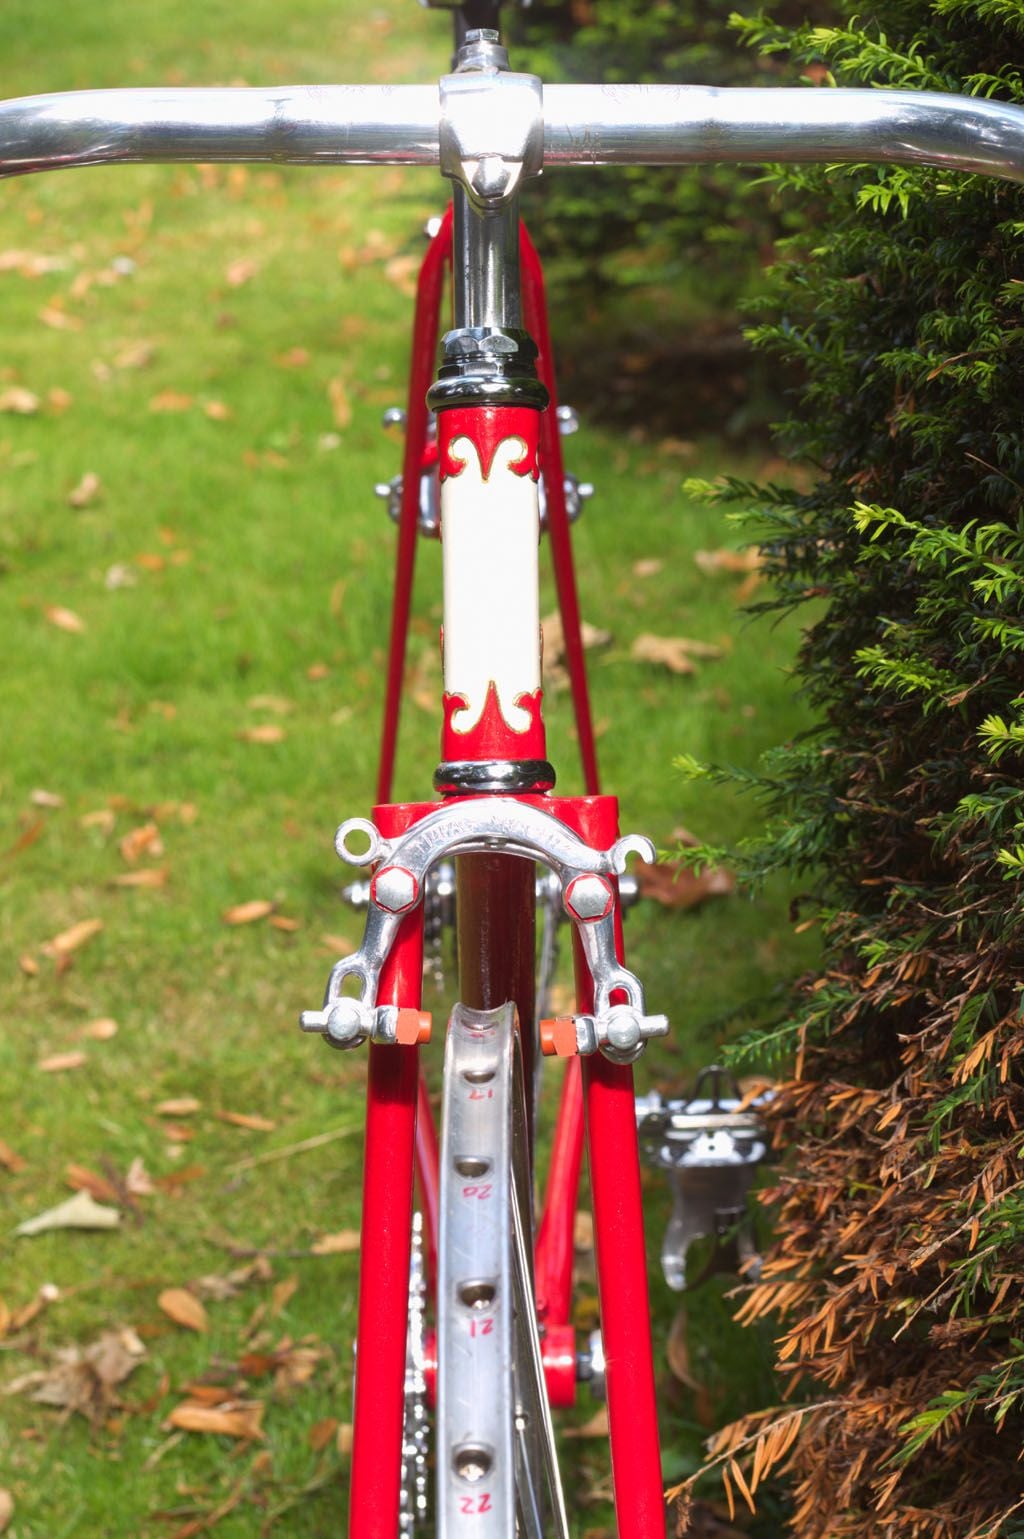
And a special thanks to Elswood Cycleworks (Putney) who fitted the crown race for free despite having to remove some paint (2nd time they've done that). (I don't have the right size metal tube).
No problems so far.
Even the brakes are long enough (although the toe-in needs setting):
And a special thanks to Elswood Cycleworks (Putney) who fitted the crown race for free despite having to remove some paint (2nd time they've done that). (I don't have the right size metal tube).
08-11-23, 02:19 PM
#15
Junior Member
Very nice!
08-12-23, 07:37 AM
#16

Senior Member
Join Date: Jun 2006
Posts: 20,305
Mentioned: 130 Post(s)
Tagged: 0 Thread(s)
Quoted: 3464 Post(s)
Liked 2,831 Times
in
1,997 Posts
I would be on the lookout for Dural Forg� brakes
should turn out very well.
should turn out very well.
Likes For Aardwolf:
08-13-23, 09:45 AM
#18
Standard Member
Join Date: Apr 2009
Location: Brunswick, Maine
Posts: 4,272
Bikes: 1948 P. Barnard & Son, 1962 Rudge Sports, 1963 Freddie Grubb Routier, 1980 Manufrance Hirondelle, 1983 F. Moser Sprint, 1989 Raleigh Technium Pre, 2001 Raleigh M80
Mentioned: 26 Post(s)
Tagged: 0 Thread(s)
Quoted: 1297 Post(s)
Liked 940 Times
in
490 Posts
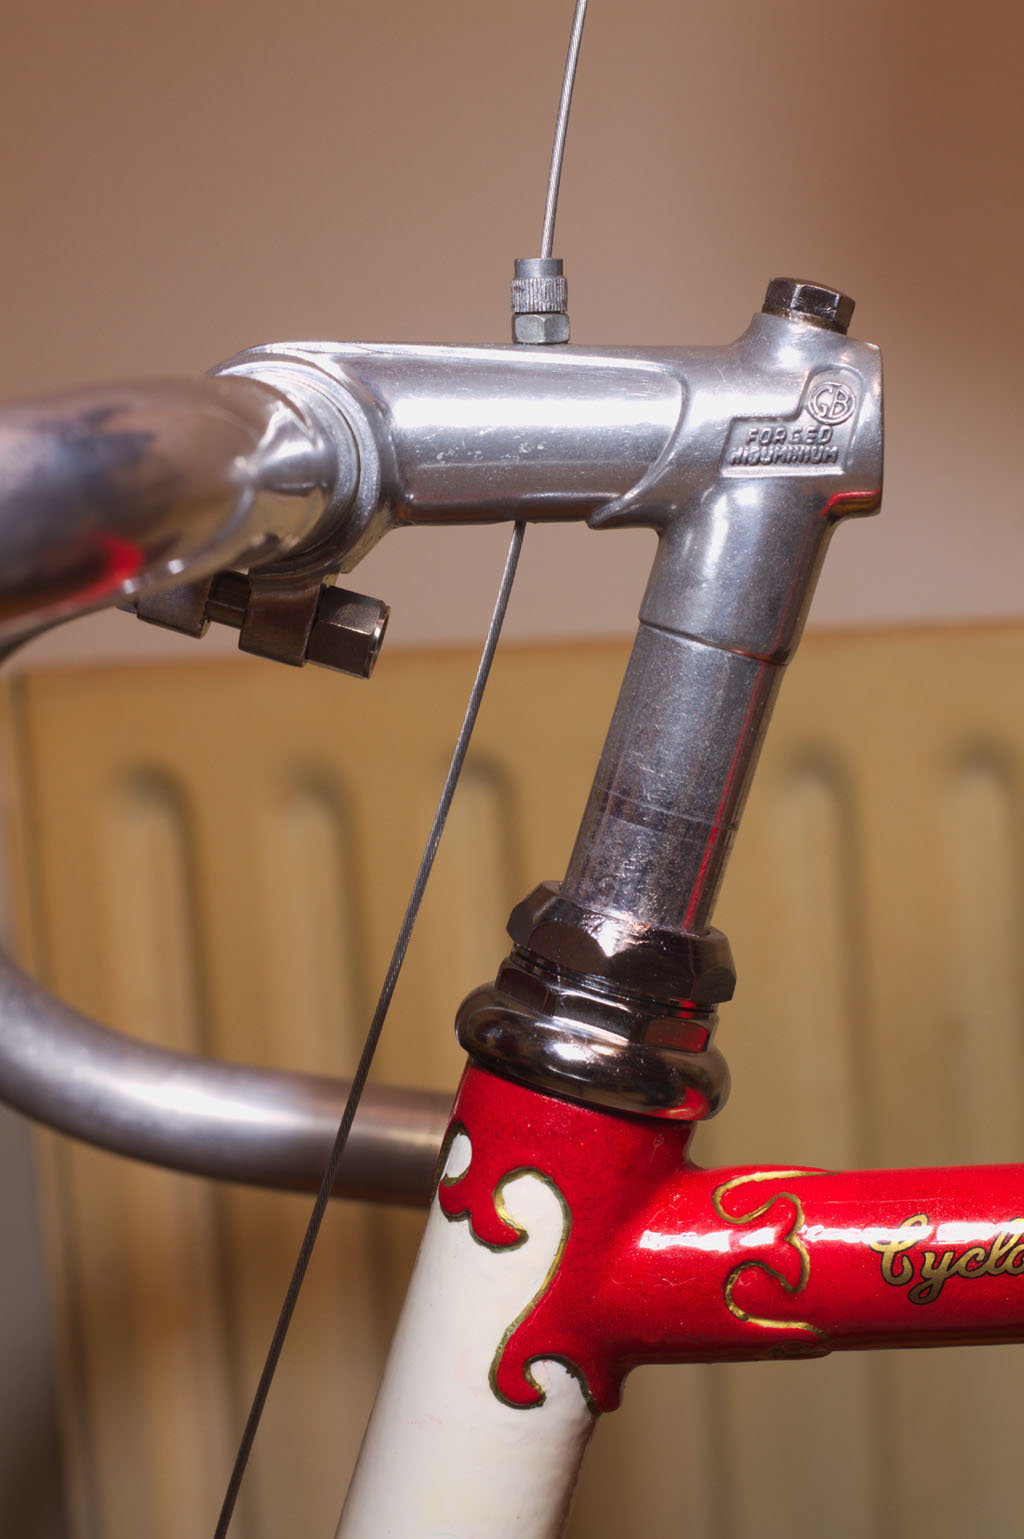
That's probably one of the nicer lug-lining jobs that I've seen. That is a gorgeous frame and you did well in the painting. The brush-on paint may be more durable than spray, and is more environmentally-friendly. That is a case-study in hand-painting. Thank you for the great photos and all of the precise information on the build. The MAFAC Racers give it a ballsy look. Did you drill out the GB stem yourself, or was that a factory job?
__________________
Unless you climb the rungs strategically, you�re not going to build the muscle you need to stay at the top.
Unless you climb the rungs strategically, you�re not going to build the muscle you need to stay at the top.
Likes For 1989Pre:
08-13-23, 10:41 AM
#19
Wheelman
Thread Starter
Join Date: Aug 2021
Location: Putney, London UK
Posts: 847
Bikes: 1982 Holdsworth Avanti (531), 1961 Holdsworth Cyclone
Mentioned: 4 Post(s)
Tagged: 0 Thread(s)
Quoted: 298 Post(s)
Liked 676 Times
in
341 Posts
That's probably one of the nicer lug-lining jobs that I've seen. That is a gorgeous frame and you did well in the painting. The brush-on paint may be more durable than spray, and is more environmentally-friendly. That is a case-study in hand-painting. Thank you for the great photos and all of the precise information on the build. The MAFAC Racers give it a ballsy look. Did you drill out the GB stem yourself, or was that a factory job?
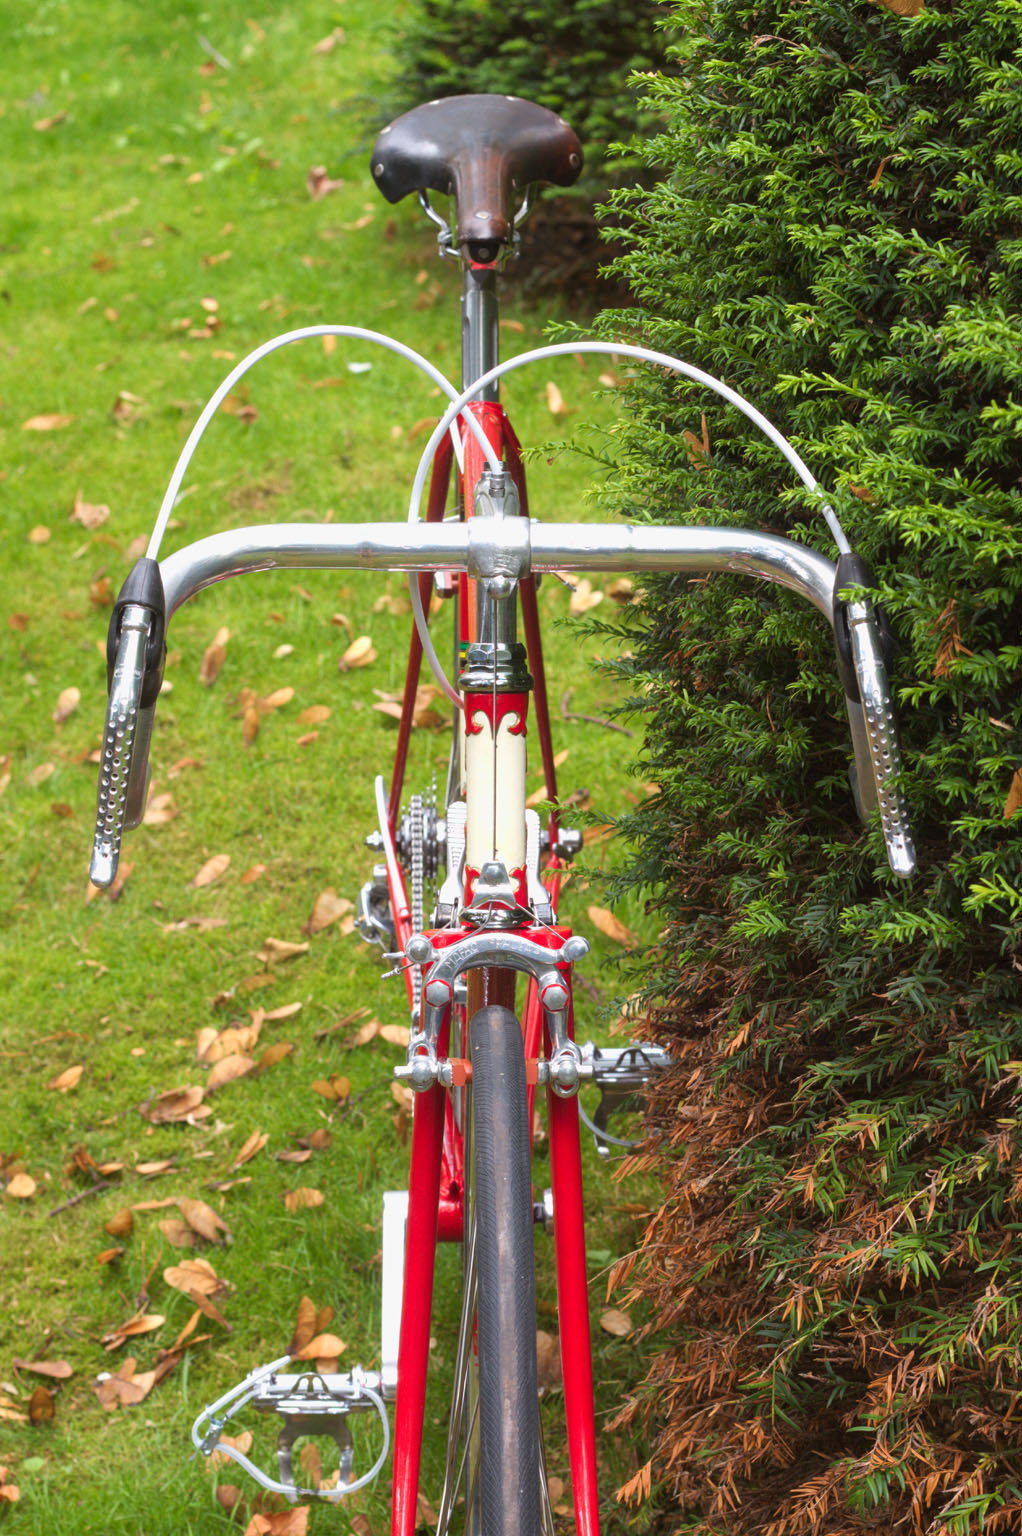
Actually I just drilled the stem myself this morning, and it worked out just fine.
Edit: using a good old fashioned hand drill.
When I bought the frame the stem that came with it had a crack starting and was too tight to remove from the cr*ppy bars so I had to cut the bars off (boo hiss).
So I used that stem to practise drilling and discovered an important lesson: the stem is hollow and you need to drill 2 holes at different angles.
Hole 1 is the top one you thread the adjuster into (5mm hole tapped to M6) and is perpendicular to the stem top surface about 38mm from the stem bolt centre.
Hole 2 is the bottom one and is parallel to the stem quill - not parallel to Hole 1. Also 5mm and positioned to meet the bottom of the adjuster in hole 1 so the brake cable will exit cleanly without touching the sides.
I tried a brake cable in place and positioned hole 1 so the cable is about parallel to the head tube:
Last edited by Aardwolf; 08-13-23 at 10:55 AM.
Likes For Aardwolf:
08-13-23, 01:05 PM
#20
Standard Member
Join Date: Apr 2009
Location: Brunswick, Maine
Posts: 4,272
Bikes: 1948 P. Barnard & Son, 1962 Rudge Sports, 1963 Freddie Grubb Routier, 1980 Manufrance Hirondelle, 1983 F. Moser Sprint, 1989 Raleigh Technium Pre, 2001 Raleigh M80
Mentioned: 26 Post(s)
Tagged: 0 Thread(s)
Quoted: 1297 Post(s)
Liked 940 Times
in
490 Posts
Thanks for the generous comments
Actually I just drilled the stem myself this morning, and it worked out just fine.
Edit: using a good old fashioned hand drill.
When I bought the frame the stem that came with it had a crack starting and was too tight to remove from the cr*ppy bars so I had to cut the bars off (boo hiss).
So I used that stem to practise drilling and discovered an important lesson: the stem is hollow and you need to drill 2 holes at different angles.
Hole 1 is the top one you thread the adjuster into (5mm hole tapped to M6) and is perpendicular to the stem top surface about 38mm from the stem bolt centre.
Hole 2 is the bottom one and is parallel to the stem quill - not parallel to Hole 1. Also 5mm and positioned to meet the bottom of the adjuster in hole 1 so the brake cable will exit cleanly without touching the sides.
I tried a brake cable in place and positioned hole 1 so the cable is about parallel to the head tube:
__________________
Unless you climb the rungs strategically, you�re not going to build the muscle you need to stay at the top.
Unless you climb the rungs strategically, you�re not going to build the muscle you need to stay at the top.
08-13-23, 01:24 PM
#21
Wheelman
Thread Starter
Join Date: Aug 2021
Location: Putney, London UK
Posts: 847
Bikes: 1982 Holdsworth Avanti (531), 1961 Holdsworth Cyclone
Mentioned: 4 Post(s)
Tagged: 0 Thread(s)
Quoted: 298 Post(s)
Liked 676 Times
in
341 Posts
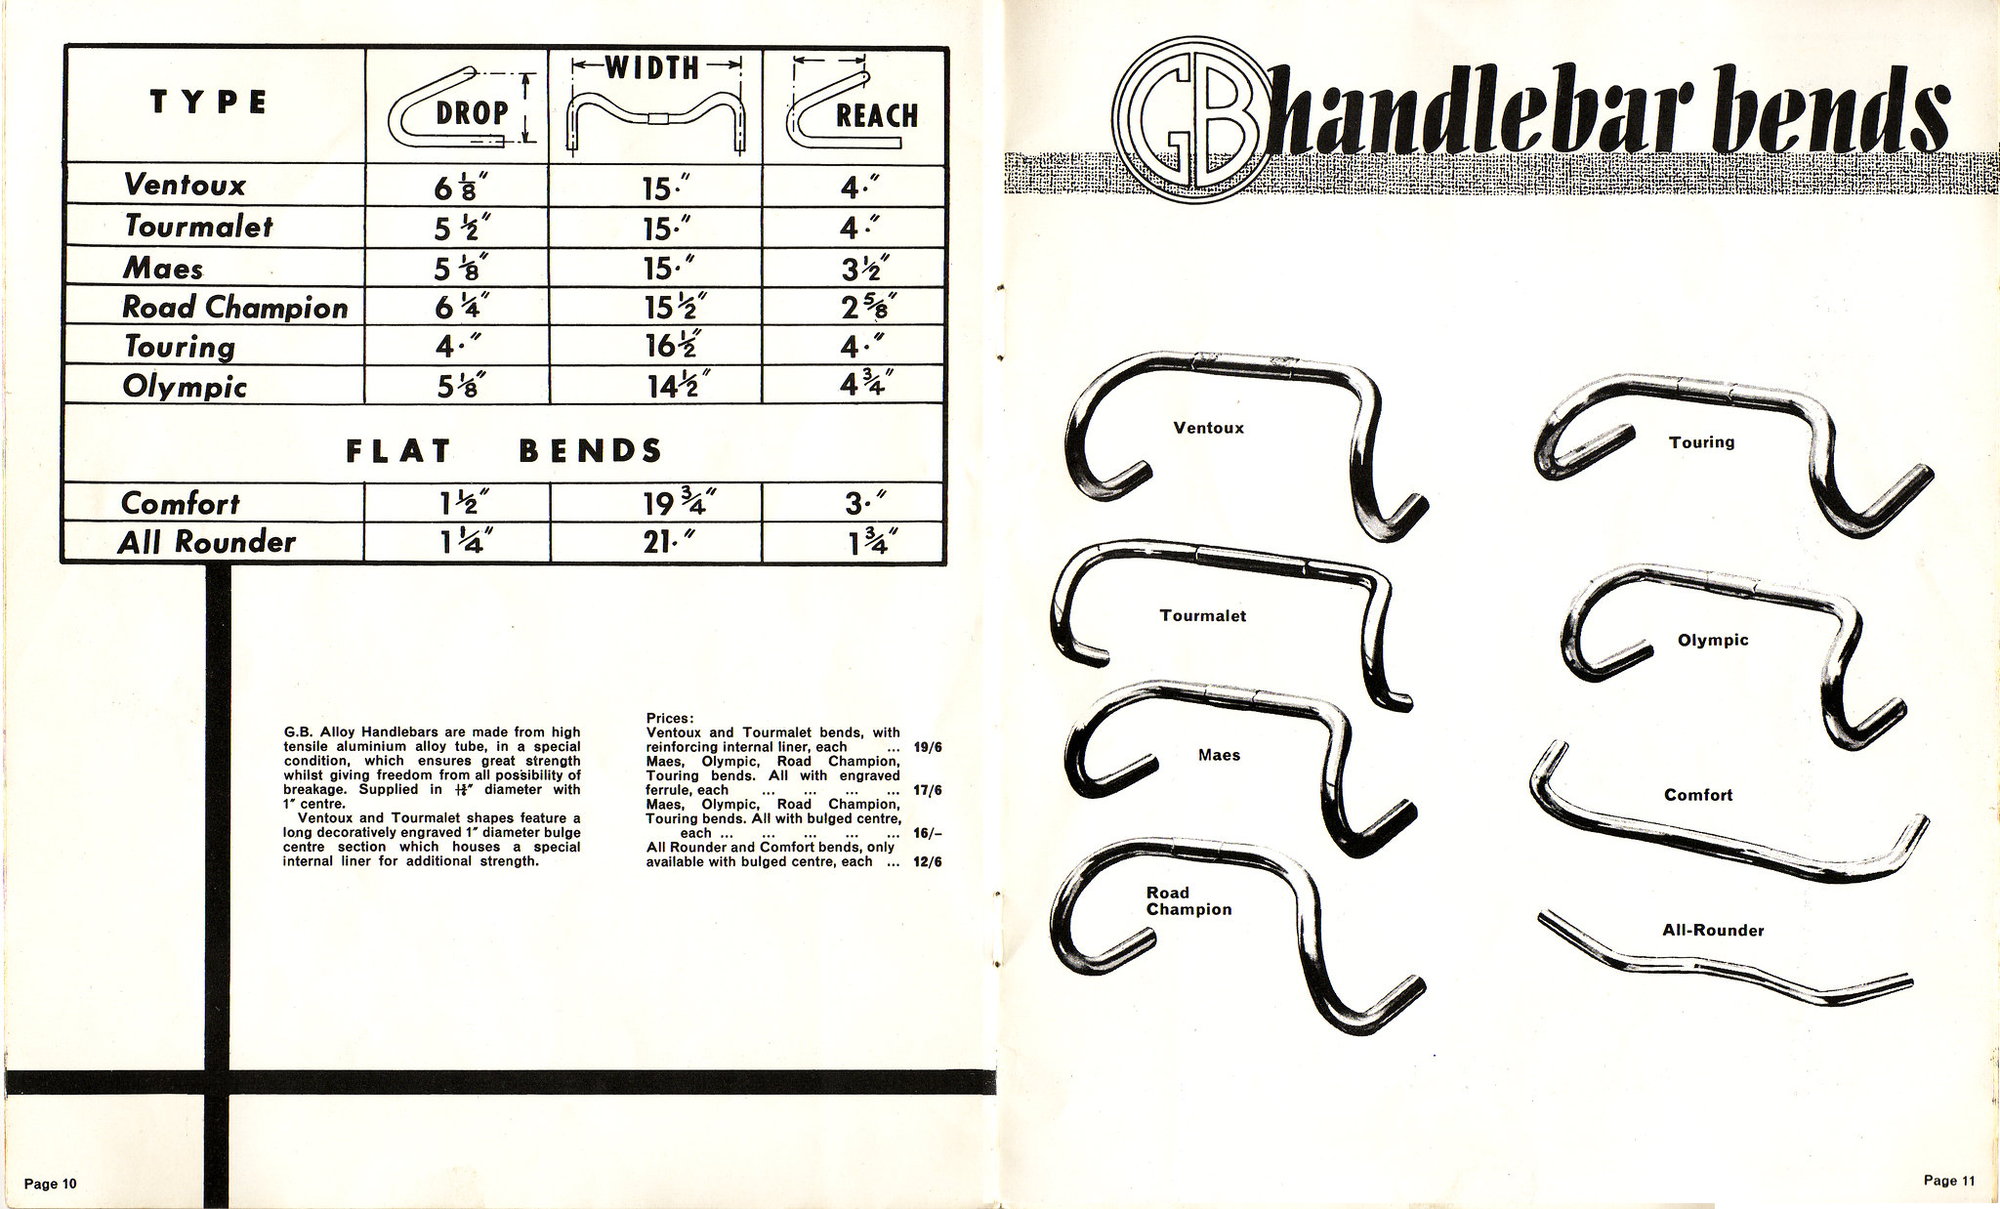
I bought a GB Tourmalet a while back in preparation and they're the ones I'm using - similar to the bars on my Avanti, but with the engraved 'GB' and map.
Edit: same as the engraving on GB Ventoux: https://velobase.com/ViewComponent.a...b768b&Enum=112
They came with a GB Ventoux for free, and some GB Professional toe cages.
1960's GB bars:
Last edited by Aardwolf; 08-14-23 at 02:52 AM. Reason: Ventoux not Maes
Likes For Aardwolf:
 09-02-23, 07:04 AM
#23
Wheelman
Thread Starter
Join Date: Aug 2021
Location: Putney, London UK
Posts: 847
Bikes: 1982 Holdsworth Avanti (531), 1961 Holdsworth Cyclone
Mentioned: 4 Post(s)
Tagged: 0 Thread(s)
Quoted: 298 Post(s)
Liked 676 Times
in
341 Posts
Definitely making progress, almost ready to ride.
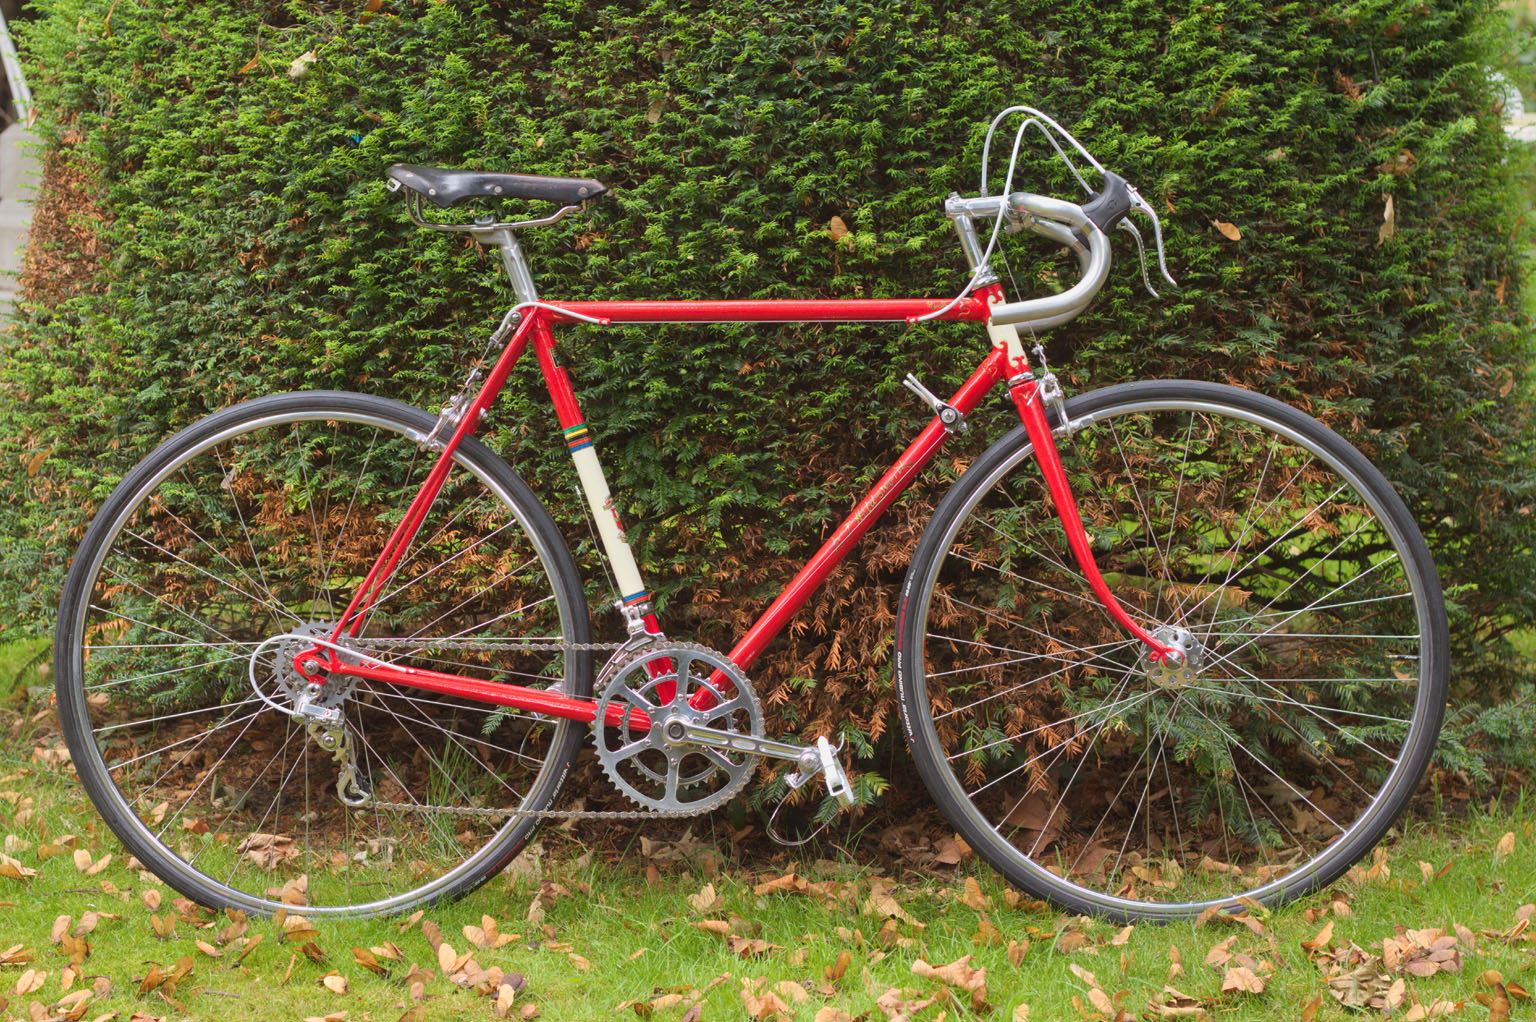
- Trued wheels.
- Tyres arrived from Spain (BikeInn) and now fitted
- Polished the clear coat.
- Brakes fitted and adjusted, even has toe-in.
- Power shifters fitted, then removed and ratchet fitted the right way round and refitted
- Derailleurs fitted but need adjusting.
- Fit copied from my Avanti.
Likes For Aardwolf:
09-06-23, 12:22 PM
#24
Wheelman
Thread Starter
Join Date: Aug 2021
Location: Putney, London UK
Posts: 847
Bikes: 1982 Holdsworth Avanti (531), 1961 Holdsworth Cyclone
Mentioned: 4 Post(s)
Tagged: 0 Thread(s)
Quoted: 298 Post(s)
Liked 676 Times
in
341 Posts
I've been playing with the RD - Cyclone II GT.
Initially it had trouble going into top gear (13T) on the New Winner Ultra 6 13-15-17-19-21-28.
But the huge upside is my spacing calculations were spot on - no chain rubbing anywhere
So I adjusted the hanger using the "spare wheel" method:
.
That worked a treat, then I slackened the B screw to give more chain round the sprocket.
Now it works fine on the workshop floor.
Backup plan is to try the Cyclone from my Avanti which handles 7 or 8 gears just fine.
May still have to do that to check if the new RD is bent in some manner.
Small issue is the L screw on a Cyclone only really works for 6-8 gears (ie 126mm OLD), the screw is M4 fine with 10mm of thread.
Luckily I have a junk SunTour Skitter which has M4 fine screws with 14.4mm of thread.
Initially it had trouble going into top gear (13T) on the New Winner Ultra 6 13-15-17-19-21-28.
But the huge upside is my spacing calculations were spot on - no chain rubbing anywhere
So I adjusted the hanger using the "spare wheel" method:
That worked a treat, then I slackened the B screw to give more chain round the sprocket.
Now it works fine on the workshop floor.
Backup plan is to try the Cyclone from my Avanti which handles 7 or 8 gears just fine.
May still have to do that to check if the new RD is bent in some manner.
Small issue is the L screw on a Cyclone only really works for 6-8 gears (ie 126mm OLD), the screw is M4 fine with 10mm of thread.
Luckily I have a junk SunTour Skitter which has M4 fine screws with 14.4mm of thread.
Last edited by Aardwolf; 09-06-23 at 03:55 PM.
Likes For Aardwolf:
09-06-23, 12:40 PM
#25
Senior Member
Join Date: Oct 2016
Location: Cambridge UK
Posts: 852
Bikes: 1903 24 spd Sunbeam, 1927 Humber, 3 1930 Raleighs, 2 1940s Sunbeams, 2 1940s Raleighs, Rudge, 1950s Robin Hood, 1958 Claud Butler, 2 1973 Colnago Supers, Eddie Merckx, 2 1980 Holdsworth, EG Bates funny TT bike, another 6 or so 1990s bikes
Mentioned: 15 Post(s)
Tagged: 0 Thread(s)
Quoted: 331 Post(s)
Liked 332 Times
in
185 Posts
Thanks for the generous comments
Actually I just drilled the stem myself this morning, and it worked out just fine.
Edit: using a good old fashioned hand drill.
When I bought the frame the stem that came with it had a crack starting and was too tight to remove from the cr*ppy bars so I had to cut the bars off (boo hiss).
So I used that stem to practise drilling and discovered an important lesson: the stem is hollow and you need to drill 2 holes at different angles.
Hole 1 is the top one you thread the adjuster into (5mm hole tapped to M6) and is perpendicular to the stem top surface about 38mm from the stem bolt centre.
Hole 2 is the bottom one and is parallel to the stem quill - not parallel to Hole 1. Also 5mm and positioned to meet the bottom of the adjuster in hole 1 so the brake cable will exit cleanly without touching the sides.
I tried a brake cable in place and positioned hole 1 so the cable is about parallel to the head tube:
Actually I just drilled the stem myself this morning, and it worked out just fine.
Edit: using a good old fashioned hand drill.
When I bought the frame the stem that came with it had a crack starting and was too tight to remove from the cr*ppy bars so I had to cut the bars off (boo hiss).
So I used that stem to practise drilling and discovered an important lesson: the stem is hollow and you need to drill 2 holes at different angles.
Hole 1 is the top one you thread the adjuster into (5mm hole tapped to M6) and is perpendicular to the stem top surface about 38mm from the stem bolt centre.
Hole 2 is the bottom one and is parallel to the stem quill - not parallel to Hole 1. Also 5mm and positioned to meet the bottom of the adjuster in hole 1 so the brake cable will exit cleanly without touching the sides.
I tried a brake cable in place and positioned hole 1 so the cable is about parallel to the head tube: