


Opinions wanted: Seat stay rust
 10-26-20, 08:47 PM
#1
Junior Member
Thread Starter
Opinions wanted: Seat stay rust
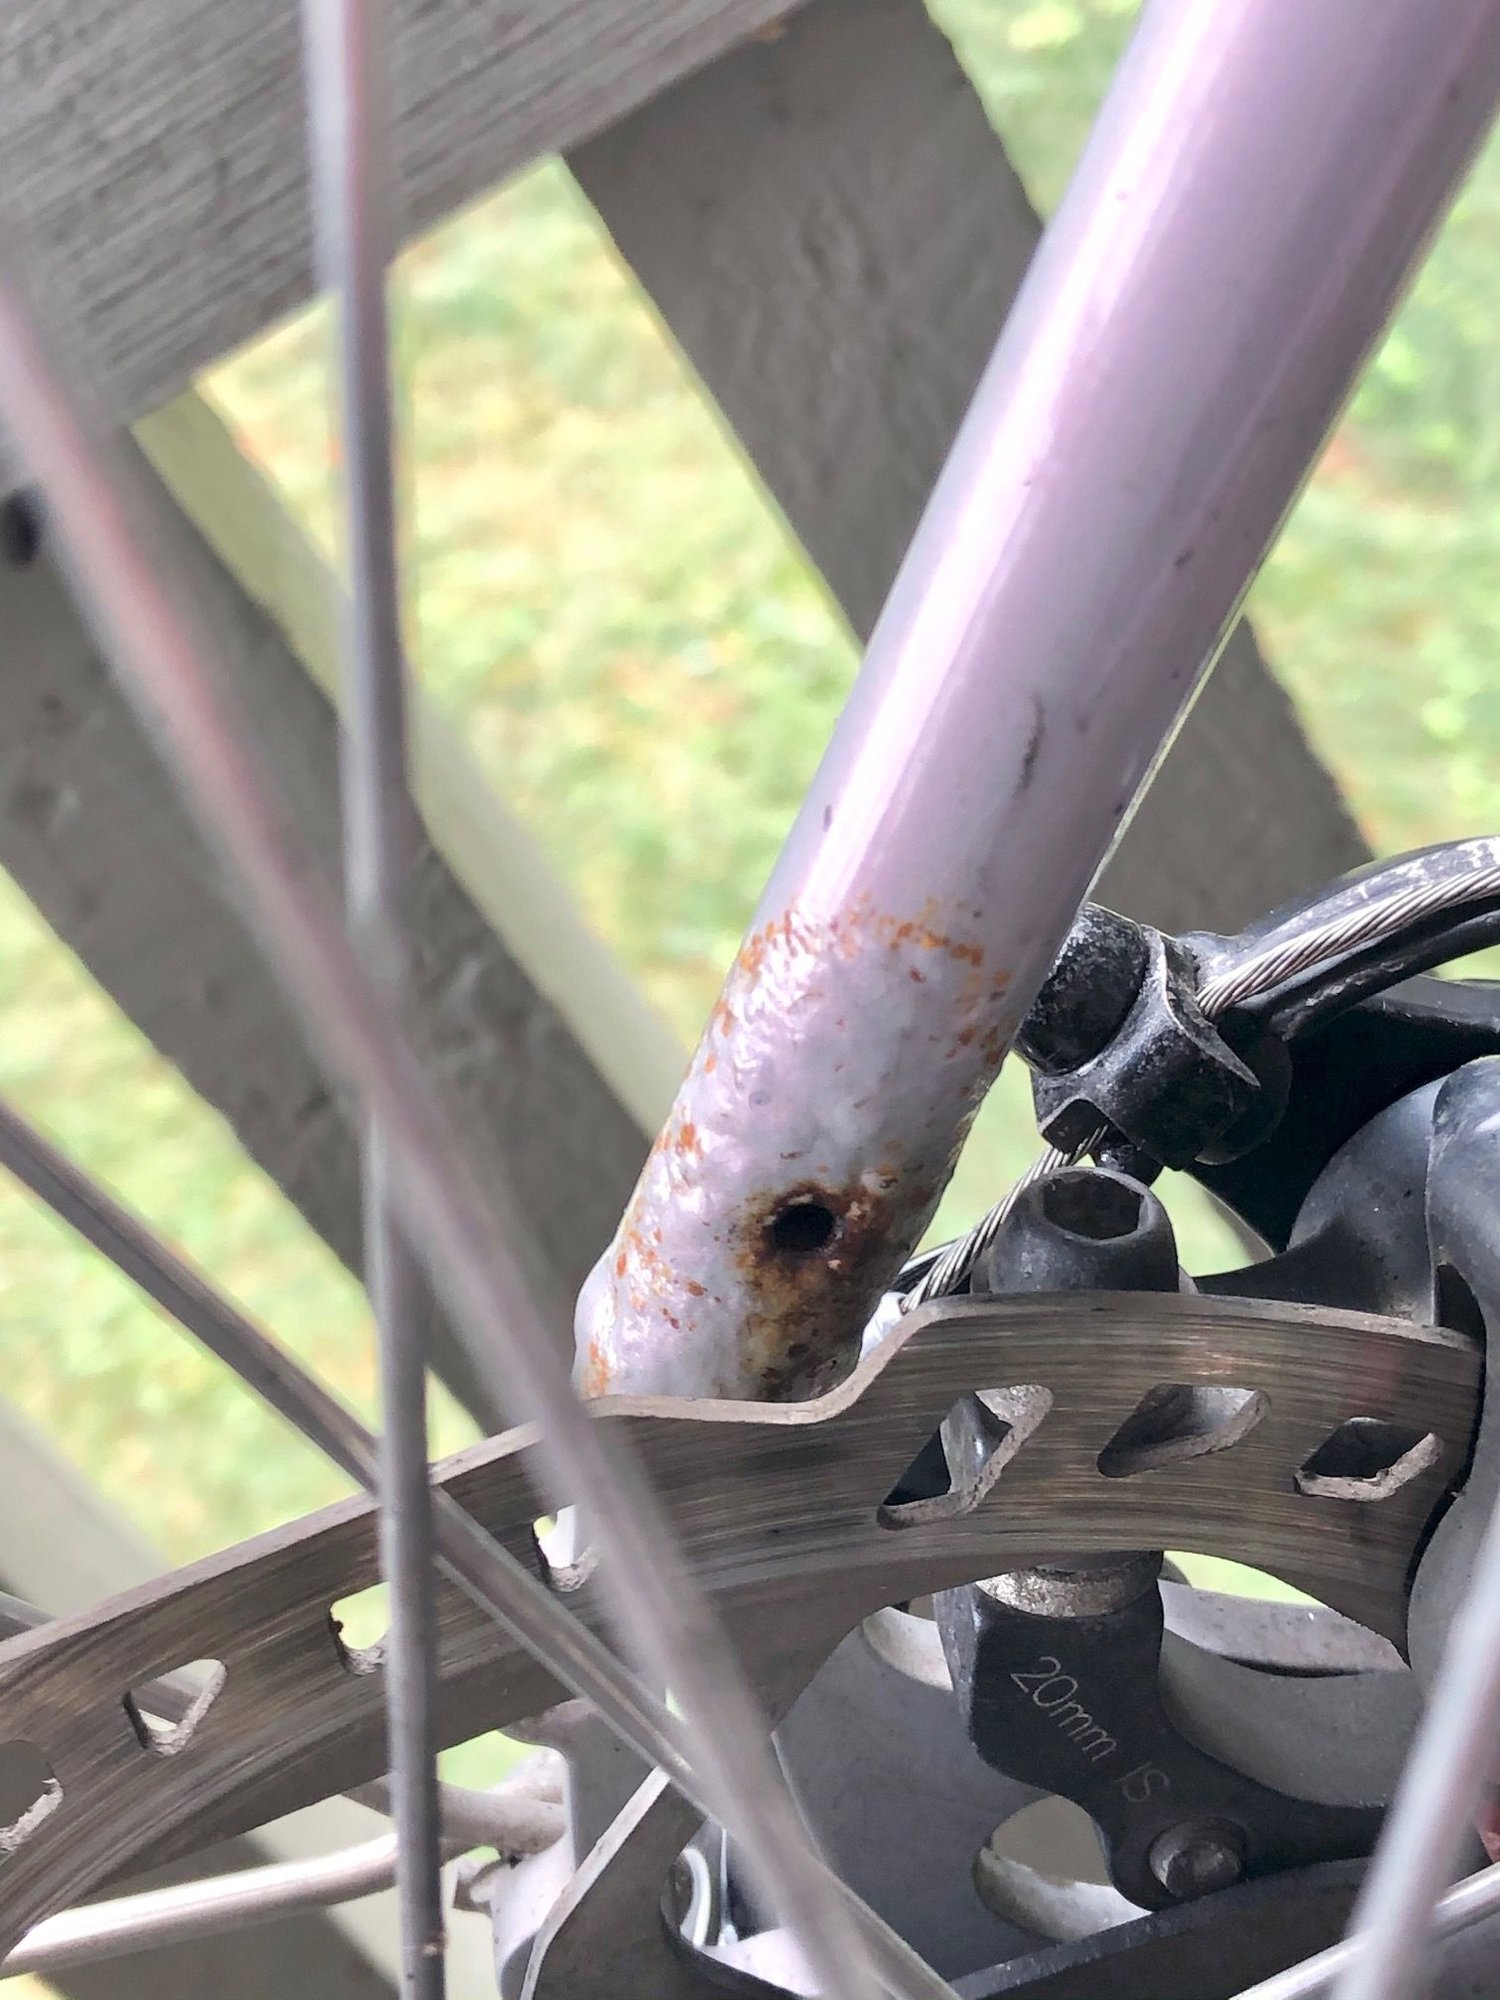
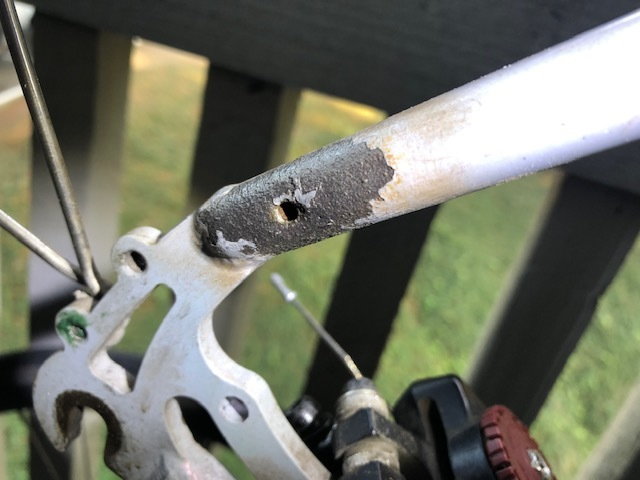
I recently picked up a steel bike, previous owner used it for commuting in the PNW. I wanted other opinions on if the rust on both seat stays are concerning or not. It also exists in some form on the brake bridge area, but I think that's it. My gut says it just looks ugly and should be fine after taking a wire wheel brush to it... though the spread of it is a little close to some of welds.
 10-26-20, 10:06 PM
#2
Senior Member
Join Date: May 2003
Location: Mountain Brook. AL
Posts: 4,002
Mentioned: 14 Post(s)
Tagged: 0 Thread(s)
Quoted: 303 Post(s)
Likes: 0
Liked 136 Times
in
104 Posts
That looks like a significant % of the thickness of the steel is now converted to rust judging from the
bubbled paint, and the hole in the tube suggests that the inside is also rusting as well. Yes clean it
up, passivate what is left with a phosphate prep and repaint (all local, suspect frame redo as a whole
is not a good idea). Eventually it will give way and you will need a new frame, but frames are
replaceable. Fortunately a tube failure in that area (assuming it does not occur at 30+mph on a
down hill) is unlikely to cause a crash, unless the chain stay looks as bad and fails at the same
time in which case the tire immediately shifts into the frame and you come to a rapid halt. Treat the
bike with care, keep power output to under 150w.
Likes For sch:
10-26-20, 10:44 PM
#3
Junior Member
Thread Starter
...Eventually it will give way and you will need a new frame, but frames are
replaceable. Fortunately a tube failure in that area (assuming it does not occur at 30+mph on a
down hill) is unlikely to cause a crash, unless the chain stay looks as bad and fails at the same
time in which case the tire immediately shifts into the frame and you come to a rapid halt. Treat the
bike with care, keep power output to under 150w.
10-27-20, 01:26 AM
#4
Senior Member
Sand it and look what's underneath. I think it's structurally ok, but you need to remedy it.
10-27-20, 07:19 AM
#5
Senior Member
Join Date: Dec 2010
Location: northern Deep South
Posts: 8,889
Bikes: Fuji Touring, Novara Randonee
Mentioned: 36 Post(s)
Tagged: 0 Thread(s)
Quoted: 2590 Post(s)
Liked 1,921 Times
in
1,205 Posts
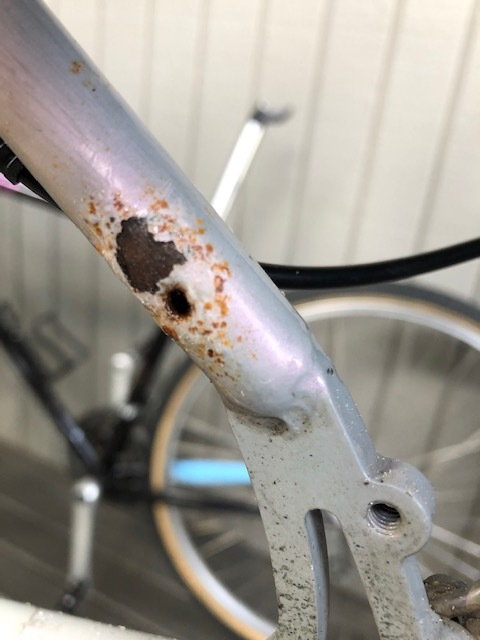
That looks like a vent hole to me, but the bubbling paint is concerning. After you've brushed or sanded the paint off you'll be able to assess it better. If the hole is pretty much circular, you should be able to passivate/prime/paint and ride it. If, OTOH, the rust goes through the tube and the hole is elongated, you're looking at an expensive tube replacement (or just tossing the frame).
10-27-20, 11:51 AM
#6
Junior Member
Thread Starter
That looks like a vent hole to me, but the bubbling paint is concerning. After you've brushed or sanded the paint off you'll be able to assess it better. If the hole is pretty much circular, you should be able to passivate/prime/paint and ride it. If, OTOH, the rust goes through the tube and the hole is elongated, you're looking at an expensive tube replacement (or just tossing the frame).


Last edited by BCATC; 10-27-20 at 12:00 PM.
10-27-20, 01:02 PM
#7
Senior Member
Join Date: Dec 2010
Location: northern Deep South
Posts: 8,889
Bikes: Fuji Touring, Novara Randonee
Mentioned: 36 Post(s)
Tagged: 0 Thread(s)
Quoted: 2590 Post(s)
Liked 1,921 Times
in
1,205 Posts
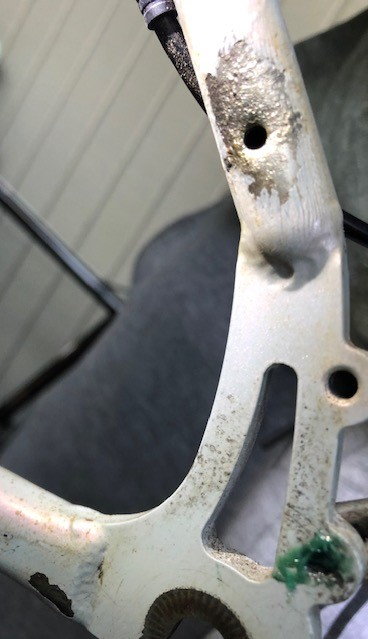
Hmm. That's roughly what I thought it might look like when you got the paint off. Keep wire brushing or sanding until you get down to shiny metal.
You might also want to get a six penny nail and push it against the seatstay when you've got to bare metal. If it goes through with hand pressure, either you're a gorilla or that tube is toast.
You might also want to get a six penny nail and push it against the seatstay when you've got to bare metal. If it goes through with hand pressure, either you're a gorilla or that tube is toast.
10-27-20, 05:32 PM
#8
Junior Member
Thread Starter
Hmm. That's roughly what I thought it might look like when you got the paint off. Keep wire brushing or sanding until you get down to shiny metal.
You might also want to get a six penny nail and push it against the seatstay when you've got to bare metal. If it goes through with hand pressure, either you're a gorilla or that tube is toast.
You might also want to get a six penny nail and push it against the seatstay when you've got to bare metal. If it goes through with hand pressure, either you're a gorilla or that tube is toast.
If I am in the clear and the frame is fine, I purchased Fluid Film to spray the interior. I would like to strip the frame but don't have access to all the tools/space right now to remove the bottom bracket. It does have a RS500 Hollowtech BB, but I'm not sure if spraying the fluid film with BB still installed will affect anything other than the fluid not reaching the BB shell. Thanks for the feedback.
Drive side seat stay.
Non-drive side seat stay 2/2
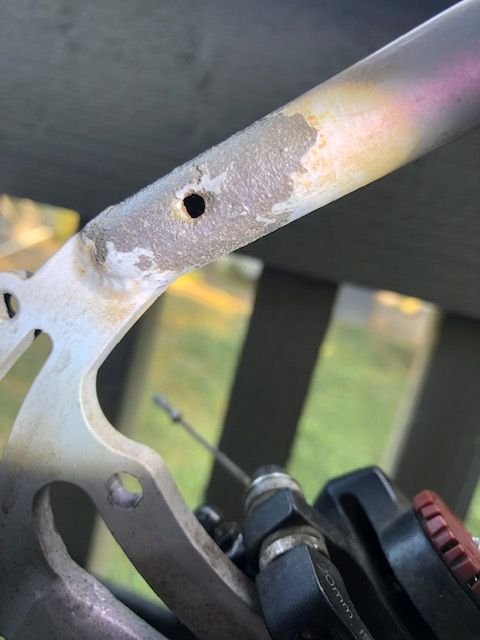
Non-drive side seat stay. 1/2
10-27-20, 05:53 PM
#9
Half way there

Join Date: Sep 2015
Location: North Carolina
Posts: 2,955
Bikes: Many, and the list changes frequently
Mentioned: 5 Post(s)
Tagged: 0 Thread(s)
Quoted: 985 Post(s)
Liked 879 Times
in
526 Posts
The first photos had me saying "yikes." These last few pics give me a lot of comfort in saying that the frame is fine. Use some sort of rust converter on the bad spots and touch them up with paint. When you get around to repainting, you can correct the esthetics.
10-27-20, 11:35 PM
#10
Junior Member
Thread Starter
Thanks. Not sure what the correct steps to repainting it would be. Rust converter --> primer --> touch up paint? Rustoleum primer --> touch up paint?
10-27-20, 11:48 PM
#11
Senior Member
Join Date: Apr 2010
Location: Elevation 666m Edmonton Canada
Posts: 2,472
Bikes: 2013 Custom SA5w / Rohloff Tourster
Mentioned: 7 Post(s)
Tagged: 0 Thread(s)
Quoted: 1233 Post(s)
Liked 317 Times
in
244 Posts
I would pump a wad of PL glue in there, so it won't crush.
===
Now I see it's both sides, toast. IMO
===
Now I see it's both sides, toast. IMO
Last edited by GamblerGORD53; 10-27-20 at 11:51 PM.
Likes For GamblerGORD53:
10-28-20, 06:50 AM
#12
Senior Member
Join Date: Dec 2010
Location: northern Deep South
Posts: 8,889
Bikes: Fuji Touring, Novara Randonee
Mentioned: 36 Post(s)
Tagged: 0 Thread(s)
Quoted: 2590 Post(s)
Liked 1,921 Times
in
1,205 Posts
I'd probably put a base of Rustoleum on the bare metal, then finish with either "matching" or contrasting paint (I've never quite successfully got a match to old paint). Rustoleum, 'cause that's what I've got in the garage. Naval jelly or rustfree might work as well, though I'm not sure what the recommended protocol is for paint on top of those.
Likes For pdlamb:
10-28-20, 09:50 AM
#13

Senior Member
Join Date: Jan 2013
Posts: 2,673
Bikes: too many sparkly Italians, some sweet Americans and a couple interesting Japanese
Mentioned: 9 Post(s)
Tagged: 0 Thread(s)
Quoted: 566 Post(s)
Liked 560 Times
in
404 Posts
I spend time in the PNW summers every year and know there is varying opinions on dealing with stay vent hole rust. Some say plug the hole some say keep it open. If nothing else I would try to flood the area with frame saver, maybe with a straw or something similar.
10-28-20, 07:48 PM
#14
Junior Member
Thread Starter
I agree, the last few shots look much better than the originals.
I'd probably put a base of Rustoleum on the bare metal, then finish with either "matching" or contrasting paint (I've never quite successfully got a match to old paint). Rustoleum, 'cause that's what I've got in the garage. Naval jelly or rustfree might work as well, though I'm not sure what the recommended protocol is for paint on top of those.
I'd probably put a base of Rustoleum on the bare metal, then finish with either "matching" or contrasting paint (I've never quite successfully got a match to old paint). Rustoleum, 'cause that's what I've got in the garage. Naval jelly or rustfree might work as well, though I'm not sure what the recommended protocol is for paint on top of those.
10-29-20, 02:49 AM
#15
Senior Member
If you plug the hole and waters gets inside the frame, which it will, as you can avoid rain but not condensation, it will be trapped inside and that won't be good for the frame.
10-29-20, 06:24 AM
#16
Senior Member
Join Date: Jan 2013
Posts: 2,673
Bikes: too many sparkly Italians, some sweet Americans and a couple interesting Japanese
Mentioned: 9 Post(s)
Tagged: 0 Thread(s)
Quoted: 566 Post(s)
Liked 560 Times
in
404 Posts
10-30-20, 08:08 AM
#17
Senior Member
re not removing the bb--Ive only applied framesaver once, but I can attest that it does get sticky, so I would be wary of doing it with the bb in place---others with more experience will have more reliable suggestions.
I figure if you are going to take the time to do this anyway, it would be worth doing it properly on the entire frame.
Owning the removal tools will always be handy down the road at some point, and frankly given the rust that occured at these points (I agree, surprising how much in just 5 years) I suspect it would be a really good idea to remove the bb and clean out the threads etc and liberally regrease it. I've been surprised how much grit and stuff works its way into bb threads grease over time.
the other thing I take from this bikes example, is how its important to do regular bike washing, especially in winter and salt conditions.
Likes For djb:
10-30-20, 09:48 AM
#18
Mostly harmless �

Join Date: Nov 2010
Location: Novi Sad
Posts: 4,430
Bikes: Heavy, with friction shifters
Mentioned: 22 Post(s)
Tagged: 0 Thread(s)
Quoted: 1107 Post(s)
Liked 216 Times
in
130 Posts
re not removing the bb--Ive only applied framesaver once, but I can attest that it does get sticky, so I would be wary of doing it with the bb in place---others with more experience will have more reliable suggestions.
I figure if you are going to take the time to do this anyway, it would be worth doing it properly on the entire frame.
Owning the removal tools will always be handy down the road at some point, and frankly given the rust that occured at these points (I agree, surprising how much in just 5 years) I suspect it would be a really good idea to remove the bb and clean out the threads etc and liberally regrease it. I've been surprised how much grit and stuff works its way into bb threads grease over time.
the other thing I take from this bikes example, is how its important to do regular bike washing, especially in winter and salt conditions.
I figure if you are going to take the time to do this anyway, it would be worth doing it properly on the entire frame.
Owning the removal tools will always be handy down the road at some point, and frankly given the rust that occured at these points (I agree, surprising how much in just 5 years) I suspect it would be a really good idea to remove the bb and clean out the threads etc and liberally regrease it. I've been surprised how much grit and stuff works its way into bb threads grease over time.
the other thing I take from this bikes example, is how its important to do regular bike washing, especially in winter and salt conditions.

I sleep better after doing a full overhaul - at least once in a bicycle's lifetime (usually right after I acquire it). Prefer anti-seize to grease, on any threads that are used for mounting stuff onto the frame, including the BB.
And agree that getting the tools and doing all the work yourself is worth it - if for no other reason, than for the pure joy and zen feeling of fixing one's bicycle.
As others have noted - the first pic looked - "uuugh - toast!" When I see bulged paint, I usually expect a very poor frame condition (advanced rust).
I would inspect closely the entire frame, to see whether it's worth saving. Any other places where paint started bulging (if less obvious), any cracks etc. If no - then by all means, go for it, try to fix the damaged part and give the frame a few more decades of life.
10-30-20, 09:58 AM
#19
Senior Member

Join Date: Sep 2020
Location: Eastern Poland
Posts: 743
Bikes: Romet Jubilat x 4, Wigry x 1, Turing x 1
Mentioned: 3 Post(s)
Tagged: 0 Thread(s)
Quoted: 194 Post(s)
Liked 204 Times
in
151 Posts
Some more photos as I removed some of the paint. Initially I was like, "eh shouldn't be a problem". Now it's "uh oh". The vent holes on the chain stay I would say are fine. Either way, it's interesting that it has progressed this much for a frame from 2015 and was apparently kept indoors.
10-30-20, 12:38 PM
#20
Senior Member
Join Date: Sep 2017
Posts: 7,835
Mentioned: 37 Post(s)
Tagged: 0 Thread(s)
Quoted: 6932 Post(s)
Liked 10,934 Times
in
4,670 Posts
I hope you didn't pay much for it.
10-30-20, 12:58 PM
#21
Senior Member
Phosphoric acid will change light surface rust into black iron phosphate and act like galvanizing. Then paint it.
The seat stays aren't heavily loaded so the frame should be ok for a lot of miles.
The seat stays aren't heavily loaded so the frame should be ok for a lot of miles.
10-30-20, 11:03 PM
#22
Junior Member
Thread Starter
re not removing the bb--Ive only applied framesaver once, but I can attest that it does get sticky, so I would be wary of doing it with the bb in place---others with more experience will have more reliable suggestions.
I figure if you are going to take the time to do this anyway, it would be worth doing it properly on the entire frame.
Owning the removal tools will always be handy down the road at some point, and frankly given the rust that occured at these points (I agree, surprising how much in just 5 years) I suspect it would be a really good idea to remove the bb and clean out the threads etc and liberally regrease it. I've been surprised how much grit and stuff works its way into bb threads grease over time.
the other thing I take from this bikes example, is how its important to do regular bike washing, especially in winter and salt conditions.
I figure if you are going to take the time to do this anyway, it would be worth doing it properly on the entire frame.
Owning the removal tools will always be handy down the road at some point, and frankly given the rust that occured at these points (I agree, surprising how much in just 5 years) I suspect it would be a really good idea to remove the bb and clean out the threads etc and liberally regrease it. I've been surprised how much grit and stuff works its way into bb threads grease over time.
the other thing I take from this bikes example, is how its important to do regular bike washing, especially in winter and salt conditions.
It never stops, does it?
I sleep better after doing a full overhaul - at least once in a bicycle's lifetime (usually right after I acquire it). Prefer anti-seize to grease, on any threads that are used for mounting stuff onto the frame, including the BB.
And agree that getting the tools and doing all the work yourself is worth it - if for no other reason, than for the pure joy and zen feeling of fixing one's bicycle.
As others have noted - the first pic looked - "uuugh - toast!" When I see bulged paint, I usually expect a very poor frame condition (advanced rust).
I would inspect closely the entire frame, to see whether it's worth saving. Any other places where paint started bulging (if less obvious), any cracks etc. If no - then by all means, go for it, try to fix the damaged part and give the frame a few more decades of life.
$250. At worse, I got a full Shimano 5700 105 groupset out of this that I can transfer to a different frame.
The Loctite Rust Neutralizer brushed on and cured seems to have done the trick, created a black and smooth(er) surface that's ready to paint when I can get to it.
Likes For BCATC:
10-31-20, 05:37 AM
#23
Senior Member
will keep that loctite rust neutralizer product in mind for future use.
10-31-20, 12:18 PM
#24
Junior Member
Thread Starter
Also keep in mind for the future that if you use the loctite product, you can only use an oil-based paint as a top coat per their instructions. Acrylic would not work!
10-31-20, 01:42 PM
#25
Senior Member
thanks, to be honest, I've really only had any use of that product , or that I perhaps should have used it, on some used steel rims I got for winter tires, and cleaned up before painting. And maybe the balcony railing, but both have held up pretty well despite just metal brushing/drill attached brushing a lot before putting oil paint on.


