


Restoration of a Raleigh Stowaway 1983 - (Advice will be needed!)
 02-18-19, 06:29 AM
#1
Member
Thread Starter
Restoration of a Raleigh Stowaway 1983 - FINISHED
Following the advice of a fellow member, i moved my restoration thread to the Vintage Section.
Living alone in your own house has some extra benefits: you can convert a big room of the house to a . . . bike garage.
You bother noone and you take your time to finish this
This thread will keep the history of my restoration, and will also seek any help for advise from experienced members here as it is the first time i attempt to do this process.
Recently, i visited my parents house and discovered the whereabouts of my old Raleigh Stowaway, a bike which was bought brand new back in 1983.
We traveled a lot because of my father's profession so the bike was always with me in my childhood when we visited and stayed in various locations. I ran many many kilometers around many towns in Greece along with various groups of kids in my age. I was the only one with such type of bicycle. I remember the other kids had BMXs or Choppers etc.
Anyway, to cut a long story short, the bike was neglected after i got the Raleigh Mustang,
and the once shiny and clean bike is transformed to this mess you see in the pictures below. The bike was left at the balcony with a cover. But this was not enough to protect it.
Perhaps i am feeling nostalgic this period, which explains why i have decided to restore this bike and even use it to remember good old times.
The progress will be slow, as i am not an expert in restorations. I have not done this before.
I have a checklist in my mind and i will implement one step at a time. I do not care if it takes a long time to complete this project.
Some photos:
Step 1: i have (almost) dismantled the bike and cleaned the areas that are covered with chrome
Problems:
1. the bar which is inserted to the fork is stuck and i cannot remove it. Also the fork cannot turn easily. Did not find any solution yet.
2. i cannot remove the screws in order to remove the crank. I will need to get a special tool.
3. the back screw that holds the back fender is so rusty that i cannot unscrew it. Did not find any solution yet; perhaps i will just break the screw with a hammer.

1. back fender screw is stuck. I will use a saw to cut the screw. 2. i do not have the tool to remove the crank.
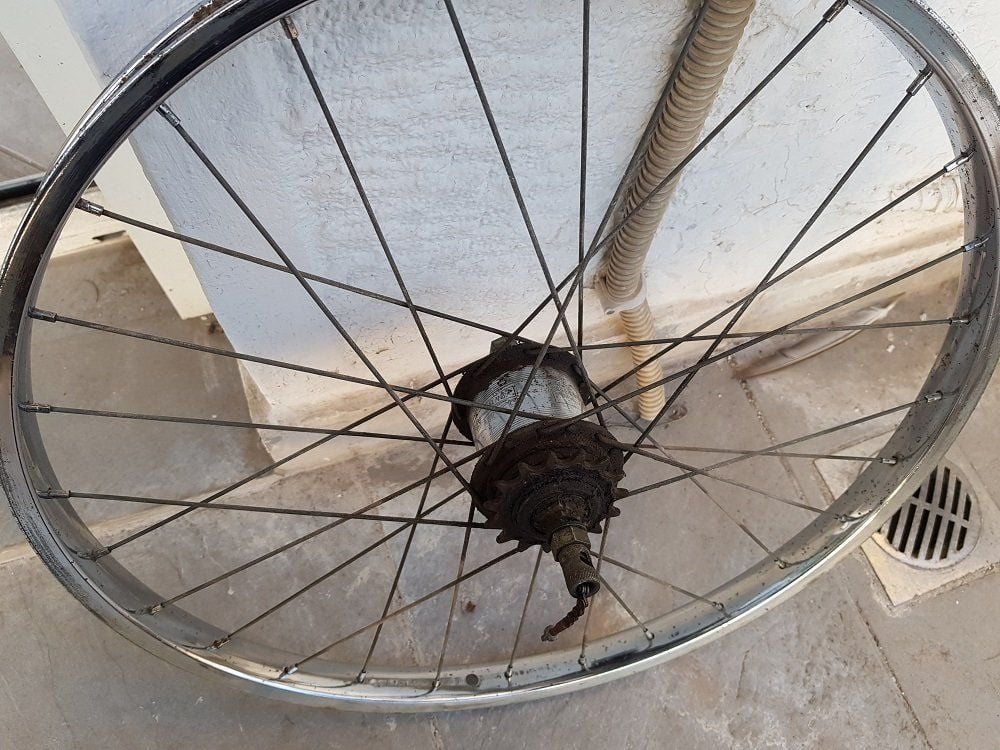
back wheel after removing the rust. Gear mechanism reads "Sturmey Archer AW 78 12" Meaning date of manufacture December 1978.

"made in England" sticker was too dry and was washed away after cleaning the frame. Good thing is that it maintened the original color, which will help when i visit paint shop.

Too much rust here. We will fix this... The stand was broken and misplaced. I have ordered a replacement.

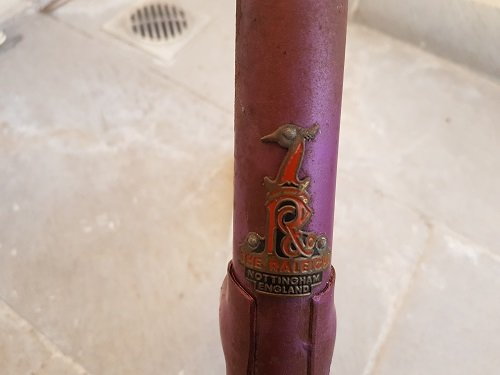
Front fork is stuck. Notice the rice paper on the damaged sticker. I was about to get the Raleigh sticker design with a pencil and recreate it with a photo editing tool, but fortunately i found some NOS stickers (thanks LittlePixel!)
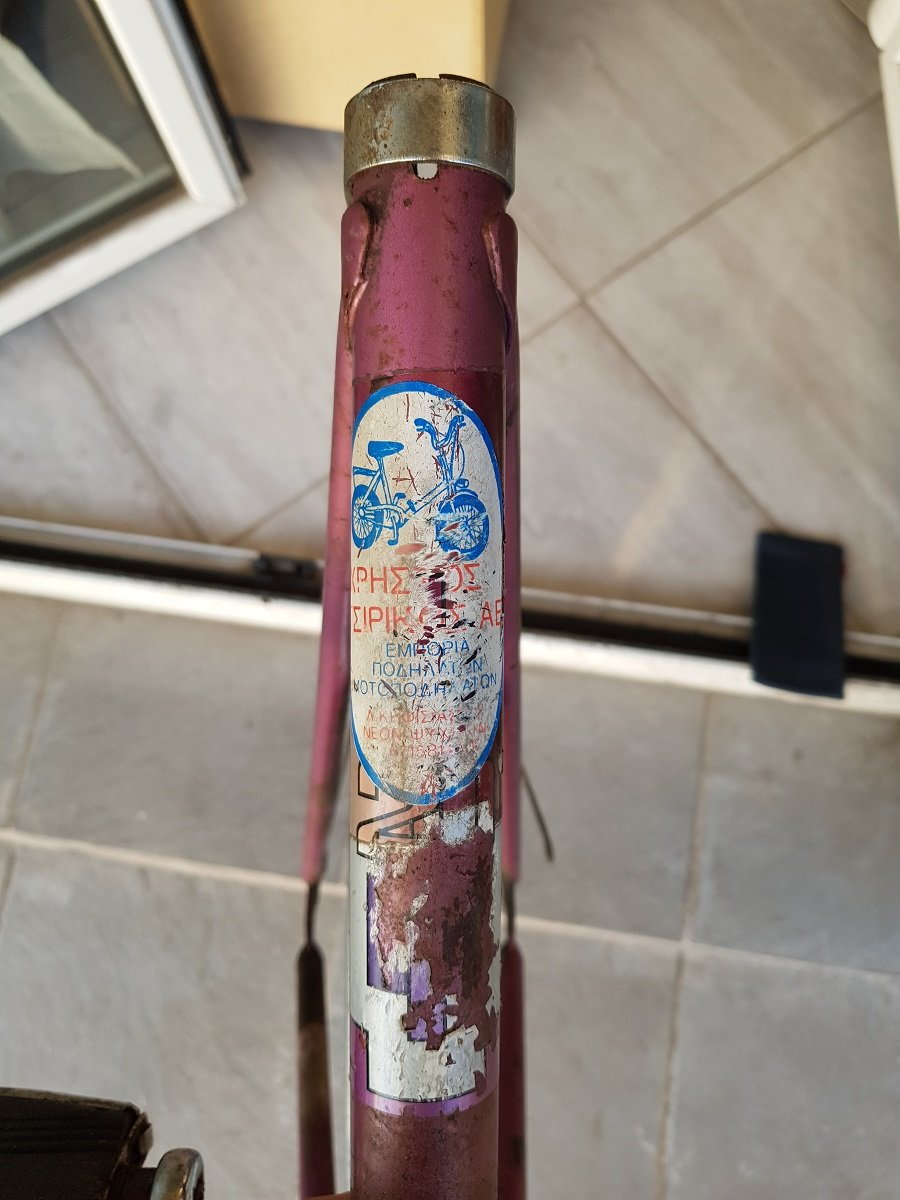
Saddle tube with "Tsirikos" shop sticker covering the twenty logo. This irritated me even when i was a kid (!). Come on Tsirikos, ok we got it, you are a big shop, you import Raleighs, you are the man, good. But please...do not destroy the bike design art. Please ?
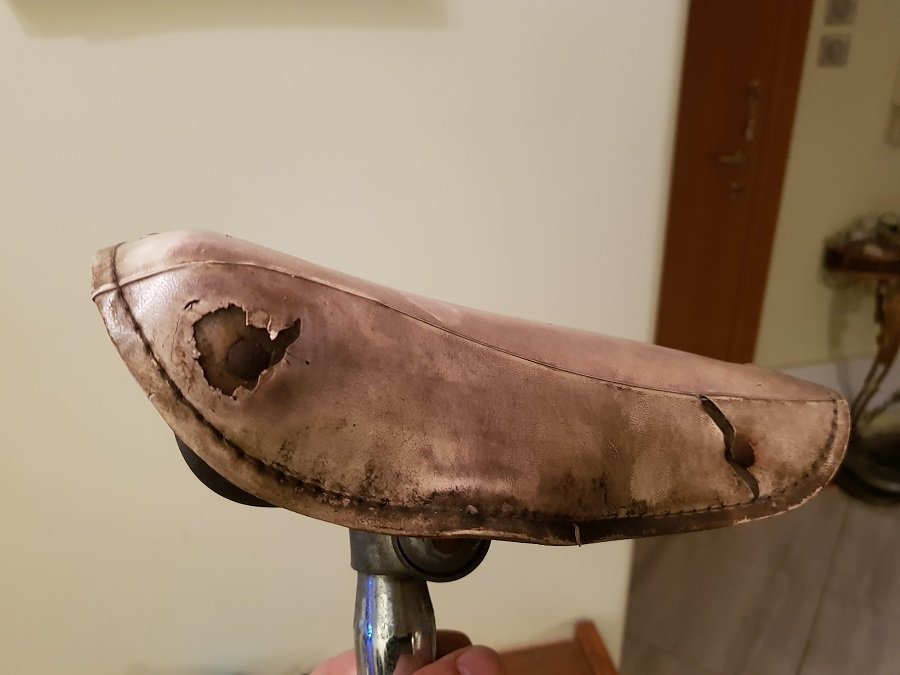
The condition of this Brooks saddle would make John Boultbee Brooks cry. It is tragic. I will replace with a new saddle. I am thinking B67.
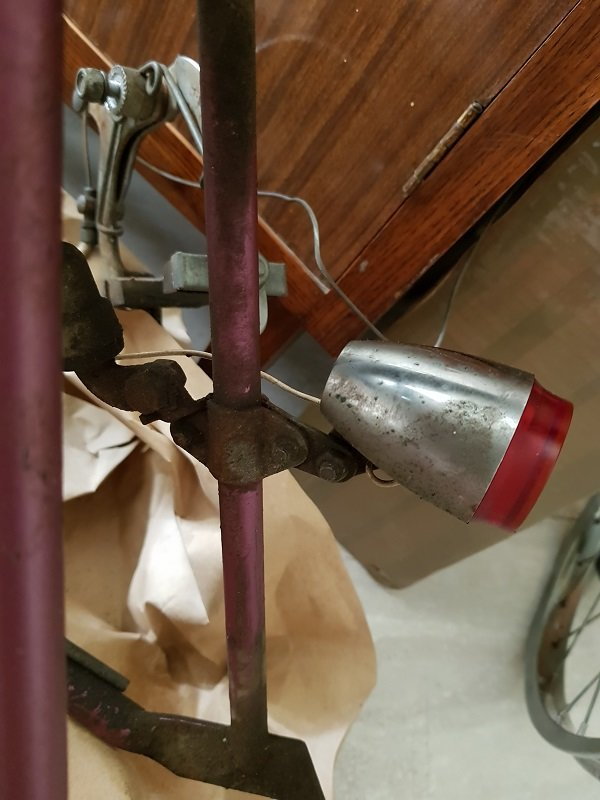
"Soubitez" light by France. I really liked the design of this light. Front light was plastic and it is broken.
I will update the thread as i make progress. Cheers.
Living alone in your own house has some extra benefits: you can convert a big room of the house to a . . . bike garage.
You bother noone and you take your time to finish this
This thread will keep the history of my restoration, and will also seek any help for advise from experienced members here as it is the first time i attempt to do this process.
Recently, i visited my parents house and discovered the whereabouts of my old Raleigh Stowaway, a bike which was bought brand new back in 1983.
We traveled a lot because of my father's profession so the bike was always with me in my childhood when we visited and stayed in various locations. I ran many many kilometers around many towns in Greece along with various groups of kids in my age. I was the only one with such type of bicycle. I remember the other kids had BMXs or Choppers etc.
Anyway, to cut a long story short, the bike was neglected after i got the Raleigh Mustang,
and the once shiny and clean bike is transformed to this mess you see in the pictures below. The bike was left at the balcony with a cover. But this was not enough to protect it.
Perhaps i am feeling nostalgic this period, which explains why i have decided to restore this bike and even use it to remember good old times.
The progress will be slow, as i am not an expert in restorations. I have not done this before.
I have a checklist in my mind and i will implement one step at a time. I do not care if it takes a long time to complete this project.
Some photos:
Step 1: i have (almost) dismantled the bike and cleaned the areas that are covered with chrome
Problems:
1. the bar which is inserted to the fork is stuck and i cannot remove it. Also the fork cannot turn easily. Did not find any solution yet.
2. i cannot remove the screws in order to remove the crank. I will need to get a special tool.
3. the back screw that holds the back fender is so rusty that i cannot unscrew it. Did not find any solution yet; perhaps i will just break the screw with a hammer.
1. back fender screw is stuck. I will use a saw to cut the screw. 2. i do not have the tool to remove the crank.
back wheel after removing the rust. Gear mechanism reads "Sturmey Archer AW 78 12" Meaning date of manufacture December 1978.
"made in England" sticker was too dry and was washed away after cleaning the frame. Good thing is that it maintened the original color, which will help when i visit paint shop.
Too much rust here. We will fix this... The stand was broken and misplaced. I have ordered a replacement.
Front fork is stuck. Notice the rice paper on the damaged sticker. I was about to get the Raleigh sticker design with a pencil and recreate it with a photo editing tool, but fortunately i found some NOS stickers (thanks LittlePixel!)
Saddle tube with "Tsirikos" shop sticker covering the twenty logo. This irritated me even when i was a kid (!). Come on Tsirikos, ok we got it, you are a big shop, you import Raleighs, you are the man, good. But please...do not destroy the bike design art. Please ?
The condition of this Brooks saddle would make John Boultbee Brooks cry. It is tragic. I will replace with a new saddle. I am thinking B67.
"Soubitez" light by France. I really liked the design of this light. Front light was plastic and it is broken.
I will update the thread as i make progress. Cheers.
Last edited by Fmtrx; 09-19-19 at 11:39 PM.
 02-18-19, 06:39 AM
#2
Member
Thread Starter
Does anyone have any association on Raleigh paint codes and RAL codes?
I still have not found the RAL code for my purple bike for example.
Taking a look at the paint code list of a paint shop i am planning to send the frame, i tend to believe that the purple is very close to RAL 4008
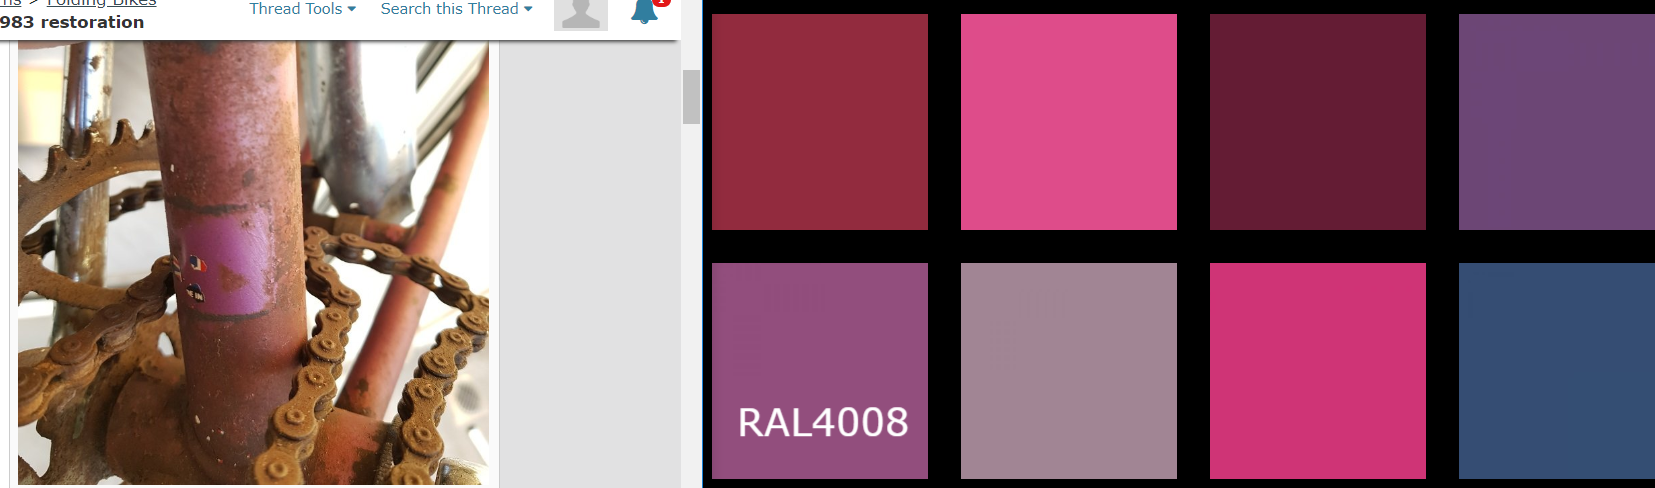
I still have not found the RAL code for my purple bike for example.
Taking a look at the paint code list of a paint shop i am planning to send the frame, i tend to believe that the purple is very close to RAL 4008
02-18-19, 08:56 AM
#3

multimodal commuter
Join Date: Nov 2006
Location: NJ, NYC, LI
Posts: 19,808
Bikes: 1940s Fothergill, 1959 Allegro Special, 1963? Claud Butler Olympic Sprint, Lambert 'Clubman', 1974 Fuji "the Ace", 1976 Holdsworth 650b conversion rando bike, 1983 Trek 720 tourer, 1984 Counterpoint Opus II, 1993 Basso Gap, 2010 Downtube 8h, and...
Mentioned: 584 Post(s)
Tagged: 0 Thread(s)
Quoted: 1908 Post(s)
Liked 574 Times
in
339 Posts
Problems:
1. the bar which is inserted to the fork is stuck and i cannot remove it. Also the fork cannot turn easily. Did not find any solution yet.
2. i cannot remove the screws in order to remove the crank. I will need to get a special tool.
3. the back screw that holds the back fender is so rusty that i cannot unscrew it. Did not find any solution yet; perhaps i will just break the screw with a hammer.
2, It is not a 'screw' that is holding on the crank, but what we call a "cotter pin." You have got the nut off it, which is good. You should be able to knock the pin out with a hammer. Better, you can press it out with a vise.
3, that is a common problem. Anything goes.
__________________
www.rhmsaddles.com.
www.rhmsaddles.com.
02-18-19, 09:14 AM
#4
Member
Thread Starter
yes i have loosened them but the handlebar is stuck, it does not even turn freely. i will find a wooden mallet or a wooden piece to hit this with the hammer.
For the cotter pin, yes i am aware of that. i used wrong terminology. Initially i used a hammer but it would not loosen. I did not want to overdo it and break the pin so i stopped after 4 hits.
anyway i have bought this to remove the pin:

i hope that it will do the job.
For the cotter pin, yes i am aware of that. i used wrong terminology. Initially i used a hammer but it would not loosen. I did not want to overdo it and break the pin so i stopped after 4 hits.
anyway i have bought this to remove the pin:
i hope that it will do the job.
 02-18-19, 09:28 AM
#6
multimodal commuter
Join Date: Nov 2006
Location: NJ, NYC, LI
Posts: 19,808
Bikes: 1940s Fothergill, 1959 Allegro Special, 1963? Claud Butler Olympic Sprint, Lambert 'Clubman', 1974 Fuji "the Ace", 1976 Holdsworth 650b conversion rando bike, 1983 Trek 720 tourer, 1984 Counterpoint Opus II, 1993 Basso Gap, 2010 Downtube 8h, and...
Mentioned: 584 Post(s)
Tagged: 0 Thread(s)
Quoted: 1908 Post(s)
Liked 574 Times
in
339 Posts
 it might!
One more suggestion, unscrew the clamp all the way, and use a block of wood to take up extra space. If you leave the screw part too long, it flexes sideways, which will bend the cotter pin. Good luck!
__________________
www.rhmsaddles.com.
www.rhmsaddles.com.
02-18-19, 10:44 AM
#8

Freewheel Medic

Join Date: Oct 2005
Location: An Island on the Coast of GA!
Posts: 12,880
Bikes: Snazzy* Schwinns, Classy Cannondales & a Super Pro Aero Lotus (* Ed.)
Mentioned: 140 Post(s)
Tagged: 0 Thread(s)
Quoted: 1451 Post(s)
Liked 2,183 Times
in
960 Posts
@Fmtrx
Thanks to all the replies above! @Mr. 66 , @rhm , @3speedslow. You are all champs! I've been responding to the OP over in the Folding Bike forum but no one else really chimes in or contributes. They are mostly interested in their Bromptons, Bike Fridays, the mythical and soon expected Helix, etc. with a scattering of interest in Terns, Dahons, and a few other modern folders. I knew that Fmtrx would benefit from your deep knowledge base and prove to be exceptionally more helpful! Continue to prove me correct!
Thanks to all the replies above! @Mr. 66 , @rhm , @3speedslow. You are all champs! I've been responding to the OP over in the Folding Bike forum but no one else really chimes in or contributes. They are mostly interested in their Bromptons, Bike Fridays, the mythical and soon expected Helix, etc. with a scattering of interest in Terns, Dahons, and a few other modern folders. I knew that Fmtrx would benefit from your deep knowledge base and prove to be exceptionally more helpful! Continue to prove me correct!
__________________
Bob
Enjoying the GA coast all year long!
Thanks for visiting my website: www.freewheelspa.com
Bob
Enjoying the GA coast all year long!
Thanks for visiting my website: www.freewheelspa.com
02-18-19, 10:45 AM
#9
minimalist cyclist

Join Date: Mar 2014
Location: North Carolina
Posts: 1,745
Bikes: yes please
Mentioned: 26 Post(s)
Tagged: 0 Thread(s)
Quoted: 1119 Post(s)
Liked 1,638 Times
in
943 Posts
I had problems with the C Clamp too on my recent Raleigh project. The clamp & socket kept wanting to slide off, especially with the liberal amount of Liquid Wrench I'd been letting soak over a few days. It's also important to tap the area sprayed with a hammer to help the LW work in. This video below is the better of the ones I found for help on getting the cottered pin out for me. As Bike Man says, it needs to be a hard decisive blow, not tentative taps while the BB is sitting on some kind of hard support. I used a 4X4 with a hole for the pin drilled out with a spade bit. I tried hitting the pin through a wood block and the pin just dug into the wood, but I have this block of aluminum that worked perfectly  I could give it a hard hit and was far enough from the frame and BB not to have to worry about hitting them.
Anyone know what this piece of aluminum is from ? It has/had a specific purpose, but now it's my cottered crank pin removal tool.
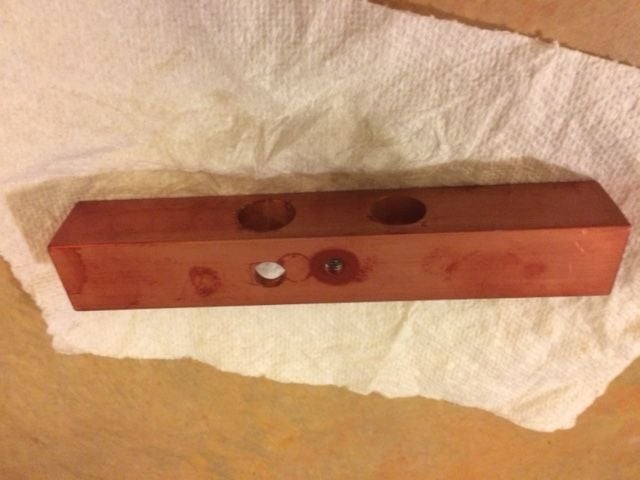


I could give it a hard hit and was far enough from the frame and BB not to have to worry about hitting them.Anyone know what this piece of aluminum is from ? It has/had a specific purpose, but now it's my cottered crank pin removal tool.
Last edited by Deal4Fuji; 02-18-19 at 11:06 AM.
02-18-19, 11:00 AM
#10
multimodal commuter
Join Date: Nov 2006
Location: NJ, NYC, LI
Posts: 19,808
Bikes: 1940s Fothergill, 1959 Allegro Special, 1963? Claud Butler Olympic Sprint, Lambert 'Clubman', 1974 Fuji "the Ace", 1976 Holdsworth 650b conversion rando bike, 1983 Trek 720 tourer, 1984 Counterpoint Opus II, 1993 Basso Gap, 2010 Downtube 8h, and...
Mentioned: 584 Post(s)
Tagged: 0 Thread(s)
Quoted: 1908 Post(s)
Liked 574 Times
in
339 Posts
That's my point precisely. You have like ten threads (that is, ten turns of the screw) exposed. Open the C-clamp up all the way, and fill that empty space with a piece of lumber or something that can't flex.
__________________
www.rhmsaddles.com.
www.rhmsaddles.com.
02-18-19, 11:02 AM
#11
minimalist cyclist
Join Date: Mar 2014
Location: North Carolina
Posts: 1,745
Bikes: yes please
Mentioned: 26 Post(s)
Tagged: 0 Thread(s)
Quoted: 1119 Post(s)
Liked 1,638 Times
in
943 Posts
^^^ actually that was the wrong video, but I'll leave it because it's specifically about a Raleigh and cottered crank removal. The C clamp worked for them. Somewhere I saw or read about the decisive blow to drive that pin out but can't seem to find it. That worked for me like a charm but mine wasn't as rusty as the OP's. Here's another vid with hammer and piece of metal method at about the .50 sec mark:
02-18-19, 12:40 PM
#12
Member
Thread Starter
After seeing all responses i have to say you were right Bob, this was the appropriate section to post! I became wiser after reading you guys thank you.Tomorrow i will attempt the removal of the crank.
Today i got my new tires and tubes. Cannot wait to put them on.
Today i got my new tires and tubes. Cannot wait to put them on.
02-18-19, 07:18 PM
#13
Senior Member
None of this is muting my sudden desire for one of these Raleigh folders. I want to play!
02-18-19, 07:32 PM
#14
Senior Member
Join Date: Jan 2019
Location: Toledo Ohio
Posts: 1,493
Bikes: 1964 Huffy Sportsman, 1972 Fuji Newest, 1973 Schwinn Super Sport (3), 1982 Trek 412, 1983 Trek 700, 1989 Miyata 1000LT, 1991 Bianchi Boardwalk, plus others
Mentioned: 21 Post(s)
Tagged: 0 Thread(s)
Quoted: 582 Post(s)
Liked 697 Times
in
393 Posts
MEC shotshell reloader part
I had problems with the C Clamp too on my recent Raleigh project. The clamp & socket kept wanting to slide off, especially with the liberal amount of Liquid Wrench I'd been letting soak over a few days. It's also important to tap the area sprayed with a hammer to help the LW work in. This video below is the better of the ones I found for help on getting the cottered pin out for me. As Bike Man says, it needs to be a hard decisive blow, not tentative taps while the BB is sitting on some kind of hard support. I used a 4X4 with a hole for the pin drilled out with a spade bit. I tried hitting the pin through a wood block and the pin just dug into the wood, but I have this block of aluminum that worked perfectly I could give it a hard hit and was far enough from the frame and BB not to have to worry about hitting them.
https://www.youtube.com/watch?v=4hTJYwlC8Sk
Anyone know what this piece of aluminum is from ? It has/had a specific purpose, but now it's my cottered crank pin removal tool.
I could give it a hard hit and was far enough from the frame and BB not to have to worry about hitting them.https://www.youtube.com/watch?v=4hTJYwlC8Sk
Anyone know what this piece of aluminum is from ? It has/had a specific purpose, but now it's my cottered crank pin removal tool.
02-18-19, 10:26 PM
#15
minimalist cyclist
Join Date: Mar 2014
Location: North Carolina
Posts: 1,745
Bikes: yes please
Mentioned: 26 Post(s)
Tagged: 0 Thread(s)
Quoted: 1119 Post(s)
Liked 1,638 Times
in
943 Posts
I wonder why the copper color ?
EDIT - I see you have a '85 Ironman too - being from OH is it the Buckeye scarlet & grey like mine? I like that color combo the most of all the IM's
Last edited by Deal4Fuji; 02-18-19 at 10:33 PM.
02-19-19, 05:46 AM
#16
Freewheel Medic
Join Date: Oct 2005
Location: An Island on the Coast of GA!
Posts: 12,880
Bikes: Snazzy* Schwinns, Classy Cannondales & a Super Pro Aero Lotus (* Ed.)
Mentioned: 140 Post(s)
Tagged: 0 Thread(s)
Quoted: 1451 Post(s)
Liked 2,183 Times
in
960 Posts
@Fmtrx --- and sometimes C&V threads go astray and you learn something interesting, yet completely nonrelated along the way--- such as what a "charge bar" is from @sd5782 ! All you need to do is pull them back a little and all's well again.
BTW, what tires did you buy? I recently installed Schwalbe Kojaks on my modern Dahon folding bike. Can't wait to try them out on a trip to the coast of Georgia (USA) in early March. I have even installed @rootboy 's tire wipers on them.
BTW, what tires did you buy? I recently installed Schwalbe Kojaks on my modern Dahon folding bike. Can't wait to try them out on a trip to the coast of Georgia (USA) in early March. I have even installed @rootboy 's tire wipers
on them.
__________________
Bob
Enjoying the GA coast all year long!
Thanks for visiting my website: www.freewheelspa.com
Bob
Enjoying the GA coast all year long!
Thanks for visiting my website: www.freewheelspa.com
02-19-19, 06:44 AM
#17
Senior Member
Join Date: Jan 2019
Location: Toledo Ohio
Posts: 1,493
Bikes: 1964 Huffy Sportsman, 1972 Fuji Newest, 1973 Schwinn Super Sport (3), 1982 Trek 412, 1983 Trek 700, 1989 Miyata 1000LT, 1991 Bianchi Boardwalk, plus others
Mentioned: 21 Post(s)
Tagged: 0 Thread(s)
Quoted: 582 Post(s)
Liked 697 Times
in
393 Posts
Colors
Thanks sd !! I knew it was made for something specific because it was so nicely milled. Cool that you could ID it. I'm not sure how I came to have it, probably left behind at a rental house. It works great for the use described above as a block punch to push out cottered pins because the aluminum is softer than the pin so it won't damage the pin.
I wonder why the copper color ?
EDIT - I see you have a '85 Ironman too - being from OH is it the Buckeye scarlet & grey like mine? I like that color combo the most of all the IM's
I wonder why the copper color ?
EDIT - I see you have a '85 Ironman too - being from OH is it the Buckeye scarlet & grey like mine? I like that color combo the most of all the IM's
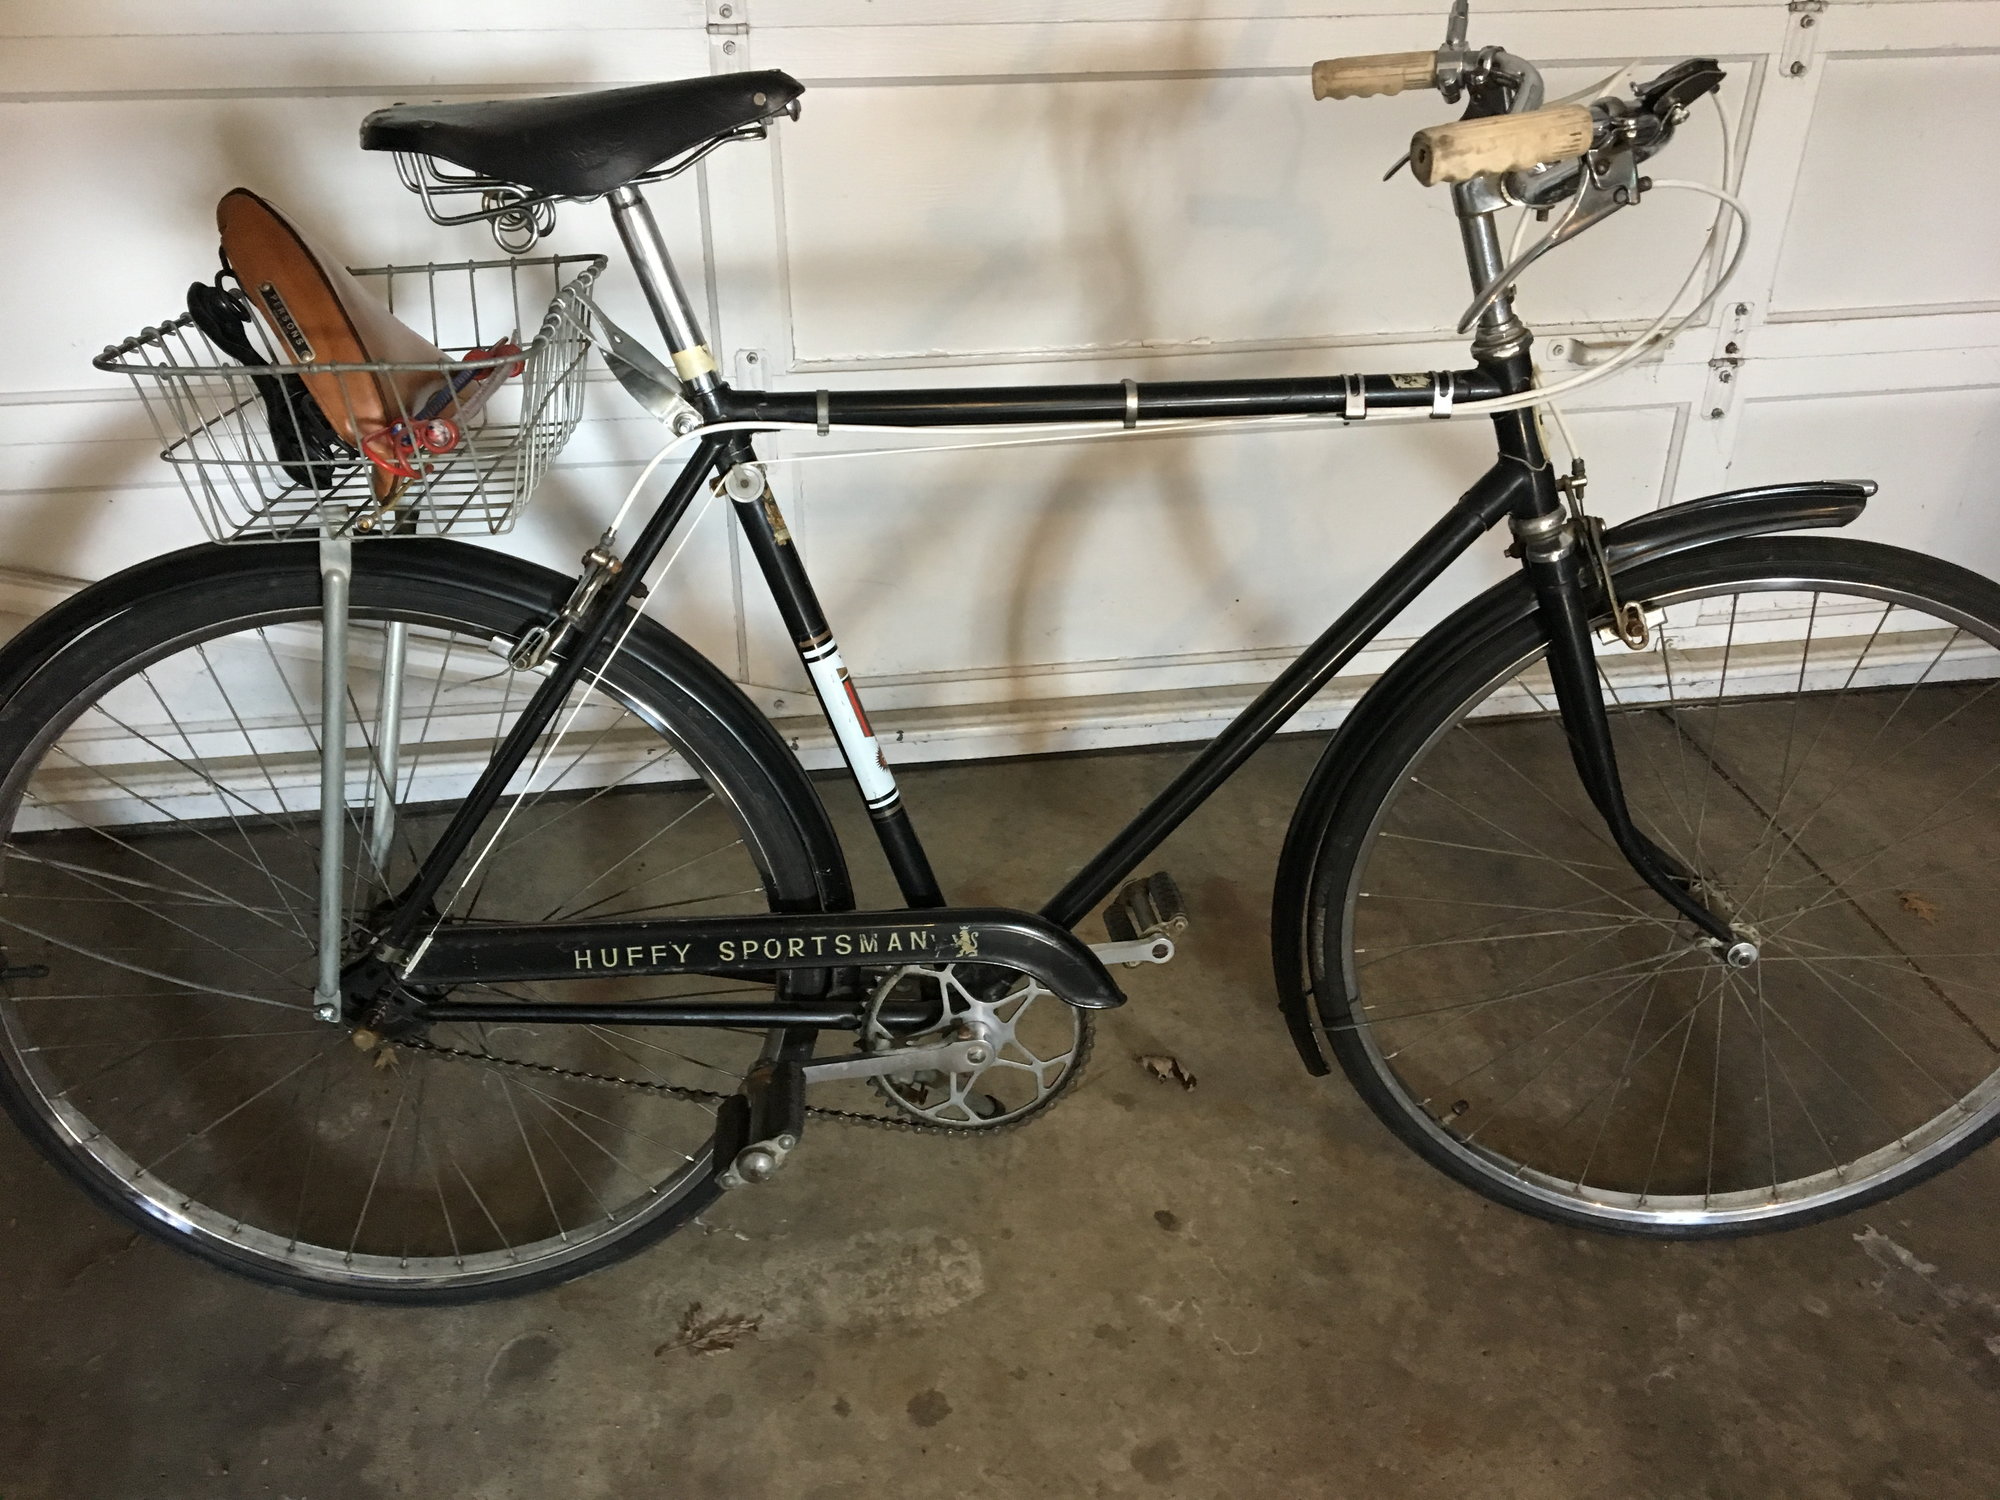
1964 Huffy Sportsman
I purchased my Ironman last fall and have been in the process of setting it up how I may like. Only about 50 miles on it so far, as we are still not enjoying winter here. At least the wrenching is entertaining. This one in the silver and blue. Very subdued which is good since I am an old guy who can't really back up any style and flash with my abilities.

1985 Ironman with some additions
02-19-19, 09:07 AM
#18
minimalist cyclist
Join Date: Mar 2014
Location: North Carolina
Posts: 1,745
Bikes: yes please
Mentioned: 26 Post(s)
Tagged: 0 Thread(s)
Quoted: 1119 Post(s)
Liked 1,638 Times
in
943 Posts
Following the advice of a fellow member, i moved my restoration thread to the Vintage Section.
This thread will keep the history of my restoration, and will also seek any help for advise from experienced members here as it is the first time i attempt to do this process.
"Soubitez" light by France. I really liked the design of this light. Front light was plastic and it is broken.
This thread will keep the history of my restoration, and will also seek any help for advise from experienced members here as it is the first time i attempt to do this process.
"Soubitez" light by France. I really liked the design of this light. Front light was plastic and it is broken.
Also I never tested it but the bulb filament looks to be intact. PM me if you're interested.
Last edited by Deal4Fuji; 02-19-19 at 09:13 AM.
02-19-19, 09:33 AM
#19
Member
Thread Starter

@Deal4Fuji i have already ordered a front light. Thanks. i will check my bottle and will let you know.
@bob i bought a china made which reads " raleigh record " on the tire. The design ia identical with the original. See attached photo.
what is a tyre wiper ???
Last edited by Fmtrx; 02-19-19 at 09:40 AM.
02-19-19, 10:02 AM
#20
Senior Member

Join Date: Aug 2015
Posts: 3,281
Mentioned: 39 Post(s)
Tagged: 0 Thread(s)
Quoted: 1134 Post(s)
Liked 1,726 Times
in
950 Posts
Nice job with the tires, where or who did you get them through? I have a 2 speed coaster brake Twenty that has sat in the garage for years in need of a rebuild.
02-19-19, 10:26 AM
#21
Member
Thread Starter
https://www.ebay.co.uk/itm/Pair-of-R...r=531180037015
the seller is :
hopkinsoncycles-2008
02-19-19, 11:27 AM
#22
Freewheel Medic
Join Date: Oct 2005
Location: An Island on the Coast of GA!
Posts: 12,880
Bikes: Snazzy* Schwinns, Classy Cannondales & a Super Pro Aero Lotus (* Ed.)
Mentioned: 140 Post(s)
Tagged: 0 Thread(s)
Quoted: 1451 Post(s)
Liked 2,183 Times
in
960 Posts
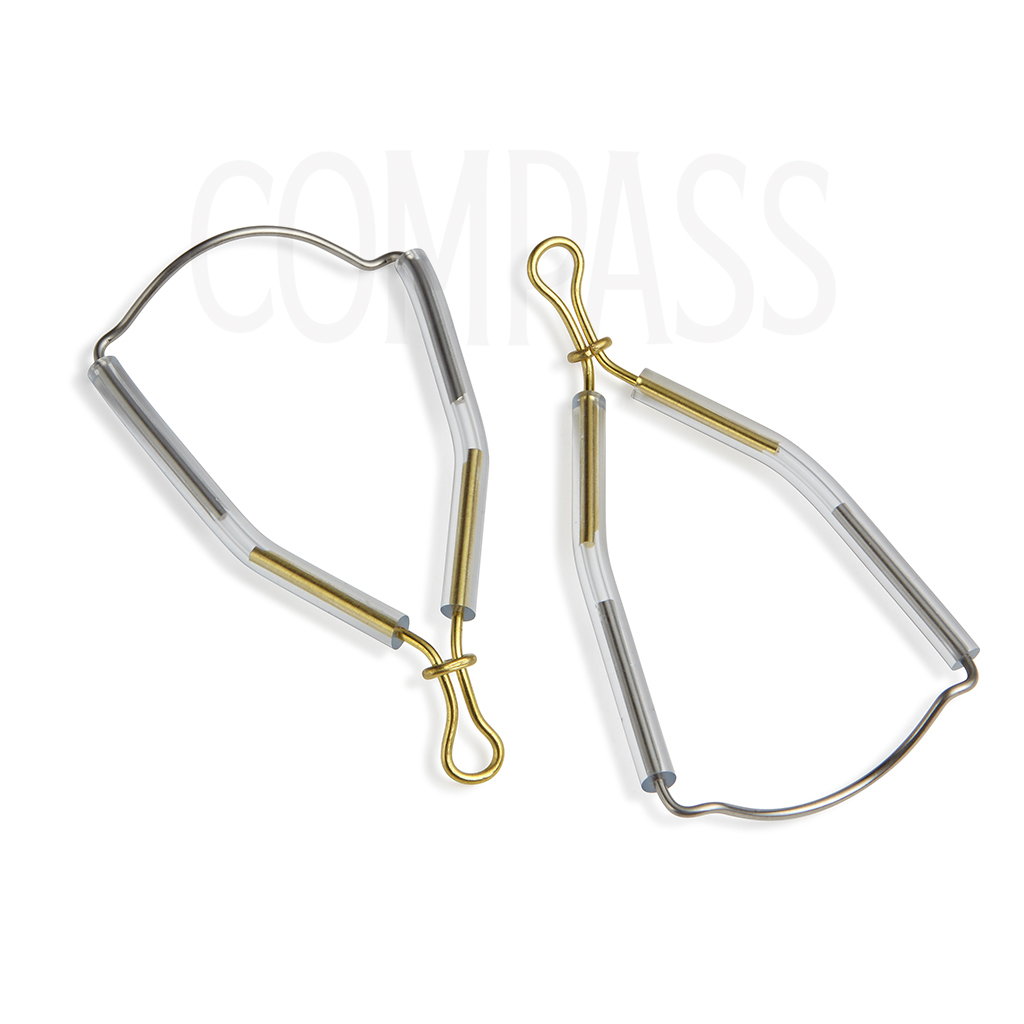
A Tire/Tyre wiper is an attachment that is supposed to catch imbedded debris, i.e. glass, stones, etc., and knock them off your tire before it can be imbedded further, thus helping to protect against flats. I'll post a picture later tonight of the Kojaks with the Wipers on my Dahon, but for now here is what they look like unmounted.
.
__________________
Bob
Enjoying the GA coast all year long!
Thanks for visiting my website: www.freewheelspa.com
Bob
Enjoying the GA coast all year long!
Thanks for visiting my website: www.freewheelspa.com
02-19-19, 11:28 AM
#23
Senior Member
A tire wiper is a wire looped across the tire with a little pressure. It scrubs off debri which might lead to a flat. Pic is worth the thousand words here.
02-19-19, 04:46 PM
#24
Freewheel Medic
Join Date: Oct 2005
Location: An Island on the Coast of GA!
Posts: 12,880
Bikes: Snazzy* Schwinns, Classy Cannondales & a Super Pro Aero Lotus (* Ed.)
Mentioned: 140 Post(s)
Tagged: 0 Thread(s)
Quoted: 1451 Post(s)
Liked 2,183 Times
in
960 Posts
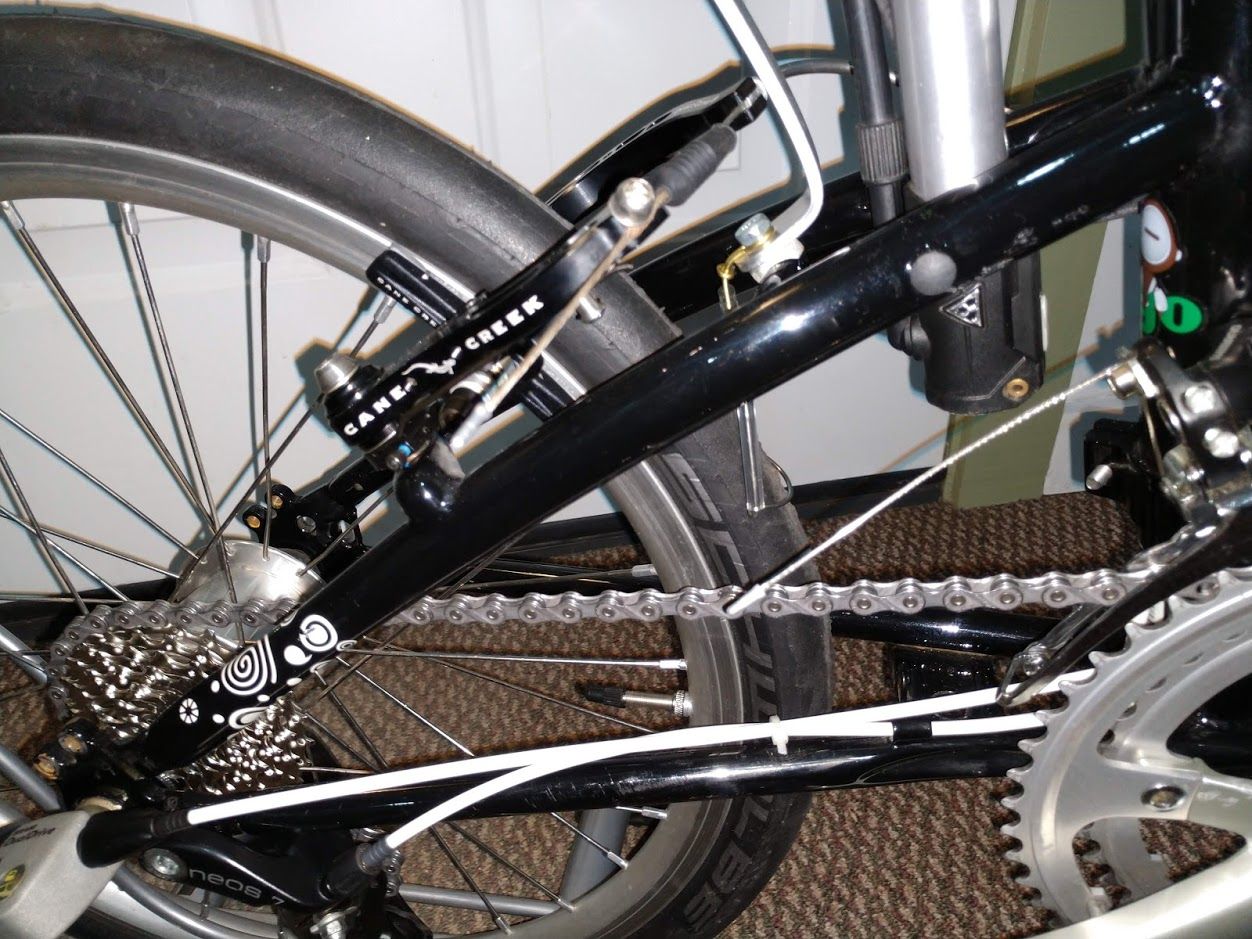
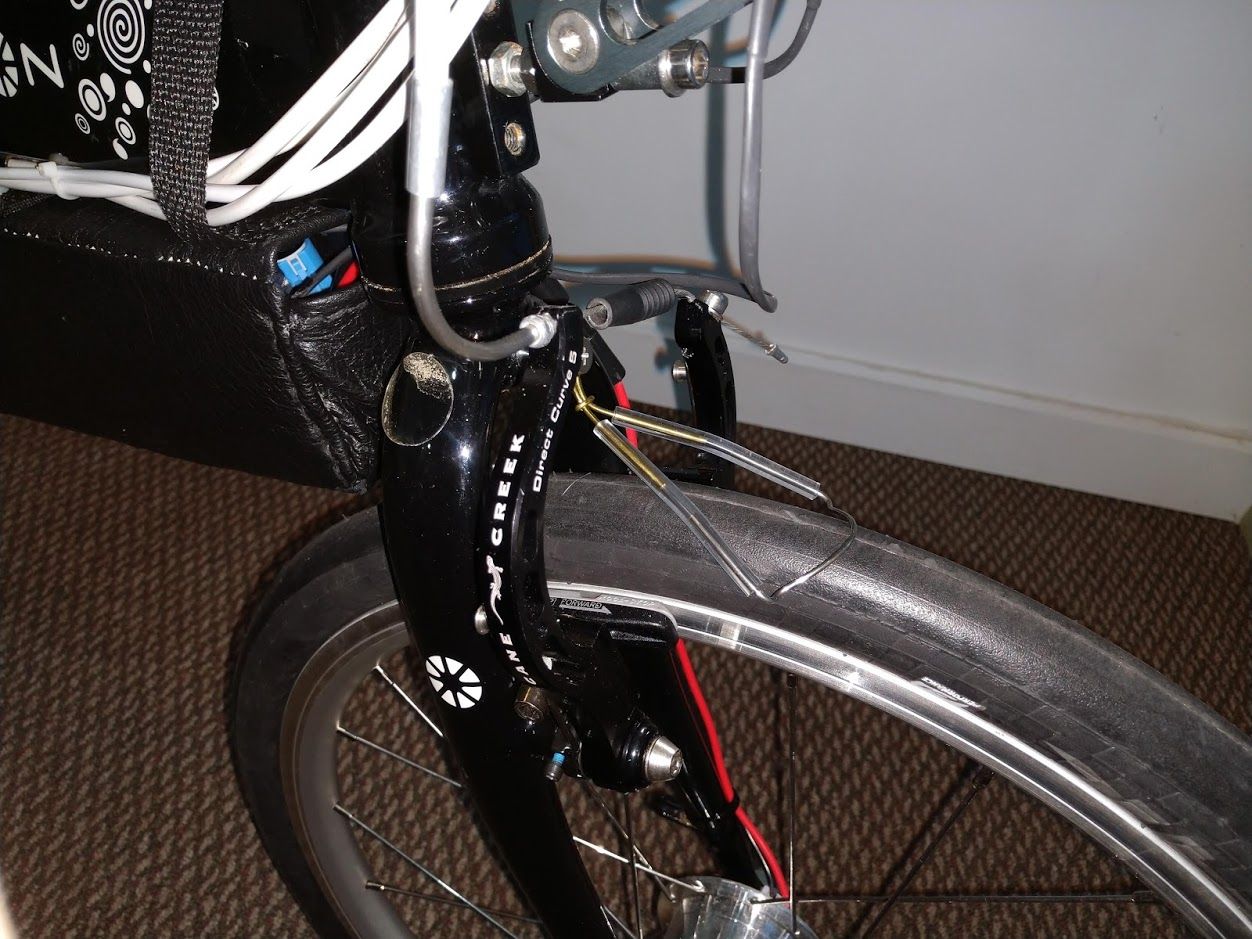
As promised, pictures. First ever use of tire/tyre wipers on a 20" (406mm) tire? 
__________________
Bob
Enjoying the GA coast all year long!
Thanks for visiting my website: www.freewheelspa.com
Bob
Enjoying the GA coast all year long!
Thanks for visiting my website: www.freewheelspa.com
02-21-19, 01:01 AM
#25
Member
Thread Starter
I am tempted to buy a pair of tyre wipers. If i had these in the 80s i would have saved me much time from applying patches on the tube, which was a common activity when we were at certain areas of Greece out of town.
I am not sure if i should change my grips. Has anyone tried such type of grips? Are they faithful to the original regarding the quality of the material and its coloring?
https://www.ebay.com/itm/VINTAGE-BIC...xaa:rk:26:pf:0

I am not sure if i should change my grips. Has anyone tried such type of grips? Are they faithful to the original regarding the quality of the material and its coloring?
https://www.ebay.com/itm/VINTAGE-BIC...xaa:rk:26:pf:0
Last edited by Fmtrx; 04-24-19 at 06:05 AM.

