


How to properly center/adjust these single pivot side pull brakes
 01-15-21, 10:02 PM
#1

bill nyecycles
Thread Starter

Join Date: Mar 2013
Location: Houston TX
Posts: 3,328
Mentioned: 19 Post(s)
Tagged: 0 Thread(s)
Quoted: 789 Post(s)
Liked 350 Times
in
190 Posts
How to properly center/adjust these single pivot side pull brakes
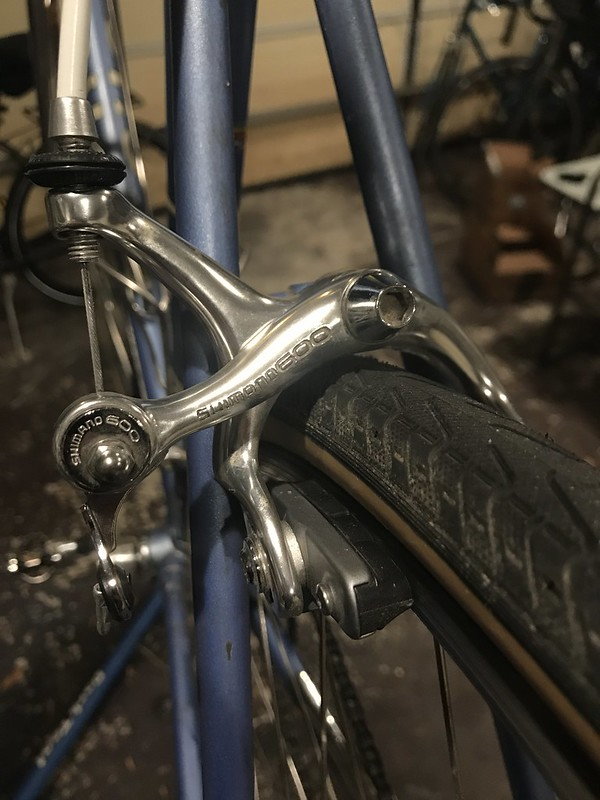
Having an issue keeping these suckers centered. Just when I think they are centered, I pull the brake lever and they swing too far to one side again. Can someone, in layman's terms, explain how to adjust these so they stay put? I assume I need this tool? https://www.parktool.com/product/off...e-wrench-obw-3 or is there a way I can do it without it?
 01-15-21, 10:36 PM
#2
Senior Member
Join Date: Feb 2012
Location: Rochester, NY
Posts: 18,094
Bikes: Stewart S&S coupled sport tourer, Stewart Sunday light, Stewart Commuting, Stewart Touring, Co Motion Tandem, Stewart 3-Spd, Stewart Track, Fuji Finest, Mongoose Tomac ATB, GT Bravado ATB, JCP Folder, Stewart 650B ATB
Mentioned: 0 Post(s)
Tagged: 0 Thread(s)
Quoted: 4209 Post(s)
Liked 3,875 Times
in
2,315 Posts
OK, lets start with basics. The brake arms/pads react to the spring tension acting on them. There are two springs in play. One is the caliper's the other is the cable/casing as it leaves the frame (often top tube stop or guide). The casing/cable stop/guide on the frame needs to not allow the casing loop length change as you turn the bars. If it does it's contribution to the total spring influence on the pads will change over time. The bottom line when doing service is to end up when things don't continue to change after your efforts. The other is the caliper spring and it's center portion is held within the caliper center bolt's fittings, the spring carrier. The two sides of the spring, as one moves away from the fixed center section, will move the pads only as much as that side's spring can provide the push.
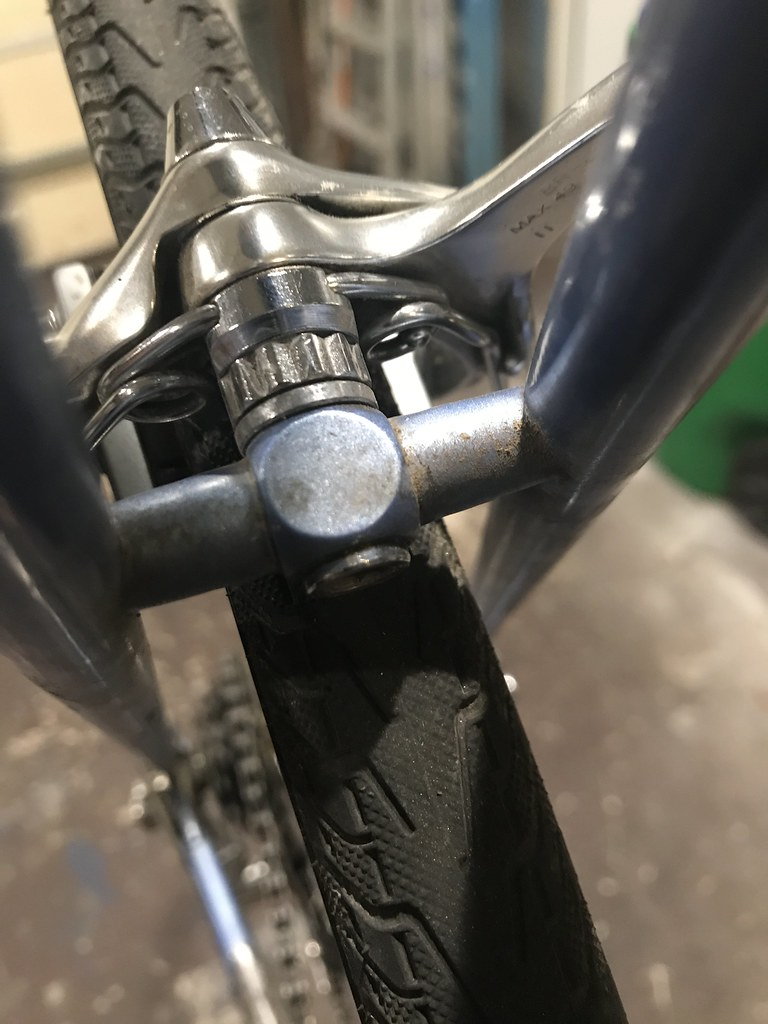
This caliper traps the spring's carrier by locking it on the center bolt's threads, using the star/roundish fitting behind the carrier. One detail is that the arms slop on the center bolt is controlled by how the spring carrier is tightened down, pressing the arms together and against the domed/hex fitted center bolt's free end. So not only does the carrier and it's lock nut (that star/roundish fitting) need to be tight against each other (much like a cone and lock nut) but their pressure on the arms needs to be just so, not so much as to hinder the arm's movement and allow no rock/slop.
All this is much easier to get done with the caliper off the bike and no cable attached. This way one can hold the centerbolt with a 5mm hex wrench (held in a vise if available) and play with the spring carrier and it's lock nut without the frame or wheel getting in the way (or distracting you). Once this arm to arm "bearing" adjustment is done and the spring carrier and lock nut are fully tightened in place the caliper can be reinstalled on the frame. Then by controlling how the center bolt domed end or the spring carrier is rotated the spring will also rotate and thus provide a balanced push on the arms, or provide an unbalanced push. As one sets this spring/center bolt rotation and tries to trap this in place with the center bolt's mounting nut (on the back side of the frame/fork) any of these parts might move independent of others. This is bad. The reason to do the carrier/lock nut first is to not have then loose enough to allow them to spin independently as the backing nut is secured. Sometimes one has to go back to the base line and redo the initial steps for all to work out.
If all is done well and before the backing nut is fully tightened against the frame (and fixing all else in stone) the cable and wheel need to be attached and in place. Some of these calipers have a set of flats on the spring carrier, allowing use of a cone wrench or Park OBT tool to hold and work the spring carrier. I find a smaller set of slip joint pliers (Channel locks) works well to hold the star/roundish lock nut.
Like many systems one has to understand the forces and actors in play, learn what affects what and break things down to the foundational aspects that much be set first the the secondary aspects next. Andy
__________________
AndrewRStewart
AndrewRStewart
Likes For Andrew R Stewart:
01-15-21, 11:51 PM
#3
Friendship is Magic

Join Date: Nov 2010
Location: Sacramento, CA
Posts: 22,984
Bikes: old ones
Mentioned: 304 Post(s)
Tagged: 0 Thread(s)
Quoted: 26425 Post(s)
Liked 10,381 Times
in
7,209 Posts
.
...after many years of patiently doing it Andy's way (which is the right way), I finally just started using a pin punch and a hammer on the top of whichever spring arm looks high, with the wheel and brake installed on the bike. It's embarrassing, but this works well for me, and it only takes a minute.
...after many years of patiently doing it Andy's way (which is the right way), I finally just started using a pin punch and a hammer on the top of whichever spring arm looks high, with the wheel and brake installed on the bike. It's embarrassing, but this works well for me, and it only takes a minute.
Likes For 3alarmer:
01-16-21, 06:53 AM
#4
SE Wis
Join Date: Apr 2005
Location: Milwaukee, WI
Posts: 10,516
Bikes: '68 Raleigh Sprite, '02 Raleigh C500, '84 Raleigh Gran Prix, '91 Trek 400, 2013 Novara Randonee, 1990 Trek 970
Mentioned: 40 Post(s)
Tagged: 0 Thread(s)
Quoted: 2747 Post(s)
Liked 3,401 Times
in
2,058 Posts
01-16-21, 10:45 AM
#5
Friendship is Magic
Join Date: Nov 2010
Location: Sacramento, CA
Posts: 22,984
Bikes: old ones
Mentioned: 304 Post(s)
Tagged: 0 Thread(s)
Quoted: 26425 Post(s)
Liked 10,381 Times
in
7,209 Posts
 01-16-21, 10:47 AM
#6
Senior Member
Join Date: Feb 2012
Location: Rochester, NY
Posts: 18,094
Bikes: Stewart S&S coupled sport tourer, Stewart Sunday light, Stewart Commuting, Stewart Touring, Co Motion Tandem, Stewart 3-Spd, Stewart Track, Fuji Finest, Mongoose Tomac ATB, GT Bravado ATB, JCP Folder, Stewart 650B ATB
Mentioned: 0 Post(s)
Tagged: 0 Thread(s)
Quoted: 4209 Post(s)
Liked 3,875 Times
in
2,315 Posts
.
...after many years of patiently doing it Andy's way (which is the right way), I finally just started using a pin punch and a hammer on the top of whichever spring arm looks high, with the wheel and brake installed on the bike. It's embarrassing, but this works well for me, and it only takes a minute.
...after many years of patiently doing it Andy's way (which is the right way), I finally just started using a pin punch and a hammer on the top of whichever spring arm looks high, with the wheel and brake installed on the bike. It's embarrassing, but this works well for me, and it only takes a minute.
The OP's caliper, a Shimano single pivot, has the spring carrier threaded onto the center bolt as well as deals with the spring. Having the same part handle two functions can allow a problem with one of the functions to upset the other function. So insuring that one function is not going to change helps maintain the other function too.
With single pivot calipers that have the spring carrier fixed to the center bolt (Campy, Weinmann, DC being the common brands) after initially rotating the center bolt/spring carrier as best possible then tightening the mounting nut (on the frame/fork's backside) I do what 3alarmer does. I also will sometimes increase the spring's tension (which can get lessened by the hammer tapping to center method) using a needle nose pliers (or my 5th hand tool) and prying out the spring past it's neutral point.
Then there's the "Classic" English calipers that were common on lower cost 3 speeds. They have the spring carrier threaded onto the center bolt, like Shimano, but the lock nut is also the mounting nut. The brake bridge or fork is trapped between the spring carrier and the carrier's back side is mitered/scallopped to index with the bridge or crown. With these calipers you pretty much have only spring bending options and the hammer and screwdriver are your friends. Andy
__________________
AndrewRStewart
AndrewRStewart
Likes For Andrew R Stewart:
01-16-21, 11:36 AM
#7
Mad bike riding scientist

Join Date: Nov 2004
Location: Denver, CO
Posts: 27,365
Bikes: Some silver ones, a red one, a black and orange one, and a few titanium ones
Mentioned: 152 Post(s)
Tagged: 1 Thread(s)
Quoted: 6219 Post(s)
Liked 4,219 Times
in
2,366 Posts
Having an issue keeping these suckers centered. Just when I think they are centered, I pull the brake lever and they swing too far to one side again. Can someone, in layman's terms, explain how to adjust these so they stay put? I assume I need this tool? https://www.parktool.com/product/off...e-wrench-obw-3 or is there a way I can do it without it?
__________________
Stuart Black
Plan Epsilon Around Lake Michigan in the era of Covid
Old School�When It Wasn�t Ancient bikepacking
Gold Fever Three days of dirt in Colorado
Pokin' around the Poconos A cold ride around Lake Erie
Dinosaurs in Colorado A mountain bike guide to the Purgatory Canyon dinosaur trackway
Solo Without Pie. The search for pie in the Midwest.
Picking the Scablands. Washington and Oregon, 2005. Pie and spiders on the Columbia River!
Likes For cyccommute:
01-16-21, 01:00 PM
#8
SE Wis
Join Date: Apr 2005
Location: Milwaukee, WI
Posts: 10,516
Bikes: '68 Raleigh Sprite, '02 Raleigh C500, '84 Raleigh Gran Prix, '91 Trek 400, 2013 Novara Randonee, 1990 Trek 970
Mentioned: 40 Post(s)
Tagged: 0 Thread(s)
Quoted: 2747 Post(s)
Liked 3,401 Times
in
2,058 Posts
Likes For dedhed:
01-16-21, 11:05 PM
#9

Insane Bicycle Mechanic

Join Date: Mar 2008
Location: other Vancouver
Posts: 9,843
Mentioned: 34 Post(s)
Tagged: 0 Thread(s)
Quoted: 809 Post(s)
Liked 711 Times
in
379 Posts
Once this is done and the caliper is back on the bike, centering is accomplished by putting a hex key in both the front and rear of the center bolt and rotating the assembly until it remains centered after a couple pull-and-release cycles.
At least that's the theory. I've never had much success adjusting these Shimano's way. I end up using a punch as you suggest.
__________________
Jeff Wills
Comcast nuked my web page. It will return soon..
Jeff Wills
Comcast nuked my web page. It will return soon..
01-17-21, 11:50 AM
#10
Mad bike riding scientist
Join Date: Nov 2004
Location: Denver, CO
Posts: 27,365
Bikes: Some silver ones, a red one, a black and orange one, and a few titanium ones
Mentioned: 152 Post(s)
Tagged: 1 Thread(s)
Quoted: 6219 Post(s)
Liked 4,219 Times
in
2,366 Posts
The star shape just screams to me that it was made for a tool to be put on it to twist the pivot assemble for alignment but, like I said, I’ve never seen a tool for it. It replaces the older block on brakes that usually had wrench flats for centering, which is a much better way of doing the centering.
__________________
Stuart Black
Plan Epsilon Around Lake Michigan in the era of Covid
Old School�When It Wasn�t Ancient bikepacking
Gold Fever Three days of dirt in Colorado
Pokin' around the Poconos A cold ride around Lake Erie
Dinosaurs in Colorado A mountain bike guide to the Purgatory Canyon dinosaur trackway
Solo Without Pie. The search for pie in the Midwest.
Picking the Scablands. Washington and Oregon, 2005. Pie and spiders on the Columbia River!
01-17-21, 12:30 PM
#11
Senior Member
Join Date: Dec 2019
Location: South Shore of Long Island
Posts: 2,799
Bikes: 2010 Carrera Volans, 2015 C-Dale Trail 2sl, 2017 Raleigh Rush Hour, 2017 Blue Proseccio, 1992 Giant Perigee, 80s Gitane Rallye Tandem
Mentioned: 12 Post(s)
Tagged: 0 Thread(s)
Quoted: 1088 Post(s)
Liked 1,025 Times
in
723 Posts
I usually use a flat screwdriver and a mallet, basically same as the pin punch but the broader head of the screwdriver is less likely to skip off and hit the frame. The tool is a good way to go but I've also seen it cause the spring to pop off the tab and have run into brakes where the tool just didn't fit in the space, more recessed bridge to thicker stays and decorative fork crowns. The screwdriver has always fit, just do light taps and test after each tap. I've done it on thousands of bikes with no ill effect.
01-18-21, 10:25 PM
#12
Insane Bicycle Mechanic
Join Date: Mar 2008
Location: other Vancouver
Posts: 9,843
Mentioned: 34 Post(s)
Tagged: 0 Thread(s)
Quoted: 809 Post(s)
Liked 711 Times
in
379 Posts
The star shape just screams to me that it was made for a tool to be put on it to twist the pivot assemble for alignment but, like I said, I�ve never seen a tool for it. It replaces the older block on brakes that usually had wrench flats for centering, which is a much better way of doing the centering.
In theory this makes it easier to center the caliper. As I said... not in my experience.
__________________
Jeff Wills
Comcast nuked my web page. It will return soon..
Jeff Wills
Comcast nuked my web page. It will return soon..
01-19-21, 07:58 AM
#13
Senior Member
Join Date: Mar 2016
Location: North of Boston
Posts: 898
Bikes: 1973 Schwinn Sports Tourer plus a " few" more :)
Mentioned: 4 Post(s)
Tagged: 0 Thread(s)
Quoted: 211 Post(s)
Liked 199 Times
in
147 Posts
Great info as I experienced this as well with my brakes.
Can someone take a picture of how to use the screwdriver and hammer ?
ALL great information !!
Thank you
Can someone take a picture of how to use the screwdriver and hammer ?
ALL great information !!
Thank you
