


1987 Trek 400D Elance paint and cleanup advice
 09-05-20, 04:37 PM
#76
S Rum
Join Date: Sep 2020
Location: Oregon Coast
Posts: 25
Bikes: 1964 Bianchi Specialissima
Mentioned: 0 Post(s)
Tagged: 0 Thread(s)
Quoted: 8 Post(s)
Likes: 0
Liked 3 Times
in
2 Posts
Take a look inside after application of Framesaver
I've had two Trek 420 frames blasted and powdercoated, and I sprayed a can of Framesaver into each frame after I received it back from the painter.
I'm curious about how the frames look inside - before and after application of the Framesaver.
It would be interesting to use some type of fiberoptic lens to snake into the frame and take a look.
I'm curious about how the frames look inside - before and after application of the Framesaver.
It would be interesting to use some type of fiberoptic lens to snake into the frame and take a look.
 09-12-20, 06:13 PM
#77
Member
Thread Starter
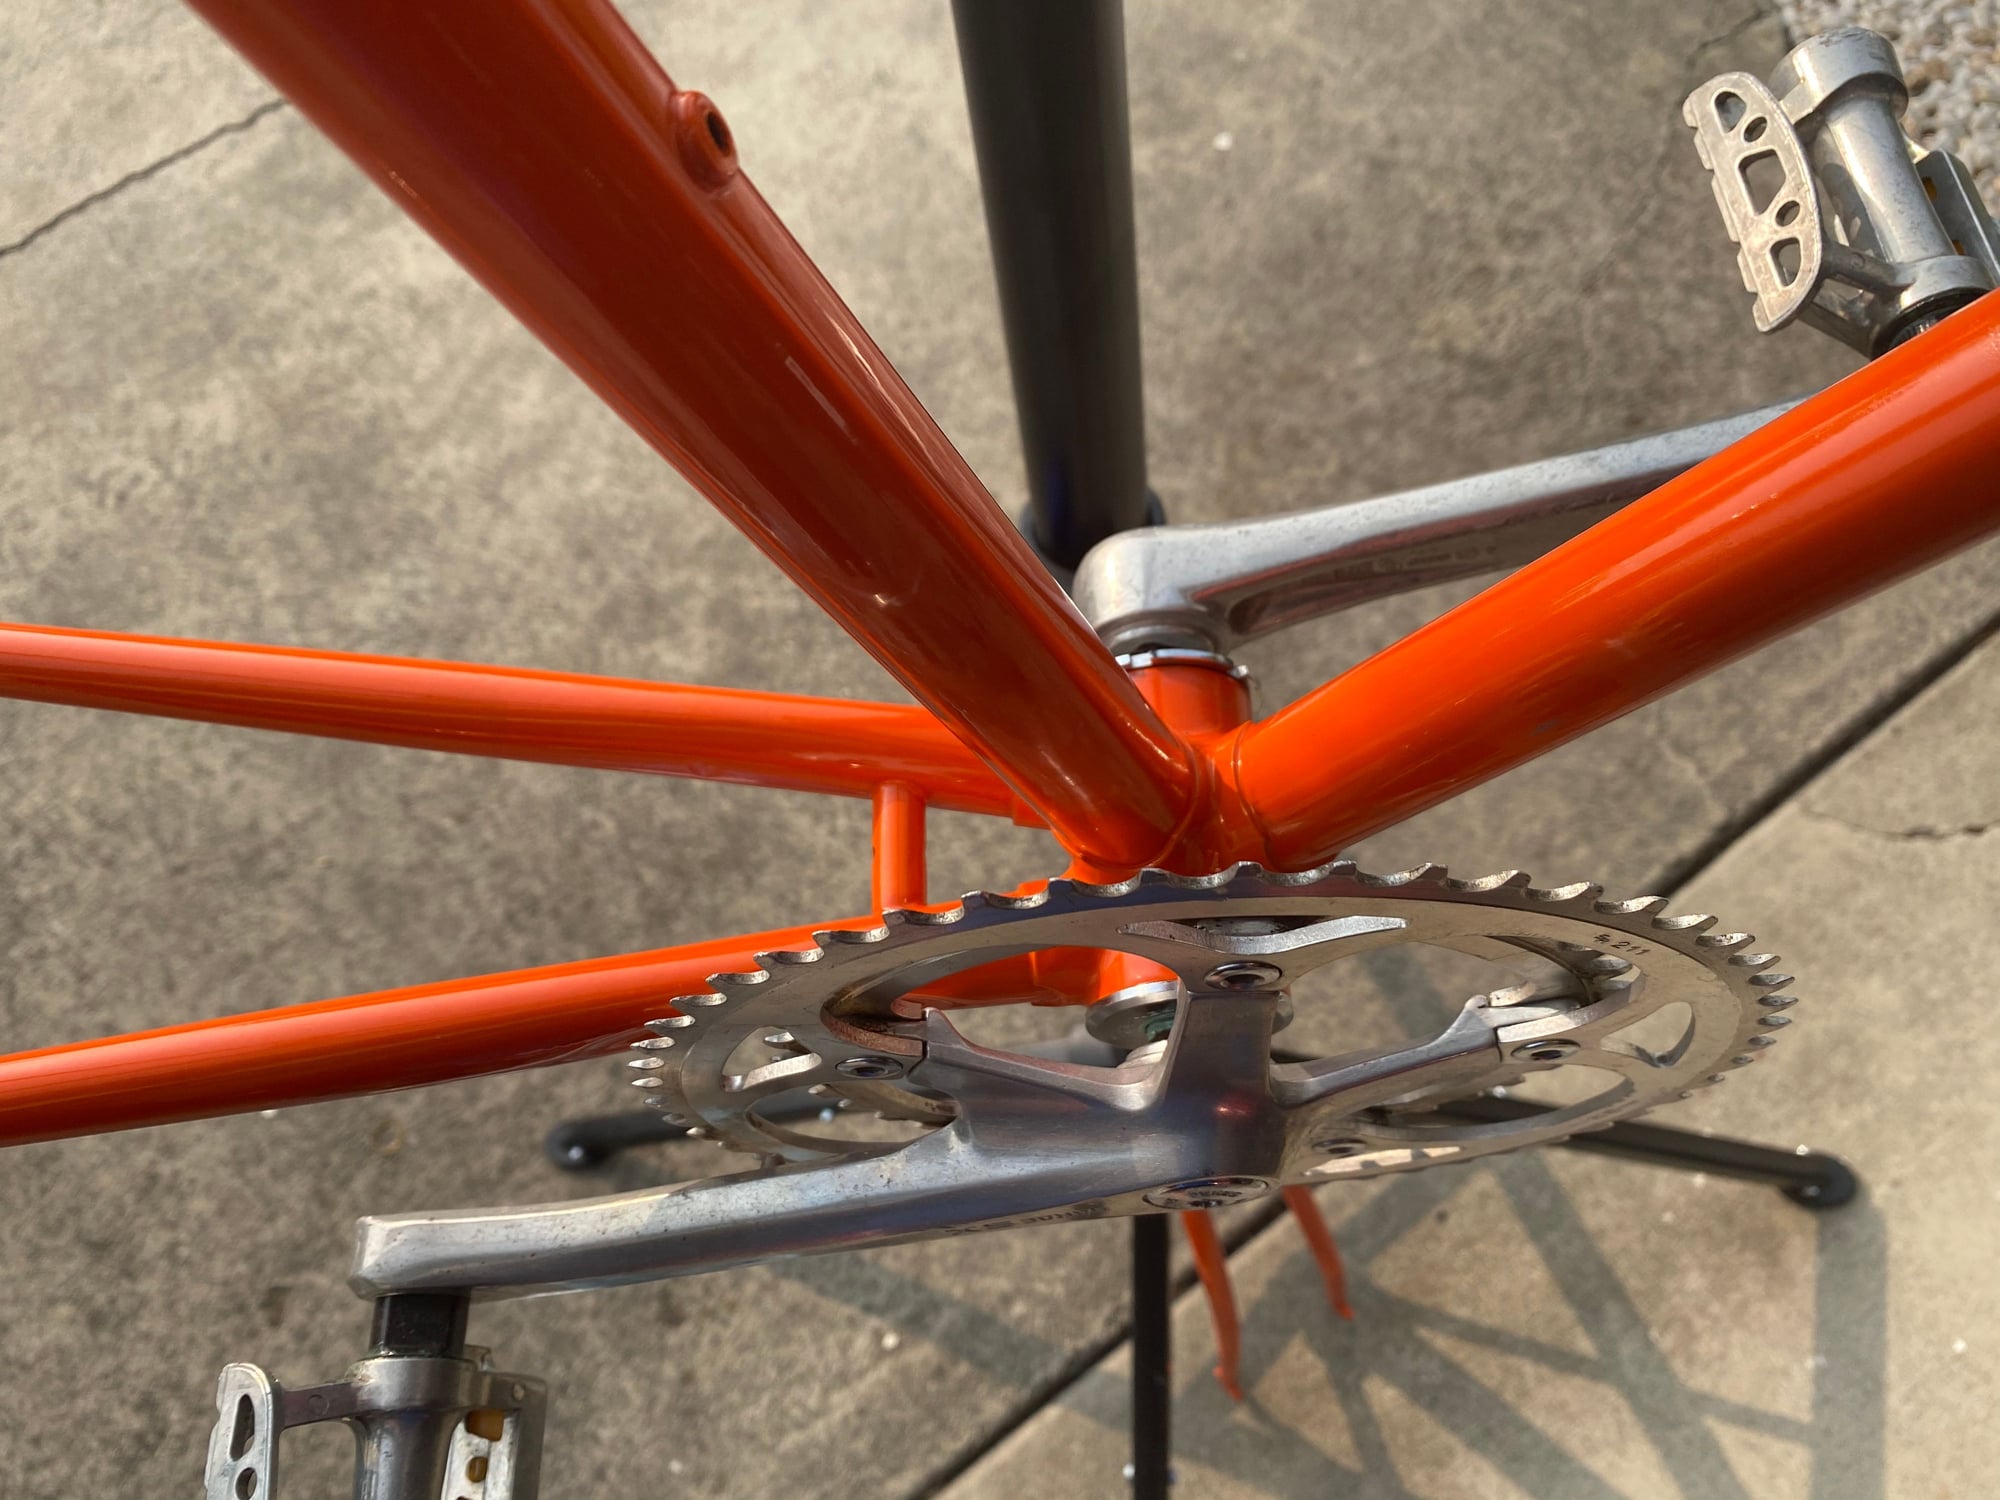
Powder coating done, frame saver applied, bottom bracket and pedals rebuilt and reassembled.

Likes For Kapurnicus:
09-13-20, 06:52 AM
#78
Full Member
Join Date: Feb 2013
Location: Worcester, Massachusetts
Posts: 308
Bikes: Fuji Sportif 1.7C, Shogun Metro AT, Jamis Durango SX, Miyata Alumicross, Fuji Special Road Racer, Mongoose ATB, Fuji SST 1.0 Team, Gitane (?), Specialized Rockhopper SS, Univega Gran Turismo, Univega Supra Sport Mixte, Nishiki Tri-A, Diamondback Coil
Mentioned: 1 Post(s)
Tagged: 0 Thread(s)
Quoted: 82 Post(s)
Liked 141 Times
in
78 Posts
Lovely color, will be interested to see the final build. As clean as it will ever be!
09-13-20, 08:43 AM
#79

Extraordinary Magnitude

Join Date: Aug 2009
Location: Waukesha WI
Posts: 13,646
Bikes: 1978 Trek TX700; 1978/79 Trek 736; 1984 Specialized Stumpjumper Sport; 1984 Schwinn Voyageur SP; 1985 Trek 620; 1985 Trek 720; 1986 Trek 400 Elance; 1987 Schwinn High Sierra; 1990 Miyata 1000LT
Mentioned: 84 Post(s)
Tagged: 0 Thread(s)
Quoted: 2608 Post(s)
Liked 1,699 Times
in
935 Posts
Looking good!!!
__________________
*Recipient of the 2006 Time Magazine "Person Of The Year" Award*
Commence to jigglin’ huh?!?!
"But hey, always love to hear from opinionated amateurs." -says some guy to Mr. Marshall.
Commence to jigglin’ huh?!?!
"But hey, always love to hear from opinionated amateurs." -says some guy to Mr. Marshall.
09-19-20, 05:06 PM
#80
Member
Thread Starter
Aligning, cable tightening, tuning, bar wrap. I think that’s what’s left of the list!
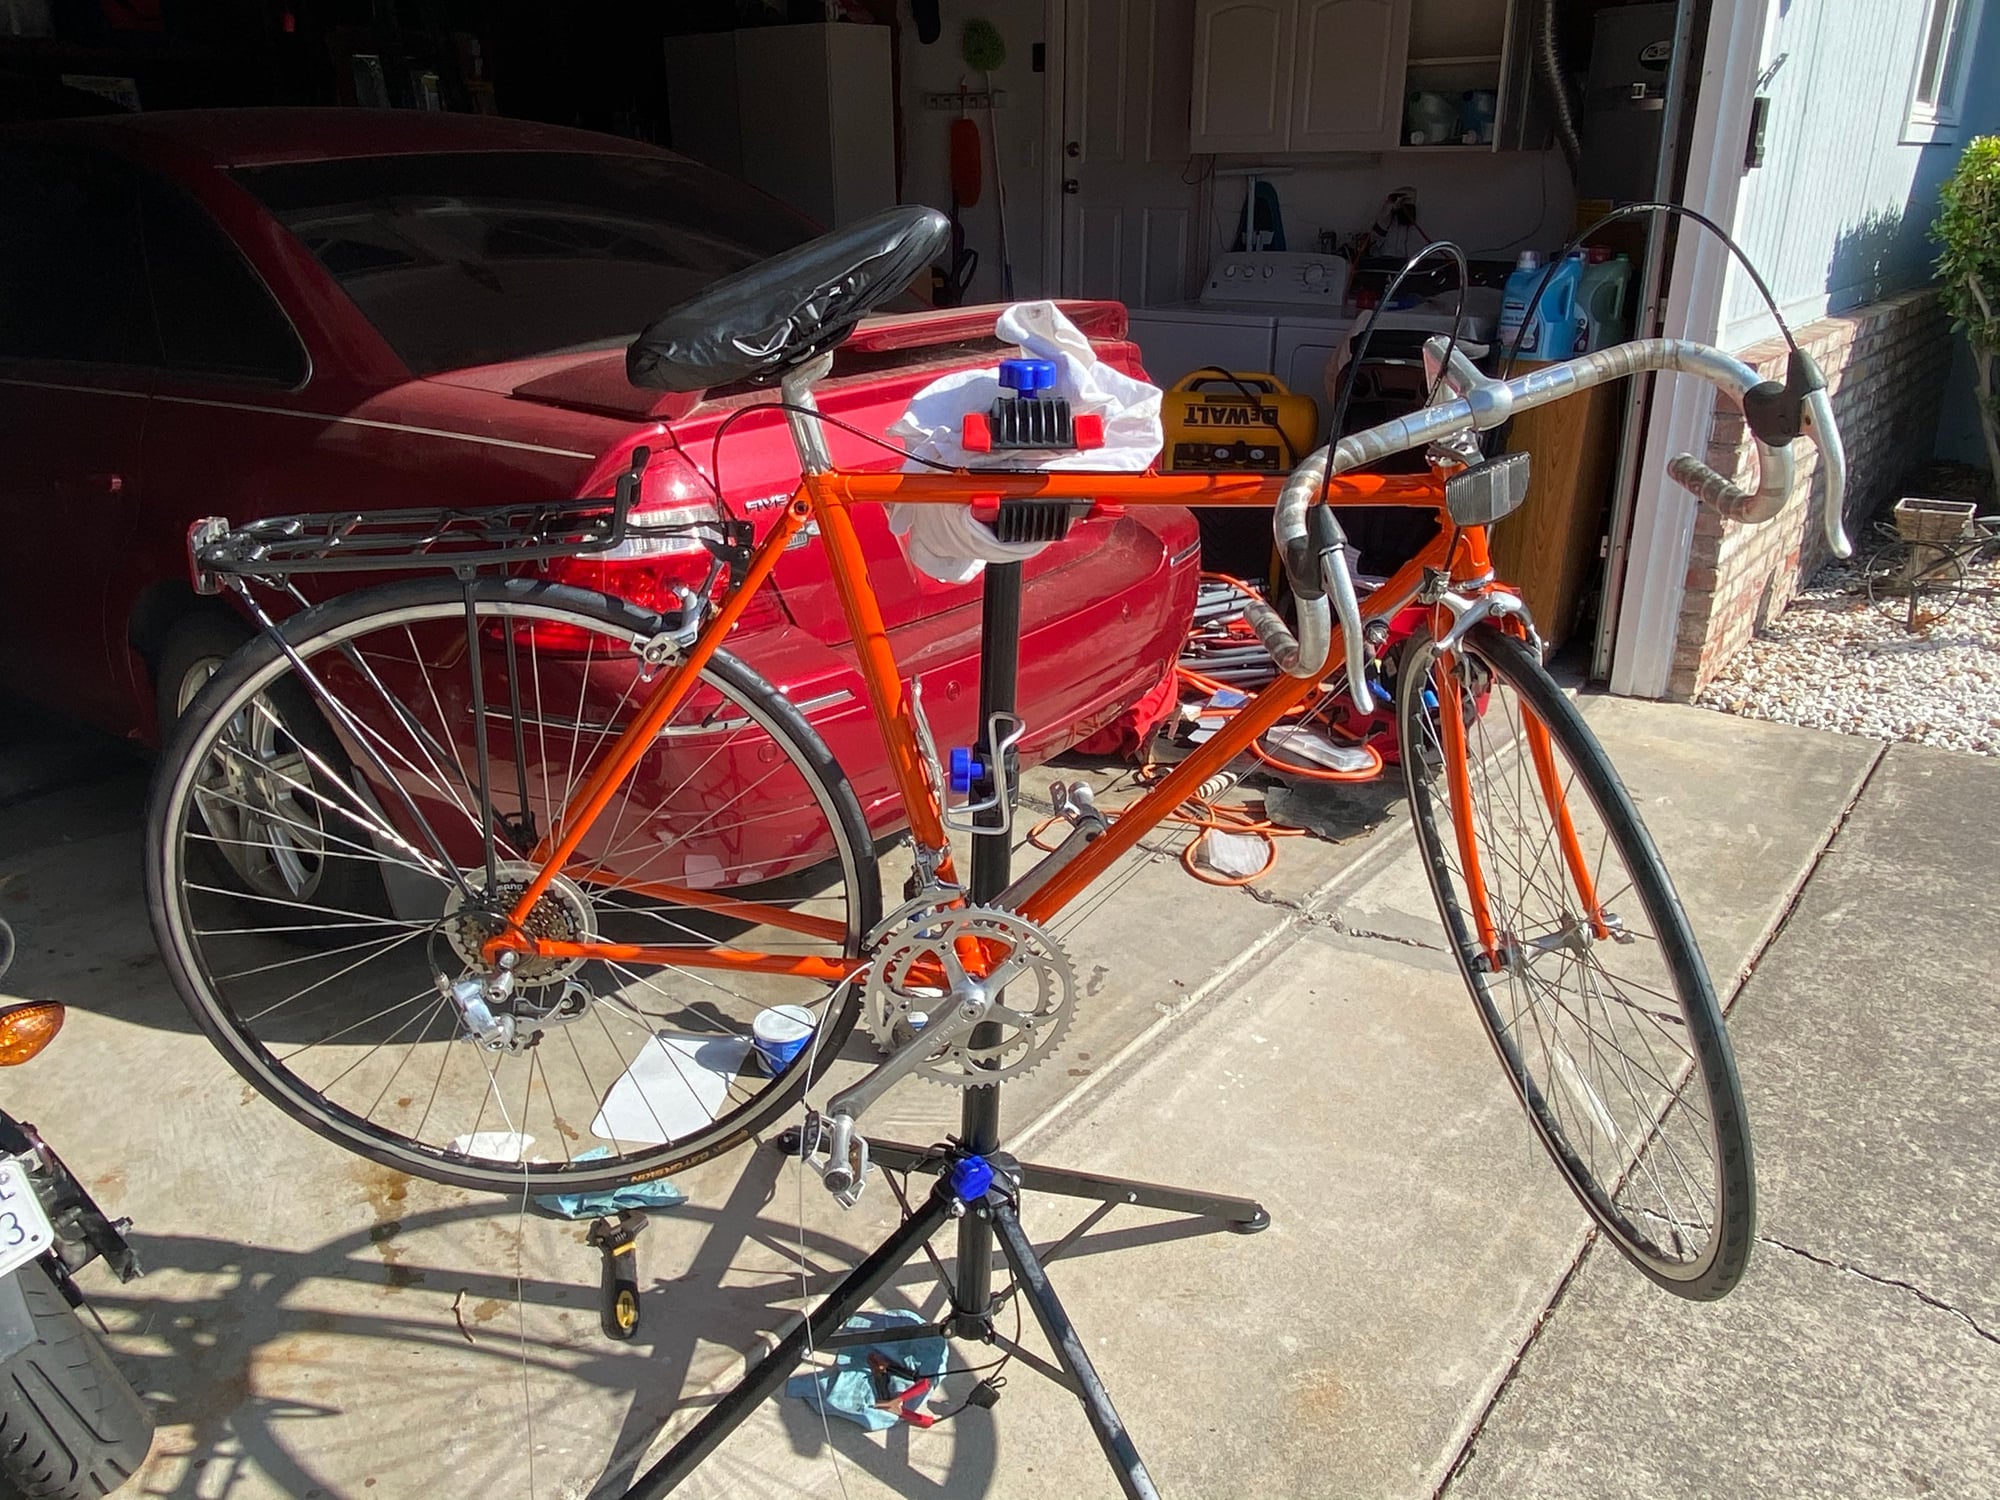
Nearly complete build
Nearly complete build
10-10-20, 04:25 PM
#81
Member
Thread Starter
Done! (Except handlebar tape. Just been wearing gloves haha, I’ll get it on there). Took 8 months. Thanks for all the help everyone. It feels great to be on the road again! It’s all adjusted, tuned, cleaned, lubed, and ridden! 2 miles so far.

Likes For Kapurnicus:
10-10-20, 10:59 PM
#82
seńor miembro

Join Date: Dec 2018
Location: Pac NW
Posts: 6,623
Bikes: '70s - '80s Campagnolo
Mentioned: 92 Post(s)
Tagged: 0 Thread(s)
Quoted: 3886 Post(s)
Liked 6,480 Times
in
3,206 Posts
Check out Sheldon's article on cable routing:
https://www.sheldonbrown.com/cables.html
The rear should look more like this:

With the front cable entry on the drive-side, you can also cross the stem with both cables, making it look more fluid. Both cables are way too long. Raise the stem as much as you ever would ride it, then trim away.
https://www.sheldonbrown.com/cables.html
The rear should look more like this:
With the front cable entry on the drive-side, you can also cross the stem with both cables, making it look more fluid. Both cables are way too long. Raise the stem as much as you ever would ride it, then trim away.
Last edited by SurferRosa; 10-10-20 at 11:04 PM.
10-11-20, 12:39 AM
#83
Member
Thread Starter
Thanks, is there anything dysfunctional about the method I went? I went swooping with all the cables from front to back (even rear derailleur) for an 80s big hair thing because I didn’t think it would make any difference. If it’s less functional I’ll change it. If not I liked the exaggerated look.
10-11-20, 03:45 PM
#84

Senior Member
Join Date: Aug 2006
Location: Land of Cheese
Posts: 1,079
Mentioned: 8 Post(s)
Tagged: 0 Thread(s)
Quoted: 111 Post(s)
Liked 213 Times
in
105 Posts
The brake cables and housing should route in front of the handlebars, not behind. Also, move the position of the brake levers; place a ruler or some straight edge parallel with the bar drops, loosen the brake levers and lower them until the bottom tip of the lever touches the top of the ruler. The brake shoes need to be aligned parallel with the rims.
10-11-20, 04:16 PM
#85
Edumacator
Join Date: Jan 2018
Location: Goose Creek, SC
Posts: 6,803
Bikes: '87 Crestdale, '87 Basso Gap, '92 Rossin Performance EL-OS, 1990 VanTuyl, 1980s Losa, 1985 Trek 670, 1982 AD SLE, 1987 PX10, etc...
Mentioned: 59 Post(s)
Tagged: 0 Thread(s)
Quoted: 2439 Post(s)
Liked 3,122 Times
in
1,964 Posts
Thanks, is there anything dysfunctional about the method I went? I went swooping with all the cables from front to back (even rear derailleur) for an 80s big hair thing because I didn’t think it would make any difference. If it’s less functional I’ll change it. If not I liked the exaggerated look.
Secondly, there might be a bit of a pinch effect in the cables without a smoother sweep.
__________________
1987 Crest Cannondale, 1987 Basso Gap, 1992 Rossin Performance EL, 1990ish Van Tuyl, 1985 Trek 670, 1982 AD SLE, 2003 Pinarello Surprise, 1990ish MBK Atlantique, 1987 Peugeot Competition, 1987 Nishiki Tri-A, 1981 Faggin, 1996 Cannondale M500, 1984 Mercian, 1982 AD SuperLeicht, 1985 Massi (model unknown), 1988 Daccordi Griffe , 1989 Fauxsin MTB, 1981 Ciocc Mockba, 1992 Bianchi Giro, 1977 Colnago Super
1987 Crest Cannondale, 1987 Basso Gap, 1992 Rossin Performance EL, 1990ish Van Tuyl, 1985 Trek 670, 1982 AD SLE, 2003 Pinarello Surprise, 1990ish MBK Atlantique, 1987 Peugeot Competition, 1987 Nishiki Tri-A, 1981 Faggin, 1996 Cannondale M500, 1984 Mercian, 1982 AD SuperLeicht, 1985 Massi (model unknown), 1988 Daccordi Griffe , 1989 Fauxsin MTB, 1981 Ciocc Mockba, 1992 Bianchi Giro, 1977 Colnago Super
Likes For jdawginsc:
10-11-20, 05:21 PM
#86
Member
Thread Starter
Thanks all. Great tips. I’ll trim the lines down and route them in front of the handlebars and take a look at the brake levers.
My pads are parallel to the rims, I’m not sure how you would get them not parallel. They touch all rim (no tire) and hit across the whole brake pad surface it looks like. I am I misunderstanding?
My pads are parallel to the rims, I’m not sure how you would get them not parallel. They touch all rim (no tire) and hit across the whole brake pad surface it looks like. I am I misunderstanding?
10-11-20, 05:50 PM
#87
Senior Member
Thanks all. Great tips. I’ll trim the lines down and route them in front of the handlebars and take a look at the brake levers.
My pads are parallel to the rims, I’m not sure how you would get them not parallel. They touch all rim (no tire) and hit across the whole brake pad surface it looks like. I am I misunderstanding?
My pads are parallel to the rims, I’m not sure how you would get them not parallel. They touch all rim (no tire) and hit across the whole brake pad surface it looks like. I am I misunderstanding?
Front drive side looks a bit askew.
10-11-20, 06:09 PM
#88
Member
Thread Starter
 10-11-20, 06:23 PM
#89
seńor miembro
Join Date: Dec 2018
Location: Pac NW
Posts: 6,623
Bikes: '70s - '80s Campagnolo
Mentioned: 92 Post(s)
Tagged: 0 Thread(s)
Quoted: 3886 Post(s)
Liked 6,480 Times
in
3,206 Posts
10-11-20, 06:32 PM
#90
Member
Thread Starter
I was following the catalog photo which had high swoops behind the bars. No cross over, and a big swoop under the seat. Granted, mine are even swoopier haha.
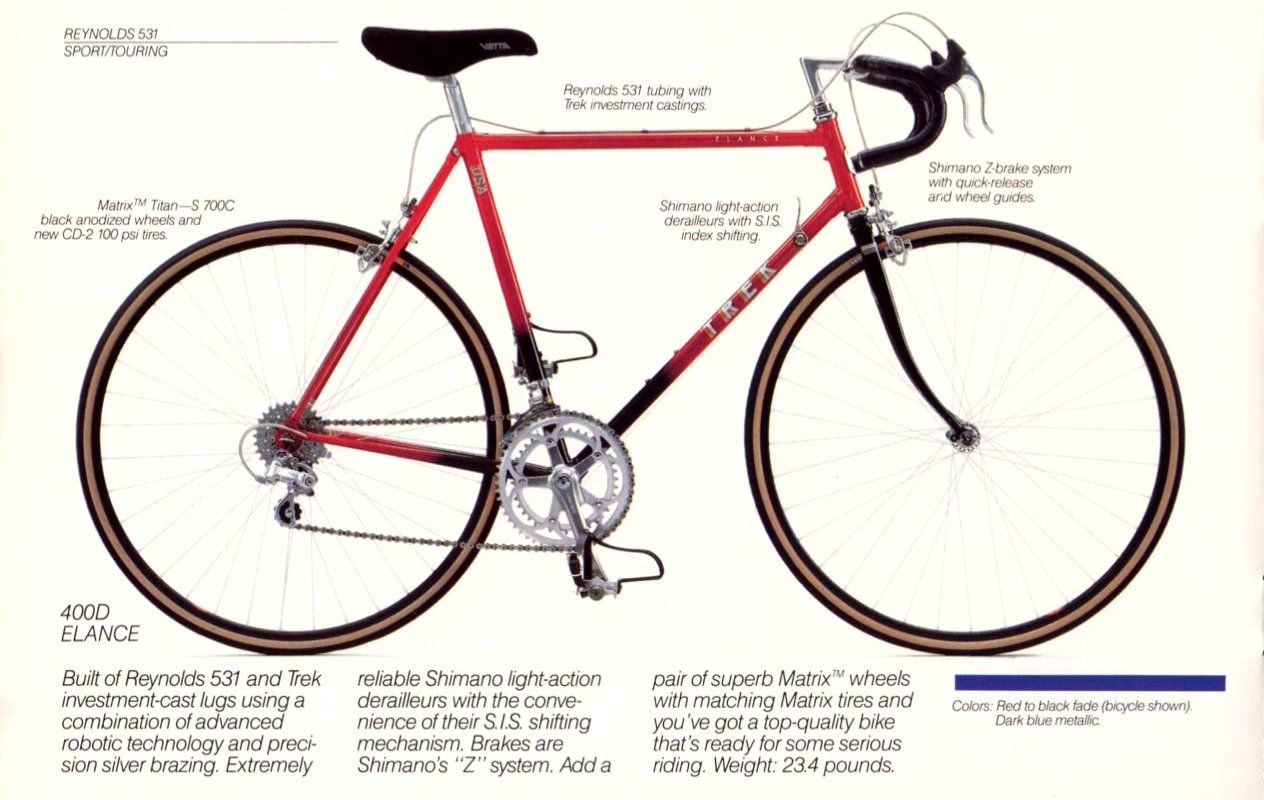
I guess it’s wrong but this is what the original 1987 catalog said my bike looked like.
I guess it’s wrong but this is what the original 1987 catalog said my bike looked like.
10-11-20, 06:55 PM
#91
seńor miembro
Join Date: Dec 2018
Location: Pac NW
Posts: 6,623
Bikes: '70s - '80s Campagnolo
Mentioned: 92 Post(s)
Tagged: 0 Thread(s)
Quoted: 3886 Post(s)
Liked 6,480 Times
in
3,206 Posts
^ That's pretty minimum in front. Not sure why you think it's "high swoops."
The catalog photo doesn't have the front reflector to navigate, so crossing the bars isn't as necessary.
Catalogs are often setup by marketing folks.
The catalog photo doesn't have the front reflector to navigate, so crossing the bars isn't as necessary.
Catalogs are often setup by marketing folks.
10-12-20, 01:13 AM
#92
Member
Thread Starter
The other ones I’ve seen have been wrapped in the handlebar tape. I took the original design and made it swoopier as I said. I meant “high swoops” as our the top of the lever mounts. Most modern bikes don’t do that. These went up and over. And the seat brake line was more like mine than the one you posted as the suggestion. I was just saying this was my baseline and I went a little more exaggerated.
10-12-20, 11:14 AM
#93
seńor miembro
Join Date: Dec 2018
Location: Pac NW
Posts: 6,623
Bikes: '70s - '80s Campagnolo
Mentioned: 92 Post(s)
Tagged: 0 Thread(s)
Quoted: 3886 Post(s)
Liked 6,480 Times
in
3,206 Posts
With non-aero levers, that's called a "kludge." With aero levers, it's necessary.
I understood. Another newbie recently used a catalog pic for his awful cable routing and made the same mistake the marketing folks made. Trouble is, he has to ride his. They don't.
https://www.bikeforums.net/classic-v...-catalogs.html
I was just saying this was my baseline.
https://www.bikeforums.net/classic-v...-catalogs.html
Last edited by SurferRosa; 10-12-20 at 11:17 AM.
10-12-20, 11:33 AM
#94
Senior Member
Join Date: Mar 2007
Location: SF Bay Area, East bay
Posts: 7,658
Bikes: Miyata 618 GT, Marinoni, Kestral 200 2002 Trek 5200, KHS Flite, Koga Miyata, Schwinn Spitfire 5, Mondia Special, Univega Alpina, Miyata team Ti, Santa Cruz Highball
Mentioned: 53 Post(s)
Tagged: 0 Thread(s)
Quoted: 1609 Post(s)
Liked 2,590 Times
in
1,224 Posts
The good thing is you have a lot of extra to work with. I will leave the cables and housing long until I get my final setup.
10-12-20, 12:28 PM
#95
Senior Member
Join Date: Aug 2006
Location: Land of Cheese
Posts: 1,079
Mentioned: 8 Post(s)
Tagged: 0 Thread(s)
Quoted: 111 Post(s)
Liked 213 Times
in
105 Posts
Now that you've aligned the brake shoe parallel to the rim, you'll need to correct another item. Pretty sure your front tire, a Conti Gatorskin, is mounted backwards. The rear tire looks correct. Check the sidewall of the front tire for the rotational direction arrow; it should face forward. Remove the tire and remount. While you're at it, center the inner tube valve stem in the Conti label; this is just aesthetics. More importantly, make sure the valve stem is perpendicular to the rim. It's slightly skewed in your photo. If the valve stem opening in the rim has a sharp edge and the valve stem is angled, it can wear on the tube/stem and give you a flat. While the tire and tube are off, take some fine grit metal sandpaper and clean up the braking surface on the rim and check the brake shoe surfaces for embedded grit.
And in your second work stand photo, the front wheel's quick release is angled too far forward, almost at a 45 degree angle. When you remount the wheel, position the quick release so it parallel to the fork blades.
And in your second work stand photo, the front wheel's quick release is angled too far forward, almost at a 45 degree angle. When you remount the wheel, position the quick release so it parallel to the fork blades.
10-12-20, 01:56 PM
#96
seńor miembro
Join Date: Dec 2018
Location: Pac NW
Posts: 6,623
Bikes: '70s - '80s Campagnolo
Mentioned: 92 Post(s)
Tagged: 0 Thread(s)
Quoted: 3886 Post(s)
Liked 6,480 Times
in
3,206 Posts
10-12-20, 04:23 PM
#97
Member
Thread Starter
You guys are very thorough.
- Shorted rear brake housing and line as much as possible. Left it behind the bar, but did cross it over. Haven't touched front brake one yet.
- Leveled brake levers with straight edge on bottom of the drop.
- Flipped the axle in the front wheel, it was backwards. Now the wheel and tire are correct. (you can read mallard while sitting on the bike, the hub before had it backwards because I put the axle in the wrong way I guess. Tire rotation is now pointed the right way)
- The thread was loose on the valve to rim screw thing that let it look more askew. It's not perfect, but not tiled enough to take off the tire.
Last edited by Kapurnicus; 10-12-20 at 04:31 PM.
11-05-20, 12:02 PM
#98
Member
Thread Starter
Thanks again for all the help! It’s been great Loving it. 116 miles so far, 10 straight up a mountain. Running well.
I still haven't shortened front brake housingor put on bar wrap put on bar wrap today. I think I also left a little too much slop in the bottom bracket I’d like to address (Fixed this this morning. Took it all apart to regrease and then tightened the cone nuts down a little harder than last time, but still just loose enough so they don't add a lot of friction. Before the chainrings would scrape the front derailer a little because it could wiggle back and forth a little too much. Now it's nice and smooth and no more chain scratching). But otherwise perfect. Did a 25 mile stint this week with no soreness or discomfort so I think I finally have it adjusted properly.


I still haven't shortened front brake housing
Last edited by Kapurnicus; 11-05-20 at 05:22 PM.
