


Getting medieval on an adjustable cup. Ideas?
 11-11-23, 05:27 PM
#1
Newbie
Thread Starter
Join Date: Nov 2023
Posts: 4
Mentioned: 0 Post(s)
Tagged: 0 Thread(s)
Quoted: 6 Post(s)
Likes: 0
Liked 0 Times
in
0 Posts
Getting medieval on an adjustable cup. Ideas?
I’m struggling with a fixed cup & adjustable cup bottom bracket on a mid-nineties Marin Palisades Trail. I can’t shift either side - I sheared the pins off a Park Tools spanner.The bearings cage inside the bracket has collapsed. I’ve read all sorts of forums on how to remove them - they all assume you can remove one side, so you can then use the Sheldon Brown washers and nuts on threaded rod method to friction grip and shift the other. The two-pin spanners can’t grip enough to turn the adjustable side (I could do with some kind of six-toothed socket to get proper grip?). The fixed cup side has been tightened to an orientation where there is no room to swing at it - the rear stay is in the way on one side. And that side is unlikely to move anyway. So… my options are a burning heat thing I think, but I’d worry that the BB would expand more than the frame and crack it. And general fire danger. Which leaves mechanical destruction - does anyone know if you can cut them out, either a grinder or Dremel, or reciprocating saw to cut through the BB shell without damaging the frame? Any other ideas on tools or methods very much welcome. Ta very much…
 11-11-23, 06:04 PM
#2

Senior Member
Join Date: Apr 2009
Location: New Rochelle, NY
Posts: 38,729
Bikes: too many bikes from 1967 10s (5x2)Frejus to a Sumitomo Ti/Chorus aluminum 10s (10x2), plus one non-susp mtn bike I use as my commuter
Mentioned: 140 Post(s)
Tagged: 1 Thread(s)
Quoted: 5793 Post(s)
Liked 2,594 Times
in
1,437 Posts
If you have access to a quality bench vise with properly square jaws, clamp the fixed cup securely and turn the frame. You'll probably want a helper because the challenge is to keep the frame level, because you only have about 3mm to hold.
BEFORE trying the above or anything else, pour a penetrant like Liquid-Wrench or Kroil into the BB. Then maneuver the frame to get it fully around both cups and set aside for a day or so.
BEFORE trying the above or anything else, pour a penetrant like Liquid-Wrench or Kroil into the BB. Then maneuver the frame to get it fully around both cups and set aside for a day or so.
__________________
FB
Chain-L site
An ounce of diagnosis is worth a pound of cure.
Just because I'm tired of arguing, doesn't mean you're right.
“One accurate measurement is worth a thousand expert opinions” - Adm Grace Murray Hopper - USN
WARNING, I'm from New York. Thin skinned people should maintain safe distance.
FB
Chain-L site
An ounce of diagnosis is worth a pound of cure.
Just because I'm tired of arguing, doesn't mean you're right.
“One accurate measurement is worth a thousand expert opinions” - Adm Grace Murray Hopper - USN
WARNING, I'm from New York. Thin skinned people should maintain safe distance.
Likes For FBinNY:
11-11-23, 06:26 PM
#3
Newbie
Thread Starter
Join Date: Nov 2023
Posts: 4
Mentioned: 0 Post(s)
Tagged: 0 Thread(s)
Quoted: 6 Post(s)
Likes: 0
Liked 0 Times
in
0 Posts
If you have access to a quality bench vise with properly square jaws, clamp the fixed cup securely and turn the frame. You'll probably want a helper because the challenge is to keep the frame level, because you only have about 3mm to hold.
BEFORE trying the above or anything else, pour a penetrant like Liquid-Wrench or Kroil into the BB. Then maneuver the frame to get it fully around both cups and set aside for a day or so.
BEFORE trying the above or anything else, pour a penetrant like Liquid-Wrench or Kroil into the BB. Then maneuver the frame to get it fully around both cups and set aside for a day or so.
11-11-23, 07:36 PM
#4
aged to perfection

Join Date: Jun 2009
Location: PacNW
Posts: 1,820
Bikes: Dinucci Allez 2.0, Richard Sachs, Alex Singer, Serotta, Masi GC, Raleigh Pro Mk.1, Hetchins, etc
Mentioned: 24 Post(s)
Tagged: 0 Thread(s)
Quoted: 840 Post(s)
Liked 1,263 Times
in
667 Posts
I would suggest you destroy the adjustable cup - clamp it in a vise and twist it back and forth until it breaks loose. A replacement is easy to find.
when you strip the flats off the fixed cup you'll have to do that anyway
/markp
when you strip the flats off the fixed cup you'll have to do that anyway
/markp
11-11-23, 07:40 PM
#5
Senior Member
Join Date: Oct 2014
Location: Portland, OR
Posts: 12,910
Bikes: (2) ti TiCycles, 2007 w/ triple and 2011 fixed, 1979 Peter Mooney, ~1983 Trek 420 now fixed and ~1973 Raleigh Carlton Competition gravel grinder
Mentioned: 129 Post(s)
Tagged: 0 Thread(s)
Quoted: 4806 Post(s)
Liked 3,933 Times
in
2,558 Posts
If you have access to a quality bench vise with properly square jaws, clamp the fixed cup securely and turn the frame. You'll probably want a helper because the challenge is to keep the frame level, because you only have about 3mm to hold.
BEFORE trying the above or anything else, pour a penetrant like Liquid-Wrench or Kroil into the BB. Then maneuver the frame to get it fully around both cups and set aside for a day or so.
BEFORE trying the above or anything else, pour a penetrant like Liquid-Wrench or Kroil into the BB. Then maneuver the frame to get it fully around both cups and set aside for a day or so.
11-11-23, 07:43 PM
#6
Senior Member
Join Date: Oct 2014
Location: Portland, OR
Posts: 12,910
Bikes: (2) ti TiCycles, 2007 w/ triple and 2011 fixed, 1979 Peter Mooney, ~1983 Trek 420 now fixed and ~1973 Raleigh Carlton Competition gravel grinder
Mentioned: 129 Post(s)
Tagged: 0 Thread(s)
Quoted: 4806 Post(s)
Liked 3,933 Times
in
2,558 Posts
Hi there - thanks for the advice, it is appreciated. I don’t think I can clamp that side - I don’t think there’s even 3mm to grip. I suspect the best route in would be to destroy the fixed cup - or shift it, preferably, but just being realistic. I read another post here about using the noses of a pair of pliers in the holes - the pliers tips broke off… it is seized solid. And yes - have soaked in penetrating oil, reapplied every day for a couple of weeks (another reason to avoid heat…!)
11-11-23, 08:12 PM
#7
Happy With My Bikes

Join Date: Sep 2020
Location: Oklahoma
Posts: 2,187
Bikes: Hi-Ten bike boomers, a Trek Domane and some projects
Mentioned: 2 Post(s)
Tagged: 0 Thread(s)
Quoted: 884 Post(s)
Liked 2,308 Times
in
1,118 Posts
Not trying to be insulting, but I assume you loosened the locknut and are trying to turn the cup the correct direction. But if I were to go to the point of destruction of one of the cups, I would try a punch and hammer on one of the adjustable cup holes.
__________________
"It is the unknown around the corner that turns my wheels." -- Heinz Stücke
"It is the unknown around the corner that turns my wheels." -- Heinz Stücke
11-11-23, 08:52 PM
#8
SE Wis
Join Date: Apr 2005
Location: Milwaukee, WI
Posts: 10,517
Bikes: '68 Raleigh Sprite, '02 Raleigh C500, '84 Raleigh Gran Prix, '91 Trek 400, 2013 Novara Randonee, 1990 Trek 970
Mentioned: 40 Post(s)
Tagged: 0 Thread(s)
Quoted: 2747 Post(s)
Liked 3,401 Times
in
2,058 Posts
11-11-23, 11:17 PM
#9
Full Member
I believe the weld approach suggested in dedhed's link is your best option -- but it requires either a friend with a welder, or finding and paying a shop that doesn't mind taking on small custom jobs. Perhaps there are people on this thread local to you, who might be of assistance -- I could be, if you are not far away, but we don't know your location.
Anyway, the procedure would be:
1) Acquire a flat steel bar at least 1/8" thick and a few feet long. A shop might be able to provide a piece of scrap, or something like this will suffice. If you can't obtain something like that, a shorter piece can be used and then a hydraulic jack handle or similar can be slipped over it, to increase the effective length, but that makes the final step trickier.
2) Either drill a hole in the bar larger than the spindle diameter, or use an angle grinder or similar to cut a notch in the end for spindle clearance.
3) Clean off all the grease, penetrating oil, etc that might be resident on the cup -- which will negatively effect the quality of your welds. If your lever is scrap material, remove any paint from the end to be welded, for the same reason.
4) Secure an ice pack or two to the shell or adjacent tubes with duct tape or whatever. This is likely to be unnecessary, but it's cheap insurance to guard against putting too much heat into the aluminum side.
5) Give some thought to how you are going to accomplish step 7 now. Unlike a ratchet wrench, the lever you are about to weld on cannot be easily respositioned, so make sure it is in the correct orientation with respect to how your frame will be secured ( which might require a vise, instead of a typical repair stand ).
6) Weld the bar to the cup you are trying to remove. It doesn't matter what kind of welding machine is used, so long as it has the necessary power to achieve a solid weld on the thickness of material you chose. You only need a few tack ( short ) welds for this project, as that will be plenty strong and that avoids putting excessive heat into the frame. If step four is impossible for some reason, the same effect can be achieved by working slowly and allowing the work to cool between tacks. A shop working hourly isn't going to want to do this, but a friend might. 'Course, a professional welder will be careful not to overheat adjacent material, since it's their job to know that.
7) Obviously, secure the frame and apply all your torque on the new lever, hopefully breaking loose the part.
Depending on the quality of the paint job on your frame, you might prefer to protect it with a welding blanket or similar. MIG and SMAW processes will generate sparks that are capable of burning paint if they land just right. TIG is spark-free, so this is unnecessary, but it's a little harder to find TIG welders ( both the machines and the humans who run them ).
11-12-23, 12:22 AM
#10
Senior Member
Join Date: Apr 2011
Posts: 7,082
Mentioned: 41 Post(s)
Tagged: 0 Thread(s)
Quoted: 4420 Post(s)
Liked 1,568 Times
in
1,030 Posts
Seems like a lot of fuss when the OP hasn't even tried a different wrench on the fixed cup. An adjustable with a better angle.
11-12-23, 02:37 AM
#11
Newbie
Thread Starter
Join Date: Nov 2023
Posts: 4
Mentioned: 0 Post(s)
Tagged: 0 Thread(s)
Quoted: 6 Post(s)
Likes: 0
Liked 0 Times
in
0 Posts
Thanks for suggestions…
Hi there - firstly, thanks to everyone for taking the time to reply, it is appreciated.
To answer a couple of points - yes, locking ring has been removed. I tried a hammer and a punch - the punch just enlarged a couple of the holes, the cup didn’t move!
I have tried a couple of different ‘correct’ tools / the hefty double ended Park Tool spanner not that great - the puns sheared off the adjustable spanner end, and the fixed cup end is a sloppy fit over the ‘oblong’ shape of the fixed cup. I tried a vintage multi spanner thing too - like an old flat Raleigh spanner - but not enough leverage available. I’ve not tried an adjustable spanner - not sure there’s enough meat on the fixed cup for the jaws of one to grab? It would have to be very fine I guess, likewise a vice on a bench.
One idea I had was to drill through each of the six holes of the adjustable cup, several times to slowly enlarge them, and so weaken them to collapse the cup away from the thread of the frame. Or just two or three of the holes to remove one part of it and so then I could collapse the remainder with a punch. Has anyone tried this?
I think I’m worried that, if I start to destroy it, and fail, then the damage caused in the attempt may mean other methods won’t be possible. So - what is the best way to destroy / drill out / saw / cut one of these?
(And sorry - one last reply - sadly I don’t have access to a welder. I have asked a couple of local bike repairers if they would help, one was honest and said they didn’t really want to get involved - he was busy, this could just take too much of his time; the other was some young guys who didn’t really understand what I was asking - more used to modern stuff in fairness, rather than crappy old bikes built before they were born! I get the same issues with my MG B - that’s the same age as me, surely we’re not old yet… ).
Best wishes to all for your help.
11-12-23, 03:05 AM
#12
Senior Member

Join Date: Jul 2015
Location: NW Oregon
Posts: 2,975
Bikes: !982 Trek 930R Custom, Diamondback ascent with SERIOUS updates, Fuji Team Pro CF and a '09 Comencal Meta 5.5
Mentioned: 15 Post(s)
Tagged: 1 Thread(s)
Quoted: 1299 Post(s)
Liked 739 Times
in
534 Posts
Hi there - firstly, thanks to everyone for taking the time to reply, it is appreciated.
To answer a couple of points - yes, locking ring has been removed. I tried a hammer and a punch - the punch just enlarged a couple of the holes, the cup didn’t move!
I have tried a couple of different ‘correct’ tools / the hefty double ended Park Tool spanner not that great - the puns sheared off the adjustable spanner end, and the fixed cup end is a sloppy fit over the ‘oblong’ shape of the fixed cup. I tried a vintage multi spanner thing too - like an old flat Raleigh spanner - but not enough leverage available. I’ve not tried an adjustable spanner - not sure there’s enough meat on the fixed cup for the jaws of one to grab? It would have to be very fine I guess, likewise a vice on a bench.
One idea I had was to drill through each of the six holes of the adjustable cup, several times to slowly enlarge them, and so weaken them to collapse the cup away from the thread of the frame. Or just two or three of the holes to remove one part of it and so then I could collapse the remainder with a punch. Has anyone tried this?
I think I’m worried that, if I start to destroy it, and fail, then the damage caused in the attempt may mean other methods won’t be possible. So - what is the best way to destroy / drill out / saw / cut one of these?
(And sorry - one last reply - sadly I don’t have access to a welder. I have asked a couple of local bike repairers if they would help, one was honest and said they didn’t really want to get involved - he was busy, this could just take too much of his time; the other was some young guys who didn’t really understand what I was asking - more used to modern stuff in fairness, rather than crappy old bikes built before they were born! I get the same issues with my MG B - that’s the same age as me, surely we’re not old yet… ).
Best wishes to all for your help.
To answer a couple of points - yes, locking ring has been removed. I tried a hammer and a punch - the punch just enlarged a couple of the holes, the cup didn’t move!
I have tried a couple of different ‘correct’ tools / the hefty double ended Park Tool spanner not that great - the puns sheared off the adjustable spanner end, and the fixed cup end is a sloppy fit over the ‘oblong’ shape of the fixed cup. I tried a vintage multi spanner thing too - like an old flat Raleigh spanner - but not enough leverage available. I’ve not tried an adjustable spanner - not sure there’s enough meat on the fixed cup for the jaws of one to grab? It would have to be very fine I guess, likewise a vice on a bench.
One idea I had was to drill through each of the six holes of the adjustable cup, several times to slowly enlarge them, and so weaken them to collapse the cup away from the thread of the frame. Or just two or three of the holes to remove one part of it and so then I could collapse the remainder with a punch. Has anyone tried this?
I think I’m worried that, if I start to destroy it, and fail, then the damage caused in the attempt may mean other methods won’t be possible. So - what is the best way to destroy / drill out / saw / cut one of these?
(And sorry - one last reply - sadly I don’t have access to a welder. I have asked a couple of local bike repairers if they would help, one was honest and said they didn’t really want to get involved - he was busy, this could just take too much of his time; the other was some young guys who didn’t really understand what I was asking - more used to modern stuff in fairness, rather than crappy old bikes built before they were born! I get the same issues with my MG B - that’s the same age as me, surely we’re not old yet… ).
Best wishes to all for your help.
the trick is to work slowly and evenly, making sure that the threads in the frame aren't cut.... NOT fun... but it worked.
Bosch 10,000 RPM die grinder.... the chips it throws are Hot and VERY SHARP.. and wear ear and EYE protection.
Last edited by maddog34; 11-12-23 at 03:10 AM. Reason: typing errors, as usual...
11-12-23, 05:01 AM
#13
Sr Member on Sr bikes

You didn’t mention it, but I presume the spindle is still in since you can’t get the cups removed. So…what if you just took the frame to the welder, and asked him to do a few spot welds, welding the spindle to the cup…whichever cup you think would be easiest to remove…and then use either the square taper, or simply vise grips to turn the welded spindle-cup for removal?
Dan
Dan
11-12-23, 07:50 AM
#14
Senior Member
Join Date: Apr 2016
Posts: 1,244
Mentioned: 3 Post(s)
Tagged: 0 Thread(s)
Quoted: 504 Post(s)
Liked 437 Times
in
336 Posts
I've had success with brazing an old headset nut onto a seized fixed cup, then gripping that in a bench vice to turn it. Any sort of large steel nut will do, if you don't have access to oxyacetylene you could try silver soldering with a MAPP torch: that requires particular attention to cleaning the workpiece, removing all rust and chrome and grease, but nothing that careful application of an angle grinder and some acetone won't fix. If you source the nut then any competent welder can sort this in ten minutes. If he's going to remove the cup, be sure to tell him it's a left hand thread.
11-12-23, 09:02 AM
#15
Senior Member
Join Date: Aug 2009
Posts: 1,820
Mentioned: 5 Post(s)
Tagged: 0 Thread(s)
Quoted: 505 Post(s)
Liked 640 Times
in
379 Posts
I've had success with brazing an old headset nut onto a seized fixed cup, then gripping that in a bench vice to turn it. Any sort of large steel nut will do, if you don't have access to oxyacetylene you could try silver soldering with a MAPP torch: that requires particular attention to cleaning the workpiece, removing all rust and chrome and grease, but nothing that careful application of an angle grinder and some acetone won't fix. If you source the nut then any competent welder can sort this in ten minutes. If he's going to remove the cup, be sure to tell him it's a left hand thread.
11-12-23, 09:24 AM
#16
SE Wis
Join Date: Apr 2005
Location: Milwaukee, WI
Posts: 10,517
Bikes: '68 Raleigh Sprite, '02 Raleigh C500, '84 Raleigh Gran Prix, '91 Trek 400, 2013 Novara Randonee, 1990 Trek 970
Mentioned: 40 Post(s)
Tagged: 0 Thread(s)
Quoted: 2747 Post(s)
Liked 3,401 Times
in
2,058 Posts
(And sorry - one last reply - sadly I don’t have access to a welder. I have asked a couple of local bike repairers if they would help, one was honest and said they didn’t really want to get involved - he was busy, this could just take too much of his time; the other was some young guys who didn’t really understand what I was asking - more used to modern stuff in fairness, rather than crappy old bikes built before they were born! I get the same issues with my MG B - that’s the same age as me, surely we’re not old yet… ).
Likes For dedhed:
11-12-23, 10:54 AM
#17
Senior Member

Join Date: Feb 2015
Location: Mission Viejo
Posts: 5,808
Bikes: 1986 Cannondale SR400 (Flat bar commuter), 1988 Cannondale Criterium XTR, 1992 Serotta T-Max, 1995 Trek 970
Mentioned: 20 Post(s)
Tagged: 0 Thread(s)
Quoted: 1944 Post(s)
Liked 2,166 Times
in
1,324 Posts
I would guess there is a chance you could fix bd a local welder that can spot weld a bar, or hex nut.
Then do the same on the other side.
I hope you don’t plan on salvaging any part of the bottom bracket.
Hopefully when, not if, you get the BB cups out, just replace it with a sealed cartridge that fits your crank.
John
Then do the same on the other side.
I hope you don’t plan on salvaging any part of the bottom bracket.
Hopefully when, not if, you get the BB cups out, just replace it with a sealed cartridge that fits your crank.
John
11-12-23, 11:15 AM
#18
SE Wis
Join Date: Apr 2005
Location: Milwaukee, WI
Posts: 10,517
Bikes: '68 Raleigh Sprite, '02 Raleigh C500, '84 Raleigh Gran Prix, '91 Trek 400, 2013 Novara Randonee, 1990 Trek 970
Mentioned: 40 Post(s)
Tagged: 0 Thread(s)
Quoted: 2747 Post(s)
Liked 3,401 Times
in
2,058 Posts
A weld bead is a common practice for removing bearing races. The steel shrinks as it cools and may also be an option to break loose a cup.
https://63miniresto.wordpress.com/20...on-by-welding/
https://63miniresto.wordpress.com/20...on-by-welding/
Likes For dedhed:
11-12-23, 11:26 AM
#20
Senior Member
Join Date: Apr 2011
Posts: 7,082
Mentioned: 41 Post(s)
Tagged: 0 Thread(s)
Quoted: 4420 Post(s)
Liked 1,568 Times
in
1,030 Posts
Has a good fitting adjustable wrench been tried on the fixed cup? Nope. Why are we talking about welding?
11-12-23, 11:53 AM
#21
Senior Member

Join Date: Aug 2015
Posts: 3,306
Mentioned: 39 Post(s)
Tagged: 0 Thread(s)
Quoted: 1143 Post(s)
Liked 1,757 Times
in
966 Posts
I would probably dab some grease on the fitting and lightly torch some heat on the area until the grease wicks. That's not very hot, certainly not hot enough to damage paint. I would also have my wrench secured so it won't pop off, I would also use a cheater bar.
The cup removal vise use never ever worked for me.
The cup removal vise use never ever worked for me.
11-12-23, 12:29 PM
#22
Senior Member
Join Date: Feb 2015
Location: Mission Viejo
Posts: 5,808
Bikes: 1986 Cannondale SR400 (Flat bar commuter), 1988 Cannondale Criterium XTR, 1992 Serotta T-Max, 1995 Trek 970
Mentioned: 20 Post(s)
Tagged: 0 Thread(s)
Quoted: 1944 Post(s)
Liked 2,166 Times
in
1,324 Posts
I’m sure others with more experience with welds can give better advice.
John
11-12-23, 02:05 PM
#23
Newbie
Thread Starter
Join Date: Nov 2023
Posts: 4
Mentioned: 0 Post(s)
Tagged: 0 Thread(s)
Quoted: 6 Post(s)
Likes: 0
Liked 0 Times
in
0 Posts
Thank you for the posts. There are some good points here - I’ll try more mechanical methods first, although I’m not sure that there’s enough of the fixed cup to grip in a vice or spanner. I’ll update from hospital when I’m getting my broken fingers straightened…
11-12-23, 02:30 PM
#24
SE Wis
Join Date: Apr 2005
Location: Milwaukee, WI
Posts: 10,517
Bikes: '68 Raleigh Sprite, '02 Raleigh C500, '84 Raleigh Gran Prix, '91 Trek 400, 2013 Novara Randonee, 1990 Trek 970
Mentioned: 40 Post(s)
Tagged: 0 Thread(s)
Quoted: 2747 Post(s)
Liked 3,401 Times
in
2,058 Posts
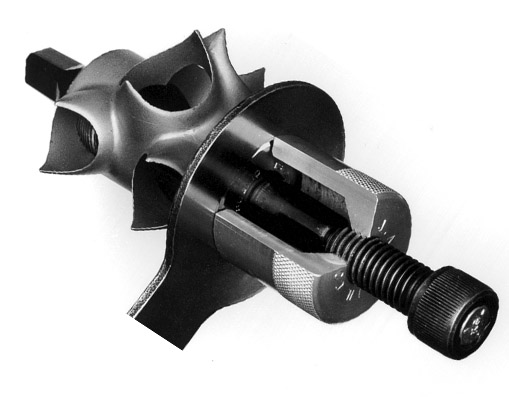
cycocommute photo
 11-12-23, 03:54 PM
#25
Old fart

Join Date: Nov 2004
Location: Appleton WI
Posts: 24,792
Bikes: Several, mostly not name brands.
Mentioned: 153 Post(s)
Tagged: 0 Thread(s)
Quoted: 3591 Post(s)
Liked 3,401 Times
in
1,935 Posts
Stein Tool's fixed cup wrench clamp may be what you need:
https://steintool.com/portfolio-item...-wrench-clamp/
Once you get the fixed cup off, you can squirt penetrating oil from the inside and use Sheldon Brown DIY tool to get the adjustable cup out:
https://arcady.genkin.ca/2016/03/an-...-removal-tool/
https://steintool.com/portfolio-item...-wrench-clamp/
Once you get the fixed cup off, you can squirt penetrating oil from the inside and use Sheldon Brown DIY tool to get the adjustable cup out:
https://arcady.genkin.ca/2016/03/an-...-removal-tool/