


Flat mount caliper-- how big should the holes through the chainstay be?
 11-27-23, 06:50 AM
#1
Senior Member
Thread Starter
Join Date: Dec 2019
Posts: 957
Mentioned: 3 Post(s)
Tagged: 0 Thread(s)
Quoted: 321 Post(s)
Liked 263 Times
in
212 Posts
Flat mount caliper-- how big should the holes through the chainstay be?
The way the rear caliper mounts with flat mount is with a couple of M5 bolts going through the chainstay. I actually have the DRO3 dropouts from here:
https://www.framebuilding.com/NEWPAR...20Dropouts.htm
which are meant for post mount. But this is OK. I can cut the posts off, and make some short tubes on my minilathe which I will weld on for those bolts to go through. It looks like there's room to put those on.
But my question is how big should the holes be? Are they actually meant to be non-round? The front uses a funny adaptor plate thing (that's just how flat mount works) with holes that are about 9mm wide and 5.5mm long. This gives you a bit of lateral wiggle room so you can set the caliper up so it doesn't rub much.
If I just make 5mm holes at the back that's not going to work. You won't be able to adjust the caliper. So how big should they be? I'm fresh out of oval drill bits so I think they're going to have to be round holes. I'm thinking 8 or 9mm?
Last edited by guy153; 11-27-23 at 06:54 AM.
 11-27-23, 08:53 AM
#2


Randomhead
Join Date: Aug 2008
Location: Happy Valley, Pennsylvania
Posts: 24,402
Mentioned: 0 Post(s)
Tagged: 0 Thread(s)
Quoted: 4 Post(s)
Liked 3,702 Times
in
2,522 Posts
Yes, they are slots, but not very long slots. I would hesitate to use a hole. I think I would use a file to make the holes oblong.
The slots are supposed to be 4mm x 5.2mm

The slots are supposed to be 4mm x 5.2mm
Last edited by unterhausen; 11-27-23 at 09:04 AM.
Likes For unterhausen:
11-27-23, 10:12 AM
#3
Senior Member
Thread Starter
Join Date: Dec 2019
Posts: 957
Mentioned: 3 Post(s)
Tagged: 0 Thread(s)
Quoted: 321 Post(s)
Liked 263 Times
in
212 Posts
Thanks! Are you sure 4mm x 5.2mm? It's an M5 bolt so 4mm seems too narrow. Assuming that diagram is to scale I make them about 5.2mm x 6.9mm. I could try and file a non-round hole but it probably won't be very straight. It seems like a 7mm or 8mm hole should be OK.
11-27-23, 10:28 AM
#4
Randomhead
Join Date: Aug 2008
Location: Happy Valley, Pennsylvania
Posts: 24,402
Mentioned: 0 Post(s)
Tagged: 0 Thread(s)
Quoted: 4 Post(s)
Liked 3,702 Times
in
2,522 Posts
Yeah, I read the drawing wrong, it's 5.2mm wide.
That's an awful way to spec a slot. #thankshimano
That's an awful way to spec a slot. #thankshimano
Likes For unterhausen:
11-27-23, 10:29 AM
#5
Full Member
The slots are dimensioned in the last view of the drawing. 5.2 �0.1 diameter, with 2+1.5/-0 between the centers of the end arcs/semicircles.
That being said, I think you are probably better off buying the correct dropout.
That being said, I think you are probably better off buying the correct dropout.
Likes For cuev�lo:
11-27-23, 11:29 AM
#6
Senior Member
Thread Starter
Join Date: Dec 2019
Posts: 957
Mentioned: 3 Post(s)
Tagged: 0 Thread(s)
Quoted: 321 Post(s)
Liked 263 Times
in
212 Posts
I probably could make something a bit more slot-like by drilling two holes in some 5mm plate instead and then joining them up with some filing etc. Then I could use one flat piece of plate. There's no reason why the bolts have to be so long. I'll see what feels like a good way of doing it.
11-27-23, 12:31 PM
#7
Randomhead
Join Date: Aug 2008
Location: Happy Valley, Pennsylvania
Posts: 24,402
Mentioned: 0 Post(s)
Tagged: 0 Thread(s)
Quoted: 4 Post(s)
Liked 3,702 Times
in
2,522 Posts
I think that people make a hollow mount and then just have a little bit at the end. Like the paragon boss, e.g. BK0030, except you don't really need 15mm. Ceeway sells some paragon parts, but maybe not the flat mounts.
https://www.paragonmachineworks.com/...er-mounts.html
When I went to look for their mounts, I noticed they finally sell front flat mounts. But they are for the rear. I understand that's fairly common on custom bikes nowadays, you might want to look at doing that.
https://www.paragonmachineworks.com/...t-dropout.html
The fixture to place the front mounts on the rear isn't that expensive.
Likes For unterhausen:
11-27-23, 12:54 PM
#8
Senior Member
Thread Starter
Join Date: Dec 2019
Posts: 957
Mentioned: 3 Post(s)
Tagged: 0 Thread(s)
Quoted: 321 Post(s)
Liked 263 Times
in
212 Posts
I think that people make a hollow mount and then just have a little bit at the end. Like the paragon boss, e.g. BK0030, except you don't really need 15mm. Ceeway sells some paragon parts, but maybe not the flat mounts.
https://www.paragonmachineworks.com/...er-mounts.html
When I went to look for their mounts, I noticed they finally sell front flat mounts. But they are for the rear. I understand that's fairly common on custom bikes nowadays, you might want to look at doing that.
https://www.paragonmachineworks.com/...t-dropout.html
The fixture to place the front mounts on the rear isn't that expensive.
https://www.paragonmachineworks.com/...er-mounts.html
When I went to look for their mounts, I noticed they finally sell front flat mounts. But they are for the rear. I understand that's fairly common on custom bikes nowadays, you might want to look at doing that.
https://www.paragonmachineworks.com/...t-dropout.html
The fixture to place the front mounts on the rear isn't that expensive.
Likes For guy153:
11-27-23, 04:13 PM
#9
Randomhead
Join Date: Aug 2008
Location: Happy Valley, Pennsylvania
Posts: 24,402
Mentioned: 0 Post(s)
Tagged: 0 Thread(s)
Quoted: 4 Post(s)
Liked 3,702 Times
in
2,522 Posts
I would consider doing something similar in the back, just use a front mount and don't worry about the rear mount. The rear mount is awful anyway, for a number of reasons.
Likes For unterhausen:
11-27-23, 04:29 PM
#10
Senior Member
Thread Starter
Join Date: Dec 2019
Posts: 957
Mentioned: 3 Post(s)
Tagged: 0 Thread(s)
Quoted: 321 Post(s)
Liked 263 Times
in
212 Posts
The caliper set I have only comes with one of those adaptor plates. Could always get another one from somewhere (or make one) but the other benefit of making a rear-style mount is the spacing is only 34mm. I have just about exactly that between the existing post mounts on the dropout so I think it might work quite well. I can fit something in there.
11-28-23, 05:48 AM
#11
Senior Member
Join Date: Jan 2013
Location: South Jersey
Posts: 2,266
Mentioned: 18 Post(s)
Tagged: 0 Thread(s)
Quoted: 714 Post(s)
Liked 800 Times
in
475 Posts
Perhaps one of these cast flat mount tabs would be a better option. I have one that I bought for another project and never used. I could send it to you for the cost of shipping. https://framebuildersupply.com/colle...hain-stay-cast
Likes For dsaul:
11-28-23, 07:24 AM
#12
Senior Member
Thread Starter
Join Date: Dec 2019
Posts: 957
Mentioned: 3 Post(s)
Tagged: 0 Thread(s)
Quoted: 321 Post(s)
Liked 263 Times
in
212 Posts
Perhaps one of these cast flat mount tabs would be a better option. I have one that I bought for another project and never used. I could send it to you for the cost of shipping. https://framebuildersupply.com/colle...hain-stay-cast
Likes For guy153:
11-28-23, 10:45 AM
#13
Senior Member
Thread Starter
Join Date: Dec 2019
Posts: 957
Mentioned: 3 Post(s)
Tagged: 0 Thread(s)
Quoted: 321 Post(s)
Liked 263 Times
in
212 Posts
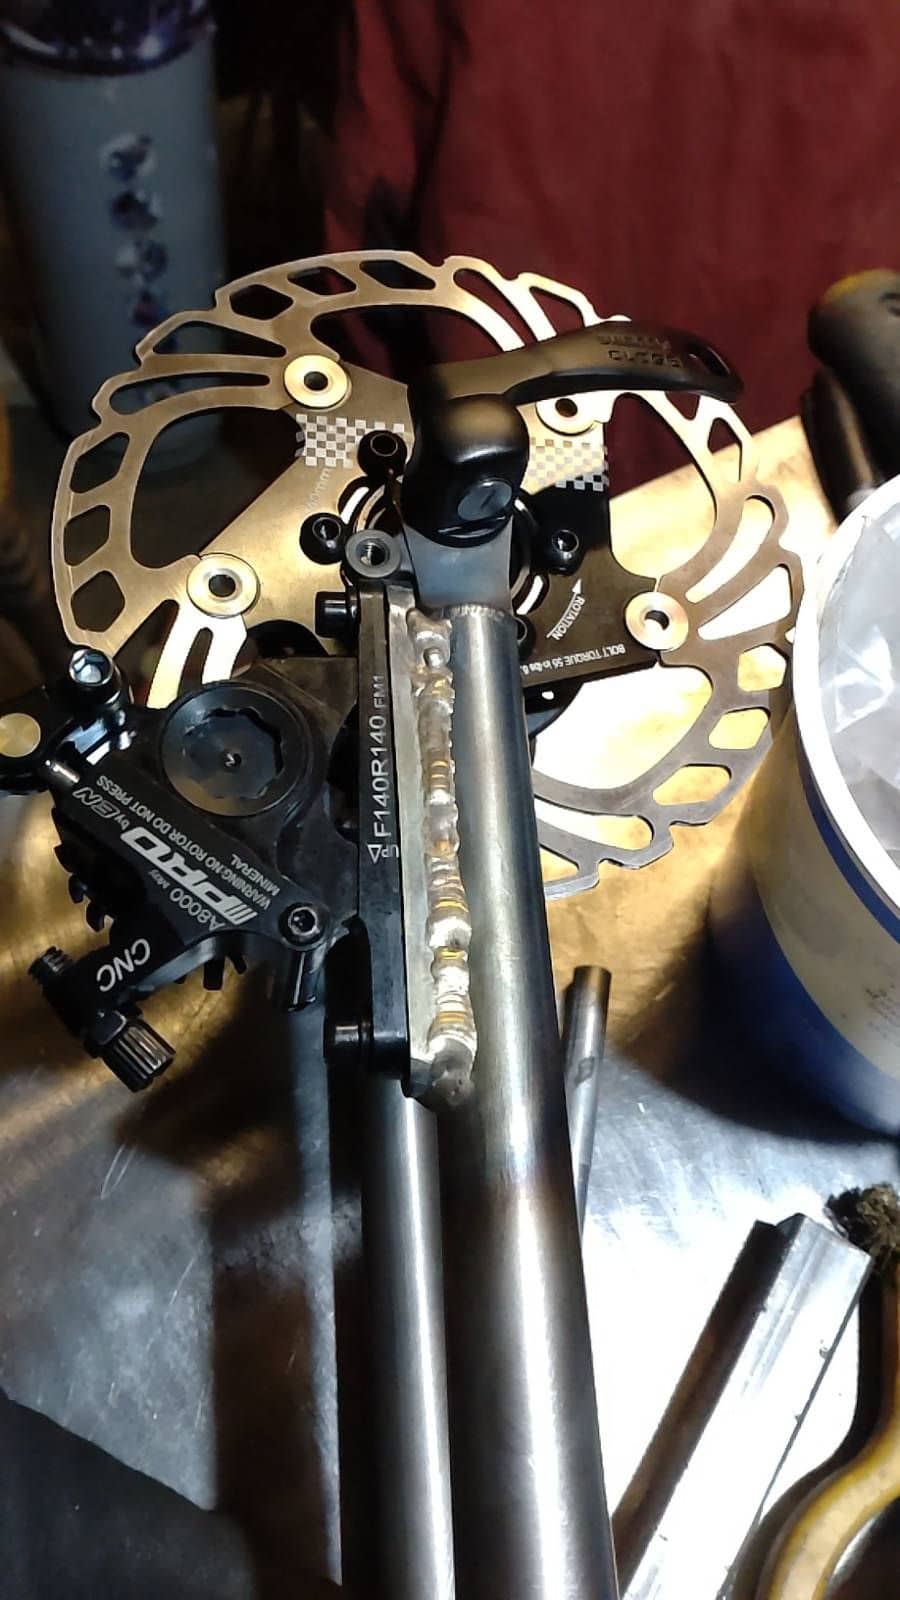
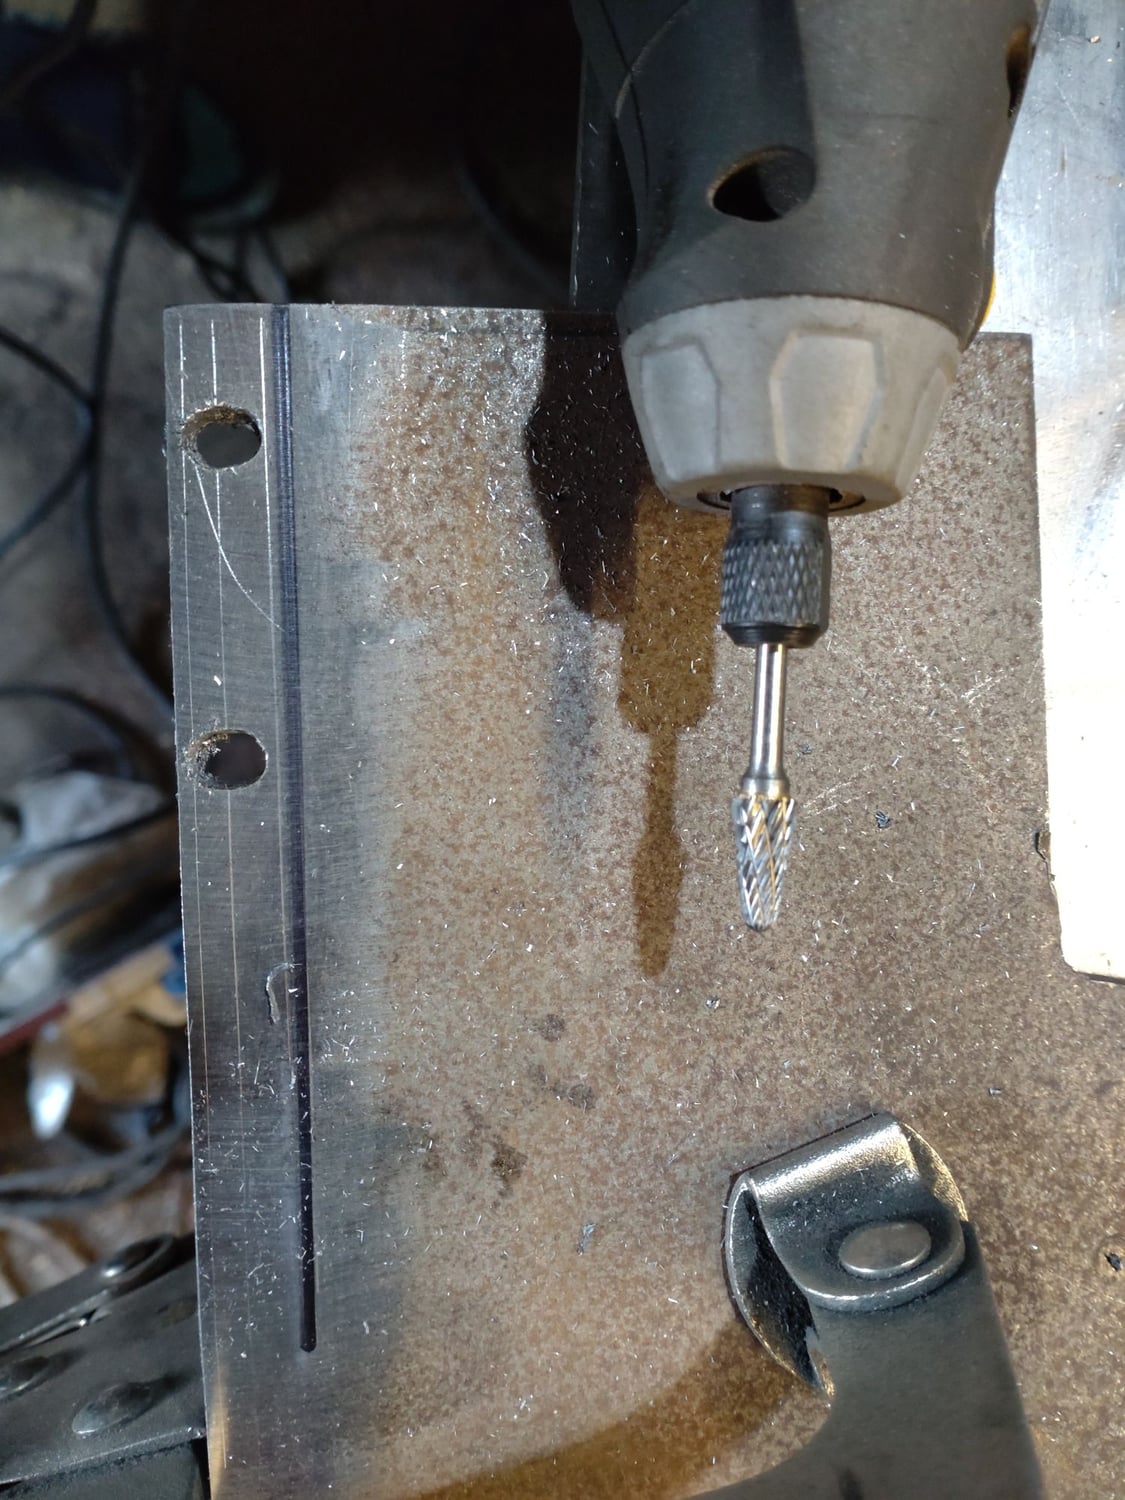
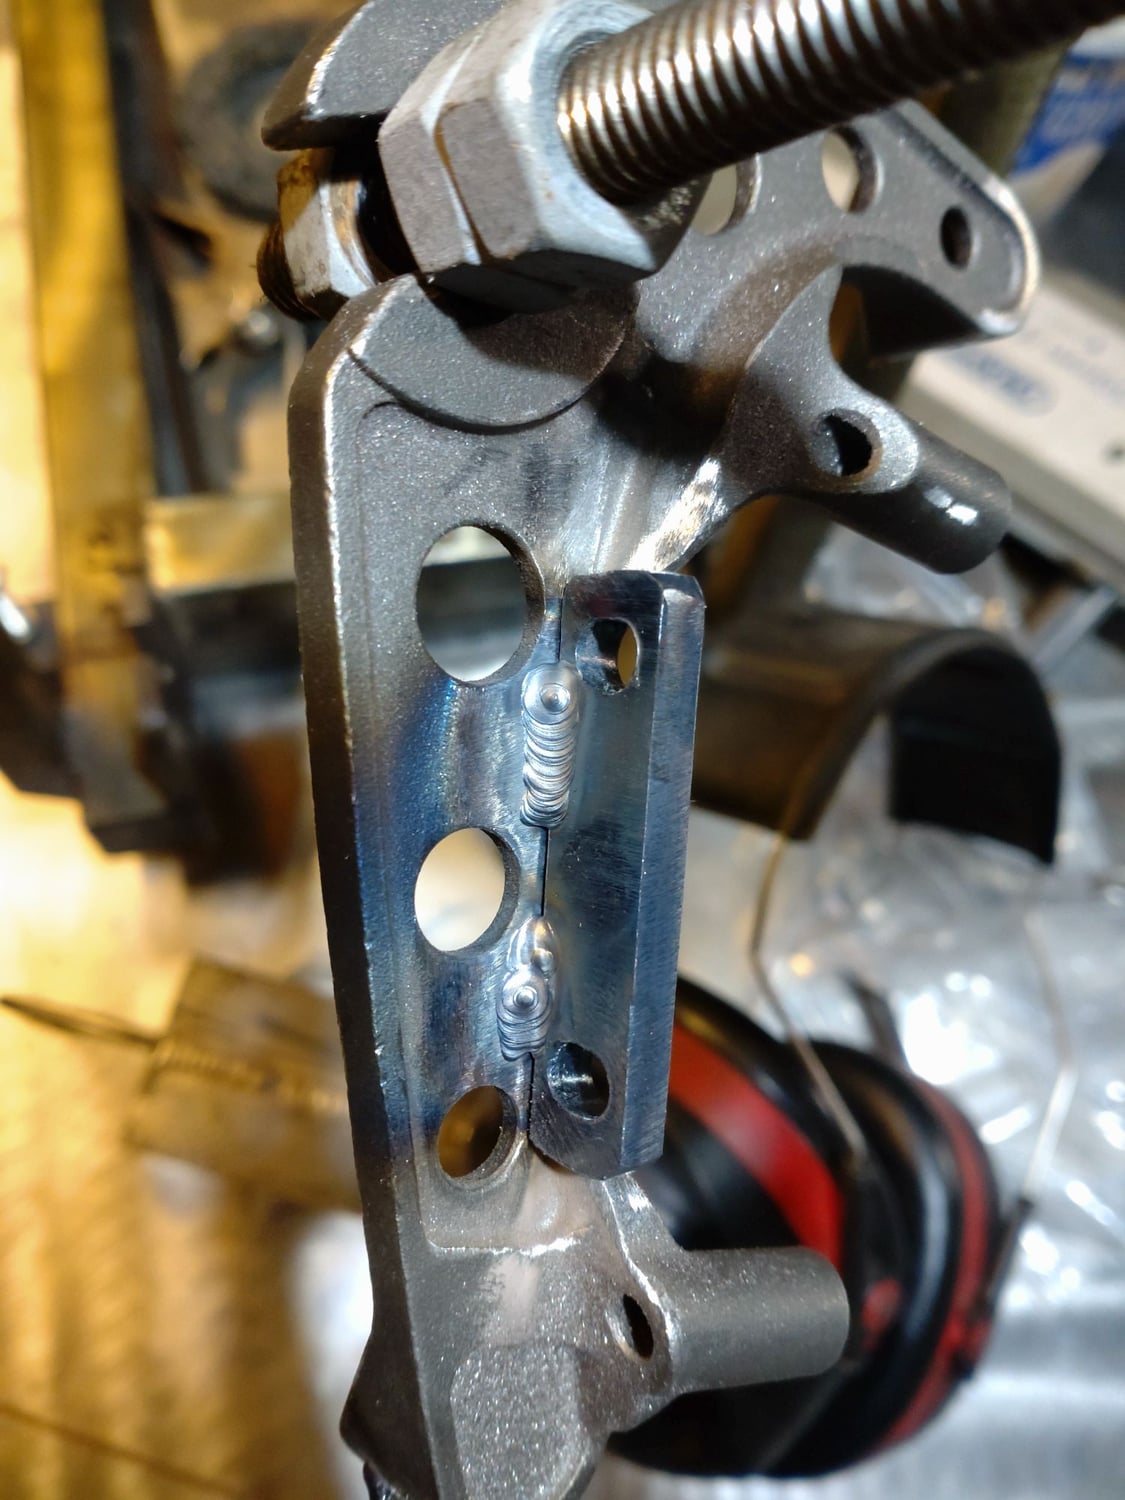
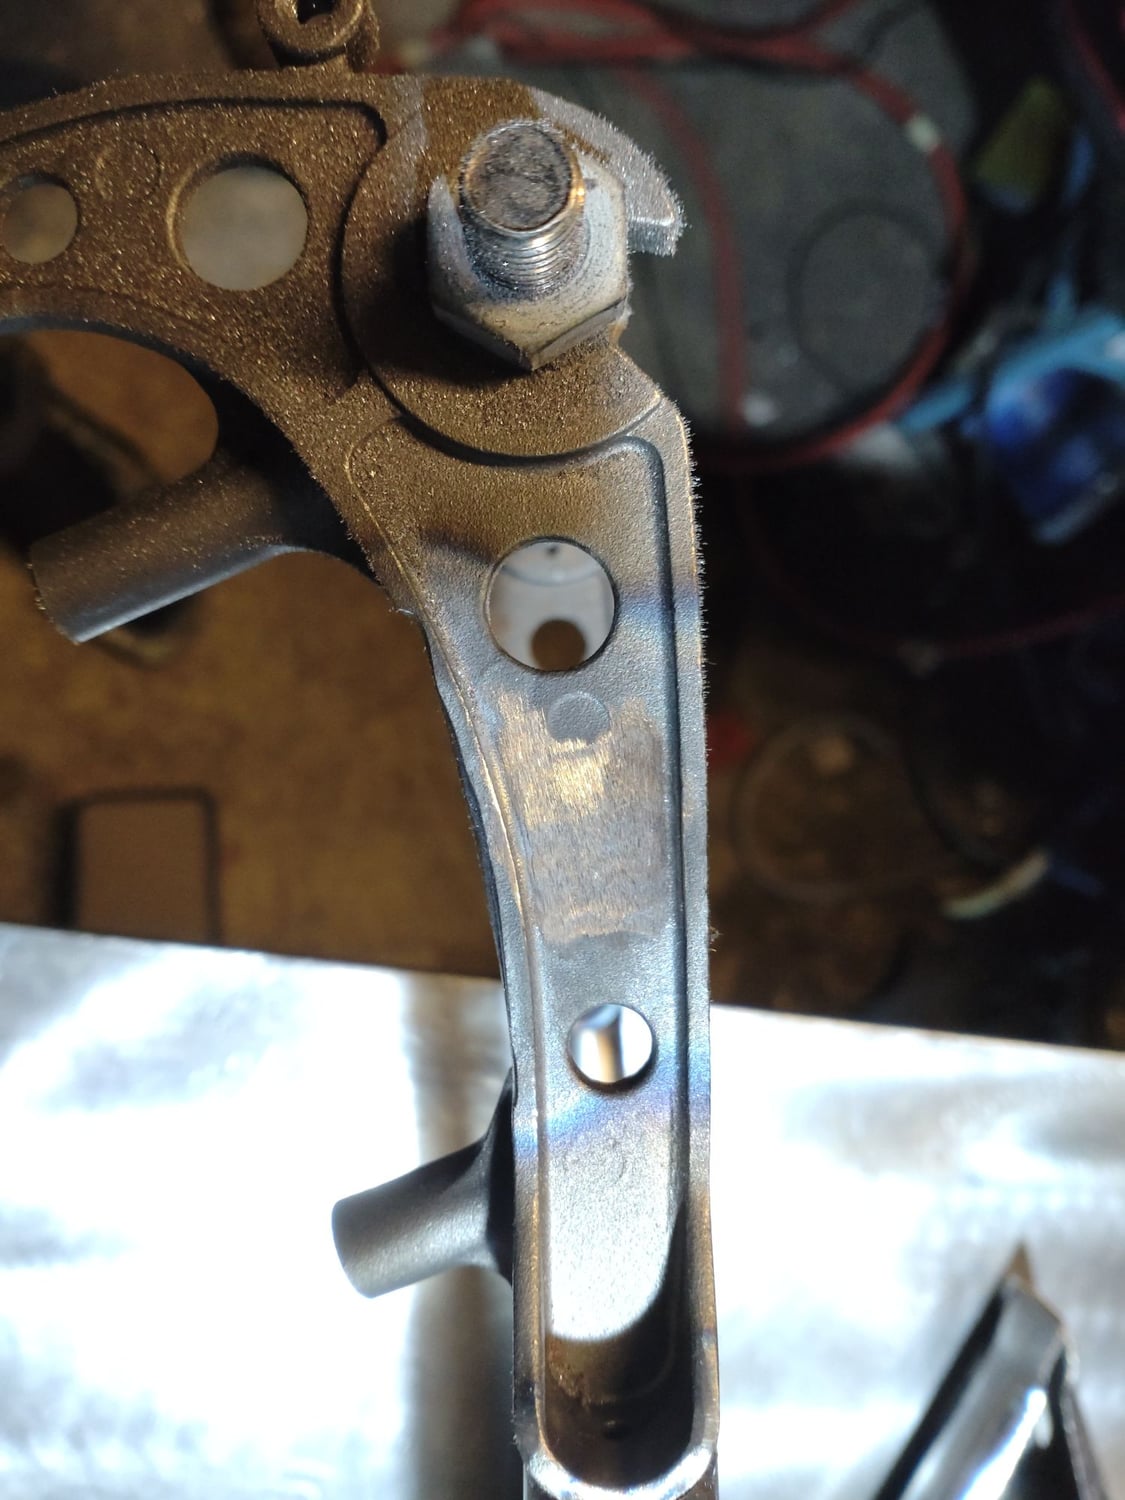
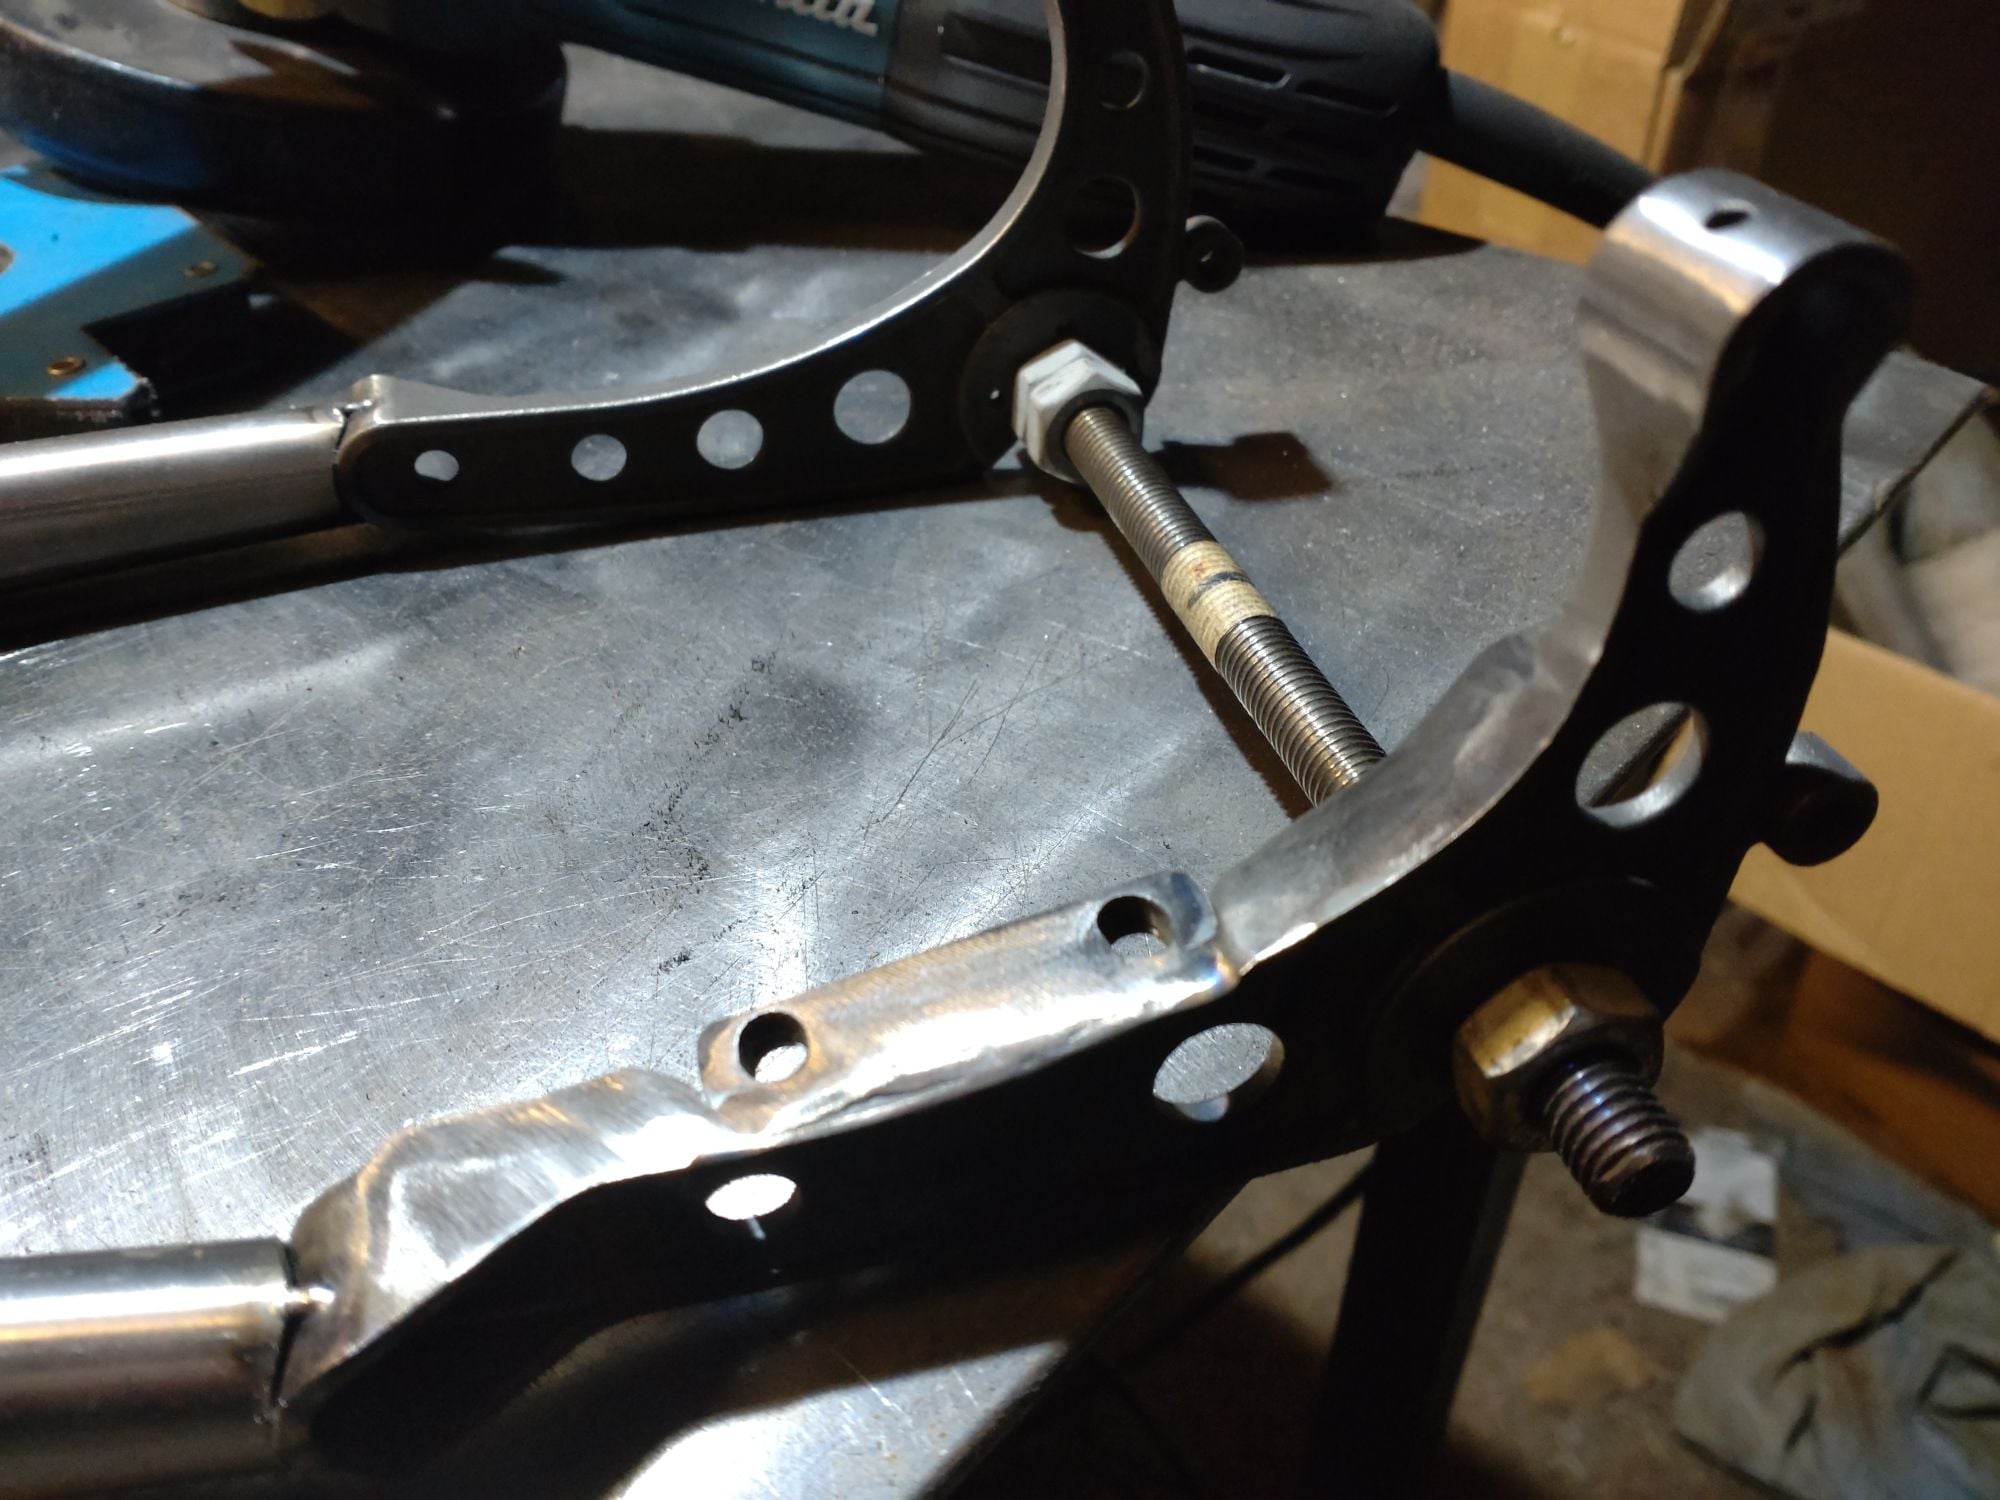
Well here's how I got on. I think it worked out very well. I drilled a couple of 5mm holes in my trusty bit of 5mm plate, and then widened them into slots with that carbide burr thing:
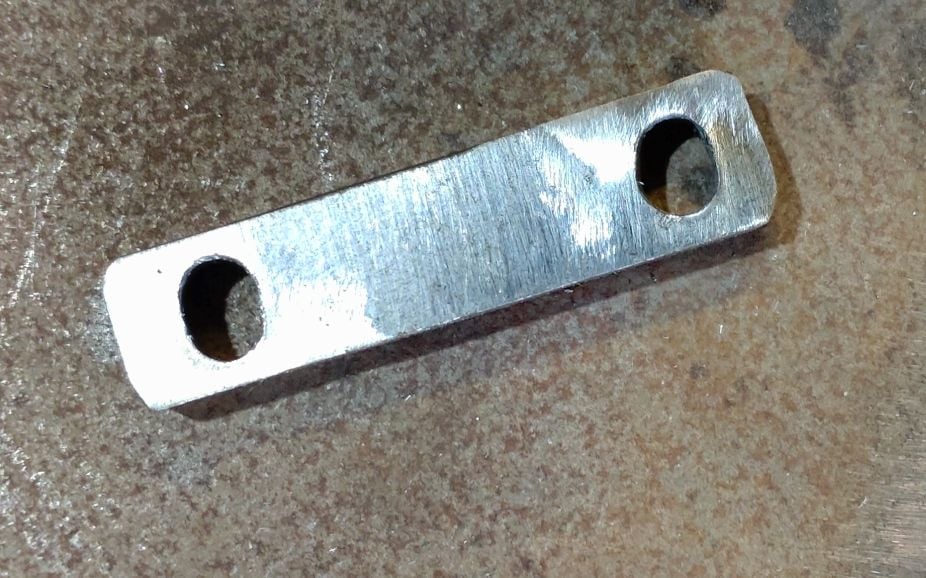
Then after cutting it out and tidying it up a bit I had this little part. One of those holes actually doesn't look too bad!
I needed to sand down the "web" inside the dropout a little bit to make it fit nicely:
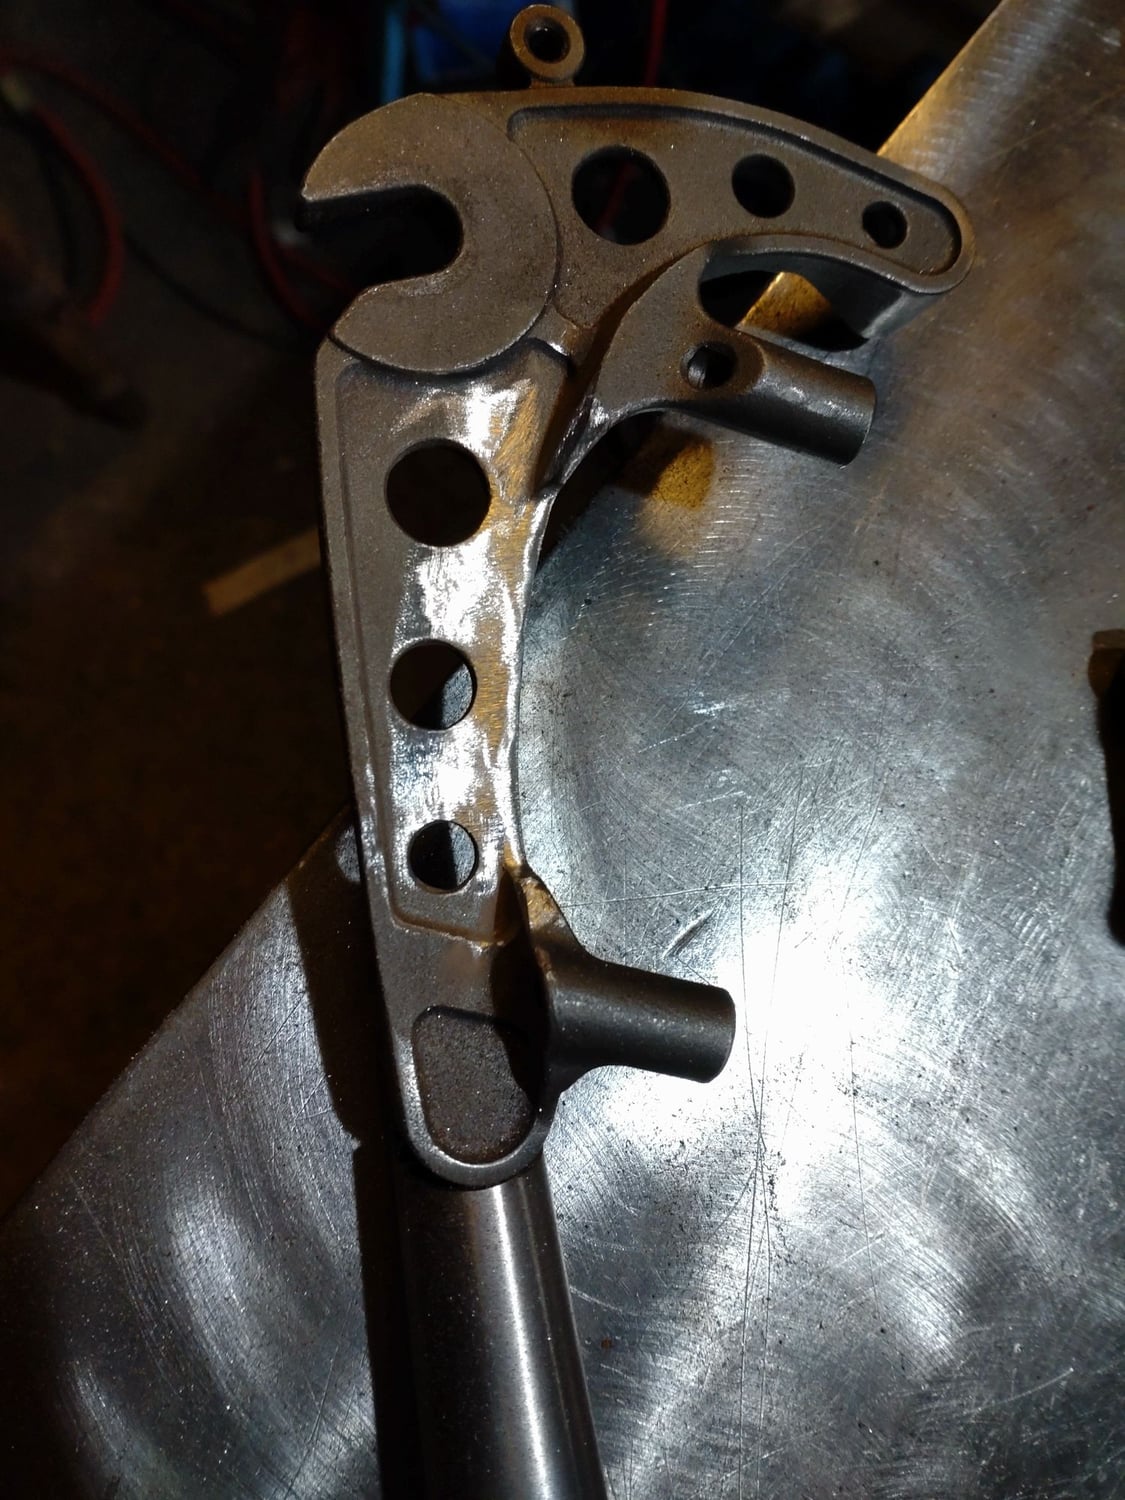
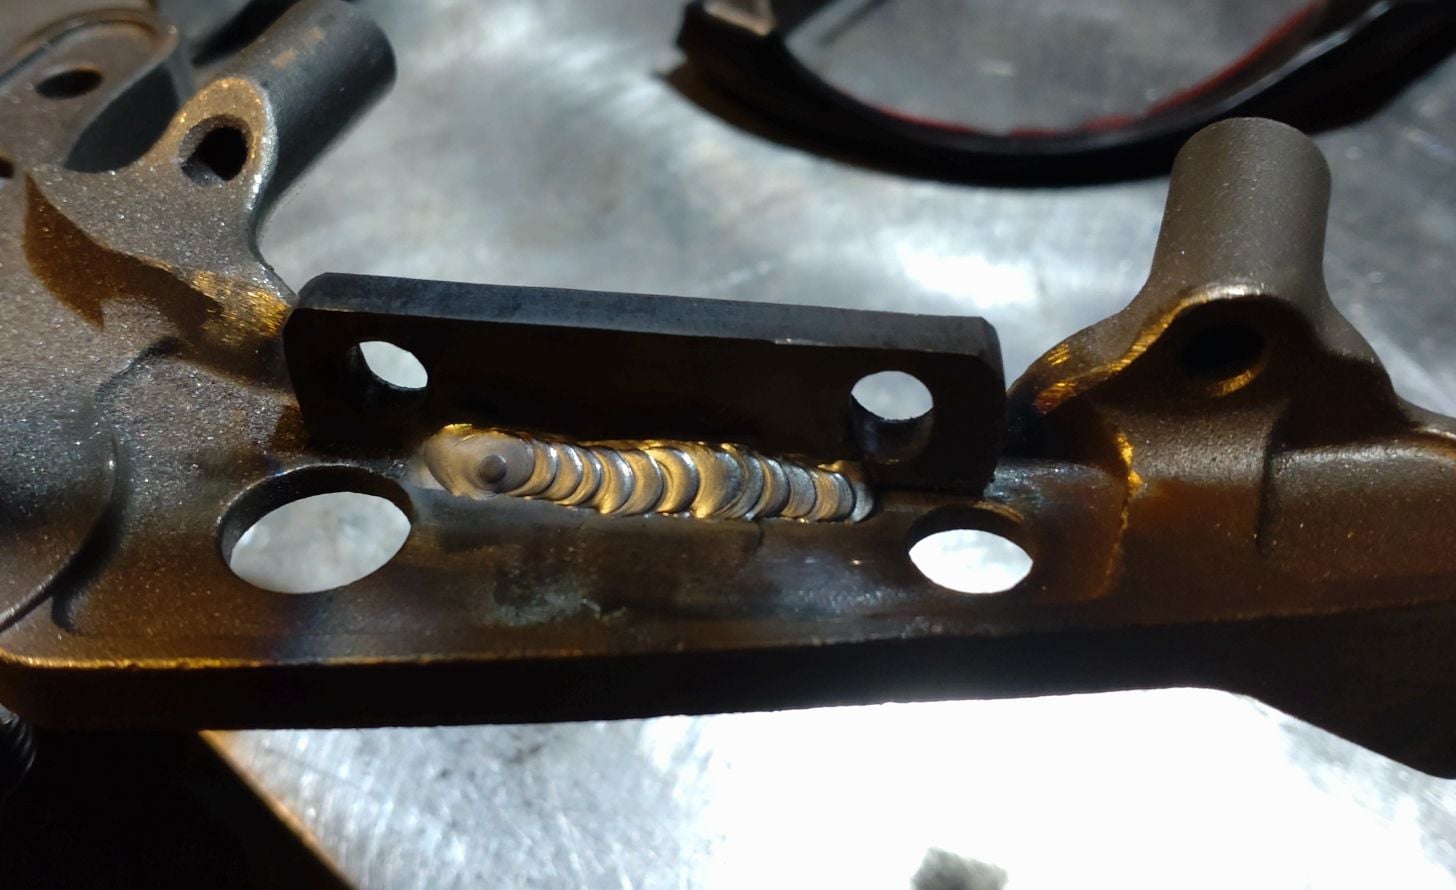
And then tacked it, checked it, and put a couple of welds on the bottom:
And then welded the edge along the top as well, and sanded it flat:
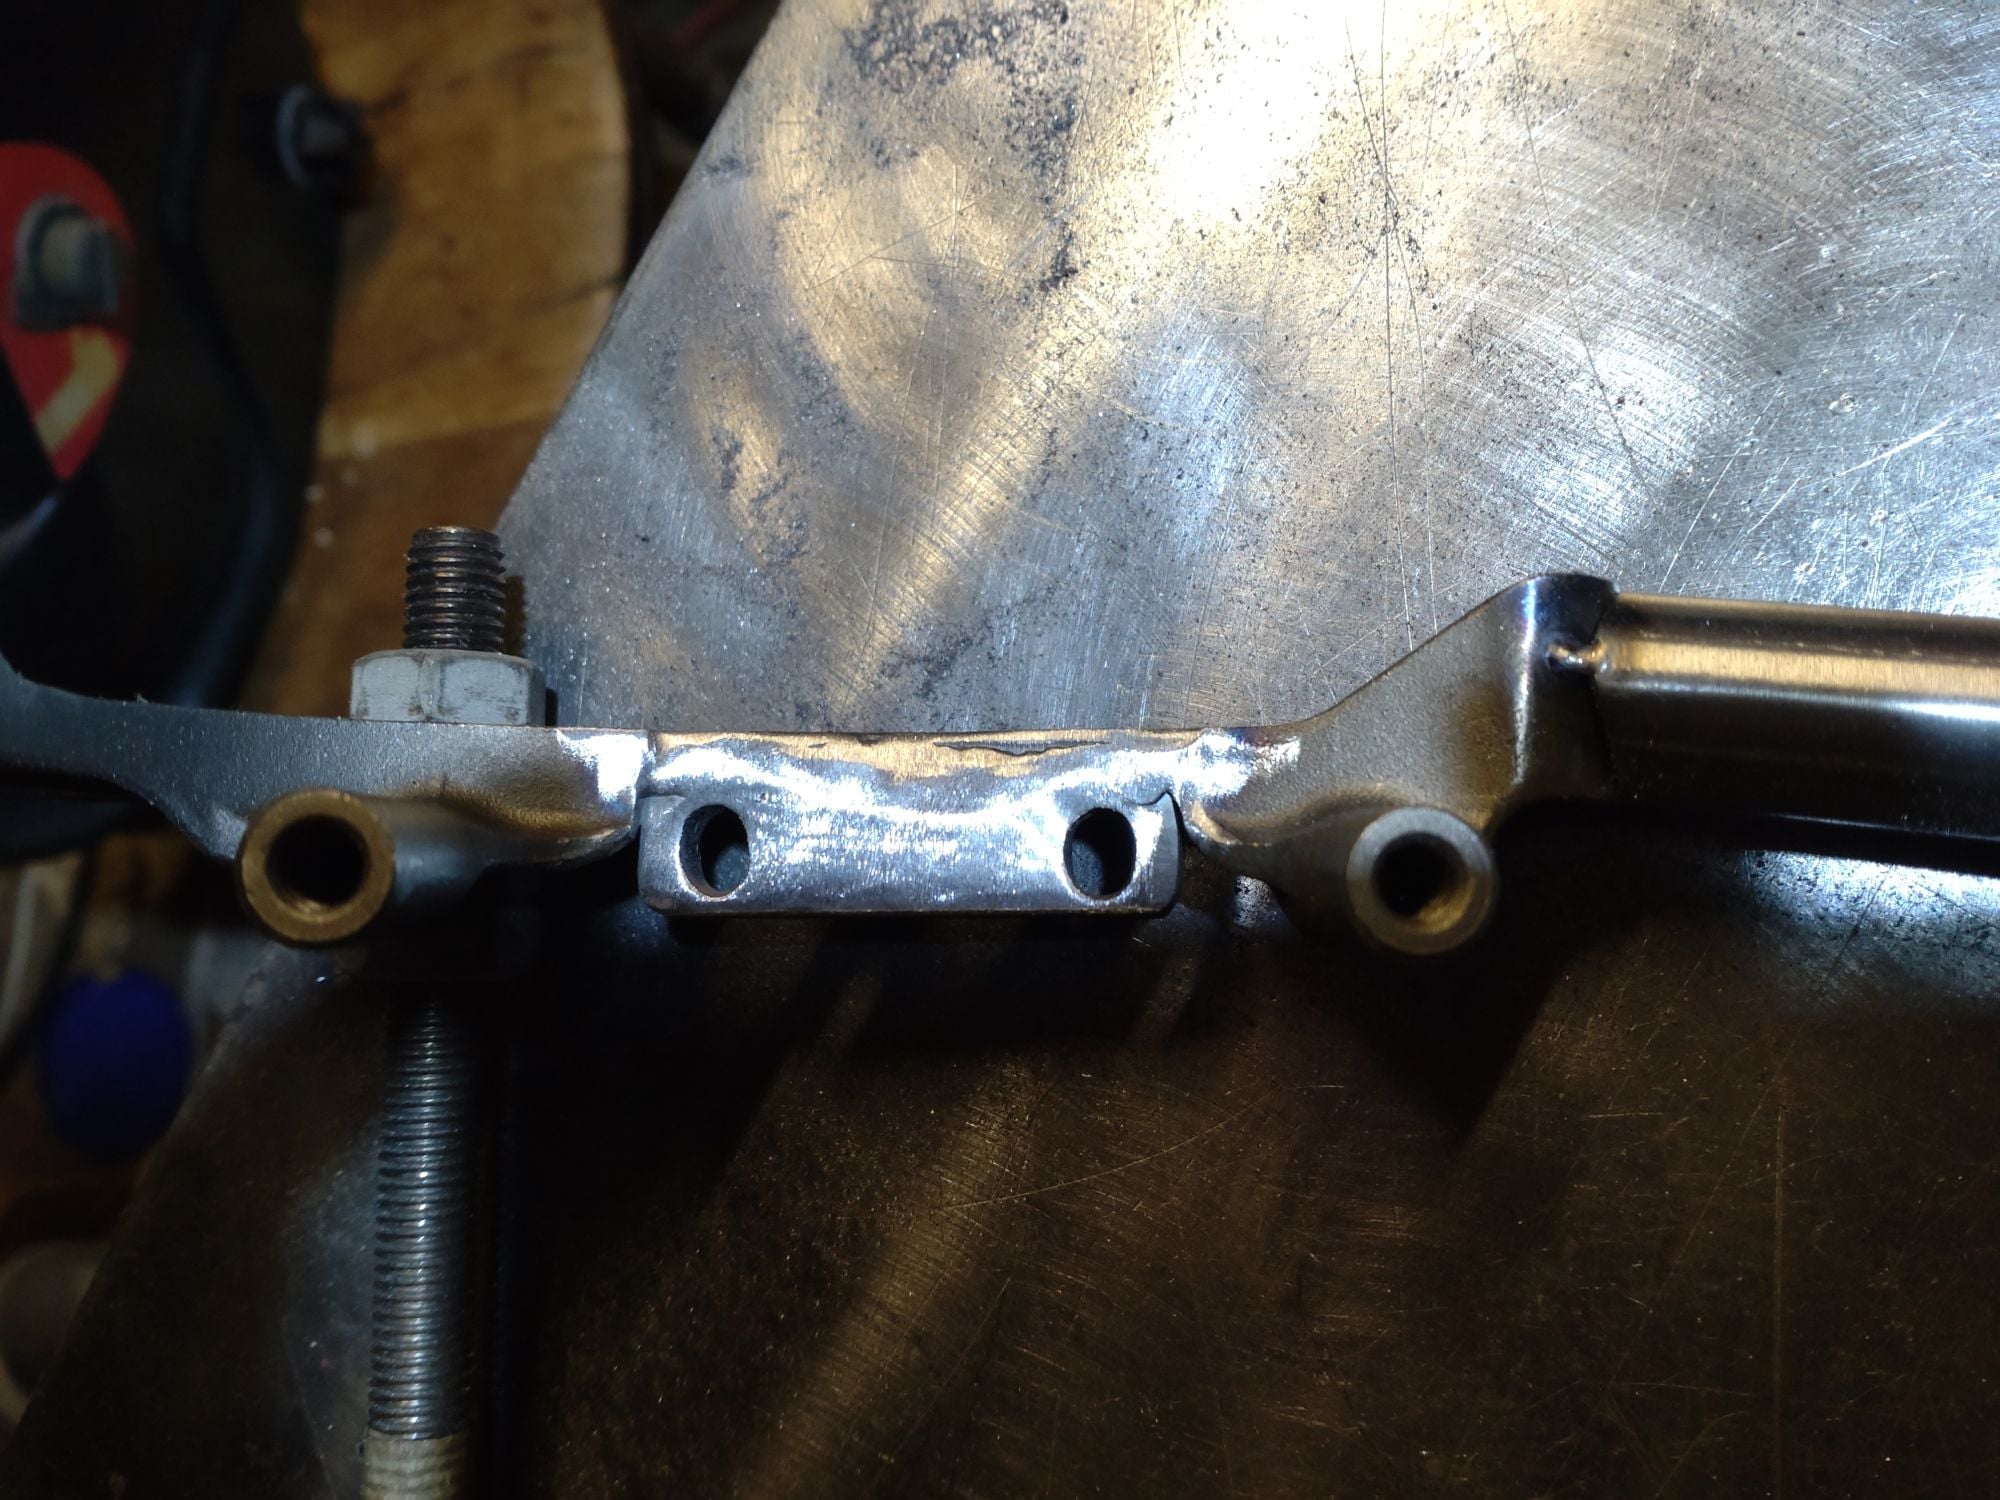
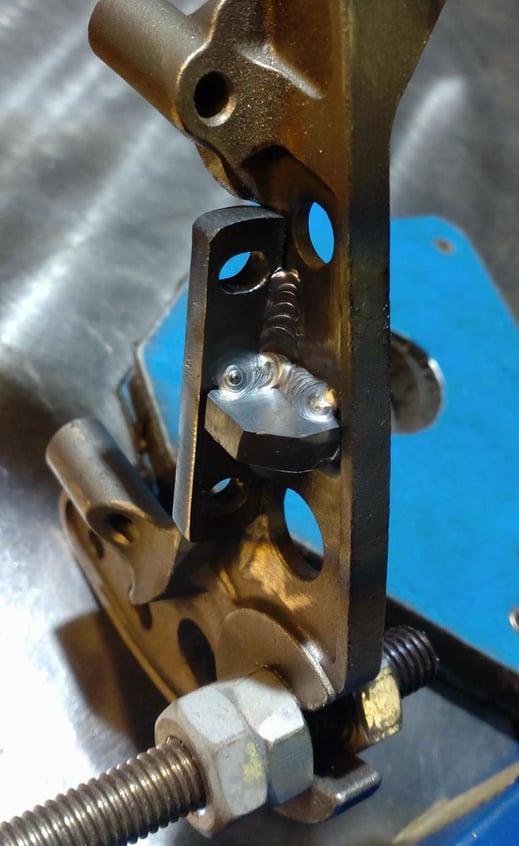
It fits perfectly, and I can adjust the caliper so the wheel spins without rubbing it. This is the view from underneath:

I'll probably cut off those post mounts later-- what I seem to have created here for now is a "universal" disk dropout .
.
Then after cutting it out and tidying it up a bit I had this little part. One of those holes actually doesn't look too bad!
I needed to sand down the "web" inside the dropout a little bit to make it fit nicely:
And then tacked it, checked it, and put a couple of welds on the bottom:
And then welded the edge along the top as well, and sanded it flat:
It fits perfectly, and I can adjust the caliper so the wheel spins without rubbing it. This is the view from underneath:
I'll probably cut off those post mounts later-- what I seem to have created here for now is a "universal" disk dropout
.
Likes For guy153:
11-29-23, 04:47 AM
#14
Senior Member
Thread Starter
Join Date: Dec 2019
Posts: 957
Mentioned: 3 Post(s)
Tagged: 0 Thread(s)
Quoted: 321 Post(s)
Liked 263 Times
in
212 Posts
I'm now wondering if I need to add a little bit more support. It's only a back brake but still potentially quite a high force trying to bend my new tab down, because it's about 5x higher at the disk than at the tyre. I was expecting to get a fillet all the way along the bottom but those holes were kind of in the way. I might see if I can put a sort of gusset down the middle. I think it's fine how it is but safety margins are good.
11-29-23, 07:06 AM
#15
Randomhead
Join Date: Aug 2008
Location: Happy Valley, Pennsylvania
Posts: 24,402
Mentioned: 0 Post(s)
Tagged: 0 Thread(s)
Quoted: 4 Post(s)
Liked 3,702 Times
in
2,522 Posts
I would, at a minimum, tie it in at the ends.
11-30-23, 09:53 AM
#16
Senior Member
Thread Starter
Join Date: Dec 2019
Posts: 957
Mentioned: 3 Post(s)
Tagged: 0 Thread(s)
Quoted: 321 Post(s)
Liked 263 Times
in
212 Posts
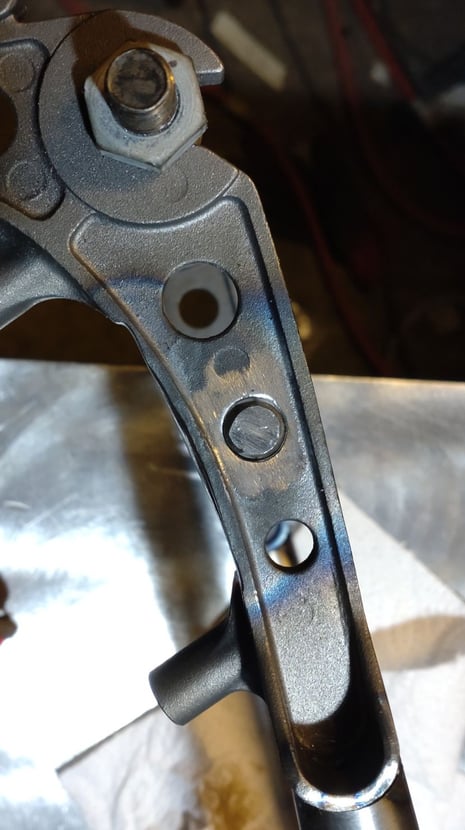
OK some reinforcement. First step was to delete that pesky hole, with a little fiddly piece of 3mm plate shaped to fit into the hole and given a beveled edge:
Weld that in, on both sides:
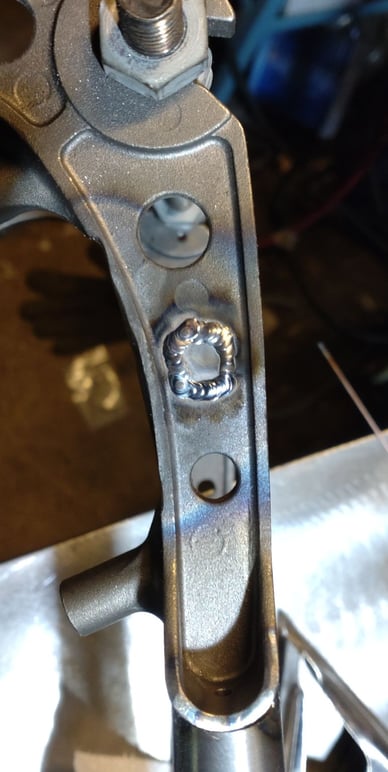
And then sand it flat (with the "dynafile" type thing):
Now we can get a decent fillet in all the way along the bottom:
And then add a gusset:
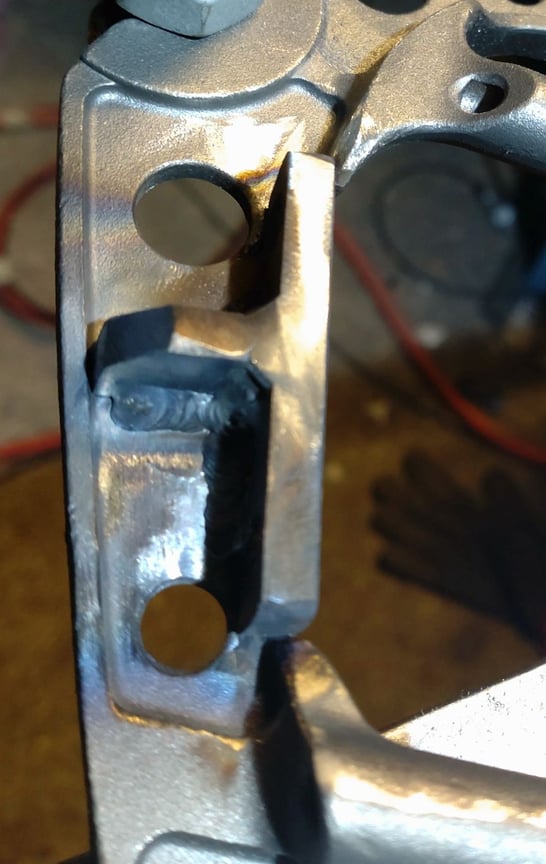
That's not going anywhere.
Finally I cut the post mounts off carefully with a Dremel and sanded them flat:
Weld that in, on both sides:
And then sand it flat (with the "dynafile" type thing):
Now we can get a decent fillet in all the way along the bottom:
And then add a gusset:
That's not going anywhere.
Finally I cut the post mounts off carefully with a Dremel and sanded them flat:
