


Head Tube Badge Creation
 11-19-18, 05:44 PM
#76
Banned.
Thread Starter

Join Date: Jun 2004
Location: Torrance, CA
Posts: 3,061
Bikes: Homebuilt steel
Mentioned: 18 Post(s)
Tagged: 0 Thread(s)
Quoted: 2193 Post(s)
Liked 425 Times
in
337 Posts
Well...managed to learn something new with my latest mistake. Namely, tried to form the badge to conform to a head tube and the copper plate creased at the various etched low spots. I've been using 1/16" material and there simply isn't enough meat remaining after etching to allow for a smooth bend. Got some 1/8" material inbound so we'll see if that's better. Kind of bummed but oh well. If we ain't learning we are dying and I'm not giving up yet.
 11-20-18, 09:55 AM
#77


Randomhead
Join Date: Aug 2008
Location: Happy Valley, Pennsylvania
Posts: 24,394
Mentioned: 0 Post(s)
Tagged: 0 Thread(s)
Quoted: 4 Post(s)
Liked 3,695 Times
in
2,517 Posts
That's' interesting, maybe I should go thicker with the shapeways design of my head badge.
11-20-18, 10:05 AM
#79

multimodal commuter

Join Date: Nov 2006
Location: NJ, NYC, LI
Posts: 19,808
Bikes: 1940s Fothergill, 1959 Allegro Special, 1963? Claud Butler Olympic Sprint, Lambert 'Clubman', 1974 Fuji "the Ace", 1976 Holdsworth 650b conversion rando bike, 1983 Trek 720 tourer, 1984 Counterpoint Opus II, 1993 Basso Gap, 2010 Downtube 8h, and...
Mentioned: 584 Post(s)
Tagged: 0 Thread(s)
Quoted: 1908 Post(s)
Liked 574 Times
in
339 Posts
Yes, they are liable to crease (and crack) at the places where the thickness changes abruptly. How are you doing the bending? I know it's tricky, but 1/16" is pretty thick. There must be a way to do it. What I usually do is clamp one edge of the badge against a steel tube (I usually use a seat post) in a vise, then wrap the badge against the tube using a variety of tools to press it against the tube, bending it little by little; then repeat that from the other side, and then continue to roll the badge between the tube and a hard surface. Patience is a virtue. I don't possess it in any great measure, but I know its value.
__________________
www.rhmsaddles.com.
www.rhmsaddles.com.
11-20-18, 07:19 PM
#82
Randomhead
Join Date: Aug 2008
Location: Happy Valley, Pennsylvania
Posts: 24,394
Mentioned: 0 Post(s)
Tagged: 0 Thread(s)
Quoted: 4 Post(s)
Liked 3,695 Times
in
2,517 Posts
because rhm said I didn't have to worry about it 
The problem with printing it with a curve in it is that you have to have support, at least I think you do for the process they use. I have seen some of the cast metal parts with support, and others without. I am not seeing much guidance on their site for that, maybe I should ask in the forums.
The problem with printing it with a curve in it is that you have to have support, at least I think you do for the process they use. I have seen some of the cast metal parts with support, and others without. I am not seeing much guidance on their site for that, maybe I should ask in the forums.
11-21-18, 07:56 PM
#83
Banned.
Thread Starter
Join Date: Jun 2004
Location: Torrance, CA
Posts: 3,061
Bikes: Homebuilt steel
Mentioned: 18 Post(s)
Tagged: 0 Thread(s)
Quoted: 2193 Post(s)
Liked 425 Times
in
337 Posts
Okay, so I'm a complete idiot! The copper sheet I've been working with was supposed to be .062" and I didn't notice it was only .020" . How dumb is that? No wonder it buckled on the etch lines! So now I'm back to having to source new sheet, this time to the proper 1/16" thickness.
12-09-18, 04:03 PM
#84
Banned.
Thread Starter
Join Date: Jun 2004
Location: Torrance, CA
Posts: 3,061
Bikes: Homebuilt steel
Mentioned: 18 Post(s)
Tagged: 0 Thread(s)
Quoted: 2193 Post(s)
Liked 425 Times
in
337 Posts
Since the forum is kind of slow these days thought I'd throw out an update...
I ordered some .050" thick sheet but the seller sent .066". Too thick. What's up with these ebay material sellers? I feel a little bad for the seller because the piece was only $8 for 2"x12". But still, I can't use the stuff so it will just go in my remnant box so I asked for a return. In the mean time I've ordered .032" this time since that seems the next closest. Finding material is harder than it should be.
I ordered some .050" thick sheet but the seller sent .066". Too thick. What's up with these ebay material sellers? I feel a little bad for the seller because the piece was only $8 for 2"x12". But still, I can't use the stuff so it will just go in my remnant box so I asked for a return. In the mean time I've ordered .032" this time since that seems the next closest. Finding material is harder than it should be.
12-15-18, 07:10 AM
#85
Banned.
Thread Starter
Join Date: Jun 2004
Location: Torrance, CA
Posts: 3,061
Bikes: Homebuilt steel
Mentioned: 18 Post(s)
Tagged: 0 Thread(s)
Quoted: 2193 Post(s)
Liked 425 Times
in
337 Posts
First usable piece. .030" material is the right thickness. Was able to curve piece with just a smig of facetting on inside. Got another piece in work with different high/low areas that's next.
Last edited by Nessism; 12-15-18 at 07:15 AM.
12-15-18, 12:01 PM
#86
Randomhead
Join Date: Aug 2008
Location: Happy Valley, Pennsylvania
Posts: 24,394
Mentioned: 0 Post(s)
Tagged: 0 Thread(s)
Quoted: 4 Post(s)
Liked 3,695 Times
in
2,517 Posts
nice.
I haven't managed to get shapeways to print me a headbadge, mostly because I'm not motivated to clean up my design enough
I haven't managed to get shapeways to print me a headbadge, mostly because I'm not motivated to clean up my design enough
01-03-19, 08:39 AM
#87
Banned.
Thread Starter
Join Date: Jun 2004
Location: Torrance, CA
Posts: 3,061
Bikes: Homebuilt steel
Mentioned: 18 Post(s)
Tagged: 0 Thread(s)
Quoted: 2193 Post(s)
Liked 425 Times
in
337 Posts
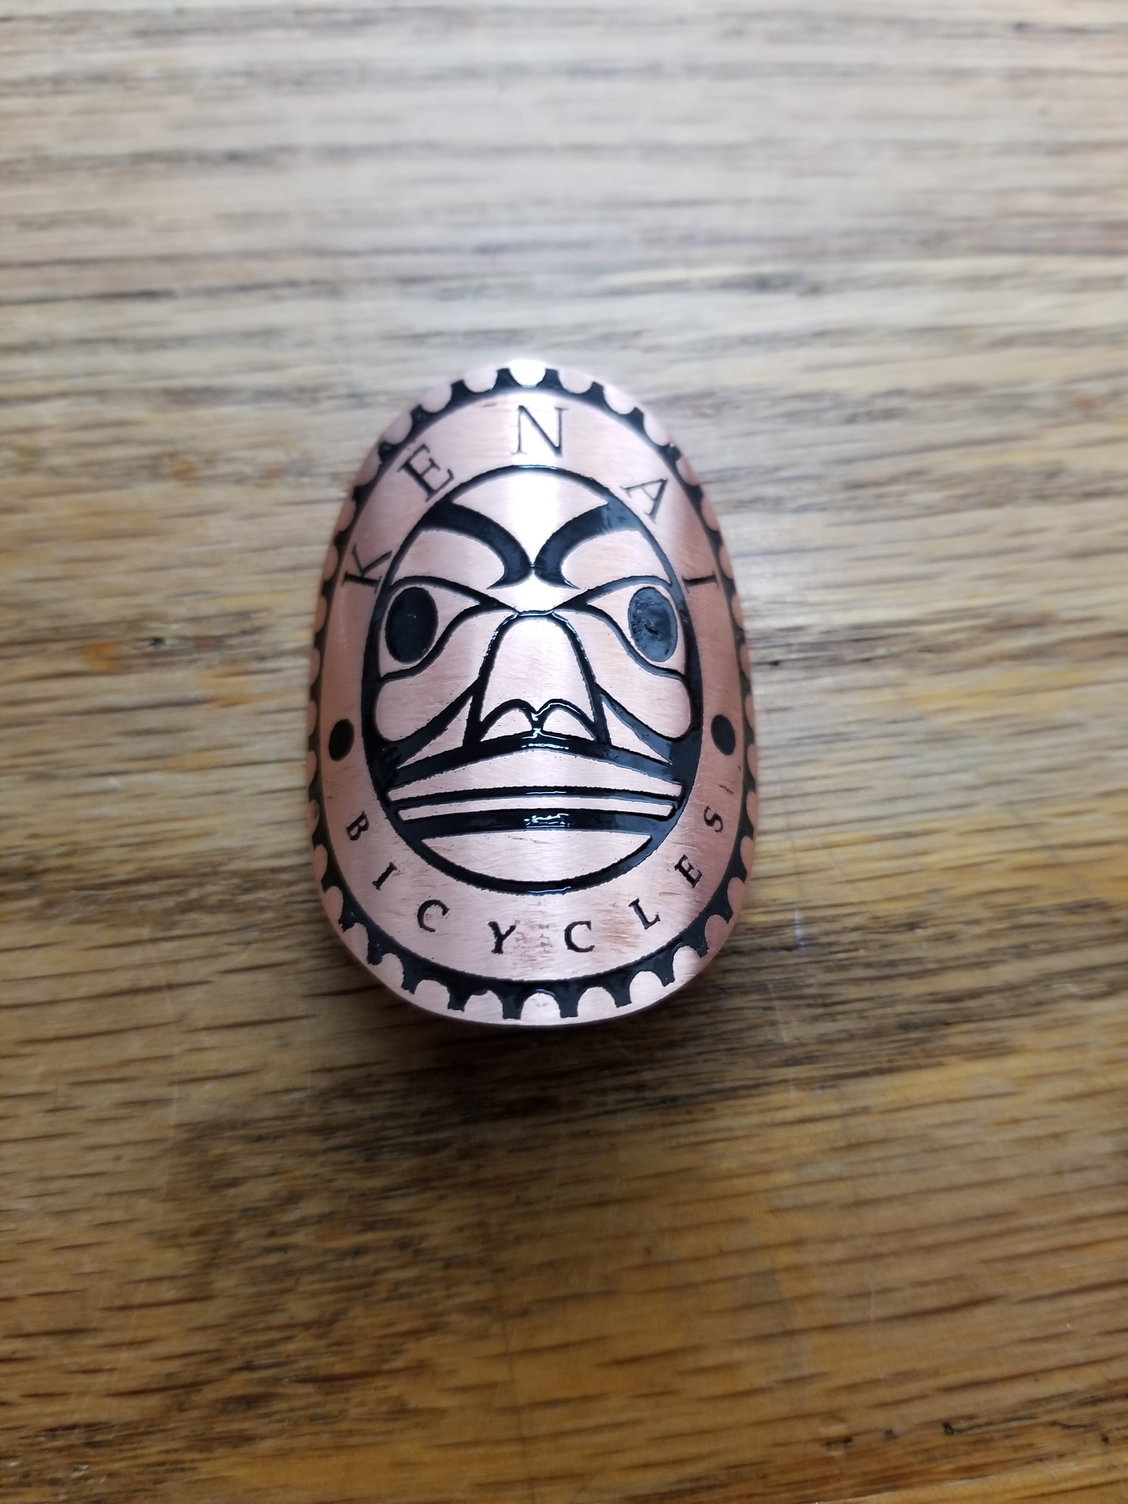
Summary of lessons learned (so far)...
- Clean artwork with smooth crisp edges make the best etch mask. Black and white with the blacks as dark as possible.
- Plan your artwork with high and low areas in mind. The low areas can be paint filled as desired.
- After artwork is finalized use a "flipping" function to create a mirror image. This is needed because the mask gets flipped onto your work piece.
- P-n-P Blue masking paper works well for this application. I print my artwork on a regular piece of paper, and then cut out a piece of PnP Blue of the right size and tape it over the printed image and put the paper back into the printer.
- A laser printer with a high resolution is needed. My printer is supposedly 1200dpi but it still didn't print dark enough to do a really good mask.
- .030" copper sheet is good. It's fairly easily bent but not so thin that the etched areas cause creases.
- Cut copper sheet slightly larger than your mask. It must be flat and without surface damage.
- Scrub down copper using 400 grit sandpaper or gray scotchbrite w/cleanser. The surface needs to be perfectly clean.
- Check surface by "water bead test": if water beads off the surface it's not properly clean.
- I used a regular household iron to apply the mask. A piece of paper between the iron and PnP paper was used. Total iron time of about 4 mins.
- Press iron over work piece but don't move it around, at first anyway. Every 20 seconds or so pick up the iron and move it 90* or the iron may shut off (mine does anyway). After a few mins of this, when lifting the iron, I used a thin towel and my finger/finger nail to burnish the mask down into the work piece. It's hot so be careful. Burnish and then put the iron back on and heat some more. About 4 cycles of this burnishing is what I did and it greatly improved my mask transfer completeness.
- Let cool or put work piece under cold water.
- Say a little prayer and peel off the PnP blue. I like to roll it over into itself and pull it off parallel to the work piece but it doesn't really matter. With some luck the mask will fully transfer, however there seems to often be some spots that don't transfer well. The poor transfer is usually due to the metal not being proper clean or the heat not reaching the area properly. If the mask isn't suitable it can be cleaned off with acetone and then back to scrubbing your work piece some more before another trial.
- If the mask is pretty good but just needs some spots touched up a fine point Sharpie can be used. In fact, I went over most of my mask since there were small white dots from the somewhat low printer resolution. If your Sharpie goes astray don't worry, just scrape it off on the offending areas using an xacto blade.
- Mask off the backside of your work piece and any other areas you don't want etched. Then suspend the piece, exposed side down, into a bowl. You don't want the piece sitting on the bottom. I used a round bottom bowl and the square work piece sat up off the bottom nicely.
- Ferric chloride is used for etching. Amazon sells it. There are other chemical formulas that can be used as well (google will provide mixture).
- 80 mins of etching does a good job.
- Rinse off work piece, remove mask tape, and wipe off residual PnP blue using acetone.
- Cut to shape using shears and a bench grinder.
- To curve the piece I used a tubing block cradle. Press the piece into the cradle and then pry it out with a small screwdriver. There will be some spring back in the metal but don't worry at this point.
- Hold piece with some old pliers and use a propane torch to heat it (from the back side) red hot , then drop it into cold water. This softens the metal.
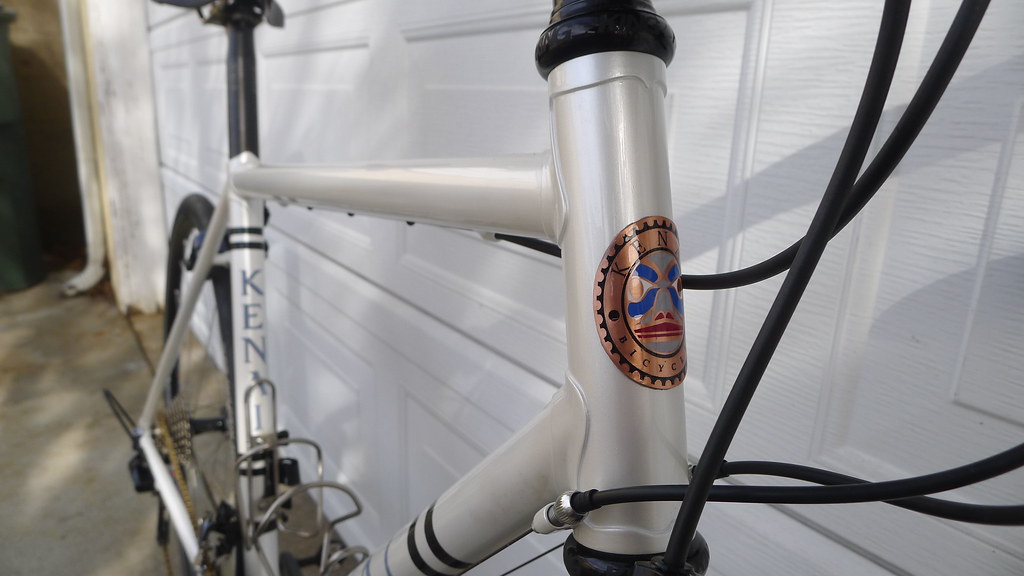
- Dry off your work piece and place it face down onto a flat surface, and then lay a piece of head tube stock inside. Roll the two pieces together over the flat plate, holding the work piece edges down so they remain in contact with the head tube stock. The annealed copper will form to the tube but not spring back since it's dead soft now.
- Scrub down your piece with some Bar Keepers Friend and a toothbrush. This will clean the metal and make it ready for applying paint. You may want to use sandpaper on the back side of the piece because it will have turned dark from the torch heat.
- Dry off and do your paint fill. A small tiny paint brush, dabbing the paint into the low spots, works well. Let dry.
- Use 400 grit sandpaper, wet, and a small sanding block and start sanding down the surface to remove the excess paint fill and to brighten the copper. Be careful when doing this to avoid sanding too deep in any particular area. Stop when all the extra paint fill is gone and the copper has a nice brushed appearance to it.
Edit: I switched to 1000 grit for creating the final brushed appearance because it's a little smoother than 400.
- Last step is to spray some clear coat over the entire work piece to seal the metal. I'm not sure how long we can expect clear to stick to the raw copper but I suspect it should last several years at least.
My plan is to affix the badge to the frame using some automotive grade 3M tape. The stuff used for body side moldings and the like. I haven't sourced it yet though so this part is a bit unknown. At any rate, hope this helps someone in the future that may want to make their own badge.
Good luck
- Clean artwork with smooth crisp edges make the best etch mask. Black and white with the blacks as dark as possible.
- Plan your artwork with high and low areas in mind. The low areas can be paint filled as desired.
- After artwork is finalized use a "flipping" function to create a mirror image. This is needed because the mask gets flipped onto your work piece.
- P-n-P Blue masking paper works well for this application. I print my artwork on a regular piece of paper, and then cut out a piece of PnP Blue of the right size and tape it over the printed image and put the paper back into the printer.
- A laser printer with a high resolution is needed. My printer is supposedly 1200dpi but it still didn't print dark enough to do a really good mask.
- .030" copper sheet is good. It's fairly easily bent but not so thin that the etched areas cause creases.
- Cut copper sheet slightly larger than your mask. It must be flat and without surface damage.
- Scrub down copper using 400 grit sandpaper or gray scotchbrite w/cleanser. The surface needs to be perfectly clean.
- Check surface by "water bead test": if water beads off the surface it's not properly clean.
- I used a regular household iron to apply the mask. A piece of paper between the iron and PnP paper was used. Total iron time of about 4 mins.
- Press iron over work piece but don't move it around, at first anyway. Every 20 seconds or so pick up the iron and move it 90* or the iron may shut off (mine does anyway). After a few mins of this, when lifting the iron, I used a thin towel and my finger/finger nail to burnish the mask down into the work piece. It's hot so be careful. Burnish and then put the iron back on and heat some more. About 4 cycles of this burnishing is what I did and it greatly improved my mask transfer completeness.
- Let cool or put work piece under cold water.
- Say a little prayer and peel off the PnP blue. I like to roll it over into itself and pull it off parallel to the work piece but it doesn't really matter. With some luck the mask will fully transfer, however there seems to often be some spots that don't transfer well. The poor transfer is usually due to the metal not being proper clean or the heat not reaching the area properly. If the mask isn't suitable it can be cleaned off with acetone and then back to scrubbing your work piece some more before another trial.
- If the mask is pretty good but just needs some spots touched up a fine point Sharpie can be used. In fact, I went over most of my mask since there were small white dots from the somewhat low printer resolution. If your Sharpie goes astray don't worry, just scrape it off on the offending areas using an xacto blade.
- Mask off the backside of your work piece and any other areas you don't want etched. Then suspend the piece, exposed side down, into a bowl. You don't want the piece sitting on the bottom. I used a round bottom bowl and the square work piece sat up off the bottom nicely.
- Ferric chloride is used for etching. Amazon sells it. There are other chemical formulas that can be used as well (google will provide mixture).
- 80 mins of etching does a good job.
- Rinse off work piece, remove mask tape, and wipe off residual PnP blue using acetone.
- Cut to shape using shears and a bench grinder.
- To curve the piece I used a tubing block cradle. Press the piece into the cradle and then pry it out with a small screwdriver. There will be some spring back in the metal but don't worry at this point.
- Hold piece with some old pliers and use a propane torch to heat it (from the back side) red hot , then drop it into cold water. This softens the metal.
- Dry off your work piece and place it face down onto a flat surface, and then lay a piece of head tube stock inside. Roll the two pieces together over the flat plate, holding the work piece edges down so they remain in contact with the head tube stock. The annealed copper will form to the tube but not spring back since it's dead soft now.
- Scrub down your piece with some Bar Keepers Friend and a toothbrush. This will clean the metal and make it ready for applying paint. You may want to use sandpaper on the back side of the piece because it will have turned dark from the torch heat.
- Dry off and do your paint fill. A small tiny paint brush, dabbing the paint into the low spots, works well. Let dry.
- Use 400 grit sandpaper, wet, and a small sanding block and start sanding down the surface to remove the excess paint fill and to brighten the copper. Be careful when doing this to avoid sanding too deep in any particular area. Stop when all the extra paint fill is gone and the copper has a nice brushed appearance to it.
Edit: I switched to 1000 grit for creating the final brushed appearance because it's a little smoother than 400.
- Last step is to spray some clear coat over the entire work piece to seal the metal. I'm not sure how long we can expect clear to stick to the raw copper but I suspect it should last several years at least.
My plan is to affix the badge to the frame using some automotive grade 3M tape. The stuff used for body side moldings and the like. I haven't sourced it yet though so this part is a bit unknown. At any rate, hope this helps someone in the future that may want to make their own badge.
Good luck
Last edited by Nessism; 01-04-19 at 03:20 PM.
01-03-19, 10:21 AM
#88
Randomhead
Join Date: Aug 2008
Location: Happy Valley, Pennsylvania
Posts: 24,394
Mentioned: 0 Post(s)
Tagged: 0 Thread(s)
Quoted: 4 Post(s)
Liked 3,695 Times
in
2,517 Posts
thanks for the detailed explanation.
I got a small Fluid Writer Pen By Kemper Tools for this kind of thing, and when I got it, I realized that everyone said to get the large. Fortunately they are not that expensive.
I got a small Fluid Writer Pen By Kemper Tools for this kind of thing, and when I got it, I realized that everyone said to get the large. Fortunately they are not that expensive.
01-04-19, 02:54 PM
#89

Framebuilder
Join Date: Dec 2007
Posts: 570
Mentioned: 0 Post(s)
Tagged: 0 Thread(s)
Quoted: 8 Post(s)
Likes: 0
Liked 0 Times
in
0 Posts
That tape works, but is kinda thick. If you want it to lay flatter, the 3m black weatherstrip adhesive works great.
01-04-19, 07:56 PM
#90
Banned.
Thread Starter
Join Date: Jun 2004
Location: Torrance, CA
Posts: 3,061
Bikes: Homebuilt steel
Mentioned: 18 Post(s)
Tagged: 0 Thread(s)
Quoted: 2193 Post(s)
Liked 425 Times
in
337 Posts
Been researching and the stuff is called "VHB" tape, and it comes in various thicknesses and widths. Thinking about going with the .025" thick stuff. Not keen on adhesive because while the badge curve matches the head tube nicely, it's not perfect. I think weatherstrip cement works best bonding something rubber to a hard surface.

 06-25-20, 06:52 PM
#93
Stop reading my posts!

Join Date: Sep 2004
Posts: 12,580
Mentioned: 89 Post(s)
Tagged: 0 Thread(s)
Quoted: 1443 Post(s)
Liked 1,061 Times
in
786 Posts
Late to this party but I used to acid-etch copper plate ( a little bit) and the trad material for resist/mask is asphaltum AKA "tar", which you can dilute with mineral spirit so it's easy to brush. Very cheap, when you can find it!

