


Homemade 16" (ETRTO 305) studded tires for a Dahon Curve
 01-10-18, 10:42 PM
#1
Senior Member
Thread Starter

Join Date: Nov 2012
Posts: 311
Bikes: Dahon Curve D8 (Sturmey Archer X-RF8), Crius Smart 3.0 5 speed
Mentioned: 2 Post(s)
Tagged: 0 Thread(s)
Quoted: 113 Post(s)
Likes: 0
Liked 2 Times
in
2 Posts
Homemade 16" (ETRTO 305) studded tires for a Dahon Curve
I made myself some 16" (ETRTO 305) studded tires this fall after Vancouver having an unusally snowy winter last year. I used the information from "Making Your Own Studded Tyres" thread on the winter biking forum. I had to make studded tires because there are none commercially made in the 16" (ETRTO 305) size. Schwalbe does make a 16" (349) size.
Materials
- 2 Kenda 16x1.75 (47-305) knobby off road tires: $7CDN/$5.50US each
- 64 6x1/4 wood/metal screws, with robertson/square head 32 per tire. $6CDN/$5US
- duct tape
- total cost: $20CDN/$16US
Tools
- 1/8 inch drill bit. Nothing special about a 1/8, it is the only one I had
- robertson/square screwdriver bit
- drill
Procedure
1) first step was to determine which stud pattern I wanted to use. Winter bike forums said to stay off of the centre set of knobbies since this would wear down the studs quickly and be really slow and noisy when there was no snow/ice. So edge knobbies it was.
2) I chose to put a stud on each 5th off centre knobby and this would allow me to double up on the studs (by placing an extra on the middle knobby) if it turned out that I put too few studs in. Deforming the tire, this appeared that it would allow 1 stud to be in contact with the ground at any given time. I'm commuting on city streets in a temperature rainforest and not on a frozen lake in Yukon.
3) I drilled holes on each 5th knobby on each side of the tire. This provided a hole as a guide to put the screw through later.
4) turn tire inside out
5) run the screws into the pilot holes. I used a drill to save time. Winter bike forum said to put rubber cement to set them but I'm glad I didn't since I first used 1/2 inch long screws which stuck out of the knobby too far and switched to 1/4 inch log screws. I assume 1/2 inche would work for normal sized off road tires, but these tires were small with small knobbies.
6) turn the tire so that the outside (knobbies) are facing outward again.
7) cover each screw head with a piece of duct tape. Winter bike forum said to rubber cement on an old tube. I didn't have one. An alternative was to run a length of duct tape as a liner, but I couldn't get it to stick to the greasy and powdery inside of the tire. Small pieces of duct tape did stick though, so I went with that.
8) mounted the tire onto a rim and put in a tube and left it slightly inflated for a few days just to let the tube push out against the duct tape to make it seal. Also to see if the screw heads would pucture the tube
9) a few days later pumped the tire up to 25 PSI which is what I would run it at. This would allow the tire to deform and grip the road.
Results
We didn't have any snow or much frost this fall, but finally after Christmas holidays we had a few days of widespread frosty/icy roads. The roads were slippery enough that my Big Apples and City Jets would skid with any attemp to brake. Was slippery for walking as well. The studded tire performed well. I could come to a confident stop without any slipping. The tire would make a nice "krik" sound as the studs bit into the icy ashphalt. As well, the knobby tires and the low 25 PSI pressure meant that I couldn't go fast, which meant no chance of a high speed crash if the studs lost traction or a tube blew because of a screw. I find that even on icy snowy road I get impatient going slowly so it is nice to have the knobbies enforce a slow maximum speed on me. I only ran one studded tire since I was having some trouble completing my rear wheel build which had nothing to do with the winter tires themselves. I purchased two extra wheels so that in the winter I could quickly put on the winter set of tires without having to mount the tire itself. One studded tire was enough to stay upright and stop quickly. So far 3 20 km commutes and no flats or other issues.
Let me know if you have any questions.
Last edited by edelay; 01-11-18 at 09:12 PM. Reason: typos
 01-11-18, 03:23 AM
#2
Senior Member

Join Date: Nov 2007
Posts: 3,720
Mentioned: 3 Post(s)
Tagged: 0 Thread(s)
Quoted: 317 Post(s)
Likes: 0
Liked 1 Time
in
1 Post
Well done! Remember the option of making chains for bikes too. I have some for 20" I made years ago that I want to put on my home built "granny speed demon electric bike" 
Also looking for the 26" ones I made to reduce them to 24" and use on my new 24" Nuvinchi wheel for my recumbent. Much easyer to put on and take off than tyres and therefor great when taking the wheel off is difficult like difficult rims, difficult frames (like my recumbent) and E-bikes.
Some months ago I visiyed a bikeshop and found to my suprise tyres that had a zip on each side so you can zip on and off a strip of studds when you need them. I`ll try to find the pictures.
01-11-18, 06:36 AM
#3
Senior Member
Join Date: Sep 2015
Posts: 663
Mentioned: 3 Post(s)
Tagged: 0 Thread(s)
Quoted: 239 Post(s)
Likes: 0
Liked 3 Times
in
3 Posts
I only stud the front wheel--I live in western Montana where we get snow/ice for long periods, and then it can be gone. Been over 4 weeks without the snow going away. If the back tire slips it is pretty easy to catch yourself---usually---I have gone down once this year. I went down several times last year but I was playing in the deep snow with my ebike.
I had a spare bike that I left studded all year around but it got stolen a couple of years ago.
For many years before I had a bike I just had a spare wheel built up.
For a winter bike I have to have a disc brake.---Rim brakes just plain do not work. I also go with a suspension seatpost---the ruts just beat on you something fierce.
I have gone through about 5 generations of screws since my first studded tire in 1987ish. Sheet metal screws don't last at all. You want hardened screws.
I have a spare wheel I have studded for my Swift---I just wish I had disc brakes on her. On my ebike I have to swap over my studded tire. I wrap an old inner tube around a thorn tube. And then keep the tire pressure up. Sliding tires around the rim from low pressure will tear a valve stem off---ask me how I know that---grin.
01-11-18, 06:41 AM
#4
Senior Member
Join Date: Sep 2015
Posts: 663
Mentioned: 3 Post(s)
Tagged: 0 Thread(s)
Quoted: 239 Post(s)
Likes: 0
Liked 3 Times
in
3 Posts
Riding temps are important also. I only ride when the temp is between 20 and 32F degrees. Below that and my face gets cold and I get too wet. Above that and the snow gets sloppy and I hate that.
It is just after 5 AM and I just got back from an hour ride---29 degrees and a skiff of fresh snow is absolutely perfect.
It is just after 5 AM and I just got back from an hour ride---29 degrees and a skiff of fresh snow is absolutely perfect.
01-11-18, 08:58 AM
#5
Full Member

Is your front tire a Schwalbe Winter Marathon or a home made one? Aren't the 20 inch wheels affected more by deeper, crustier or rutted snow than, say a 26" mtn bike tire? How much more effort is needed to push the heavier studded tire? I have a 700c bike with Schwalbe Winters (72 studs) and while it goes pretty well on level ground, through in a headwind or a grade and it seems significantly more work.
01-11-18, 09:27 AM
#6
Senior Member
Join Date: Sep 2004
Location: Chicago area
Posts: 2,556
Bikes: Airborne "Carpe Diem", Motobecane "Mirage", Trek 6000, Strida 2, Dahon "Helios XL", Dahon "Mu XL", Tern "Verge S11i"
Mentioned: 23 Post(s)
Tagged: 0 Thread(s)
Quoted: 981 Post(s)
Liked 584 Times
in
401 Posts
Based on my experience with Schwalbe Marathon Winter tires, I have these suggestions:
1) Scrub out the inside of the tire with a stiff nylon brush and a detergent; this makes the tape stick better.
2) Duct tape isn't very strong when it comes to resisting punctures or wear from abrasive particles such as rust from the screws (salt on the roads causes serious corrosion on studded tires). I've had really good luck with "Mr. Tuffy" tire liners... after last season, when I took the tires off for inspection the studs had worn through the tire and were up against the tire liner, which showed no wear. Without the tire liners, I would have had flats for sure. To keep the liner in place during installation, I place eight one-inch sections of double-sided tape rated for "outdoor" use (after scrubbing out the tire as described above.
3) A glued-in old tube won't resist abrasion and puncture as well as a tire liner.
Have fun on the ice!
Steve
EDIT: I guess for 16" you may not have the option of commercially-available studded tires. My folder is 20", so I use Marathon Winters. Attached image is 26" Nokian "Extreme 294" tires.
01-11-18, 05:02 PM
#7
Senior Member
Join Date: Nov 2007
Posts: 3,720
Mentioned: 3 Post(s)
Tagged: 0 Thread(s)
Quoted: 317 Post(s)
Likes: 0
Liked 1 Time
in
1 Post
I use self tapping sheet screws since they have a bigger flat head. Old inner tube between studs and tube but I do not commute so you guys may ride more than I do. I tend to stop riding when the temp is around -20 Celsius.
I just recived my TI nut for the B (forgot to get the right nut for the chain tensioner when I converted it to 5x2 this atumn) so now I can put the studded tyres on my B and test ride
I just recived my TI nut for the B (forgot to get the right nut for the chain tensioner when I converted it to 5x2 this atumn) so now I can put the studded tyres on my B and test ride
01-11-18, 08:05 PM
#8

Senior Member
Join Date: Sep 2005
Location: Michigan
Posts: 3,706
Bikes: Trek 730 (quad), 720 & 830, Bike Friday NWT, Brompton M36R & M6R, Dahon HAT060 & HT060, ...
Mentioned: 10 Post(s)
Tagged: 0 Thread(s)
Quoted: 840 Post(s)
Liked 336 Times
in
251 Posts
Is there an option of using carbide-tipped replacement studs for commercial tires, or are they too short in practice?
Last edited by 2_i; 01-11-18 at 08:13 PM.
01-11-18, 08:38 PM
#9
Senior Member
Thread Starter
Join Date: Nov 2012
Posts: 311
Bikes: Dahon Curve D8 (Sturmey Archer X-RF8), Crius Smart 3.0 5 speed
Mentioned: 2 Post(s)
Tagged: 0 Thread(s)
Quoted: 113 Post(s)
Likes: 0
Liked 2 Times
in
2 Posts
Well done! Remember the option of making chains for bikes too. I have some for 20" I made years ago that I want to put on my home built "granny speed demon electric bike"
Also looking for the 26" ones I made to reduce them to 24" and use on my new 24" Nuvinchi wheel for my recumbent. Much easyer to put on and take off than tyres and therefor great when taking the wheel off is difficult like difficult rims, difficult frames (like my recumbent) and E-bikes.
Some months ago I visiyed a bikeshop and found to my suprise tyres that had a zip on each side so you can zip on and off a strip of studds when you need them. I`ll try to find the pictures.
If you post any information about the Nuvinchi, let me know.
01-11-18, 08:53 PM
#10
Senior Member
Thread Starter
Join Date: Nov 2012
Posts: 311
Bikes: Dahon Curve D8 (Sturmey Archer X-RF8), Crius Smart 3.0 5 speed
Mentioned: 2 Post(s)
Tagged: 0 Thread(s)
Quoted: 113 Post(s)
Likes: 0
Liked 2 Times
in
2 Posts
I only stud the front wheel--I live in western Montana where we get snow/ice for long periods, and then it can be gone. Been over 4 weeks without the snow going away. If the back tire slips it is pretty easy to catch yourself---usually---I have gone down once this year. I went down several times last year but I was playing in the deep snow with my ebike.
I had a spare bike that I left studded all year around but it got stolen a couple of years ago.
For many years before I had a bike I just had a spare wheel built up.
For a winter bike I have to have a disc brake.---Rim brakes just plain do not work. I also go with a suspension seatpost---the ruts just beat on you something fierce.
I have gone through about 5 generations of screws since my first studded tire in 1987ish. Sheet metal screws don't last at all. You want hardened screws.
I have a spare wheel I have studded for my Swift---I just wish I had disc brakes on her. On my ebike I have to swap over my studded tire. I wrap an old inner tube around a thorn tube. And then keep the tire pressure up. Sliding tires around the rim from low pressure will tear a valve stem off---ask me how I know that---grin.
I had a spare bike that I left studded all year around but it got stolen a couple of years ago.
For many years before I had a bike I just had a spare wheel built up.
For a winter bike I have to have a disc brake.---Rim brakes just plain do not work. I also go with a suspension seatpost---the ruts just beat on you something fierce.
I have gone through about 5 generations of screws since my first studded tire in 1987ish. Sheet metal screws don't last at all. You want hardened screws.
I have a spare wheel I have studded for my Swift---I just wish I had disc brakes on her. On my ebike I have to swap over my studded tire. I wrap an old inner tube around a thorn tube. And then keep the tire pressure up. Sliding tires around the rim from low pressure will tear a valve stem off---ask me how I know that---grin.
Having a spare front wheel with a quick release makes it so quick to change over to the spare when frost hits. Need a minor adjustment of the rim brakes though. Next time will get the exact same rim so don't have to do a brake adjustment.
On a typical winter, I would bet that I will use these a dozen or so times, so these wood/sheet metal screws should last several years. What do you mean by "hardened screws". What would they be listed as in a hardware store?
Yeah, have been worrying about shearing off the valve stem, but so far so good at 25 PSI.
Thanks for the information Rick.
01-11-18, 08:58 PM
#11
Senior Member
Thread Starter
Join Date: Nov 2012
Posts: 311
Bikes: Dahon Curve D8 (Sturmey Archer X-RF8), Crius Smart 3.0 5 speed
Mentioned: 2 Post(s)
Tagged: 0 Thread(s)
Quoted: 113 Post(s)
Likes: 0
Liked 2 Times
in
2 Posts
Riding temps are important also. I only ride when the temp is between 20 and 32F degrees. Below that and my face gets cold and I get too wet. Above that and the snow gets sloppy and I hate that.
It is just after 5 AM and I just got back from an hour ride---29 degrees and a skiff of fresh snow is absolutely perfect.
It is just after 5 AM and I just got back from an hour ride---29 degrees and a skiff of fresh snow is absolutely perfect.
01-11-18, 09:04 PM
#12
Senior Member
Thread Starter
Join Date: Nov 2012
Posts: 311
Bikes: Dahon Curve D8 (Sturmey Archer X-RF8), Crius Smart 3.0 5 speed
Mentioned: 2 Post(s)
Tagged: 0 Thread(s)
Quoted: 113 Post(s)
Likes: 0
Liked 2 Times
in
2 Posts
I think you'd get better performance out of commercially made studded tires, but DIY is more fun!
Based on my experience with Schwalbe Marathon Winter tires, I have these suggestions:
1) Scrub out the inside of the tire with a stiff nylon brush and a detergent; this makes the tape stick better.
2) Duct tape isn't very strong when it comes to resisting punctures or wear from abrasive particles such as rust from the screws (salt on the roads causes serious corrosion on studded tires). I've had really good luck with "Mr. Tuffy" tire liners... after last season, when I took the tires off for inspection the studs had worn through the tire and were up against the tire liner, which showed no wear. Without the tire liners, I would have had flats for sure. To keep the liner in place during installation, I place eight one-inch sections of double-sided tape rated for "outdoor" use (after scrubbing out the tire as described above.
3) A glued-in old tube won't resist abrasion and puncture as well as a tire liner.
Have fun on the ice!
Steve
EDIT: I guess for 16" you may not have the option of commercially-available studded tires. My folder is 20", so I use Marathon Winters. Attached image is 26" Nokian "Extreme 294" tires.
Thanks for the tip regarding scrubbing the tire. Funny that I bought both Kenda tires at the same time and the inner of one was greasy while the other one was powdery. I guess both achieve the same thing for tubes, in allowing them to slip around a bit without a pinch flat.
01-11-18, 09:18 PM
#13
Senior Member
Join Date: Sep 2004
Location: Chicago area
Posts: 2,556
Bikes: Airborne "Carpe Diem", Motobecane "Mirage", Trek 6000, Strida 2, Dahon "Helios XL", Dahon "Mu XL", Tern "Verge S11i"
Mentioned: 23 Post(s)
Tagged: 0 Thread(s)
Quoted: 981 Post(s)
Liked 584 Times
in
401 Posts
Thanks for the tip regarding scrubbing the tire. Funny that I bought both Kenda tires at the same time and the inner of one was greasy while the other one was powdery. I guess both achieve the same thing for tubes, in allowing them to slip around a bit without a pinch flat.
Steve
EDIT: Here it is! https://www.sheldonbrown.com/brandt/talcum.html
01-12-18, 02:59 AM
#14
Senior Member
Join Date: Nov 2007
Posts: 3,720
Mentioned: 3 Post(s)
Tagged: 0 Thread(s)
Quoted: 317 Post(s)
Likes: 0
Liked 1 Time
in
1 Post
https://retyre.no/#
I`ll report back on the Nuvinci. Hope to install it less than a week from now.
If nobody beats me to it I`ll pull out my Curve and try. At present I am stuck in my sons house pretending to be a carpenter but in a day or two I`ll be back home. I`ll report back.EDIT: I just put a Brompton front wheel w studded Marathon whinters on my Curve. Fits perfectly with room to spare. No need to remove the fenders
Last edited by badmother; 01-12-18 at 02:25 PM.
01-12-18, 03:00 PM
#15
Senior Member
Thread Starter
Join Date: Nov 2012
Posts: 311
Bikes: Dahon Curve D8 (Sturmey Archer X-RF8), Crius Smart 3.0 5 speed
Mentioned: 2 Post(s)
Tagged: 0 Thread(s)
Quoted: 113 Post(s)
Likes: 0
Liked 2 Times
in
2 Posts
A quick google search brought this result (among lots of pictures of bike wheels with zipties on them for winter riding):
https://retyre.no/#
I`ll report back on the Nuvinci. Hope to install it less than a week from now.
Wow! Smart thinkingIf nobody beats me to it I`ll pull out my Curve and try. At present I am stuck in my sons house pretending to be a carpenter but in a day or two I`ll be back home. I`ll report back.
EDIT: I just put a Brompton front wheel w studded Marathon whinters on my Curve. Fits perfectly with room to spare. No need to remove the fenders
https://retyre.no/#
I`ll report back on the Nuvinci. Hope to install it less than a week from now.
Wow! Smart thinking
If nobody beats me to it I`ll pull out my Curve and try. At present I am stuck in my sons house pretending to be a carpenter but in a day or two I`ll be back home. I`ll report back.EDIT: I just put a Brompton front wheel w studded Marathon whinters on my Curve. Fits perfectly with room to spare. No need to remove the fenders
The zip on/off sudded tires are a great idea. Simple.
01-12-18, 03:15 PM
#16
Senior Member
Join Date: Nov 2007
Posts: 3,720
Mentioned: 3 Post(s)
Tagged: 0 Thread(s)
Quoted: 317 Post(s)
Likes: 0
Liked 1 Time
in
1 Post
Thank you so much for trying that out and with a Marathon winter! So nice that it fits with even the the fenders on. I hear that that axle diameter is different on the Dahon Curve and the Brompton. Does the Brompton axle have any movement when in the Dahon fork? Does it look like the v-brakes can be adjusted to reach the Brompton rim? Sorry for the barrage of questions .... which approximate year and model of Curve and Brompton to do you have? I have a Dahon Curve D3 from 5 years ago.
The zip on/off sudded tires are a great idea. Simple.
The zip on/off sudded tires are a great idea. Simple.
 .
.A little less space at the back but not much. If there is a problem it would be where the fender is just behind the BB but that can be solved.
Edit: Forgot your question about V brakes and rims. I`ll take a look tomorrow but there are adaptors that can solve this if it can not work as is.
Play? Not much, no problem for the nuts to hold it in place.
Age? I think my Curve is a bit older than yours. Bought it "second hand" (just ridden home and then parked) some years ago, serial number is xxxxxxxxxx if that can help you. Maybe Thor can help with dating my bike?
This actually makes me think of keeping one pair of studded tyres around on an extra wheelset and be able to use it on both bikes
Last edited by badmother; 01-13-18 at 03:42 AM.
01-12-18, 04:37 PM
#17
Senior Member
Thread Starter
Join Date: Nov 2012
Posts: 311
Bikes: Dahon Curve D8 (Sturmey Archer X-RF8), Crius Smart 3.0 5 speed
Mentioned: 2 Post(s)
Tagged: 0 Thread(s)
Quoted: 113 Post(s)
Likes: 0
Liked 2 Times
in
2 Posts
In the front there was room for my finger between the fender and the tyre, and I do NOT have slim lady fingers .
A little less space at the back but not much. If there is a problem it would be where the fender is just behind the BB but that can be solved.
Edit: Forgot your question about V brakes and rims. I`ll take a look tomorrow but there are adaptors that can solve this if it can not work as is.
Play? Not much, no problem for the nuts to hold it in place.
Age? I think my Curve is a bit older than yours. Bought it "second hand" (just ridden home and then parked) some years ago, serial number is *redacted* if that can help you. Maybe Thor can help with dating my bike?
This actually makes me think of keeping one pair of studded tyres around on an extra wheelset and be able to use it on both bikes
.A little less space at the back but not much. If there is a problem it would be where the fender is just behind the BB but that can be solved.
Edit: Forgot your question about V brakes and rims. I`ll take a look tomorrow but there are adaptors that can solve this if it can not work as is.
Play? Not much, no problem for the nuts to hold it in place.
Age? I think my Curve is a bit older than yours. Bought it "second hand" (just ridden home and then parked) some years ago, serial number is *redacted* if that can help you. Maybe Thor can help with dating my bike?
This actually makes me think of keeping one pair of studded tyres around on an extra wheelset and be able to use it on both bikes
I wonder if you should remove your serial number from here in case someone registers it as stolen then then tries to claim it.
I don't imagine that Brompton axles have changed much but what year is your Brompton?
01-13-18, 03:50 AM
#18
Senior Member
Join Date: Nov 2007
Posts: 3,720
Mentioned: 3 Post(s)
Tagged: 0 Thread(s)
Quoted: 317 Post(s)
Likes: 0
Liked 1 Time
in
1 Post
Thanks for that information. Can't wait to hear regarding the brakes and rims.
I wonder if you should remove your serial number from here in case someone registers it as stolen then then tries to claim it.
I don't imagine that Brompton axles have changed much but what year is your Brompton?
I wonder if you should remove your serial number from here in case someone registers it as stolen then then tries to claim it.
I don't imagine that Brompton axles have changed much but what year is your Brompton?
They would have a problem explaining where they bought the bike since it has a special history but yes you are right, I should have sent it to you on PM
. Thank you for the advice.Since we need to make changes to the brakes between the two common 20" sizes I bet you need to do so here too.
I wish there still was a slim drum brake hub. On my "to do list" is taking a close look at a drum brake to see if I can make it fit. I tend to think "If they can (make a slim drum brake) I can
01-17-18, 02:56 PM
#20
Senior Member
Join Date: Sep 2005
Location: Michigan
Posts: 3,706
Bikes: Trek 730 (quad), 720 & 830, Bike Friday NWT, Brompton M36R & M6R, Dahon HAT060 & HT060, ...
Mentioned: 10 Post(s)
Tagged: 0 Thread(s)
Quoted: 840 Post(s)
Liked 336 Times
in
251 Posts
Life is more complicated. You can lose a stud or two for one reason or another and studs wear off quickly if you ride on bare pavement for one reason or another. In any case my question was about the fact that replacement studs with carbide tips are available in the marketplace. Could these be used in home-studded tires in place of screws?
01-23-18, 10:25 AM
#21
Senior Member
Join Date: Sep 2015
Posts: 663
Mentioned: 3 Post(s)
Tagged: 0 Thread(s)
Quoted: 239 Post(s)
Likes: 0
Liked 3 Times
in
3 Posts
I saw some carbide studs at the Las vegas bike show a few years ago but they were a really expensive for the kit. I am sure you could use car tire stud in bike tires ---you would just have to learn how they are installed and make sure the hole in your bike tire would accept them.---anything is doable.
05-04-18, 02:53 PM
#22
Senior Member
Join Date: Nov 2007
Posts: 3,720
Mentioned: 3 Post(s)
Tagged: 0 Thread(s)
Quoted: 317 Post(s)
Likes: 0
Liked 1 Time
in
1 Post
Testing it tomorrow. I found that the Rover instalation video is the one I found most helpful:
05-08-18, 12:40 PM
#23
Senior Member
Thread Starter
Join Date: Nov 2012
Posts: 311
Bikes: Dahon Curve D8 (Sturmey Archer X-RF8), Crius Smart 3.0 5 speed
Mentioned: 2 Post(s)
Tagged: 0 Thread(s)
Quoted: 113 Post(s)
Likes: 0
Liked 2 Times
in
2 Posts
Finally got around to installing the Nuvinci today. The challenge on this bike is the chainline so that is what is giving me a headace, and that (Idlers and stuff) is what is going to get messed up if anything.
Testing it tomorrow. I found that the Rover instalation video is the one I found most helpful:
https://www.youtube.com/watch?v=L_hGY0QOuZ0
Testing it tomorrow. I found that the Rover instalation video is the one I found most helpful:
https://www.youtube.com/watch?v=L_hGY0QOuZ0
Thanks for remembering my request. Would be great to hear about how you like or dislike the hub after putting on some km's. I've always been intrigued by this hub. I'm sort of picky when it comes to the cadence that feels right, so this hub would be really nice in that regard.
05-08-18, 12:55 PM
#24
Senior Member
Thread Starter
Join Date: Nov 2012
Posts: 311
Bikes: Dahon Curve D8 (Sturmey Archer X-RF8), Crius Smart 3.0 5 speed
Mentioned: 2 Post(s)
Tagged: 0 Thread(s)
Quoted: 113 Post(s)
Likes: 0
Liked 2 Times
in
2 Posts
Just doing a follow up post now that winter is long gone.
- the studs held up fine. Probably did a good 12 commutes on the studded front tire
- only a tiny degree of wear on the screws, so they should last several winters
- no flats from the screws puncturing the tube or the duct tape pulling/pinching the tube
- winter was a normal one with a few snowfalls that were gone within a day or two
- never was able to build a rear hub so I never ended up running a studded tire on the back. Studded on front was plenty safe for steering and stopping the bike
So the homemade DIY tire was a success. Cheap. Easy to make. Works well and works safely.
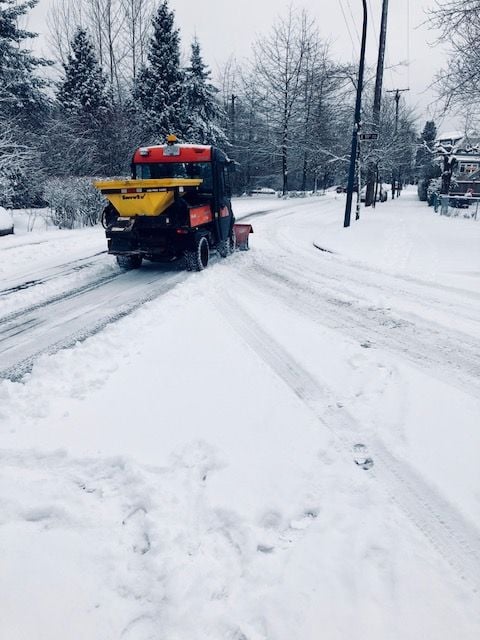
P.S. I was good to see that we have a tiny plow for some bike lanes now. Was struggling to pedal through some deep snow one day, then the plow caught up to me, so let it pass then followed it. I never expected to see a bike lane plow in my temperate city but the months of snow from last year must have leads to lots of complaints. I know I put a few in.
- the studs held up fine. Probably did a good 12 commutes on the studded front tire
- only a tiny degree of wear on the screws, so they should last several winters
- no flats from the screws puncturing the tube or the duct tape pulling/pinching the tube
- winter was a normal one with a few snowfalls that were gone within a day or two
- never was able to build a rear hub so I never ended up running a studded tire on the back. Studded on front was plenty safe for steering and stopping the bike
So the homemade DIY tire was a success. Cheap. Easy to make. Works well and works safely.
P.S. I was good to see that we have a tiny plow for some bike lanes now. Was struggling to pedal through some deep snow one day, then the plow caught up to me, so let it pass then followed it. I never expected to see a bike lane plow in my temperate city but the months of snow from last year must have leads to lots of complaints. I know I put a few in.
I made myself some 16" (ETRTO 305) studded tires this fall after Vancouver having an unusally snowy winter last year. I used the information from "Making Your Own Studded Tyres" thread on the winter biking forum. I had to make studded tires because there are none commercially made in the 16" (ETRTO 305) size. Schwalbe does make a 16" (349) size.
Materials
- 2 Kenda 16x1.75 (47-305) knobby off road tires: $7CDN/$5.50US each
- 64 6x1/4 wood/metal screws, with robertson/square head 32 per tire. $6CDN/$5US
- duct tape
- total cost: $20CDN/$16US
Tools
- 1/8 inch drill bit. Nothing special about a 1/8, it is the only one I had
- robertson/square screwdriver bit
- drill
Procedure
1) first step was to determine which stud pattern I wanted to use. Winter bike forums said to stay off of the centre set of knobbies since this would wear down the studs quickly and be really slow and noisy when there was no snow/ice. So edge knobbies it was.
2) I chose to put a stud on each 5th off centre knobby and this would allow me to double up on the studs (by placing an extra on the middle knobby) if it turned out that I put too few studs in. Deforming the tire, this appeared that it would allow 1 stud to be in contact with the ground at any given time. I'm commuting on city streets in a temperature rainforest and not on a frozen lake in Yukon.
3) I drilled holes on each 5th knobby on each side of the tire. This provided a hole as a guide to put the screw through later.
4) turn tire inside out
5) run the screws into the pilot holes. I used a drill to save time. Winter bike forum said to put rubber cement to set them but I'm glad I didn't since I first used 1/2 inch long screws which stuck out of the knobby too far and switched to 1/4 inch log screws. I assume 1/2 inche would work for normal sized off road tires, but these tires were small with small knobbies.
6) turn the tire so that the outside (knobbies) are facing outward again.
7) cover each screw head with a piece of duct tape. Winter bike forum said to rubber cement on an old tube. I didn't have one. An alternative was to run a length of duct tape as a liner, but I couldn't get it to stick to the greasy and powdery inside of the tire. Small pieces of duct tape did stick though, so I went with that.
8) mounted the tire onto a rim and put in a tube and left it slightly inflated for a few days just to let the tube push out against the duct tape to make it seal. Also to see if the screw heads would pucture the tube
9) a few days later pumped the tire up to 25 PSI which is what I would run it at. This would allow the tire to deform and grip the road.
Results
We didn't have any snow or much frost this fall, but finally after Christmas holidays we had a few days of widespread frosty/icy roads. The roads were slippery enough that my Big Apples and City Jets would skid with any attemp to brake. Was slippery for walking as well. The studded tire performed well. I could come to a confident stop without any slipping. The tire would make a nice "krik" sound as the studs bit into the icy ashphalt. As well, the knobby tires and the low 25 PSI pressure meant that I couldn't go fast, which meant no chance of a high speed crash if the studs lost traction or a tube blew because of a screw. I find that even on icy snowy road I get impatient going slowly so it is nice to have the knobbies enforce a slow maximum speed on me. I only ran one studded tire since I was having some trouble completing my rear wheel build which had nothing to do with the winter tires themselves. I purchased two extra wheels so that in the winter I could quickly put on the winter set of tires without having to mount the tire itself. One studded tire was enough to stay upright and stop quickly. So far 3 20 km commutes and no flats or other issues.
Let me know if you have any questions.
Materials
- 2 Kenda 16x1.75 (47-305) knobby off road tires: $7CDN/$5.50US each
- 64 6x1/4 wood/metal screws, with robertson/square head 32 per tire. $6CDN/$5US
- duct tape
- total cost: $20CDN/$16US
Tools
- 1/8 inch drill bit. Nothing special about a 1/8, it is the only one I had
- robertson/square screwdriver bit
- drill
Procedure
1) first step was to determine which stud pattern I wanted to use. Winter bike forums said to stay off of the centre set of knobbies since this would wear down the studs quickly and be really slow and noisy when there was no snow/ice. So edge knobbies it was.
2) I chose to put a stud on each 5th off centre knobby and this would allow me to double up on the studs (by placing an extra on the middle knobby) if it turned out that I put too few studs in. Deforming the tire, this appeared that it would allow 1 stud to be in contact with the ground at any given time. I'm commuting on city streets in a temperature rainforest and not on a frozen lake in Yukon.
3) I drilled holes on each 5th knobby on each side of the tire. This provided a hole as a guide to put the screw through later.
4) turn tire inside out
5) run the screws into the pilot holes. I used a drill to save time. Winter bike forum said to put rubber cement to set them but I'm glad I didn't since I first used 1/2 inch long screws which stuck out of the knobby too far and switched to 1/4 inch log screws. I assume 1/2 inche would work for normal sized off road tires, but these tires were small with small knobbies.
6) turn the tire so that the outside (knobbies) are facing outward again.
7) cover each screw head with a piece of duct tape. Winter bike forum said to rubber cement on an old tube. I didn't have one. An alternative was to run a length of duct tape as a liner, but I couldn't get it to stick to the greasy and powdery inside of the tire. Small pieces of duct tape did stick though, so I went with that.
8) mounted the tire onto a rim and put in a tube and left it slightly inflated for a few days just to let the tube push out against the duct tape to make it seal. Also to see if the screw heads would pucture the tube
9) a few days later pumped the tire up to 25 PSI which is what I would run it at. This would allow the tire to deform and grip the road.
Results
We didn't have any snow or much frost this fall, but finally after Christmas holidays we had a few days of widespread frosty/icy roads. The roads were slippery enough that my Big Apples and City Jets would skid with any attemp to brake. Was slippery for walking as well. The studded tire performed well. I could come to a confident stop without any slipping. The tire would make a nice "krik" sound as the studs bit into the icy ashphalt. As well, the knobby tires and the low 25 PSI pressure meant that I couldn't go fast, which meant no chance of a high speed crash if the studs lost traction or a tube blew because of a screw. I find that even on icy snowy road I get impatient going slowly so it is nice to have the knobbies enforce a slow maximum speed on me. I only ran one studded tire since I was having some trouble completing my rear wheel build which had nothing to do with the winter tires themselves. I purchased two extra wheels so that in the winter I could quickly put on the winter set of tires without having to mount the tire itself. One studded tire was enough to stay upright and stop quickly. So far 3 20 km commutes and no flats or other issues.
Let me know if you have any questions.
Last edited by edelay; 05-08-18 at 12:57 PM. Reason: typos

Thread
Thread Starter
Forum
Replies
Last Post
PaulRivers
Commuting
100
07-26-17 07:48 AM
PaulRivers
Winter Cycling
25
02-08-10 09:34 AM
