


Bottom Bracket: Replacing UN72 with UN55. HELP!!!
 04-08-20, 09:10 AM
#26
Senior Member
Thread Starter
Follow-Up: I just tried backing off the screw that secures the cable guide. No help, but a good idea. It wasn't protruding into the bottom bracket shell, anyway.
I guess the next step is to wait for delivery of the new bracket and cross my fingers.
I guess the next step is to wait for delivery of the new bracket and cross my fingers.
 04-08-20, 11:09 AM
#27

Senior Member

Join Date: Sep 2005
Location: Oakland, CA
Posts: 3,265
Bikes: '82 Univega Competizione, '72 Motobecane Grand Record, '83 Mercian KOM Touring, '85 Univega Alpina Uno, '76 Eisentraut Limited
Mentioned: 57 Post(s)
Tagged: 0 Thread(s)
Quoted: 1088 Post(s)
Liked 1,205 Times
in
701 Posts
Shoot. Well, now I am crossing my fingers, too. In your original post, you said the only marking on the old UN72 was "113." Since you have both coming and can return one or both, I guess we'll just have to wait and see.
04-08-20, 11:10 AM
#28
Senior Member
Join Date: Jun 2002
Location: San Jose, CA
Posts: 3,691
Bikes: Too many bikes, too little time to ride
Mentioned: 2 Post(s)
Tagged: 0 Thread(s)
Quoted: 431 Post(s)
Liked 460 Times
in
318 Posts
The difference between a 68 and 73 is 2.5mm on each side. Definitely not the 1/2� discrepancy you reported in the first post.
How do the threaded cups compare? You're saying the new BB cups don't thread into the shell all the way, correct?
How do the threaded cups compare? You're saying the new BB cups don't thread into the shell all the way, correct?
04-08-20, 12:19 PM
#29
Senior Member
Thread Starter
I appreciate your input, so don't worry about crossing your fingers. It's the guys at Jensen I am disappointed in.
04-08-20, 12:35 PM
#30
Senior Member
Thread Starter
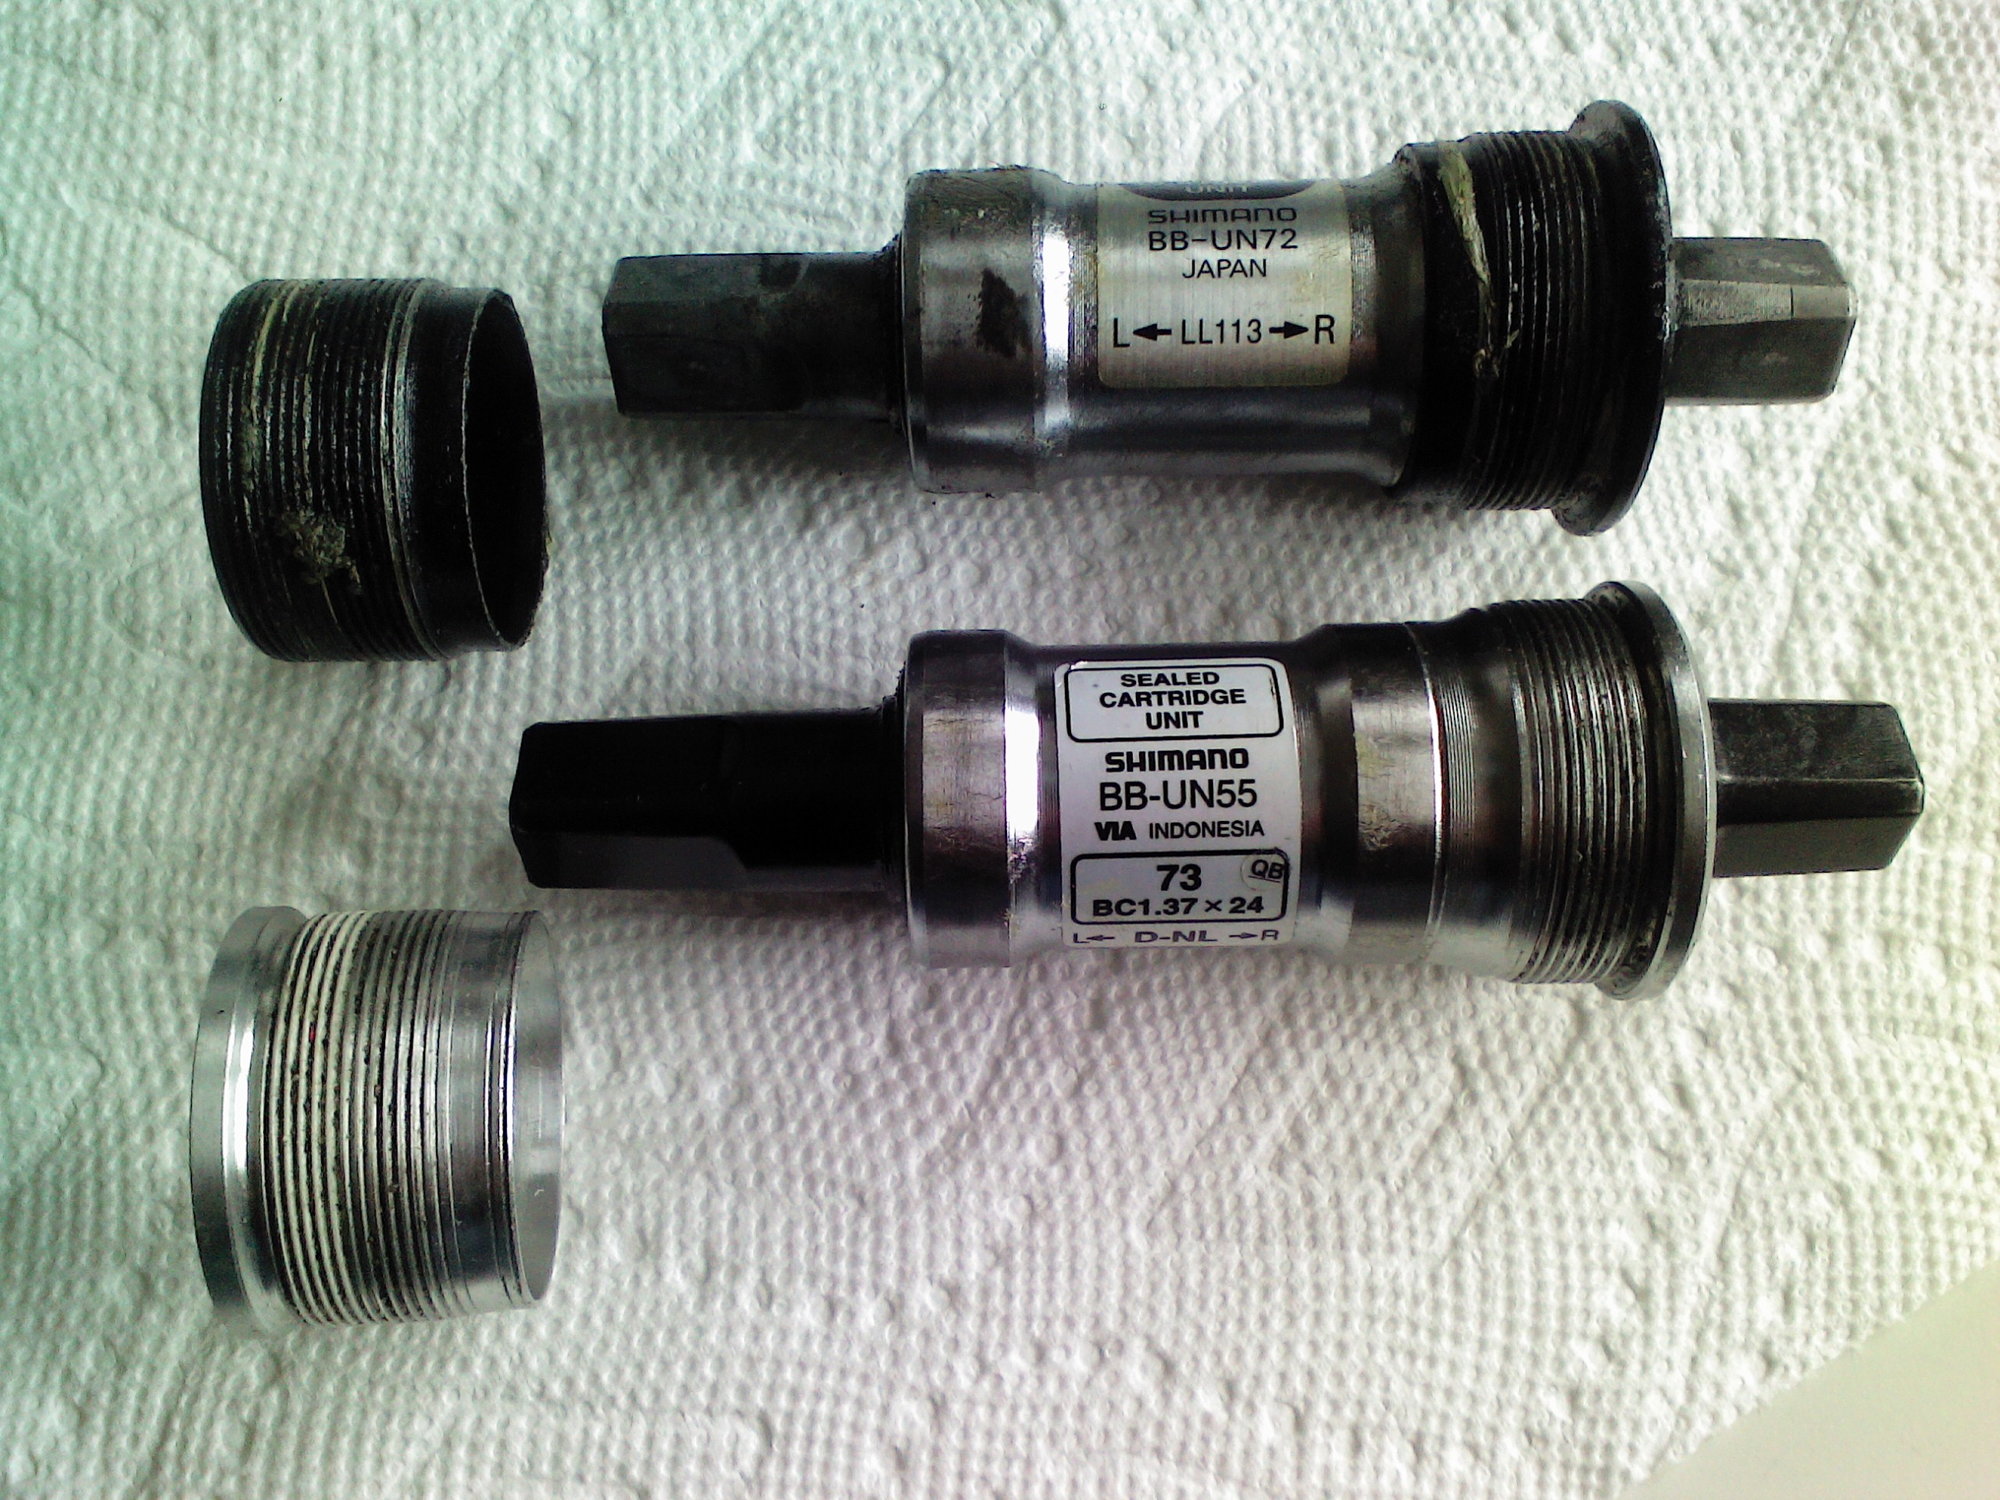
Here is a photo of the two brackets I have in my possession right now. The top one is the one I removed; the bottom is the replacement that does not thread in all the way. The one I have on order is another UN-55, but a 68mm X 113.
04-08-20, 12:45 PM
#31
Senior Member

Join Date: Feb 2004
Location: St Peters, Missouri
Posts: 30,225
Bikes: Catrike 559 I own some others but they don't get ridden very much.
Mentioned: 16 Post(s)
Tagged: 0 Thread(s)
Quoted: 1572 Post(s)
Liked 643 Times
in
364 Posts
But not nearly as satisfying as it will be when he finally figures it out.
__________________
My greatest fear is all of my kids standing around my coffin and talking about "how sensible" dad was.
My greatest fear is all of my kids standing around my coffin and talking about "how sensible" dad was.
04-08-20, 01:12 PM
#32
I'm good to go!
Join Date: Jul 2017
Location: Mississippi
Posts: 14,988
Bikes: Tarmac Disc Comp Di2 - 2020
Mentioned: 51 Post(s)
Tagged: 0 Thread(s)
Quoted: 6193 Post(s)
Liked 4,810 Times
in
3,318 Posts
Hard to tell from the pic. Take and match the threads up on the old and new. Just put them against each other and if they don't perfectly mesh together, then something is amiss. Because specs I've found for what I think matches your bikes says it should be BC1.37 x 24
04-08-20, 01:58 PM
#33
Senior Member
Join Date: Apr 2005
Location: Northern CA
Posts: 743
Bikes: Cannondale tandems: '92 Road, '97 Mtn. Mongoose 10.9 Ti, Kelly Deluxe, Tommaso Chorus, Cdale MT2000, Schwinn Deluxe Cruiser, Torker Unicycle, among others.
Mentioned: 5 Post(s)
Tagged: 0 Thread(s)
Quoted: 279 Post(s)
Liked 207 Times
in
129 Posts
Your original post said both sides wouldn't screw in all the way. This is strange, unless the BB stopped when it hit the left cup before going in all the way (73mm BB in a 68 shell will do this), or the cable guide screw (common). Regardless of 68 vs 73, the right side (reverse thread) should screw in all the way. If you leave the left cup out of the picture, can you get the right side in all the way (with BB guide screw out)? If not, then this is a thread problem. If you can get it started at first and get three turns, there's nothing that should stop it from continuing until the seat hits the edge of the BB shell. If you cannot, it makes no sense. You removed virtually the same BB from the shell.
If this is the case, time to visit the LBS. Probably will need the frame's BB threads chased. Or have the eyes of a "pro" look at it to diagnose your apparently inexplainable issues.
If this is the case, time to visit the LBS. Probably will need the frame's BB threads chased. Or have the eyes of a "pro" look at it to diagnose your apparently inexplainable issues.
04-08-20, 02:43 PM
#34
Senior Member
Thread Starter
>>>If you leave the left cup out of the picture, can you get the right side in all the way (with BB guide screw out)?<<<<
No. The right side turns smoothly for a while, then stops dead. I'm afraid to keep turning because I don't want to strip it. When I try to thread the left with the right already in, it, too, stops after a few turns. All the threads look pretty much intact.
No. The right side turns smoothly for a while, then stops dead. I'm afraid to keep turning because I don't want to strip it. When I try to thread the left with the right already in, it, too, stops after a few turns. All the threads look pretty much intact.
04-08-20, 03:13 PM
#35
Senior Member
Thread Starter
THIS is interesting...
For giggles, I just went out and tried to thread the "old" BB back in. Doesn't go any further than the "new" one.
The threads look intact on both the BB and the shell. What's going on here? Maybe I just need to use some force? Never had to before.
For giggles, I just went out and tried to thread the "old" BB back in. Doesn't go any further than the "new" one.
The threads look intact on both the BB and the shell. What's going on here? Maybe I just need to use some force? Never had to before.
04-08-20, 04:10 PM
#36
Senior Member
Thread Starter
OK...BIG breakthrough. Don't even ask me what I did differently or how this happened. After what seems like the hundredth time I have reinserted the new BB, backed it off and tried to tighten it, I got it to hit the threads correctly and tightened it ALMOST all the way. Emboldened by having gotten the drive side, I did the same with the left side.
Now I'm going to show you a photo and ask you all a question. First, you have to promise to ignore the greasy mess from my filthy rubber glove all over the frame. That will be gone soon! So be sure to see my question at the end....
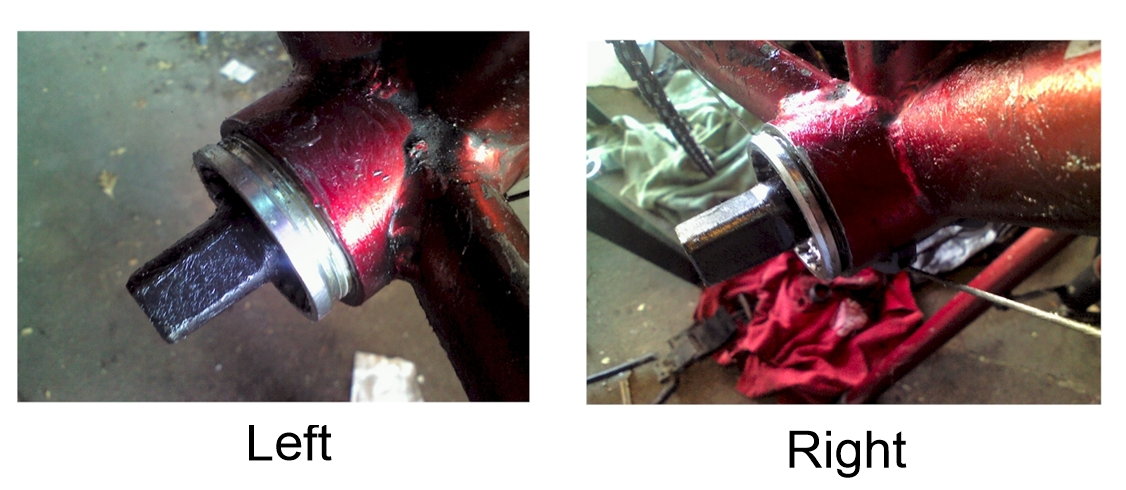
Now, check out how far I was able to tighten both sides with hardly any resistance. At this point, though, I'd have to use a good amount of torque to go any further. The bracket is tight. Can I get away with it like this, or is the 68mm-113 bracket going to make it perfect? Note: The left-side screw-in component (don't know what it's called) of the new bracket is a bit longer than the old one. I tried to get the old one in with no success, thinking this might solve at least part of the problem. Should I try harder?
Now I'm going to show you a photo and ask you all a question. First, you have to promise to ignore the greasy mess from my filthy rubber glove all over the frame. That will be gone soon! So be sure to see my question at the end....
Now, check out how far I was able to tighten both sides with hardly any resistance. At this point, though, I'd have to use a good amount of torque to go any further. The bracket is tight. Can I get away with it like this, or is the 68mm-113 bracket going to make it perfect? Note: The left-side screw-in component (don't know what it's called) of the new bracket is a bit longer than the old one. I tried to get the old one in with no success, thinking this might solve at least part of the problem. Should I try harder?
04-08-20, 04:28 PM
#37
Senior Member
Join Date: Jun 2002
Location: San Jose, CA
Posts: 3,691
Bikes: Too many bikes, too little time to ride
Mentioned: 2 Post(s)
Tagged: 0 Thread(s)
Quoted: 431 Post(s)
Liked 460 Times
in
318 Posts
I suspect that the locktite on the threads of the new BB had something to do with your issues getting the cups into the shell.
The mismatched BB width (68 vs 73mm) is a separate issue. You need a BB that matches your shell.
The spindle length is another issue. You ideally want a new BB with the same spindle length as the original.
The mismatched BB width (68 vs 73mm) is a separate issue. You need a BB that matches your shell.
The spindle length is another issue. You ideally want a new BB with the same spindle length as the original.
04-08-20, 04:34 PM
#38
Dangerous Old Man
Your best bet would be to purchase an electric vernier caliper, go here https://www.harborfreight.com/6-in-c...per-63586.html
About $10. Harbor Freight.
It would have saved you a lot of time and angst.
About $10. Harbor Freight.
It would have saved you a lot of time and angst.
04-08-20, 05:08 PM
#39
Senior Member
Thread Starter
So did anybody look at the photos, and can I get away with it as-is, or does the BB have to be flush against the shell? I've changed two or three of them on this bike during its lifetime and never had it turn out like this - although I'm pretty sure I had exact replacements for the original each time.
04-08-20, 05:24 PM
#40
I'm good to go!
Join Date: Jul 2017
Location: Mississippi
Posts: 14,988
Bikes: Tarmac Disc Comp Di2 - 2020
Mentioned: 51 Post(s)
Tagged: 0 Thread(s)
Quoted: 6193 Post(s)
Liked 4,810 Times
in
3,318 Posts
Looking at the two bb's next to each other the spindle looks too long on the UN55. Don't know if that can be your issue with it not screwing in all the way. But it is going to screw up your chainline. Does the left side screw all the way in when the bb isn't in the shell?
When and who put that UN72 in? As I said earlier, I don't think it's original to the bike. And did you ever try to match the threads of the two left sides together and see if they mesh together almost perfectly?
Whether or not you should wrench on it harder, I wouldn't dare say from here. That's a call that can ruin your bike.
Last edited by Iride01; 04-08-20 at 05:28 PM.
04-08-20, 05:27 PM
#41
Senior Member
Join Date: Apr 2005
Location: Northern CA
Posts: 743
Bikes: Cannondale tandems: '92 Road, '97 Mtn. Mongoose 10.9 Ti, Kelly Deluxe, Tommaso Chorus, Cdale MT2000, Schwinn Deluxe Cruiser, Torker Unicycle, among others.
Mentioned: 5 Post(s)
Tagged: 0 Thread(s)
Quoted: 279 Post(s)
Liked 207 Times
in
129 Posts
OK...BIG breakthrough. Don't even ask me what I did differently or how this happened. After what seems like the hundredth time I have reinserted the new BB, backed it off and tried to tighten it, I got it to hit the threads correctly and tightened it ALMOST all the way. Emboldened by having gotten the drive side, I did the same with the left side.
Now I'm going to show you a photo and ask you all a question. First, you have to promise to ignore the greasy mess from my filthy rubber glove all over the frame. That will be gone soon! So be sure to see my question at the end....
Now, check out how far I was able to tighten both sides with hardly any resistance. At this point, though, I'd have to use a good amount of torque to go any further. The bracket is tight. Can I get away with it like this, or is the 68mm-113 bracket going to make it perfect? Note: The left-side screw-in component (don't know what it's called) of the new bracket is a bit longer than the old one. I tried to get the old one in with no success, thinking this might solve at least part of the problem. Should I try harder?
Looks fine to me. If you got the right side in that far and THEN it got hard, the previous poster is right - it's the threadlocking compound on the cups binding. No way you can cross thread once the cup is in two or three full turns (or more). Plus, you said your threads were pristine, so it's A-OK.
You now need to use a the proper spline tool and wrench to tighten the right side against the BB shell. I do this with an extra long bolt and washers to hold the tool firmly inside the spline and against the the bottom bracket. (A crank bolt is too short - usually. I picked up a 45mm metric bolt from the hardware store. I just use an assortment of axle spacers and large washers to accommodate different spindle lengths of various BBs and the difference between left and right. Just remember to loosen the tool whenever you've broken the cup loose when unscrewing on the left side in the future. You'll damage the bearings if you don't.) Otherwise it will slip when you're applying torque to the tool. My standard procedure is to thoroughly grease the threads of all parts as well as the metal/metal contact points between the cups (they're called BB cups, BTW). Then I insert the right side only all the way in. Then I back it off about a half turn. This "loosens" up the bottom bracket so the left cup can thread into the shell and over the BB cylinder without binding (if your BB shell faces aren't parallel - and they usually aren't from the factory on a mass-produced bike). This allows me to bring the left cup all the way in, save for about a full turn. Then I torque the right side down completely. THEN torque the left cup completely. It's imperative you lock the right side, traditionally called the "fixed cup" in place because, first, it's properly in all the way, and second, its position determines proper spindle (or axle) position for the chainring/chain stay clearance. This, of course, assumes you do not have an adjustable BB, which in this case, you do not.
Once the BB is torqued in place, then reinstall your BB cable guide and bolt (with grease). Then install your cranks... with grease on the tapers! (Oh lord, I just opened a can of worms here...)
PS And regarding the reply saying your spindle looks too long: not to me. Looks absolutely fine. A 113mm spindle hardly sticks out at all. 107 is about the shortest square taper spindle out there, and you're just 6mm wider (3mm on either side, +/-. You should see my 127.5mm spindle. Now THAT has a lot of spindle protruding - and it's a perfect fit for my '90 XT cranks.
Last edited by LV2TNDM; 04-08-20 at 05:34 PM.
04-08-20, 05:45 PM
#42
Senior Member
Thread Starter
Additional update: So, if I back off on the left side, I can thread the right (drive) side all the way in. This gave me the idea to try again (even harder) to thread the left cylinder (whatever it's called) from the OLD BB into this side, being that it's a little shorter than the new one (see photo of both BB's at the top of this thread). I can't get that damned thing back in there.
04-08-20, 06:48 PM
#43
Dangerous Old Man
It drive side does't matter but the other side would not have enough taper left on the shaft for the non chainring side to get tight on the crankshaft taper.
04-08-20, 07:55 PM
#44
Senior Member
Thread Starter
Bottom line: Is a 68mm BB going to solve this problem? Having surveyed this forum and a bicycle mechanics forum on FB, I think it might. I will let you know when I install the new one that's coming (hopefully) by the weekend.
Thank you all.
04-08-20, 08:15 PM
#45
Senior Member
Join Date: Jun 2002
Location: San Jose, CA
Posts: 3,691
Bikes: Too many bikes, too little time to ride
Mentioned: 2 Post(s)
Tagged: 0 Thread(s)
Quoted: 431 Post(s)
Liked 460 Times
in
318 Posts
You want it flush against the shell. You also want the spindles to be the same length.
04-08-20, 08:21 PM
#46
Senior Member
Join Date: Jun 2002
Location: San Jose, CA
Posts: 3,691
Bikes: Too many bikes, too little time to ride
Mentioned: 2 Post(s)
Tagged: 0 Thread(s)
Quoted: 431 Post(s)
Liked 460 Times
in
318 Posts
Assuming the spindle length is correct, you can get away with using 2 2.5mm BB spacers between each cup and the shell. I personally think you should just get the correct BB (shell width, spindle length) instead of doing workarounds.
04-08-20, 08:43 PM
#47
Dangerous Old Man
"the drive side does't matter but the other side would not have enough taper left on the shaft for the non chainring side to get tight on the crankshaft taper." look at your pictures again, the right side you can see more shaft, the left side not as much, the crank arm at the attachment point would probably rub the second cap and never get snug on the taper...
04-08-20, 09:19 PM
#48
Senior Member
Join Date: Apr 2005
Location: Northern CA
Posts: 743
Bikes: Cannondale tandems: '92 Road, '97 Mtn. Mongoose 10.9 Ti, Kelly Deluxe, Tommaso Chorus, Cdale MT2000, Schwinn Deluxe Cruiser, Torker Unicycle, among others.
Mentioned: 5 Post(s)
Tagged: 0 Thread(s)
Quoted: 279 Post(s)
Liked 207 Times
in
129 Posts
And your old BB left cup may not be the same ID as the new one. I found the old UN71's and 91's are a smaller diameter, so an old cup from them will not slide over the UN55 BB cylinder and seat properly. So unless you have calipers, don't try to mix and match cups from different vintages. If the UN55 left cup won't go in all the way (sticks out 5mm), then it's obviously a shell width issue.
Just put a metric ruler up to your shell and measure it so there isn't any more question (although I think the question has been more than answered).
04-09-20, 02:57 AM
#49
Senior Member
Thread Starter
Yes, I think this question is answered, assuming the newer new BB solves the problem. I will report back when the new BB finally arrives.
04-09-20, 07:07 AM
#50
Senior Member
Join Date: Dec 2019
Location: South Shore of Long Island
Posts: 2,799
Bikes: 2010 Carrera Volans, 2015 C-Dale Trail 2sl, 2017 Raleigh Rush Hour, 2017 Blue Proseccio, 1992 Giant Perigee, 80s Gitane Rallye Tandem
Mentioned: 12 Post(s)
Tagged: 0 Thread(s)
Quoted: 1088 Post(s)
Liked 1,025 Times
in
723 Posts
The actual question to ask is, did the BB shell bed against the non-drive side cup, your picture doesn't say. If it did then the 68 is your solution, if it didn't then you need to tighten a lot more. As long as the spindle length is right putting a 2.5mm spacer on each side would work fine, spacers have no effect on spindle length. But as you have a 68 coming you might as well just install it.