


French threaded headsets
 02-25-21, 07:07 AM
#1
Member
Thread Starter
Join Date: Feb 2021
Posts: 32
Mentioned: 1 Post(s)
Tagged: 0 Thread(s)
Quoted: 4 Post(s)
Likes: 0
Liked 7 Times
in
5 Posts
French threaded headsets
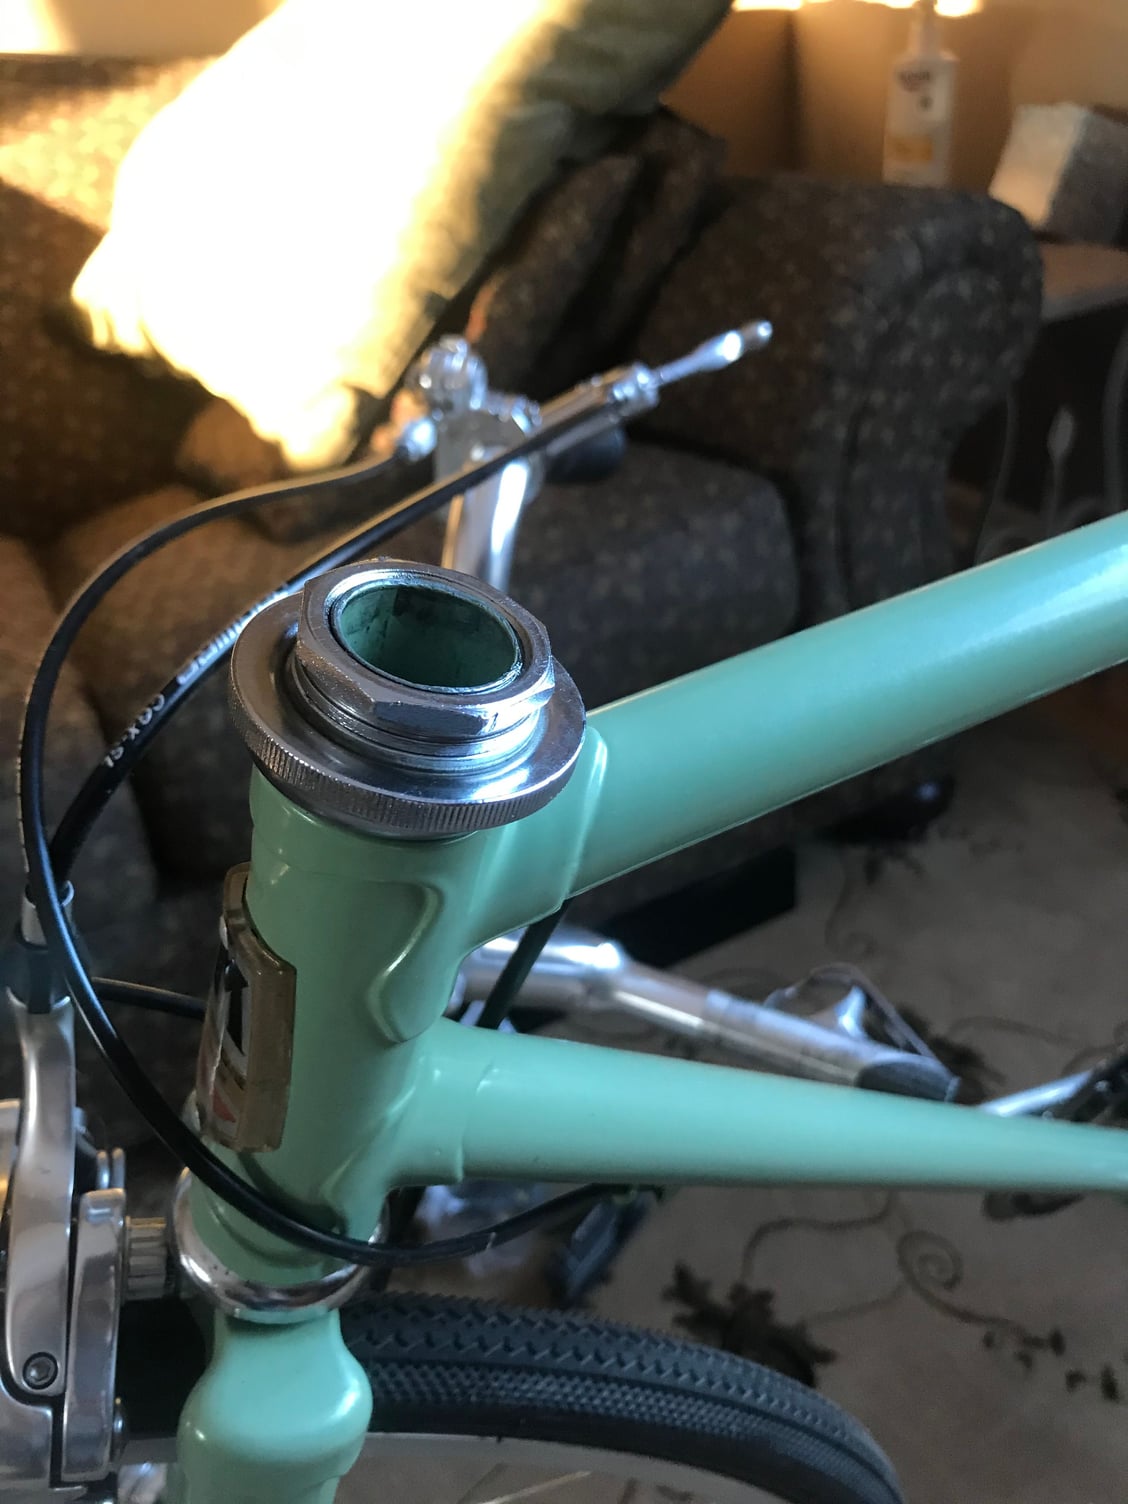
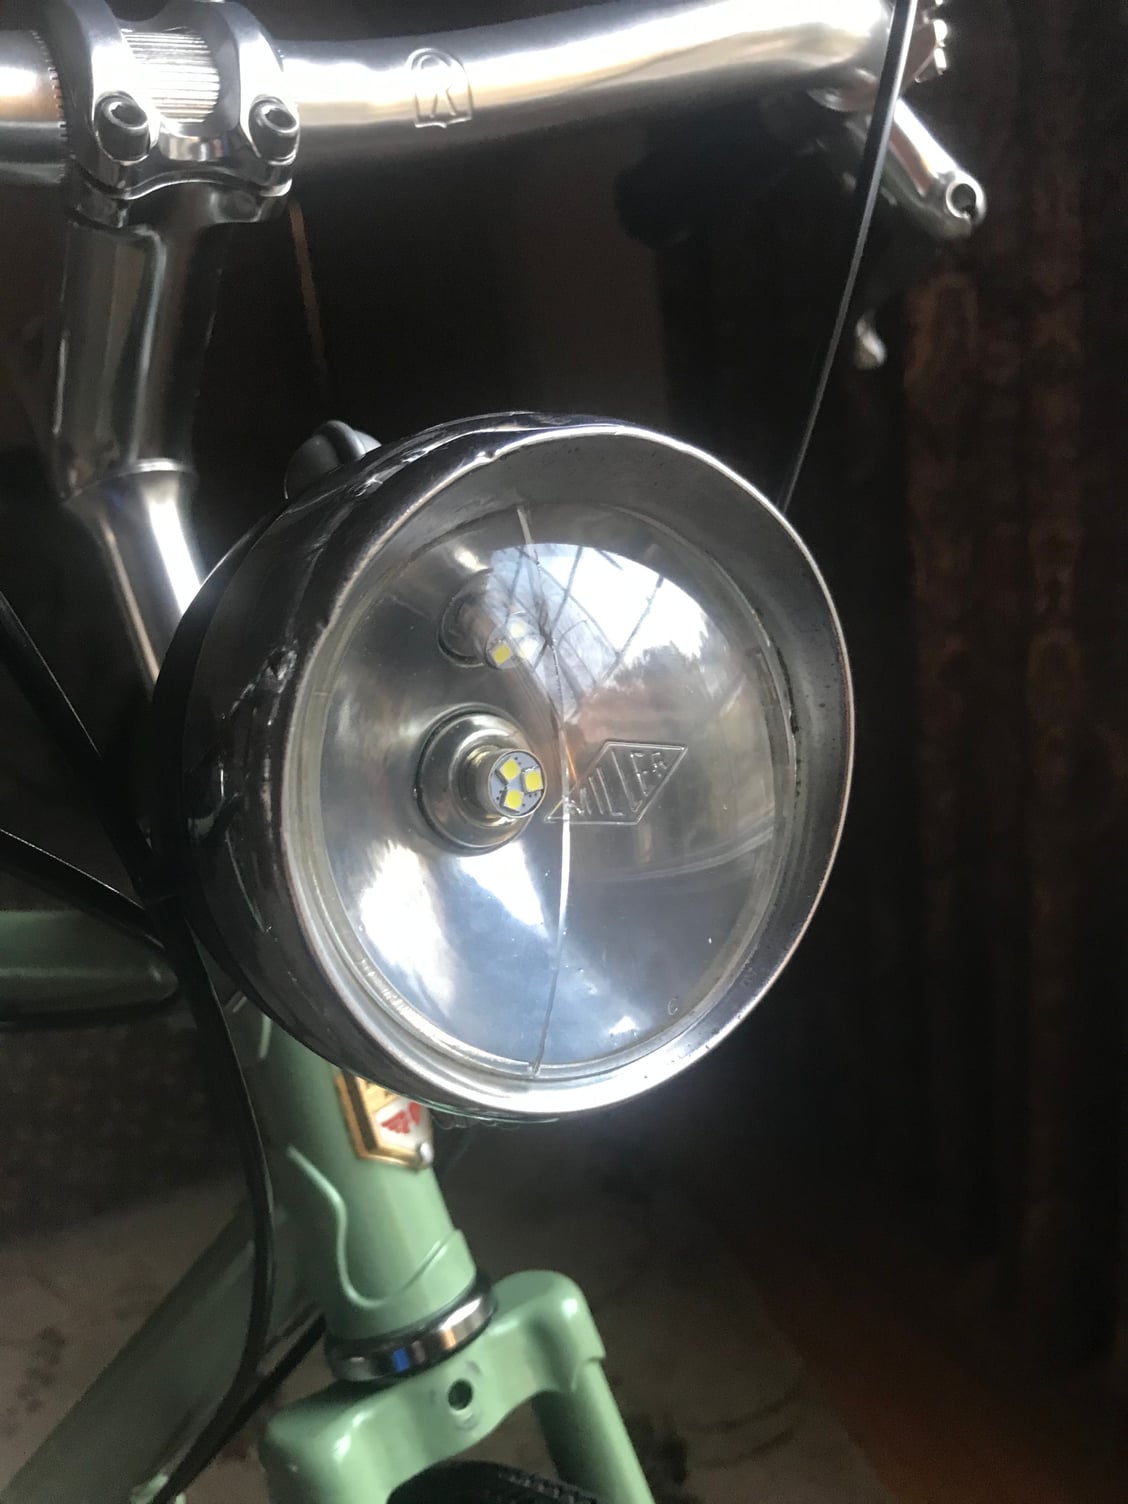
I am attempting to mount a headlamp on a vintage Motobecane but the top race is too big to allow the bracket to sit flush. Would like to replace the headset but the french headsets I have found (velo orange) have stack heights that are too high for my steerer tube. The stack height of the original headset is around 32mm. Options I have considered are: extend the steerer tube, replace top race with smaller top surface area, convert to ISO headset. file bracket seat to make flat). Some of these may not be feasible. I am hoping that I can replace just the top race but not sure if I would also need to replace the bearings and bottom race as well. For some reason I cannot uplaad pics (only gets to 50% and then get an alert with no explanation).

 02-25-21, 07:17 AM
#2

Senior Member

Join Date: May 2008
Location: Fredericksburg, Va
Posts: 9,578
Bikes: '65 Frejus TDF, '73 Bottecchia Giro d'Italia, '83 Colnago Superissimo, '84 Trek 610, '84 Trek 760, '88 Pinarello Veneto, '88 De Rosa Pro, '89 Pinarello Montello, '94 Burley Duet, 97 Specialized RockHopper, 2010 Langster, Tern Link D8
Mentioned: 73 Post(s)
Tagged: 0 Thread(s)
Quoted: 1606 Post(s)
Liked 2,211 Times
in
1,102 Posts
@bbader - have you tried to replace the washer with the mount?
__________________
Bikes don't stand alone. They are two tired.
Bikes don't stand alone. They are two tired.
Likes For SJX426:
02-25-21, 08:06 AM
#3
Half way there

Join Date: Sep 2015
Location: North Carolina
Posts: 2,955
Bikes: Many, and the list changes frequently
Mentioned: 5 Post(s)
Tagged: 0 Thread(s)
Quoted: 985 Post(s)
Liked 879 Times
in
526 Posts
Having dealt with short stack headsets I can say that you're on the road to frustration. It appears that your current problem is that your lamp bracket is flanged so that it interferes with the top race. Can you bend or grind the bracket so that it fits? That would certainly be easier than trying to adapt a higher stack headset, which could require a different fork or perhaps just cutting down the head tube a bit.
Personally I'd give an hour or so to modifying the bracket and if that didn't work I'd opt for a bracket that mounts at the fork crown.
Good luck to you.
Personally I'd give an hour or so to modifying the bracket and if that didn't work I'd opt for a bracket that mounts at the fork crown.
Good luck to you.
02-25-21, 08:21 AM
#4
Member
Thread Starter
Join Date: Feb 2021
Posts: 32
Mentioned: 1 Post(s)
Tagged: 0 Thread(s)
Quoted: 4 Post(s)
Likes: 0
Liked 7 Times
in
5 Posts
Thanks for the input. I agree that grinding down the flange would be the easiest solution although it would end up looking less elegant. I was wondering if rather than replacing the entire headset, I could just find a different top race that would not increase the stack height and allow the flange to seat properly. ie, are these interchangeable or perhaps replace the top of the headset (bearings and race).
02-25-21, 08:27 AM
#5
Member
Thread Starter
Join Date: Feb 2021
Posts: 32
Mentioned: 1 Post(s)
Tagged: 0 Thread(s)
Quoted: 4 Post(s)
Likes: 0
Liked 7 Times
in
5 Posts
not sure what washer you are referring to. THe large flat coin looking object is actually the top race. I was hoping to replace this with a more standard looking race but didnt know if there were different size races that were interchangable with this one
02-25-21, 08:56 AM
#6
Senior Member
Join Date: Feb 2020
Posts: 2,811
Mentioned: 49 Post(s)
Tagged: 0 Thread(s)
Quoted: 1105 Post(s)
Likes: 0
Liked 1,324 Times
in
781 Posts
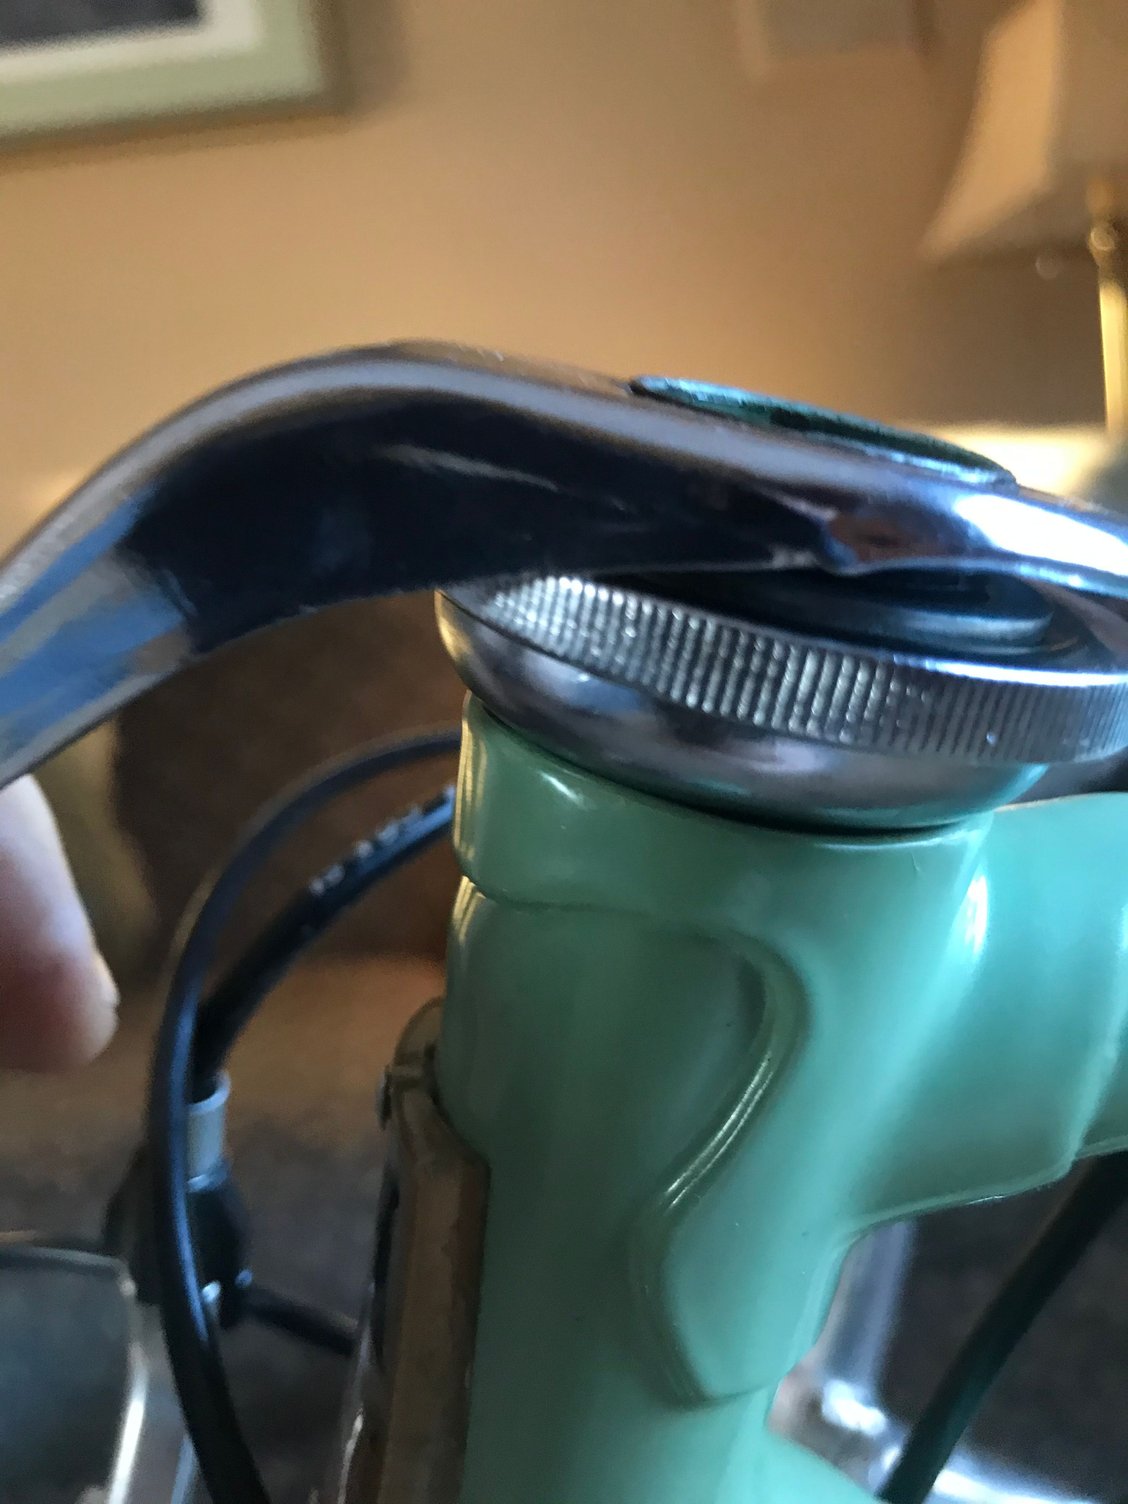
In which case, yes, file the web of the hanger for clearance, dab the cut with cold galvanizing paint, and it should do just fine as a combined washer/mount. It's only a lamp, the loss of strength is unlikely to matter.
Last edited by oneclick; 02-25-21 at 10:09 AM.
02-25-21, 11:10 AM
#7
Member
Thread Starter
Join Date: Feb 2021
Posts: 32
Mentioned: 1 Post(s)
Tagged: 0 Thread(s)
Quoted: 4 Post(s)
Likes: 0
Liked 7 Times
in
5 Posts
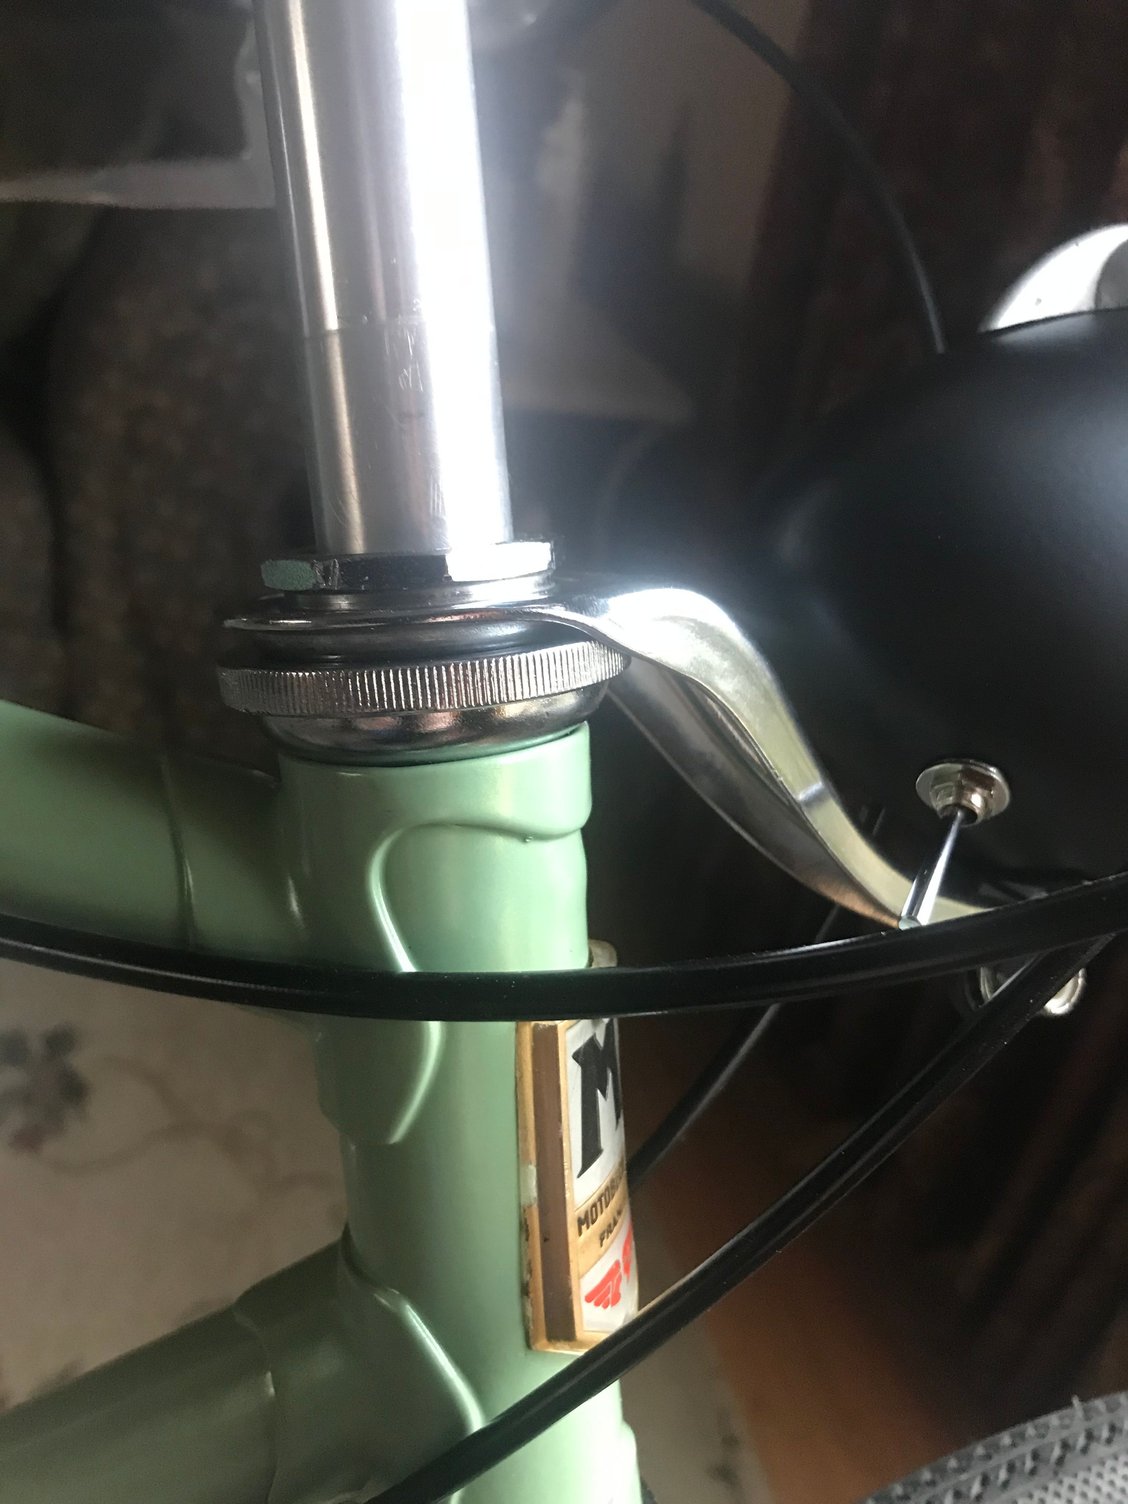
I think what he's referring to is shown in the first picture, where the sequence (going downward) is locknut-washer-toprace-steerer. He was suggesting you don't use the washer and put the hanger there instead. I think that may not work - if the bottom of the hanger needs the washer so the side-reinforcing web clears the toprace, well, it needs it.
In which case, yes, file the web of the hanger for clearance, dab the cut with cold galvanizing paint, and it should do just fine as a combined washer/mount. It's only a lamp, the loss of strength is unlikely to matter.
In which case, yes, file the web of the hanger for clearance, dab the cut with cold galvanizing paint, and it should do just fine as a combined washer/mount. It's only a lamp, the loss of strength is unlikely to matter.
02-25-21, 11:19 AM
#9
Senior Member

Join Date: Aug 2009
Location: Berkeley, CA
Posts: 7,236
Bikes: '72 Cilo Pacer, '72 Gitane Gran Tourisme, '72 Peugeot PX10, '73 Speedwell Ti, '74 Peugeot UE-8, '75 Peugeot PR-10L, '80 Colnago Super, '85 De Rosa Pro, '86 Look Equipe 753, '86 Look KG86, '89 Parkpre Team, '90 Parkpre Team MTB, '90 Merlin
Mentioned: 87 Post(s)
Tagged: 0 Thread(s)
Quoted: 830 Post(s)
Liked 2,110 Times
in
553 Posts
+1 to grinding the flange of the mounting bracket. That seems by far the easiest solution. The headlamp will not need too much support, and that steel bracket should be plenty strong to hold a lamp with or without the flanges.
What vintage lamp are you using? I'd be curious to see it since I'm in the market for a head lamp for my own project.
What vintage lamp are you using? I'd be curious to see it since I'm in the market for a head lamp for my own project.
02-25-21, 11:22 AM
#10
Senior Member
Join Date: May 2008
Location: Fredericksburg, Va
Posts: 9,578
Bikes: '65 Frejus TDF, '73 Bottecchia Giro d'Italia, '83 Colnago Superissimo, '84 Trek 610, '84 Trek 760, '88 Pinarello Veneto, '88 De Rosa Pro, '89 Pinarello Montello, '94 Burley Duet, 97 Specialized RockHopper, 2010 Langster, Tern Link D8
Mentioned: 73 Post(s)
Tagged: 0 Thread(s)
Quoted: 1606 Post(s)
Liked 2,211 Times
in
1,102 Posts
If you don't have a washer, then I suspect the steerer was cut too short at some point. If you do, then compare the thickness of the washer with the mount to determine if the lock ring will engage enough threads.
__________________
Bikes don't stand alone. They are two tired.
Bikes don't stand alone. They are two tired.
02-25-21, 11:35 AM
#11

Senior Member
Join Date: Dec 2005
Posts: 17,140
Mentioned: 481 Post(s)
Tagged: 0 Thread(s)
Quoted: 3802 Post(s)
Liked 6,624 Times
in
2,596 Posts
Can you mount the lamp to the fork crown instead?
02-25-21, 11:48 AM
#12
BMX Connoisseur

Join Date: Jun 2016
Location: Canada
Posts: 774
Bikes: 1988 Kuwahara Newport, 1983 Nishiki, 1984 Diamond Back Viper, 1991 Dyno Compe
Mentioned: 1 Post(s)
Tagged: 0 Thread(s)
Quoted: 399 Post(s)
Liked 108 Times
in
69 Posts
I think the bracket does replace the lock nut washer. And I think there is a possibility that you have it mounted upside down.
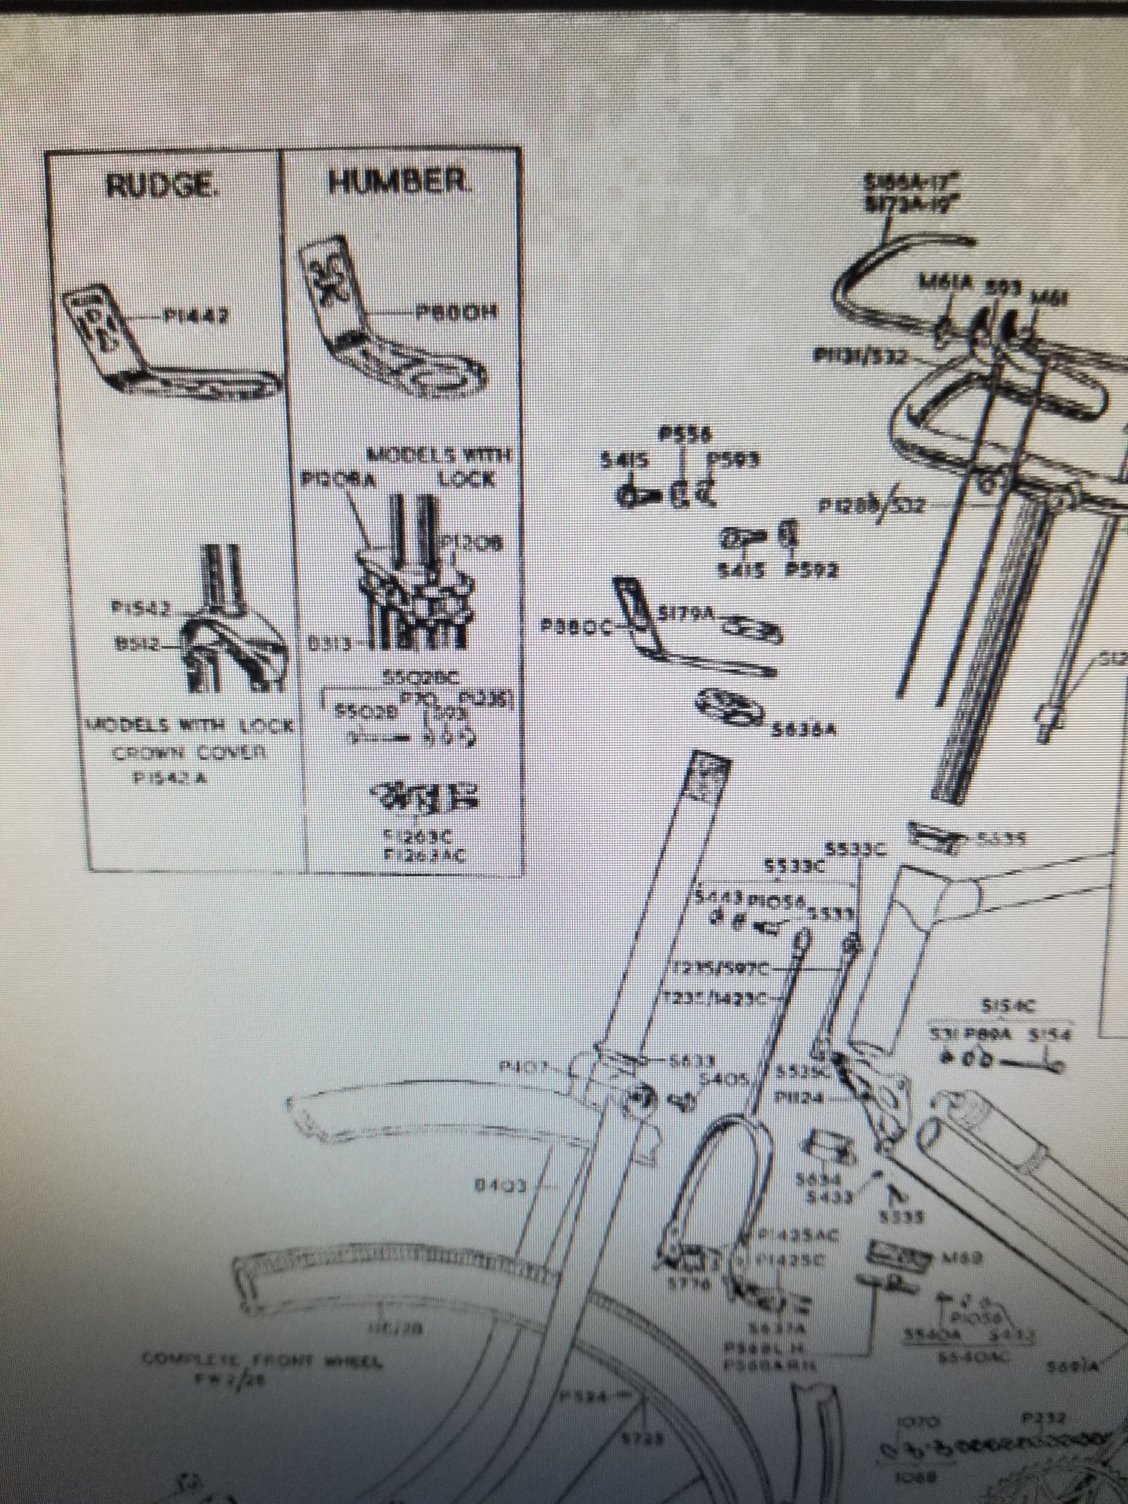
When you look at this vintage Raleigh manual from the 1950's. Their bracket is oriented the other way.
Before I start grinding everything down. If you want your light lower I would look into the possibility of using a brake mount bracket.
When you look at this vintage Raleigh manual from the 1950's. Their bracket is oriented the other way.
Before I start grinding everything down. If you want your light lower I would look into the possibility of using a brake mount bracket.
Last edited by cbrstar; 02-25-21 at 11:53 AM.
Likes For cbrstar:
02-25-21, 12:29 PM
#13
Member
Thread Starter
Join Date: Feb 2021
Posts: 32
Mentioned: 1 Post(s)
Tagged: 0 Thread(s)
Quoted: 4 Post(s)
Likes: 0
Liked 7 Times
in
5 Posts
Typically the HS assembly is the race (threaded) washer, and lock nut. The washer may have a tab on the ID to fit into a slot on the steerer or a flat section for the same on the steerer. The intent is that the lock washer would not cause the race to rotate while it is being tightened.
If you don't have a washer, then I suspect the steerer was cut too short at some point. If you do, then compare the thickness of the washer with the mount to determine if the lock ring will engage enough threads.
If you don't have a washer, then I suspect the steerer was cut too short at some point. If you do, then compare the thickness of the washer with the mount to determine if the lock ring will engage enough threads.
02-25-21, 12:32 PM
#14
Member
Thread Starter
Join Date: Feb 2021
Posts: 32
Mentioned: 1 Post(s)
Tagged: 0 Thread(s)
Quoted: 4 Post(s)
Likes: 0
Liked 7 Times
in
5 Posts
I dont believe I can since I adapted dual pivot brakes to this 70s bike there is no room on the bolt and still be able to add the nut
02-25-21, 12:38 PM
#15
Member
Thread Starter
Join Date: Feb 2021
Posts: 32
Mentioned: 1 Post(s)
Tagged: 0 Thread(s)
Quoted: 4 Post(s)
Likes: 0
Liked 7 Times
in
5 Posts
Thanks. I did consider both the brake mount and the raleigh mount which uses a second bracket to attach the light to the mount. I believe the flange is intended to point down otherwise water and dirt would collect on it. I also did not want the lamp to be above the hadlebars.
02-25-21, 01:35 PM
#16
Member
Thread Starter
Join Date: Feb 2021
Posts: 32
Mentioned: 1 Post(s)
Tagged: 0 Thread(s)
Quoted: 4 Post(s)
Likes: 0
Liked 7 Times
in
5 Posts
+1 to grinding the flange of the mounting bracket. That seems by far the easiest solution. The headlamp will not need too much support, and that steel bracket should be plenty strong to hold a lamp with or without the flanges.
What vintage lamp are you using? I'd be curious to see it since I'm in the market for a head lamp for my own project.
What vintage lamp are you using? I'd be curious to see it since I'm in the market for a head lamp for my own project.
Likes For bbader:
02-25-21, 01:45 PM
#17
Friendship is Magic

Join Date: Nov 2010
Location: Sacramento, CA
Posts: 22,984
Bikes: old ones
Mentioned: 304 Post(s)
Tagged: 0 Thread(s)
Quoted: 26375 Post(s)
Liked 10,351 Times
in
7,190 Posts
.
...I, too, think maybe you are trying to mount that bracket upside down. And water and dirt will accumulate in the recesses regardless of which way you mount it.
If I were trying to accomplish what you seem to want, I'd just bite the bullet, buy and mount some fenders, and mount the headlamp on the front fender. Which is where you see many of the French originals anyway.
 02-25-21, 02:18 PM
#18
Member
Thread Starter
Join Date: Feb 2021
Posts: 32
Mentioned: 1 Post(s)
Tagged: 0 Thread(s)
Quoted: 4 Post(s)
Likes: 0
Liked 7 Times
in
5 Posts
.
...I, too, think maybe you are trying to mount that bracket upside down. And water and dirt will accumulate in the recesses regardless of which way you mount it.
If I were trying to accomplish what you seem to want, I'd just bite the bullet, buy and mount some fenders, and mount the headlamp on the front fender. Which is where you see many of the French originals anyway.
...I, too, think maybe you are trying to mount that bracket upside down. And water and dirt will accumulate in the recesses regardless of which way you mount it.
If I were trying to accomplish what you seem to want, I'd just bite the bullet, buy and mount some fenders, and mount the headlamp on the front fender. Which is where you see many of the French originals anyway.
03-09-21, 04:38 PM
#19
Member
Thread Starter
Join Date: Feb 2021
Posts: 32
Mentioned: 1 Post(s)
Tagged: 0 Thread(s)
Quoted: 4 Post(s)
Likes: 0
Liked 7 Times
in
5 Posts
Typically the HS assembly is the race (threaded) washer, and lock nut. The washer may have a tab on the ID to fit into a slot on the steerer or a flat section for the same on the steerer. The intent is that the lock washer would not cause the race to rotate while it is being tightened.
If you don't have a washer, then I suspect the steerer was cut too short at some point. If you do, then compare the thickness of the washer with the mount to determine if the lock ring will engage enough threads.
If you don't have a washer, then I suspect the steerer was cut too short at some point. If you do, then compare the thickness of the washer with the mount to determine if the lock ring will engage enough threads.

 03-09-21, 04:51 PM
#20
Senior Member
Join Date: Feb 2020
Posts: 2,811
Mentioned: 49 Post(s)
Tagged: 0 Thread(s)
Quoted: 1105 Post(s)
Likes: 0
Liked 1,324 Times
in
781 Posts
You might be able to hide that split a lot by using cyanoacrylate cement. Fit the pieces, tape the inside (and make sure you have it well stuck on the seam edges), turn it and dribble a little into the top of the crack, if the match is good you can scrape off the excess with a blade.
03-09-21, 05:27 PM
#21

Stop reading my posts!

Join Date: Sep 2004
Posts: 12,568
Mentioned: 89 Post(s)
Tagged: 0 Thread(s)
Quoted: 1438 Post(s)
Liked 1,052 Times
in
779 Posts
The glue idea is worth a try, but my experience is even tho CA glue wicks well into tight non-gapped gaps, the glue tends to craze and fog clear plastics. If this is an acrylic lens I'd try the same but with acetone and use a syringe with a blunt needle applicator, be very sparing as you "inject the patient". Use a tape that won't be melted by the acetone....best of luck!
03-10-21, 03:55 AM
#22
Member
Thread Starter
Join Date: Feb 2021
Posts: 32
Mentioned: 1 Post(s)
Tagged: 0 Thread(s)
Quoted: 4 Post(s)
Likes: 0
Liked 7 Times
in
5 Posts
You might be able to hide that split a lot by using cyanoacrylate cement. Fit the pieces, tape the inside (and make sure you have it well stuck on the seam edges), turn it and dribble a little into the top of the crack, if the match is good you can scrape off the excess with a blade.
03-10-21, 09:18 AM
#24
PM me your cotters

Join Date: Jun 2015
Location: ATL
Posts: 3,241
Mentioned: 80 Post(s)
Tagged: 0 Thread(s)
Quoted: 1137 Post(s)
Liked 588 Times
in
420 Posts
The glue idea is worth a try, but my experience is even tho CA glue wicks well into tight non-gapped gaps, the glue tends to craze and fog clear plastics. If this is an acrylic lens I'd try the same but with acetone and use a syringe with a blunt needle applicator, be very sparing as you "inject the patient". Use a tape that won't be melted by the acetone....best of luck!
Weld-on #4 is what I use on acrylic turntable lids, works like a champ, and many aquarium builders use - use in a vented area, put a few drops in the plastic bottle, follow these instructions (3m 04s mark) to prevent spilling issues. The video also shows how you just need to tap a drop at a side seam and it'll pull through your piece, so you really don't need to worry much about hazing, as you see a great example of at the 3m 35s mark.
Hazing can happen, but it's nothing a decent wet/dry sandpaper kit won't fix, starting at 400 grit wet, then doubling the grit count through a couple of stages, finishing with Novus scratch polishing kit.
All three linked products are what I use for turntable restorations. It takes a little practice, but it's super easy to both repair acrylic, haze-free, or repair, and de-haze it.
But ... @ OP I see you said it was glass. Sorry I've got no experience with that.

__________________
███████████████
███████████████


