


1972 Peugeot PX-10 Build
 12-07-19, 08:31 AM
#1

Senior Member
Thread Starter

Join Date: Sep 2015
Location: Detroit
Posts: 566
Bikes: '72 Paramount 15-9, '74 Schwinn Paramount P10-9, '73 Schwinn Super Sport, 1983 Schwinn Voyageur SP,17 Motobecane Cafe Noir, 1970 Raleigh Competition Tourist, 1999 Rans V-Rex
Mentioned: 9 Post(s)
Tagged: 0 Thread(s)
Quoted: 220 Post(s)
Likes: 0
Liked 83 Times
in
45 Posts
1972 Peugeot PX-10 Build
Hello all,
I recently found a 1972 PX-10 frame for $70.00 that's more than a little rough, however since I've always wanted to ride one periodically during a season here in Detroit, I launched a thread looking for parts. I felt if I could build a bike up from whatever parts I could cobble together at a reasonable price I'd take a shot at building up the frame.
To no surprise, MANY members here helped me identify and find the parts needed to build this bike. A few asked for pics of the start point so I thought I'd start a new thread similar to my last build: https://www.bikeforums.net/classic-v...welcome-3.html
Before I begin, I'd like to note, the common theme with EVERYONE (too many to list) helping me start this project is to get another old PX-10 on the road, not parts profit. As we all know, that attitude is what makes this site great. For me, it's a BIG plus because I can NEVER keep to any budget I try to establish for a complete build.
Pics below provide a fair idea of my start point. Frame seller thought the frame was involved in an accident and I believe he's correct. Using Park alignment tools and a straight edge, string, etc. I saw 2-3 approx. 0.5mm to 1.5mm "gaps" where the top tube and down tube join the head tube. When I took the frame to my LBS who does a great job brazing, repairing, etc., for a second opinion they said it wouldn't be worth the effort to straighten the tops for that little of a variance. As this a shop I trust, I decide to press on with a build.
Here are a few pics of my start point. I plan to take my time with this build but will post periodic updates for those interested. I'm approx. 50% with the clean-up process. As I noted during my last Paramount build, touching up paint correctly is time consuming and takes a number of steps to get it right. It's not particularly hard but time consuming. I'll post pics of the clean frame upon completion.

Likes For cqlink:
12-07-19, 12:12 PM
#3
Senior Member
Join Date: Jun 2012
Location: Stillwater, OK
Posts: 7,827
Mentioned: 33 Post(s)
Tagged: 0 Thread(s)
Quoted: 1872 Post(s)
Liked 692 Times
in
468 Posts
Dang, you shoulda had me go get the nervex lugged PX-10 languishing here locally for that price.
__________________
2014 Cannondale SuperSix EVO 2
2019 Salsa Warbird
2014 Cannondale SuperSix EVO 2
2019 Salsa Warbird
12-07-19, 12:29 PM
#4
Senior Member
Thread Starter
Join Date: Sep 2015
Location: Detroit
Posts: 566
Bikes: '72 Paramount 15-9, '74 Schwinn Paramount P10-9, '73 Schwinn Super Sport, 1983 Schwinn Voyageur SP,17 Motobecane Cafe Noir, 1970 Raleigh Competition Tourist, 1999 Rans V-Rex
Mentioned: 9 Post(s)
Tagged: 0 Thread(s)
Quoted: 220 Post(s)
Likes: 0
Liked 83 Times
in
45 Posts


 12-07-19, 05:45 PM
#5
Senior Member
Join Date: Oct 2015
Location: PDX
Posts: 13,029
Bikes: Merz x 5 + Specialized Merz Allez x 2, Strawberry/Newlands/DiNucci/Ti x3, Gordon, Fuso/Moulton x2, Bornstein, Paisley,1958-74 Paramounts x3, 3rensho, 74 Moto TC, 73-78 Raleigh Pro's x5, Marinoni x2, 1960 Cinelli SC, 1980 Bianchi SC, PX-10 X 2
Mentioned: 267 Post(s)
Tagged: 0 Thread(s)
Quoted: 4507 Post(s)
Liked 6,373 Times
in
3,665 Posts
So completed pics tomorrow, right. 
The power of the forum at work again.
Glad you went with the Simplex SP, crappy or no, they are a iconic to this iconic bike.
The power of the forum at work again.
Glad you went with the Simplex SP, crappy or no, they are a iconic to this iconic bike.
12-07-19, 07:31 PM
#6
Senior Member

Join Date: Aug 2014
Location: Bronx, NYC
Posts: 1,885
Bikes: '19 Fuji Gran Fondo 1.5, '72 Peugeot PX10, '71ish Gitane Super Corsa, '78 Fuji Newest, '89 Fuji Ace, '94 Cannondale R600, early '70s LeJeune Pro project
Mentioned: 87 Post(s)
Tagged: 0 Thread(s)
Quoted: 293 Post(s)
Liked 218 Times
in
101 Posts
I am excited to see this unfold and of course I will gladly help with parts if you need.
12-07-19, 07:42 PM
#7

feros ferio

Join Date: Jul 2000
Location: www.ci.encinitas.ca.us
Posts: 21,793
Bikes: 1959 Capo Modell Campagnolo; 1960 Capo Sieger (2); 1962 Carlton Franco Suisse; 1970 Peugeot UO-8; 1982 Bianchi Campione d'Italia; 1988 Schwinn Project KOM-10;
Mentioned: 44 Post(s)
Tagged: 0 Thread(s)
Quoted: 1390 Post(s)
Liked 1,322 Times
in
835 Posts
Why do people put kickstands on PX-10s? At least they do not appear to have flattened your chainstays.
__________________
"Far and away the best prize that life offers is the chance to work hard at work worth doing." --Theodore Roosevelt
Capo: 1959 Modell Campagnolo, S/N 40324; 1960 Sieger (2), S/N 42624, 42597
Carlton: 1962 Franco Suisse, S/N K7911
Peugeot: 1970 UO-8, S/N 0010468
Bianchi: 1982 Campione d'Italia, S/N 1.M9914
Schwinn: 1988 Project KOM-10, S/N F804069
Likes For John E:
12-07-19, 08:37 PM
#8
Ride, Wrench, Swap, Race

Join Date: Jan 2010
Location: Northern California
Posts: 9,181
Bikes: Cheltenham-Pedersen racer, Boulder F/S Paris-Roubaix, Varsity racer, '52 Christophe, '62 Continental, '92 Merckx, '75 Limongi, '76 Presto, '72 Gitane SC, '71 Schwinn SS, etc.
Mentioned: 132 Post(s)
Tagged: 0 Thread(s)
Quoted: 1562 Post(s)
Liked 1,285 Times
in
856 Posts
It's why we can still find these bikes in unused condition for sale as often as we do.
12-08-19, 11:01 AM
#9
PM me your cotters

Join Date: Jun 2015
Location: ATL
Posts: 3,241
Mentioned: 80 Post(s)
Tagged: 0 Thread(s)
Quoted: 1137 Post(s)
Liked 588 Times
in
420 Posts
And if no clamping kickstand damage, there's inevitably one somewhere in the mix with trainer damage.

Likes For francophile:
12-17-19, 01:58 PM
#10
Senior Member
Thread Starter
Join Date: Sep 2015
Location: Detroit
Posts: 566
Bikes: '72 Paramount 15-9, '74 Schwinn Paramount P10-9, '73 Schwinn Super Sport, 1983 Schwinn Voyageur SP,17 Motobecane Cafe Noir, 1970 Raleigh Competition Tourist, 1999 Rans V-Rex
Mentioned: 9 Post(s)
Tagged: 0 Thread(s)
Quoted: 220 Post(s)
Likes: 0
Liked 83 Times
in
45 Posts
Update (for those that may want to follow build and cost progress):
As I alluded to during my last Paramount build, touching up a frame takes a bit of time to do "correctly." That said, a good touch up process is no substitute for a quality respray. As cost control is a factor with this build, I went the touch-up route.
To get a decent touched-up finish, I've found over the years, scratches and nicks need to be looked at as very small craters or ravines. The right combination of paint and acetone (or whatever thinner you prefer) is needed to get the mix to completely flow into the scratch or nick. You want to avoid brush strokes and let the mix flow from the SMALL brush. Even so, it may take a cycle or two of paint and drying to get the touched-up area to match the surrounding paint.
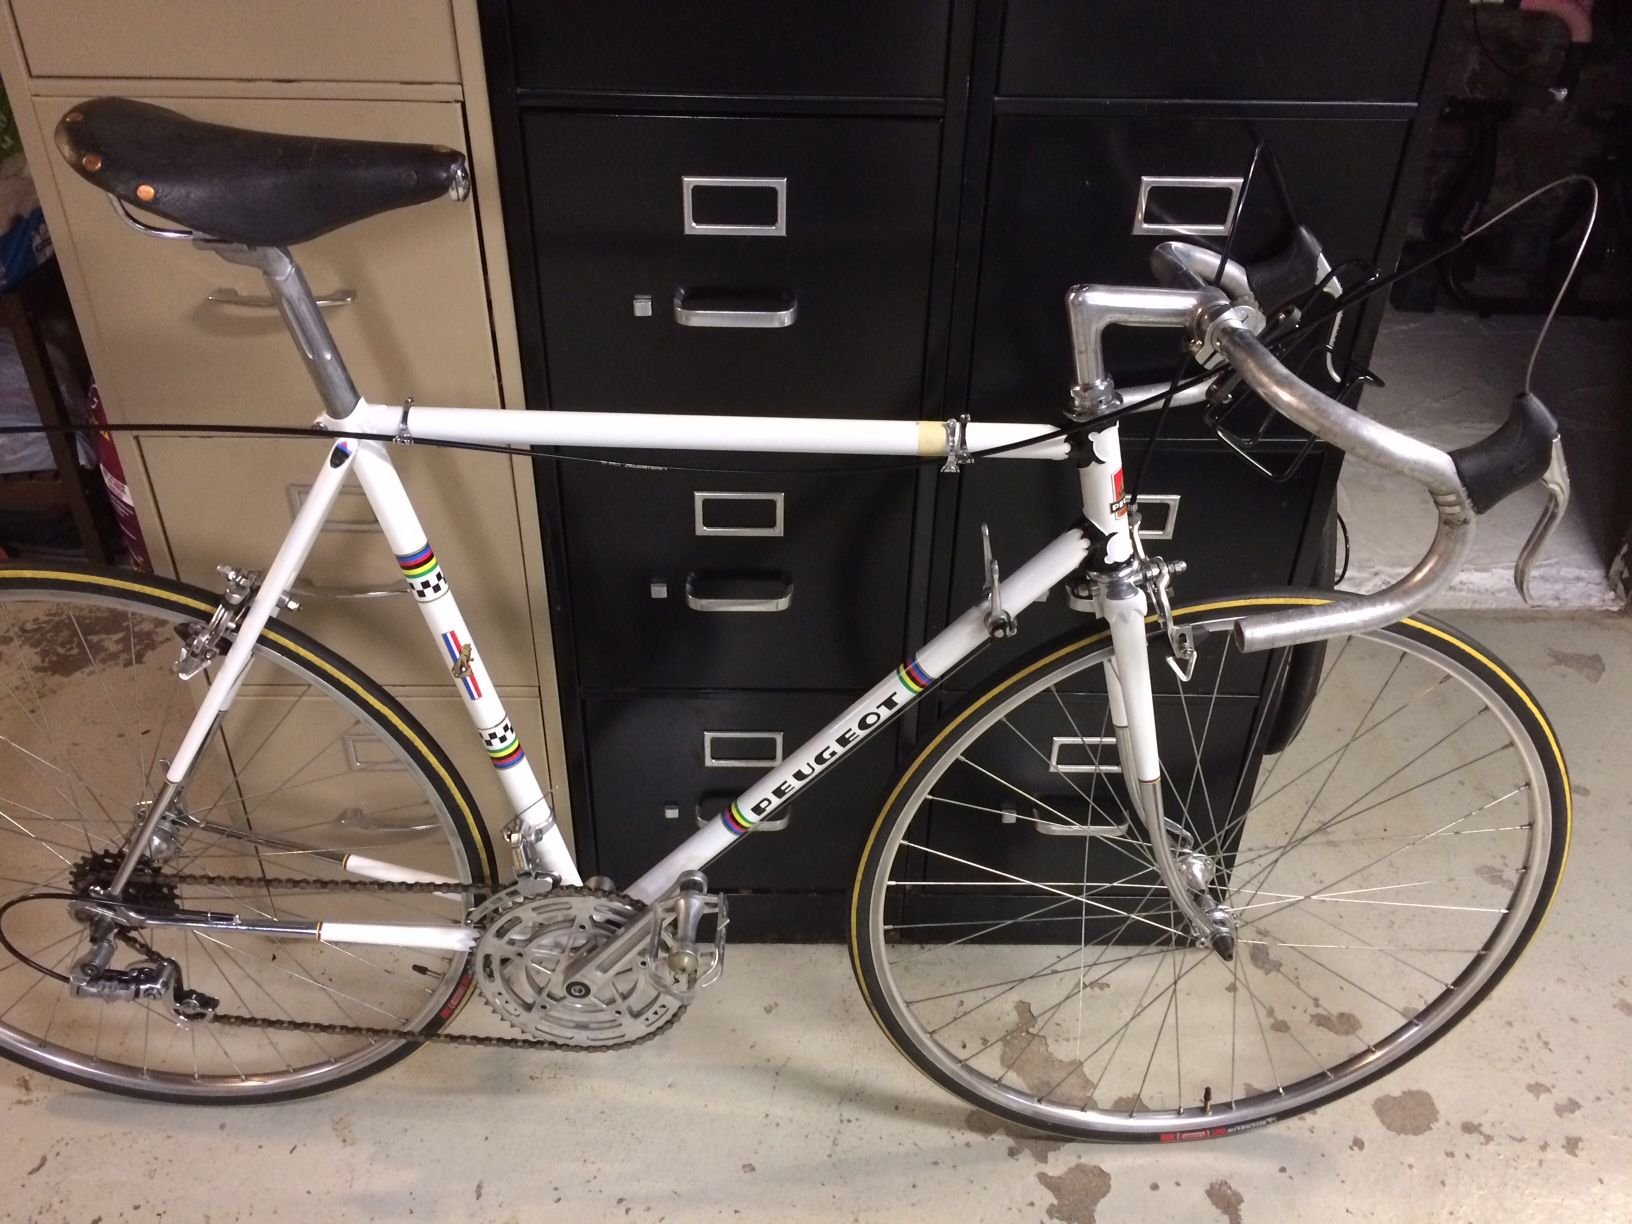
With my frame it's going to take at least two cycles to get the touch-up correct. Once complete, the finished touch-up will take another two weeks for the paint to harden to the point where Meguires 205 may be used to blend in the new paint with the surrounding area. This frame had a LOT of scratches and nicks so it's going to take some time. If you can zoom in on the first pic below, you can see where a fairly deep nick on the top tube just near the head tube requires a second paint "fill" to bring the paint level up to the surrounding paint. Similar condition exists at the bottom of the stays pictured.
I'm at approx. 40% frame clean-up completion. Here's are the aforementioned pics and a few others:


The wheel behind the frame belongs to an old Super Sport I've hung on the wall with a few other bikes. My boss was complaining I had too many in the garage:

As I alluded to during my last Paramount build, touching up a frame takes a bit of time to do "correctly." That said, a good touch up process is no substitute for a quality respray. As cost control is a factor with this build, I went the touch-up route.
To get a decent touched-up finish, I've found over the years, scratches and nicks need to be looked at as very small craters or ravines. The right combination of paint and acetone (or whatever thinner you prefer) is needed to get the mix to completely flow into the scratch or nick. You want to avoid brush strokes and let the mix flow from the SMALL brush. Even so, it may take a cycle or two of paint and drying to get the touched-up area to match the surrounding paint.
With my frame it's going to take at least two cycles to get the touch-up correct. Once complete, the finished touch-up will take another two weeks for the paint to harden to the point where Meguires 205 may be used to blend in the new paint with the surrounding area. This frame had a LOT of scratches and nicks so it's going to take some time. If you can zoom in on the first pic below, you can see where a fairly deep nick on the top tube just near the head tube requires a second paint "fill" to bring the paint level up to the surrounding paint. Similar condition exists at the bottom of the stays pictured.
I'm at approx. 40% frame clean-up completion. Here's are the aforementioned pics and a few others:
The wheel behind the frame belongs to an old Super Sport I've hung on the wall with a few other bikes. My boss was complaining I had too many in the garage:
Likes For cqlink:
 01-18-20, 02:10 PM
#12
Senior Member
Thread Starter
Join Date: Sep 2015
Location: Detroit
Posts: 566
Bikes: '72 Paramount 15-9, '74 Schwinn Paramount P10-9, '73 Schwinn Super Sport, 1983 Schwinn Voyageur SP,17 Motobecane Cafe Noir, 1970 Raleigh Competition Tourist, 1999 Rans V-Rex
Mentioned: 9 Post(s)
Tagged: 0 Thread(s)
Quoted: 220 Post(s)
Likes: 0
Liked 83 Times
in
45 Posts
About 90% complete with the frame clean-up. Added a few bits:


Got tied up with this. I posted it on the "are you looking for..." thread with a tag, "Needs Some Love:

Couldn't resist. I picked it up for $80 and found the groupset with upgraded Campy Record small flange hubs for $100:
 01-18-20, 02:34 PM
#13
Senior Member

I too am in the process of building up a PX10. Mine is actually a UX10 which is the clincher tire version of the PX10. I believe mine is a '75 or '76. Here are a couple pictures. One is the original as purchased frame with some of the components removed and the other is the refurbished frame. I did update many of the components that were on the bike when purchased.

01-18-20, 06:53 PM
#15
Senior Member
Thread Starter
Join Date: Sep 2015
Location: Detroit
Posts: 566
Bikes: '72 Paramount 15-9, '74 Schwinn Paramount P10-9, '73 Schwinn Super Sport, 1983 Schwinn Voyageur SP,17 Motobecane Cafe Noir, 1970 Raleigh Competition Tourist, 1999 Rans V-Rex
Mentioned: 9 Post(s)
Tagged: 0 Thread(s)
Quoted: 220 Post(s)
Likes: 0
Liked 83 Times
in
45 Posts
I too am in the process of building up a PX10. Mine is actually a UX10 which is the clincher tire version of the PX10. I believe mine is a '75 or '76. Here are a couple pictures. One is the original as purchased frame with some of the components removed and the other is the refurbished frame. I did update many of the components that were on the bike when purchased.
02-12-20, 12:05 PM
#16
Senior Member
Thread Starter
Join Date: Sep 2015
Location: Detroit
Posts: 566
Bikes: '72 Paramount 15-9, '74 Schwinn Paramount P10-9, '73 Schwinn Super Sport, 1983 Schwinn Voyageur SP,17 Motobecane Cafe Noir, 1970 Raleigh Competition Tourist, 1999 Rans V-Rex
Mentioned: 9 Post(s)
Tagged: 0 Thread(s)
Quoted: 220 Post(s)
Likes: 0
Liked 83 Times
in
45 Posts
Progress Report...
I'm getting close to the finish line. Ordered bar tape and I'm looking for reasonably priced tubular tires. As of today, I've around $290 into the build. Fortunate to have a fellow Forum member provide a complete PX-10 group, otherwise cost would have been approx. $100 more.
I'm finishing the brakes, FD and RD cables, then final clean-up an polish. Looking for a French seat tube 531 decal.
The paint on the BB was chipped and worn. No way to touch-up. Instead, I masked the frame and rattle canned it. After that, I waited a day and used Meguires 105 and 205 to blend. I'll use Mothers Aluminum and Mag for the chrome.
The black plastic bits and brake hoods were brought back to life with a dab or two of liquid silicone. It does a great job on plastic. I've used it on a number of black plastic bits on old cars.
Here's a few pics of where I'm at:
Likes For cqlink:
02-12-20, 12:15 PM
#17
PM me your cotters
Join Date: Jun 2015
Location: ATL
Posts: 3,241
Mentioned: 80 Post(s)
Tagged: 0 Thread(s)
Quoted: 1137 Post(s)
Liked 588 Times
in
420 Posts
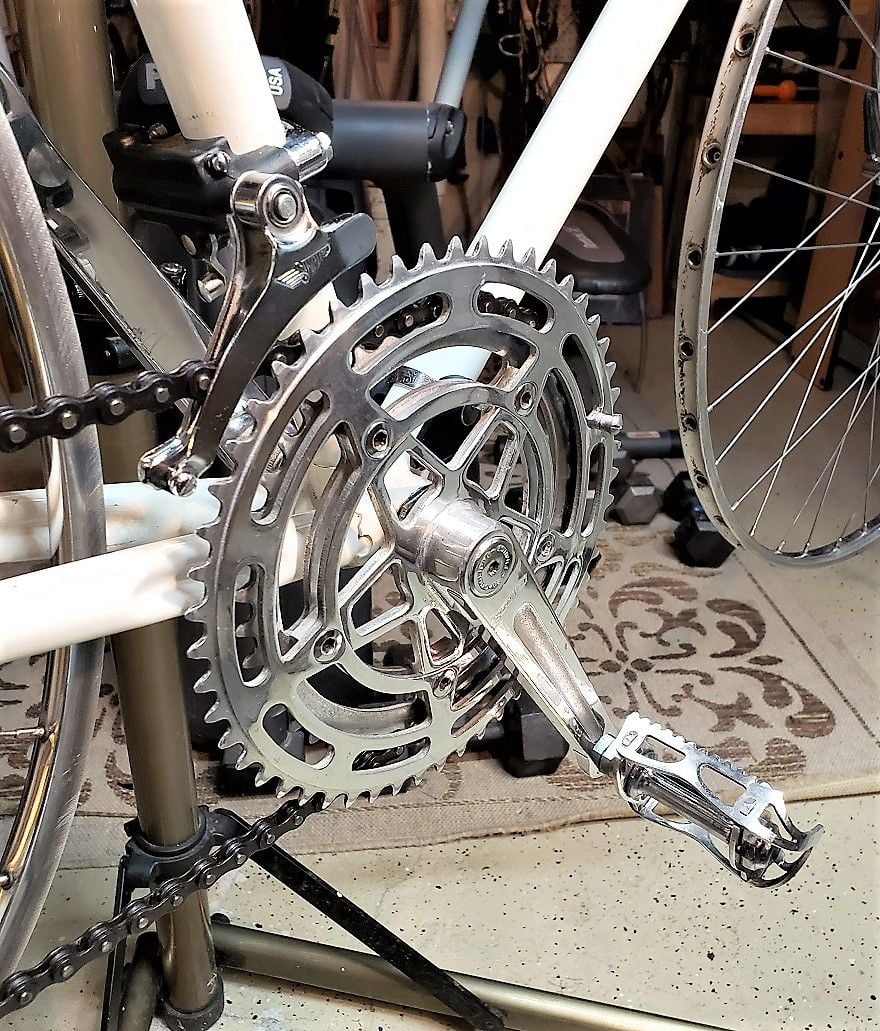
Holy crap that's awesome! You know it's good when the only thing a guy can pick apart is a little orange spot on a dropout (below)
Maybe it's just the close-up but the cup doesn't quite look secured or flush with the BB shell.

Maybe it's just the close-up but the cup doesn't quite look secured or flush with the BB shell.
__________________
███████████████
███████████████
02-12-20, 01:47 PM
#18
Senior Member
Thread Starter
Join Date: Sep 2015
Location: Detroit
Posts: 566
Bikes: '72 Paramount 15-9, '74 Schwinn Paramount P10-9, '73 Schwinn Super Sport, 1983 Schwinn Voyageur SP,17 Motobecane Cafe Noir, 1970 Raleigh Competition Tourist, 1999 Rans V-Rex
Mentioned: 9 Post(s)
Tagged: 0 Thread(s)
Quoted: 220 Post(s)
Likes: 0
Liked 83 Times
in
45 Posts
Since this build was going too smoothly (albeit, slow), I needed to spice things up by breaking the FD cable guide.
Can any of you post a pic detailing the correct routing with cable housing?
I'm not getting much , if any lateral movement when I shift. The cable pressure broke the plastic guide as seen in the pic.
Also, if anyone has another guide they'd like to part with, let me know.
Edit: (see Pic2) There was enough of the plastic left on the guide allowing me to butt the cable housing up to the broken piece. I also cut a piece of housing long enough to jam it next to the grooved metal slot leading into the FD cable hole. Doesn't look great but it's functional.
Still looking to replace.

Pic2:

Can any of you post a pic detailing the correct routing with cable housing?
I'm not getting much , if any lateral movement when I shift. The cable pressure broke the plastic guide as seen in the pic.
Also, if anyone has another guide they'd like to part with, let me know.
Edit: (see Pic2) There was enough of the plastic left on the guide allowing me to butt the cable housing up to the broken piece. I also cut a piece of housing long enough to jam it next to the grooved metal slot leading into the FD cable hole. Doesn't look great but it's functional.
Still looking to replace.
Pic2:
Last edited by cqlink; 02-12-20 at 02:05 PM.
02-12-20, 02:06 PM
#19
Full Member
Bummer! I believe that guide requires a cable housing on the left side, between the guide and the stop on the derailleur, rather than a direct, un-housed, run of the inner cable.
02-12-20, 02:07 PM
#20
Senior Member
Thread Starter
Join Date: Sep 2015
Location: Detroit
Posts: 566
Bikes: '72 Paramount 15-9, '74 Schwinn Paramount P10-9, '73 Schwinn Super Sport, 1983 Schwinn Voyageur SP,17 Motobecane Cafe Noir, 1970 Raleigh Competition Tourist, 1999 Rans V-Rex
Mentioned: 9 Post(s)
Tagged: 0 Thread(s)
Quoted: 220 Post(s)
Likes: 0
Liked 83 Times
in
45 Posts
Of course, figured it out the hard way
 02-12-20, 02:22 PM
#21
PM me your cotters
Join Date: Jun 2015
Location: ATL
Posts: 3,241
Mentioned: 80 Post(s)
Tagged: 0 Thread(s)
Quoted: 1137 Post(s)
Liked 588 Times
in
420 Posts
This may be the only time in BF history when someone complains about not seeing the non-drive side of a bike 
You need a spare Simplex cable guide now? PM over an address and I'll ship you one, on the house.
You need a spare Simplex cable guide now? PM over an address and I'll ship you one, on the house.
__________________
███████████████
███████████████
02-12-20, 02:42 PM
#22
Senior Member
Thread Starter
Join Date: Sep 2015
Location: Detroit
Posts: 566
Bikes: '72 Paramount 15-9, '74 Schwinn Paramount P10-9, '73 Schwinn Super Sport, 1983 Schwinn Voyageur SP,17 Motobecane Cafe Noir, 1970 Raleigh Competition Tourist, 1999 Rans V-Rex
Mentioned: 9 Post(s)
Tagged: 0 Thread(s)
Quoted: 220 Post(s)
Likes: 0
Liked 83 Times
in
45 Posts
Shifts great. Absolutely nothing wrong with regreased Normandy hubs! Have to say the Mavic Racer brakes were very easy to install and adjust.

Likes For cqlink:
02-12-20, 03:53 PM
#23
feros ferio
Join Date: Jul 2000
Location: www.ci.encinitas.ca.us
Posts: 21,793
Bikes: 1959 Capo Modell Campagnolo; 1960 Capo Sieger (2); 1962 Carlton Franco Suisse; 1970 Peugeot UO-8; 1982 Bianchi Campione d'Italia; 1988 Schwinn Project KOM-10;
Mentioned: 44 Post(s)
Tagged: 0 Thread(s)
Quoted: 1390 Post(s)
Liked 1,322 Times
in
835 Posts
Those are great-looking bikes, and I am enjoying watching yours come together. Did I miss it, or have you decided which tubulars to buy for it? (Where I live, goat head thorns are rampant, which caused me to give up tubulars when I moved here 40 years ago, but now that I have two Capo Siegers, it would make sense to put tubulars on one of them.)
__________________
"Far and away the best prize that life offers is the chance to work hard at work worth doing." --Theodore Roosevelt
Capo: 1959 Modell Campagnolo, S/N 40324; 1960 Sieger (2), S/N 42624, 42597
Carlton: 1962 Franco Suisse, S/N K7911
Peugeot: 1970 UO-8, S/N 0010468
Bianchi: 1982 Campione d'Italia, S/N 1.M9914
Schwinn: 1988 Project KOM-10, S/N F804069
02-12-20, 06:12 PM
#24
Senior Member
Thread Starter
Join Date: Sep 2015
Location: Detroit
Posts: 566
Bikes: '72 Paramount 15-9, '74 Schwinn Paramount P10-9, '73 Schwinn Super Sport, 1983 Schwinn Voyageur SP,17 Motobecane Cafe Noir, 1970 Raleigh Competition Tourist, 1999 Rans V-Rex
Mentioned: 9 Post(s)
Tagged: 0 Thread(s)
Quoted: 220 Post(s)
Likes: 0
Liked 83 Times
in
45 Posts
Those are great-looking bikes, and I am enjoying watching yours come together. Did I miss it, or have you decided which tubulars to buy for it? (Where I live, goat head thorns are rampant, which caused me to give up tubulars when I moved here 40 years ago, but now that I have two Capo Siegers, it would make sense to put tubulars on one of them.)
02-12-20, 06:34 PM
#25

What happened?

Join Date: Jun 2007
Location: Around here somewhere
Posts: 7,927
Bikes: 3 Rollfasts, 3 Schwinns, a Shelby and a Higgins Flightliner in a pear tree!
Mentioned: 57 Post(s)
Tagged: 1 Thread(s)
Quoted: 1835 Post(s)
Liked 292 Times
in
255 Posts
Because a dropstand is even worse, which is why they started using kickstands on the antique 26" bikes just before WW II I suppose.
__________________
I don't know nothing, and I memorized it in school and got this here paper I'm proud of to show it.

