


Rear brake bridge issue
 05-19-19, 08:54 AM
#1

Senior Member
Thread Starter

Join Date: Apr 2012
Location: Middle Earth (aka IA)
Posts: 20,435
Bikes: A bunch of old bikes and a few new ones
Mentioned: 178 Post(s)
Tagged: 0 Thread(s)
Quoted: 5888 Post(s)
Liked 3,471 Times
in
2,079 Posts
Rear brake bridge issue
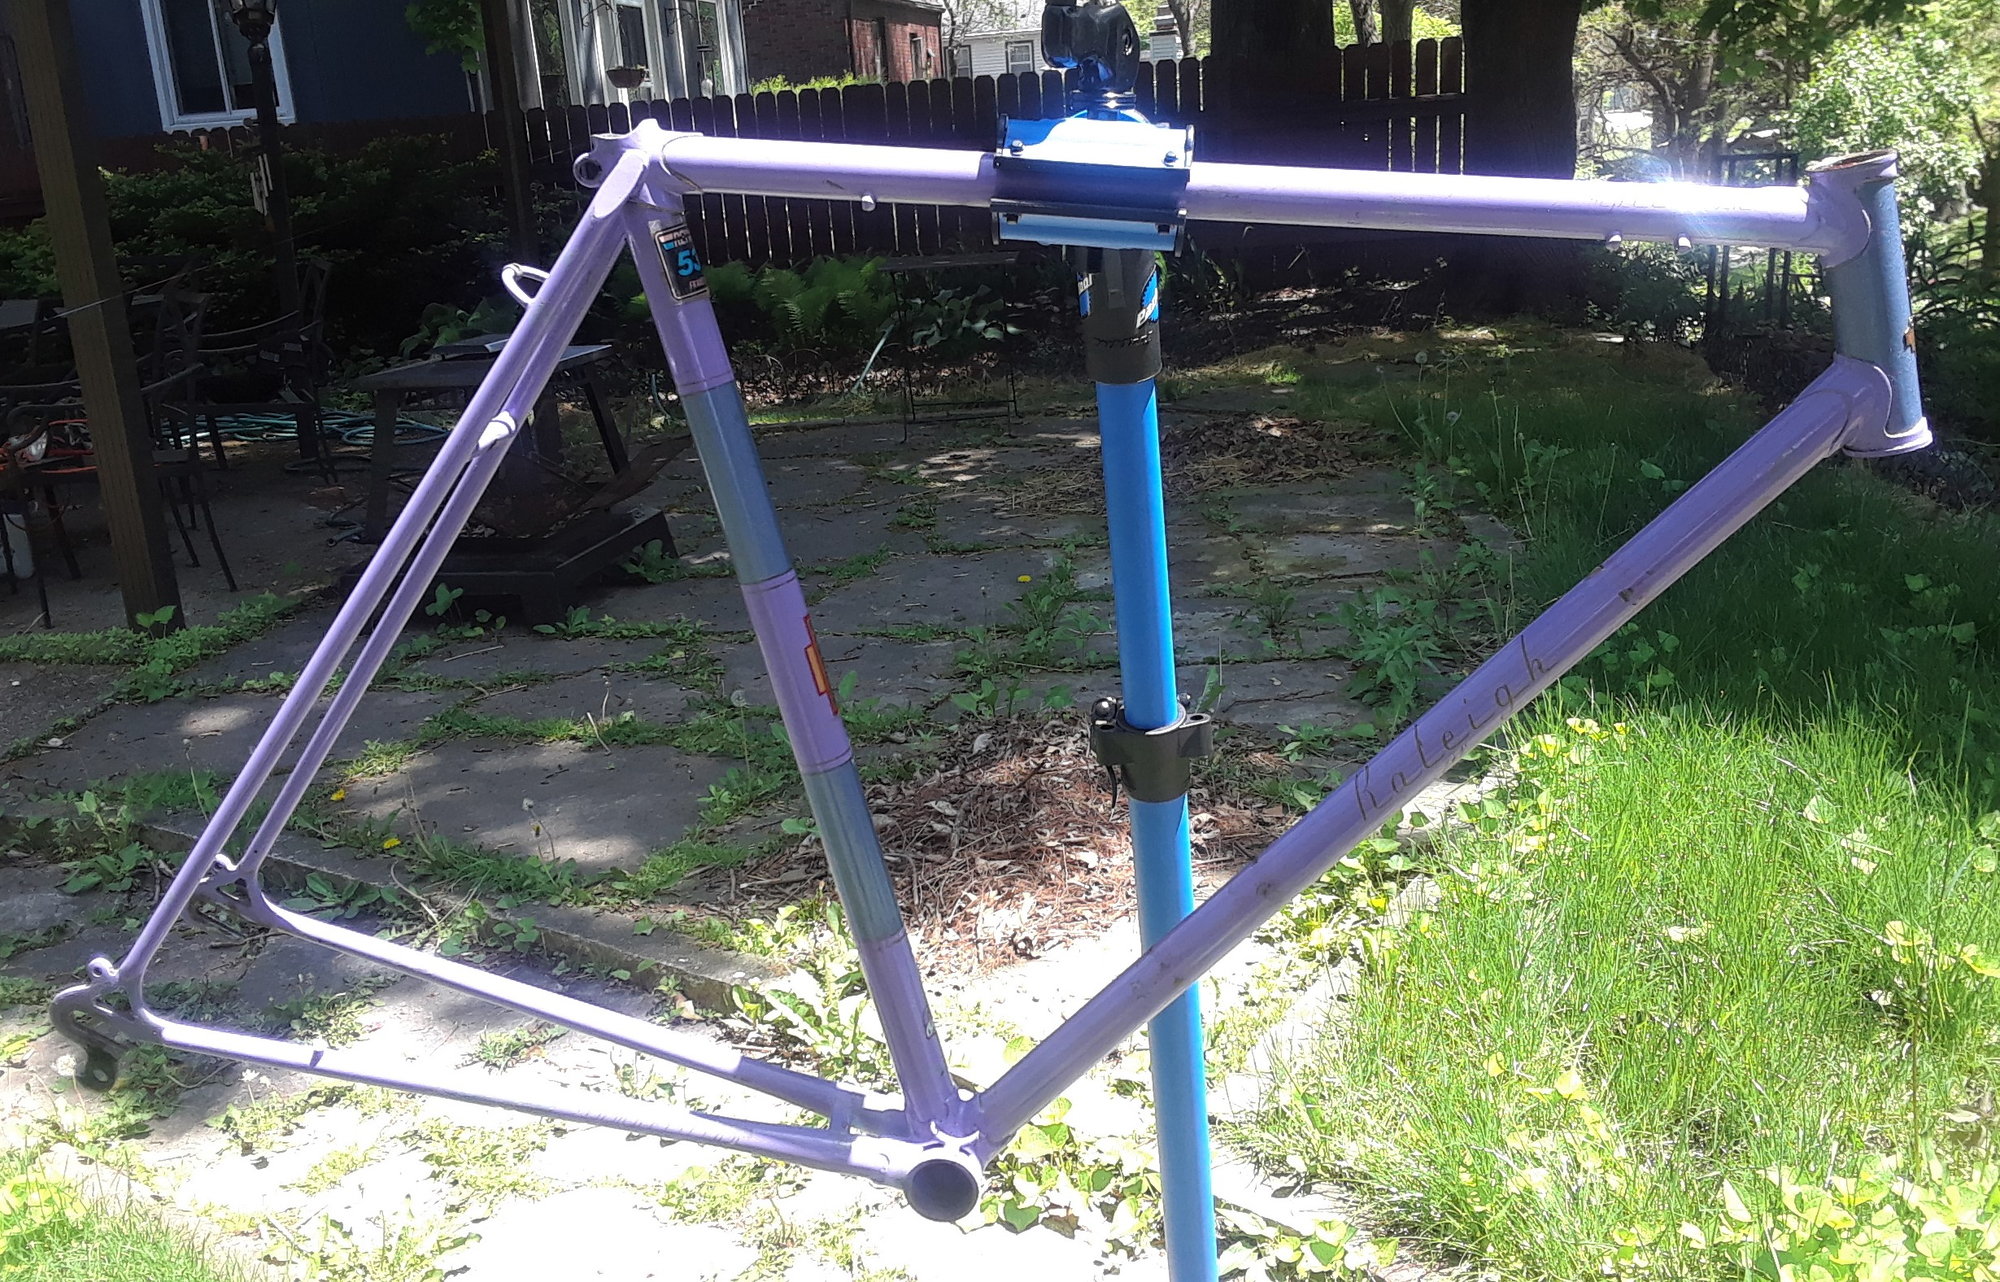
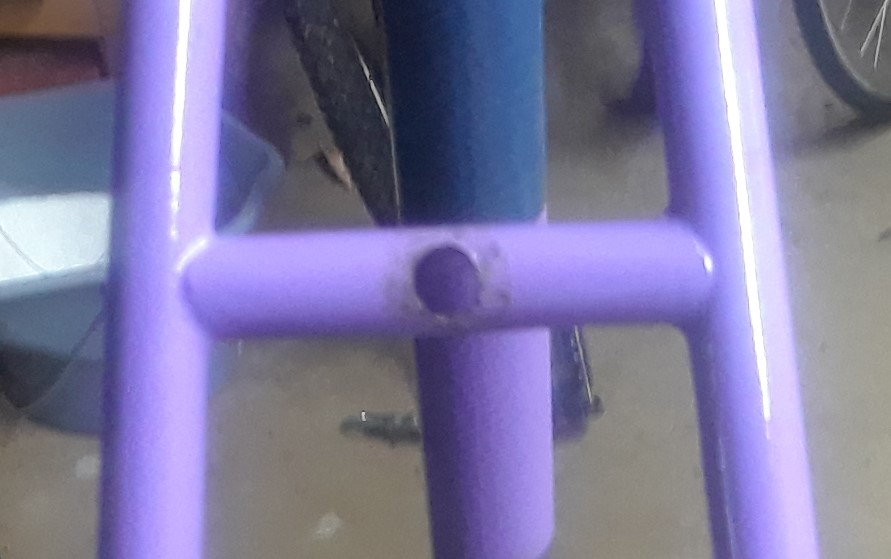
I recently picked up a lilac Raleigh Competition (likely a 1971) with a few issues. I plan on using the C&V crew to crowd source some solutions. The frame, fork, chrome, and paint are in nice shape. The paint has been touched up with some weird color but that's just part of the charm of an old bike.
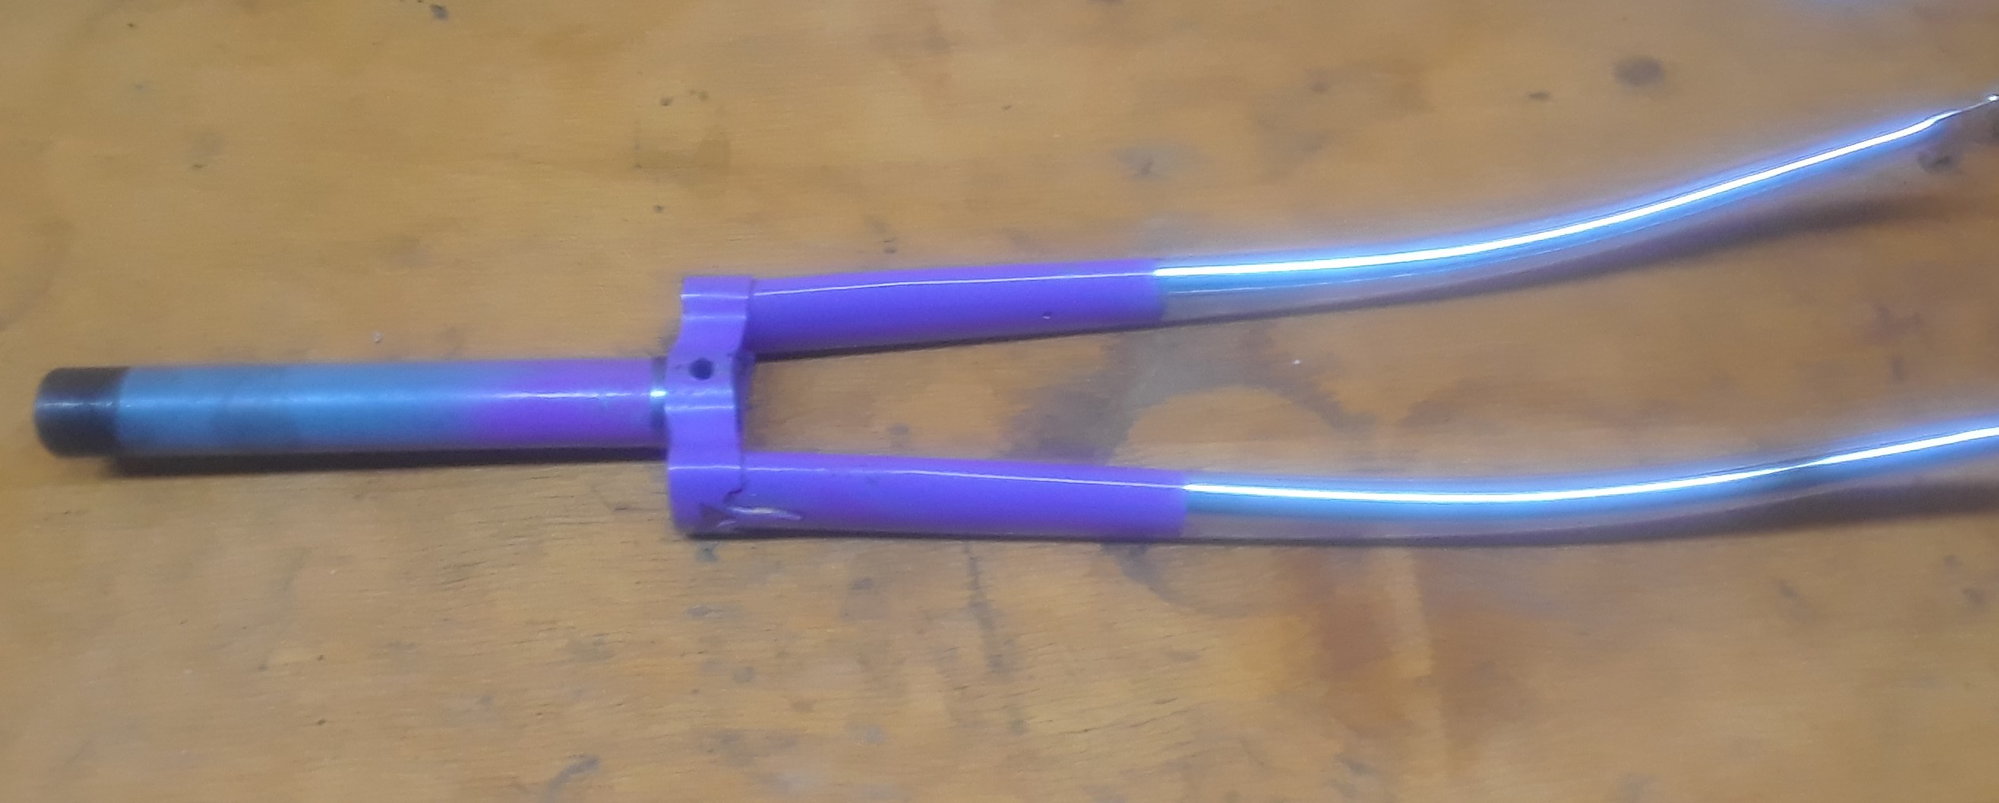
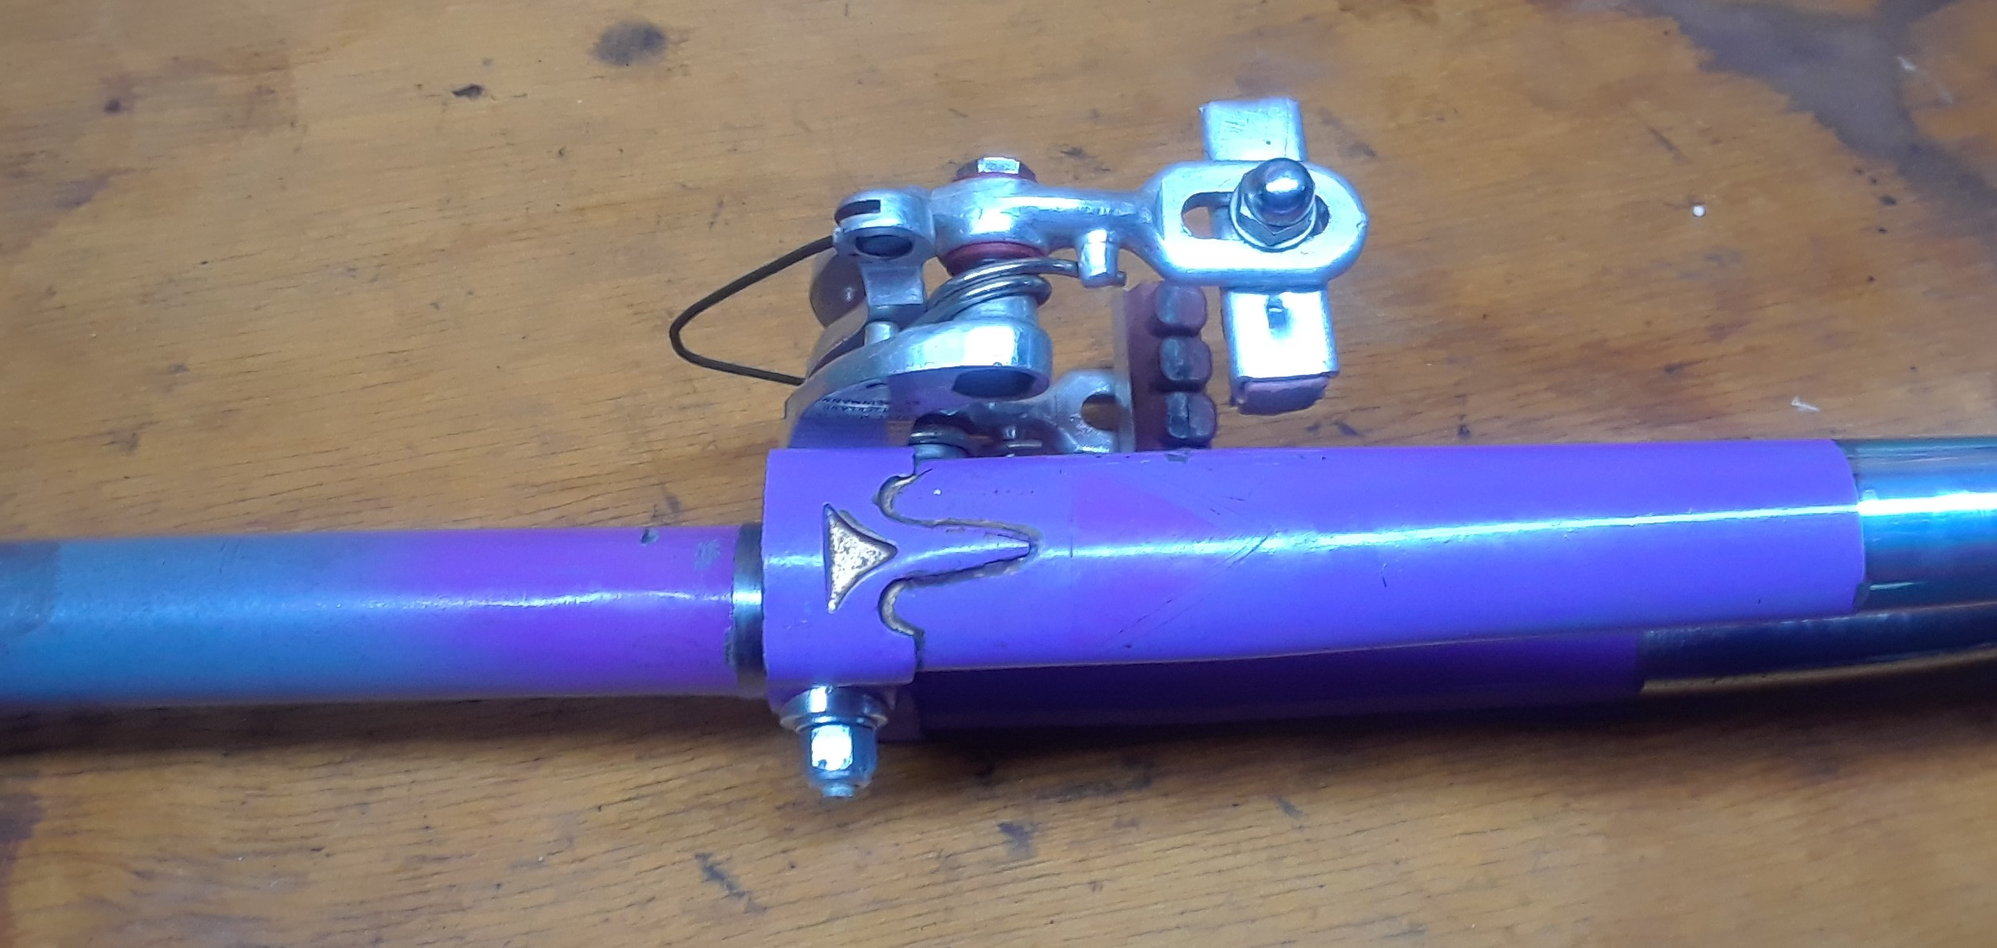
Here is the first problem. The front fork and rear brake bridge have been drilled for recessed brakes. I'm not quite sure how recessed brakes would have worked in any case as the fork crown and rear brake bridge are curved and clearly designed for concave washers and nutted brakes but maybe I'm missing something here. In any case, I plan on running nutted brakes. I prefer them on an old bike but I'm not opposed to recessed ones if that provides a better solution.
The front fork was drilled correctly. The brake mounting hole facing forward was not touched (it's at 6 mm) and the hole facing to the rear was drilled to 8 mm. I figure the concave washers plus the hole running through the fork crown will nicely support the brake.
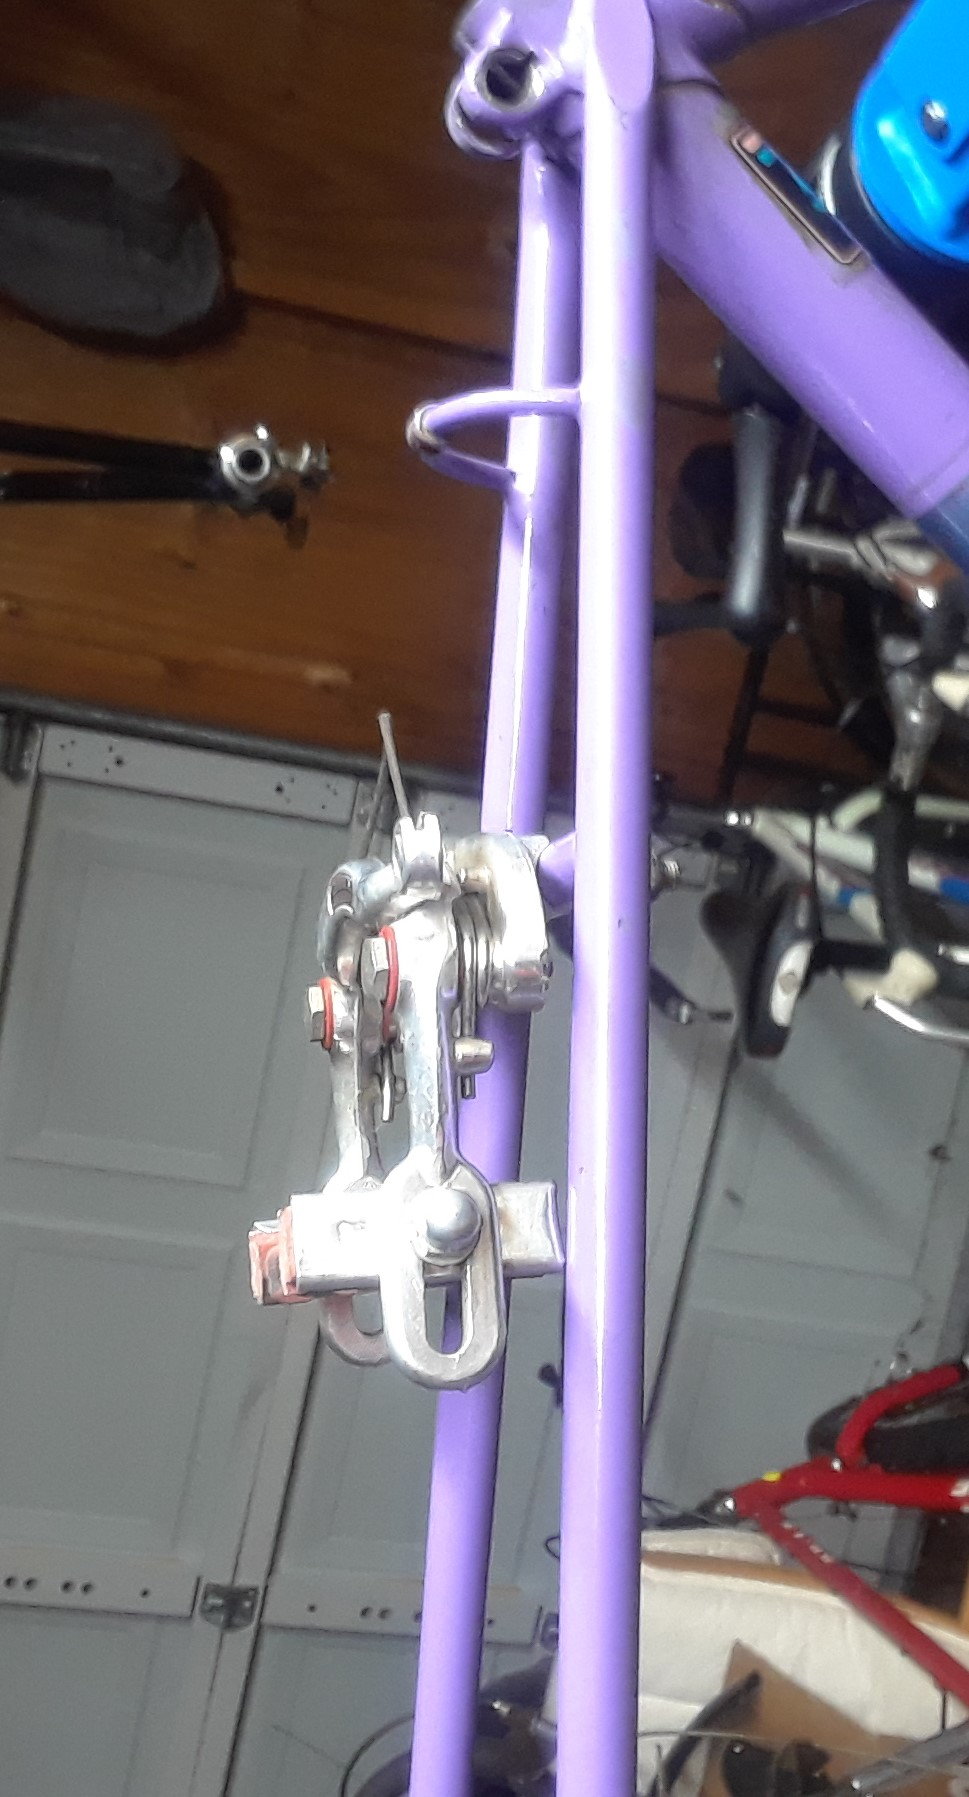
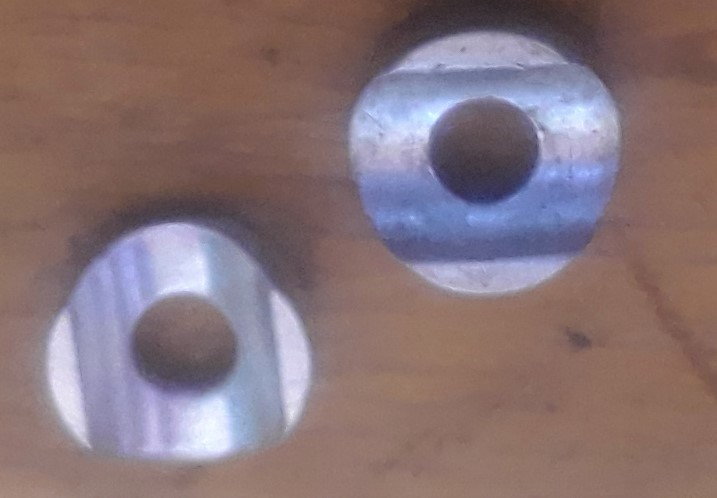
The rear brake bridge is a mess. It was badly drilled. The hole facing forwards is at 8 mm; the one in the rear is 8.7 mm. I was thinking of running a nutted brake, as I said earlier, but the problem is that only the concave washers will be supporting the brake as the holes in the brake bridge are too large.
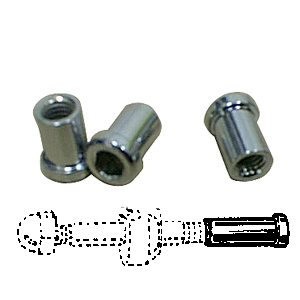
I know that the usual solution for running nutted brakes on a frame set up for recessed brakes is to drill out a recessed nut or to pick up a nylon brake insert from Rivindell, https://www.rivbike.com/collections/...n-brake-insert
This won't work right with concave washers, right? That provides a flat surface and I need to rely on the curve in the brake bridge.
Here is my concern. When I tighten down the nutted brake, it feels nice and tight but I cannot generate by hand the forces that braking will generate. Will this kludge work? Is there a more elegant solution? Am I missing something obvious? The problem is that the holes in the rear brake bridge (8 mm and 8.7) are quite a bit larger than the brake mounting bolt which is, I believe, 6 mm.
Oh and a shout out to @gugie, @juvela, and @USAZorro who have helped me work through some of the issues with this frame.
Here are some pics of the frame and of a rear brake mounted up with concave washers:
Here is the first problem. The front fork and rear brake bridge have been drilled for recessed brakes. I'm not quite sure how recessed brakes would have worked in any case as the fork crown and rear brake bridge are curved and clearly designed for concave washers and nutted brakes but maybe I'm missing something here. In any case, I plan on running nutted brakes. I prefer them on an old bike but I'm not opposed to recessed ones if that provides a better solution.
The front fork was drilled correctly. The brake mounting hole facing forward was not touched (it's at 6 mm) and the hole facing to the rear was drilled to 8 mm. I figure the concave washers plus the hole running through the fork crown will nicely support the brake.
The rear brake bridge is a mess. It was badly drilled. The hole facing forwards is at 8 mm; the one in the rear is 8.7 mm. I was thinking of running a nutted brake, as I said earlier, but the problem is that only the concave washers will be supporting the brake as the holes in the brake bridge are too large.
I know that the usual solution for running nutted brakes on a frame set up for recessed brakes is to drill out a recessed nut or to pick up a nylon brake insert from Rivindell, https://www.rivbike.com/collections/...n-brake-insert
This won't work right with concave washers, right? That provides a flat surface and I need to rely on the curve in the brake bridge.
Here is my concern. When I tighten down the nutted brake, it feels nice and tight but I cannot generate by hand the forces that braking will generate. Will this kludge work? Is there a more elegant solution? Am I missing something obvious? The problem is that the holes in the rear brake bridge (8 mm and 8.7) are quite a bit larger than the brake mounting bolt which is, I believe, 6 mm.
Oh and a shout out to @gugie, @juvela, and @USAZorro who have helped me work through some of the issues with this frame.
Here are some pics of the frame and of a rear brake mounted up with concave washers:
Last edited by bikemig; 05-19-19 at 09:01 AM.
 05-19-19, 09:03 AM
#2
Pedalin' Erry Day

Personally I'd wire up the brakes and try them before anything else, there may not even be a problem waiting to be solved.
05-19-19, 09:27 AM
#3
Senior Member

Join Date: Sep 2015
Location: Madison, WI
Posts: 2,701
Mentioned: 52 Post(s)
Tagged: 0 Thread(s)
Quoted: 1136 Post(s)
Liked 650 Times
in
336 Posts
I would guess that tightening that rear brake down with concave washers on both sides of the bridge will work fine, even if the holes are a couple mm bigger than the bolt. The only thing I can see happening is the brake moving left or right in the mounting holes, but that's doubtful.
I would just install and try it with some hard braking.
If it does shift during braking, here is my solution: custom-made unthreaded aluminum spacer, 6mm ID, 8.7mm OD, to fit on the bolt inside the brake bridge, taking up the extra space in the hole. Easily done with a lathe (for the OD) and a file (for making curved ends to match the brake bridge radius). You can buy bags of M6 aluminum spacers and modify them.
Last edited by TenGrainBread; 05-19-19 at 09:35 AM.
05-19-19, 10:02 AM
#4
Senior Member
Join Date: Oct 2015
Location: PDX
Posts: 13,046
Bikes: Merz x 5 + Specialized Merz Allez x 2, Strawberry/Newlands/DiNucci/Ti x3, Gordon, Fuso/Moulton x2, Bornstein, Paisley,1958-74 Paramounts x3, 3rensho, 74 Moto TC, 73-78 Raleigh Pro's x5, Marinoni x2, 1960 Cinelli SC, 1980 Bianchi SC, PX-10 X 2
Mentioned: 267 Post(s)
Tagged: 0 Thread(s)
Quoted: 4512 Post(s)
Liked 6,387 Times
in
3,672 Posts
Similar to @TenGrainBread, how about using a long recessed nut to sleeve the caliper stud, round the ends to match the bridge curve and length so it provides a tighter fit and some backstop for the other hardware when tightened down, you could also add some small nylon insert washer in each end to really tighten things up.
Last edited by merziac; 05-19-19 at 10:05 AM.
05-19-19, 10:41 AM
#5
Senior Member
It's not unusual for there to be some slop in the rear brake bridge hole. Normally simply tightening the bolt pretty hard on those concave washers is enough to keep it from shifting. If it's too loose, the rear caliper can shift under hard braking as you show in the picture.
That being so, there does seem to be some excessive slop there. It should not be able to shift so much it hits the frame, ideally. Seems to me a short piece of brass tube cut and filed to shape would be a reasonable kludge.
That being so, there does seem to be some excessive slop there. It should not be able to shift so much it hits the frame, ideally. Seems to me a short piece of brass tube cut and filed to shape would be a reasonable kludge.
Last edited by Salamandrine; 05-19-19 at 03:41 PM. Reason: i'm stoopid
05-19-19, 10:43 AM
#6
Senior Member
Maybe a sleeve made from plastic tubing cut so it extends slightly outside the mounting hole. Crushing the plastic tube when the mounting bolt is tightened should hold the caliper in place.
05-19-19, 11:19 AM
#7
Old fart

Join Date: Nov 2004
Location: Appleton WI
Posts: 24,790
Bikes: Several, mostly not name brands.
Mentioned: 153 Post(s)
Tagged: 0 Thread(s)
Quoted: 3590 Post(s)
Liked 3,401 Times
in
1,935 Posts
I would guess that tightening that rear brake down with concave washers on both sides of the bridge will work fine, even if the holes are a couple mm bigger than the bolt. The only thing I can see happening is the brake moving left or right in the mounting holes, but that's doubtful.
05-19-19, 11:22 AM
#8
Old fart
Join Date: Nov 2004
Location: Appleton WI
Posts: 24,790
Bikes: Several, mostly not name brands.
Mentioned: 153 Post(s)
Tagged: 0 Thread(s)
Quoted: 3590 Post(s)
Liked 3,401 Times
in
1,935 Posts

Rivendell used to offer a plastic version of this on their web site, but I don't see it anymore. I seem to recall that it was a standard industrial part, so it might be found in a well-stocked hardware store or perhaps McMaster-Carr.
05-19-19, 11:49 AM
#9
Senior Member
Thread Starter
Join Date: Apr 2012
Location: Middle Earth (aka IA)
Posts: 20,435
Bikes: A bunch of old bikes and a few new ones
Mentioned: 178 Post(s)
Tagged: 0 Thread(s)
Quoted: 5888 Post(s)
Liked 3,471 Times
in
2,079 Posts
Cinelli used to supply shouldered brass washers to convert their recessed-mount brake bridges to nutted-mount:
Rivendell used to offer a plastic version of this on their web site, but I don't see it anymore. I seem to recall that it was a standard industrial part, so it might be found in a well-stocked hardware store or perhaps McMaster-Carr.
Rivendell used to offer a plastic version of this on their web site, but I don't see it anymore. I seem to recall that it was a standard industrial part, so it might be found in a well-stocked hardware store or perhaps McMaster-Carr.
It provides a flat surface though so it won't work well with the concave washer, right? I could buy a few and file a bit of the nylon away to see if I can get it to roughly match the concave washer as force and pressure will do the rest. This might be the ticket as I don't have a lathe. That way at least the brake mounting bolt will be supported by the rear brake bridge on one side. I could try to do this on both sides actually.
05-19-19, 11:59 AM
#10
Bad example
Join Date: Nov 2015
Location: Seattle and Reims
Posts: 3,071
Bikes: Peugeot: AO-8 1973, PA-10 1971, PR-10 1973, Sante 1988; Masi Gran Criterium 1975, Stevenson Tourer 1980, Stevenson Criterium 1981, Schwinn Paramount 1972, Rodriguez 2006, Gitane Federal ~1975, Holdsworth Pro, Follis 172 ~1973, Bianchi '62
Mentioned: 36 Post(s)
Tagged: 0 Thread(s)
Quoted: 826 Post(s)
Liked 213 Times
in
97 Posts
I also would be inclined to use an aluminum insert to remove the slop.
__________________
Keeping Seattle�s bike shops in business since 1978
Keeping Seattle�s bike shops in business since 1978
05-19-19, 01:44 PM
#11
Senior Member
Thread Starter
Join Date: Apr 2012
Location: Middle Earth (aka IA)
Posts: 20,435
Bikes: A bunch of old bikes and a few new ones
Mentioned: 178 Post(s)
Tagged: 0 Thread(s)
Quoted: 5888 Post(s)
Liked 3,471 Times
in
2,079 Posts
I would guess that tightening that rear brake down with concave washers on both sides of the bridge will work fine, even if the holes are a couple mm bigger than the bolt. The only thing I can see happening is the brake moving left or right in the mounting holes, but that's doubtful.
I would just install and try it with some hard braking.
If it does shift during braking, here is my solution: custom-made unthreaded aluminum spacer, 6mm ID, 8.7mm OD, to fit on the bolt inside the brake bridge, taking up the extra space in the hole. Easily done with a lathe (for the OD) and a file (for making curved ends to match the brake bridge radius). You can buy bags of M6 aluminum spacers and modify them.
05-19-19, 02:05 PM
#12

Senior Member
Join Date: Jun 2006
Posts: 20,305
Mentioned: 130 Post(s)
Tagged: 0 Thread(s)
Quoted: 3464 Post(s)
Liked 2,831 Times
in
1,997 Posts
not a lot of meat left on that bridge.
I would go hardware store shopping for a bronze bushing- 8mm is very close to 5/16"
A file, a hack saw possibly and my guess the holes could be filled with the one bushing.
I would go hardware store shopping for a bronze bushing- 8mm is very close to 5/16"
A file, a hack saw possibly and my guess the holes could be filled with the one bushing.
05-19-19, 03:51 PM
#13
Senior Member
Since it's been modified already for recessed brakes, why not run modern reissue Dia Compe brakes? Solves the problem. If it were my bike I'd either (A) silver solder in brass or bronze to reverse the mods, or (B) just go with recessed brakes.
https://www.rivbike.com/collections/...l-brakes-15111
My memory of how the nutted to recessed conversion mod was done is a little fuzzy, but it was a pretty common LBS task once. I think you just drilled out one or both of the concave spacers enough so that the allen nut fits. You could countersink if you want to get fancy.
05-19-19, 04:02 PM
#14
Senior Member

Join Date: Feb 2013
Location: Alta California
Posts: 14,270
Mentioned: 415 Post(s)
Tagged: 1 Thread(s)
Quoted: 3814 Post(s)
Liked 3,345 Times
in
2,182 Posts
-----
in foto nr. quattro it appears that upper portion of right blade is forward of centerline of steerer.
this may be a photographic effect due to perspective.
delighted to defer to il gugissimo on all matters bladal.
if Mann-Libertas just the right size for thee then this telaio be clearly too piccolo - shall be right over.
@gugie
-----
05-19-19, 05:03 PM
#15
Senior Member
Thread Starter
Join Date: Apr 2012
Location: Middle Earth (aka IA)
Posts: 20,435
Bikes: A bunch of old bikes and a few new ones
Mentioned: 178 Post(s)
Tagged: 0 Thread(s)
Quoted: 5888 Post(s)
Liked 3,471 Times
in
2,079 Posts
Since it's been modified already for recessed brakes, why not run modern reissue Dia Compe brakes? Solves the problem. If it were my bike I'd either (A) silver solder in brass or bronze to reverse the mods, or (B) just go with recessed brakes.
https://www.rivbike.com/collections/...l-brakes-15111
My memory of how the nutted to recessed conversion mod was done is a little fuzzy, but it was a pretty common LBS task once. I think you just drilled out one or both of the concave spacers enough so that the allen nut fits. You could countersink if you want to get fancy.
https://www.rivbike.com/collections/...l-brakes-15111
My memory of how the nutted to recessed conversion mod was done is a little fuzzy, but it was a pretty common LBS task once. I think you just drilled out one or both of the concave spacers enough so that the allen nut fits. You could countersink if you want to get fancy.
I've never seen it done this way but this makes sense.
05-20-19, 05:54 AM
#16
Senior Member
Thread Starter
Join Date: Apr 2012
Location: Middle Earth (aka IA)
Posts: 20,435
Bikes: A bunch of old bikes and a few new ones
Mentioned: 178 Post(s)
Tagged: 0 Thread(s)
Quoted: 5888 Post(s)
Liked 3,471 Times
in
2,079 Posts
Since it's been modified already for recessed brakes, why not run modern reissue Dia Compe brakes? Solves the problem. If it were my bike I'd either (A) silver solder in brass or bronze to reverse the mods, or (B) just go with recessed brakes.
https://www.rivbike.com/collections/...l-brakes-15111
My memory of how the nutted to recessed conversion mod was done is a little fuzzy, but it was a pretty common LBS task once. I think you just drilled out one or both of the concave spacers enough so that the allen nut fits. You could countersink if you want to get fancy.
https://www.rivbike.com/collections/...l-brakes-15111
My memory of how the nutted to recessed conversion mod was done is a little fuzzy, but it was a pretty common LBS task once. I think you just drilled out one or both of the concave spacers enough so that the allen nut fits. You could countersink if you want to get fancy.
@Salamandrine: You said you would solder in brass or or bronze to reverse the mods. I like that idea but I don't have the technical skills to do this. Wouldn't that ruin the paint though?
05-20-19, 06:39 AM
#17
aged to perfection

Join Date: Jun 2009
Location: PacNW
Posts: 1,817
Bikes: Dinucci Allez 2.0, Richard Sachs, Alex Singer, Serotta, Masi GC, Raleigh Pro Mk.1, Hetchins, etc
Mentioned: 24 Post(s)
Tagged: 0 Thread(s)
Quoted: 839 Post(s)
Liked 1,258 Times
in
663 Posts
don't use plastic and don't do any more drilling on the fork or bridge.
just get the "recessed brake nut" at your bike shop or out of your junk box. Take your Makita and clearance it so it will slide down the brake shaft. Install and then put your regular nut on top of it.
so you're using the "recessed nut" as a spacer or bushing.
Mark Petry
Bainbridge Island, WA USA
just get the "recessed brake nut" at your bike shop or out of your junk box. Take your Makita and clearance it so it will slide down the brake shaft. Install and then put your regular nut on top of it.
so you're using the "recessed nut" as a spacer or bushing.
Mark Petry
Bainbridge Island, WA USA
05-20-19, 07:00 AM
#18
Senior Member
Thread Starter
Join Date: Apr 2012
Location: Middle Earth (aka IA)
Posts: 20,435
Bikes: A bunch of old bikes and a few new ones
Mentioned: 178 Post(s)
Tagged: 0 Thread(s)
Quoted: 5888 Post(s)
Liked 3,471 Times
in
2,079 Posts
don't use plastic and don't do any more drilling on the fork or bridge.
just get the "recessed brake nut" at your bike shop or out of your junk box. Take your Makita and clearance it so it will slide down the brake shaft. Install and then put your regular nut on top of it.
so you're using the "recessed nut" as a spacer or bushing.
Mark Petry
Bainbridge Island, WA USA
just get the "recessed brake nut" at your bike shop or out of your junk box. Take your Makita and clearance it so it will slide down the brake shaft. Install and then put your regular nut on top of it.
so you're using the "recessed nut" as a spacer or bushing.
Mark Petry
Bainbridge Island, WA USA
The optional solution may be a sleeve of some sort 8 mm on the outside and 6 on the inside. @TenGrainBread pointed out you can get m6 aluminum spacers in those dimensions. The nylon brake inserts that Rivendell sells would be great as well if I could find one without the flange: https://www.rivbike.com/collections/...n-brake-insert. @Salamandrine's idea of drilling out the concave washer to accept a recessed nut is neat as well since then the brake will have the support of the concave washer and the rear brake bridge assuming the recessed nut is long enough to run into the frame. I was hoping to use a nutted brake I have on hand but this is an option as well. I really don't want to use a modern dual pivot brake and the modern centerpulls like the dia compe 610s would look good on this bike but they are expensive and the reach is too long.
Last edited by bikemig; 05-20-19 at 07:21 AM.
05-20-19, 07:15 AM
#19
aged to perfection
Join Date: Jun 2009
Location: PacNW
Posts: 1,817
Bikes: Dinucci Allez 2.0, Richard Sachs, Alex Singer, Serotta, Masi GC, Raleigh Pro Mk.1, Hetchins, etc
Mentioned: 24 Post(s)
Tagged: 0 Thread(s)
Quoted: 839 Post(s)
Liked 1,258 Times
in
663 Posts
If you do what I suggest (using the recessed nut) then you should not need the concave "washer"
on the back side of the bridge, right ?
It would not be used with a recessed brake nut.
Or, you can counterbore your concave "washer" (I'd call it a pillow block) so the flange fits inside it.
you might also find that you need to shorten the recessed nut so it does not bottom out in the brake bridge.
Mark Petry
Bainbridge Island, WA USA
05-20-19, 07:35 AM
#20
Senior Member
Thread Starter
Join Date: Apr 2012
Location: Middle Earth (aka IA)
Posts: 20,435
Bikes: A bunch of old bikes and a few new ones
Mentioned: 178 Post(s)
Tagged: 0 Thread(s)
Quoted: 5888 Post(s)
Liked 3,471 Times
in
2,079 Posts
If you do what I suggest (using the recessed nut) then you should not need the concave "washer"
on the back side of the bridge, right ?
It would not be used with a recessed brake nut.
Or, you can counterbore your concave "washer" (I'd call it a pillow block) so the flange fits inside it.
you might also find that you need to shorten the recessed nut so it does not bottom out in the brake bridge.
Mark Petry
Bainbridge Island, WA USA
on the back side of the bridge, right ?
It would not be used with a recessed brake nut.
Or, you can counterbore your concave "washer" (I'd call it a pillow block) so the flange fits inside it.
you might also find that you need to shorten the recessed nut so it does not bottom out in the brake bridge.
Mark Petry
Bainbridge Island, WA USA
I think drilling out the concave washer or pillow block and drilling out the recessed nut should work and that will let me run nutted brakes. I'm trying to keep my costs down,
 . I still have the issue that the rear hole in the rear brake bridge was badly drilled at 8.7 mm so keeping the concave washer as support there will be important.
05-20-19, 08:00 AM
. I still have the issue that the rear hole in the rear brake bridge was badly drilled at 8.7 mm so keeping the concave washer as support there will be important.
05-20-19, 08:00 AM
#21
aged to perfection
Join Date: Jun 2009
Location: PacNW
Posts: 1,817
Bikes: Dinucci Allez 2.0, Richard Sachs, Alex Singer, Serotta, Masi GC, Raleigh Pro Mk.1, Hetchins, etc
Mentioned: 24 Post(s)
Tagged: 0 Thread(s)
Quoted: 839 Post(s)
Liked 1,258 Times
in
663 Posts
got it. Unlike the nice chrome moly bridge shown by John in the pic above, your frame (like my '69 Raleigh Pro) likely has a bridge that is made from a piece of steel tube, or even rolled. The previous owner weakened it by drilling it out. Using the concave washer is probably the best way to recover that strength.
Your LBS will have a recessed nut in their junk box, or I can send you one.
Mark Petry
Bainbridge Island, WA USA
Your LBS will have a recessed nut in their junk box, or I can send you one.
Mark Petry
Bainbridge Island, WA USA
05-20-19, 09:19 AM
#22
Senior Member
Had this problem on my Carr�. The bridge was overdrilled at an odd angle and enough material removed to make strength of the bridge tube questionable. Off to Yellow Jersey. Andy rummaged through a dozen inserts and found one that would both work and look at least somewhat 1960 and French. To braze in of course. Promised me the paint damage would be trivial and I could touch it up easy.
The old paint was not 'normal' and caught fire. Rear stays were sanded down, matching paint was mixed and sprayed. Color match not good enough so a second coat of a color match neither of us could see. Slight change in texture only. All of this on a while-u-wait basis and by memory the charge was $25.
Andy's service is unusual. But he is not only one who can do this. It is brakes. Do it right.
05-20-19, 09:33 AM
#23
Senior Member
Thread Starter
Join Date: Apr 2012
Location: Middle Earth (aka IA)
Posts: 20,435
Bikes: A bunch of old bikes and a few new ones
Mentioned: 178 Post(s)
Tagged: 0 Thread(s)
Quoted: 5888 Post(s)
Liked 3,471 Times
in
2,079 Posts
Had this problem on my Carr�. The bridge was overdrilled at an odd angle and enough material removed to make strength of the bridge tube questionable. Off to Yellow Jersey. Andy rummaged through a dozen inserts and found one that would both work and look at least somewhat 1960 and French. To braze in of course. Promised me the paint damage would be trivial and I could touch it up easy.
The old paint was not 'normal' and caught fire. Rear stays were sanded down, matching paint was mixed and sprayed. Color match not good enough so a second coat of a color match neither of us could see. Slight change in texture only. All of this on a while-u-wait basis and by memory the charge was $25.
Andy's service is unusual. But he is not only one who can do this. It is brakes. Do it right.
The old paint was not 'normal' and caught fire. Rear stays were sanded down, matching paint was mixed and sprayed. Color match not good enough so a second coat of a color match neither of us could see. Slight change in texture only. All of this on a while-u-wait basis and by memory the charge was $25.
Andy's service is unusual. But he is not only one who can do this. It is brakes. Do it right.

My bridge is in decent shape other than the overdrilling (8.7 on the hole facing the rear, 8 on the hole facing forwards).
Last edited by bikemig; 05-20-19 at 09:43 AM.
05-20-19, 10:18 AM
#24
Senior Member
Join Date: Oct 2015
Location: PDX
Posts: 13,046
Bikes: Merz x 5 + Specialized Merz Allez x 2, Strawberry/Newlands/DiNucci/Ti x3, Gordon, Fuso/Moulton x2, Bornstein, Paisley,1958-74 Paramounts x3, 3rensho, 74 Moto TC, 73-78 Raleigh Pro's x5, Marinoni x2, 1960 Cinelli SC, 1980 Bianchi SC, PX-10 X 2
Mentioned: 267 Post(s)
Tagged: 0 Thread(s)
Quoted: 4512 Post(s)
Liked 6,387 Times
in
3,672 Posts
don't use plastic and don't do any more drilling on the fork or bridge.
just get the "recessed brake nut" at your bike shop or out of your junk box. Take your Makita and clearance it so it will slide down the brake shaft. Install and then put your regular nut on top of it.
so you're using the "recessed nut" as a spacer or bushing.
Mark Petry
Bainbridge Island, WA USA
just get the "recessed brake nut" at your bike shop or out of your junk box. Take your Makita and clearance it so it will slide down the brake shaft. Install and then put your regular nut on top of it.
so you're using the "recessed nut" as a spacer or bushing.
Mark Petry
Bainbridge Island, WA USA
My suggestion to round the end would include grinding off the flange after drilling out or threading on all the way with concave and other washers in place and getting the length close for a tight fit.
Last edited by merziac; 05-20-19 at 10:34 AM.
