


First Raleigh Rebuild Nightmare
 07-18-20, 08:32 AM
#1
Newbie
Thread Starter
Join Date: Jul 2020
Posts: 2
Mentioned: 0 Post(s)
Tagged: 0 Thread(s)
Quoted: 3 Post(s)
Likes: 0
Liked 0 Times
in
0 Posts
First Raleigh Rebuild Nightmare
I recently bought a Raleigh Stratos (see below) as a project to keep me busy during lockdown.
This is my first time taking a bike apart so I need some advice.
the bike has a Maillard 3983 hub with 6spd cassette.
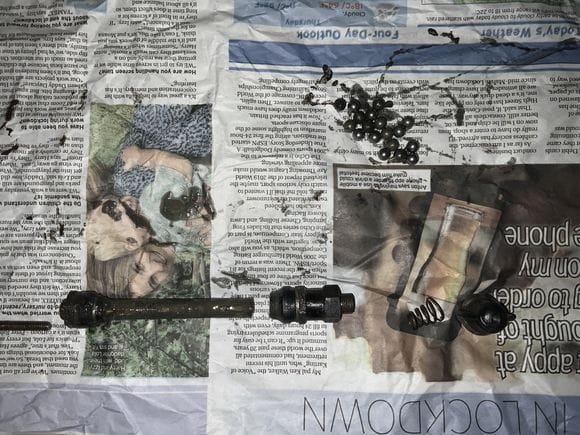
When I removed the skewer from the rear wheel half of the axel fell out from the drive side followed by the bearings. There were no dust caps fitted, just the axel being held in place by the skewer and the bike frame. Is this normal?
I did not have to remove the cassette or anything else just the skewer and the axel fell straight out the hub.
Images are in my gallery. Any advice is appreciated.
This is my first time taking a bike apart so I need some advice.
the bike has a Maillard 3983 hub with 6spd cassette.
When I removed the skewer from the rear wheel half of the axel fell out from the drive side followed by the bearings. There were no dust caps fitted, just the axel being held in place by the skewer and the bike frame. Is this normal?
I did not have to remove the cassette or anything else just the skewer and the axel fell straight out the hub.
Images are in my gallery. Any advice is appreciated.
Last edited by edlt; 07-18-20 at 08:46 AM.
 07-18-20, 08:44 AM
#2

Senior Member

Join Date: Jun 2019
Location: Michigan USA
Posts: 886
Bikes: A bunch of old bikes.
Mentioned: 7 Post(s)
Tagged: 0 Thread(s)
Quoted: 278 Post(s)
Liked 871 Times
in
417 Posts
You need 10 posts for picture attachment. Your pics uploaded to your gallery,
https://www.bikeforums.net/g/album/18541657
It looks like you need a new axle
https://www.bikeforums.net/g/album/18541657
It looks like you need a new axle
07-18-20, 08:52 AM
#3
Senior Member

The axle is a single piece. In your picture, you can see where yours snapped just left of the left cone.
Likes For Pars:
07-18-20, 08:56 AM
#4
The dropped

Join Date: Oct 2018
Location: Columbus, OH
Posts: 2,144
Bikes: Pake C'Mute Touring/Commuter Build, 1989 Kona Cinder Cone, 1995 Trek 5200, 1973 Raleigh Super Course FG, 1960/61 Montgomery Ward Hawthorne "thrift" 3 speed, by Hercules (sold) : 1966 Schwinn Deluxe Racer (sold)
Mentioned: 10 Post(s)
Tagged: 0 Thread(s)
Quoted: 1739 Post(s)
Liked 1,014 Times
in
696 Posts
I recently bought a Raleigh Stratos (see below) as a project to keep me busy during lockdown.
This is my first time taking a bike apart so I need some advice.
the bike has a Maillard 3983 hub with 6spd cassette.
When I removed the skewer from the rear wheel half of the axel fell out from the drive side followed by the bearings. There were no dust caps fitted, just the axel being held in place by the skewer and the bike frame. Is this normal?
I did not have to remove the cassette or anything else just the skewer and the axel fell straight out the hub
Do you have a caliper? You'll need to measure the axle diameter to buy a replacement, but look over the other wheel components first. If the cones have pits, or the cups, or if the rim is more than a little out of round, or needs lots of truing, buying a replacement axle is unwise. Buy a new wheel spaced for your bike's dropouts then.
Likes For Unca_Sam:
07-18-20, 08:58 AM
#5
Senior Member
You have a broken axle. Measure the inside of the rear dropouts to determine what length skewer you need. For 6 speed it is like 126mm but check first. Once you know that the axle will be about 4.5mm longer on either side to sit in the dropouts so you'll want a 135mm axle or so if the bike is indeed 126mm. Or, measure the old axle end to end. You can reuse the cones, locknuts and spacers on the new axle as they should be the same standard threading for this kind of bike. Clean up the cones and the inside of the hub first to make sure someone riding the broken axle hasnt damaged it. If it is damaged you may need a new rear wheel or replacement parts.
Axles come in two varieties, solid and hollow for a quick release. You'll want the hollow one as you already have the quick release.
Axles come in two varieties, solid and hollow for a quick release. You'll want the hollow one as you already have the quick release.
Likes For Narhay:
07-18-20, 09:12 AM
#6
Senior Member

Join Date: Jun 2018
Location: The Urban Shores Of Michigami
Posts: 1,749
Bikes: ........................................ .....Holdsworth "Special"..... .......Falcon "Special".......... .........Miyata 912........... ........................................
Mentioned: 11 Post(s)
Tagged: 0 Thread(s)
Quoted: 702 Post(s)
Liked 672 Times
in
420 Posts
edlt , is it a cassette or freewheel? What is the written on it?
07-18-20, 09:18 AM
#7
Passista
Join Date: Jul 2005
Posts: 7,598
Bikes: 1998 Pinarello Asolo, 1992 KHS Monta�a pro, 1980 Raleigh DL-1, IGH Hybrid, IGH Utility
Mentioned: 5 Post(s)
Tagged: 0 Thread(s)
Quoted: 867 Post(s)
Liked 721 Times
in
396 Posts
It's a freewheel hub, that's why the axle broke there - the right cone is not against the dropout but has spacers.
07-18-20, 10:32 AM
#8
Newbie
Thread Starter
Join Date: Jul 2020
Posts: 2
Mentioned: 0 Post(s)
Tagged: 0 Thread(s)
Quoted: 3 Post(s)
Likes: 0
Liked 0 Times
in
0 Posts
Thank you for your great advice. That is exactly what I needed to know. I have ordered a new axel.
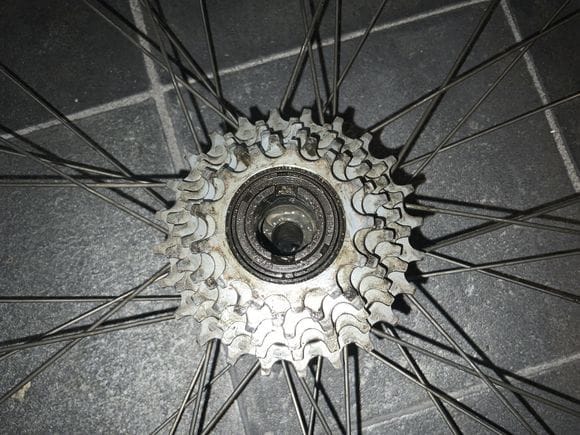
I have another issue. My freewheel is making a grinding noise when spinning.
Please could you advice what could be causing the noise (I suspect bearings need a good clean and new grease)
Does anybody know what type of tool will remove this freewheel I have never seen it before. I will upload an image to my gallery.
Last edited by edlt; 07-18-20 at 10:37 AM.
07-18-20, 10:49 AM
#9
SE Wis
Join Date: Apr 2005
Location: Milwaukee, WI
Posts: 10,515
Bikes: '68 Raleigh Sprite, '02 Raleigh C500, '84 Raleigh Gran Prix, '91 Trek 400, 2013 Novara Randonee, 1990 Trek 970
Mentioned: 40 Post(s)
Tagged: 0 Thread(s)
Quoted: 2747 Post(s)
Liked 3,396 Times
in
2,056 Posts
Looks like a 2 prong tool required. You'll need to bolt the tool in place so it doesn't slip.
https://www.parktool.com/product/freewheel-remover-fr-2
https://www.parktool.com/product/freewheel-remover-fr-2
07-18-20, 10:54 AM
#10
Shifting is fun!

Join Date: Aug 2009
Location: South Holland, NL
Posts: 11,006
Bikes: Yes, please.
Mentioned: 280 Post(s)
Tagged: 0 Thread(s)
Quoted: 2198 Post(s)
Liked 4,601 Times
in
1,764 Posts
You need a two-prong freewheel remover, such as the Park Tool FR-2.
After you get it off, flush the freewheel with WD40 until clean, then re-lube with oil.
Google this forum for instructions.
After you get it off, flush the freewheel with WD40 until clean, then re-lube with oil.
Google this forum for instructions.
07-18-20, 02:23 PM
#11
Senior Member

Join Date: Feb 2008
Location: Peoria, IL
Posts: 4,476
Mentioned: 86 Post(s)
Tagged: 0 Thread(s)
Quoted: 1829 Post(s)
Liked 3,376 Times
in
1,580 Posts
a quick note.. it's not a good idea to ride with a bent or broken rear axle, since it tends to concentrate the bearing load in a small section of the hub's bearing cup. This can cause extreme wear of the cup, or in some cases, cause the cup to crack where the bearings run. It would be good to clean out the grease and closely examine the cup. If the cup is badly worn or cracked, the hub is probably shot/trashed.
Steve in Peoria (been there, done that)
Steve in Peoria (been there, done that)
Likes For steelbikeguy:
07-18-20, 03:00 PM
#12
Shifting is fun!
Join Date: Aug 2009
Location: South Holland, NL
Posts: 11,006
Bikes: Yes, please.
Mentioned: 280 Post(s)
Tagged: 0 Thread(s)
Quoted: 2198 Post(s)
Liked 4,601 Times
in
1,764 Posts
A broken rear axle was the very first technical issue I ever had with a vintage bike, in 2009. Google brought me to this forum ...
07-18-20, 05:08 PM
#14
Senior Member
RE the freewheel: it cannot be removed without reassembling the hub first. The freewheel tool must be held on very firmly by a tightened quick release skewer.
Best to do it with a non broken axle, but it could be reassembled as it is. Try to get most of the bearings back in at least temporarily.
Best to do it with a non broken axle, but it could be reassembled as it is. Try to get most of the bearings back in at least temporarily.
07-18-20, 05:21 PM
#15
Friendship is Magic

Join Date: Nov 2010
Location: Sacramento, CA
Posts: 22,984
Bikes: old ones
Mentioned: 304 Post(s)
Tagged: 0 Thread(s)
Quoted: 26421 Post(s)
Liked 10,380 Times
in
7,208 Posts
.
...just a heads up : it's likely gonna be problematic removing that freewheel to work on the hub and flush the freewheel. Which is what I would do were I working on this wheel.
The standard practice in using one of those old tw pron removers is to hold it on the freewheel using the axle and QR skewer, which you don't have on there now.
You can use a long bolt, a couple of large fender washers sized for your bolt, but large enough to cover the openings on both sides, and a nut that holds it all together.
Even then, a freewheel that's been in place a long time, and was originally installed without benefit of grease or anti-sieze on the threads, can be very vexing to remove.
The best penetrant is a 50/50 mix of ATF and acetone, but Freeze Off is also pretty good. You need to apply it in the crevice between the hub and the freewheel, in back, for maximum effect. If you have a Mapp gas or propane torch, it doesn't hurt to heat and cool the hub right there where the freewheel screws on. Finally, you can use a wrench on the removal tool, but most people get more leverage placing he flats of the tool in a decent, solidly mounted bench vise, and grabbing the wheel to turn it and break loose the freewheel.
If you don't have the tool solidly attached in the freewheel slots, it will jump out and damage the slots (and eventually the tool). It's one of the more frustrating aspects of that design, which was supplanted by others with better interfacing.
 07-18-20, 05:31 PM
#16
Old fart

Join Date: Nov 2004
Location: Appleton WI
Posts: 24,786
Bikes: Several, mostly not name brands.
Mentioned: 153 Post(s)
Tagged: 0 Thread(s)
Quoted: 3588 Post(s)
Liked 3,400 Times
in
1,934 Posts
the bike has a Maillard 3983 hub with 6spd cassette.
When I removed the skewer from the rear wheel half of the axel fell out from the drive side followed by the bearings. There were no dust caps fitted, just the axel being held in place by the skewer and the bike frame. Is this normal?
I did not have to remove the cassette or anything else just the skewer and the axel fell straight out the hub.
As others noted, you have a broken axle. A decent bike shop should be able to source a suitable replacement.
N.B. the axle in the picture indicates that you have a freewheel hub, not a cassette hub.
07-18-20, 05:35 PM
#17
Senior Member
I think it's better and faster to reassemble the hub and remove the freewheel the conventional way. It is a little tricky but not impossible. Glop some grease in there to hold the ball bearings. Doesn't matter if a couple are missing at this point. Be sure to take the springs off the QR first. As noted earlier, google for more detailed instructions.
I've removed a lot of freewheels from hubs with broken axles, and it isn't that big of a deal.
For sure I agree soak it with some penetrant etc. They can be stubborn. People who put freewheels on with insufficient grease should... (deleted...


 )
)
I've removed a lot of freewheels from hubs with broken axles, and it isn't that big of a deal.
For sure I agree soak it with some penetrant etc. They can be stubborn. People who put freewheels on with insufficient grease should... (deleted...
)
07-18-20, 05:35 PM
#18
Old fart
Join Date: Nov 2004
Location: Appleton WI
Posts: 24,786
Bikes: Several, mostly not name brands.
Mentioned: 153 Post(s)
Tagged: 0 Thread(s)
Quoted: 3588 Post(s)
Liked 3,400 Times
in
1,934 Posts
If the freewheel uses a splined remover, e.g. Atom, Normandy, new-style Regina, most Shimano, etc., then it is usually possible to remove the freewheel even in the absence of the hub axle.
Last edited by JohnDThompson; 07-18-20 at 05:40 PM. Reason: Looked at the gallery pic of the freewheel; it's a SunTour "Winner" two-prong unit. So yes, reassembly will be needed.
07-18-20, 05:46 PM
#19
Senior Member
That depends on the freewheel. If it's one of the two-prong variety, e.g. SunTour, old-style Regina, and such like, then yes, you need to be able to secure the remover tool against the freewheel body.
If the freewheel uses a splined remover, e.g. Atom, Normandy, new-style Regina, most Shimano, etc., then it is usually possible to remove the freewheel even in the absence of the hub axle.
If the freewheel uses a splined remover, e.g. Atom, Normandy, new-style Regina, most Shimano, etc., then it is usually possible to remove the freewheel even in the absence of the hub axle.
On rare occasions I'd use a skewer even with a splined freewheel. If they were super stuck and you are applying a lot of force, it makes things a little more secure. It's also helpful if you are using a big wrench and not a bench vise, to keep the tool from falling out.
07-18-20, 05:52 PM
#20
Senior Member
Join Date: Oct 2015
Location: PDX
Posts: 13,043
Bikes: Merz x 5 + Specialized Merz Allez x 2, Strawberry/Newlands/DiNucci/Ti x3, Gordon, Fuso/Moulton x2, Bornstein, Paisley,1958-74 Paramounts x3, 3rensho, 74 Moto TC, 73-78 Raleigh Pro's x5, Marinoni x2, 1960 Cinelli SC, 1980 Bianchi SC, PX-10 X 2
Mentioned: 267 Post(s)
Tagged: 0 Thread(s)
Quoted: 4512 Post(s)
Liked 6,383 Times
in
3,669 Posts
 Then come stand in the "I got this line" after working through that long line.
07-18-20, 06:10 PM
Then come stand in the "I got this line" after working through that long line.
07-18-20, 06:10 PM
#21
Senior Member
07-18-20, 06:12 PM
#22
Senior Member
Join Date: Oct 2015
Location: PDX
Posts: 13,043
Bikes: Merz x 5 + Specialized Merz Allez x 2, Strawberry/Newlands/DiNucci/Ti x3, Gordon, Fuso/Moulton x2, Bornstein, Paisley,1958-74 Paramounts x3, 3rensho, 74 Moto TC, 73-78 Raleigh Pro's x5, Marinoni x2, 1960 Cinelli SC, 1980 Bianchi SC, PX-10 X 2
Mentioned: 267 Post(s)
Tagged: 0 Thread(s)
Quoted: 4512 Post(s)
Liked 6,383 Times
in
3,669 Posts
I recently bought a Raleigh Stratos (see below) as a project to keep me busy during lockdown.
This is my first time taking a bike apart so I need some advice.
the bike has a Maillard 3983 hub with 6spd cassette.
When I removed the skewer from the rear wheel half of the axel fell out from the drive side followed by the bearings. There were no dust caps fitted, just the axel being held in place by the skewer and the bike frame. Is this normal?
I did not have to remove the cassette or anything else just the skewer and the axel fell straight out the hub.
Images are in my gallery. Any advice is appreciated.
It will however be a valuable learning experience, which is good for skill building and will make other problems less so.
Stuck stems, seatposts, DS BB cups, cross, stripped threads and such can be real nightmares.
You're in the right place, we'll get you through all of this and more as you can probably already tell.
Patience is key, take a breath, have a beer or whatever, gather your chi and get good correct tools for the task at hand, you got this.

Likes For merziac:
07-18-20, 06:44 PM
#24
Ride, Wrench, Swap, Race

Join Date: Jan 2010
Location: Northern California
Posts: 9,194
Bikes: Cheltenham-Pedersen racer, Boulder F/S Paris-Roubaix, Varsity racer, '52 Christophe, '62 Continental, '92 Merckx, '75 Limongi, '76 Presto, '72 Gitane SC, '71 Schwinn SS, etc.
Mentioned: 132 Post(s)
Tagged: 0 Thread(s)
Quoted: 1565 Post(s)
Liked 1,296 Times
in
866 Posts
The dust cover under the freewheel is likely still there, but probably now enlarged from riding on the broken axle with the cone pushing against the dust cover opening.
I advise using the longest wrench possible or a bench vise to hold the tool while the wheel is turned leftward. I use an 18" wrench for example, with the tire gripping the ground as I apply downward force to the wrench. Don't give yourself a hernia!
Shorter wrenches put so much side-loading on the tool and the prongs that failure of the prong interface (or outright cracking of the tool) is more likely in cases of the freewheel being very difficult to turn.
Freewheels self-tighten in use to a high degree of torque. Yours appears to have traditional "road" gearing so should not be very difficult to remove (relatively speaking if one has removed a few freewheels already).
Be sure to grease the freewheel threads well upon reassembly!
WD40 is a good fluid to wash through the freewheel bearings, but follow up with heavier oil and allow to drain on a rag for a good while in a warm place in the sun. Hopefully this one isn't rusted inside and so turns smoothly after flushing.
Lastly take note that the rear derailer does not move/tilt as the quick-release is tightened down on the newly-rebuilt axle.
If there is significant movement of this kind, the dropout of the frame has likely been bent from the sharp tilting of the broken axle. Bend back carefully using a large adjustable wrench in the needed direction, and be sure to clamp the wrench down on both the upper and lower run of the dropout (to both sides of the dropout axle slot).
