


Cracked Holdsworth/Claud Butler Autopsy => Resurrection
 07-05-19, 12:51 PM
#1

Senior Member
Thread Starter

Join Date: Jun 2010
Location: Medford MA
Posts: 2,089
Bikes: Ron Cooper touring, 1959 Jack Taylor 650b ladyback touring tandem, Vitus 979, Joe Bell painted Claud Butler Dalesman, Colin Laing curved tube tandem, heavily-Dilberted 1982 Trek 6xx, Ren� Herse tandem
Mentioned: 80 Post(s)
Tagged: 0 Thread(s)
Quoted: 964 Post(s)
Liked 1,451 Times
in
723 Posts
Cracked Holdsworth/Claud Butler Autopsy => Resurrection
Many of you have seen this picture:
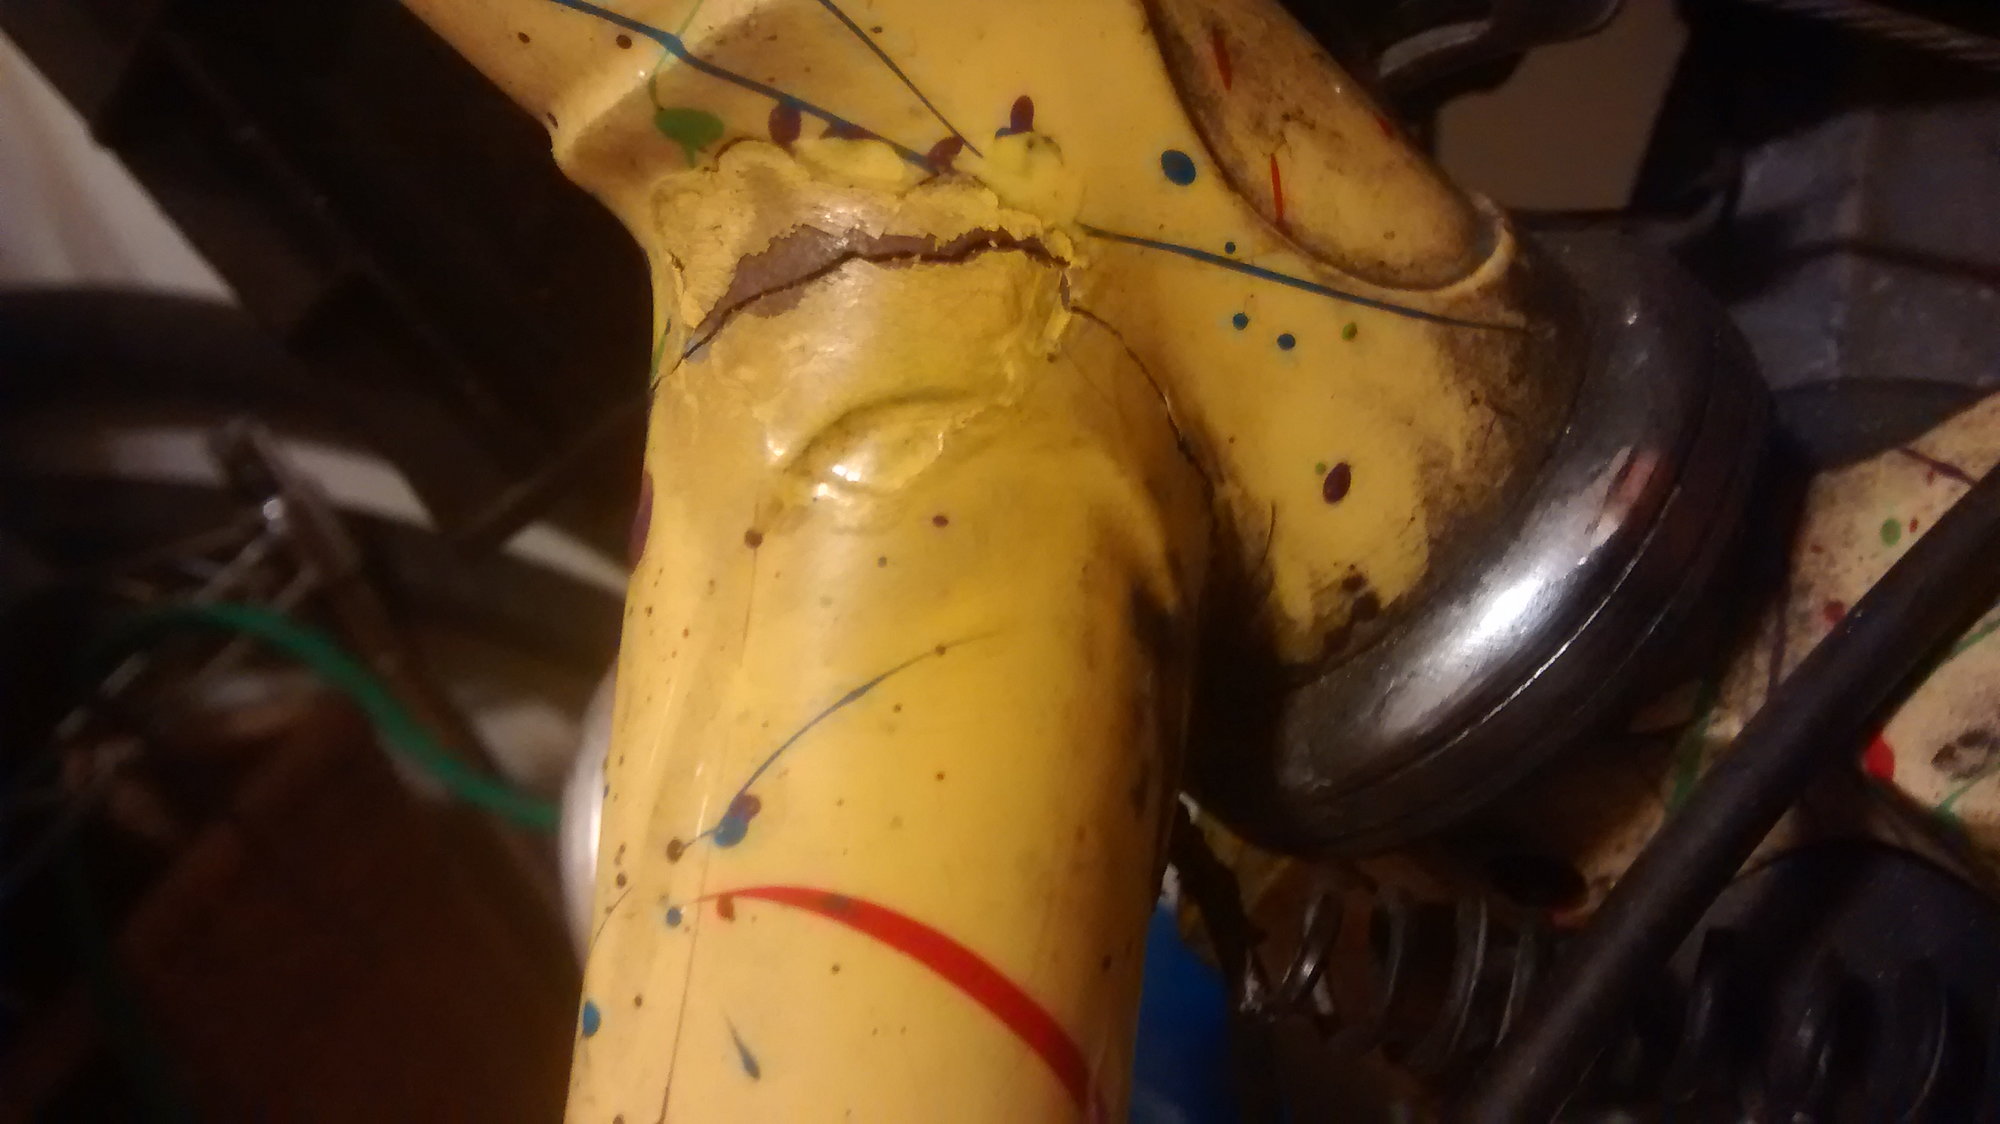
This crack is my main impetus for doing anything worth posting on these here forums. My unknown year Claud Butler Dalesman with a Joe Bell paintjob began to creak like mad on a midnight commute home, and upon inspection of the area from whence the creak came, I found this awful crack. Spreading the crack, I think I can see a tube inside that is _not_ cracked. That is, the crack only goes through the lug. I formed the hypothesis that the Holdsworth workman did not get enough penetration when brazing under the lug, for whatever reason, so the crack follows the front of the bronze. In other words, these tubes are not brazed together under the lug, so the lug, being the only thing that held the joint together, failed. If this is the case, it should be possible to mend the frame without replacing the tube.
Only one way to find out, and that involves an angle grinder. My neighbors who hate me and my projects are away for the long weekend, so it's time to make hay while the sun shines! If the tube is intact and well mitered, I will grind away the parts of the lug that aren't brazed to anything, then build up a nice fillet around the joint, file to blend it into the lug, and call it good.

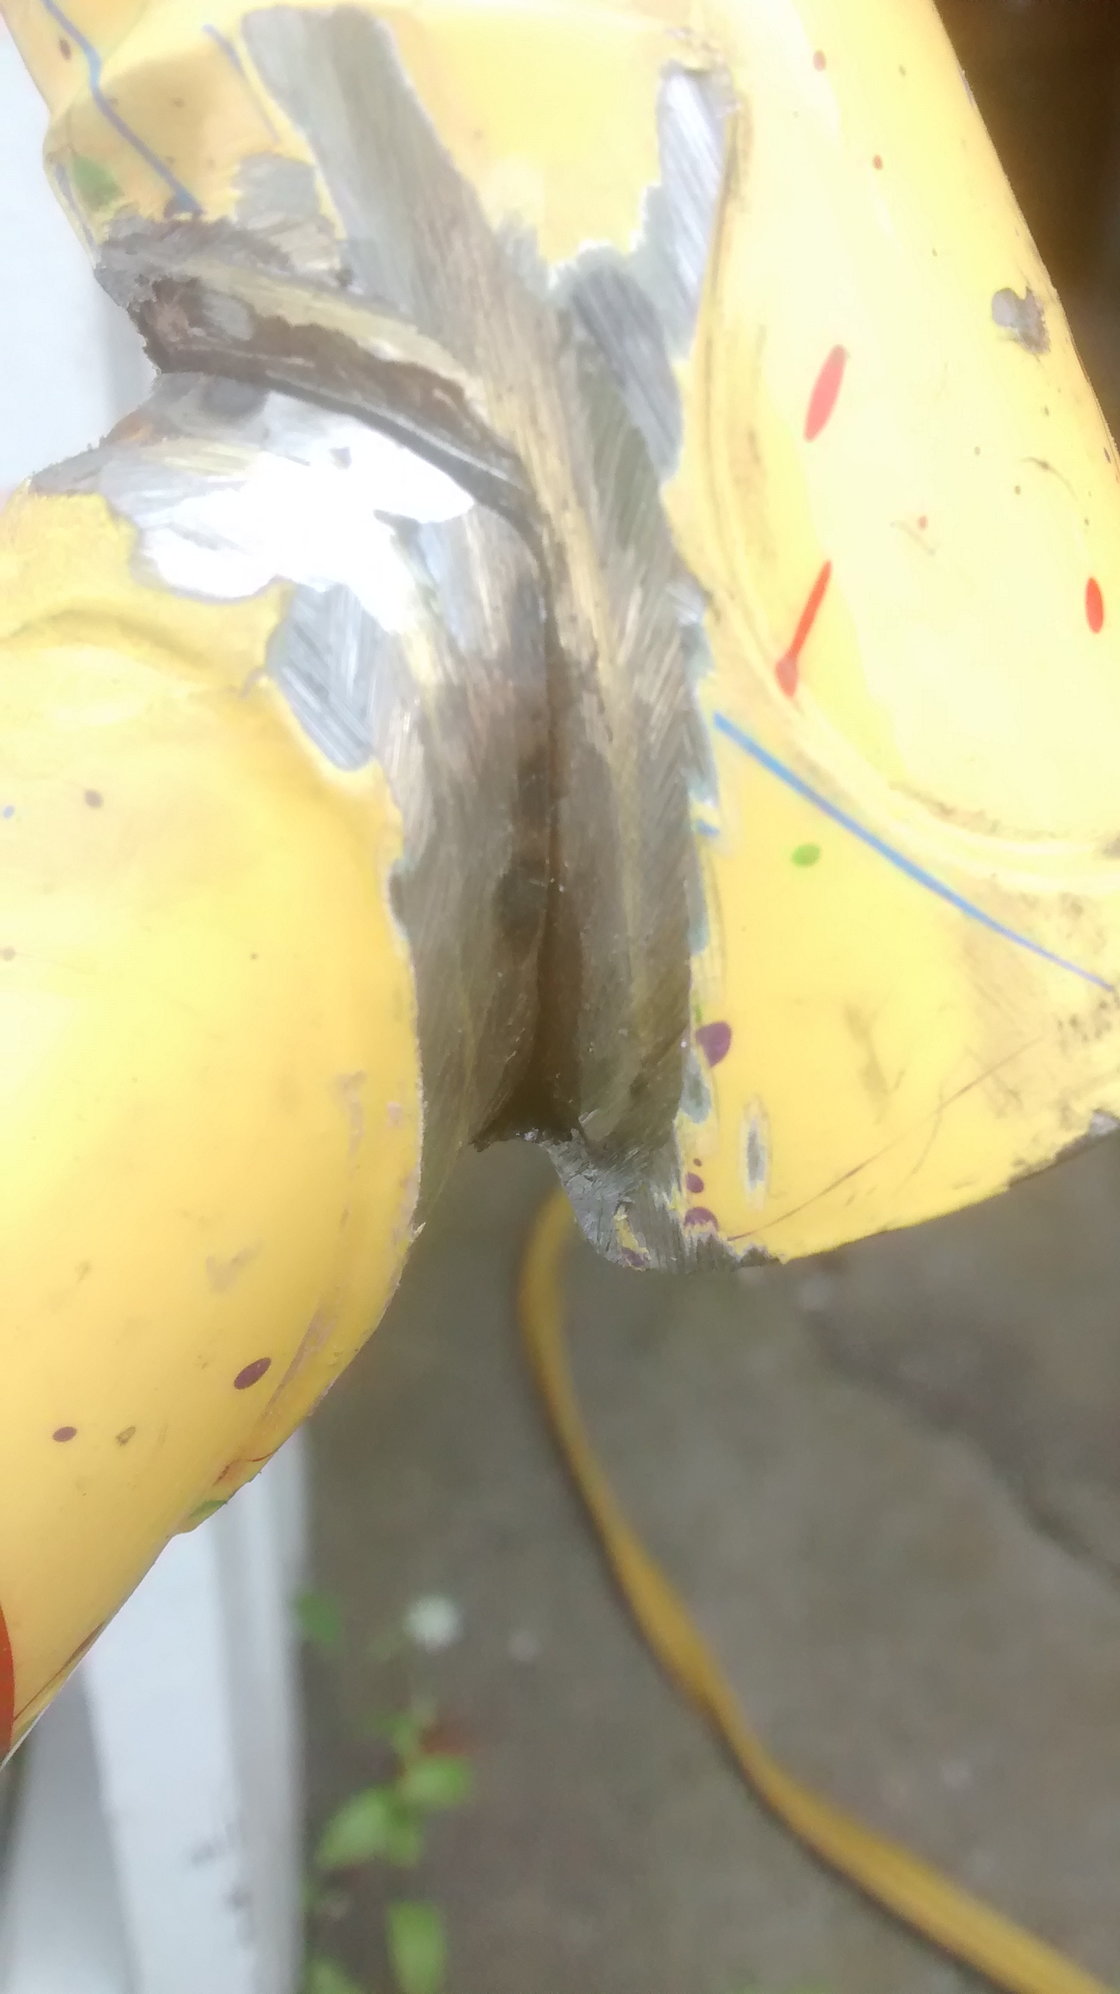
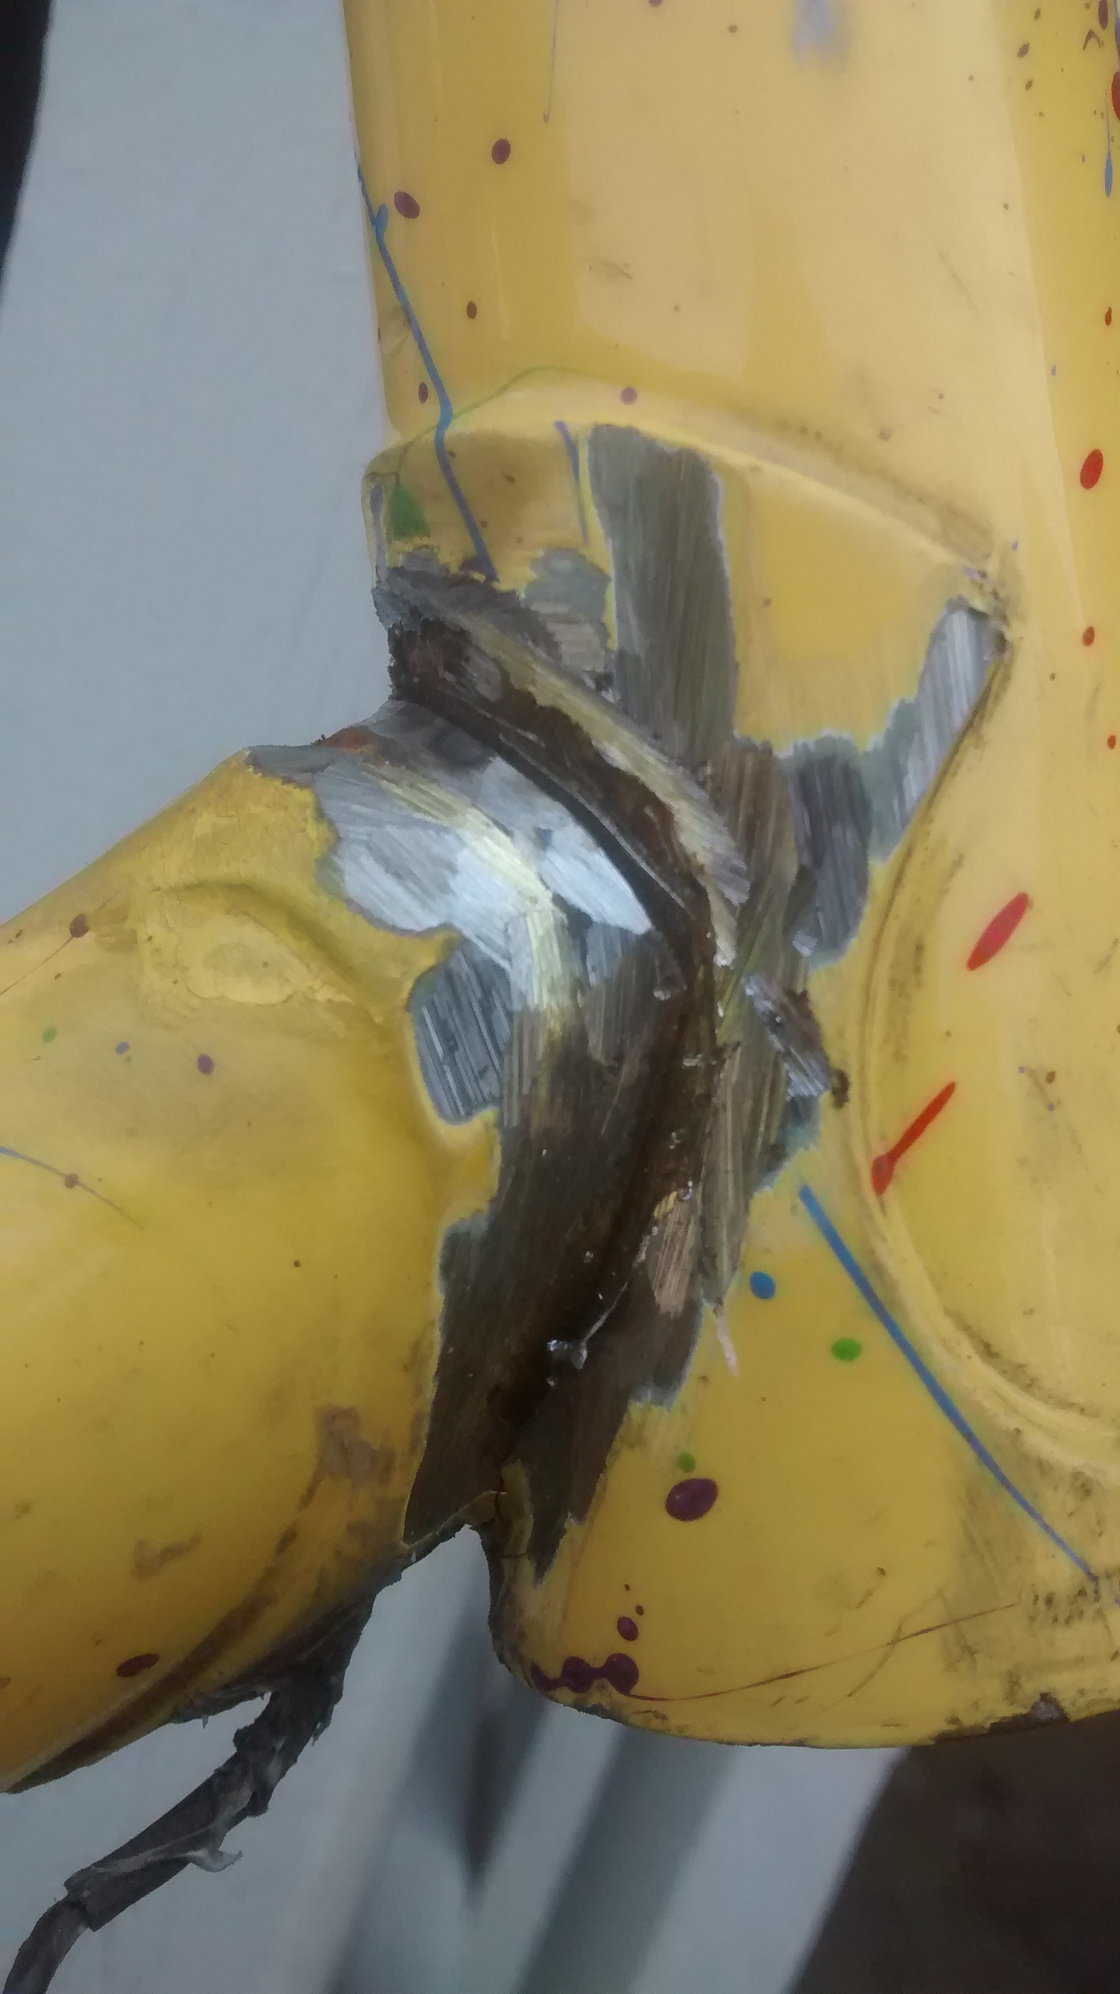
Hypothesis confirmed! Everywhere that is rusty is a place bronze didn't get to. It's pretty much perfectly following the crack! So we are go for ignition (torch ignition, that is). Fillet brazing here I come.
Stay tuned for HOLDSWORTH RESURRECTION!
This crack is my main impetus for doing anything worth posting on these here forums. My unknown year Claud Butler Dalesman with a Joe Bell paintjob began to creak like mad on a midnight commute home, and upon inspection of the area from whence the creak came, I found this awful crack. Spreading the crack, I think I can see a tube inside that is _not_ cracked. That is, the crack only goes through the lug. I formed the hypothesis that the Holdsworth workman did not get enough penetration when brazing under the lug, for whatever reason, so the crack follows the front of the bronze. In other words, these tubes are not brazed together under the lug, so the lug, being the only thing that held the joint together, failed. If this is the case, it should be possible to mend the frame without replacing the tube.
Only one way to find out, and that involves an angle grinder. My neighbors who hate me and my projects are away for the long weekend, so it's time to make hay while the sun shines! If the tube is intact and well mitered, I will grind away the parts of the lug that aren't brazed to anything, then build up a nice fillet around the joint, file to blend it into the lug, and call it good.
Hypothesis confirmed! Everywhere that is rusty is a place bronze didn't get to. It's pretty much perfectly following the crack! So we are go for ignition (torch ignition, that is). Fillet brazing here I come.
Stay tuned for HOLDSWORTH RESURRECTION!
 07-06-19, 05:04 PM
#3
Senior Member
Thread Starter
Join Date: Jun 2010
Location: Medford MA
Posts: 2,089
Bikes: Ron Cooper touring, 1959 Jack Taylor 650b ladyback touring tandem, Vitus 979, Joe Bell painted Claud Butler Dalesman, Colin Laing curved tube tandem, heavily-Dilberted 1982 Trek 6xx, Ren� Herse tandem
Mentioned: 80 Post(s)
Tagged: 0 Thread(s)
Quoted: 964 Post(s)
Liked 1,451 Times
in
723 Posts
Feeling brazen
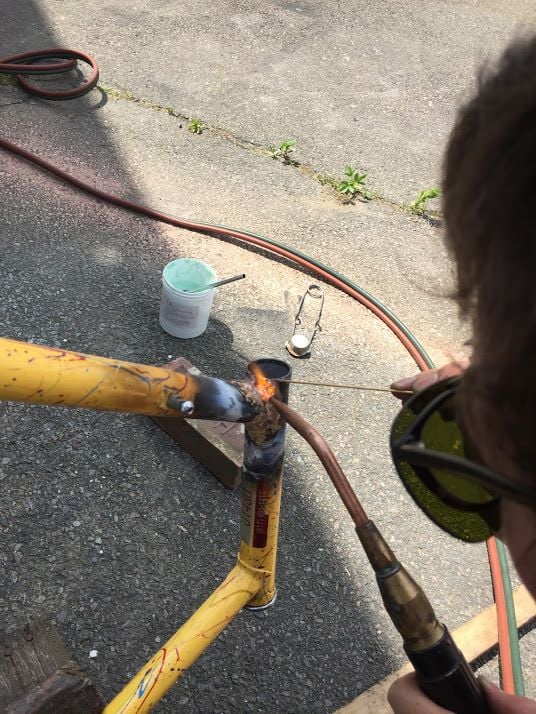
I used my oxy-acetylene torch running oxy-propane (blue rhino). I just bought a #10 tip and was excited to try it out. YIKES too much!! I got the original bronze under the lug flowing after only a second on it. It will be good for bronze brazing lugs and forks, getting in and out real fast. I definitely do not need a rosebud heating tip. I settled on a #7 for most of this work. This is propane so it burns a little cooler than acetylene, before you all get up in arms about how much fire I was using.
I'd never done fillet brazing before, but basically the strategy is to make a fillet in one spot by heating and then dipping/touching the rod to add filler, then move over and repeat, as the previously done fillet hardens. Kind of like welding but slower. This way you have a constantly wet puddle of bronze and you can kind of rely on your previously-done fillet as a dam to hold the bronze in place, by capillary action. If you get the speed down right, it really goes easily. If you dwell too much or try to push it too fast, it ends up all a big mess. The bright side is you can always fix it by going over it again, with the danger of causing voids or pinholes. I definitely had a few pinholes!!
Here are some photos of me doing the dirty work. I think by this point I had gone to a #5 tip to do some smaller touching-up. Same process though, but maybe even a bit slower.


Monday I should be doing finish work. I'm going to put a stainless tube in for internal dynamo wire routing, Jack Taylor style. I've already burnt the paint off in the lower head lug and BB area anyway (previous thread repair) so there's no harm in adding this. Plus this was the hardest frame I've ever fished dynamo wire through, and a nice internal tube should solve that once and for all.
I'd never done fillet brazing before, but basically the strategy is to make a fillet in one spot by heating and then dipping/touching the rod to add filler, then move over and repeat, as the previously done fillet hardens. Kind of like welding but slower. This way you have a constantly wet puddle of bronze and you can kind of rely on your previously-done fillet as a dam to hold the bronze in place, by capillary action. If you get the speed down right, it really goes easily. If you dwell too much or try to push it too fast, it ends up all a big mess. The bright side is you can always fix it by going over it again, with the danger of causing voids or pinholes. I definitely had a few pinholes!!
Here are some photos of me doing the dirty work. I think by this point I had gone to a #5 tip to do some smaller touching-up. Same process though, but maybe even a bit slower.
Monday I should be doing finish work. I'm going to put a stainless tube in for internal dynamo wire routing, Jack Taylor style. I've already burnt the paint off in the lower head lug and BB area anyway (previous thread repair) so there's no harm in adding this. Plus this was the hardest frame I've ever fished dynamo wire through, and a nice internal tube should solve that once and for all.
Last edited by scarlson; 07-06-19 at 05:16 PM.
Likes For scarlson:
07-07-19, 07:47 AM
#4
Senior Member
Thread Starter
Join Date: Jun 2010
Location: Medford MA
Posts: 2,089
Bikes: Ron Cooper touring, 1959 Jack Taylor 650b ladyback touring tandem, Vitus 979, Joe Bell painted Claud Butler Dalesman, Colin Laing curved tube tandem, heavily-Dilberted 1982 Trek 6xx, Ren� Herse tandem
Mentioned: 80 Post(s)
Tagged: 0 Thread(s)
Quoted: 964 Post(s)
Liked 1,451 Times
in
723 Posts
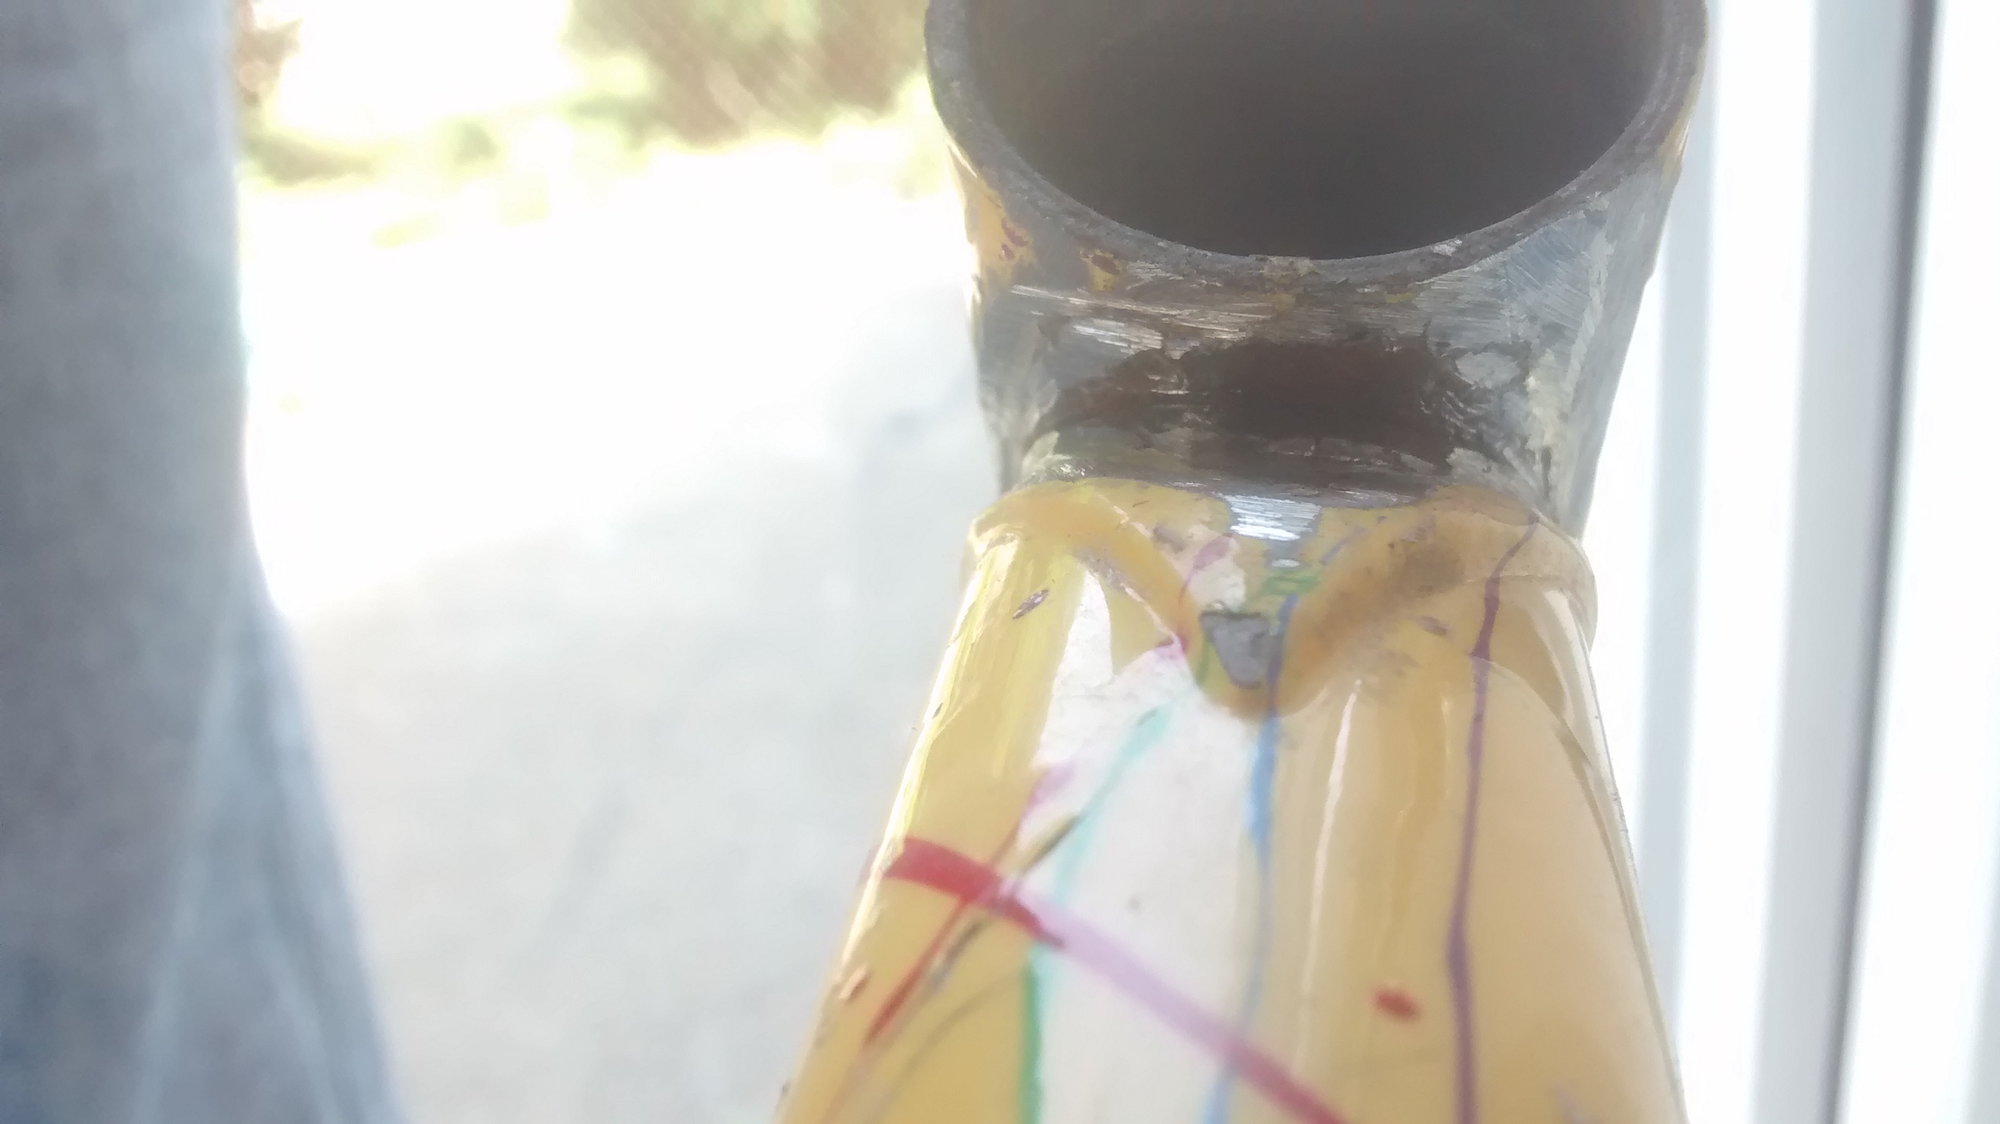
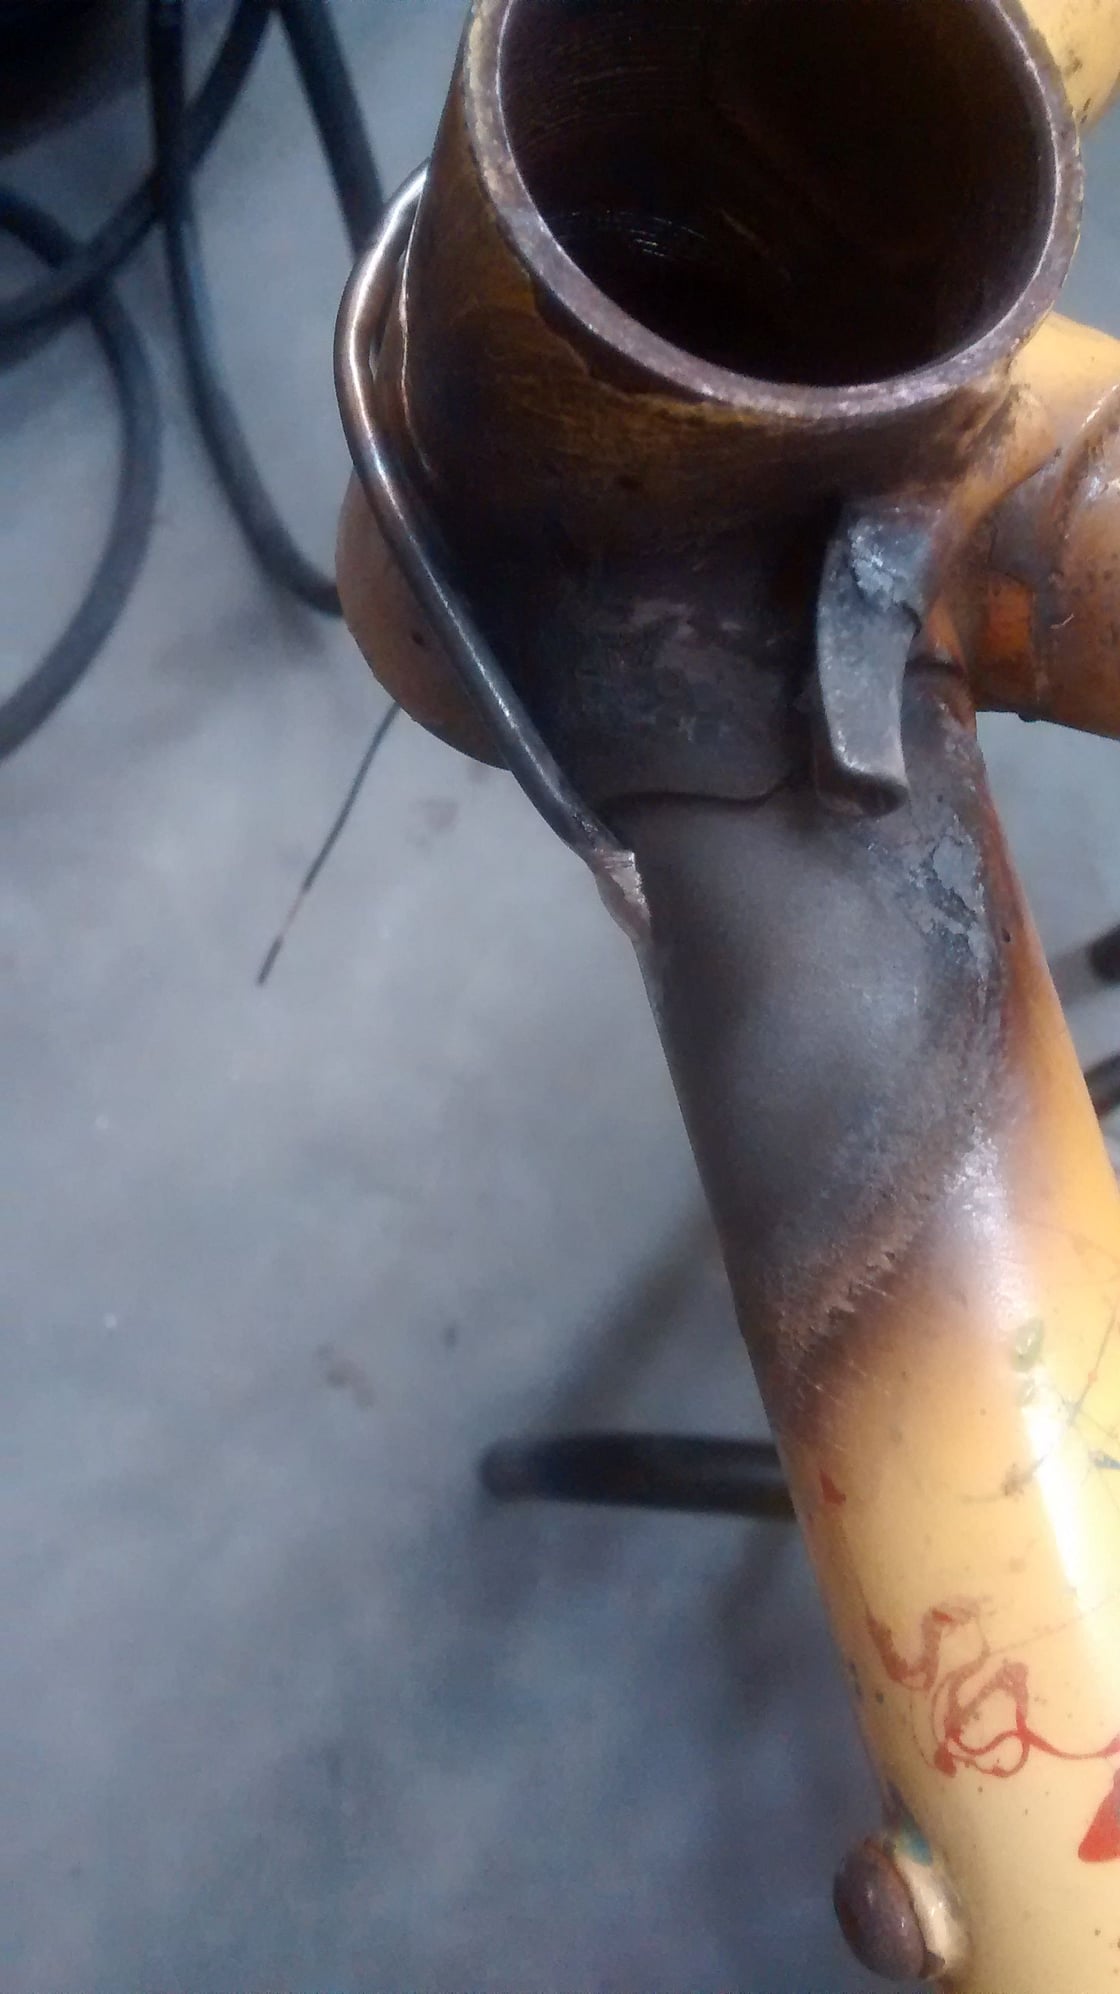
Here's a photo of the fully-prepped joint prior to brazing, that I forgot to upload yesterday. I had wire-wheeled the rust and paint off to a suitable distance, to avoid the fumes and make brazing go more smoothly. A carburizing or reducing flame (meaning a little rich in fuel) and flux can take care of surface rust, but it's still a good idea to prep the joint well. All the lug that's ground off was not attached to the tubes. It was a really bad job they did at the Holdsworth factory.

Here's the finished joint. For reference, I brazed with Gasflux C-04 nickel bronze rod and Gasflux type B flux.


It won't be possible to detect that the lug isn't there under the paint, I think! The ghost of Claud Butler whispered in my ear, suggesting this new "sesquilaminate" construction. It's halfway between lugging and fillet brazing, like bilaminate construction, but there are not quite two layers!!
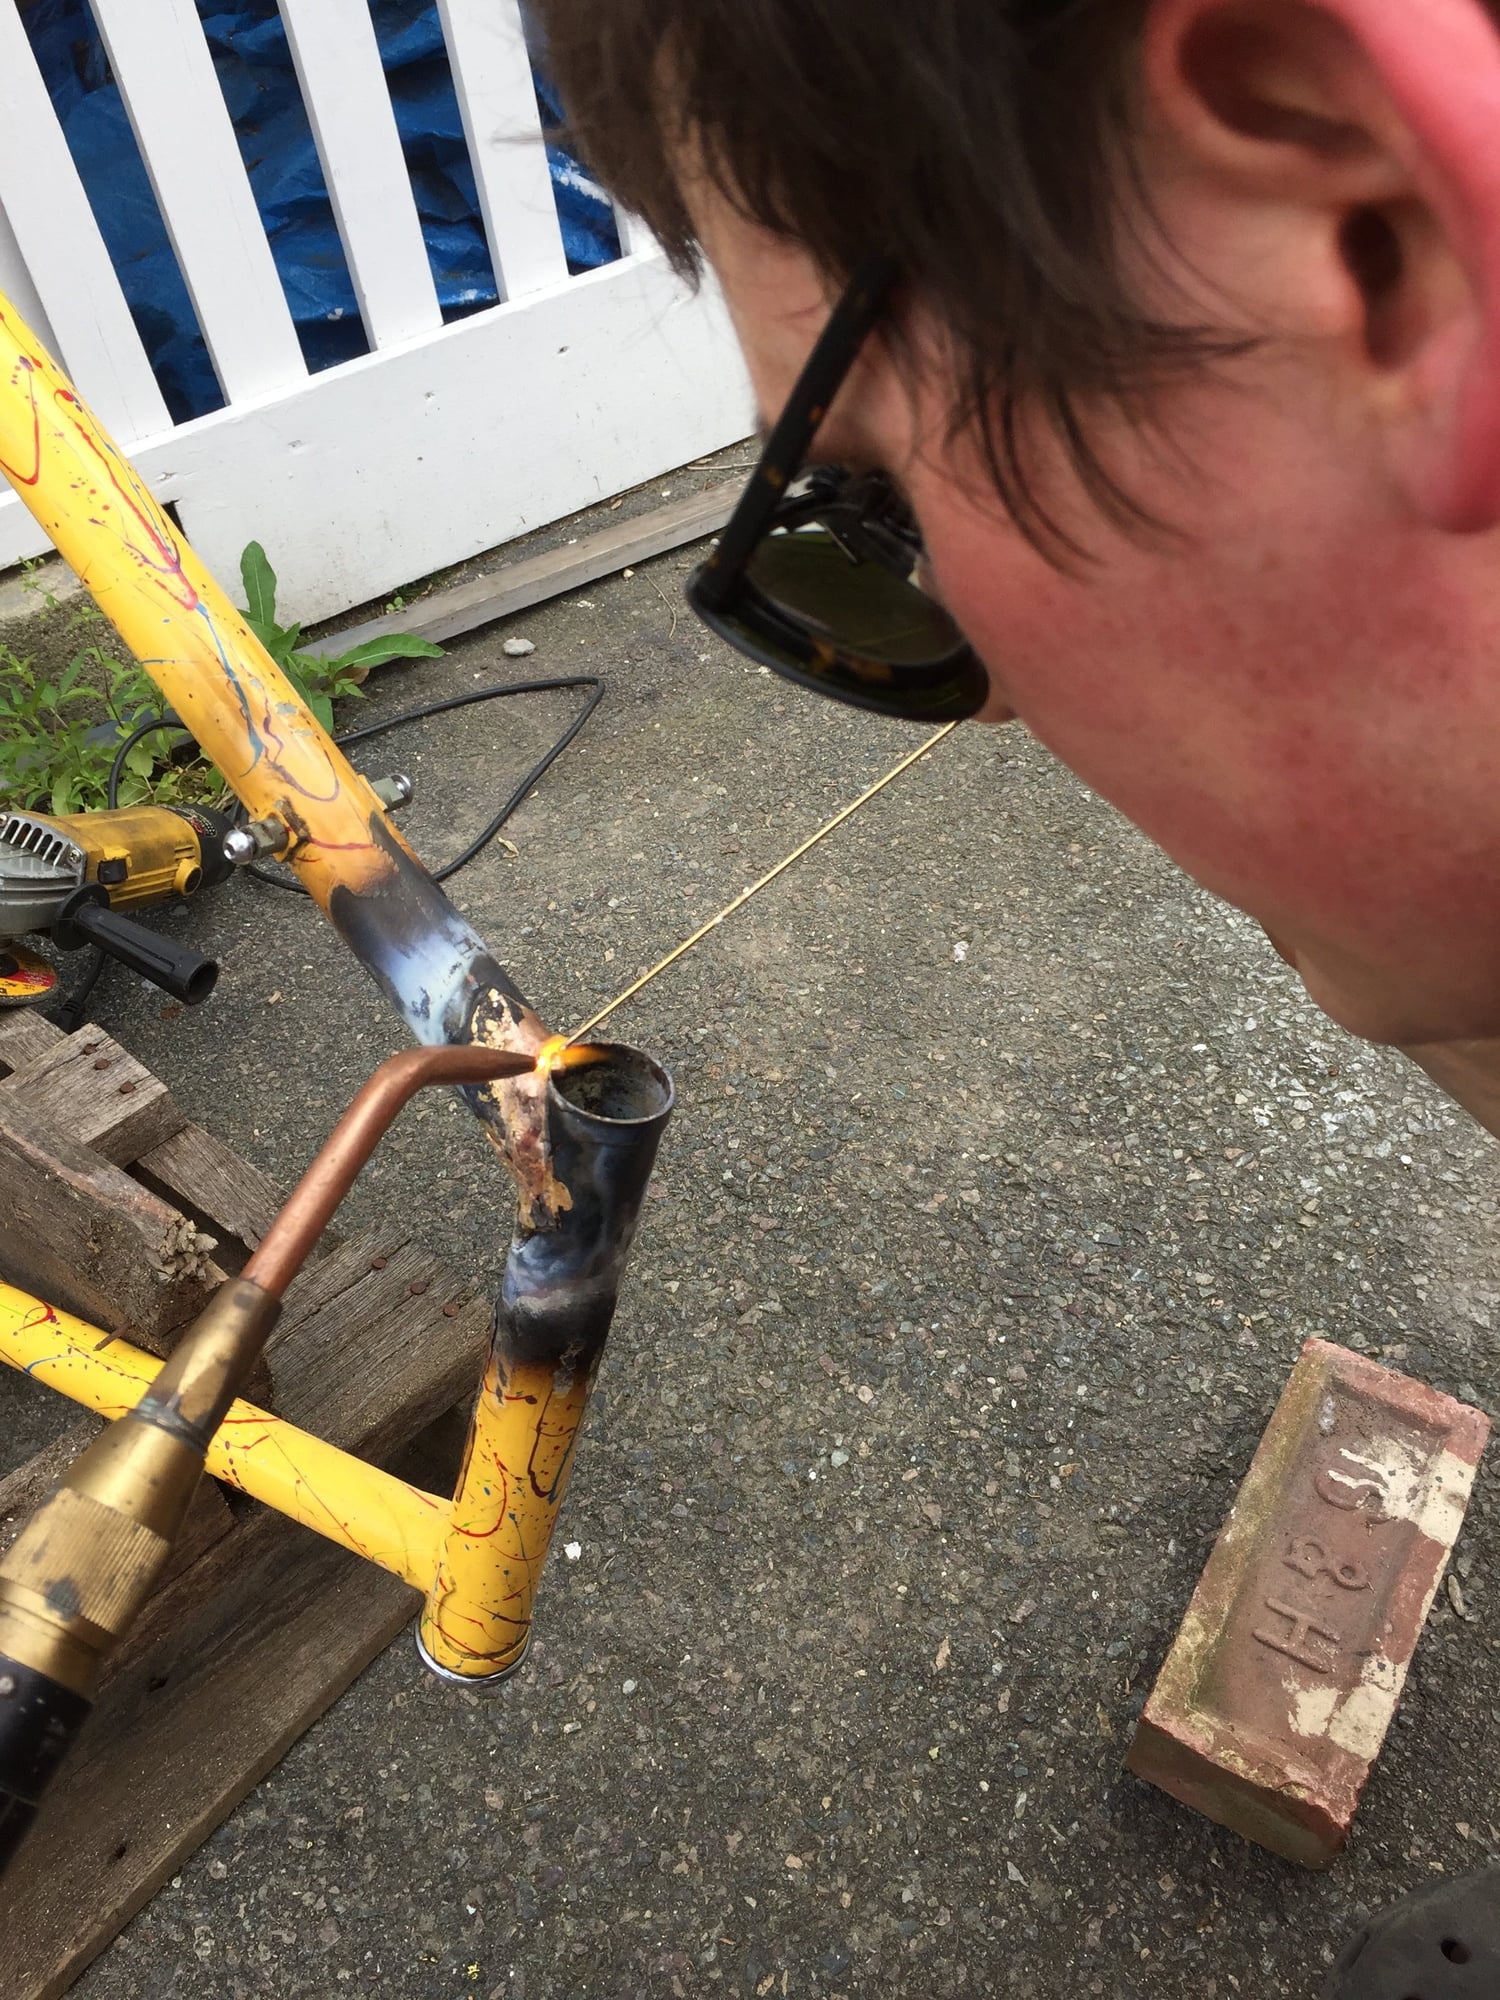
Next up I drilled two tiny holes in the downtube, at an angle, and force-fed a tiny stainless tube through, for my dynamo wire. This is something similar to what I've seen on my 1959 Jack Taylor tandem, and I thought it was a good idea for bikes that are hard to shove wires through. This one required a vacuum pump last time, so I'm not keen on repeating that. With these internal tubes, you can rewire the bike in about ten minutes. I kept feeding wire through to make sure I hadn't kinked the tubing somewhere along the line. It runs under the bottom bracket and is brazed to the chainstay bridge.

I brazed the tube with Harris Safety-Silv 56 and the turbo torch. It was surprisingly hard to do because the internal tubing I had was so thin-walled that it would heat up and cook the flux long before the frame tube would even take the silver. I had to be careful not to point the torch at anything but the frame during the whole operation, and then I could get decent joints.
Here's the finished joint. For reference, I brazed with Gasflux C-04 nickel bronze rod and Gasflux type B flux.
It won't be possible to detect that the lug isn't there under the paint, I think! The ghost of Claud Butler whispered in my ear, suggesting this new "sesquilaminate" construction. It's halfway between lugging and fillet brazing, like bilaminate construction, but there are not quite two layers!!
Next up I drilled two tiny holes in the downtube, at an angle, and force-fed a tiny stainless tube through, for my dynamo wire. This is something similar to what I've seen on my 1959 Jack Taylor tandem, and I thought it was a good idea for bikes that are hard to shove wires through. This one required a vacuum pump last time, so I'm not keen on repeating that. With these internal tubes, you can rewire the bike in about ten minutes. I kept feeding wire through to make sure I hadn't kinked the tubing somewhere along the line. It runs under the bottom bracket and is brazed to the chainstay bridge.
I brazed the tube with Harris Safety-Silv 56 and the turbo torch. It was surprisingly hard to do because the internal tubing I had was so thin-walled that it would heat up and cook the flux long before the frame tube would even take the silver. I had to be careful not to point the torch at anything but the frame during the whole operation, and then I could get decent joints.
Likes For scarlson:
07-07-19, 07:55 AM
#5
Sophomore Member

Join Date: Jan 2019
Posts: 2,531
Mentioned: 12 Post(s)
Tagged: 0 Thread(s)
Quoted: 1628 Post(s)
Liked 1,057 Times
in
631 Posts
Nice work! I guess steel frames DO eventually wear out, after decades of use.
It's a shame to lose that paint job, I really like that splatter. Dates the paint job a bit, I think it was 1991-92 that many bike manufacturers went with the splatter trend, which only lasted a couple of years. My 1991 Paramount had it, though nowhere near as nice as the paint work on this bike.
It's a shame to lose that paint job, I really like that splatter. Dates the paint job a bit, I think it was 1991-92 that many bike manufacturers went with the splatter trend, which only lasted a couple of years. My 1991 Paramount had it, though nowhere near as nice as the paint work on this bike.
07-07-19, 08:21 AM
#6
Bike Butcher of Portland

Join Date: Jul 2014
Location: Portland, OR
Posts: 11,630
Bikes: It's complicated.
Mentioned: 1299 Post(s)
Tagged: 0 Thread(s)
Quoted: 4677 Post(s)
Liked 5,790 Times
in
2,279 Posts
Well done!
Likes For gugie:
07-07-19, 09:46 AM
#7
www.theheadbadge.com

Join Date: Sep 2005
Location: Southern Florida
Posts: 28,510
Bikes: https://www.theheadbadge.com
Mentioned: 124 Post(s)
Tagged: 0 Thread(s)
Quoted: 2420 Post(s)
Liked 4,381 Times
in
2,090 Posts
It won't be possible to detect that the lug isn't there under the paint, I think! The ghost of Claud Butler whispered in my ear, suggesting this new "sesquilaminate" construction. It's halfway between lugging and fillet brazing, like bilaminate construction, but there are not quite two layers!!

-Kurt
__________________


07-07-19, 09:49 AM
#8
Senior Member
Thread Starter
Join Date: Jun 2010
Location: Medford MA
Posts: 2,089
Bikes: Ron Cooper touring, 1959 Jack Taylor 650b ladyback touring tandem, Vitus 979, Joe Bell painted Claud Butler Dalesman, Colin Laing curved tube tandem, heavily-Dilberted 1982 Trek 6xx, Ren� Herse tandem
Mentioned: 80 Post(s)
Tagged: 0 Thread(s)
Quoted: 964 Post(s)
Liked 1,451 Times
in
723 Posts
Particularly it shows how bad the penetration of the filler in a lugged steel joint has to be before it will actually fail. Framebuilding lore holds that full penetration of the filler is of paramount importance. Basic framebuilder training often involves brazing practice lugs and then cutting them open to check filler penetration. Granted, this failure is only one data point, but it raises the question of how much this actually matters. If it's the difference between a failure after decades and a failure never, then does it warrant every framebuilder-in-training cutting five lugs in half after brazing them? Even so, the lug penetration test is still a good didactic tool to teach a feel for metal flow and heat-following, so I'm not knocking it - just musing about the origins of framebuilding lore. Musing and muttering aside, it's a rare thing to actually see a badly brazed joint make its way into the world, and probably even rarer to see it subsequently fail in a textbook way decades later. That's why I posted about it - I'm a scientist after all.
It's a shame to lose that paint job, I really like that splatter. Dates the paint job a bit, I think it was 1991-92 that many bike manufacturers went with the splatter trend, which only lasted a couple of years. My 1991 Paramount had it, though nowhere near as nice as the paint work on this bike.
Last edited by scarlson; 07-07-19 at 09:59 AM.
07-07-19, 10:15 AM
#9
Senior Member
Thread Starter
Join Date: Jun 2010
Location: Medford MA
Posts: 2,089
Bikes: Ron Cooper touring, 1959 Jack Taylor 650b ladyback touring tandem, Vitus 979, Joe Bell painted Claud Butler Dalesman, Colin Laing curved tube tandem, heavily-Dilberted 1982 Trek 6xx, Ren� Herse tandem
Mentioned: 80 Post(s)
Tagged: 0 Thread(s)
Quoted: 964 Post(s)
Liked 1,451 Times
in
723 Posts
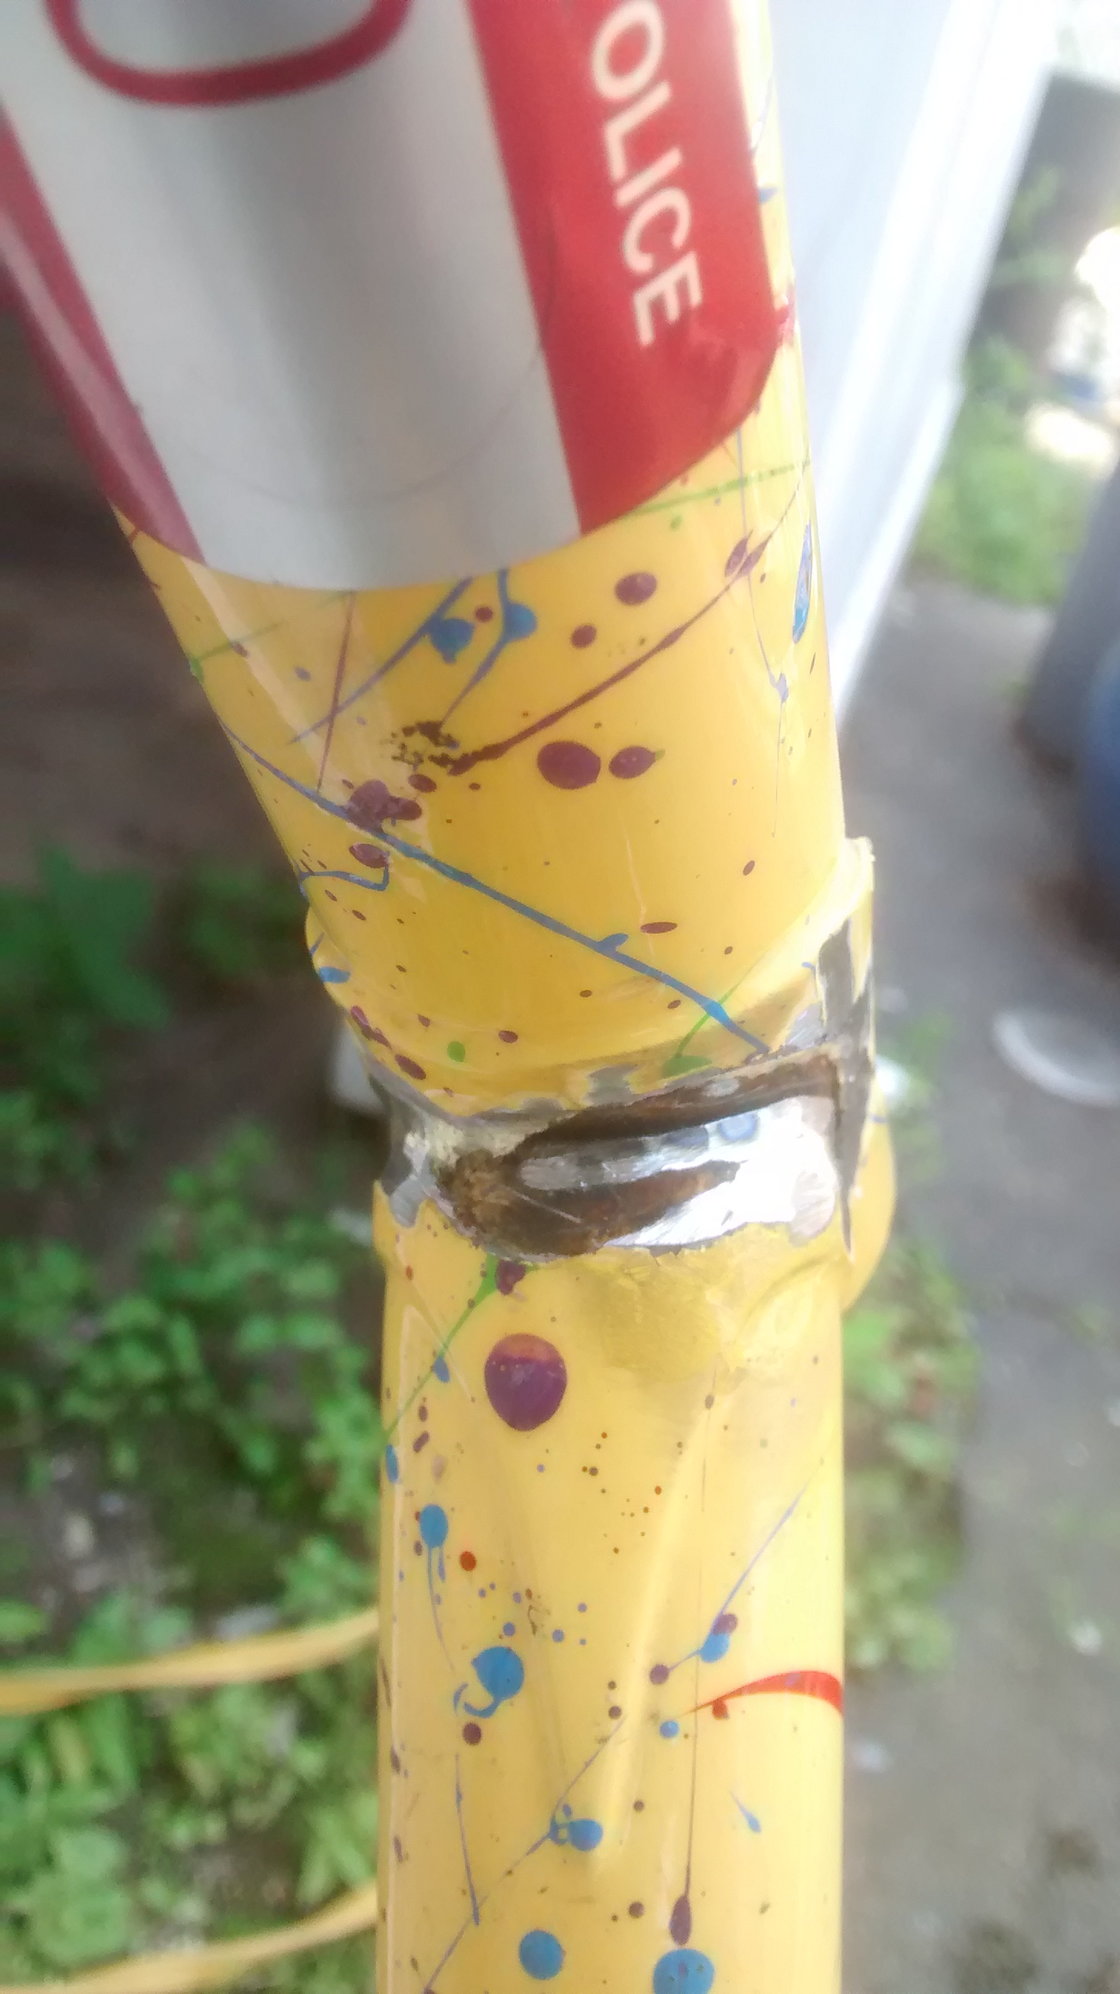
 I do wonder if the top lug is also brazed with inadequate penetration.
I am just glad that at least one person doesn't think I'm completely crazy for calling this "sesquilaminate". The strangest spirits speak to me while I've got the torch running - or is it just the fumes?
Likes For scarlson:
07-07-19, 03:09 PM
#10
Senior Member
Join Date: Oct 2015
Location: PDX
Posts: 13,033
Bikes: Merz x 5 + Specialized Merz Allez x 2, Strawberry/Newlands/DiNucci/Ti x3, Gordon, Fuso/Moulton x2, Bornstein, Paisley,1958-74 Paramounts x3, 3rensho, 74 Moto TC, 73-78 Raleigh Pro's x5, Marinoni x2, 1960 Cinelli SC, 1980 Bianchi SC, PX-10 X 2
Mentioned: 267 Post(s)
Tagged: 0 Thread(s)
Quoted: 4510 Post(s)
Liked 6,374 Times
in
3,666 Posts
I think it's a neat case study Particularly it shows how bad the penetration of the filler in a lugged steel joint has to be before it will actually fail. Framebuilding lore holds that full penetration of the filler is of paramount importance. Basic framebuilder training often involves brazing practice lugs and then cutting them open to check filler penetration. Granted, this failure is only one data point, but it raises the question of how much this actually matters. If it's the difference between a failure after decades and a failure never, then does it warrant every framebuilder-in-training cutting five lugs in half after brazing them? Even so, the lug penetration test is still a good didactic tool to teach a feel for metal flow and heat-following, so I'm not knocking it - just musing about the origins of framebuilding lore. Musing and muttering aside, it's a rare thing to actually see a badly brazed joint make its way into the world, and probably even rarer to see it subsequently fail in a textbook way decades later. That's why I posted about it - I'm a scientist after all.
I really like the splatter too! The date of this paintjob is '87, so maybe they were ahead of the curve. I get comments occasionally, mainly about how dated it is! Maybe it helps against theft - not just because most people wouldn't like it, but also because it's so darn distinctive that the would-be thief wouldn't be able to sell it. You're right, Joe Bell is really a cut above. I haven't seen automotive paint this nice, and that's saying something. It's so thick and tough that you can tell just from looking at the pictures. I felt really bad taking it off, but the blow was softened by having had to take the paint off the bottom bracket two years ago to fix the threads. This bike has been through the wringer for sure, but it just keeps coming back swinging. Rustoleum yellow will go on this coming week and it'll be back to the daily grind!
Particularly it shows how bad the penetration of the filler in a lugged steel joint has to be before it will actually fail. Framebuilding lore holds that full penetration of the filler is of paramount importance. Basic framebuilder training often involves brazing practice lugs and then cutting them open to check filler penetration. Granted, this failure is only one data point, but it raises the question of how much this actually matters. If it's the difference between a failure after decades and a failure never, then does it warrant every framebuilder-in-training cutting five lugs in half after brazing them? Even so, the lug penetration test is still a good didactic tool to teach a feel for metal flow and heat-following, so I'm not knocking it - just musing about the origins of framebuilding lore. Musing and muttering aside, it's a rare thing to actually see a badly brazed joint make its way into the world, and probably even rarer to see it subsequently fail in a textbook way decades later. That's why I posted about it - I'm a scientist after all.I really like the splatter too! The date of this paintjob is '87, so maybe they were ahead of the curve. I get comments occasionally, mainly about how dated it is! Maybe it helps against theft - not just because most people wouldn't like it, but also because it's so darn distinctive that the would-be thief wouldn't be able to sell it. You're right, Joe Bell is really a cut above. I haven't seen automotive paint this nice, and that's saying something. It's so thick and tough that you can tell just from looking at the pictures. I felt really bad taking it off, but the blow was softened by having had to take the paint off the bottom bracket two years ago to fix the threads. This bike has been through the wringer for sure, but it just keeps coming back swinging. Rustoleum yellow will go on this coming week and it'll be back to the daily grind!
07-07-19, 03:56 PM
#11
www.theheadbadge.com
Join Date: Sep 2005
Location: Southern Florida
Posts: 28,510
Bikes: https://www.theheadbadge.com
Mentioned: 124 Post(s)
Tagged: 0 Thread(s)
Quoted: 2420 Post(s)
Liked 4,381 Times
in
2,090 Posts
https://www.bikeforums.net/classic-v...h-brazing.html
https://www.bikeforums.net/classic-vintage/437962-cracks-raleigh-frame.html <- Post #12
There's another thread that I'm having a hell of a time trying to bring up - it was of a Raleigh Sports or Sprite where the downtube pulled out of the lower head lug due to minimal penetration.
-Kurt
__________________
07-07-19, 06:15 PM
#12
framebuilder
I like pretty small tips with fillet brazing. Like really small. Are you using a Harris torch handle? Every company uses a different number system to indicate orifice size so I don't know how big yours is for comparison to what I like. However the flames on standard small acetylene tips tend to blow out from gas pressure blowback when getting close to the work when fillet brazing. Bigger tips less likely. The solution is Meco or Paige multiport tips that have a sharp flame and don't blow out nearly as easily.
07-07-19, 06:41 PM
#13
Senior Member
Join Date: Oct 2015
Location: PDX
Posts: 13,033
Bikes: Merz x 5 + Specialized Merz Allez x 2, Strawberry/Newlands/DiNucci/Ti x3, Gordon, Fuso/Moulton x2, Bornstein, Paisley,1958-74 Paramounts x3, 3rensho, 74 Moto TC, 73-78 Raleigh Pro's x5, Marinoni x2, 1960 Cinelli SC, 1980 Bianchi SC, PX-10 X 2
Mentioned: 267 Post(s)
Tagged: 0 Thread(s)
Quoted: 4510 Post(s)
Liked 6,374 Times
in
3,666 Posts
*Ahem*
https://www.bikeforums.net/classic-v...h-brazing.html
https://www.bikeforums.net/classic-vintage/437962-cracks-raleigh-frame.html <- Post #12
There's another thread that I'm having a hell of a time trying to bring up - it was of a Raleigh Sports or Sprite where the downtube pulled out of the lower head lug due to minimal penetration.
-Kurt
And as evidenced by your, mine and many others appreciation for them it really doesn't matter very much this far down the line.
07-07-19, 06:42 PM
#14
www.theheadbadge.com
Join Date: Sep 2005
Location: Southern Florida
Posts: 28,510
Bikes: https://www.theheadbadge.com
Mentioned: 124 Post(s)
Tagged: 0 Thread(s)
Quoted: 2420 Post(s)
Liked 4,381 Times
in
2,090 Posts
So a few threads and a handful of failures was hardly an epidemic, I know there were plenty more. Not saying it didn't happen but for the 10's of 1000's of frames they cranked out and the fact that even the worst ones gave plenty of warning like the one's shown, their track record literally and figuratively was pretty good despite the shortcomings. Few manufactuers achieved the production Raleigh did, good bad or otherwise.
And as evidenced by your, mine and many others appreciation for them it really doesn't matter very much this far down the line.
And as evidenced by your, mine and many others appreciation for them it really doesn't matter very much this far down the line.

-Kurt
__________________
Likes For cudak888:
07-08-19, 07:43 AM
#15
Senior Member
Thread Starter
Join Date: Jun 2010
Location: Medford MA
Posts: 2,089
Bikes: Ron Cooper touring, 1959 Jack Taylor 650b ladyback touring tandem, Vitus 979, Joe Bell painted Claud Butler Dalesman, Colin Laing curved tube tandem, heavily-Dilberted 1982 Trek 6xx, Ren� Herse tandem
Mentioned: 80 Post(s)
Tagged: 0 Thread(s)
Quoted: 964 Post(s)
Liked 1,451 Times
in
723 Posts
I like pretty small tips with fillet brazing. Like really small. Are you using a Harris torch handle? Every company uses a different number system to indicate orifice size so I don't know how big yours is for comparison to what I like. However the flames on standard small acetylene tips tend to blow out from gas pressure blowback when getting close to the work when fillet brazing. Bigger tips less likely. The solution is Meco or Paige multiport tips that have a sharp flame and don't blow out nearly as easily.
07-08-19, 08:01 AM
#16
Senior Member
Thread Starter
Join Date: Jun 2010
Location: Medford MA
Posts: 2,089
Bikes: Ron Cooper touring, 1959 Jack Taylor 650b ladyback touring tandem, Vitus 979, Joe Bell painted Claud Butler Dalesman, Colin Laing curved tube tandem, heavily-Dilberted 1982 Trek 6xx, Ren� Herse tandem
Mentioned: 80 Post(s)
Tagged: 0 Thread(s)
Quoted: 964 Post(s)
Liked 1,451 Times
in
723 Posts
*Ahem*
https://www.bikeforums.net/classic-v...h-brazing.html
https://www.bikeforums.net/classic-vintage/437962-cracks-raleigh-frame.html <- Post #12
There's another thread that I'm having a hell of a time trying to bring up - it was of a Raleigh Sports or Sprite where the downtube pulled out of the lower head lug due to minimal penetration.
-Kurt
https://www.bikeforums.net/classic-v...h-brazing.html
https://www.bikeforums.net/classic-vintage/437962-cracks-raleigh-frame.html <- Post #12
There's another thread that I'm having a hell of a time trying to bring up - it was of a Raleigh Sports or Sprite where the downtube pulled out of the lower head lug due to minimal penetration.
-Kurt
Likes For scarlson:
07-08-19, 09:18 AM
#17
framebuilder
It is a Harris Calorific rebranded as Sears Craftsman, from the '70s. The tips are definitely Harris. I do have to be a little careful with blowback and flame going out, that's definitely true. I'm working with a bare minimum setup because I don't do this enough to warrant upgrading. I got the torch from a relative for free and I'm not intending to upgrade anytime soon, although I could be persuaded to buy different tips if someone makes something better for my torch. It's not even made for propane, but it seems like skill can make up for a lot of shortcomings in the tool, at the expense of time and sanity of course. What size and brand of tip do you use? Oxy/ace or oxy/propane?
One of my past framebuilding class students bought Harris equipment because his wife worked for W.W. Grainger and could buy it on discount. I�ll check with him on what tips for his Harris he was able to find that worked well with propane. By the way I�ve written a lot on this subject on various framebuilding forums including some in Bike Forums.
07-08-19, 09:50 AM
#18
1/2 as far in 2x the time
Join Date: Nov 2013
Location: Northern Bergen County, NJ
Posts: 1,746
Bikes: Yes, Please.
Mentioned: 13 Post(s)
Tagged: 0 Thread(s)
Quoted: 499 Post(s)
Liked 285 Times
in
222 Posts
[QUOTE=scarlson;21015067]I think it's a neat case study Particularly it shows how bad the penetration of the filler in a lugged steel joint has to be before it will actually fail. Framebuilding lore holds that full penetration of the filler is of paramount importance. Basic framebuilder training often involves brazing practice lugs and then cutting them open to check filler penetration. Granted, this failure is only one data point, but it raises the question of how much this actually matters. If it's the difference between a failure after decades and a failure never, then does it warrant every framebuilder-in-training cutting five lugs in half after brazing them? Even so, the lug penetration test is still a good didactic tool to teach a feel for metal flow and heat-following, so I'm not knocking it - just musing about the origins of framebuilding lore. Musing and muttering aside, it's a rare thing to actually see a badly brazed joint make its way into the world, and probably even rarer to see it subsequently fail in a textbook way decades later. That's why I posted about it - I'm a scientist after all.
I always wondered how accurate the mitering was on frames bitd, as I found it a very difficult job to do satisfactorily, repairing my Ron Cooper in 1976. I didn't use/make a jig, but was a decent hand with jewelry smithing saws and files, (and also had the patience of Job with that bike, if nowhere else in my life). When I sawed the head tube of the Cooper off after my crash, I could see the mitres fit extremely well, though not to the degree of perfection we see from today's master builders. Looking at your photos, I think that also may have been part of the general mythology, though rusting probably exacerbated the problem.
Was there a technical reason you ran the dynamo tube outside the bb bracket shell, or was it a stylistic choice?
Thank you for posting this series, and congrats on the great resurrection.
Particularly it shows how bad the penetration of the filler in a lugged steel joint has to be before it will actually fail. Framebuilding lore holds that full penetration of the filler is of paramount importance. Basic framebuilder training often involves brazing practice lugs and then cutting them open to check filler penetration. Granted, this failure is only one data point, but it raises the question of how much this actually matters. If it's the difference between a failure after decades and a failure never, then does it warrant every framebuilder-in-training cutting five lugs in half after brazing them? Even so, the lug penetration test is still a good didactic tool to teach a feel for metal flow and heat-following, so I'm not knocking it - just musing about the origins of framebuilding lore. Musing and muttering aside, it's a rare thing to actually see a badly brazed joint make its way into the world, and probably even rarer to see it subsequently fail in a textbook way decades later. That's why I posted about it - I'm a scientist after all.I always wondered how accurate the mitering was on frames bitd, as I found it a very difficult job to do satisfactorily, repairing my Ron Cooper in 1976. I didn't use/make a jig, but was a decent hand with jewelry smithing saws and files, (and also had the patience of Job with that bike, if nowhere else in my life). When I sawed the head tube of the Cooper off after my crash, I could see the mitres fit extremely well, though not to the degree of perfection we see from today's master builders. Looking at your photos, I think that also may have been part of the general mythology, though rusting probably exacerbated the problem.
Was there a technical reason you ran the dynamo tube outside the bb bracket shell, or was it a stylistic choice?
Thank you for posting this series, and congrats on the great resurrection.
Likes For Last ride 76:
07-08-19, 11:12 AM
#19
Senior Member
Thread Starter
Join Date: Jun 2010
Location: Medford MA
Posts: 2,089
Bikes: Ron Cooper touring, 1959 Jack Taylor 650b ladyback touring tandem, Vitus 979, Joe Bell painted Claud Butler Dalesman, Colin Laing curved tube tandem, heavily-Dilberted 1982 Trek 6xx, Ren� Herse tandem
Mentioned: 80 Post(s)
Tagged: 0 Thread(s)
Quoted: 964 Post(s)
Liked 1,451 Times
in
723 Posts
I always wondered how accurate the mitering was on frames bitd, as I found it a very difficult job to do satisfactorily, repairing my Ron Cooper in 1976. I didn't use/make a jig, but was a decent hand with jewelry smithing saws and files, (and also had the patience of Job with that bike, if nowhere else in my life). When I sawed the head tube of the Cooper off after my crash, I could see the mitres fit extremely well, though not to the degree of perfection we see from today's master builders. Looking at your photos, I think that also may have been part of the general mythology, though rusting probably exacerbated the problem.
Was there a technical reason you ran the dynamo tube outside the bb bracket shell, or was it a stylistic choice?
Thank you for posting this series, and congrats on the great resurrection.
Was there a technical reason you ran the dynamo tube outside the bb bracket shell, or was it a stylistic choice?
Thank you for posting this series, and congrats on the great resurrection.
I love my Ron Cooper so, I do understand rebuilding it! I bet he got full penetration on those lugs he brazed. It's the only bike I have that *doesn't* creak.
I ran the tube outside the bottom bracket shell for a variety of reasons.
1) Future-proofing is the biggest reason, because I was nervous about it not fitting with brand X cartridge bottom bracket and didn't want to be restricted. Cup-and-cone would work, but I won't use a cup-and-cone unit on my commuter, I ride this thing in the salt in winter and I've destroyed too many of those and it's yucky to overhaul them especially when I have better things to do. Some cartridges may fit, but some cartridges have thick waists or other restrictions when screwing them in, and nobody publishes that spec so it'd be expensive guesswork.
2) laziness and prior experience with this frame. Normally I'd run a bare wire inside the BB and through a chainstay to the rear, out a small hole and then up the rack or through a hollow fender strut, but this frame is really snaggy inside, so it's hard to push bare wires through it, which is partly why I did the tube in the first place, and also why I already had the wire going through the fender lip (cemented in place with Hondabond RTV leftover from a motorcycle project). Plus no pre-drilled hole in the chainstay so it would be more work. It's just a commuter after all. Best not to open cans of worms and keep it all modular and stay with proven stuff in this case. Plus bending the internal tube to closely follow the inside of the BB shell seems hard.
3) Not really a reason, but a precedent. On my tandem, Jack Taylor just ended the tube and ran a bare wire outside the BB as well, probably because the BB shells are fillet brazed instead of lugged and so they don't have holes into the tubes (and the front one's eccentric so it definitely can't go through).
07-08-19, 11:33 AM
#20
Senior Member
Thread Starter
Join Date: Jun 2010
Location: Medford MA
Posts: 2,089
Bikes: Ron Cooper touring, 1959 Jack Taylor 650b ladyback touring tandem, Vitus 979, Joe Bell painted Claud Butler Dalesman, Colin Laing curved tube tandem, heavily-Dilberted 1982 Trek 6xx, Ren� Herse tandem
Mentioned: 80 Post(s)
Tagged: 0 Thread(s)
Quoted: 964 Post(s)
Liked 1,451 Times
in
723 Posts
Unfortunately Harris is the most expensive company for brazing accessories. We do a charity bicycle project in Ukraine where we braze with oxy/propane. The 1st torch handle I used there many years ago was a Harris with standard acetylene tips. It worked okay. Eventually I made upgrades with Victor propane specific TEN tips (that have a recess on the end that helps keep the flame attached) on their J-28 torch handle and finally to multiport tips from Paige made specifically to use with propane and they work even better. The market for these tips is primarily in jewelry making. Paige has just recently come out with adaptors so the threading on their tips works with either a Victor J-28 or Smith AW1A torch handle. They are awesome. With a Harris torch handle it gets complicated.
One of my past framebuilding class students bought Harris equipment because his wife worked for W.W. Grainger and could buy it on discount. I’ll check with him on what tips for his Harris he was able to find that worked well with propane. By the way I’ve written a lot on this subject on various framebuilding forums including some in Bike Forums.
One of my past framebuilding class students bought Harris equipment because his wife worked for W.W. Grainger and could buy it on discount. I’ll check with him on what tips for his Harris he was able to find that worked well with propane. By the way I’ve written a lot on this subject on various framebuilding forums including some in Bike Forums.
I can probably make an adapter for my torch to use those Paige tips. I have a lathe at work and I know how to use it (made myself some crank extractors for old Stronglight, among other things). Are these tips the M and MA series? They are not bad compared to Harris prices. The big soft flames I can get with the higher numbered Harris tips are useful for some jobs requiring lots of heat, but having something more focused and "pushable" as they say would be nice if the price is right.
07-09-19, 01:52 PM
#21
framebuilder
Ah I've read Ben Hudson's Medium article series about the Ukraine framebuilding thing! ... I can probably make an adapter for my torch to use those Paige tips. I have a lathe at work and I know how to use it Are these tips the M and MA series? They are not bad compared to Harris prices.
The threading on the Paige multiport tips is �� X 28 tpi. They were designed to fit the Meco Midget torch handle. Tin Man Technologies also sells multiport tips specifically to fit the Meco Midget torch handle (now made by Victor). Their tips are more expensive and not as well made as the Paige tips. In addition they sell an adaptor so these tips can fit on various torch handles from different manufacturers. That part number is AWS-0067. It costs $12. In reality this is just a long brass tube with �� X 28 threading on one end (which you could make yourself). They way I adapted it to a Victor UN-J mixer/elbow was to cut off the threads of the elbow and silver brazed a sleeve to attach the Meco adaptor and elbow together. Since the OD of the 2 tubes was different, I counter bored a larger hole to fit the larger sleeve half way through the sleeve. That made them easier to braze together too. Of course I had to cut some of the length off of the adaptor so the whole assembly was not too long.
These multiport tips from Paige are a significant advancement/improvement when using propane over standard acetylene tips. You want to get the biggest Paige M tips (I only use MA rosebuds are for taking things apart) since they are already small for the jewelry market. It is easy enough to screw different size tips on and off your modified elbow assembly depending on what size tip you need for the job at hand.
07-09-19, 06:36 PM
#22
Senior Member
Thread Starter
Join Date: Jun 2010
Location: Medford MA
Posts: 2,089
Bikes: Ron Cooper touring, 1959 Jack Taylor 650b ladyback touring tandem, Vitus 979, Joe Bell painted Claud Butler Dalesman, Colin Laing curved tube tandem, heavily-Dilberted 1982 Trek 6xx, Ren� Herse tandem
Mentioned: 80 Post(s)
Tagged: 0 Thread(s)
Quoted: 964 Post(s)
Liked 1,451 Times
in
723 Posts
This bicycle project in Ukraine has made a big impact on me. The college campus where our bike repair and frame building shop is located was a distribution center for food and clothing for fleeing Eastern Ukraine refugees whose homes were destroyed or their lives were in danger because Putin was using his military to get that territory for Russia. They want a land bridge to Crimea – a militarily strategic peninsula for launching submarines into the Black Sea. Seeing their distress on their faces in real life was really upsetting. Witnessing them personally is a lot more powerful then reading about it.
The threading on the Paige multiport [...] for the job at hand.
The threading on the Paige multiport [...] for the job at hand.
Thank you for all the information on the Paige tips. That all makes so much sense now after reading your post and looking up a few things. I may buy one and try it out. Harris is crazy, with their proprietary 23/64" thread and all. But it looks like I can mount an old beat-up Harris tip in the lathe chuck and machine/thread the end to make a neck that will accept the Paige/Meco tip or some other adapter I can also machine to go in between.
07-17-19, 06:30 PM
#23
Senior Member
Thread Starter
Join Date: Jun 2010
Location: Medford MA
Posts: 2,089
Bikes: Ron Cooper touring, 1959 Jack Taylor 650b ladyback touring tandem, Vitus 979, Joe Bell painted Claud Butler Dalesman, Colin Laing curved tube tandem, heavily-Dilberted 1982 Trek 6xx, Ren� Herse tandem
Mentioned: 80 Post(s)
Tagged: 0 Thread(s)
Quoted: 964 Post(s)
Liked 1,451 Times
in
723 Posts
I hung all the parts on it and screwed them all together. I had thought that the bike was no longer for this world, so when a friend needed a new rear tire I even passed him the original wire-bead Schwalbe Marathon I had been running. I put a Compass tire on the back because my Ron Cooper has spoiled me with its suppleness  Contemporary Stronglight bottom bracket from my friend in Germany and a few newly machined parts to more securely mount the front rack round out the build. It even felt nice enough to be worthy of soldered cable ends
The thing rides so much more responsively!! It really reacts to my input, springing forward and encouraging hard efforts in a way it has not done in recent memory. Back-to-back rides with my Vitus 979 are in order I think. I am pleased with the way it rides! Best of all, it's silent. No more creaking!
I guess this thread wouldn't be complete without:
a) A few drive-side photos of the completed bike.

How bout that horrible rear fenderline? I think if the seatstays break, I will redo the brake bridge higher up.

Glamor shot of my 73-degree beveled aluminum bracket for a third attachment point on the Jandd Expedition front rack. Also note the wire internal tube.
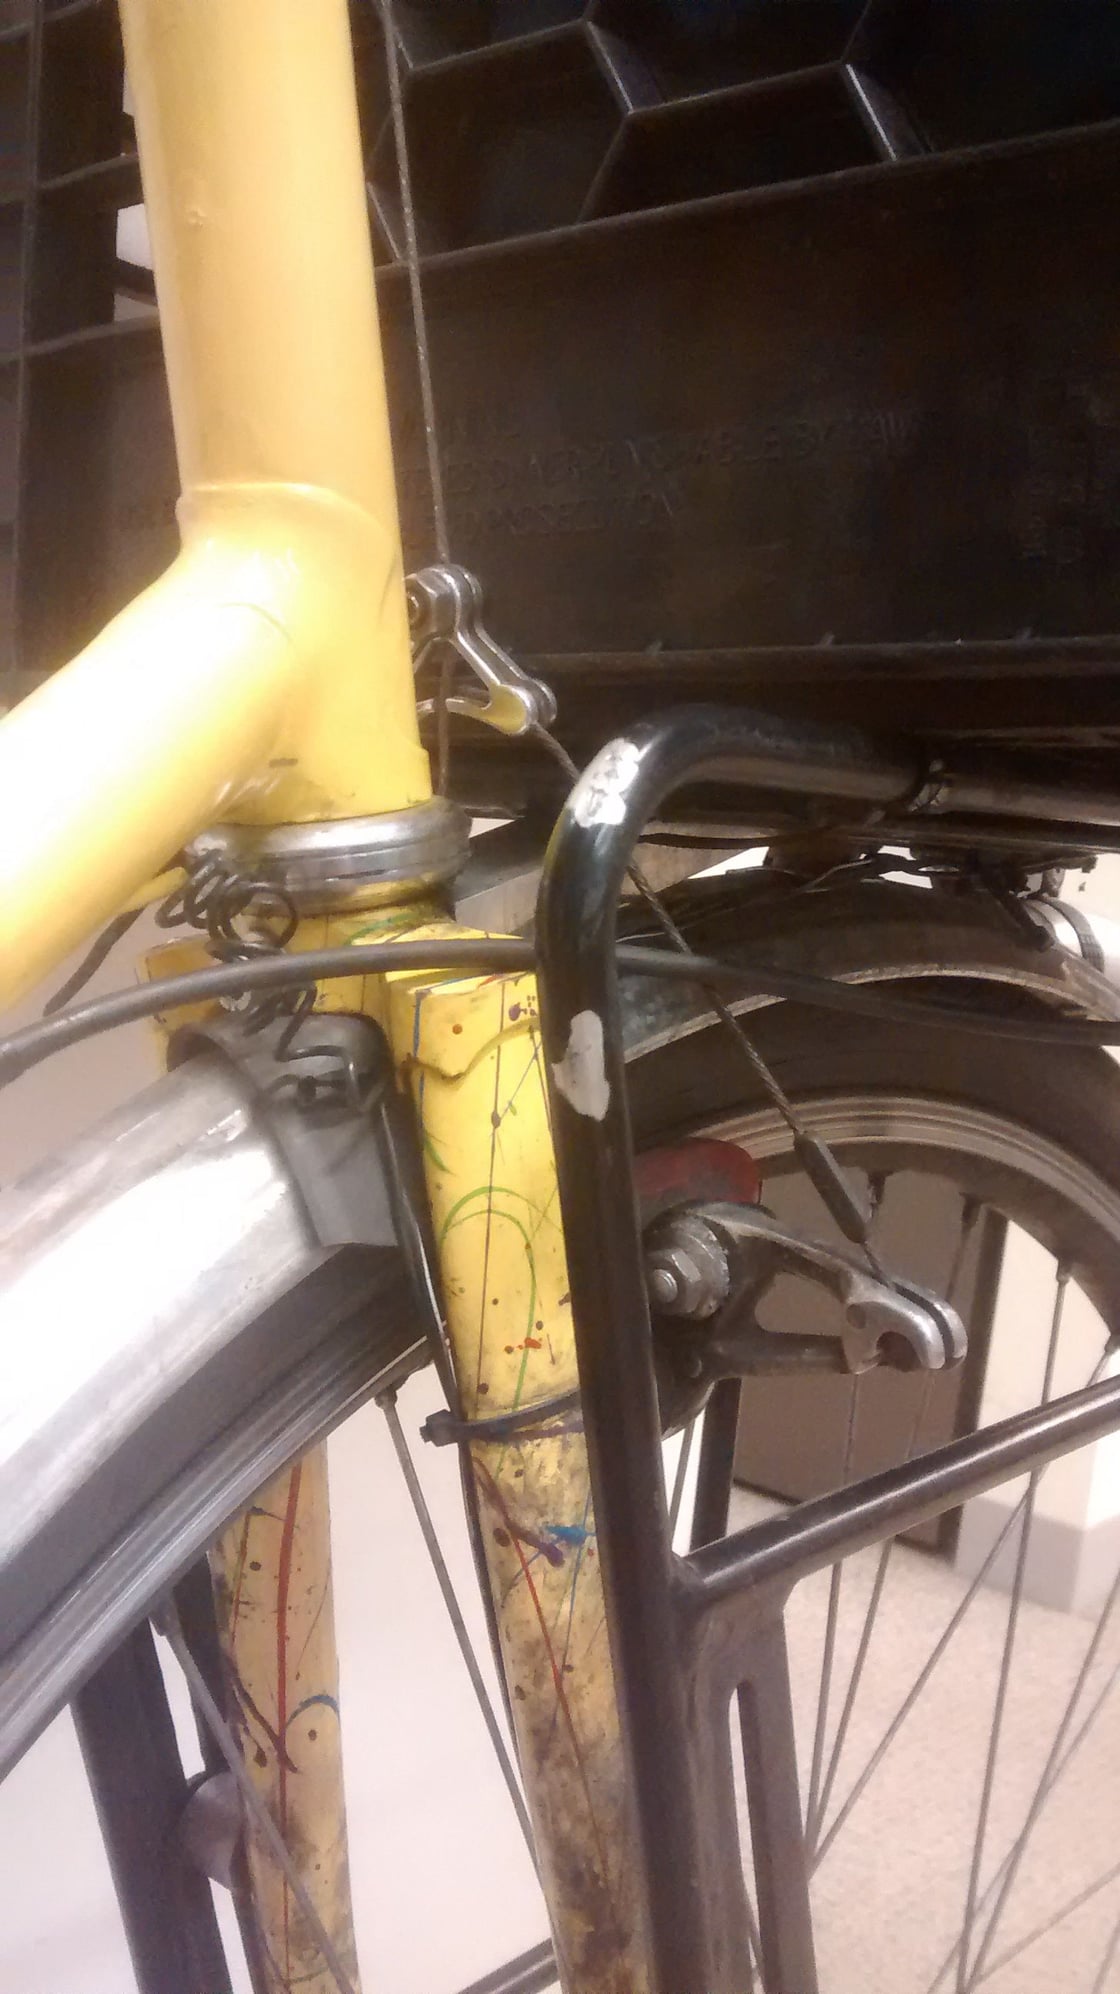
Sesquilaminate construction with Rustoleum finish!

That Mercedes symbol has been on there for years. A reminder that we all do silly things sometimes.
b) Some angst.
The bars obviously are missing some tape. The old tape is in tatters. What should I do for handlebar tape? Here are four options I can think of.
i. Natural cork-looking stuff like it's had? It gets dirty so quickly.
ii. Splash bar tape to go with the multicolor business? It's splatter painted after all. But again, anything with yellow will really show dirt
iii. Black or dark-colored cork or Bike Ribbon style vinyl. This is probably the most sensible, but I can't stand black bar tape.
iv. Yellow Bike Ribbon style vinyl and then I'll just clean it off with orange degreaser once a month.
And should I buy new brake levers, since the little plastic thingies around the lever blades are broken? Ugh it's just a commuter, I'll probably break them immediately if I buy new ones.
Contemporary Stronglight bottom bracket from my friend in Germany and a few newly machined parts to more securely mount the front rack round out the build. It even felt nice enough to be worthy of soldered cable ends The thing rides so much more responsively!! It really reacts to my input, springing forward and encouraging hard efforts in a way it has not done in recent memory. Back-to-back rides with my Vitus 979 are in order I think. I am pleased with the way it rides! Best of all, it's silent. No more creaking!
I guess this thread wouldn't be complete without:
a) A few drive-side photos of the completed bike.
How bout that horrible rear fenderline? I think if the seatstays break, I will redo the brake bridge higher up.
Glamor shot of my 73-degree beveled aluminum bracket for a third attachment point on the Jandd Expedition front rack. Also note the wire internal tube.
Sesquilaminate construction with Rustoleum finish!
That Mercedes symbol has been on there for years. A reminder that we all do silly things sometimes.
b) Some angst.
The bars obviously are missing some tape. The old tape is in tatters. What should I do for handlebar tape? Here are four options I can think of.
i. Natural cork-looking stuff like it's had? It gets dirty so quickly.
ii. Splash bar tape to go with the multicolor business? It's splatter painted after all. But again, anything with yellow will really show dirt
iii. Black or dark-colored cork or Bike Ribbon style vinyl. This is probably the most sensible, but I can't stand black bar tape.
iv. Yellow Bike Ribbon style vinyl and then I'll just clean it off with orange degreaser once a month.
And should I buy new brake levers, since the little plastic thingies around the lever blades are broken? Ugh it's just a commuter, I'll probably break them immediately if I buy new ones.
07-17-19, 07:02 PM
#24
www.theheadbadge.com
Join Date: Sep 2005
Location: Southern Florida
Posts: 28,510
Bikes: https://www.theheadbadge.com
Mentioned: 124 Post(s)
Tagged: 0 Thread(s)
Quoted: 2420 Post(s)
Liked 4,381 Times
in
2,090 Posts
Likes For cudak888:
07-17-19, 07:52 PM
#25
Senior Member
Thread Starter
Join Date: Jun 2010
Location: Medford MA
Posts: 2,089
Bikes: Ron Cooper touring, 1959 Jack Taylor 650b ladyback touring tandem, Vitus 979, Joe Bell painted Claud Butler Dalesman, Colin Laing curved tube tandem, heavily-Dilberted 1982 Trek 6xx, Ren� Herse tandem
Mentioned: 80 Post(s)
Tagged: 0 Thread(s)
Quoted: 964 Post(s)
Liked 1,451 Times
in
723 Posts

Funny you should comment... When assembling this front rack support, I unwisely did not remove the milk crate. Instead I used a trick that you have to use on the old Mercedes W210 when replacing the upper control arms: masking-tape the nut to the open end of a wrench and stick the wrench in the inaccessible spot, then thread the bolt through from the other side and tighten it, then tug on the wrench to rip the tape and remove the wrench. Funny little coincidences!
I used to work on one for a local beekeeper back when I lived in Vermont. He'd pay me in honey, which was literally and figuratively a sweet deal. I had gallons of it at all times, his stepchildren kept wrecking the car and it was pretty easy to work on, other than having to know a few tricks. The symbol on the bike is from a W123 trunk lid, I think.
Likes For scarlson: