


Reynolds 753 frame rust removal and refurbishment
 01-02-20, 05:18 AM
#1
Junior Member
Thread Starter
Join Date: Apr 2014
Posts: 12
Mentioned: 0 Post(s)
Tagged: 0 Thread(s)
Quoted: 6 Post(s)
Likes: 0
Liked 0 Times
in
0 Posts
Reynolds 753 frame rust removal and refurbishment
Hi all
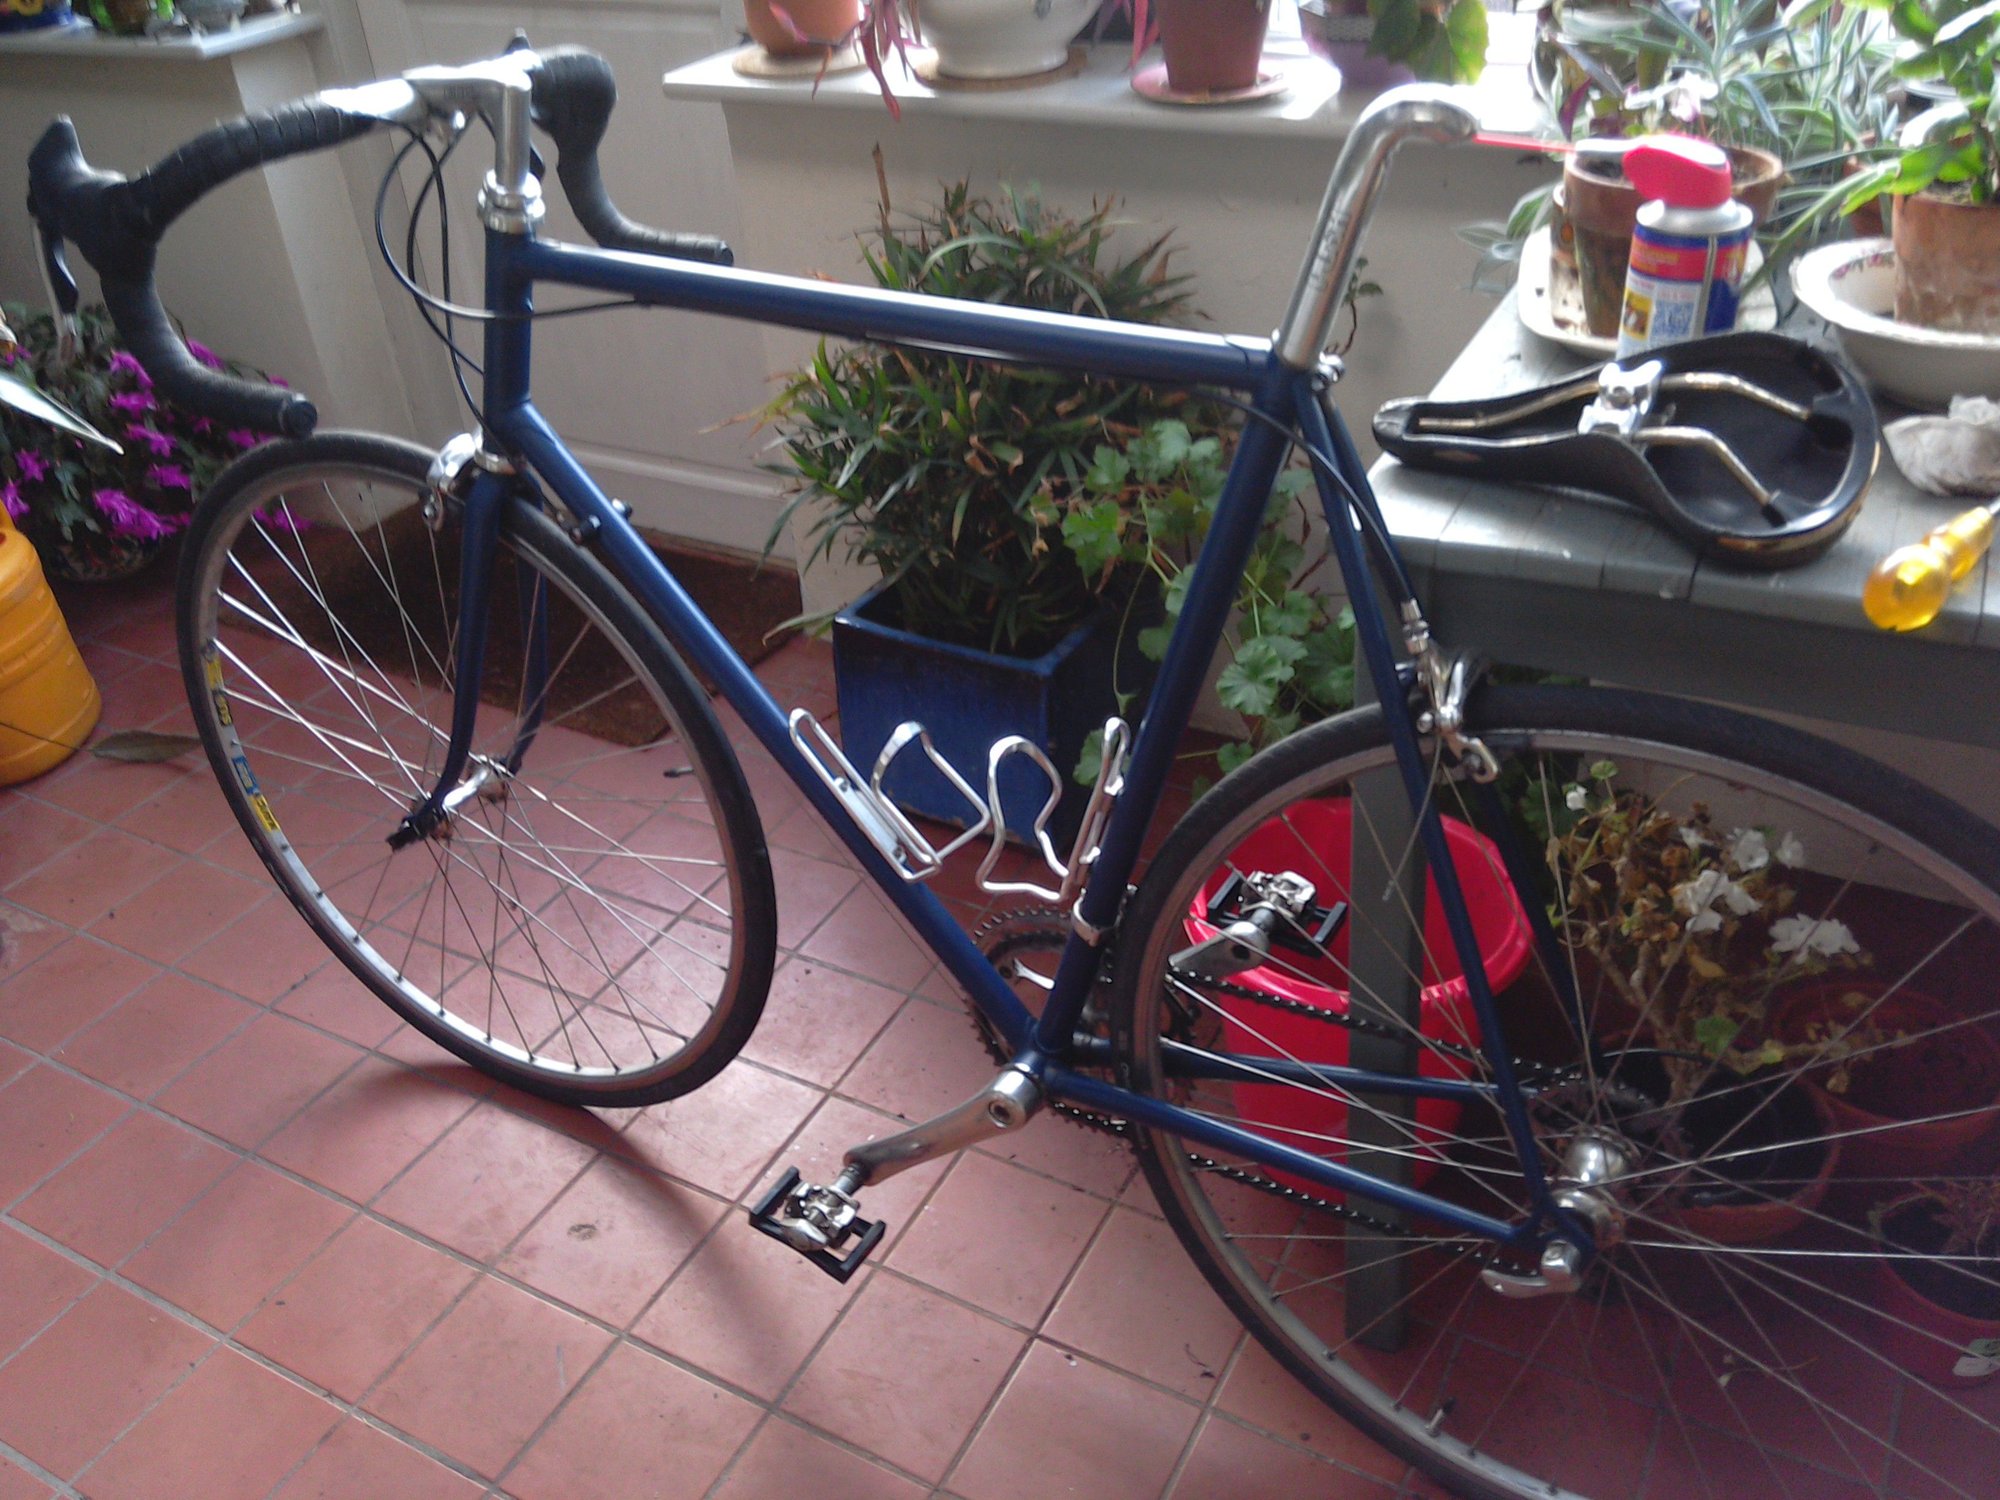
I recently acquired what the seller described as an early 90s Peugeot Chorus (scroll down this link for info and some original catalogue images: https://www.bikeforums.net/classic-v...rus-753-a.html), with a Reynolds 753 frame. As the bike doesn't have all of its original components and has had a respray it's difficult to confirm this, but the Campagnolo Veloce ergo shifters, Front mech and Chainset would seem about right. Only some time after having got this home did I realise that the frame was in worse condition than I had originally thought. There's some pretty serious looking rust patches where the paint has come away in the nooks where the down tube meets the head tube and the bottom bracket shell (obvious places where water/mud would gather, especially on a bike with minimal clearance, thus no mudguards). There's also some bubbling under the paint on the underside of the down tube and the bottom bracket shell. Into the bargain, the seat post has seized. Tapping the frame with my nail (I know, not exactly scientific), the main tubes have a nice ring, with the seat tube predictably sounding pretty dead given its got a seized post in it and the stays (particularly the chain stays) not sounding great.
I've cleared some of the problem areas up with fine glass paper and wire wool. The pitting on the down tube seems to be retaining some of the paint in the depressions, which I'm not sure what to do about as I want to get all the old paint off so that the rust can be removed and repainted. Given this is a high quality frame, I'm happy to invest in a professional repaint. However, I want to get rid of all the rust and old paint beforehand, so that there won't be any repeat of the rust bubbling up beneath the paint. As 753 frame tubes can be 0.3mm at their thinnest, I know I need to be careful with this. My main question is, then, has anyone had experience of restoring a rusty 753 frame and can you offer any advice on what I should do to get rid of the rust and have the maximum chance of it not coming back again, and also getting the old paint out of the pitting. Also what do you think the chances are of the stays being in precarious condition, and how might I be able to ascertain whether the inside of the stays are rusted to an extent that they might be dangerous to ride on? If they're salvageable, any advice on how to treat the inside of the stays, other than the obvious (liberal application of framesaver).
Also, although there's plenty of existing posts regarding the particularly annoying problem of a seized seat post, I wondered if anyone had experience of this specifically with a 753 frame? I've tried putting the seat post in a vice and twisting, with no luck, but I was pretty careful as I didn't want to damage what is a very lightweight frame. Also tried lots of spraying wd40 etc and boiling water on the seat tube. I'm thinking of just sawing the post off with an inch to work with at the top and then carefully using a thin saw to cut down into it and remove it bit by bit.
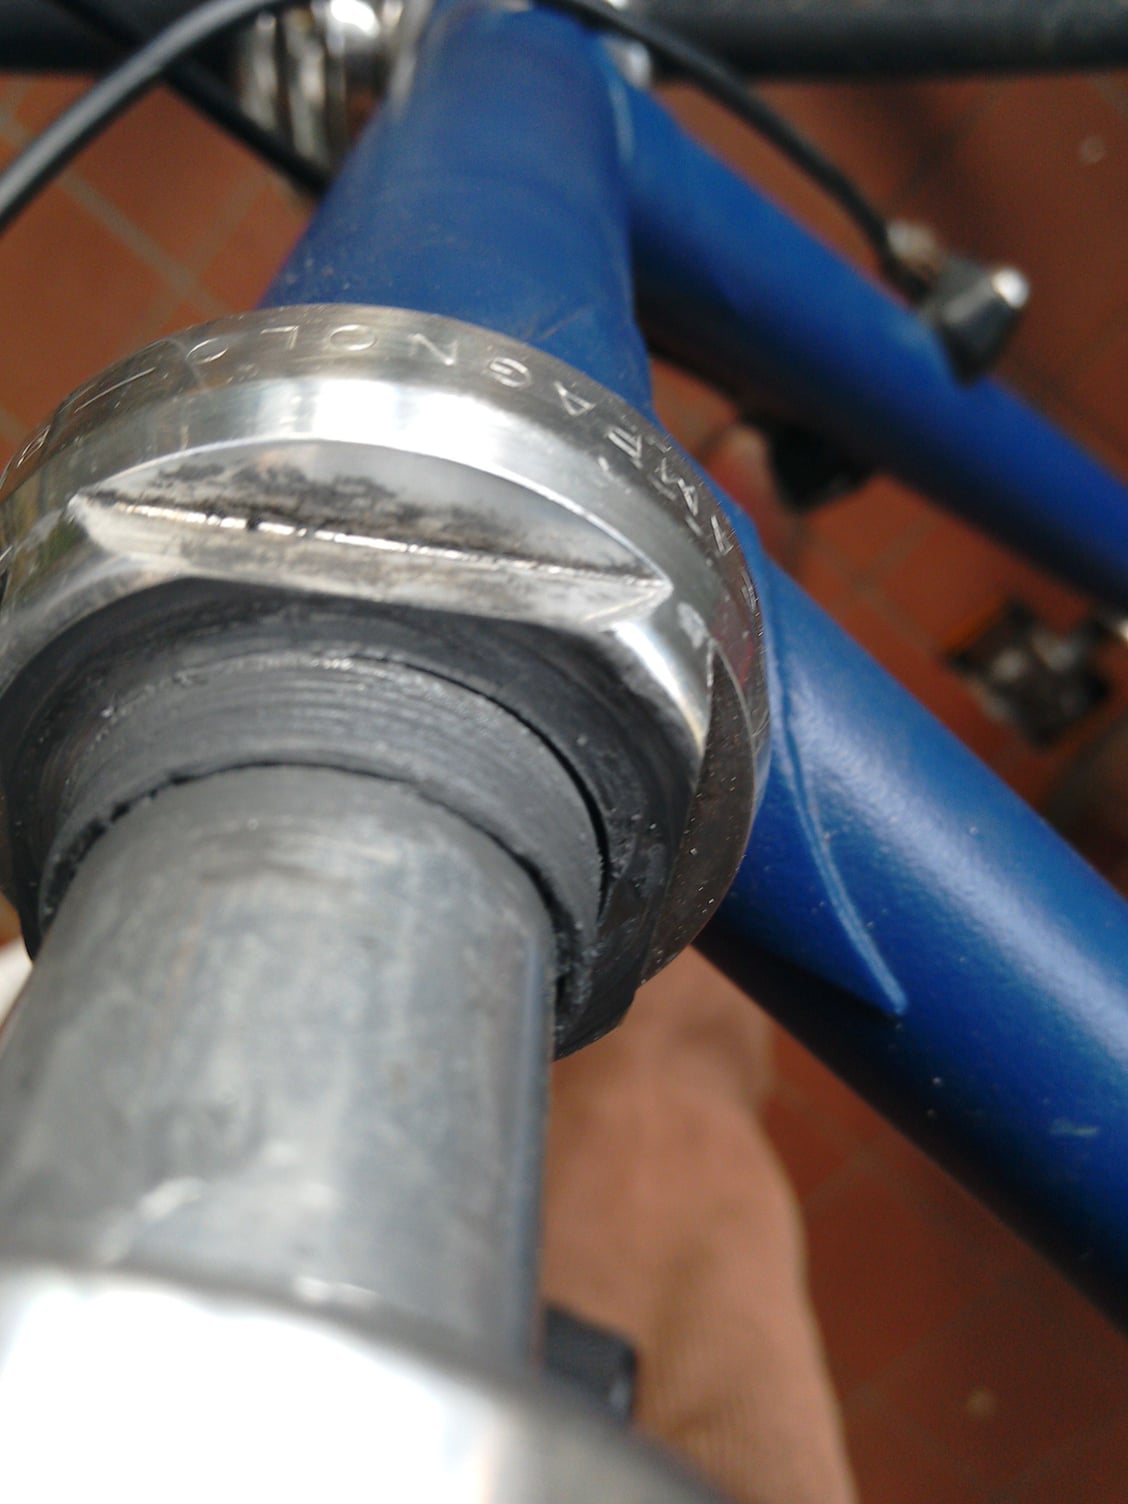
There's also an unrelated and mysterious problem with the headset, which is a Campagnolo Brev Int, which is what the Chorus was sold with, so looks original. As there was a bit of rocking in the forks, I tried to tighten up the threaded top race. Bizarrely, it just turns and turns. I removed the lock nut to find that the top race is slightly larger than the diameter of the fork steerer, so just sits on top of the bearings in the upper race with the lock nut holding it (loosely) there. Anyone have any idea why a top race would be a tiny (about a mm or so) bit too big to fit the steerer?
Many thanks for your time.

Seized seat post with corroded seat tube (paint came away when I parted top of seat tube with screwdriver)
Inexplicable gap between threaded top race and steerer
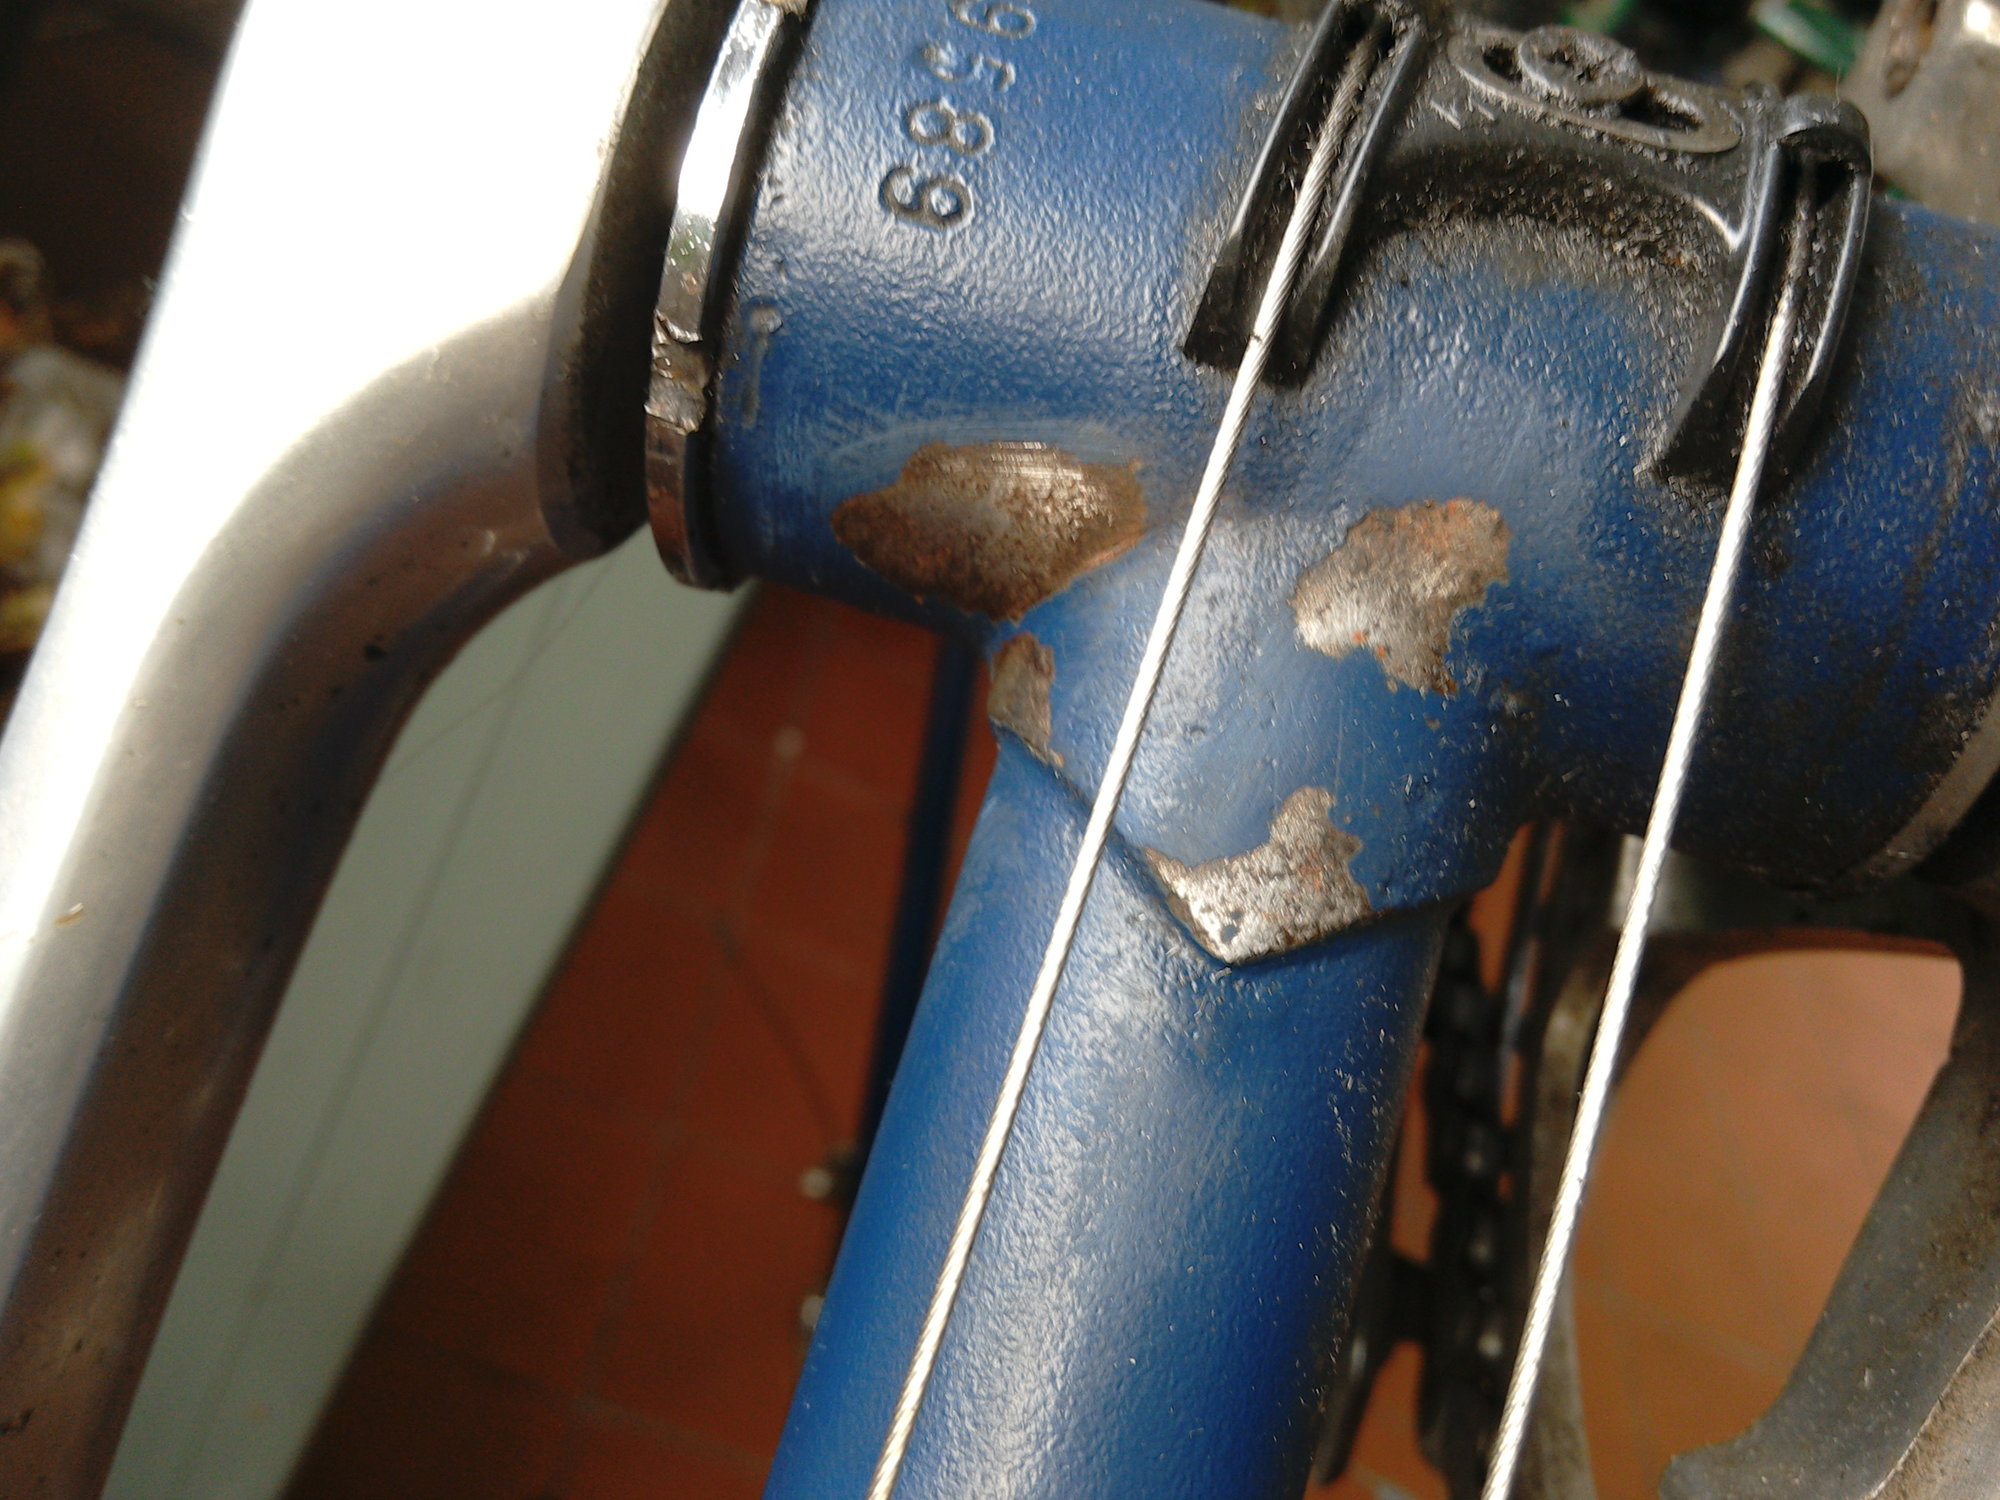
rust patches on underside of bb shell


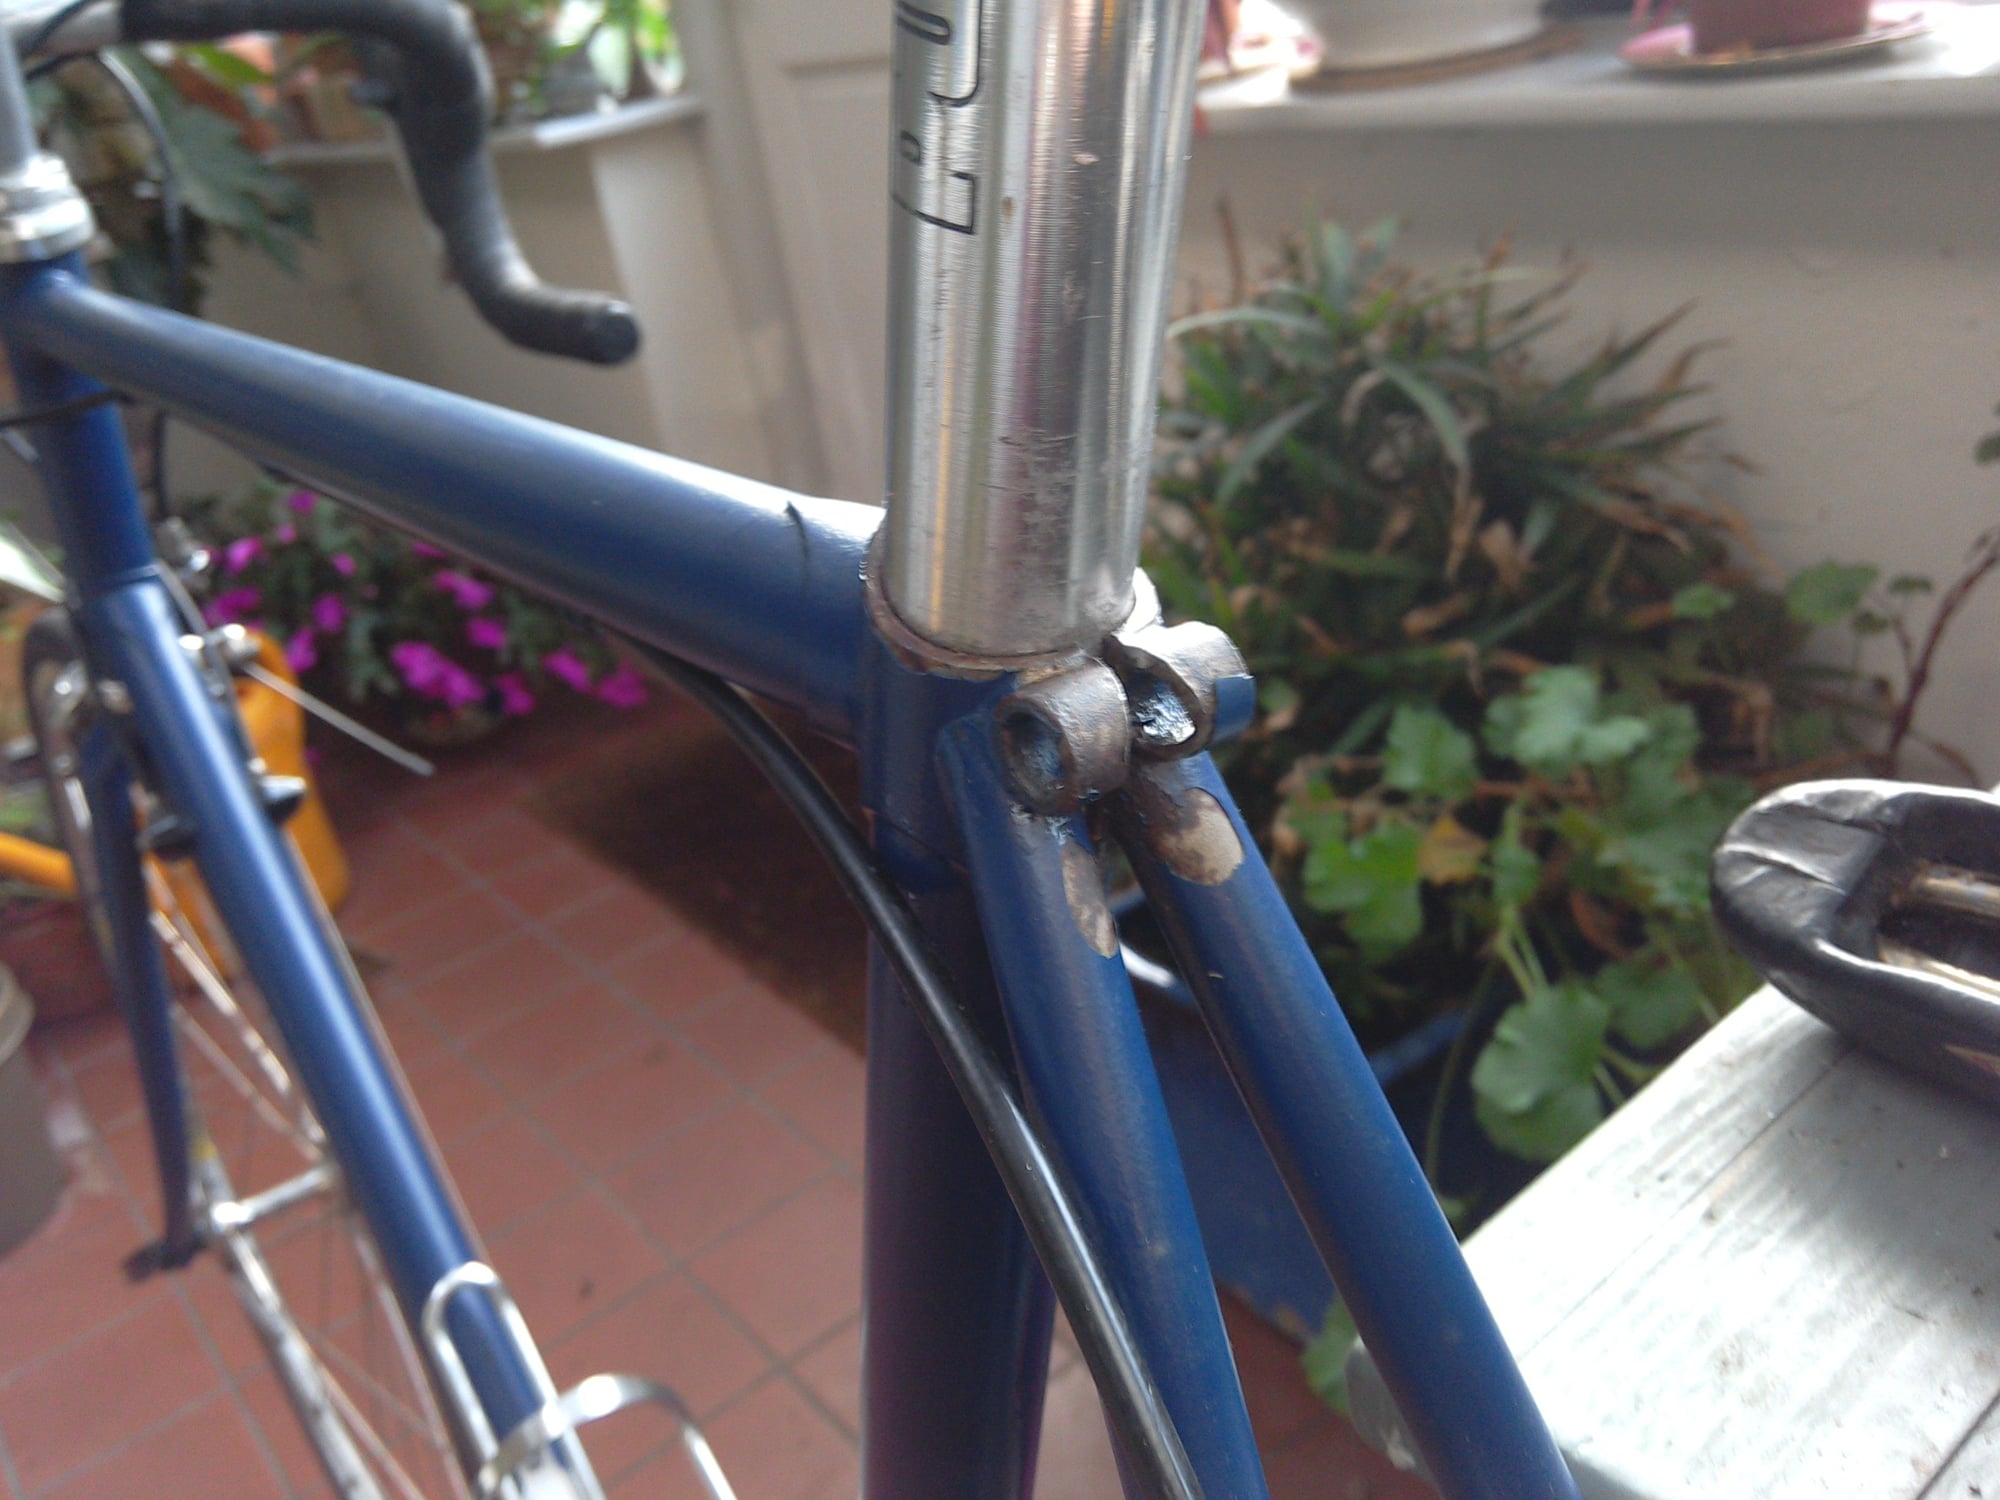
rust patches on lugging where down tube and head tube meet

pitting on underside of bb shell

Pitting on underside of down tube

I recently acquired what the seller described as an early 90s Peugeot Chorus (scroll down this link for info and some original catalogue images: https://www.bikeforums.net/classic-v...rus-753-a.html), with a Reynolds 753 frame. As the bike doesn't have all of its original components and has had a respray it's difficult to confirm this, but the Campagnolo Veloce ergo shifters, Front mech and Chainset would seem about right. Only some time after having got this home did I realise that the frame was in worse condition than I had originally thought. There's some pretty serious looking rust patches where the paint has come away in the nooks where the down tube meets the head tube and the bottom bracket shell (obvious places where water/mud would gather, especially on a bike with minimal clearance, thus no mudguards). There's also some bubbling under the paint on the underside of the down tube and the bottom bracket shell. Into the bargain, the seat post has seized. Tapping the frame with my nail (I know, not exactly scientific), the main tubes have a nice ring, with the seat tube predictably sounding pretty dead given its got a seized post in it and the stays (particularly the chain stays) not sounding great.
I've cleared some of the problem areas up with fine glass paper and wire wool. The pitting on the down tube seems to be retaining some of the paint in the depressions, which I'm not sure what to do about as I want to get all the old paint off so that the rust can be removed and repainted. Given this is a high quality frame, I'm happy to invest in a professional repaint. However, I want to get rid of all the rust and old paint beforehand, so that there won't be any repeat of the rust bubbling up beneath the paint. As 753 frame tubes can be 0.3mm at their thinnest, I know I need to be careful with this. My main question is, then, has anyone had experience of restoring a rusty 753 frame and can you offer any advice on what I should do to get rid of the rust and have the maximum chance of it not coming back again, and also getting the old paint out of the pitting. Also what do you think the chances are of the stays being in precarious condition, and how might I be able to ascertain whether the inside of the stays are rusted to an extent that they might be dangerous to ride on? If they're salvageable, any advice on how to treat the inside of the stays, other than the obvious (liberal application of framesaver).
Also, although there's plenty of existing posts regarding the particularly annoying problem of a seized seat post, I wondered if anyone had experience of this specifically with a 753 frame? I've tried putting the seat post in a vice and twisting, with no luck, but I was pretty careful as I didn't want to damage what is a very lightweight frame. Also tried lots of spraying wd40 etc and boiling water on the seat tube. I'm thinking of just sawing the post off with an inch to work with at the top and then carefully using a thin saw to cut down into it and remove it bit by bit.
There's also an unrelated and mysterious problem with the headset, which is a Campagnolo Brev Int, which is what the Chorus was sold with, so looks original. As there was a bit of rocking in the forks, I tried to tighten up the threaded top race. Bizarrely, it just turns and turns. I removed the lock nut to find that the top race is slightly larger than the diameter of the fork steerer, so just sits on top of the bearings in the upper race with the lock nut holding it (loosely) there. Anyone have any idea why a top race would be a tiny (about a mm or so) bit too big to fit the steerer?
Many thanks for your time.
Seized seat post with corroded seat tube (paint came away when I parted top of seat tube with screwdriver)
Inexplicable gap between threaded top race and steerer
rust patches on underside of bb shell
rust patches on lugging where down tube and head tube meet
pitting on underside of bb shell
Pitting on underside of down tube
 01-02-20, 07:54 AM
#2

Senior Member
Join Date: Jan 2013
Posts: 2,678
Bikes: too many sparkly Italians, some sweet Americans and a couple interesting Japanese
Mentioned: 10 Post(s)
Tagged: 0 Thread(s)
Quoted: 569 Post(s)
Liked 581 Times
in
409 Posts
I did one Reynolds 753r Colin Laing frame and it is a lovely ride so I understand why you want to take this on.
I would get that post out first, just in case the lack of ring is due to something other than the post. Search "stuck post" and try everything reasonable before sawing, hopefully it will pop out but may as you say take sawing.
Mine was not a serious as some of your tube pitting looks but I still did not trust sand blasting and the bead blaster had trouble getting everything off so ended up paint tank cleaning the frame. I would not be too worried about the inside of the DT and CS as they have vent holes which should help get water/moisture out, but with that said what you can not see can be a major problem. I had a big advantage as we had ultrasonic thickness gauges at work that measure thickness in thousands of an inch and after cleaning we found just the slightest material loss, not really any from internal pitting, well within the safety factors used in design.
A caution here is my bike probably was built in Tucson or maybe Tempe Arizona where wet conditions are unusual.
I also have a helpful local framebuilder who's advise I solicit and trust.
Your headset is just weird, sorry I can't be more help.
01-02-20, 08:15 AM
#3
Senior Member

Join Date: Jul 2018
Location: USA
Posts: 2,190
Bikes: Ti, Mn Cr Ni Mo Nb, Al, C
Mentioned: 22 Post(s)
Tagged: 0 Thread(s)
Quoted: 942 Post(s)
Liked 527 Times
in
349 Posts
Check out Evaporust�.you can pick it up at Advanced Auto. Look on YouTube it's pretty amazing stuff. Since you cannot soak your frame you could expose the rust like you have done sanding above, and soak a rag with Evaporust and leave it on there overnight.
01-02-20, 08:21 AM
#4
Zip tie Karen
Join Date: Aug 2009
Location: Fair Oaks Ranch, TX
Posts: 7,004
Bikes: '13 Motobecane Fantom29 HT, '16 Motobecane Turino Pro Disc, '18 Velobuild VB-R-022, '21 Tsunami SNM-100
Mentioned: 26 Post(s)
Tagged: 0 Thread(s)
Quoted: 1465 Post(s)
Liked 1,542 Times
in
806 Posts
For the seatpost, remove the crank and bottom bracket bearing. Plug any seat tube bottle cage holes. Tape or plug any places where liquid could escape the seatpost. Invert the frame and carefully pour ammonia down into the seat tube through the BB shell. Wait 3-5 days, and then carefully twist the seatpost (vise with frame as your lever is a good approach). This should work.
01-02-20, 11:27 AM
#5
Senior Member

Join Date: Sep 2010
Location: Roswell, GA
Posts: 8,319
Bikes: '93 Trek 750, '92 Schwinn Crisscross, '93 Mongoose Alta
Mentioned: 30 Post(s)
Tagged: 0 Thread(s)
Quoted: 1438 Post(s)
Liked 1,092 Times
in
723 Posts
I would suggest getting a USB endoscope, which are available for under $20, if you are concerned about hidden rust in your frame tubes. Mine has a 5.5mm diameter end which gets into very small places. There are also available skinny brass or steel brushes which can get into narrow places. second the recommendation for Evaporust.
01-02-20, 12:35 PM
#6
SE Wis
Join Date: Apr 2005
Location: Milwaukee, WI
Posts: 10,509
Bikes: '68 Raleigh Sprite, '02 Raleigh C500, '84 Raleigh Gran Prix, '91 Trek 400, 2013 Novara Randonee, 1990 Trek 970
Mentioned: 40 Post(s)
Tagged: 0 Thread(s)
Quoted: 2746 Post(s)
Liked 3,390 Times
in
2,053 Posts
Oxalic acid or the aforementioned evaporust.
Is it possible the fork has a French threaded steerer tube which has 25mm threads rather than 1" (25.4mm) and the locknut is for an English 1"?
https://www.sheldonbrown.com/velos.html
Is it possible the fork has a French threaded steerer tube which has 25mm threads rather than 1" (25.4mm) and the locknut is for an English 1"?
https://www.sheldonbrown.com/velos.html
01-02-20, 02:36 PM
#7
Friendship is Magic

Join Date: Nov 2010
Location: Sacramento, CA
Posts: 22,984
Bikes: old ones
Mentioned: 304 Post(s)
Tagged: 0 Thread(s)
Quoted: 26406 Post(s)
Liked 10,374 Times
in
7,203 Posts
...If you are going to invest in a full repaint, the simplest and most effective way to remove the stuck seat post (and any other stuck thing) is with a MAPP gas torch. Heat and cool it a couple of cycles until the paint on the frame is nicely bubbled and a little charred. Dribble in some ATF/acetone mix as a penetrant. Bang on the post a couple of times with a mallet, and the combination of all these things usually frees up the worst stuck seat post. Still not free after all that ? wash, rinse, repeat. It really helps to have a firmly mounted bench vise and a helper when you are doing the extraction of the post, once you get it turning freely in the frame.
Here's a bike (531, not 753) I derustificated, stripped, and painted. The frame is hanging up out in the hot sun filled with Evaporust stuff. There was beaucoup rust in the bottom bracket shell, so I had concerns about the interior of the stays and the rest of the frame.


Here's a bike (531, not 753) I derustificated, stripped, and painted. The frame is hanging up out in the hot sun filled with Evaporust stuff. There was beaucoup rust in the bottom bracket shell, so I had concerns about the interior of the stays and the rest of the frame.
01-02-20, 02:41 PM
#8
Friendship is Magic
Join Date: Nov 2010
Location: Sacramento, CA
Posts: 22,984
Bikes: old ones
Mentioned: 304 Post(s)
Tagged: 0 Thread(s)
Quoted: 26406 Post(s)
Liked 10,374 Times
in
7,203 Posts
...^^^those paint bubbles on the outside of the BB shell are from a MAPP gas torch used to loosen the very stuck sealed unit BB. Use some kind of frame oil on the interior after you de-rust it, or in the worst cases you can pour/spray in a rust converter product from Rustoleum that turns the remaining rust black and is supposed to be stable enough for painting over it.
01-03-20, 04:54 AM
#9
Junior Member
Thread Starter
Join Date: Apr 2014
Posts: 12
Mentioned: 0 Post(s)
Tagged: 0 Thread(s)
Quoted: 6 Post(s)
Likes: 0
Liked 0 Times
in
0 Posts
Thanks so much for all these suggestions, which are very useful. I'll certainly go down the ammonia route with the seat post when I get a chance, I think this is probably the best option. I'm loathe to use a lot of heat as the silver solder on the 753 frame has a lower melting point than the usual stuff (slightly worrying if someone has already been using one on the bb shell!). Thanks also for the info on French 25mm steerers, I wasn't aware of this, will try measuring to check. Not sure how easy it will be (in UK) to track down a French headset.
So for the frame, it looks like the consensus is to remove all rust outside and inside, and coat the inside with rust inhibiter of some sort. As for removing the paint before the repaint, I don't want to blast the frame, can anyone recommend a chemical paint remover that would be suitable? Don't want to end up using something that could risk damaging the frame.
So for the frame, it looks like the consensus is to remove all rust outside and inside, and coat the inside with rust inhibiter of some sort. As for removing the paint before the repaint, I don't want to blast the frame, can anyone recommend a chemical paint remover that would be suitable? Don't want to end up using something that could risk damaging the frame.
01-03-20, 09:38 AM
#10
Senior Member
Join Date: Jul 2018
Location: USA
Posts: 2,190
Bikes: Ti, Mn Cr Ni Mo Nb, Al, C
Mentioned: 22 Post(s)
Tagged: 0 Thread(s)
Quoted: 942 Post(s)
Liked 527 Times
in
349 Posts
...If you are going to invest in a full repaint, the simplest and most effective way to remove the stuck seat post (and any other stuck thing) is with a MAPP gas torch. Heat and cool it a couple of cycles until the paint on the frame is nicely bubbled and a little charred. Dribble in some ATF/acetone mix as a penetrant. Bang on the post a couple of times with a mallet, and the combination of all these things usually frees up the worst stuck seat post. Still not free after all that ? wash, rinse, repeat. It really helps to have a firmly mounted bench vise and a helper when you are doing the extraction of the post, once you get it turning freely in the frame.
Here's a bike (531, not 753) I derustificated, stripped, and painted. The frame is hanging up out in the hot sun filled with Evaporust stuff. There was beaucoup rust in the bottom bracket shell, so I had concerns about the interior of the stays and the rest of the frame.
Here's a bike (531, not 753) I derustificated, stripped, and painted. The frame is hanging up out in the hot sun filled with Evaporust stuff. There was beaucoup rust in the bottom bracket shell, so I had concerns about the interior of the stays and the rest of the frame.
Likes For jadocs:
01-03-20, 12:35 PM
#11
Friendship is Magic
Join Date: Nov 2010
Location: Sacramento, CA
Posts: 22,984
Bikes: old ones
Mentioned: 304 Post(s)
Tagged: 0 Thread(s)
Quoted: 26406 Post(s)
Liked 10,374 Times
in
7,203 Posts

Likes For 3alarmer:
01-03-20, 12:39 PM
#12
Friendship is Magic
Join Date: Nov 2010
Location: Sacramento, CA
Posts: 22,984
Bikes: old ones
Mentioned: 304 Post(s)
Tagged: 0 Thread(s)
Quoted: 26406 Post(s)
Liked 10,374 Times
in
7,203 Posts


 01-03-20, 01:15 PM
#13
SE Wis
Join Date: Apr 2005
Location: Milwaukee, WI
Posts: 10,509
Bikes: '68 Raleigh Sprite, '02 Raleigh C500, '84 Raleigh Gran Prix, '91 Trek 400, 2013 Novara Randonee, 1990 Trek 970
Mentioned: 40 Post(s)
Tagged: 0 Thread(s)
Quoted: 2746 Post(s)
Liked 3,390 Times
in
2,053 Posts
With the 68mm shell, Do you install a 70mm Italian BB w/2mm of spacers or do they make a 68mm Italian BB? Or is it cup & cone and you use a spindle made for a 68mm shell with Italian cups?
01-03-20, 02:19 PM
#14
Friendship is Magic
Join Date: Nov 2010
Location: Sacramento, CA
Posts: 22,984
Bikes: old ones
Mentioned: 304 Post(s)
Tagged: 0 Thread(s)
Quoted: 26406 Post(s)
Liked 10,374 Times
in
7,203 Posts
 I definitely did not use spacers. I think maybe I discovered that I could use a regular sealed unit with some cups I had lying around with no lip where they meet the shell. They're both RH threaded, so it's pretty easy to dig out a couple of the threaded pieces in Italian from the miscellaneous parts inventory. Like the deal where you run an adjustable cup with a lock ring on both sides, so you can have some side to side adjustment for the spacing and chain line.
Or I might have just used an Italian BB with a spindle that originally came with the Shimano 600 crankset I ended up using.
For sure I know I didn't use spacers, because the BB that was so solidly rusted in there was one of the original Mavic sealed BB's, where you have to chamfer fit the cups. As a happy accident, the larger diameter threading took off most of that chamfer as well. It did take me a while to figure it all out.
 01-03-20, 02:23 PM
#15
Friendship is Magic
Join Date: Nov 2010
Location: Sacramento, CA
Posts: 22,984
Bikes: old ones
Mentioned: 304 Post(s)
Tagged: 0 Thread(s)
Quoted: 26406 Post(s)
Liked 10,374 Times
in
7,203 Posts
01-03-20, 05:30 PM
#16
Friendship is Magic
Join Date: Nov 2010
Location: Sacramento, CA
Posts: 22,984
Bikes: old ones
Mentioned: 304 Post(s)
Tagged: 0 Thread(s)
Quoted: 26406 Post(s)
Liked 10,374 Times
in
7,203 Posts
Thanks so much for all these suggestions, which are very useful. I'll certainly go down the ammonia route with the seat post when I get a chance, I think this is probably the best option. I'm loathe to use a lot of heat as the silver solder on the 753 frame has a lower melting point than the usual stuff (slightly worrying if someone has already been using one on the bb shell!). Thanks also for the info on French 25mm steerers, I wasn't aware of this, will try measuring to check. Not sure how easy it will be (in UK) to track down a French headset.
So for the frame, it looks like the consensus is to remove all rust outside and inside, and coat the inside with rust inhibiter of some sort. As for removing the paint before the repaint, I don't want to blast the frame, can anyone recommend a chemical paint remover that would be suitable? Don't want to end up using something that could risk damaging the frame.
So for the frame, it looks like the consensus is to remove all rust outside and inside, and coat the inside with rust inhibiter of some sort. As for removing the paint before the repaint, I don't want to blast the frame, can anyone recommend a chemical paint remover that would be suitable? Don't want to end up using something that could risk damaging the frame.
The melting point of silver solder varies, depending on the chemical composition of the solder being used. Solder that is composed of 56 percent silver will have a melting point of 1,145 degrees Fahrenheit, while solder composed of 80 percent silver melts at 1,370 degrees Fahrenheit.
...most of the paints you run into on an older bike like this will start to bubble and smoke well before this, like in the 5-600* neighborhood. There are some high temp paints, but they don't get used on bikes except by accident. You're good if you stop when the paint starts to demonstrate that you need to stop. Here, I buy a chemical paint stripper at Home Depot in the paint department...It is fine on steel frames, but probably something I wouldn't use on CF reinforced plastic.
Goes on with a paint brush, makes a huge mess, so lay down newspapers or a drop cloth you want to throw away. Do it outside, if you can, and wear heavy duty rubber gloves and some sort of eye protection. I use it without a respirator, but I use it outside and in small quantities on the bike frame. They sell it in smaller than a gallon containers, because you won't require that much.
 01-03-20, 06:04 PM
#17
Full Member
Join Date: Apr 2019
Location: Northern NJ
Posts: 419
Bikes: 1987 Pinarello Montello, 1996 Litespeed Classic, 1996 Colnago Master Light, 1997 Litespeed Ultimate, 2006 Opera Leonardo FP, 2006 Pinarello Paris FP, 1984 Pinarello Record, 89-ish Cornelo Profilo
Mentioned: 5 Post(s)
Tagged: 0 Thread(s)
Quoted: 148 Post(s)
Liked 119 Times
in
73 Posts
I've used Citristrip, that I bought on Amazon. A little friendlier than that stuff.
https://www.amazon.com/Citristrip-QC..._dp&th=1&psc=1
And, certainly worked easily on this old repainted Pinarello:
https://www.bikeforums.net/classic-v...r-project.html
https://www.amazon.com/Citristrip-QC..._dp&th=1&psc=1
And, certainly worked easily on this old repainted Pinarello:
https://www.bikeforums.net/classic-v...r-project.html
01-04-20, 09:22 PM
#18
Junior Member
751 won’t rust through unless it was really badly neglected. Most of the time, the rust is just on the surface. Once you get it cleaned up inside and out, a treatment with framesaver (or equivalent) should have it running for another 25 years.
Likes For bitpuddle:
01-07-20, 11:15 AM
#19
Se�or Member

Join Date: Feb 2013
Posts: 5,066
Mentioned: 5 Post(s)
Tagged: 0 Thread(s)
Quoted: 649 Post(s)
Liked 292 Times
in
215 Posts
The pictures of the blue frame show absolutely no rust spots that I would be in any way concerned about. Respray or get some touch-up paint or nail polish to cover the spots, and ride.
There is likely some rust inside the frame, too, butt the absence of air flow usually means that the initial layer of iron oxide (rust) will protect the metal underneath, so you are unlikely to lose any noticeable amount of material. Get some type of preservative or wax (Weigle Framesaver?) to coat the inside and never worry about it again.
There is likely some rust inside the frame, too, butt the absence of air flow usually means that the initial layer of iron oxide (rust) will protect the metal underneath, so you are unlikely to lose any noticeable amount of material. Get some type of preservative or wax (Weigle Framesaver?) to coat the inside and never worry about it again.
01-07-20, 11:52 AM
#20
Generally bewildered

Join Date: Aug 2015
Location: Eastern PA, USA
Posts: 3,037
Bikes: 2014 Trek Domane 6.9, 1999 LeMond Zurich, 1978 Schwinn Superior
Mentioned: 20 Post(s)
Tagged: 0 Thread(s)
Quoted: 1152 Post(s)
Liked 341 Times
in
251 Posts
The pictures of the blue frame show absolutely no rust spots that I would be in any way concerned about. Respray or get some touch-up paint or nail polish to cover the spots, and ride.
There is likely some rust inside the frame, too, butt the absence of air flow usually means that the initial layer of iron oxide (rust) will protect the metal underneath, so you are unlikely to lose any noticeable amount of material. Get some type of preservative or wax (Weigle Framesaver?) to coat the inside and never worry about it again.
There is likely some rust inside the frame, too, butt the absence of air flow usually means that the initial layer of iron oxide (rust) will protect the metal underneath, so you are unlikely to lose any noticeable amount of material. Get some type of preservative or wax (Weigle Framesaver?) to coat the inside and never worry about it again.
Please forgive the digression, but I'd be tempted to say "There's nothing wrong with that frame". The exterior rust looks extremely minor. Agree with Mr. Laurier on particulars.
01-07-20, 03:42 PM
#21
Senior Member
Great pictures. Agree with the ammonia for the seat post. But as a last resort, if you are considering destroying it by cutting it anyway, try some lye down the seat tube in the same fashion. Eventually it melts the aluminum and the seatpost will just fall out. Takes a few repetitions. I've done this.
That Chorus in the link had chrome chainstays. Are you saying the prior owner painted over chrome?
That Chorus in the link had chrome chainstays. Are you saying the prior owner painted over chrome?
Last edited by Jicafold; 01-07-20 at 04:03 PM.
