


Cracked Holdsworth/Claud Butler Autopsy => Resurrection
 07-17-19, 08:34 PM
#26

www.theheadbadge.com

Join Date: Sep 2005
Location: Southern Florida
Posts: 28,513
Bikes: https://www.theheadbadge.com
Mentioned: 124 Post(s)
Tagged: 0 Thread(s)
Quoted: 2422 Post(s)
Liked 4,392 Times
in
2,092 Posts

Funny you should comment... When assembling this front rack support, I unwisely did not remove the milk crate. Instead I used a trick that you have to use on the old Mercedes W210 when replacing the upper control arms: masking-tape the nut to the open end of a wrench and stick the wrench in the inaccessible spot, then thread the bolt through from the other side and tighten it, then tug on the wrench to rip the tape and remove the wrench. Funny little coincidences!
I used to work on one for a local beekeeper back when I lived in Vermont. He'd pay me in honey, which was literally and figuratively a sweet deal. I had gallons of it at all times, his stepchildren kept wrecking the car and it was pretty easy to work on, other than having to know a few tricks. The symbol on the bike is from a W123 trunk lid, I think.

It reminds me that I'm completely over-engineering the modified, mad-scientist Twenty that I've been rapidly over-complicating, and I'm just now starting to come up with integrated front rack ideas. Avoiding hard-to-service bits has been part of the design gestalt, but that went out the window when I decided that the Sturmey hub had to be supplemented with a 52/36 up front...and nothing in back. Chain tensioner + IGH time. If that isn't a German approach to engineering, I don't know what is.
-Kurt
__________________


 07-17-19, 09:05 PM
#27


Randomhead
Join Date: Aug 2008
Location: Happy Valley, Pennsylvania
Posts: 24,396
Mentioned: 0 Post(s)
Tagged: 0 Thread(s)
Quoted: 4 Post(s)
Liked 3,696 Times
in
2,517 Posts
I'm pretty sure that BITD, many companies considered the lug to be the joint, and just got enough tube into the lug so that it would hold together. There are plenty of pictures people have taken of frames that were taken apart that show very rudimentary mitering. Still, good mitering and full penetration are really the minimum anyone should expect of someone calling themselves a framebuilder.
07-17-19, 09:07 PM
#28
Senior Member

Join Date: Mar 2014
Location: City of Angels
Posts: 4,870
Bikes: A few too many
Mentioned: 42 Post(s)
Tagged: 1 Thread(s)
Quoted: 1364 Post(s)
Liked 2,180 Times
in
1,183 Posts

Sesquilaminate construction with Rustoleum finish!
Nice color match..if you want to splater paint, You can use a toothbrush to splatter the frame...wet the brush and then put one hand near where you want the splatter and tap the brush against your hand and splatter away! You could also flick the bristles with your thumb.
Ben
__________________
"EVERY PERSON IS GUILTY OF ALL THE GOOD THEY DID NOT DO"
Voltaire
Voice recognition may sometimes create odd spelling and grammatical errors
"EVERY PERSON IS GUILTY OF ALL THE GOOD THEY DID NOT DO"
Voltaire
Voice recognition may sometimes create odd spelling and grammatical errors
07-17-19, 10:01 PM
#29
Senior Member
Thread Starter

Join Date: Jun 2010
Location: Medford MA
Posts: 2,089
Bikes: Ron Cooper touring, 1959 Jack Taylor 650b ladyback touring tandem, Vitus 979, Joe Bell painted Claud Butler Dalesman, Colin Laing curved tube tandem, heavily-Dilberted 1982 Trek 6xx, Ren� Herse tandem
Mentioned: 80 Post(s)
Tagged: 0 Thread(s)
Quoted: 964 Post(s)
Liked 1,451 Times
in
723 Posts
Nice color match..if you want to splater paint, You can use a toothbrush to splatter the frame...wet the brush and then put one hand near where you want the splatter and tap the brush against your hand and splatter away! You could also flick the bristles with your thumb.
Ben
Ben

Likes For scarlson:
07-18-19, 11:37 AM
#30
Senior Member
Thread Starter
Join Date: Jun 2010
Location: Medford MA
Posts: 2,089
Bikes: Ron Cooper touring, 1959 Jack Taylor 650b ladyback touring tandem, Vitus 979, Joe Bell painted Claud Butler Dalesman, Colin Laing curved tube tandem, heavily-Dilberted 1982 Trek 6xx, Ren� Herse tandem
Mentioned: 80 Post(s)
Tagged: 0 Thread(s)
Quoted: 964 Post(s)
Liked 1,451 Times
in
723 Posts
I've never worked on any of the old W-series, but judging from your description, that sounds like the UCA pivot bolt installation, am I right? Sounds like fun...not
It reminds me that I'm completely over-engineering the modified, mad-scientist Twenty that I've been rapidly over-complicating, and I'm just now starting to come up with integrated front rack ideas. Avoiding hard-to-service bits has been part of the design gestalt, but that went out the window when I decided that the Sturmey hub had to be supplemented with a 52/36 up front...and nothing in back. Chain tensioner + IGH time. If that isn't a German approach to engineering, I don't know what is.
-Kurt
 01-08-20, 03:46 PM
#31
Senior Member
Thread Starter
Join Date: Jun 2010
Location: Medford MA
Posts: 2,089
Bikes: Ron Cooper touring, 1959 Jack Taylor 650b ladyback touring tandem, Vitus 979, Joe Bell painted Claud Butler Dalesman, Colin Laing curved tube tandem, heavily-Dilberted 1982 Trek 6xx, Ren� Herse tandem
Mentioned: 80 Post(s)
Tagged: 0 Thread(s)
Quoted: 964 Post(s)
Liked 1,451 Times
in
723 Posts
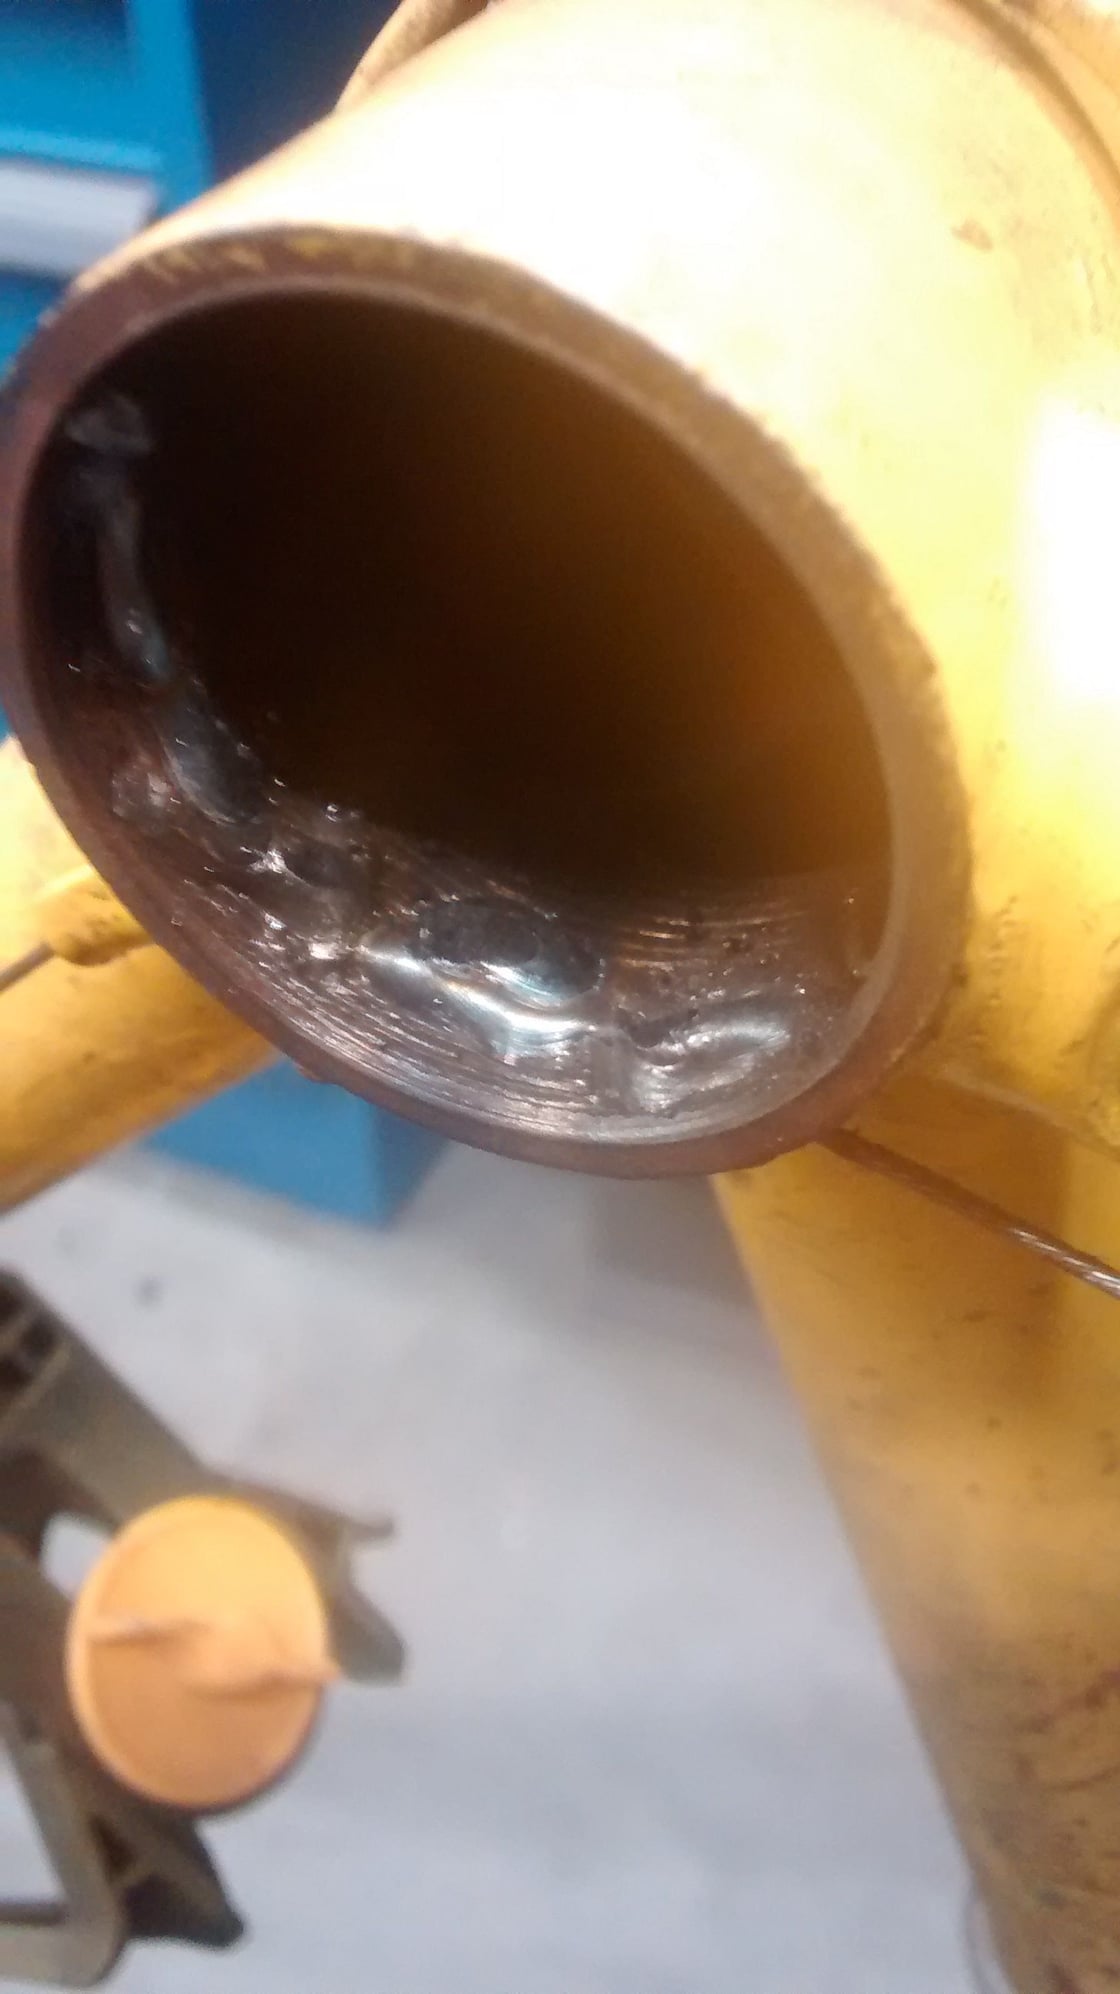
AND it broke again. I don't remember if I mentioned this, but in prehistory (2017) the BB threads were no good on the adjustable cup (left) side, so I filled them with silver and re-tapped them. This time, the other side of the BB went bad. I noticed it the same way I always notice it on this bike: the cranks start rocking as I'm pedaling. 
Not wanting to melt the silver I'd already laid in there, I decided I'd build up the inside of the BB with mig weld, file it down, and cut threads with my BB taps. This would be more local heat but less total heat, so it might not even get toasty on the other side of the BB shell. I also figure it's stronger than silver!
Tooling up, I love my taps and I think they were like $35 on Ebay. I have paid shops more than that to chase threads.
And here goes. I only welded on the top and front, because that's where I did the silver on the other side. This should improve alignment in there, since I don't use piloted taps. A bit pigeon-poo, but it doesn't need to be pretty, it needs to be strong. Also note how little paint was burned off! Didn't even soften the braze. Phew.
File to knock it down to a decent depth.
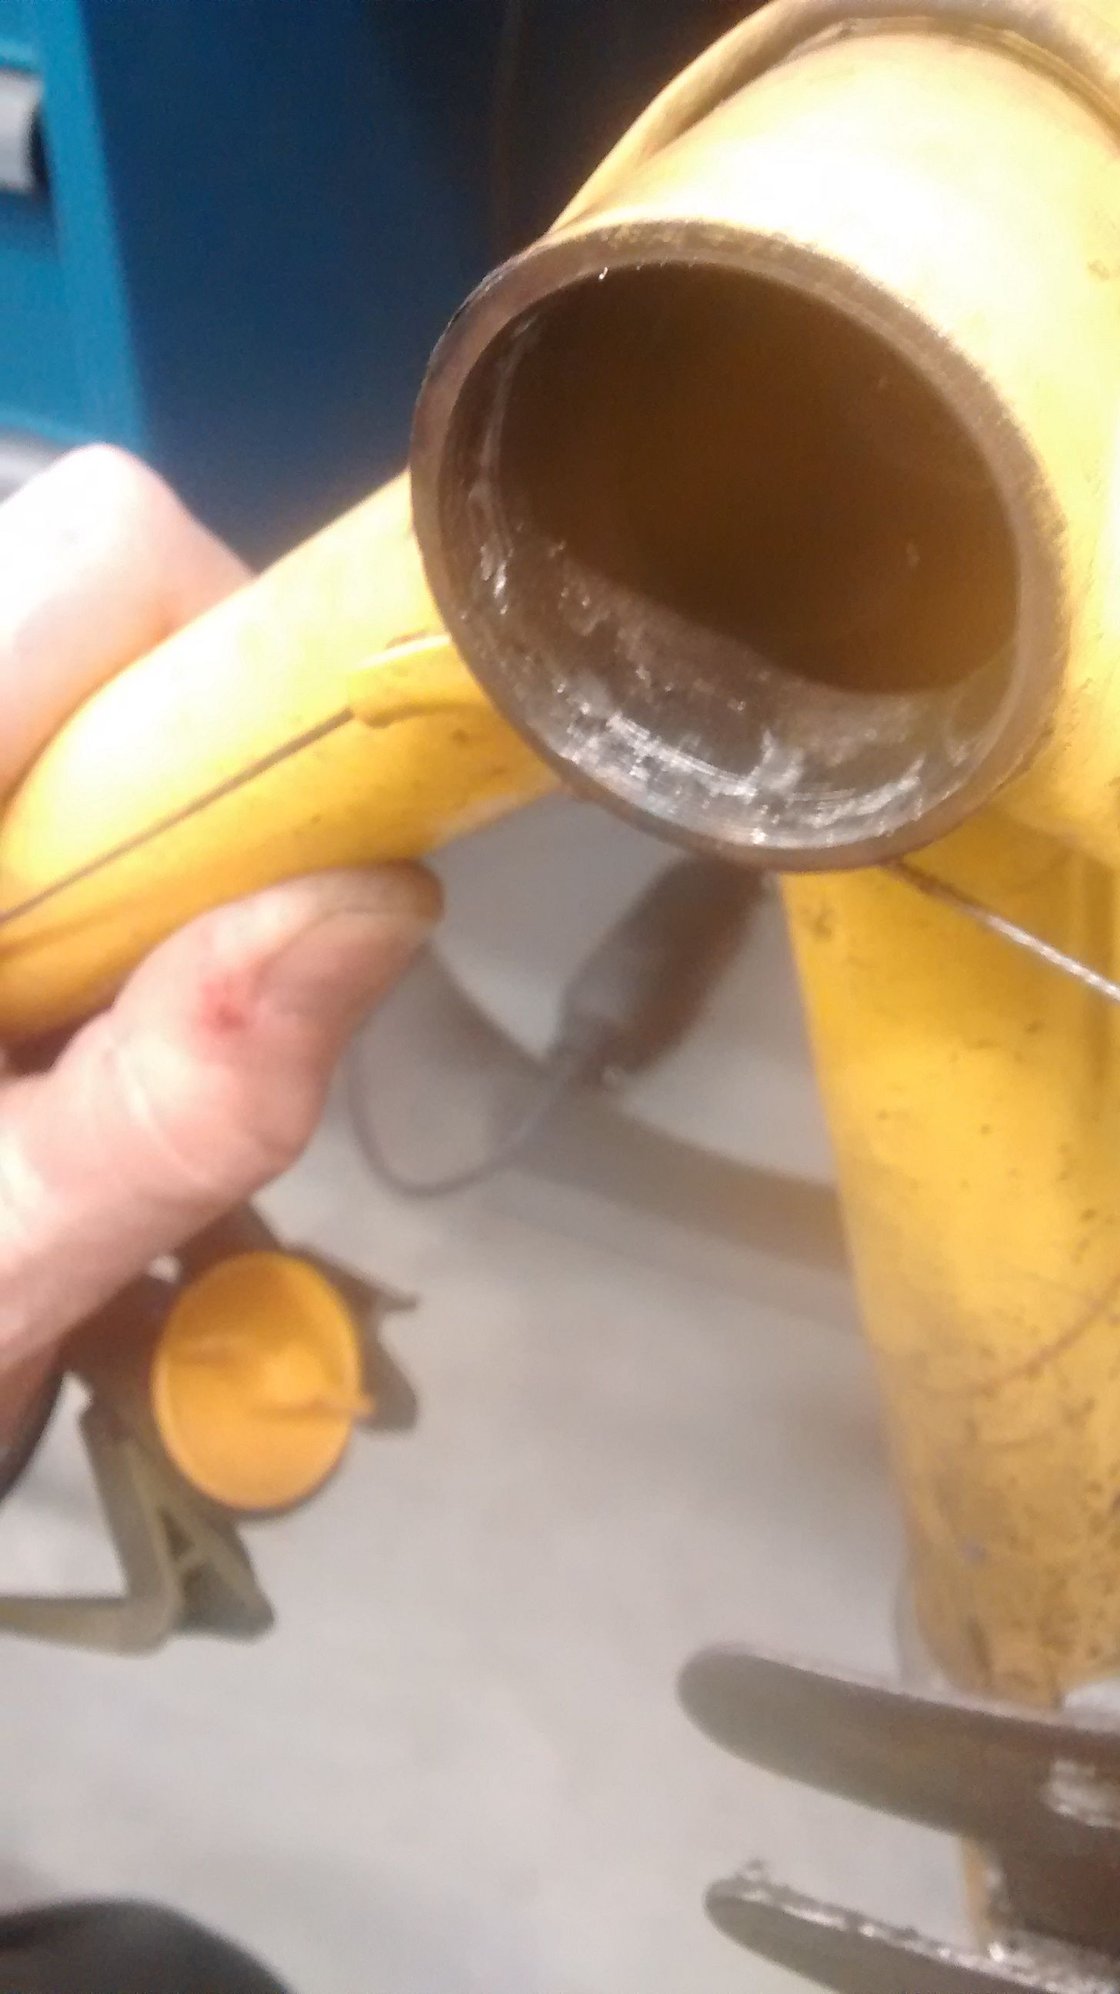
Tapping the threads. I did not have a tap handle big enough for my BB taps so a breaka bar with 12-point socket had to do.

Finished product!

Bear in mind, it may look crummy but a lot of the thread engagement is coming from the back and bottom of the shell, which I did not weld on at all, but which got skimmed a little by the tap. The cup went in nice and tight and I was back on the road in 2 hours.
And to be clear, I wouldn't do this on anybody's bike except my own, and only on a locally-used commuter, not on something I'd take on tour. This is a hail-Mary sorta thing. Next step would be to weld the fixed cup directly to the shell.
Not wanting to melt the silver I'd already laid in there, I decided I'd build up the inside of the BB with mig weld, file it down, and cut threads with my BB taps. This would be more local heat but less total heat, so it might not even get toasty on the other side of the BB shell. I also figure it's stronger than silver!
Tooling up, I love my taps and I think they were like $35 on Ebay. I have paid shops more than that to chase threads.
And here goes. I only welded on the top and front, because that's where I did the silver on the other side. This should improve alignment in there, since I don't use piloted taps. A bit pigeon-poo, but it doesn't need to be pretty, it needs to be strong. Also note how little paint was burned off! Didn't even soften the braze. Phew.
File to knock it down to a decent depth.
Tapping the threads. I did not have a tap handle big enough for my BB taps so a breaka bar with 12-point socket had to do.
Finished product!
Bear in mind, it may look crummy but a lot of the thread engagement is coming from the back and bottom of the shell, which I did not weld on at all, but which got skimmed a little by the tap. The cup went in nice and tight and I was back on the road in 2 hours.
And to be clear, I wouldn't do this on anybody's bike except my own, and only on a locally-used commuter, not on something I'd take on tour. This is a hail-Mary sorta thing. Next step would be to weld the fixed cup directly to the shell.
__________________
Owner & co-founder, Cycles Ren� Hubris. Unfortunately attaching questionable braze-ons to perfectly good frames since about 2015. With style.
Owner & co-founder, Cycles Ren� Hubris. Unfortunately attaching questionable braze-ons to perfectly good frames since about 2015. With style.
Last edited by scarlson; 01-08-20 at 03:49 PM.
Likes For scarlson:
01-08-20, 08:42 PM
#32
Banned.

Join Date: Jul 2009
Location: PAZ
Posts: 12,294
Mentioned: 255 Post(s)
Tagged: 0 Thread(s)
Quoted: 2588 Post(s)
Liked 4,824 Times
in
1,709 Posts
Good job! I like how you keep bringing this frame back from the edge of the pit
DD
DD

Likes For Drillium Dude:
01-08-20, 09:03 PM
#33
Senior Member
Thread Starter
Join Date: Jun 2010
Location: Medford MA
Posts: 2,089
Bikes: Ron Cooper touring, 1959 Jack Taylor 650b ladyback touring tandem, Vitus 979, Joe Bell painted Claud Butler Dalesman, Colin Laing curved tube tandem, heavily-Dilberted 1982 Trek 6xx, Ren� Herse tandem
Mentioned: 80 Post(s)
Tagged: 0 Thread(s)
Quoted: 964 Post(s)
Liked 1,451 Times
in
723 Posts
It is my old war horse. Rocinante to my Quixote, at least here in the city and in foul weather. I guess I'm somewhat sentimentally attached to it. After I got the crack, I went through some of the stages of grief, and poured a lot of energy into my Trek, but I couldn't get the feels to go away. You know how it is. Better not to fight it.
__________________
Owner & co-founder, Cycles Ren� Hubris. Unfortunately attaching questionable braze-ons to perfectly good frames since about 2015. With style.
Owner & co-founder, Cycles Ren� Hubris. Unfortunately attaching questionable braze-ons to perfectly good frames since about 2015. With style.
Likes For scarlson:
01-08-20, 09:18 PM
#34
blahblahblah chrome moly

Join Date: Apr 2009
Location: Seattle
Posts: 1,987
Mentioned: 92 Post(s)
Tagged: 0 Thread(s)
Quoted: 1173 Post(s)
Liked 2,569 Times
in
1,073 Posts
Nice kluge!
Another quick'n'dirty method I have used a few times is the Cut'n'Weld. Do you know it? Read on for details if interested.
You hacksaw through the shell underneath, parallel to the spindle axis. Not all the way across, just in from one end, farther than the extent of the threads but less than halfway to the other side.
Then hammer on it until the slit closes up. I like a hard plastic-faced mallet for the hammering, but most any hammer will do. Not all in one place, we're try to maintain roundness, though of course it won't be fully round anymore. You're just reducing the radius in the lower maybe 1/3 of the circle, good enough for jazz.
Then you quickly weld or braze the slit. I always brass brazed it, which I think may be best because you can flow a little brass into the existing threads inside in the vicinity of the slit. Large flame, do it fast. If you do it quickly enough, very little paint is burnt, and it's all on the underside. Soak the brass flux off, dry it, hit it with a little rattle-can and retap the thread. I guess welding rather than brazing would have the advantage of no brass flux, saving the soak and dry steps.
I did maybe a half dozen of these and never had one come back. Though I suppose it's possible that someone had it fail later and just threw it away without telling me -- but I doubt it. I think this is a reliable repair, and really quick (thus cheap).
On a few of the frames that got this repair, the thread damage was severe enough that I decided closing up the kerf of a single hacksaw blade would not reduce the hole size enough to get all new threads, so I ganged up two blades on my hacksaw frame to get double the kerf. Not all hacksaws allow this, so make sure a hacksaw frame does allow it before buying one -- this has proven a useful feature pretty often. If you gang up two or more blades, try to find ones where the "wave-set" is in phase, so the blades "spoon" with each other when mounted on the saw frame. Hard to describe but easy to see. It seems the wave-set phasing is somewhat random even within one pack of blades, so it's useful to have a bunch of blades to try and find the ones that match. I can probably take a picture to illustrate this if anyone needs it. If the wave-sets are out of phase, it's possible for the blade on the right to skew to the right, and the left blade to the left, leaving a piece of uncut metal in between.
I was taught this by a master framebuilder, so if you're learning it over the internet, you might want to practice on a junk frame first.
Mark Bulgier
Irony Cycles
Seattle
01-08-20, 10:08 PM
#35
Senior Member
Join Date: Oct 2014
Location: Portland, OR
Posts: 12,904
Bikes: (2) ti TiCycles, 2007 w/ triple and 2011 fixed, 1979 Peter Mooney, ~1983 Trek 420 now fixed and ~1973 Raleigh Carlton Competition gravel grinder
Mentioned: 129 Post(s)
Tagged: 0 Thread(s)
Quoted: 4806 Post(s)
Liked 3,928 Times
in
2,553 Posts
And yeah - I know you wrote this last summer. Some of us are slow.
Ben

