


Lug Making
 06-24-18, 07:56 PM
#1

Senior Member
Thread Starter
Join Date: Feb 2012
Location: Rochester, NY
Posts: 18,084
Bikes: Stewart S&S coupled sport tourer, Stewart Sunday light, Stewart Commuting, Stewart Touring, Co Motion Tandem, Stewart 3-Spd, Stewart Track, Fuji Finest, Mongoose Tomac ATB, GT Bravado ATB, JCP Folder, Stewart 650B ATB
Mentioned: 0 Post(s)
Tagged: 0 Thread(s)
Quoted: 4205 Post(s)
Liked 3,863 Times
in
2,311 Posts
Lug Making
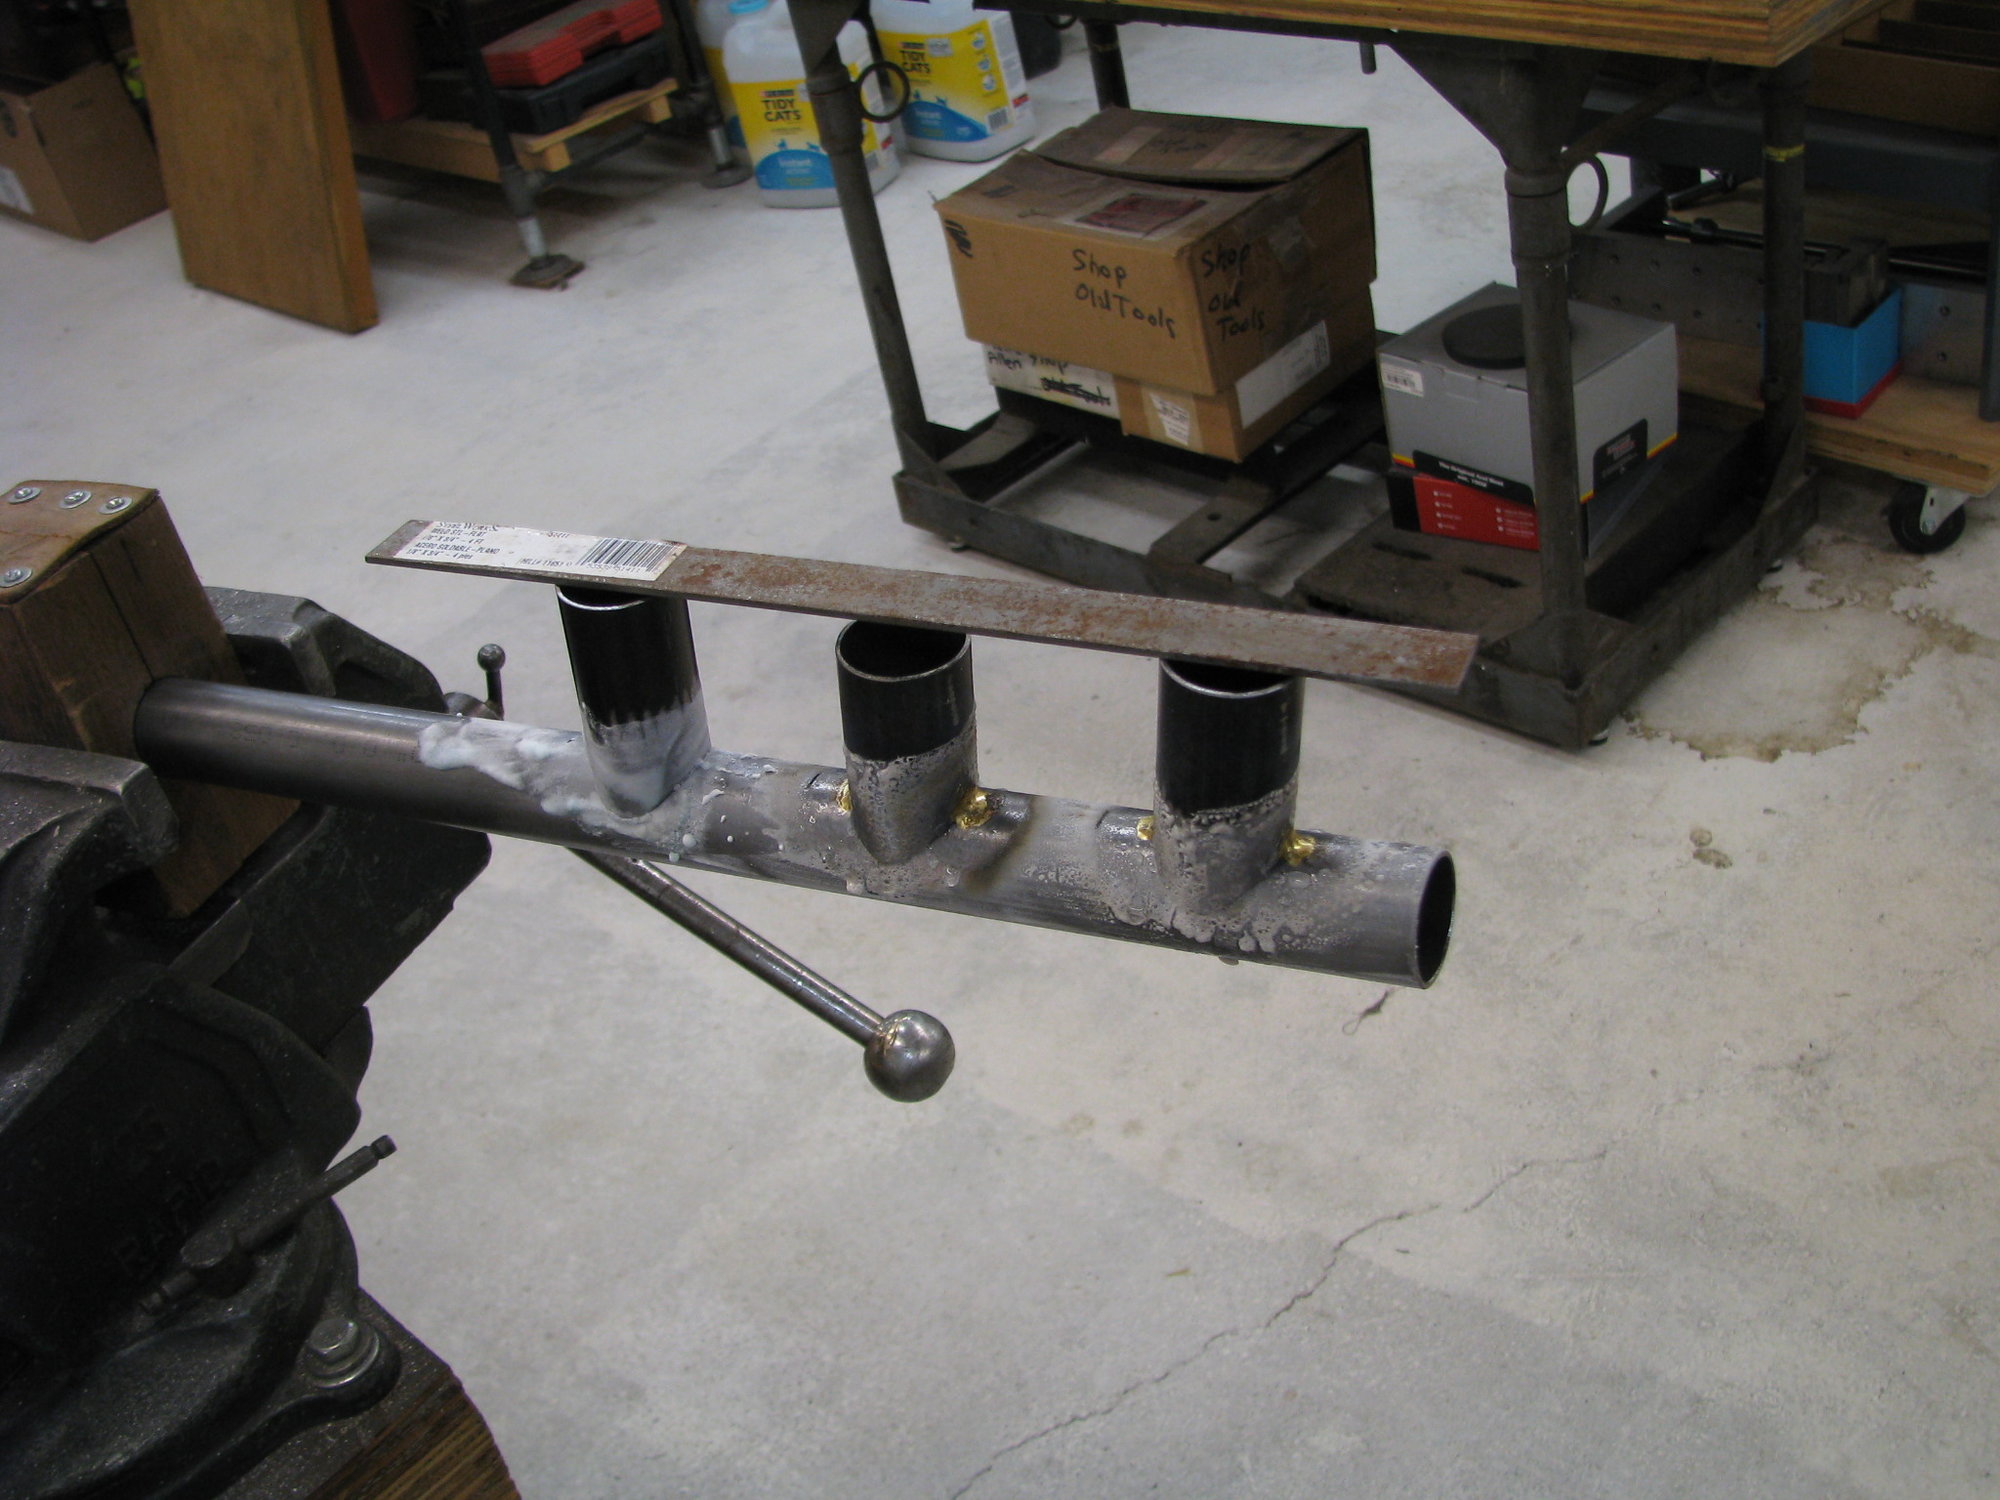
I've only made a couple of lugs before, a number of years ago, before I decided to go fillet for most of my frames. So looking for a new project a custom lugged urban station wagon bike seems right. This will be a long time job. Making what is a second mainframe for all intents takes a while. I started with the frame geometry and tube dimensions. Then got .058" walled tubes that are .125" larger an OD (to allow the frame tubes to slip inside with nice brazing clearances). Mitered to angles, tacked and fillet brazed then began the slow filing step. Out of the first batch of 3 DT/HT blanks 1 was nice enough to continue with.
Here's a couple of shots of the beginning. I've applied navel jelly to enhance the fillet/steel difference. More to come as I get to it. Andy
Here's a couple of shots of the beginning. I've applied navel jelly to enhance the fillet/steel difference. More to come as I get to it. Andy
__________________
AndrewRStewart
AndrewRStewart
 06-25-18, 07:19 AM
#2


Randomhead
Join Date: Aug 2008
Location: Happy Valley, Pennsylvania
Posts: 24,398
Mentioned: 0 Post(s)
Tagged: 0 Thread(s)
Quoted: 4 Post(s)
Liked 3,697 Times
in
2,518 Posts
those look great. Keep us posted
 06-25-18, 08:08 PM
#3
Senior Member
Join Date: Aug 2012
Location: Seattle
Posts: 507
Mentioned: 0 Post(s)
Tagged: 0 Thread(s)
Quoted: 103 Post(s)
Liked 144 Times
in
88 Posts
Looking forward to this! Did you miter both tubes or butt one against the other like with a filleted joint?
__________________
https://www.flickr.com/photos/54319503@N05/
https://www.draper-cycles.com
https://www.flickr.com/photos/54319503@N05/
https://www.draper-cycles.com
06-25-18, 08:30 PM
#4
Senior Member
Thread Starter
Join Date: Feb 2012
Location: Rochester, NY
Posts: 18,084
Bikes: Stewart S&S coupled sport tourer, Stewart Sunday light, Stewart Commuting, Stewart Touring, Co Motion Tandem, Stewart 3-Spd, Stewart Track, Fuji Finest, Mongoose Tomac ATB, GT Bravado ATB, JCP Folder, Stewart 650B ATB
Mentioned: 0 Post(s)
Tagged: 0 Thread(s)
Quoted: 4205 Post(s)
Liked 3,863 Times
in
2,311 Posts
06-25-18, 08:59 PM
#5
Senior Member
Join Date: Apr 2011
Posts: 7,062
Mentioned: 41 Post(s)
Tagged: 0 Thread(s)
Quoted: 4406 Post(s)
Liked 1,560 Times
in
1,023 Posts
Speaking of which, have you considered clamping the lug tube around its future tube mate and then mitering them at the same time?
I love the fact that brass and silver brazing temp differences makes this possible. It is too bad bronze and stainless mix poorly - those would be neat looking bare lugs for little cost.
06-25-18, 10:11 PM
#6
Senior Member
Thread Starter
Join Date: Feb 2012
Location: Rochester, NY
Posts: 18,084
Bikes: Stewart S&S coupled sport tourer, Stewart Sunday light, Stewart Commuting, Stewart Touring, Co Motion Tandem, Stewart 3-Spd, Stewart Track, Fuji Finest, Mongoose Tomac ATB, GT Bravado ATB, JCP Folder, Stewart 650B ATB
Mentioned: 0 Post(s)
Tagged: 0 Thread(s)
Quoted: 4205 Post(s)
Liked 3,863 Times
in
2,311 Posts
My lugs don't wear underwear. Frame tube to frame tube contact is the plan. Andy
__________________
AndrewRStewart
AndrewRStewart
06-25-18, 10:17 PM
#7
Senior Member
Join Date: Apr 2011
Posts: 7,062
Mentioned: 41 Post(s)
Tagged: 0 Thread(s)
Quoted: 4406 Post(s)
Liked 1,560 Times
in
1,023 Posts
Are you going to use a hole saw from the inside of the downtube side of the lug, or hog it out from the head tube side?
Jeff at Spectrum now makes 100% of their lugs from scratch like you are. It's very cool what you're doing. Thanks for sharing it.
06-25-18, 10:19 PM
#8
Senior Member
Join Date: Aug 2012
Location: Seattle
Posts: 507
Mentioned: 0 Post(s)
Tagged: 0 Thread(s)
Quoted: 103 Post(s)
Liked 144 Times
in
88 Posts

I haven't ever heard of anyone doing it any other way but thought I would ask. Definitely taking the long road!
__________________
https://www.flickr.com/photos/54319503@N05/
https://www.draper-cycles.com
https://www.flickr.com/photos/54319503@N05/
https://www.draper-cycles.com
06-26-18, 06:22 AM
#9
Randomhead
Join Date: Aug 2008
Location: Happy Valley, Pennsylvania
Posts: 24,398
Mentioned: 0 Post(s)
Tagged: 0 Thread(s)
Quoted: 4 Post(s)
Liked 3,697 Times
in
2,518 Posts
It makes sense to open up the pipes, I wouldn't want to have to miter around the internal fillet. The number of people making lugs is fairly small relative to the number of people doing bilaminate construction. For bilaminate, I don't think people generally join frame tube to frame tube. But everybody makes up their own method, it's not like there is a consensus technique.
The owner of speedplay wanted a Masi replica, and the builder made lugs. I think they were welded. The funny thing about that was that there is a really good Cinelli lug copy available, and I'm pretty sure it was available at that time.
Well before the internet era, I wanted to modify some lugs by adding parts. So I welded tube scraps on to them -- cleanup was a real pain. Fast forward 27 years, and I saw pictures of Peter Weigle modified lugs where he brazed extra parts on. It was a real head-slapping moment. My point is that now we can go get ideas from others (and also, my first impulse is to do things the hard way).
06-27-18, 11:13 AM
#10
Junior Member
Join Date: Feb 2015
Location: Manchester, UK
Posts: 12
Bikes: n-1
Mentioned: 0 Post(s)
Tagged: 0 Thread(s)
Quoted: 3 Post(s)
Likes: 0
Liked 0 Times
in
0 Posts
There is a sequence of videos on Youtube showing Hirose scratch building and modifying lugs, a bit long winded but I found it interesting. Looks like he is gas welding them. This is the first: youtube.com/watch?v=VbBTZrOS56Q
William.
William.
06-27-18, 11:53 AM
#11
Senior Member
Join Date: Apr 2011
Posts: 7,062
Mentioned: 41 Post(s)
Tagged: 0 Thread(s)
Quoted: 4406 Post(s)
Liked 1,560 Times
in
1,023 Posts
Or is he welding everything because he's going to use brass to braze the tubes rather than silver?
06-27-18, 03:23 PM
#12
Randomhead
Join Date: Aug 2008
Location: Happy Valley, Pennsylvania
Posts: 24,398
Mentioned: 0 Post(s)
Tagged: 0 Thread(s)
Quoted: 4 Post(s)
Liked 3,697 Times
in
2,518 Posts
Hirose does everything the hard way. Go watch him make a crank, for example. I have wasted way too many hours watching his video. I don't think it's a commentary on any other method, it's just the way he does things. I'm thinking I have seen him fillet stems, for example, and that's probably the most critical joint on the bike.
I want to make some lugs the way the pressed lugs were made, just bent with a hammer and punch around a form. And then welded along the center line. No good reason, it's just something I keep thinking about doing.
I want to make some lugs the way the pressed lugs were made, just bent with a hammer and punch around a form. And then welded along the center line. No good reason, it's just something I keep thinking about doing.
06-27-18, 04:54 PM
#13
Senior Member
Join Date: Apr 2011
Posts: 7,062
Mentioned: 41 Post(s)
Tagged: 0 Thread(s)
Quoted: 4406 Post(s)
Liked 1,560 Times
in
1,023 Posts
Hirose does everything the hard way. Go watch him make a crank, for example. I have wasted way too many hours watching his video. I don't think it's a commentary on any other method, it's just the way he does things. I'm thinking I have seen him fillet stems, for example, and that's probably the most critical joint on the bike.
I want to make some lugs the way the pressed lugs were made, just bent with a hammer and punch around a form. And then welded along the center line. No good reason, it's just something I keep thinking about doing.
I want to make some lugs the way the pressed lugs were made, just bent with a hammer and punch around a form. And then welded along the center line. No good reason, it's just something I keep thinking about doing.
So Hirose probably just likes the idea of the lug being all steel, or he's concerned about temps because he is using bronze on the tubes.
Torch welding is the first thing I learned - neat to see it being used on a bicycle. I do some blacksmithing, and I've seen examples that lead me to believe a gifted smith could forge weld a complete lug with the right mandrels.
06-27-18, 06:07 PM
#14
Senior Member
Thread Starter
Join Date: Feb 2012
Location: Rochester, NY
Posts: 18,084
Bikes: Stewart S&S coupled sport tourer, Stewart Sunday light, Stewart Commuting, Stewart Touring, Co Motion Tandem, Stewart 3-Spd, Stewart Track, Fuji Finest, Mongoose Tomac ATB, GT Bravado ATB, JCP Folder, Stewart 650B ATB
Mentioned: 0 Post(s)
Tagged: 0 Thread(s)
Quoted: 4205 Post(s)
Liked 3,863 Times
in
2,311 Posts
Eric- I remember seeing a vid a bunch of years ago of a back country Australian smithy who made a VW Bug floor pan with nothing but a fire, a hammer and a few chisels. Tap Tap Tap then anneal and start tapping again. Somehow this vision came to me as I read your wish to use sheet steel for lugs.
I sandblasted the blanks today and scribed their center and side lines. Soon I'll use pencil and create the shorelines. Andy.
I sandblasted the blanks today and scribed their center and side lines. Soon I'll use pencil and create the shorelines. Andy.
__________________
AndrewRStewart
AndrewRStewart
10-11-18, 10:33 PM
#15
Senior Member
Thread Starter
Join Date: Feb 2012
Location: Rochester, NY
Posts: 18,084
Bikes: Stewart S&S coupled sport tourer, Stewart Sunday light, Stewart Commuting, Stewart Touring, Co Motion Tandem, Stewart 3-Spd, Stewart Track, Fuji Finest, Mongoose Tomac ATB, GT Bravado ATB, JCP Folder, Stewart 650B ATB
Mentioned: 0 Post(s)
Tagged: 0 Thread(s)
Quoted: 4205 Post(s)
Liked 3,863 Times
in
2,311 Posts
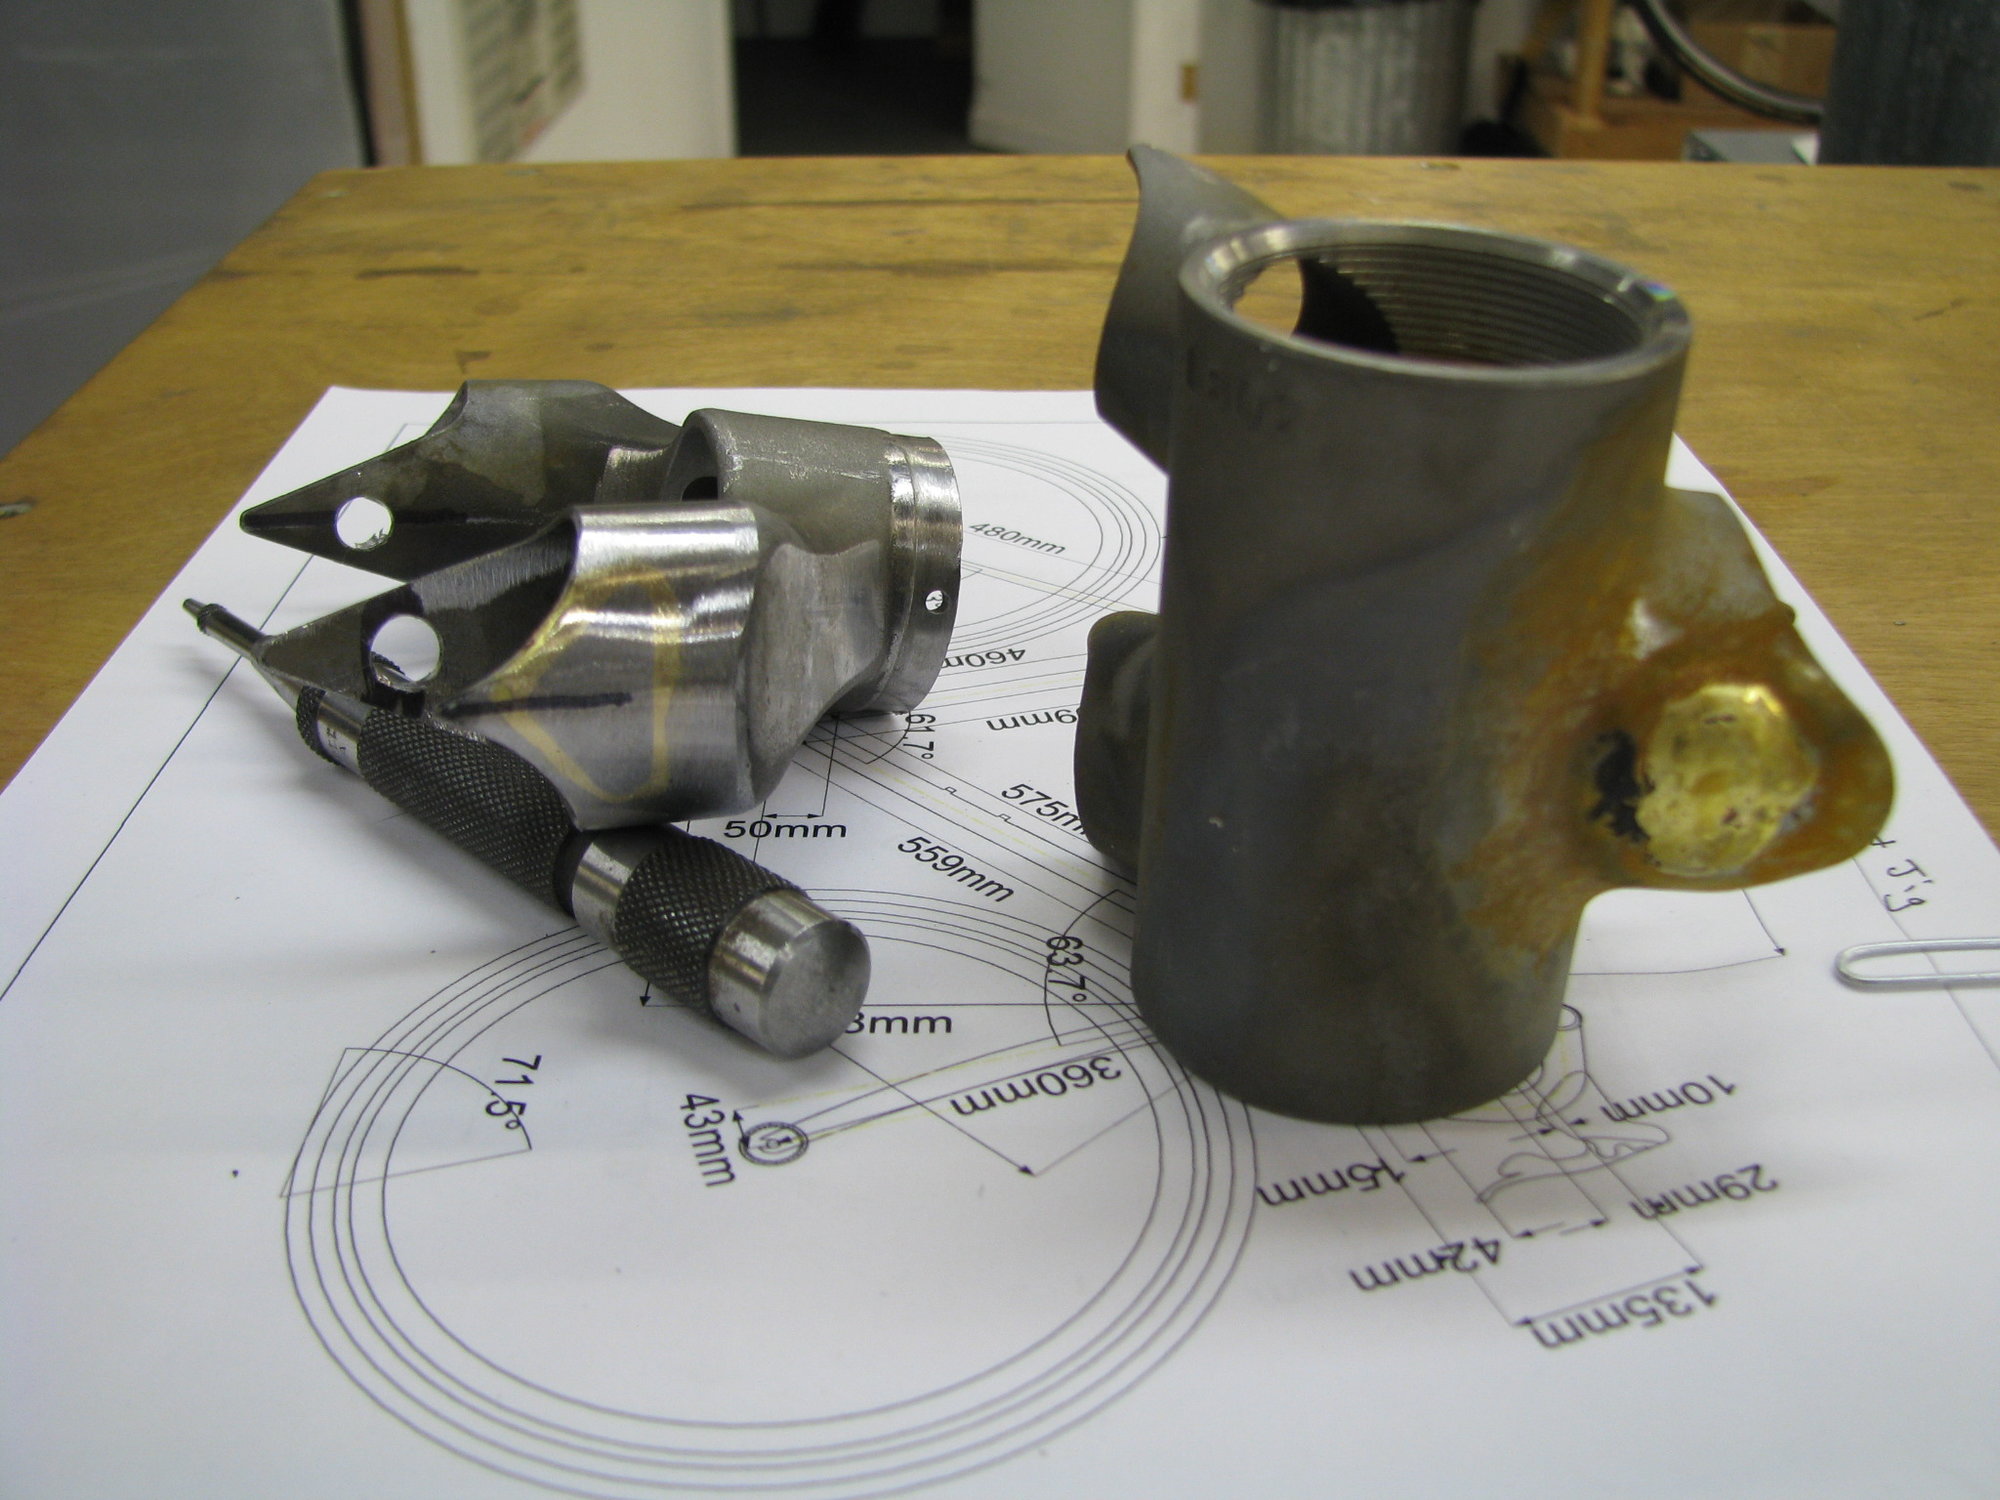
Slow forward a few months and I got time to cut out the walls of the DT&ST tubes. Lined the blanks up on my well used mill by eye. I placed solid cylinders in the ST&DT to prevent vice crush. A bit of trial plunges with no power and away I went. It went well. I played a bit with possible shore line shapes on the shinny practice blank. It seems that a, sort of, Art Deco look is where I'm going... Andy
__________________
AndrewRStewart
AndrewRStewart
10-11-18, 10:40 PM
#16
Senior Member
Thread Starter
Join Date: Feb 2012
Location: Rochester, NY
Posts: 18,084
Bikes: Stewart S&S coupled sport tourer, Stewart Sunday light, Stewart Commuting, Stewart Touring, Co Motion Tandem, Stewart 3-Spd, Stewart Track, Fuji Finest, Mongoose Tomac ATB, GT Bravado ATB, JCP Folder, Stewart 650B ATB
Mentioned: 0 Post(s)
Tagged: 0 Thread(s)
Quoted: 4205 Post(s)
Liked 3,863 Times
in
2,311 Posts

For some reason this shot didn't upload. Andy
__________________
AndrewRStewart
AndrewRStewart
11-25-18, 08:00 PM
#17
Senior Member
Thread Starter
Join Date: Feb 2012
Location: Rochester, NY
Posts: 18,084
Bikes: Stewart S&S coupled sport tourer, Stewart Sunday light, Stewart Commuting, Stewart Touring, Co Motion Tandem, Stewart 3-Spd, Stewart Track, Fuji Finest, Mongoose Tomac ATB, GT Bravado ATB, JCP Folder, Stewart 650B ATB
Mentioned: 0 Post(s)
Tagged: 0 Thread(s)
Quoted: 4205 Post(s)
Liked 3,863 Times
in
2,311 Posts
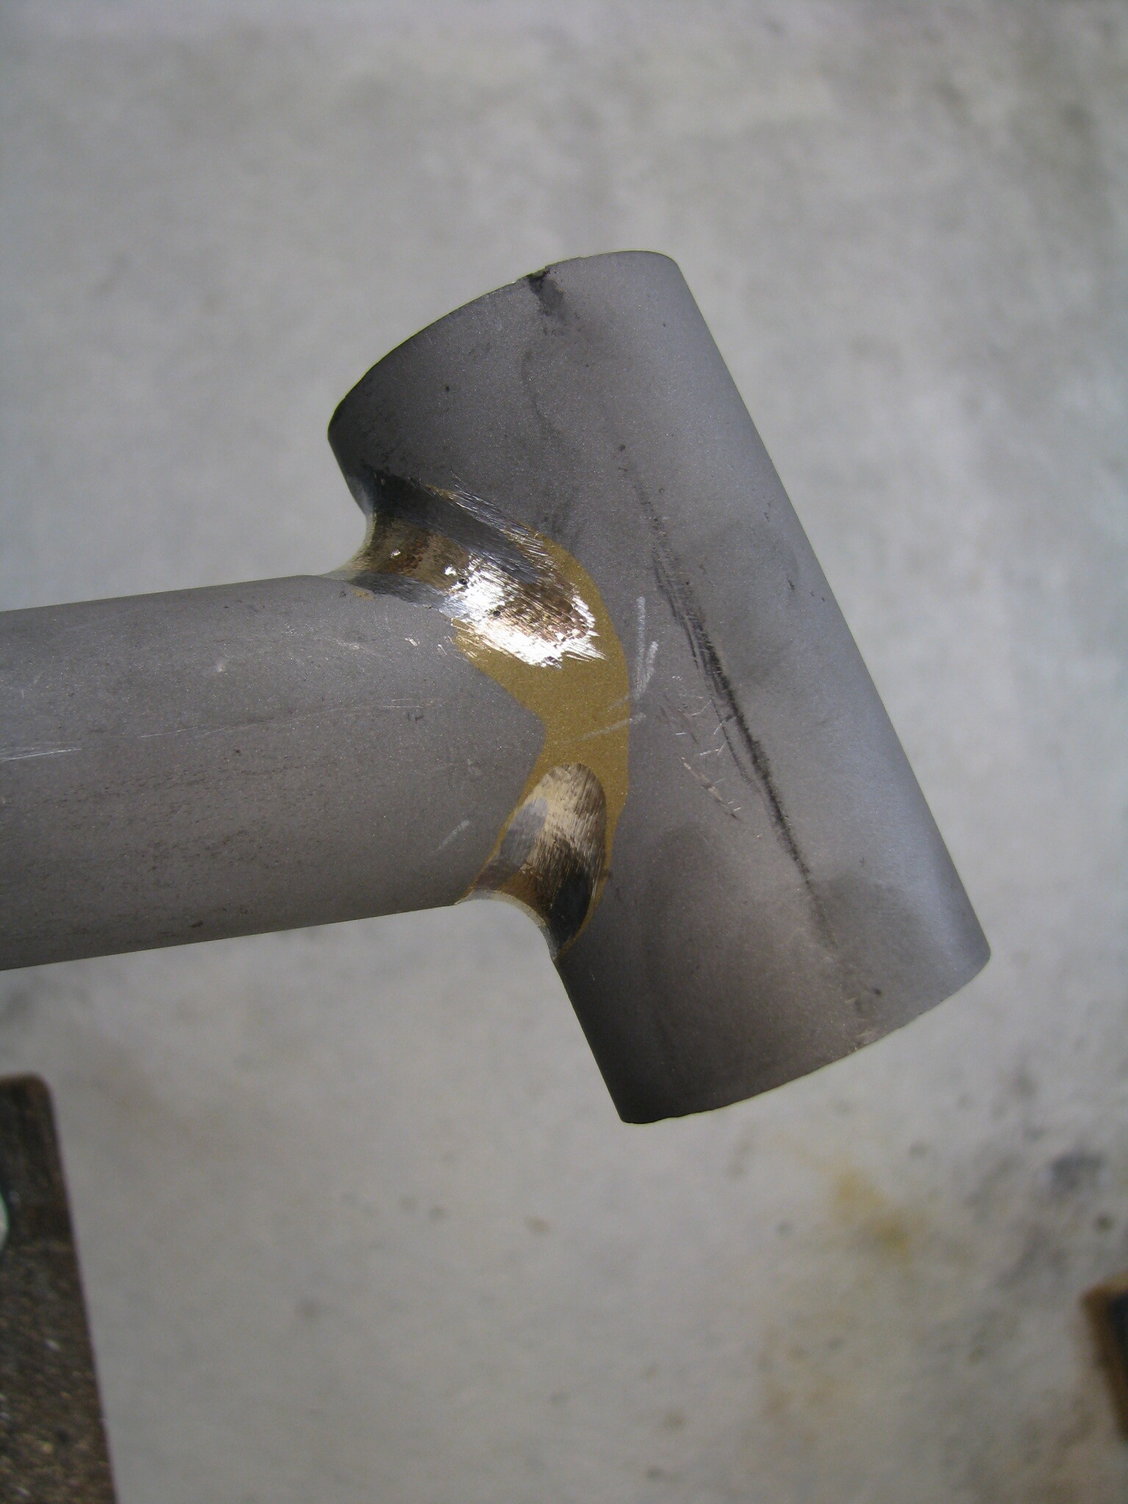
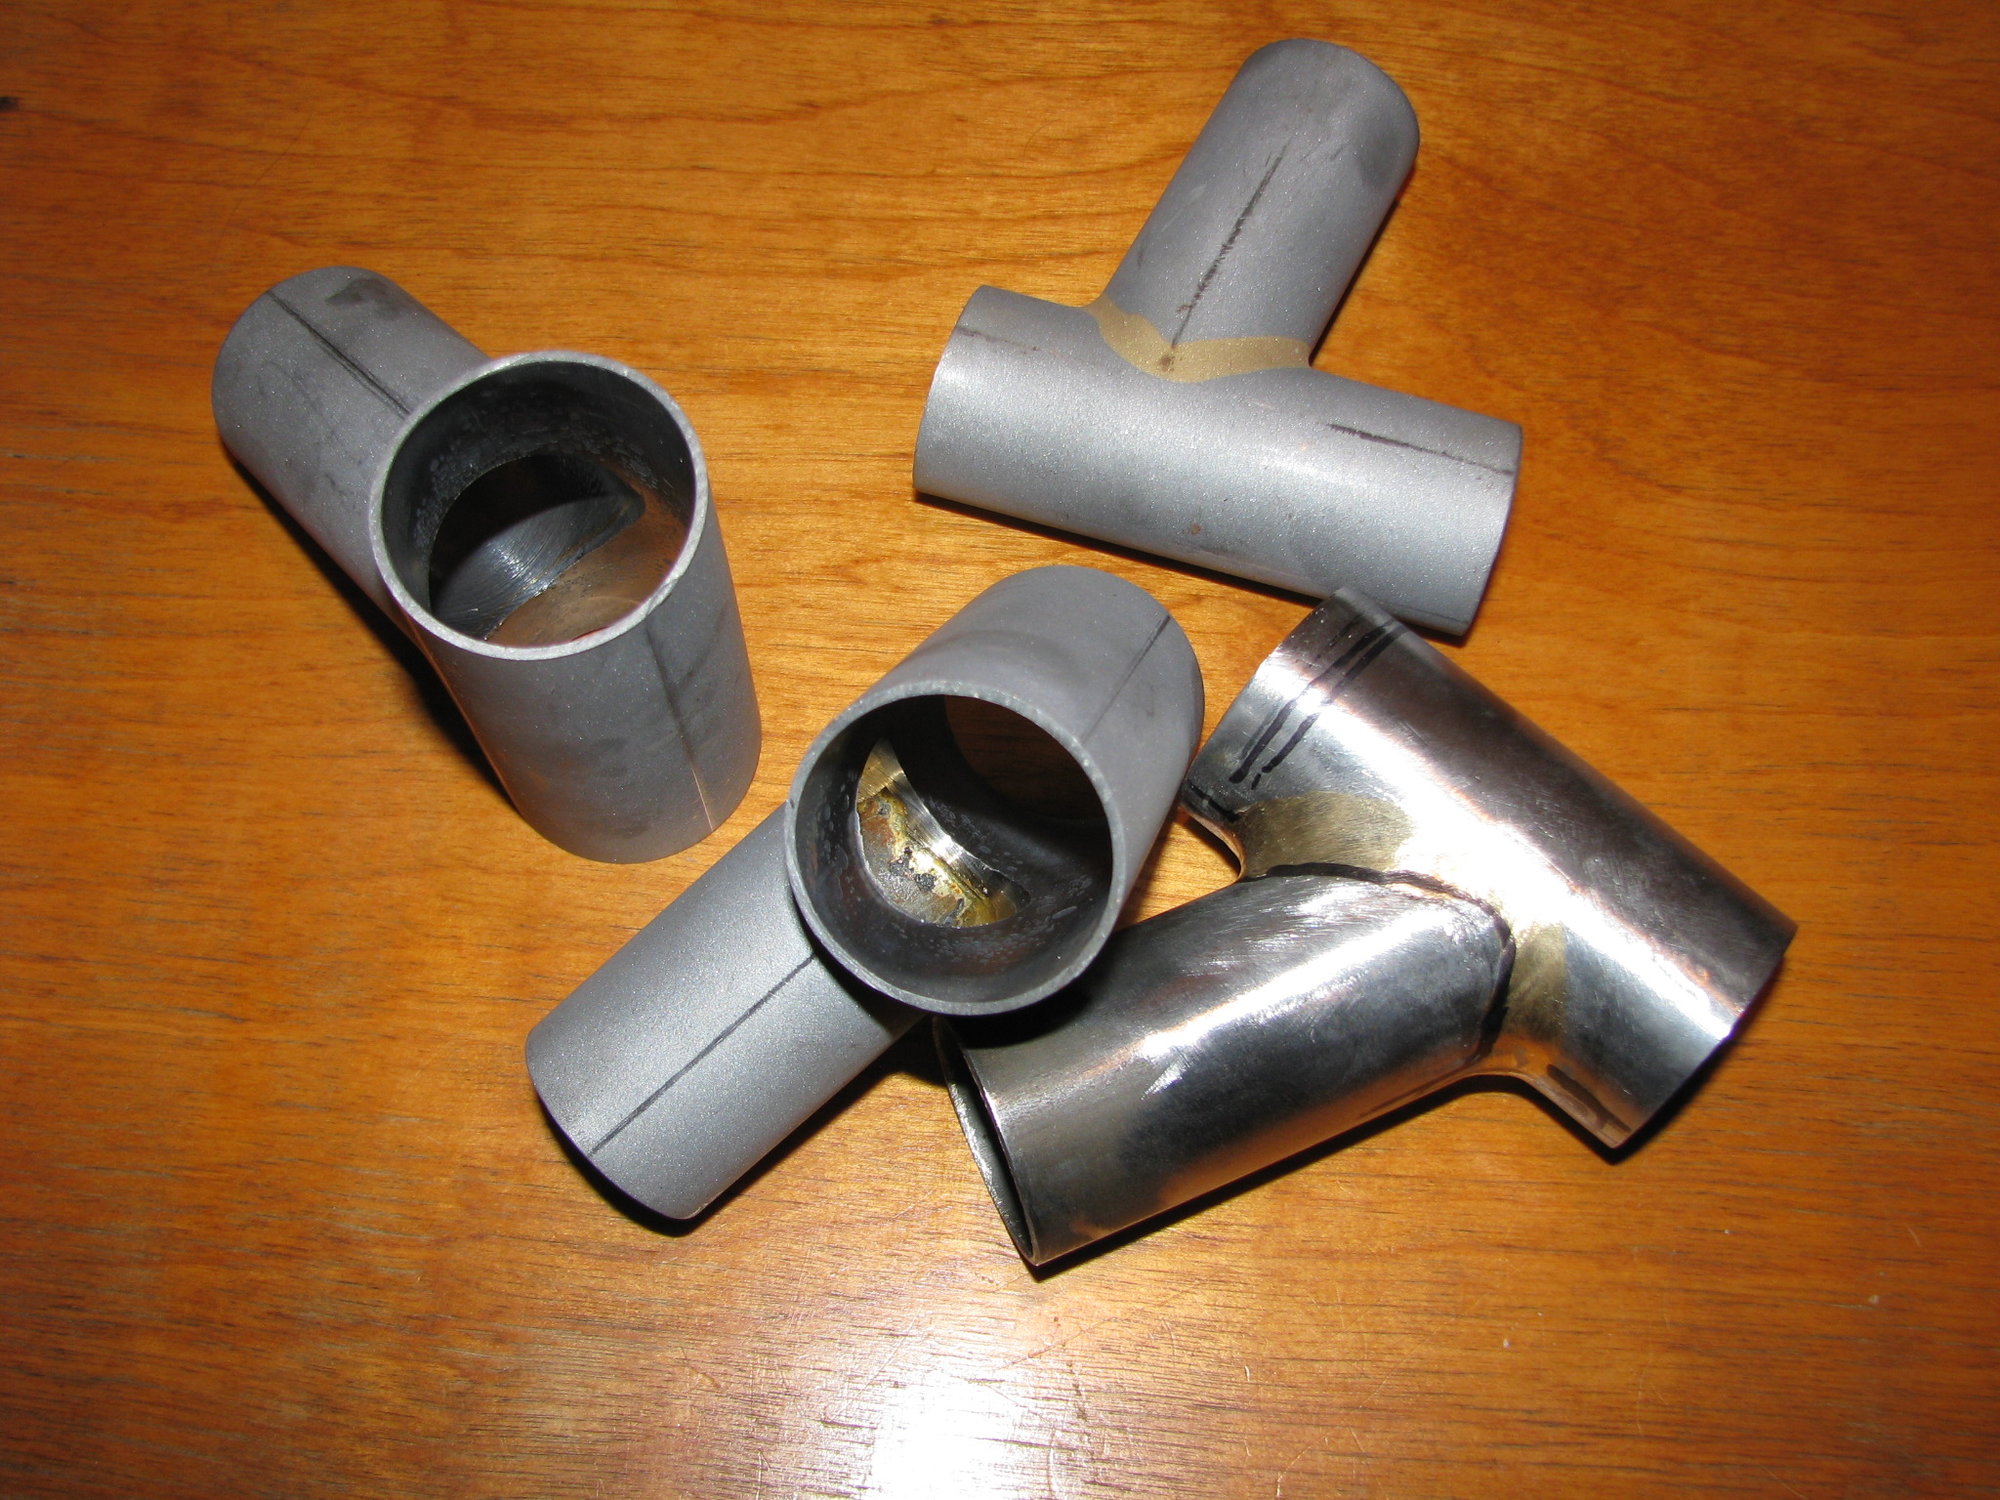
Typical of my work here's after a 2 month pause before a return to this project. In the meantime I played with drawing on a practice and doing some cutting and grinding. I wasn't real happy with it but then that's why one plays/practices. So I decided to take a different path and started to do some thinning. Starting with narrowing down the fillets. Unlike some I like a distinctive and tight flow from one socket to another. If you look carefully you can see the silver of the steel along both sides of the now skinnier brass. I did this all the war around using a couple of different sizes of rat tail bastards. Then moving to a half round bastard took down the tube surfaces outside of this new narrower fillet. It was odd to purposely under cut then even surfaces out. That's always been a big nono.

I went over everything with a medium then fine set of files before sanding a bunch. I will be trimming off the vast majority of the tubes so the obvious starches won't even be a part of the lug. I do expect that I will need to do more thinning in time. It's hard to really know what wall thickness remains or how even it is around the fillet. When I trim I'll get a better idea. I've included one of the other blanks to give a better idea to today's efforts. The untouched blank is just a sand blasted surface (with hand grime). The thinned one shows the nice contrast that Navel Jelly provides.

Here's the practice piece I've played with. Again you can see the fillet thinning and steel on it's sides at one point. I'm better with what I've done now. The other two lugs will wait for a while. I need to get back to the racks before this new project continues. Andy
__________________
AndrewRStewart
AndrewRStewart
11-26-18, 10:07 AM
#18
Newbie
Join Date: Feb 2017
Posts: 12
Mentioned: 0 Post(s)
Tagged: 0 Thread(s)
Quoted: 2 Post(s)
Likes: 0
Liked 0 Times
in
0 Posts
Lugs for my last lugged frame...also perhaps the nicest frame I ever built. Sadly after about 4 years on the road, the young lady i built it for was taken out hard by an out of control car who's driver had just had a stroke...frame was toast and Cori got hurt pretty bad. Thankfully, she's recovered fully!
Six-Nine Design Gallery - Wheels
tig welded lugs 'cuz I switched from Silver to brass way back in about 1978
Six-Nine Design Gallery - Wheels
tig welded lugs 'cuz I switched from Silver to brass way back in about 1978
12-05-18, 11:01 PM
#19
Senior Member
Thread Starter
Join Date: Feb 2012
Location: Rochester, NY
Posts: 18,084
Bikes: Stewart S&S coupled sport tourer, Stewart Sunday light, Stewart Commuting, Stewart Touring, Co Motion Tandem, Stewart 3-Spd, Stewart Track, Fuji Finest, Mongoose Tomac ATB, GT Bravado ATB, JCP Folder, Stewart 650B ATB
Mentioned: 0 Post(s)
Tagged: 0 Thread(s)
Quoted: 4205 Post(s)
Liked 3,863 Times
in
2,311 Posts
Today I patched a couple of pocks in the blanks' fillets, drilled some holes and did the initial cut lines. One issue I have discovered is that the headtube I intend to use is a tad smaller then it should have been, so after reaming for the headset cups it's walls would be around .5mm thick. A tad thin for my tastes. So what I've decided to do is to widen the head lugs' bands that wrap around the HT so they are wider then the cup's skirts are deep, by a few mms. I will have to be careful how deep the reamer goes, not hard to do. But I won't be able to use the facer part as this would result in too deep a reaming (the headset cups skirts are under 10mm deep and the reamer goes about 17mm in to have the facer engage). I'll use a hand file and a square to insure a square face. Just like I did for the first few frames I made in 1978.
Here's a shot of current progress. The big holes are visual lightening ones. The medium ones on the HT sides are where shoreline corners will be (approximately) The tiny ones on the tube centerlines will be aesthetic ones at the ends of short tangs, which will be rounded off and not pointy. Like I said I'm going for a sort of art deco look. The Sharpie lines are approximate shoreline edges. The HT portions have the end face and the band widths scribed. Andy

Here's a shot of current progress. The big holes are visual lightening ones. The medium ones on the HT sides are where shoreline corners will be (approximately) The tiny ones on the tube centerlines will be aesthetic ones at the ends of short tangs, which will be rounded off and not pointy. Like I said I'm going for a sort of art deco look. The Sharpie lines are approximate shoreline edges. The HT portions have the end face and the band widths scribed. Andy
__________________
AndrewRStewart
AndrewRStewart
12-07-18, 10:22 PM
#20
Senior Member
Thread Starter
Join Date: Feb 2012
Location: Rochester, NY
Posts: 18,084
Bikes: Stewart S&S coupled sport tourer, Stewart Sunday light, Stewart Commuting, Stewart Touring, Co Motion Tandem, Stewart 3-Spd, Stewart Track, Fuji Finest, Mongoose Tomac ATB, GT Bravado ATB, JCP Folder, Stewart 650B ATB
Mentioned: 0 Post(s)
Tagged: 0 Thread(s)
Quoted: 4205 Post(s)
Liked 3,863 Times
in
2,311 Posts
When your hot , your hot.
Spent more time today and got 1 1/2 more lugs pretty much done. It's interesting how this stuff goes. Periods of focus and productive rush and long moments of pause. Soon a pause will happen. I will be getting my walking boot of and the medical immobilization will end, for now (1 week after New Years I repeat surgery on the other foot). The holidays are on us and I need to drive a couple of frames to paint. Just as I am getting my builder's hand/arms built up too...
As I file/grind away I see the forms get defined. I will need to revisit some corners and curves a bit to better make all the details be part of the same story. But so far things are pretty close. I'm getting better at watching how far I hack saw and grind before I file. I think it was in my Flicker album that I mentioned how much more difficult this all would be without a lug vice, or two. A few other tools really help too. I'll post about this later.
The seat lug was done yesterday. Today the lower head lug and part of the upper was done.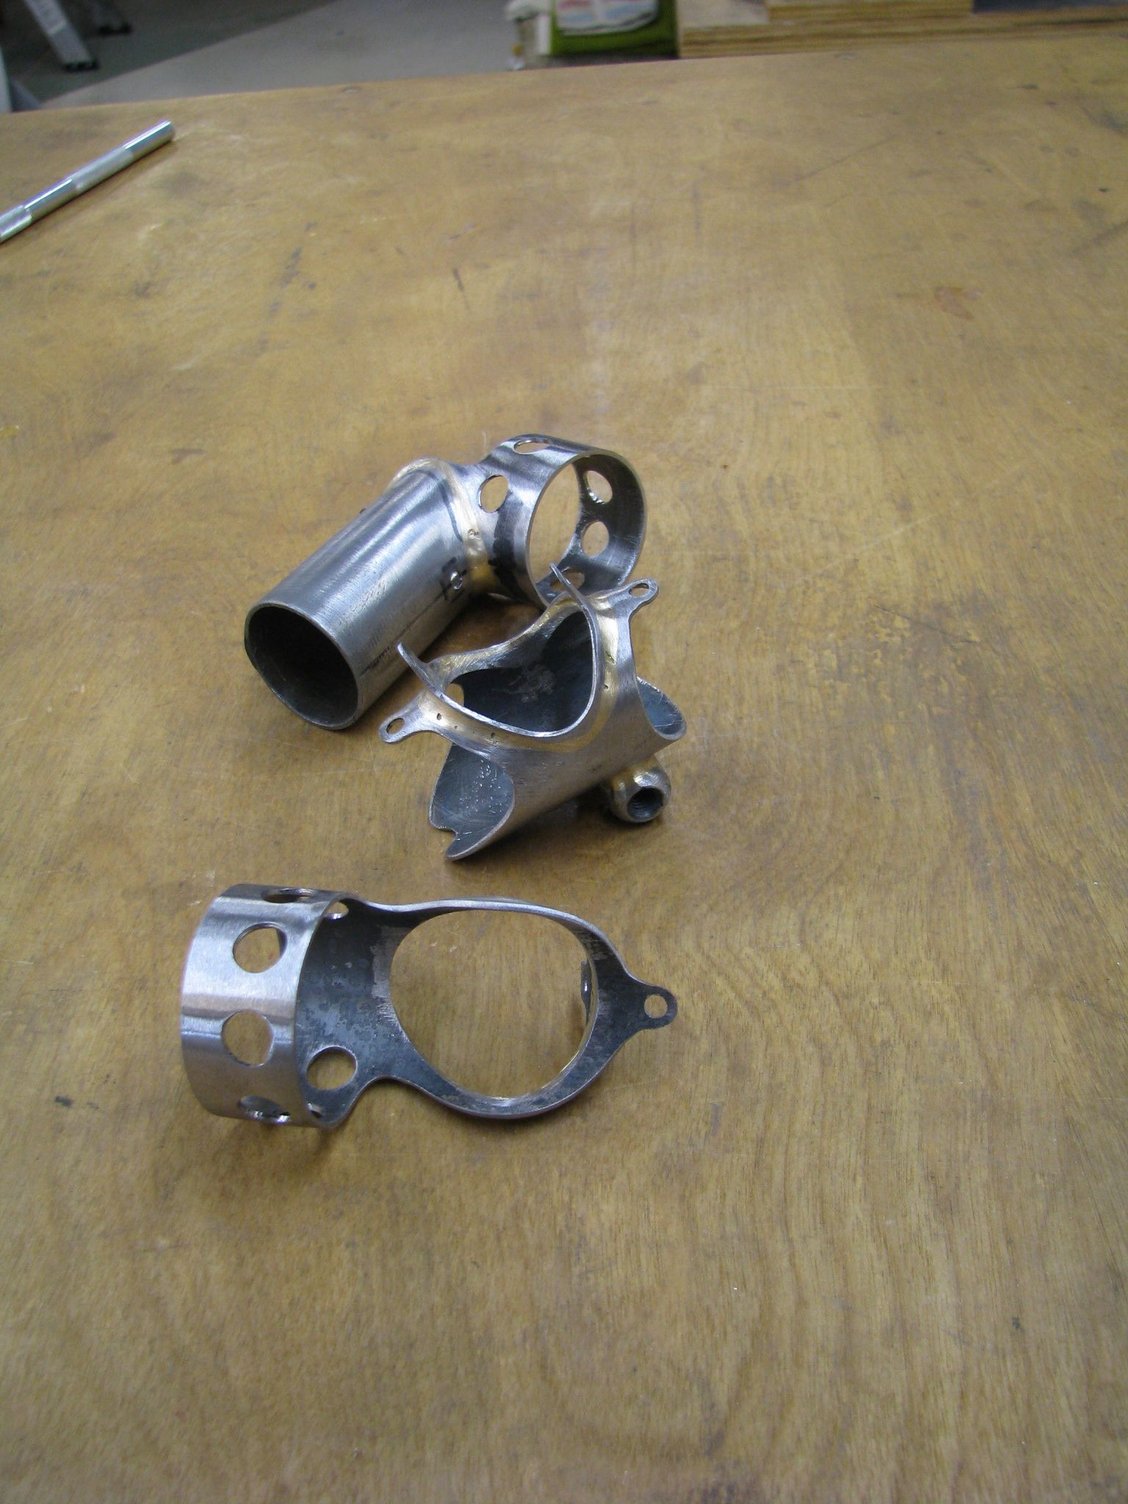
I think the real challenges will be with the BB shell and crown. Both are production units and to mimic the lugs' styling some mods will be needed to cut outs and shore lines. That will be the next installment of merit. After that I'll close this down for the actual frame work. I have more firsts there too to look forward to and share. Andy
__________________
AndrewRStewart
AndrewRStewart
12-08-18, 07:11 AM
#21
Banned.

Join Date: Jun 2004
Location: Torrance, CA
Posts: 3,061
Bikes: Homebuilt steel
Mentioned: 18 Post(s)
Tagged: 0 Thread(s)
Quoted: 2193 Post(s)
Liked 425 Times
in
337 Posts
Great work Andy. Your design work is unique, and that's saying something in the world of lugs where just about everything has been done before.
12-08-18, 12:21 PM
#22
Senior Member
Thread Starter
Join Date: Feb 2012
Location: Rochester, NY
Posts: 18,084
Bikes: Stewart S&S coupled sport tourer, Stewart Sunday light, Stewart Commuting, Stewart Touring, Co Motion Tandem, Stewart 3-Spd, Stewart Track, Fuji Finest, Mongoose Tomac ATB, GT Bravado ATB, JCP Folder, Stewart 650B ATB
Mentioned: 0 Post(s)
Tagged: 0 Thread(s)
Quoted: 4205 Post(s)
Liked 3,863 Times
in
2,311 Posts
 Thanks, I do take it as a compliment. Andy
__________________
AndrewRStewart
AndrewRStewart
12-10-18, 10:42 PM
#23
Senior Member
Thread Starter
Join Date: Feb 2012
Location: Rochester, NY
Posts: 18,084
Bikes: Stewart S&S coupled sport tourer, Stewart Sunday light, Stewart Commuting, Stewart Touring, Co Motion Tandem, Stewart 3-Spd, Stewart Track, Fuji Finest, Mongoose Tomac ATB, GT Bravado ATB, JCP Folder, Stewart 650B ATB
Mentioned: 0 Post(s)
Tagged: 0 Thread(s)
Quoted: 4205 Post(s)
Liked 3,863 Times
in
2,311 Posts
More progress. I needed to plug the OEM cut outs on the crown and shell before doing any carving. Before I go any further on the crown I've decided I need a better handle for it so tomorrow I'll braze in the steerer. The rest of it's mods will be pretty straight forward. The shell will take longer as it has 4 sockets that 3 get in the way of each other while filing the shore lines. Andy
__________________
AndrewRStewart
AndrewRStewart
12-12-18, 01:32 PM
#24
Senior Member
Thread Starter
Join Date: Feb 2012
Location: Rochester, NY
Posts: 18,084
Bikes: Stewart S&S coupled sport tourer, Stewart Sunday light, Stewart Commuting, Stewart Touring, Co Motion Tandem, Stewart 3-Spd, Stewart Track, Fuji Finest, Mongoose Tomac ATB, GT Bravado ATB, JCP Folder, Stewart 650B ATB
Mentioned: 0 Post(s)
Tagged: 0 Thread(s)
Quoted: 4205 Post(s)
Liked 3,863 Times
in
2,311 Posts
So this is the end to this thread. Here's the fork complete set, lugs, crown and shell. They now go into a box for the frame to be started. The frame will be a 559 ISO wheeled, dropped bar, disk braked, 5 spd internal hubbed and a Ft hub generator for a dedicated light. A rather uncommon mix and a first for disk brakes for me. As I'm about to have my second big toe fused and then as I recover work will ramp up (assuming I still will work this year, not decided yet) this frame will take the usual for me many months to complete. I'll post if I feel like it as I go along. What I will do is to up load photos to my Flicker albums. I've done so for this lug making effort. There's more shots and details there for those interested.
If anyone has questions please either reply here and I'll see this thread pop up and reply or PM me. Thanks for your sharing this project with me. Andy

If anyone has questions please either reply here and I'll see this thread pop up and reply or PM me. Thanks for your sharing this project with me. Andy
__________________
AndrewRStewart
AndrewRStewart
12-12-18, 03:03 PM
#25
Old fart

Join Date: Nov 2004
Location: Appleton WI
Posts: 24,786
Bikes: Several, mostly not name brands.
Mentioned: 153 Post(s)
Tagged: 0 Thread(s)
Quoted: 3588 Post(s)
Liked 3,400 Times
in
1,934 Posts