


Building A Trailer Hitch
 02-16-11, 12:04 AM
#1
Senior Member
Thread Starter
Join Date: Sep 2010
Posts: 100
Mentioned: 0 Post(s)
Tagged: 0 Thread(s)
Quoted: 0 Post(s)
Likes: 0
Liked 0 Times
in
0 Posts
Building A Trailer Hitch
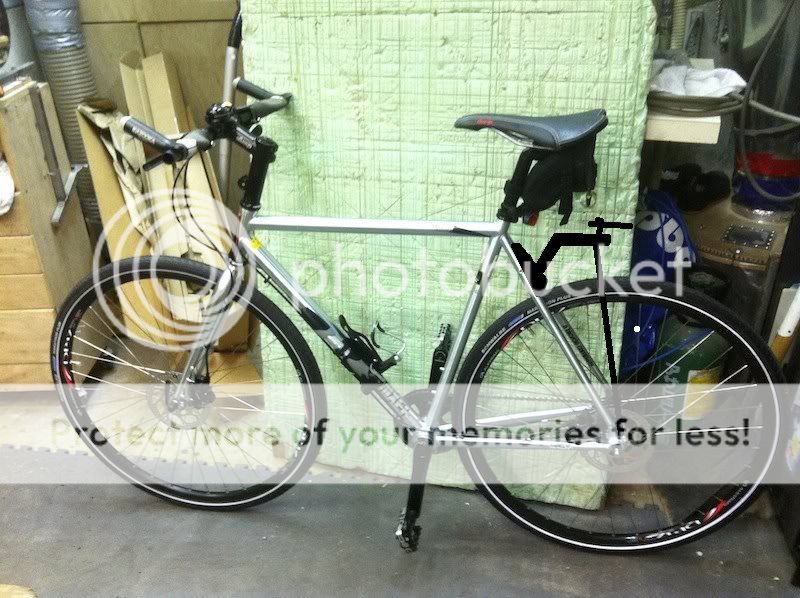
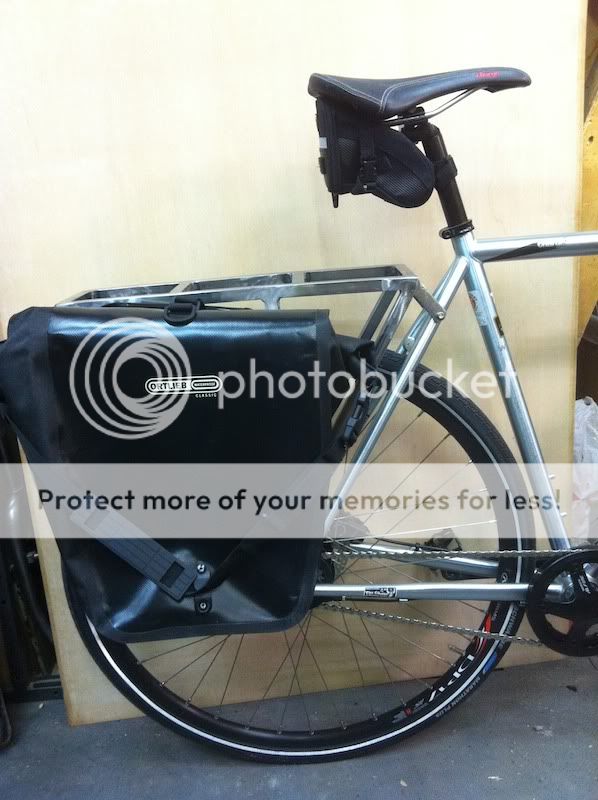
OK, I have the new tow bike, a 2010 Charge Mixer 8...

The new Mixer with the venerable Cannondale.
My old Cannondale will be retired from towing duty, and be come my ride bike, the Mixer 8 will become the workhorse.
The Mixer 8 is a steel framed bike, Tange Prestige Double Butted tubing, Shimano hydraulic disk brakes (man they stop time!) and an Alfine 8 speed hub, should be very little maintenance on this bike The wheels are 700C with 36 spokes, so they too should hold up, and I put some larger Schwalbe Marathon Plus 35 tires on it, for a bit more volume, they just fit.
On to the new hitch.....
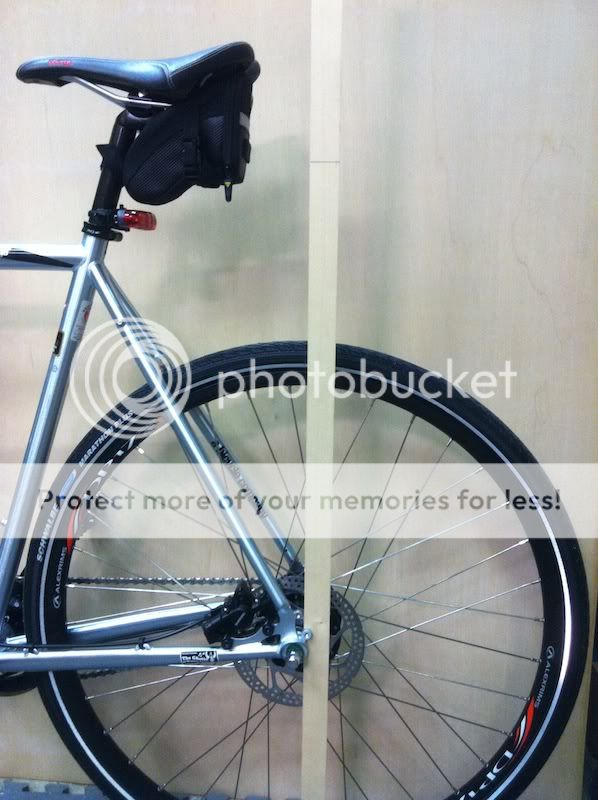
On the Cannondale I had the hitch attached to the seatpost, this worked, but I have always been concerned of the potential damage I could do the the frame with the back and forth leverage from the seatpost attaching point.
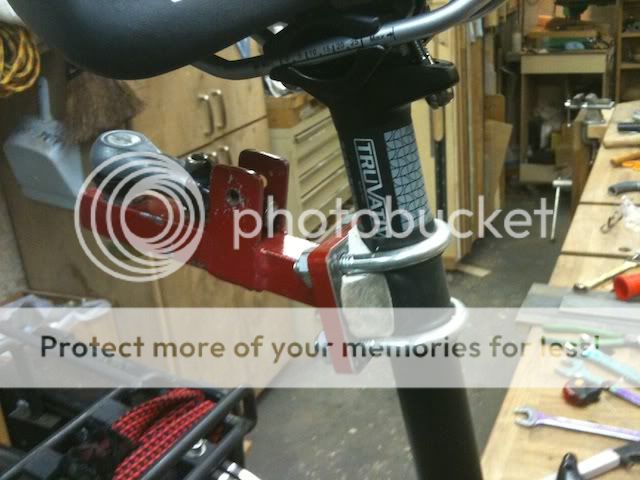
That is a close up of the existing hitch.
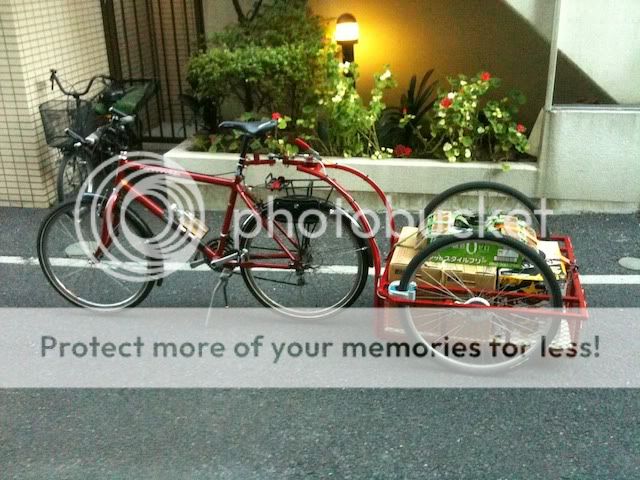
A 165lb delivery
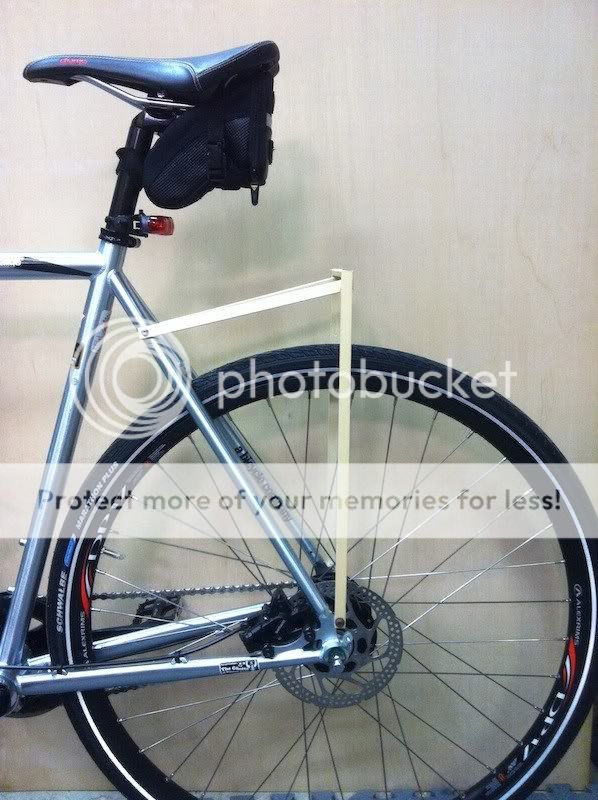
Below is a quick mock up using some wood to give an idea of how I want to attach the new hitch, the size of the plates, the gussets and the hitch are will change, this is just a crude mock up, but I think you get where I'm going.....

I'm looking for some comments, if you see something that sends up red flags, please do tell, I'm not married to this exact design, so I am looking for ideas.
I will also say that I've looked hard at the hitch down at the axle and I find it not to be so good, I understand that with a fairly heavy load, which I will carry daily, the trailer usually does not track well, and turning in one direction is easier than the other etc.
Comments please!
The new Mixer with the venerable Cannondale.
My old Cannondale will be retired from towing duty, and be come my ride bike, the Mixer 8 will become the workhorse.
The Mixer 8 is a steel framed bike, Tange Prestige Double Butted tubing, Shimano hydraulic disk brakes (man they stop time!) and an Alfine 8 speed hub, should be very little maintenance on this bike
The wheels are 700C with 36 spokes, so they too should hold up, and I put some larger Schwalbe Marathon Plus 35 tires on it, for a bit more volume, they just fit. On to the new hitch.....
On the Cannondale I had the hitch attached to the seatpost, this worked, but I have always been concerned of the potential damage I could do the the frame with the back and forth leverage from the seatpost attaching point.
That is a close up of the existing hitch.
A 165lb delivery
Below is a quick mock up using some wood to give an idea of how I want to attach the new hitch, the size of the plates, the gussets and the hitch are will change, this is just a crude mock up, but I think you get where I'm going.....
I'm looking for some comments, if you see something that sends up red flags, please do tell, I'm not married to this exact design, so I am looking for ideas.
I will also say that I've looked hard at the hitch down at the axle and I find it not to be so good, I understand that with a fairly heavy load, which I will carry daily, the trailer usually does not track well, and turning in one direction is easier than the other etc.
Comments please!
 02-16-11, 03:23 AM
#2
Full Member
Join Date: Jun 2009
Location: Norwich, Norfolk. UK
Posts: 316
Bikes: 2006 Falcon Explorer Hybrid, 2008 Landrover Visalia Crossover, 2010 Cargo Cycles Senton, 2010 Cargo Cycles Capability, and a 2001 AVD quad pedi-van, 1980 Peugeot Carbolite 10sp racer
Mentioned: 2 Post(s)
Tagged: 0 Thread(s)
Quoted: 21 Post(s)
Liked 24 Times
in
7 Posts
This is a copy & Paste of a posting that I made in the trailer construction tips page about 10 months ago .... I hope that it answers your question.
A lot of people have asked me about the hitch that I use on my now 11 year old home-built bicycle trailer. So I have recently taken a few photos of it for you all.
A brief recap:
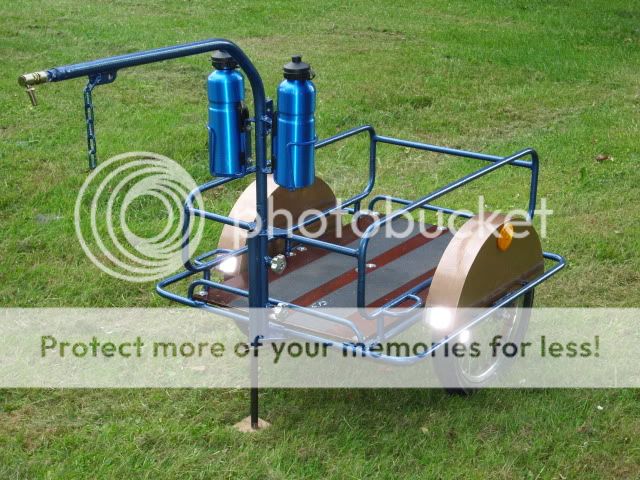
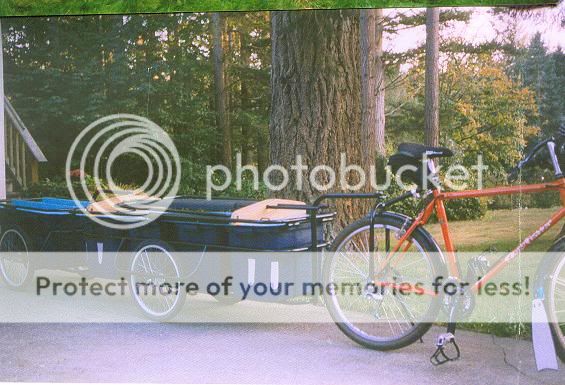
The trailer just after I had refurbished it about 18 months ago:
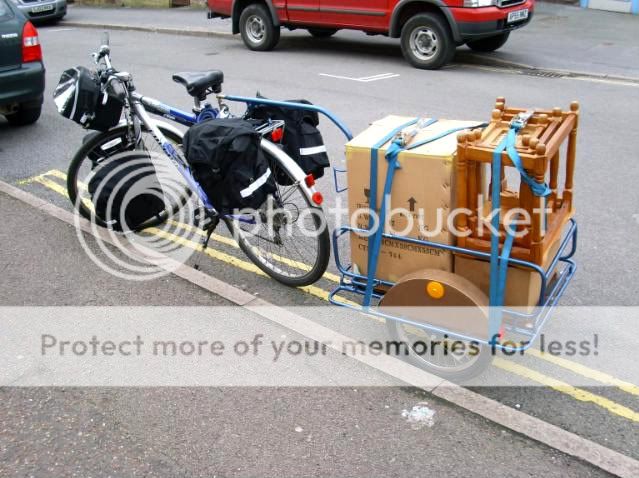
and recently ready for action on a charity shop run:
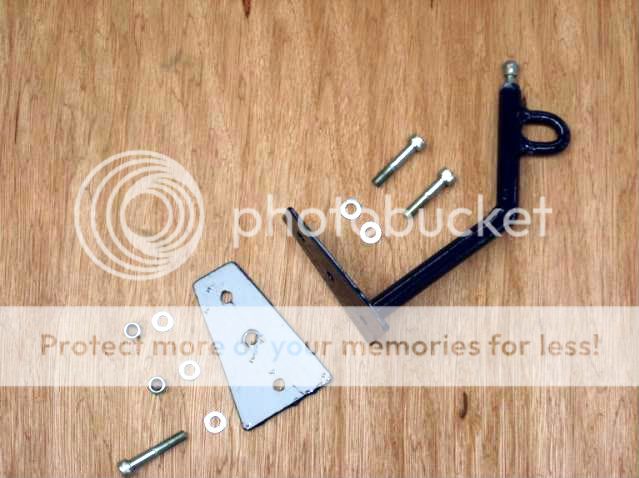
The components laid out before final fitting on to my bicycle's frame. I use a spring loaded quick attach 10 mm industrial ball joint assembly for the actual hitch; these are often found on the connecting rods of process machinery. I made up a suitable fixing arm for the ball joint from a length of 16 mm diameter steel bar, mitred it (although recently I made one by putting the bar stock into my tube bender), welded it to a piece of 4 mm thick mild steel plate, and for the fitting I utilised 3 of 8 mm X 40 mm diameter stainless steel socket head bolts, 5 Stainless Steel flat washers, and 2 stainless steel nylock nuts; the lower bolt is threaded into the bottom of the 16 mm steel bar by boring it with a pistol drill 6.2 mm dia prior to cutting the 8mm X 1.25 mm threads with a 2nd cut & plug tap:
Fitted into position:
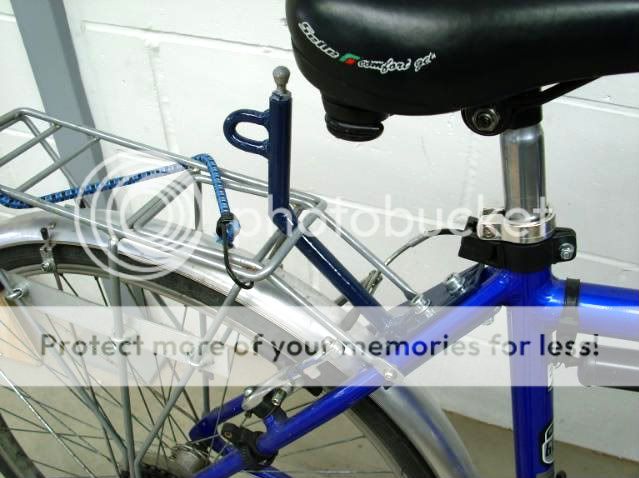
Note; that it has left sufficient room to accommodate my bike lock under the saddle:
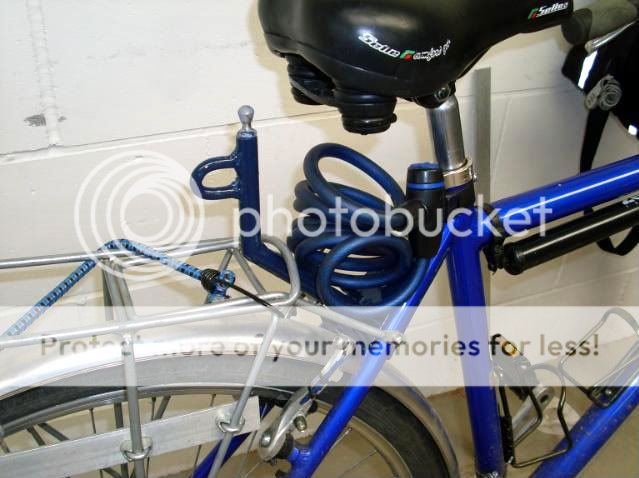
and finally with the trailer hitched up and ready for a utility run:
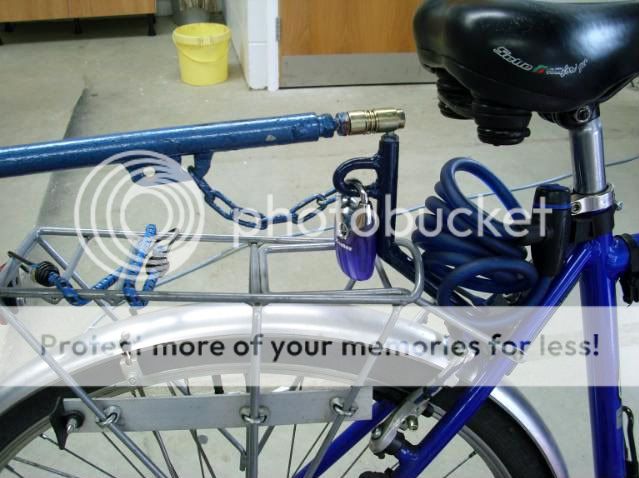
Note; the piece of chain and the padlock that I have included. This gives me some additional security when the bike and trailer are left outside of a shop, or parked up at the city cycle stands, and also as an extra safety device for if the trailer should ever jump the hitch when I am towing a load, etc.
A lot of people have asked me about the hitch that I use on my now 11 year old home-built bicycle trailer. So I have recently taken a few photos of it for you all.
A brief recap:
The trailer just after I had refurbished it about 18 months ago:
and recently ready for action on a charity shop run:
The components laid out before final fitting on to my bicycle's frame. I use a spring loaded quick attach 10 mm industrial ball joint assembly for the actual hitch; these are often found on the connecting rods of process machinery. I made up a suitable fixing arm for the ball joint from a length of 16 mm diameter steel bar, mitred it (although recently I made one by putting the bar stock into my tube bender), welded it to a piece of 4 mm thick mild steel plate, and for the fitting I utilised 3 of 8 mm X 40 mm diameter stainless steel socket head bolts, 5 Stainless Steel flat washers, and 2 stainless steel nylock nuts; the lower bolt is threaded into the bottom of the 16 mm steel bar by boring it with a pistol drill 6.2 mm dia prior to cutting the 8mm X 1.25 mm threads with a 2nd cut & plug tap:
Fitted into position:
Note; that it has left sufficient room to accommodate my bike lock under the saddle:
and finally with the trailer hitched up and ready for a utility run:
Note; the piece of chain and the padlock that I have included. This gives me some additional security when the bike and trailer are left outside of a shop, or parked up at the city cycle stands, and also as an extra safety device for if the trailer should ever jump the hitch when I am towing a load, etc.
Last edited by Gareth; 02-17-11 at 05:09 AM.
02-16-11, 03:43 AM
#3
Senior Member
Thread Starter
Join Date: Sep 2010
Posts: 100
Mentioned: 0 Post(s)
Tagged: 0 Thread(s)
Quoted: 0 Post(s)
Likes: 0
Liked 0 Times
in
0 Posts
This is a copy & Paste of a posting that I made in the trailer construction tips page about 10 months ago .... I hope that it answers your question.
A lot of people have asked me about the hitch that I use on my now 11 year old home-built bicycle trailer. So I have recently taken a few photos of it for you all.
A brief recap:
The trailer just after I had refurbished it about 18 months ago:
and recently ready for action on a charity shop run:
The components laid out before final fitting on to my bicycle's frame. I use a spring loaded quick attach 10 mm industrial ball joint assembly for the actual hitch; these are often found on the connecting rods of process machinery. I made up a suitable fixing arm for the ball joint from a length of 16 mm diameter steel bar, mitred it (although recently I made one by putting the bar stock into my tube bender), welded it to a piece of 4 mm thick mild steel plate, and for the fitting I utilised 3 of 8 mm X 40 mm diameter stainless steel socket head bolts, 5 Stainless Steel flat washers, and 2 stainless steel nylock nuts; the lower bolt is threaded into the bottom of the 16 mm steel bar by boring it with a pistol drill 6.2 mm dia prior to cutting the 8mm X 1.25 mm threads with a 2nd cut & plug tap:
Fitted into position:
Note; that it has left sufficient room to accommodate my bike lock under the saddle:
and finally with the trailer hitched up and ready for a utility run:
Note; the piece of chain and the padlock that I have included. This gives me some additional security when the bike and trailer are left outside of a shop, or parked up at the city cycle stands, and also as an extra safety device for if the trailer should ever jump the hitch when I am towing a load, etc
If you don't mind, can I ask you a few questions?
How are you finding the hitch, has it lived up to your expectations?
Why did you decided to put the hitch up there at the top of the seat stays and seat tube junction?
Now I'm with you on this, I think it is a lot better location, but I am always told that the best location is one of these side hitches to one side of the rear axle, usually the left side to avoid the derailleur, but I really think that these trailers pull to one side, and there is always a limit to your turning in one direction.
I guess I'm looking for a bit of justification here from someone who is walking the walk
Thanks in advance for you help

Cheers!
02-16-11, 04:12 AM
#4
Full Member
Join Date: Jun 2009
Location: Norwich, Norfolk. UK
Posts: 316
Bikes: 2006 Falcon Explorer Hybrid, 2008 Landrover Visalia Crossover, 2010 Cargo Cycles Senton, 2010 Cargo Cycles Capability, and a 2001 AVD quad pedi-van, 1980 Peugeot Carbolite 10sp racer
Mentioned: 2 Post(s)
Tagged: 0 Thread(s)
Quoted: 21 Post(s)
Liked 24 Times
in
7 Posts
My trailer was originally designed and built to be towed behind a Mountain Bike on 26 inch diameter wheels. Like you, my trailer hitch started out on the seat post tube, and this position was chosen because my regular commute to work, and to town included off road gravel ballast covered farm tracks, a bridal way for horses, and about 800 metres through the forest on varying surfaces (alas, I no longer live there ) The seat post hitch seemed better suited to the terrain that I was cycling over, as a chain stay mounted side hitch would possibly have hit; rocks, logs, fallen branches, vegetation, and other objects etc.
As an Agricultural engineer, I also knew how difficult, time and material consuming getting a side mounted hitch set up correctly for the trailer to track perfectly central would be.
When I sold my old MTB, and bought the hybrid, wheel size was a major consideration for me and the city streets I would be using it upon, and so I chose a bike on 700c wheels, with absolutely no thought at all about using my trailer at the time. Because of the drawbar length the trailer's parking prop stand tube contacted the bike's mudguards which made using the trailer impossible. So rather than extending the drawbar (20mm O/D X 1.6 mm wall thickness mild steel tube) and increasing the leverage that would have entailed, I decided to mount the hitch ball off the top off the wheel stays, and stand it back so the trailer cleared the bike's rear wheel, and to level the trailer using a 16mm dia solid bar. This means that no stress loading has been imparted upon the seat post in its extended position for my long legs, or it's single 8mm clamping bolt .
The 10mm spring release quick-attach ball joint has proven to be very reliable in use: I have towed up to 100 kgs through it covering about 2000 miles since it was fitted 2 years ago, and it has saved me from injury during a recent accident: I got rear ended in the trailer when I was stationary at the lights. The ball joint was popped off, and my cheap padlock shackle was sheared. One of the rear horizontal cross frame tubes on the trailer was bent (and still needs replacing), and the sheet metal pull back shroud on the ball joint was slightly damaged, but I was unhurt and my Bike undamaged. Two minutes work with a pair of pliers has repaired the ball joint shroud and everything is now working correctly and securely.
) The seat post hitch seemed better suited to the terrain that I was cycling over, as a chain stay mounted side hitch would possibly have hit; rocks, logs, fallen branches, vegetation, and other objects etc. As an Agricultural engineer, I also knew how difficult, time and material consuming getting a side mounted hitch set up correctly for the trailer to track perfectly central would be.
When I sold my old MTB, and bought the hybrid, wheel size was a major consideration for me and the city streets I would be using it upon, and so I chose a bike on 700c wheels, with absolutely no thought at all about using my trailer at the time. Because of the drawbar length the trailer's parking prop stand tube contacted the bike's mudguards which made using the trailer impossible. So rather than extending the drawbar (20mm O/D X 1.6 mm wall thickness mild steel tube) and increasing the leverage that would have entailed, I decided to mount the hitch ball off the top off the wheel stays, and stand it back so the trailer cleared the bike's rear wheel, and to level the trailer using a 16mm dia solid bar. This means that no stress loading has been imparted upon the seat post in its extended position for my long legs, or it's single 8mm clamping bolt .
The 10mm spring release quick-attach ball joint has proven to be very reliable in use: I have towed up to 100 kgs through it covering about 2000 miles since it was fitted 2 years ago, and it has saved me from injury during a recent accident: I got rear ended in the trailer when I was stationary at the lights. The ball joint was popped off, and my cheap padlock shackle was sheared. One of the rear horizontal cross frame tubes on the trailer was bent (and still needs replacing), and the sheet metal pull back shroud on the ball joint was slightly damaged, but I was unhurt and my Bike undamaged. Two minutes work with a pair of pliers has repaired the ball joint shroud and everything is now working correctly and securely.
Last edited by Gareth; 02-16-11 at 06:00 AM.
02-16-11, 06:08 AM
#5
Senior Member
Thread Starter
Join Date: Sep 2010
Posts: 100
Mentioned: 0 Post(s)
Tagged: 0 Thread(s)
Quoted: 0 Post(s)
Likes: 0
Liked 0 Times
in
0 Posts
Thanks Gareth, your help is truly appreciated.
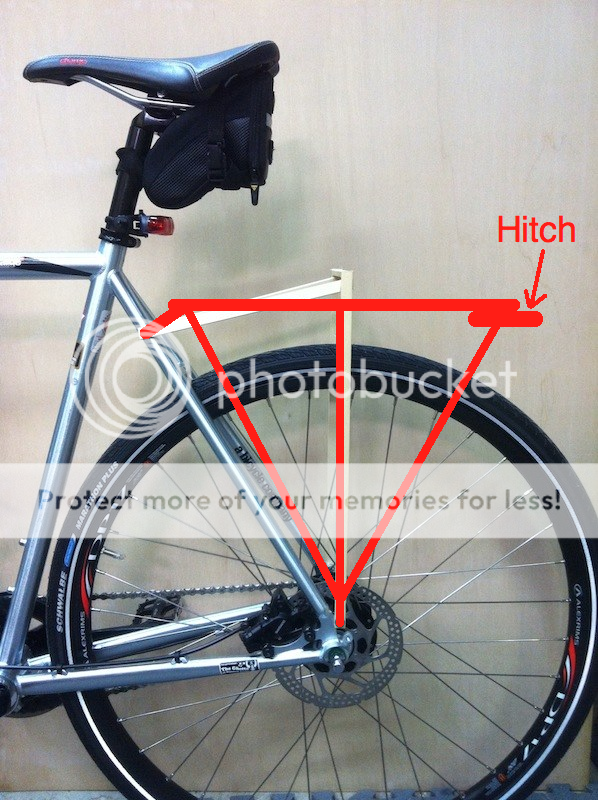
I'm thinking of putting some additional supports up from where the rack would bolt on near the rear axle, something like this......
..... sorry for the VERY crude drawing
I got the idea from looking at this picture......
....... of a "Heavy Duty" trailer hitch from >> Tony's Trailers <<
I think this would really make things solid, but it might make using the rear rack impossible...... Then again, I could always use the Cannondale with the rear rack if I need to make a run without the trailer...
02-16-11, 08:56 AM
#6
Full Member
Join Date: Jun 2009
Location: Norwich, Norfolk. UK
Posts: 316
Bikes: 2006 Falcon Explorer Hybrid, 2008 Landrover Visalia Crossover, 2010 Cargo Cycles Senton, 2010 Cargo Cycles Capability, and a 2001 AVD quad pedi-van, 1980 Peugeot Carbolite 10sp racer
Mentioned: 2 Post(s)
Tagged: 0 Thread(s)
Quoted: 21 Post(s)
Liked 24 Times
in
7 Posts
Drawbar over rack clearance is a contentious issue for me, and I should have given this some thought before I made my current trailer hitch.
As you can see from my photos I often use rear panniers and I also have a small rack-pack for the top of the rack which I can not use when the trailer is installed.
The rack on my Falcon Explorer is not level, even though it was factory fitted, having about a 10 degree drop from the rear to front on it, and it also includesa lot of under rack to mudguard clearance.
Recently I have been considering building a new rear rack from Stainless steel tubing that:
1) Sits lower and level on the bicycle and is much closer to the mudguard.
2) Allows the fitting of my rack-pack and pannier bags
3) Allows my trailer to be hitched directly to the extreme rear of the new rack: although I would have to modify my trailer's drawbar to suit.
4) Has a couple of easy access and removable frames for the two 0.5 litre capacity Stainless steel hot drink flasks that Lois & I often use on days out (the flasks do not fit into standard bottle frames.
Like I said, I have thought about it, but still have to get around to doing anything about it. Knowing me, and how busy I am at the moment I'll forget about it until it is too late to enjoy the benefits of it during this coming summer.
Last edited by Gareth; 02-17-11 at 05:05 AM.
02-16-11, 06:24 PM
#7
Senior Member
Thread Starter
Join Date: Sep 2010
Posts: 100
Mentioned: 0 Post(s)
Tagged: 0 Thread(s)
Quoted: 0 Post(s)
Likes: 0
Liked 0 Times
in
0 Posts
Gareth, I like your thinking and I think I might just make up a very strong rack, and have it serve also as my hitch mounting point, and I could also set it up to use my panniers as well for when the trailer is too much.
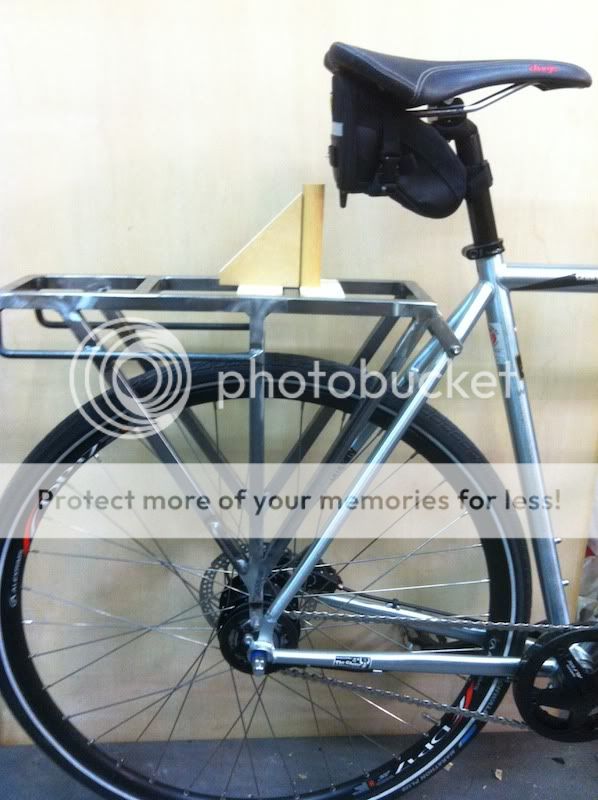
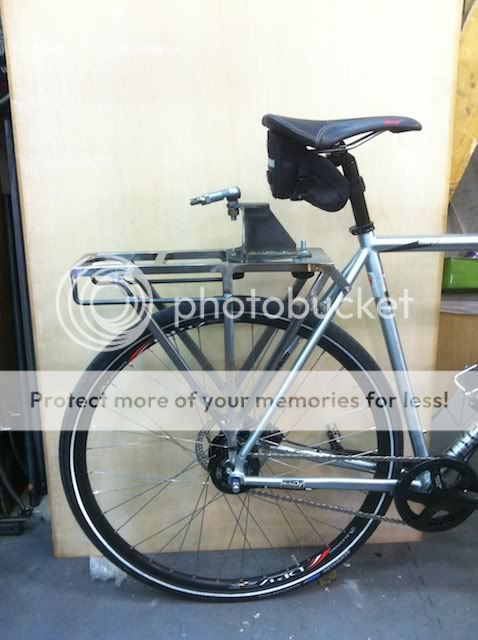
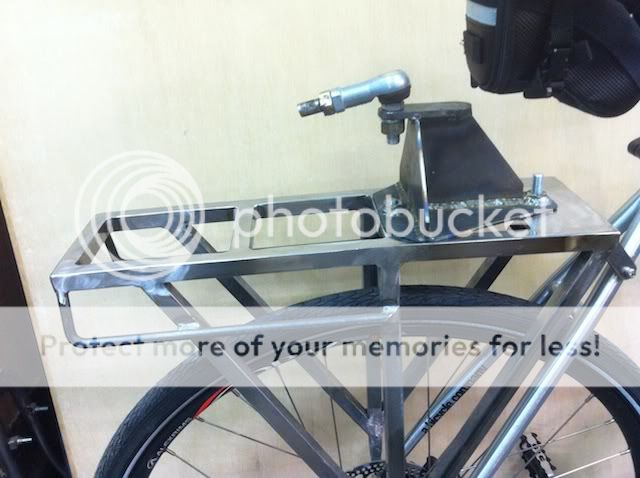
Some pics.....
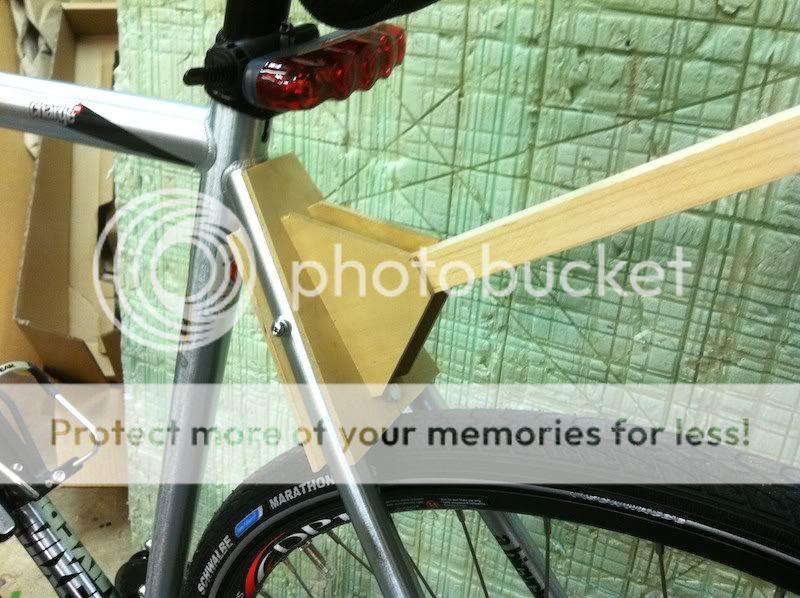
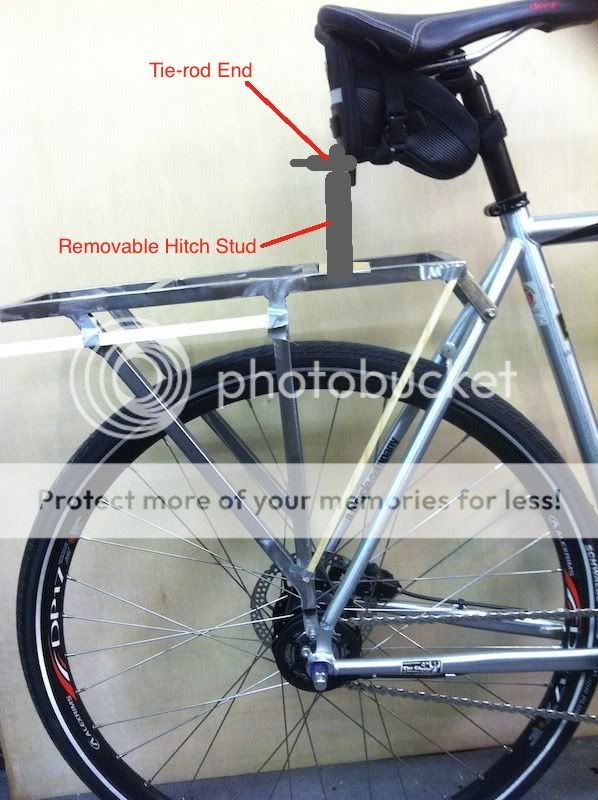
The mark on the stick shows where the hitch on the trailer is now, this is rather tall, so I'm thinking to modify the trailer (yet again!) to lower a bit where the hitch level is. On the Cannondale I am taking off from the seat post, so of course the hitch is quite a bit higher, with the Mixer 8 I'll be taking off much lower on the back of the bike, just over the wheel, I hope.
Some kind of a rack might be what I want, need.....
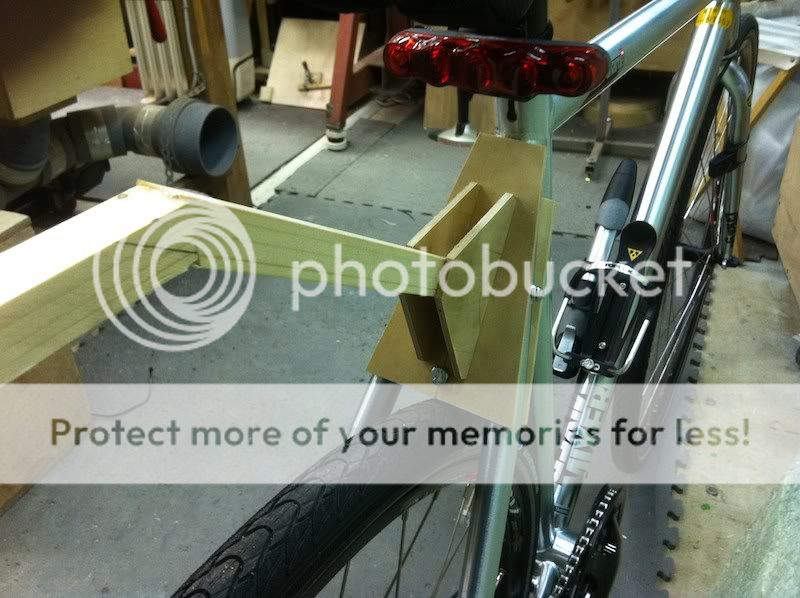
Just a crude mock up with thin strips of wood, but I think this could work, with another bit coming down and a flat carrying area it might work just fine.
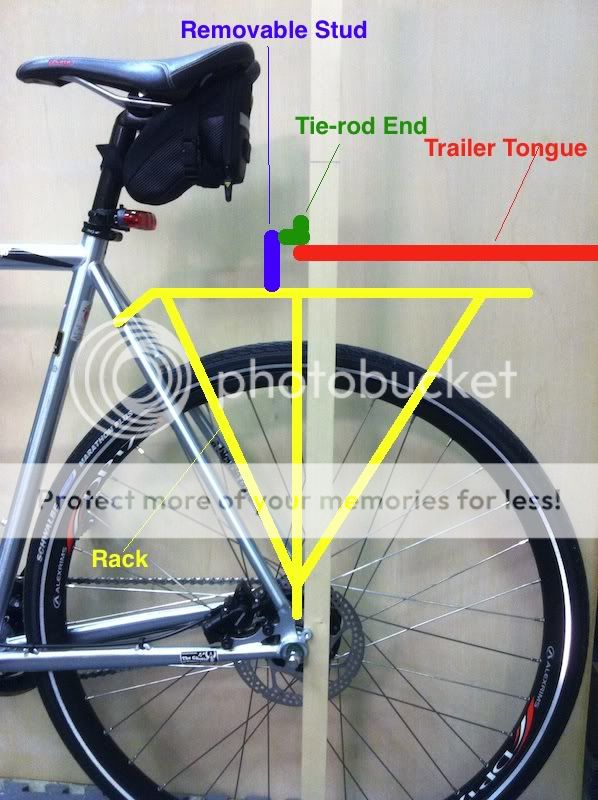
I'm also thinking of reversing the way the hitch hooks up, now the tie rod end joint is on the bike and that goes into the trailer, but if I leave the tie rod end on the trailer and have it go into the hitch, like on the back of the beefy rack I will build, then I have the rack to use, unobstructed when I want, but a spot to hitch the trailer too, if that makes sense")
Cheers!
Some pics.....
The mark on the stick shows where the hitch on the trailer is now, this is rather tall, so I'm thinking to modify the trailer (yet again!) to lower a bit where the hitch level is. On the Cannondale I am taking off from the seat post, so of course the hitch is quite a bit higher, with the Mixer 8 I'll be taking off much lower on the back of the bike, just over the wheel, I hope.
Some kind of a rack might be what I want, need.....
Just a crude mock up with thin strips of wood, but I think this could work, with another bit coming down and a flat carrying area it might work just fine.
I'm also thinking of reversing the way the hitch hooks up, now the tie rod end joint is on the bike and that goes into the trailer, but if I leave the tie rod end on the trailer and have it go into the hitch, like on the back of the beefy rack I will build, then I have the rack to use, unobstructed when I want, but a spot to hitch the trailer too, if that makes sense
Cheers!
02-16-11, 06:35 PM
#8
Senior Member
Thread Starter
Join Date: Sep 2010
Posts: 100
Mentioned: 0 Post(s)
Tagged: 0 Thread(s)
Quoted: 0 Post(s)
Likes: 0
Liked 0 Times
in
0 Posts
A little crude drawing and I have this for an idea....
I know it is just basically a rack, but it would be made out of square tubing and it would be very solid, the hitch would be below the deck at the rear, so when the trailer was not in use, it would not interfere with using the rack on the bike. To use my panniers I'd have to add additional mounts to the side of the rack, and most likely move them back, to get the heel clearance I need, as the chain stays are a bit short on this bike, but I think that would also be possible.
I think this could be a very good solution, I'll have a good solid point to mount my hitch, I'll have a usable rack, even when towing the trailer and I'll have a place to hang my panniers.
Sounds good, now I just have to build it
Cheers!
02-16-11, 07:12 PM
#9
Full Member
Join Date: Jun 2009
Location: Norwich, Norfolk. UK
Posts: 316
Bikes: 2006 Falcon Explorer Hybrid, 2008 Landrover Visalia Crossover, 2010 Cargo Cycles Senton, 2010 Cargo Cycles Capability, and a 2001 AVD quad pedi-van, 1980 Peugeot Carbolite 10sp racer
Mentioned: 2 Post(s)
Tagged: 0 Thread(s)
Quoted: 21 Post(s)
Liked 24 Times
in
7 Posts
Yes, you are thinking exactly along the same lines as me here
02-16-11, 09:51 PM
#10

Humvee of bikes =Worksman

Join Date: May 2004
Posts: 5,362
Mentioned: 0 Post(s)
Tagged: 0 Thread(s)
Quoted: 10 Post(s)
Likes: 0
Liked 6 Times
in
6 Posts
Using a strip of car tire sidewall is a bullet proof hitch!
https://www.motherearthnews.com/multi...id=67956&seq=2
https://www.motherearthnews.com/Do-It...e-Trailer.aspx
https://www.motherearthnews.com/multi...id=67956&seq=2
https://www.motherearthnews.com/Do-It...e-Trailer.aspx
__________________
My preferred bicycle brand is.......WORKSMAN CYCLES
I dislike clipless pedals on any city bike since I feel they are unsafe.
Originally Posted by krazygluon
Steel: nearly a thousand years of metallurgical development
Aluminum: barely a hundred, which one would you rather have under your butt at 30mph?
02-17-11, 03:13 AM
#11
Full Member
Join Date: Jun 2009
Location: Norwich, Norfolk. UK
Posts: 316
Bikes: 2006 Falcon Explorer Hybrid, 2008 Landrover Visalia Crossover, 2010 Cargo Cycles Senton, 2010 Cargo Cycles Capability, and a 2001 AVD quad pedi-van, 1980 Peugeot Carbolite 10sp racer
Mentioned: 2 Post(s)
Tagged: 0 Thread(s)
Quoted: 21 Post(s)
Liked 24 Times
in
7 Posts
Using a strip of car tire sidewall is a bullet proof hitch!
https://www.motherearthnews.com/multi...id=67956&seq=2
https://www.motherearthnews.com/Do-It...e-Trailer.aspx
https://www.motherearthnews.com/multi...id=67956&seq=2
https://www.motherearthnews.com/Do-It...e-Trailer.aspx
02-17-11, 06:58 AM
#12
Senior Member
Thread Starter
Join Date: Sep 2010
Posts: 100
Mentioned: 0 Post(s)
Tagged: 0 Thread(s)
Quoted: 0 Post(s)
Likes: 0
Liked 0 Times
in
0 Posts
Some quick head scratching and some bad drawings, and this is what I came up with.....
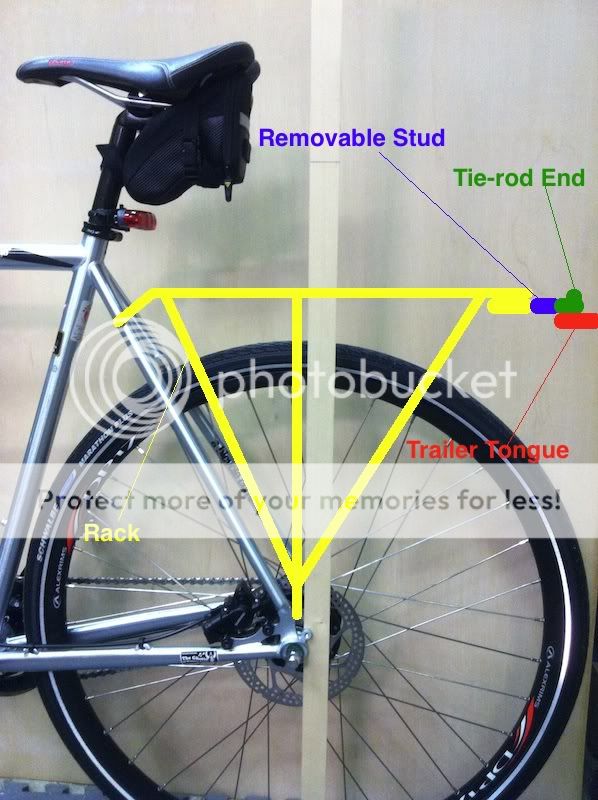
OK This is what I was thinking, the hitch would be at the rear of the rack, but this would put the pivot point well behind the center of the rear wheel, and the weight would be quite far behind the rear wheel, I do not think this is a good idea
With this set up, the blue stud would be removable, I could take it out when not towing the trailer, and have full use of the rack. This set up places the weight of the trailer over the rear wheel, and the pivot point over the rear wheel.
The rack I will make will be a bit longer than most, I want to be able to put my panniers on the bike, but with the very short chain stays of this bike, I need some extra room for heel clearance.
Well, what do you think of these ideas?
02-17-11, 07:40 AM
#13
Full Member
Join Date: Jun 2009
Location: Norwich, Norfolk. UK
Posts: 316
Bikes: 2006 Falcon Explorer Hybrid, 2008 Landrover Visalia Crossover, 2010 Cargo Cycles Senton, 2010 Cargo Cycles Capability, and a 2001 AVD quad pedi-van, 1980 Peugeot Carbolite 10sp racer
Mentioned: 2 Post(s)
Tagged: 0 Thread(s)
Quoted: 21 Post(s)
Liked 24 Times
in
7 Posts
I will be experimenting by building my version similar to the top drawing there. I do not perceive an issue with the hitch located behind the wheel centre: Bob Yaks, and most other single wheel trailers pivot from beyond the circumference of the rear wheel, although the centre of gravity is usual a lot lower.
I can see a potential problem with lateral sway stability by mounting off the rear most point of the rack. But careful design, accurate manufacturing, adequate bracing and correct mounting should resolve this issue.
When I start to build my new rack, I will probably use 16 mm O/D X 1.6 mm (5/8 X 16 gauge) 316 stainless steel tubing Tig welded throughout, utilising BZP M6 grade 8.8 (min) or A4 marine grade stainless steel bolts/set screws and nylock nuts for mounting.
02-17-11, 08:25 AM
#14
Senior Member
Thread Starter
Join Date: Sep 2010
Posts: 100
Mentioned: 0 Post(s)
Tagged: 0 Thread(s)
Quoted: 0 Post(s)
Likes: 0
Liked 0 Times
in
0 Posts
I will be experimenting by building my version similar to the top drawing there. I do not perceive an issue with the hitch located behind the wheel centre: Bob Yaks, and most other single wheel trailers pivot from beyond the circumference of the rear wheel, although the centre of gravity is usual a lot lower.
I can see a potential problem with lateral sway stability by mounting off the rear most point of the rack. But careful design, accurate manufacturing, adequate bracing and correct mounting should resolve this issue.
When I start to build my new rack, I will probably use 16 mm O/D X 1.6 mm (5/8 X 16 gauge) 316 stainless steel tubing Tig welded throughout, utilising BZP M6 grade 8.8 (min) or A4 marine grade stainless steel bolts/set screws and nylock nuts for mounting.
I can see a potential problem with lateral sway stability by mounting off the rear most point of the rack. But careful design, accurate manufacturing, adequate bracing and correct mounting should resolve this issue.
When I start to build my new rack, I will probably use 16 mm O/D X 1.6 mm (5/8 X 16 gauge) 316 stainless steel tubing Tig welded throughout, utilising BZP M6 grade 8.8 (min) or A4 marine grade stainless steel bolts/set screws and nylock nuts for mounting.
Cheers!
02-17-11, 09:03 AM
#15
Full Member
Join Date: Jun 2009
Location: Norwich, Norfolk. UK
Posts: 316
Bikes: 2006 Falcon Explorer Hybrid, 2008 Landrover Visalia Crossover, 2010 Cargo Cycles Senton, 2010 Cargo Cycles Capability, and a 2001 AVD quad pedi-van, 1980 Peugeot Carbolite 10sp racer
Mentioned: 2 Post(s)
Tagged: 0 Thread(s)
Quoted: 21 Post(s)
Liked 24 Times
in
7 Posts
I should have been clearer in that last posting of mine.
What I meant was lateral sway in the rack due to the extra leverage, rather than lateral sway felt at the wheel.
What I meant was lateral sway in the rack due to the extra leverage, rather than lateral sway felt at the wheel.
02-17-11, 11:14 AM
#16
cowboy, steel horse, etc

Join Date: Sep 2008
Location: The hot spot.
Posts: 44,785
Bikes: everywhere
Mentioned: 71 Post(s)
Tagged: 1 Thread(s)
Quoted: 12736 Post(s)
Liked 7,647 Times
in
4,055 Posts
One thing though,. my trailer had a headset. I have a feeling the headset (or similar pivot point on the yaw axis) would be necessary for good tracking and reduce some of the load on the pivot point at the tongue/rack interface.
Here's a link to pictures:

Last edited by LesterOfPuppets; 02-17-11 at 11:20 AM.
02-17-11, 12:43 PM
#17
Humvee of bikes =Worksman
Join Date: May 2004
Posts: 5,362
Mentioned: 0 Post(s)
Tagged: 0 Thread(s)
Quoted: 10 Post(s)
Likes: 0
Liked 6 Times
in
6 Posts

__________________
My preferred bicycle brand is.......WORKSMAN CYCLES
I dislike clipless pedals on any city bike since I feel they are unsafe.
Originally Posted by krazygluon
Steel: nearly a thousand years of metallurgical development
Aluminum: barely a hundred, which one would you rather have under your butt at 30mph?
My preferred bicycle brand is.......WORKSMAN CYCLES
I dislike clipless pedals on any city bike since I feel they are unsafe.
Originally Posted by krazygluon
Steel: nearly a thousand years of metallurgical development
Aluminum: barely a hundred, which one would you rather have under your butt at 30mph?
02-17-11, 02:47 PM
#18
Banned
Air hose fittings used like we did on the grinding tools in the shipyard work great ,
for the low left chainstay type trailer mounts,
Bike Friday took that hardware choice and ran with it.
for the low left chainstay type trailer mounts,
Bike Friday took that hardware choice and ran with it.
02-17-11, 09:37 PM
#19
Senior Member
Thread Starter
Join Date: Sep 2010
Posts: 100
Mentioned: 0 Post(s)
Tagged: 0 Thread(s)
Quoted: 0 Post(s)
Likes: 0
Liked 0 Times
in
0 Posts
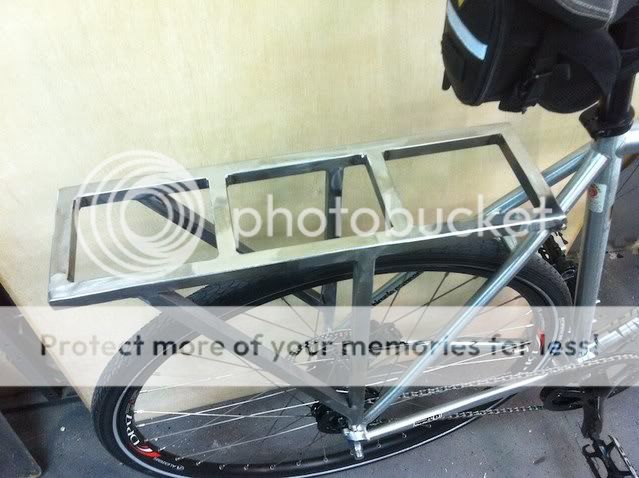
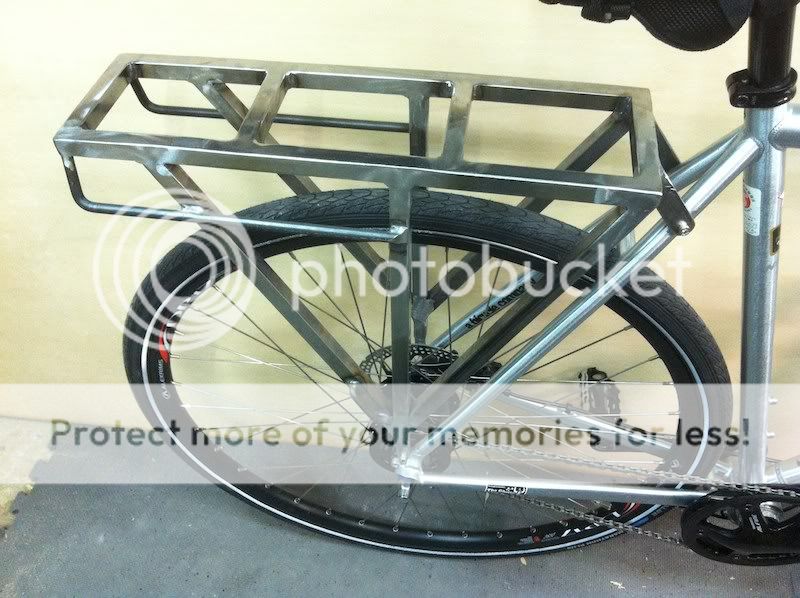
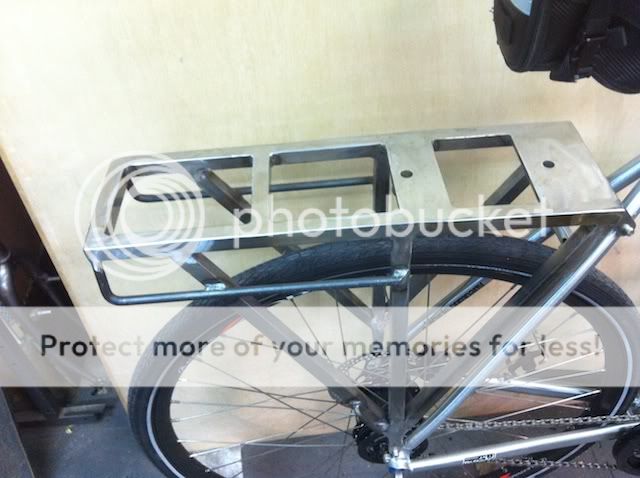
I'm not 100% sure what I'm going to do with the mounting point for the hitch yet, but I have got a good start on the rack....
The rack is kind of long, but this is to accommodate my panniers on the rack, because of heel clearance. It is mostly just tacked together at this point, so there is some more welding to do.
I'm wondering if I should put a third support in from near the front of the rack to the center main vertical support...? That really might be overkill
02-18-11, 04:01 AM
#20
Senior Member
Thread Starter
Join Date: Sep 2010
Posts: 100
Mentioned: 0 Post(s)
Tagged: 0 Thread(s)
Quoted: 0 Post(s)
Likes: 0
Liked 0 Times
in
0 Posts
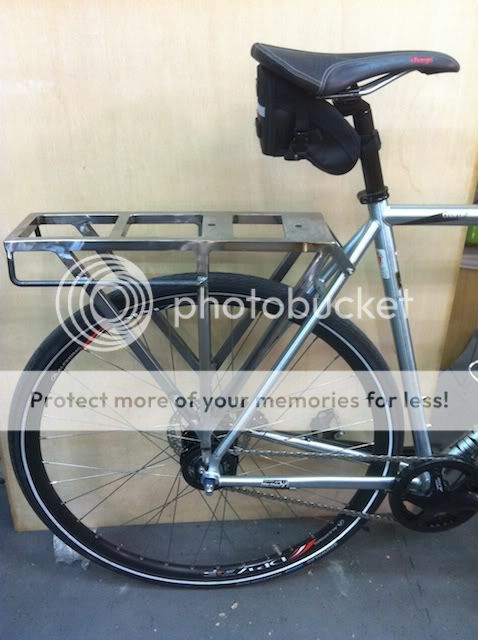
Some work got done today on the rack....
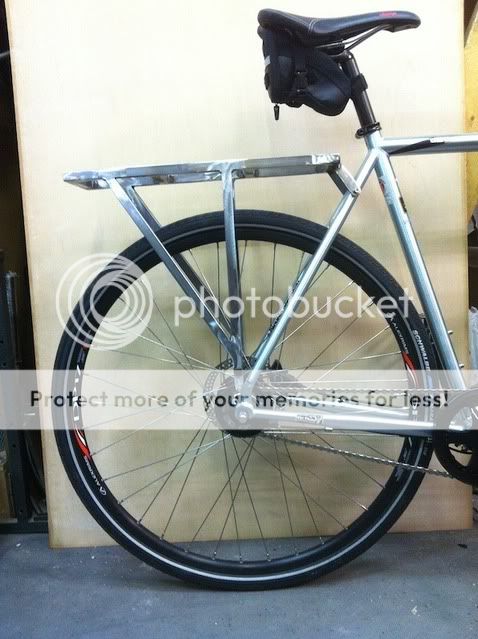
I think this should be a very skookum rack
Now a question, do you think I should put a 3rd strut on the rack...?
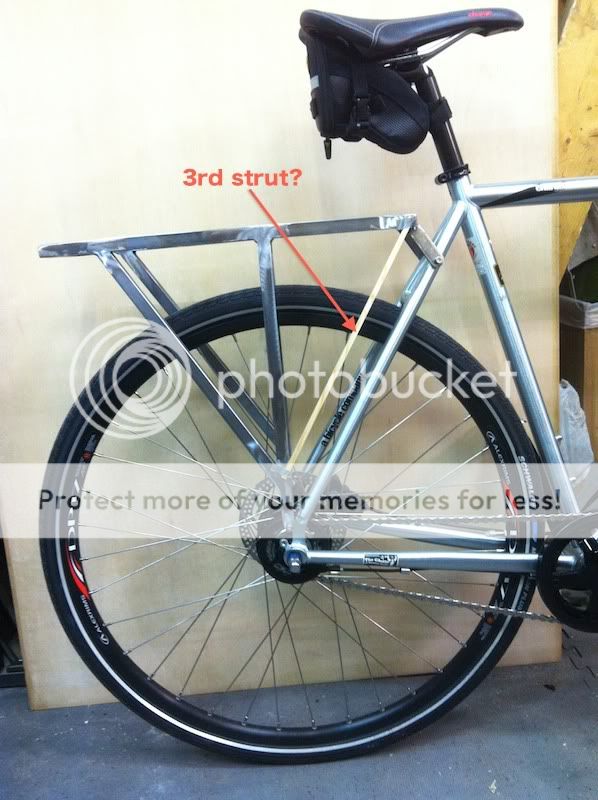
I guess it would just make everything more balanced and it certainly cannot hurt with the strength of the rack and hitch....???
I will put a "Pannier Rail" on each side of the rack....
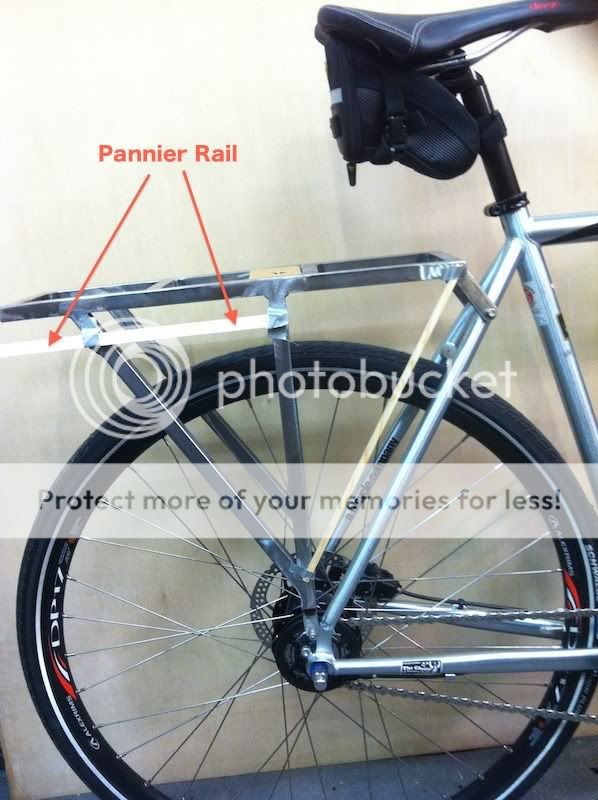
This will let me put the panniers on and have enough heel clearance as well as keep the panniers lower to the ground for better stability.
On to mounting the hitch...........
I think this should be a very skookum rack
Now a question, do you think I should put a 3rd strut on the rack...?
I guess it would just make everything more balanced and it certainly cannot hurt with the strength of the rack and hitch....???
I will put a "Pannier Rail" on each side of the rack....
This will let me put the panniers on and have enough heel clearance as well as keep the panniers lower to the ground for better stability.
On to mounting the hitch...........
Last edited by Stu In Tokyo; 02-18-11 at 04:05 AM.
02-18-11, 04:06 AM
#21
Senior Member
Thread Starter
Join Date: Sep 2010
Posts: 100
Mentioned: 0 Post(s)
Tagged: 0 Thread(s)
Quoted: 0 Post(s)
Likes: 0
Liked 0 Times
in
0 Posts
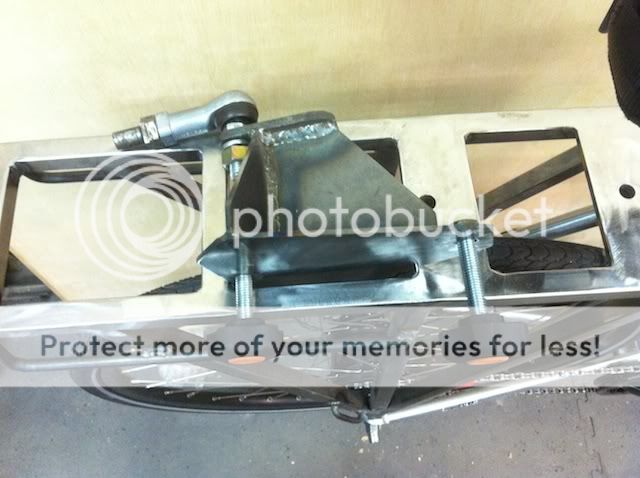
The piece of cardboard in the pics below, would be a steel plate, welded in place, with a 1" in diameter piece of steel, maybe 1" long, welded onto the bottom of the plate, there would be a hole through the plate and the steel below the plate, which would accept a removable stud that would have the hitch on it. This would make it removable so I could use the rack, without the trailer, and it would allow me to raise the mounting point to the existing height I am using now, so I don't have to do major surgery on the trailer again.
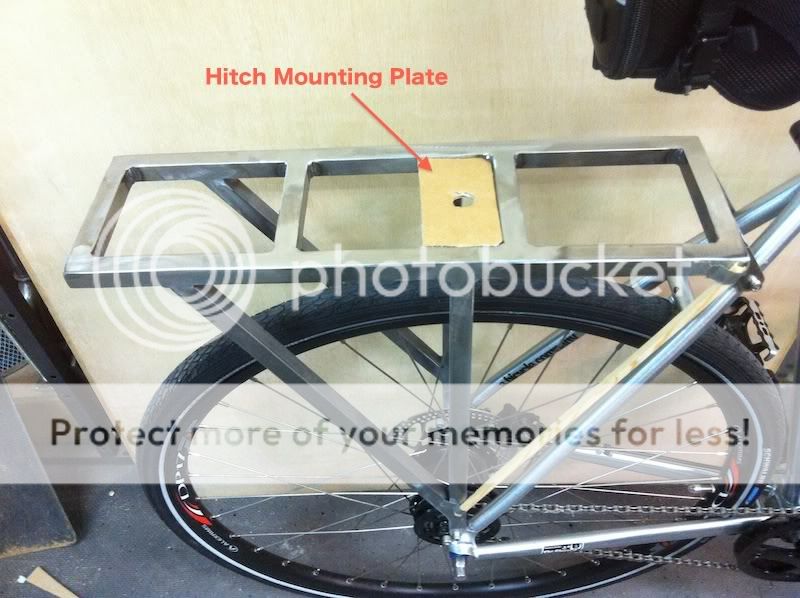
In this pic the mounting plate would be directly above the rear axle.

In the second option, the mounting point would be forward of the rear axle, very much the same as the set up I have now with the Cannondale.
I think I'll go for the forward mounting position, as the handling of the trailer now is fine, good in fact.
This is kind of what I'm thinking about for a removable stud, it would have to be very solid and maybe one hole is not enough, maybe I'd make it with three holes and somewhat gusseted?
Comments?
Cheers!
In this pic the mounting plate would be directly above the rear axle.
In the second option, the mounting point would be forward of the rear axle, very much the same as the set up I have now with the Cannondale.
I think I'll go for the forward mounting position, as the handling of the trailer now is fine, good in fact.
This is kind of what I'm thinking about for a removable stud, it would have to be very solid and maybe one hole is not enough, maybe I'd make it with three holes and somewhat gusseted?
Comments?
Cheers!
02-18-11, 12:16 PM
#22
Senior Member
Thread Starter
Join Date: Sep 2010
Posts: 100
Mentioned: 0 Post(s)
Tagged: 0 Thread(s)
Quoted: 0 Post(s)
Likes: 0
Liked 0 Times
in
0 Posts
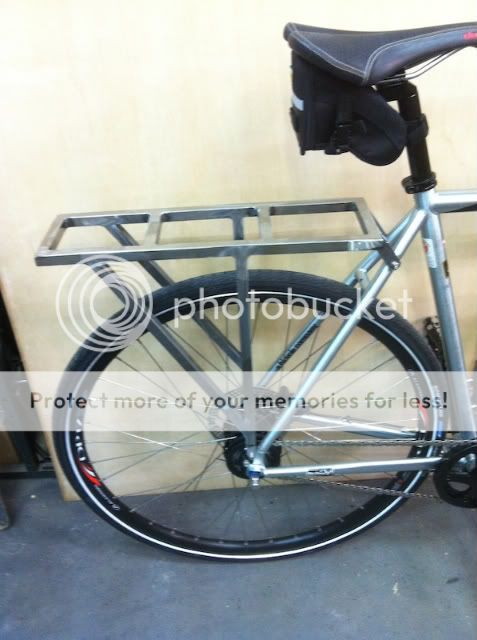
I got some more work done on the rack, I did decide to put a third strut on the rack, and I got the pannier rails done too.....
This will allow me to use the panniers even with the trailer in tow, I won't be able to use the top of the rack but I think that is OK.
I will make up some sort of attachment, a stud for lack of a better word, that will mount on top of the rack to attach the trailer to, it will become the hitch I guess.

Just playing with ideas here.
One thought I had was to make something that hooks around the cross bars on the rack, and then is held in place with one bolt big knob. This would allow me to easily remove the hitch from the rack if I wish, but would also be a very solid mount for the hitch.
More on that tomorrow, it's 3AM and I need to get some sleep!
Thanks to everyone who has commented on this build, it is really great to hear all of the various ideas, it makes me think
Cheers!
This will allow me to use the panniers even with the trailer in tow, I won't be able to use the top of the rack but I think that is OK.
I will make up some sort of attachment, a stud for lack of a better word, that will mount on top of the rack to attach the trailer to, it will become the hitch I guess.
Just playing with ideas here.
One thought I had was to make something that hooks around the cross bars on the rack, and then is held in place with one bolt big knob. This would allow me to easily remove the hitch from the rack if I wish, but would also be a very solid mount for the hitch.
More on that tomorrow, it's 3AM and I need to get some sleep!
Thanks to everyone who has commented on this build, it is really great to hear all of the various ideas, it makes me think
Cheers!
02-18-11, 12:30 PM
#23
Full Member
Join Date: Jun 2009
Location: Norwich, Norfolk. UK
Posts: 316
Bikes: 2006 Falcon Explorer Hybrid, 2008 Landrover Visalia Crossover, 2010 Cargo Cycles Senton, 2010 Cargo Cycles Capability, and a 2001 AVD quad pedi-van, 1980 Peugeot Carbolite 10sp racer
Mentioned: 2 Post(s)
Tagged: 0 Thread(s)
Quoted: 21 Post(s)
Liked 24 Times
in
7 Posts
Nice work there Stu.
Is that 20 x 20 X 1.6 wall thick box section for the rack, and 10 mm dia round for the pannier bars you have used there?.
Here is a thought for you: Would it possible make a base for the hitch bracket and drill two 8 mm holes in it, and then weld a 30 X 8 flat into the rack with two corresponding
slotted holes to utilise two 8mm (seat post) quick release skewers to fix it in place?
02-18-11, 12:40 PM
#24
Senior Member
Thread Starter
Join Date: Sep 2010
Posts: 100
Mentioned: 0 Post(s)
Tagged: 0 Thread(s)
Quoted: 0 Post(s)
Likes: 0
Liked 0 Times
in
0 Posts
Nice work there Stu.
Is that 20 x 20 X 1.6 wall thick box section for the rack, and 10 mm dia round for the pannier bars you have used there?.
Here is a thought for you: Would it possible make a base for the hitch bracket and drill two 8 mm holes in it, and then weld a 30 X 8 flat into the rack with two corresponding
slotted holes to utilise two 8mm (seat post) quick release skewers to fix it in place?
Is that 20 x 20 X 1.6 wall thick box section for the rack, and 10 mm dia round for the pannier bars you have used there?.
Here is a thought for you: Would it possible make a base for the hitch bracket and drill two 8 mm holes in it, and then weld a 30 X 8 flat into the rack with two corresponding
slotted holes to utilise two 8mm (seat post) quick release skewers to fix it in place?
The tubing is 16mm x 16mm and the wall thickness is about 1.2mm. The Pannier bars are 9mm diameter.
The seat post quick release..... oh yeah, that has possibilities
Nice thought, I'll run with that!
02-19-11, 03:37 AM
#25
Senior Member
Thread Starter
Join Date: Sep 2010
Posts: 100
Mentioned: 0 Post(s)
Tagged: 0 Thread(s)
Quoted: 0 Post(s)
Likes: 0
Liked 0 Times
in
0 Posts
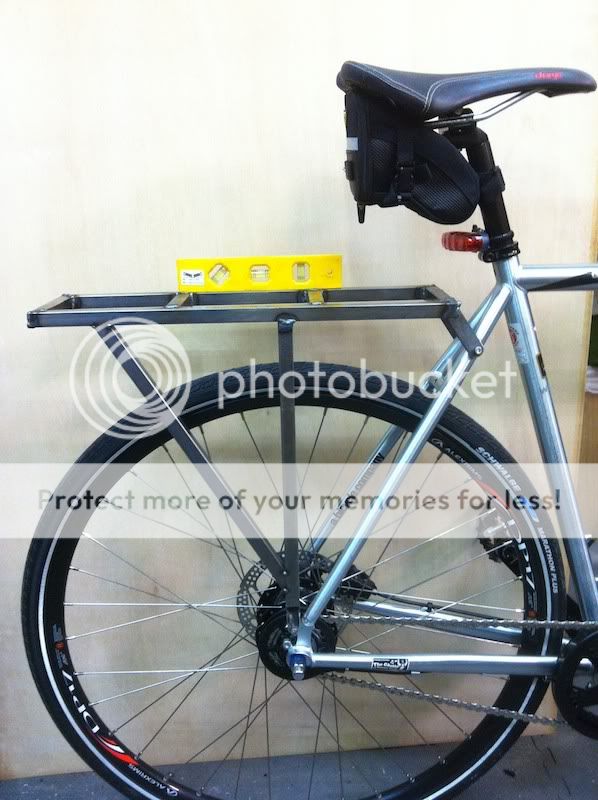
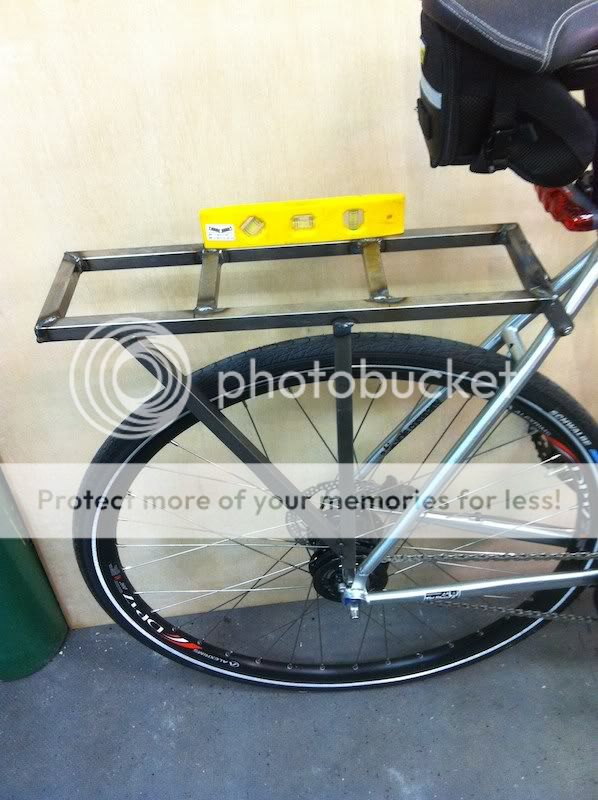
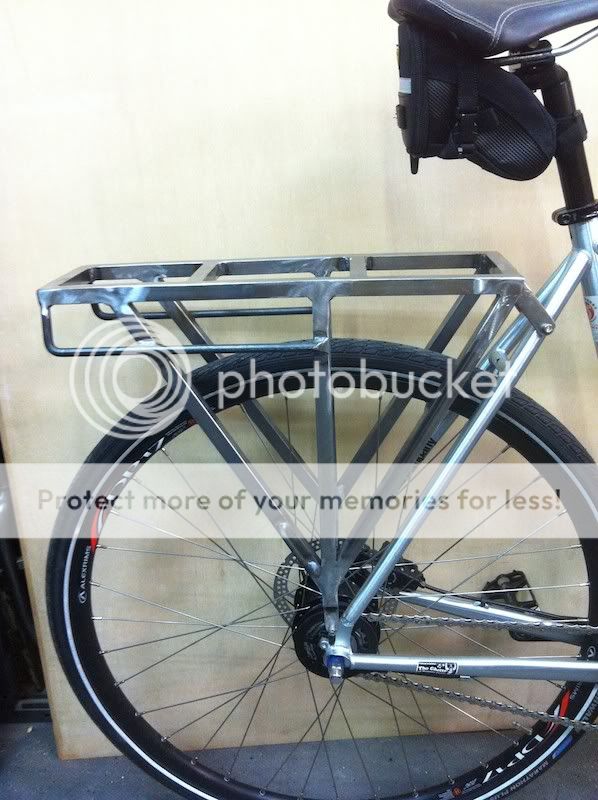
Just about got it done
That is the rack, basically finished, I might add a few bungy point on it, and do a bit more sanding on some of my rougher welds but that is about 95% done.
Here it is with the hitch attached....
.... I'll not lie, this is NOT lightweight in any way, but I think it is rather skookum, that is solid and durable.
The hitch is held in place with two 10mm bolts, with hand knobs on them......
The knob nearest the seat is a bit long, I'll drill a hole in near the top of it and put a small padlock on it, to prevent theft.
Cont ..........
That is the rack, basically finished, I might add a few bungy point on it, and do a bit more sanding on some of my rougher welds
but that is about 95% done.Here it is with the hitch attached....
.... I'll not lie, this is NOT lightweight in any way, but I think it is rather skookum, that is solid and durable.
The hitch is held in place with two 10mm bolts, with hand knobs on them......
The knob nearest the seat is a bit long, I'll drill a hole in near the top of it and put a small padlock on it, to prevent theft.
Cont ..........