


Advice for adhesive to bond aluminum cable guides to aluminum top tube
 03-10-21, 10:16 AM
#1

Senior Member
Thread Starter

Join Date: Oct 2013
Location: Connecticut
Posts: 3,448
Bikes: are fun!
Mentioned: 66 Post(s)
Tagged: 0 Thread(s)
Quoted: 466 Post(s)
Liked 863 Times
in
272 Posts
Advice for adhesive to bond aluminum cable guides to aluminum top tube
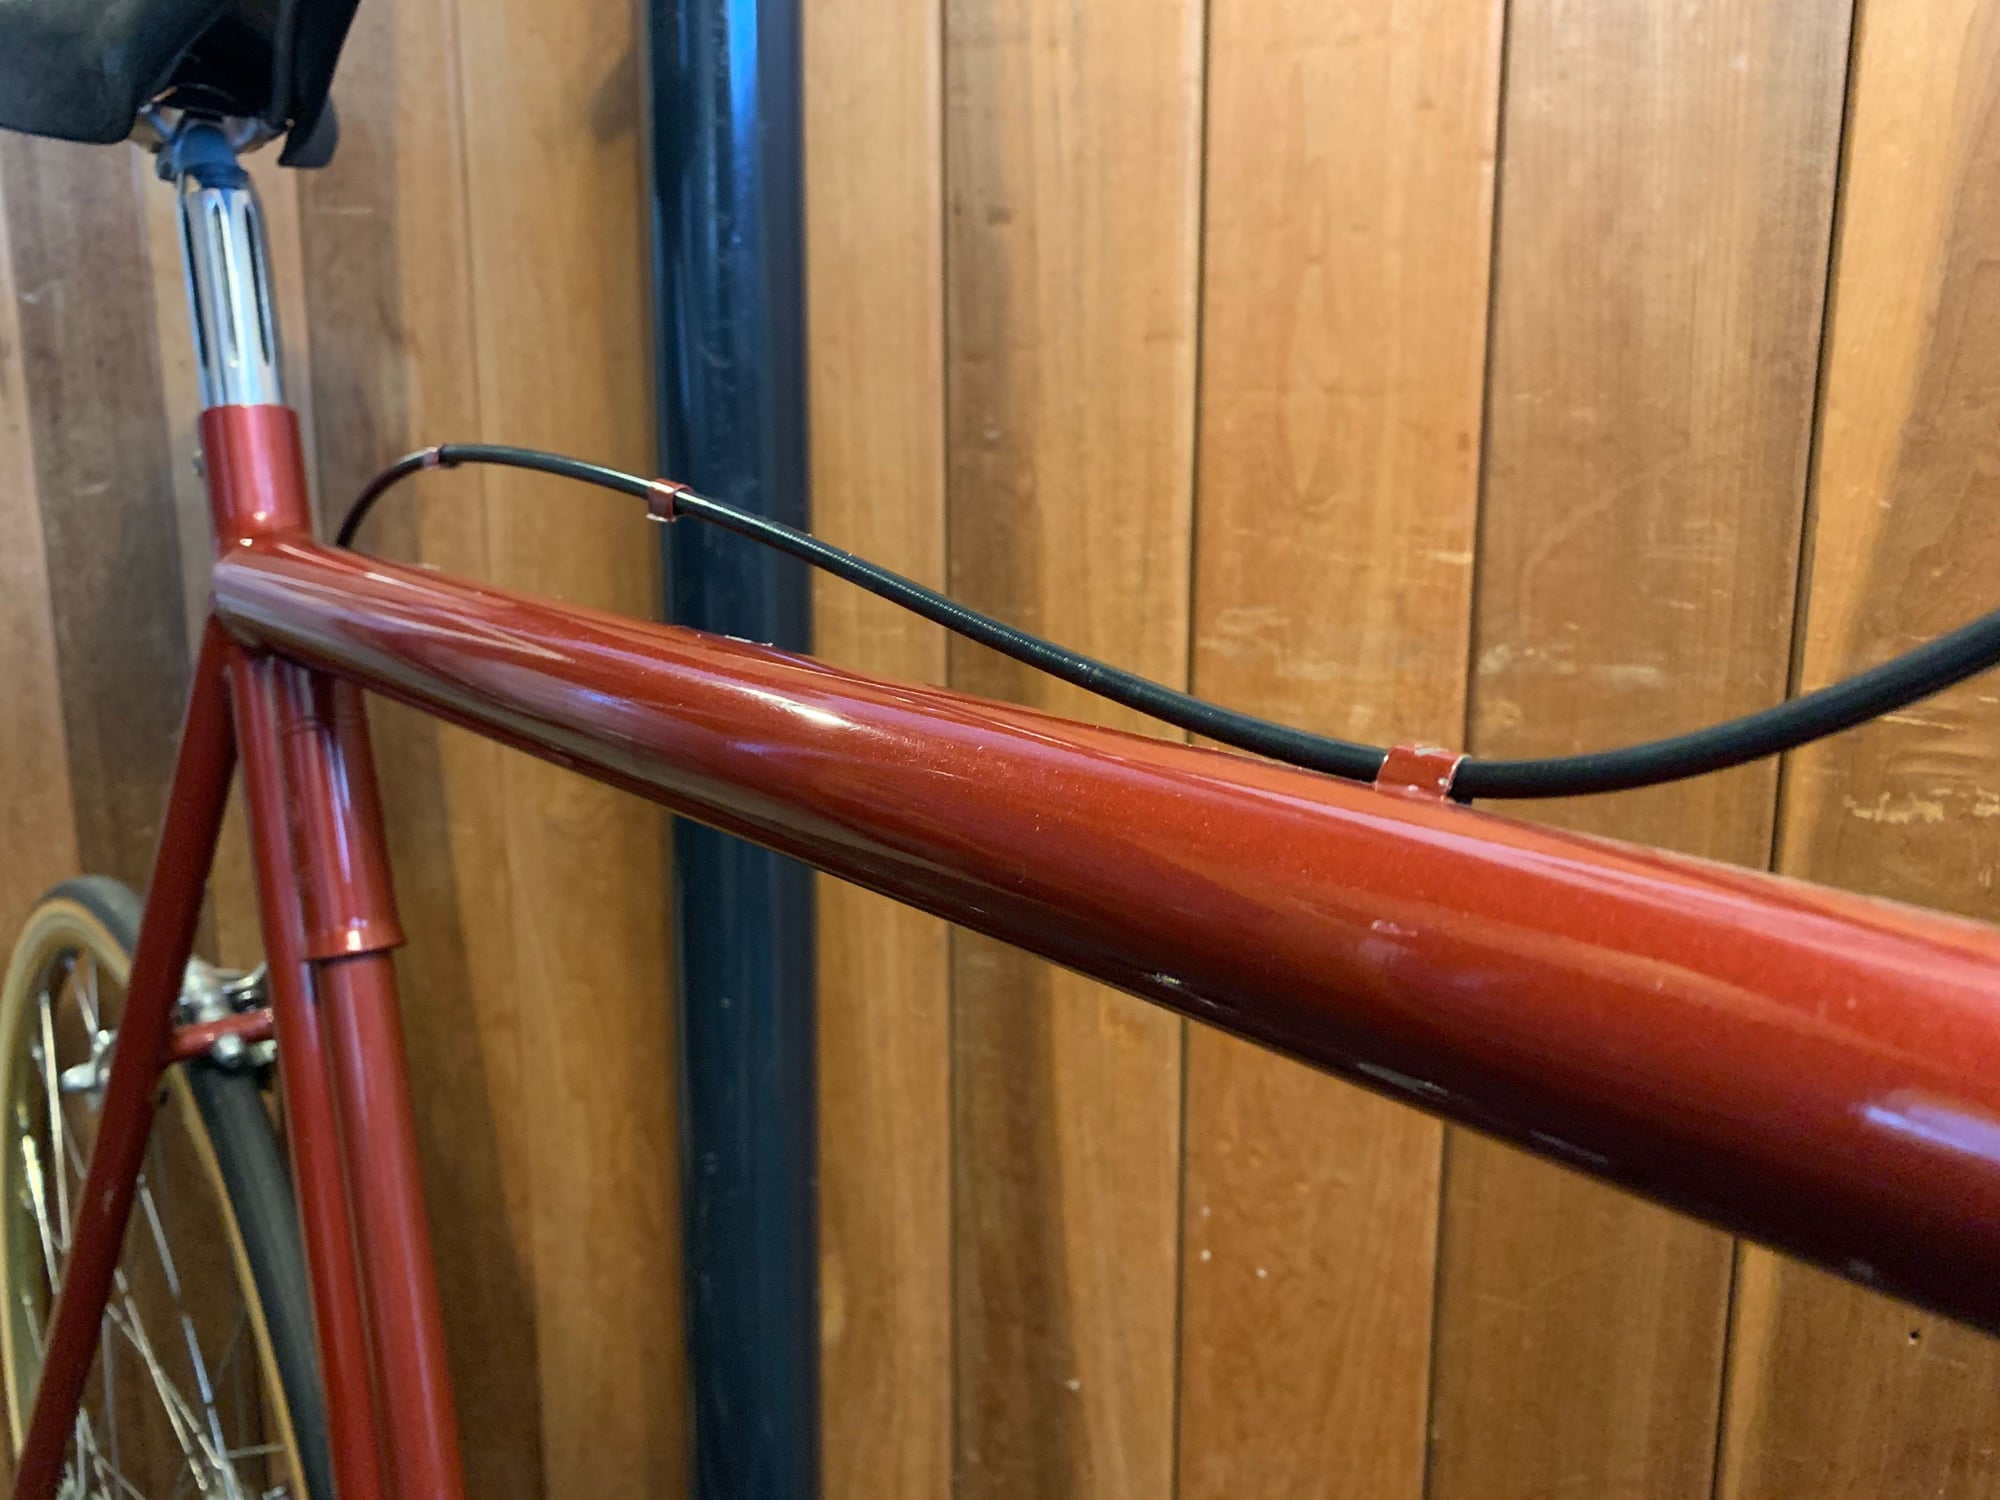
A few years ago I picked up a ‘74/‘75ish Klein. When I got the bike two of the three top tube cable guides had been broken free from the top tube and were strung freely along the brake cable housing. I’ve tried a few different adhesives over the years to try to get these bonded back in place with no lasting success (hobby glue and cement, some Gorilla product, silicone caulk/adhesive). Curious what the collective here recommends. Given the quality and relative rarity of the bike I want to get this right. I’m thinking that something with a bit of give when cured could be useful to provide some damping and isolation from road vibration. That there are pockets in the paint to seat the guides is helpful and may provide a bit of additional purchase.
I’ll of course need to clean off the last adhesive before applying the next.
I’ll give a two part epoxy a go depending on feedback here.
I’ll of course need to clean off the last adhesive before applying the next.
I’ll give a two part epoxy a go depending on feedback here.
Last edited by Sir_Name; 03-10-21 at 10:26 AM.
 03-10-21, 10:40 AM
#2
Senior Member
Join Date: Jan 2010
Location: se MIch.
Posts: 2,309
Bikes: 1938 claud butler,1983 Basso,teledyne titan,teocali super,nrs,1993 stumpjumper fsr,Paramountain,Paramount Buell(sold),4 banger,Zaskar LE,Colnago Master Ibex MTB,1987ish,.etc....
Mentioned: 7 Post(s)
Tagged: 0 Thread(s)
Quoted: 802 Post(s)
Liked 2,979 Times
in
1,497 Posts
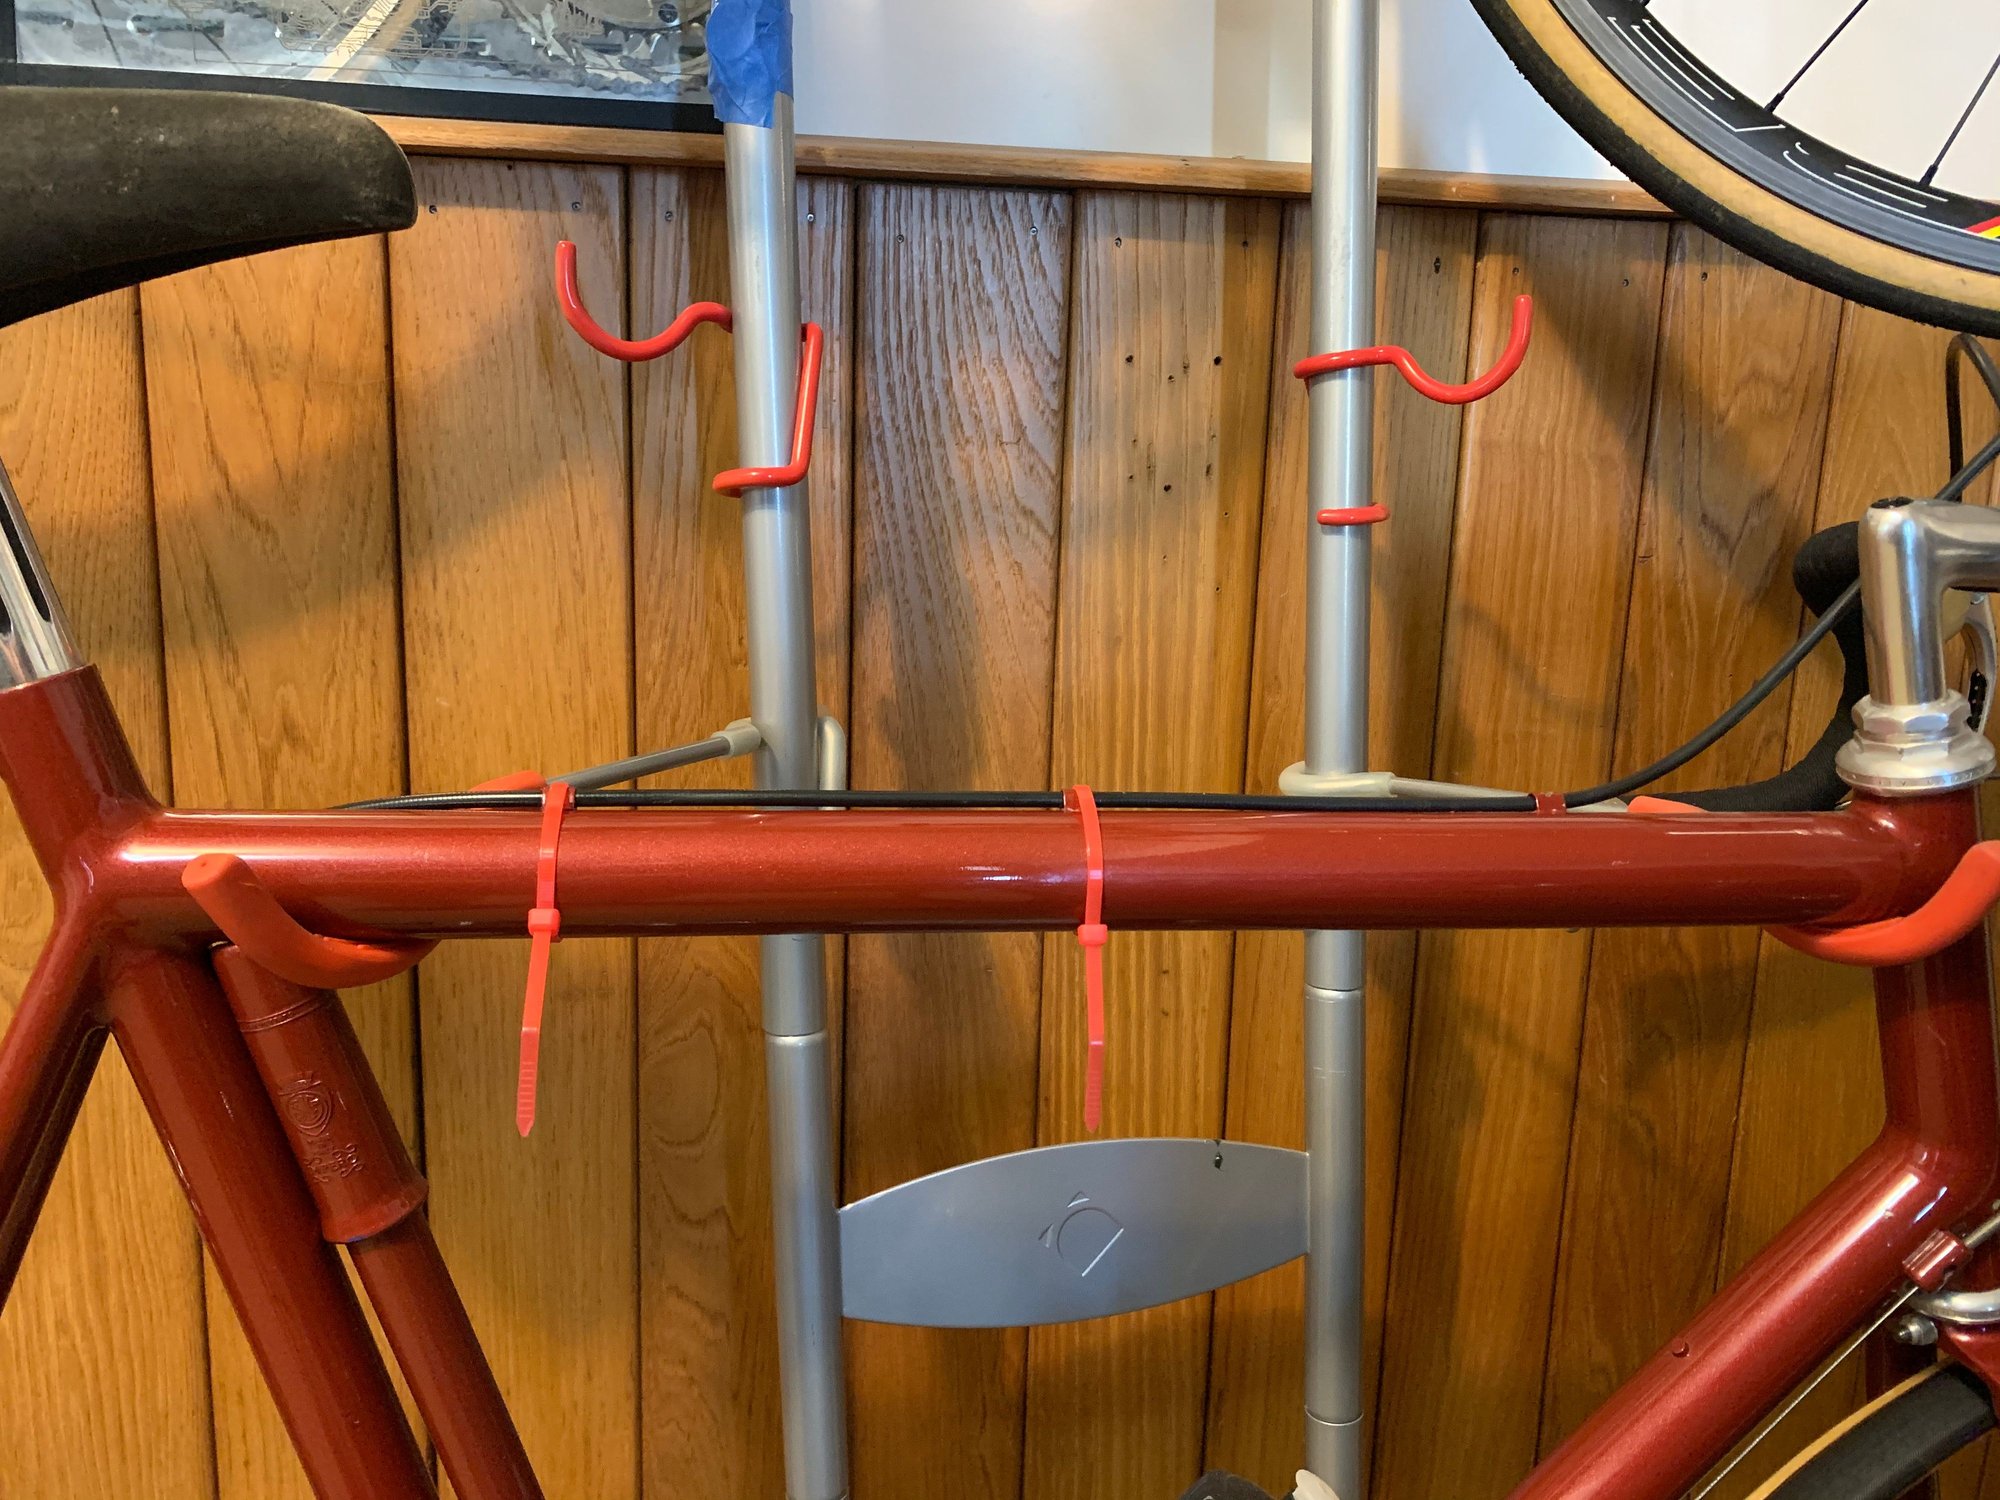
an epoxy as long as the surfaces are bondable-clean.also are you applying pressure after the adhesive? if not try a zip tie to keep the guides in place till dry.
03-10-21, 10:53 AM
#3
Senior Member
Join Date: Sep 2017
Location: Eastern Shore, MD
Posts: 2,107
Bikes: Road ready: 1993 Koga Miyata City Liner Touring Hybrid, 1989 Centurion Sport DLX, "I Blame GP" Bridgestone CB-1. Projects: Yea, I got a problem....
Mentioned: 24 Post(s)
Tagged: 0 Thread(s)
Quoted: 753 Post(s)
Liked 737 Times
in
422 Posts
That looks fussy. I would be tempted to try West System G Flex Epoxy here. If you are careful with the prep you could leave the paint ridges in place and get a pretty much invisible repair. I would read the various instructions that covers bonding aluminum with Epoxy. The big thing is to get the surfaces free of oxidation. I've done this with an acid etch, but I think that gluing up immediately after prep work can be effective. I would scrape off the old adhesive down to bare metal, cross hatch both surfaces with an exacto blade, I think an acetone wash would be a good idea, but I'm going on 20 year old recollections, best to read the data sheets. The other way to go would be one of the Loctite products. I recall they had an adhesive designed to replace silver soldering for some gunsmithing operations. I might skip the cross hatching as these are less gap filling than epoxy. I'd start with the Brownells gunsmithing supply website and work back towards the hardware store for availability. If your just going to try and "giterdone" rear view mirror adhesive is impressive stuff and clear.
PS. There it is:
https://www.amazon.com/Loctite-13542.../dp/B000132VEE
https://www.brownells.com/gunsmith-t...-prod6139.aspx
PS. There it is:
https://www.amazon.com/Loctite-13542.../dp/B000132VEE
https://www.brownells.com/gunsmith-t...-prod6139.aspx
Last edited by bark_eater; 03-10-21 at 11:06 AM.
03-10-21, 05:42 PM
#4
Senior Member
Thread Starter
Join Date: Oct 2013
Location: Connecticut
Posts: 3,448
Bikes: are fun!
Mentioned: 66 Post(s)
Tagged: 0 Thread(s)
Quoted: 466 Post(s)
Liked 863 Times
in
272 Posts
Thanks, I�ve been (carefully) using some quick-grip clamps to apply pressure while curing. I believe one of the best products so far was a two-part crafts-grade epoxy, but it�s been a few years since that attempt. Surfaces were cleaned prior to application, prep is key I�m sure. A higher quality epoxy might be the ticket.
03-10-21, 05:49 PM
#5
Senior Member
Thread Starter
Join Date: Oct 2013
Location: Connecticut
Posts: 3,448
Bikes: are fun!
Mentioned: 66 Post(s)
Tagged: 0 Thread(s)
Quoted: 466 Post(s)
Liked 863 Times
in
272 Posts
That looks fussy. I would be tempted to try West System G Flex Epoxy here. If you are careful with the prep you could leave the paint ridges in place and get a pretty much invisible repair. I would read the various instructions that covers bonding aluminum with Epoxy. The big thing is to get the surfaces free of oxidation. I've done this with an acid etch, but I think that gluing up immediately after prep work can be effective. I would scrape off the old adhesive down to bare metal, cross hatch both surfaces with an exacto blade, I think an acetone wash would be a good idea, but I'm going on 20 year old recollections, best to read the data sheets. The other way to go would be one of the Loctite products. I recall they had an adhesive designed to replace silver soldering for some gunsmithing operations. I might skip the cross hatching as these are less gap filling than epoxy. I'd start with the Brownells gunsmithing supply website and work back towards the hardware store for availability. If your just going to try and "giterdone" rear view mirror adhesive is impressive stuff and clear.
PS. There it is:
https://www.amazon.com/Loctite-13542.../dp/B000132VEE
https://www.brownells.com/gunsmith-t...-prod6139.aspx
PS. There it is:
https://www.amazon.com/Loctite-13542.../dp/B000132VEE
https://www.brownells.com/gunsmith-t...-prod6139.aspx
03-10-21, 06:21 PM
#6

Stop reading my posts!

Join Date: Sep 2004
Posts: 12,583
Mentioned: 90 Post(s)
Tagged: 0 Thread(s)
Quoted: 1443 Post(s)
Liked 1,062 Times
in
787 Posts
Yes to using a high grade name-brand epoxy, yes to proper surface prep (clean with denatured alcohol or acetone) and roughen surfaces. Yes to careful measuring and mixing and I always opt for SLOW-cure and give it plenty of time with no movement. That said you do not need to clamp epoxy tightly, just enough pressure to keep the piece(s) in place. You might even get away with taping to hold..
03-10-21, 06:38 PM
#7
Senior Member
Join Date: Jun 2019
Location: Portland Oregon
Posts: 996
Mentioned: 7 Post(s)
Tagged: 0 Thread(s)
Quoted: 457 Post(s)
Liked 462 Times
in
270 Posts
I would use a dremmel and tiny grinding wheel to make sure I had bare metal on both sides, I would probably go with JB Weld myself to stick them back on there.
03-10-21, 06:58 PM
#8
Senior Member
Join Date: Jun 2006
Posts: 20,305
Mentioned: 130 Post(s)
Tagged: 0 Thread(s)
Quoted: 3464 Post(s)
Liked 2,829 Times
in
1,995 Posts
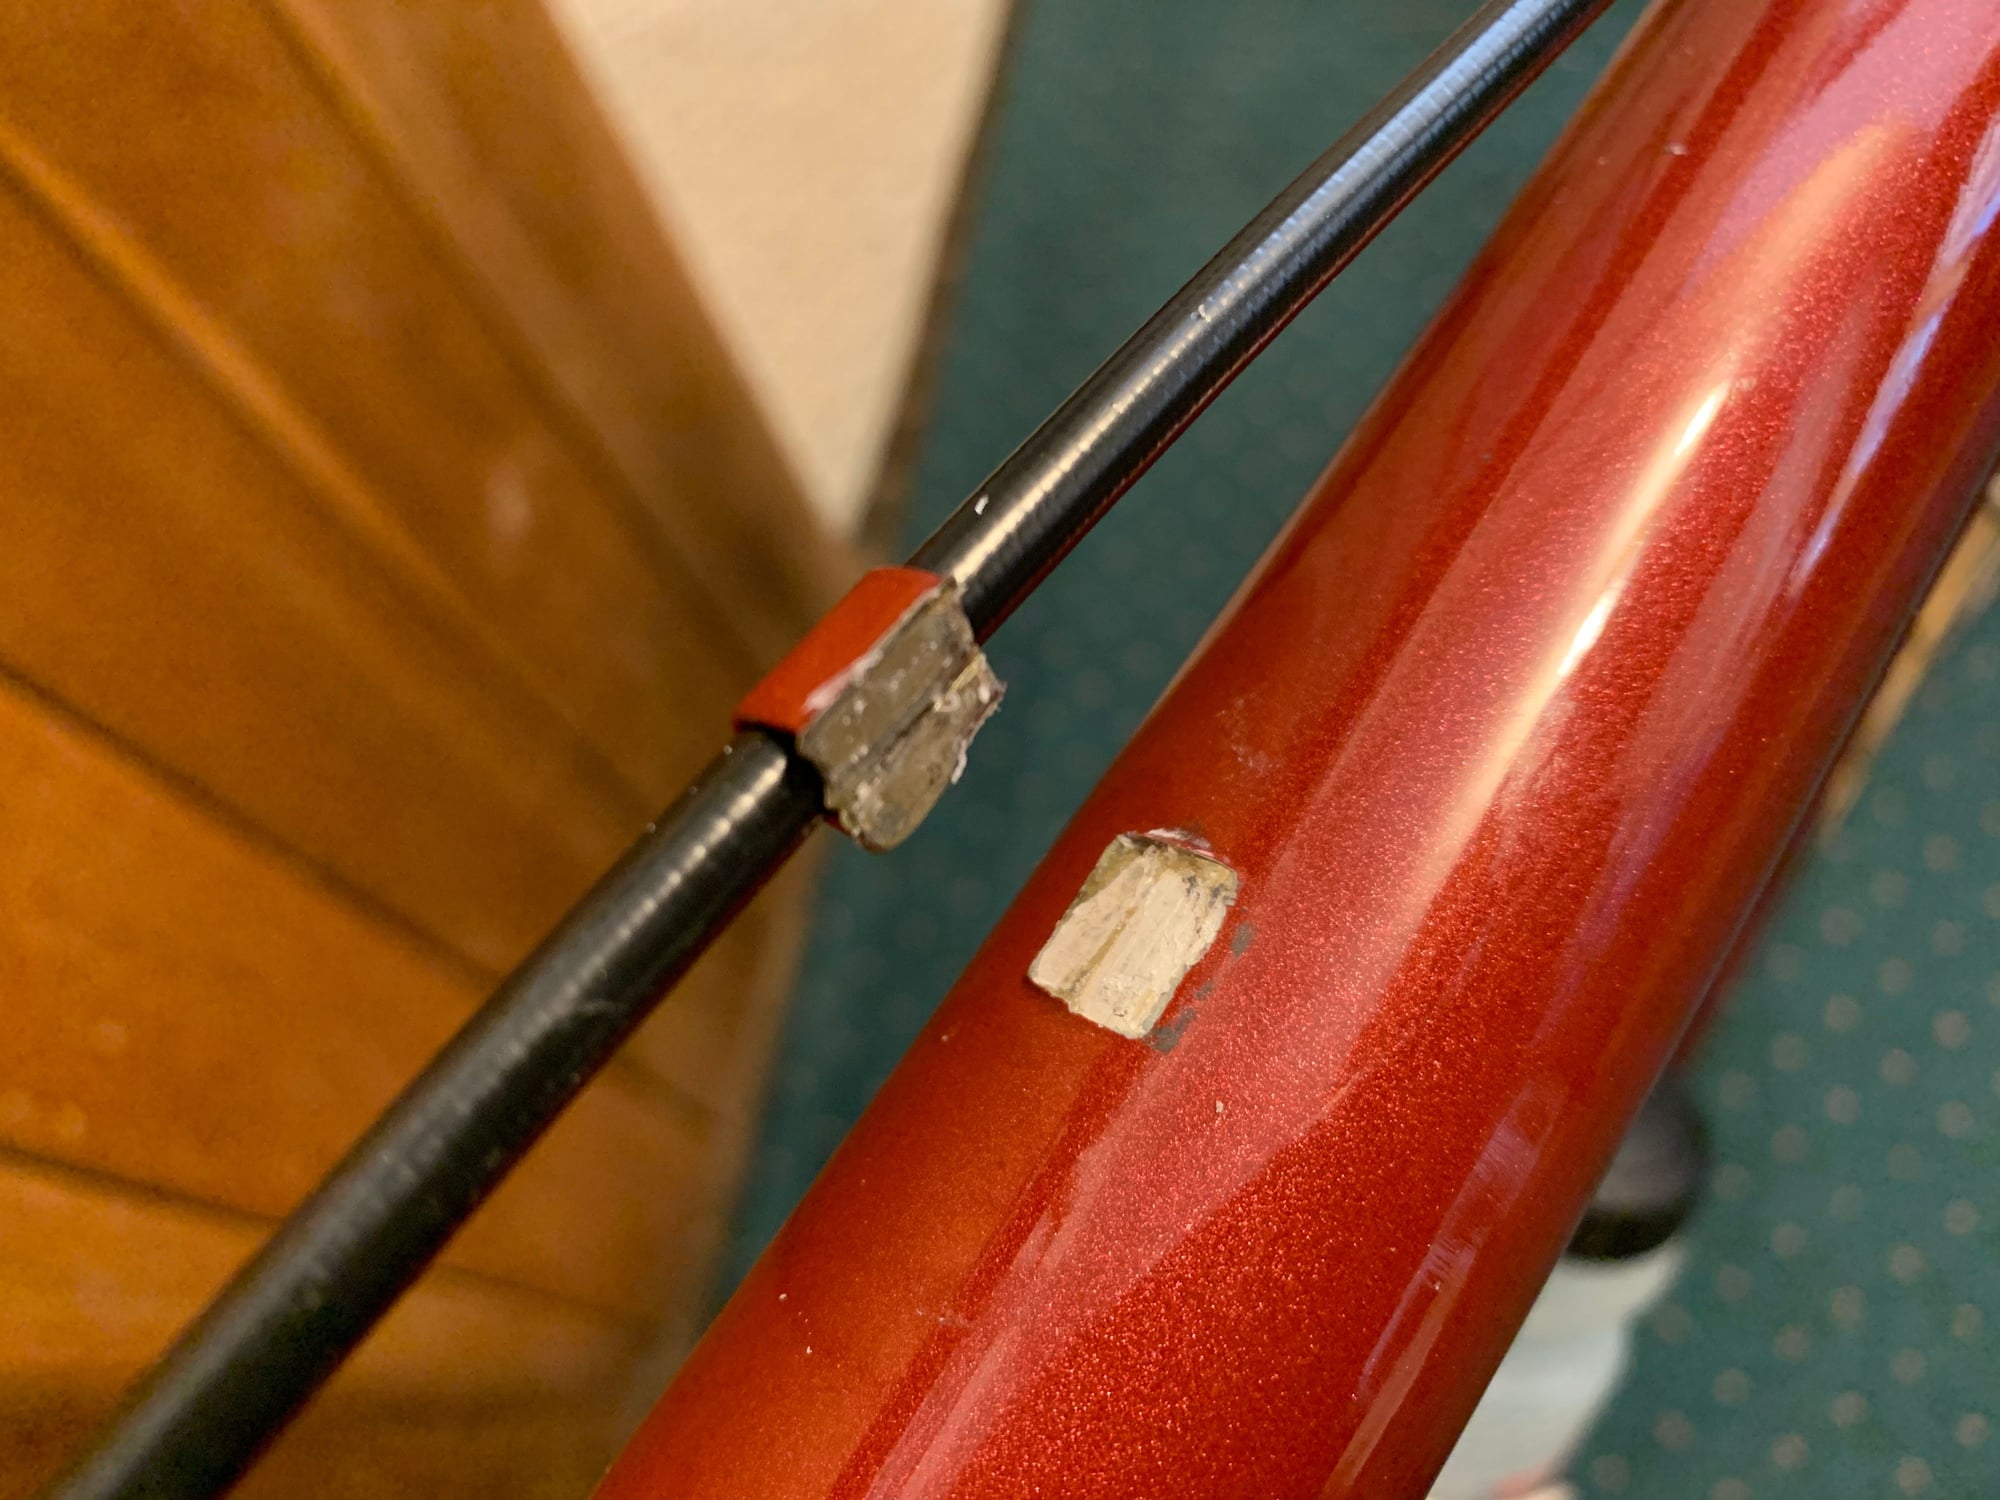
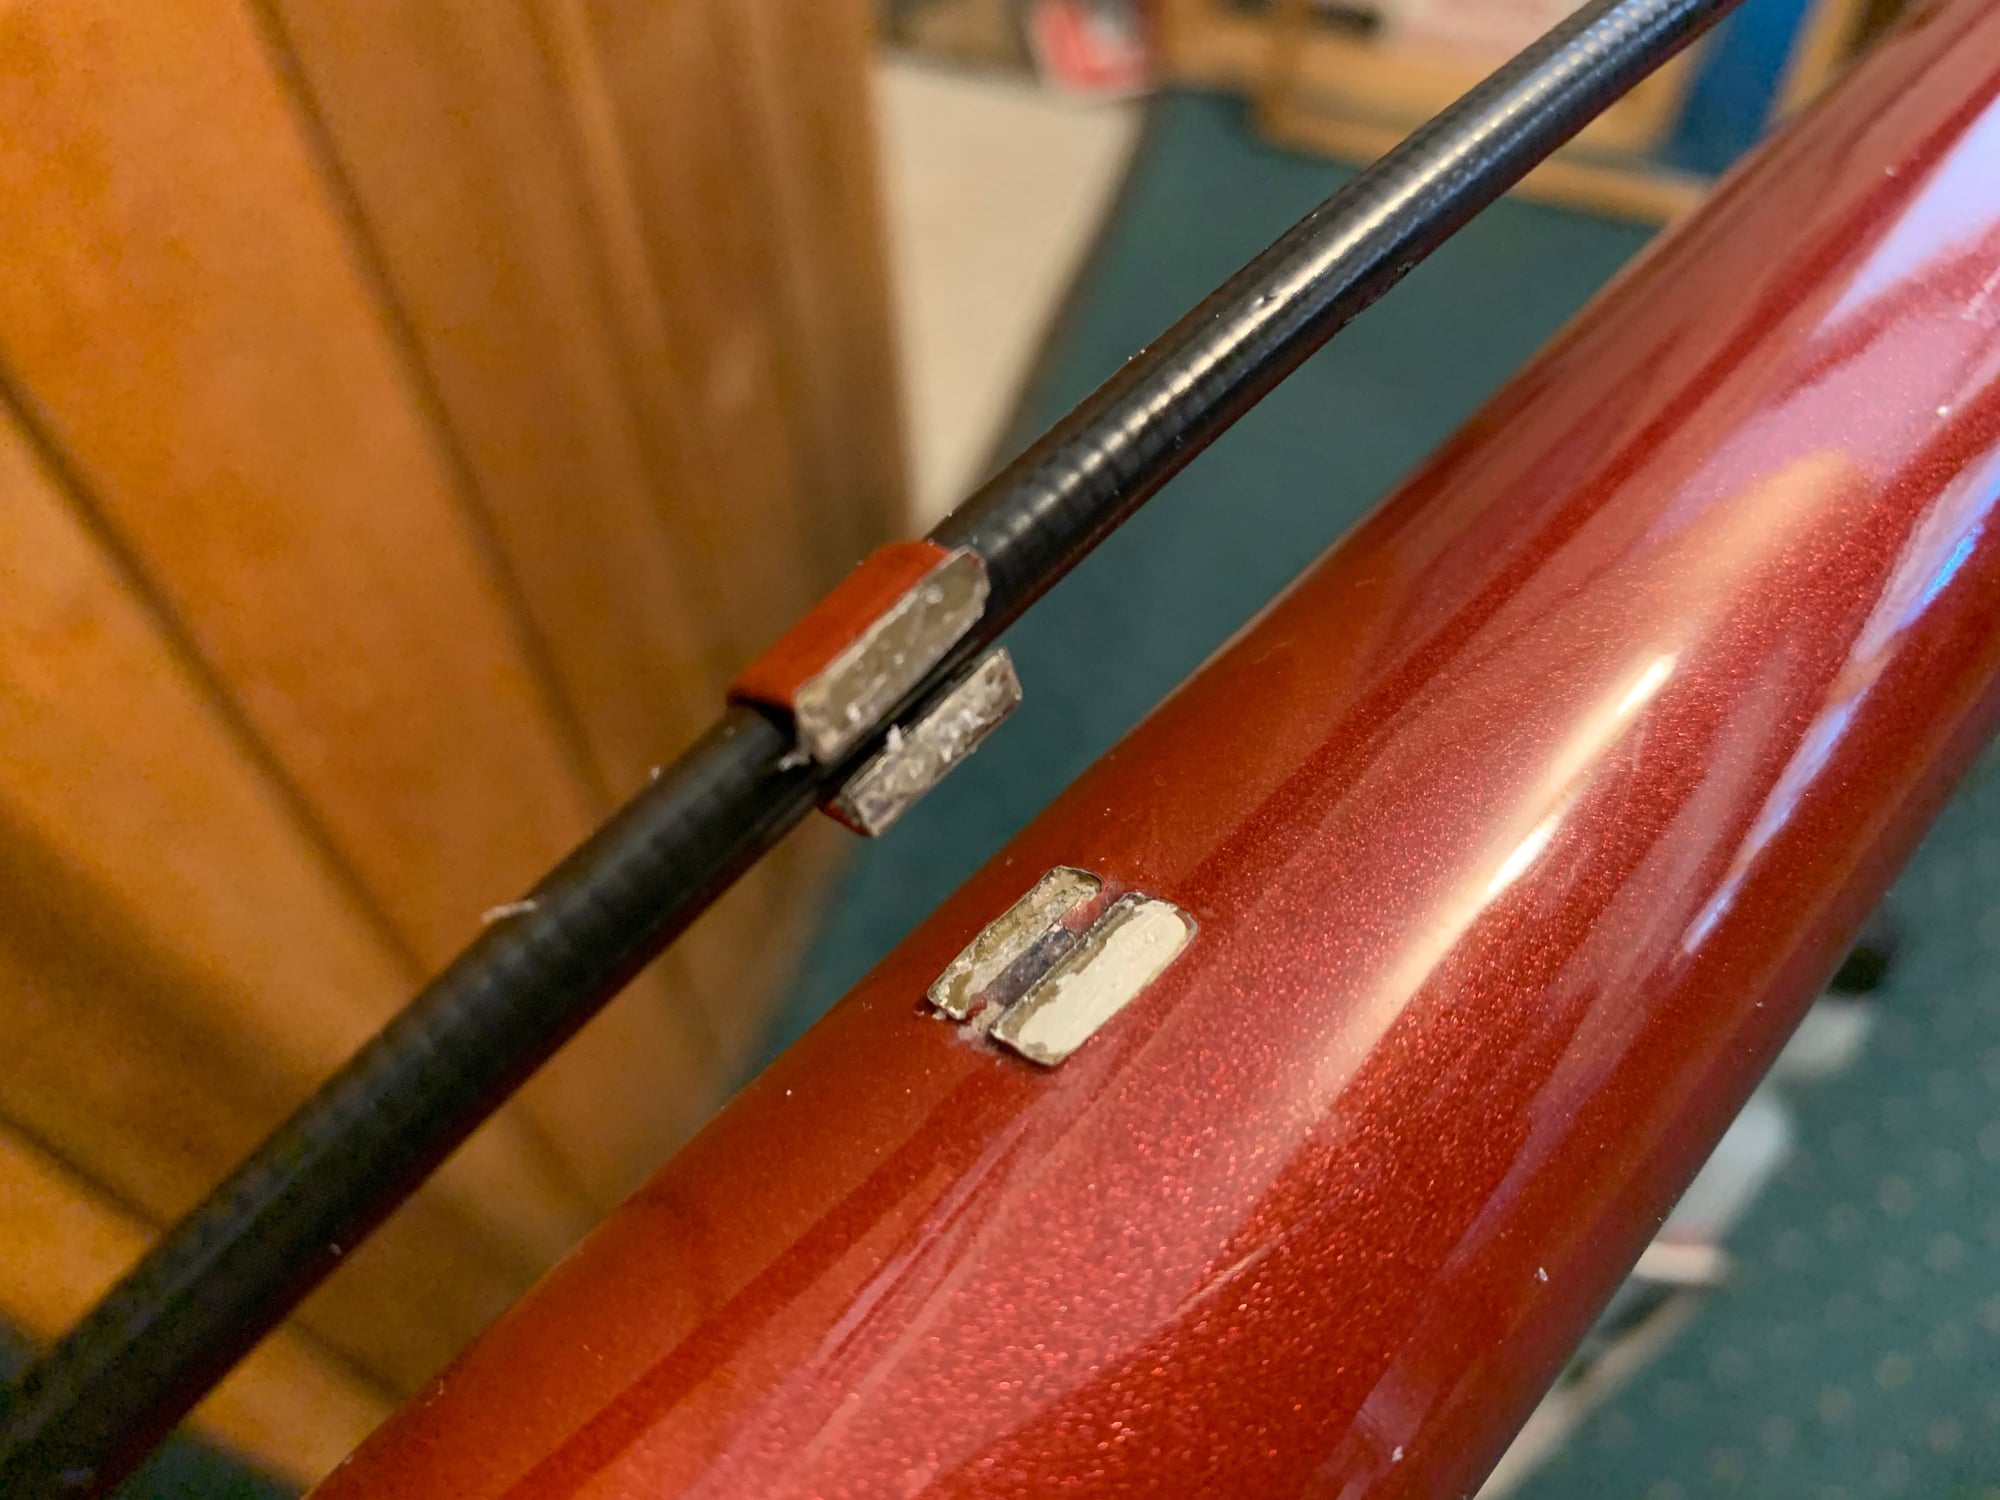
What is interesting is the failure shown appears a bit different either side.
the stronger bond most likely was to the aluminum.
I wonder what those guides are made of.
He is around, I would ask Gary Klein. Could not hurt.
Or
Check Rockwestcomposites
they have some stout adhesives.
the stronger bond most likely was to the aluminum.
I wonder what those guides are made of.
He is around, I would ask Gary Klein. Could not hurt.
Or
Check Rockwestcomposites
they have some stout adhesives.
03-10-21, 07:01 PM
#9
Senior Member
Join Date: Jun 2006
Posts: 20,305
Mentioned: 130 Post(s)
Tagged: 0 Thread(s)
Quoted: 3464 Post(s)
Liked 2,829 Times
in
1,995 Posts
Yes to using a high grade name-brand epoxy, yes to proper surface prep (clean with denatured alcohol or acetone) and roughen surfaces. Yes to careful measuring and mixing and I always opt for SLOW-cure and give it plenty of time with no movement. That said you do not need to clamp epoxy tightly, just enough pressure to keep the piece(s) in place. You might even get away with taping to hold..
there are various types with different flex tolerance.
The G series from West System might work
03-10-21, 08:36 PM
#10
aka: Dr. Cannondale
Join Date: Jul 2009
Posts: 7,733
Mentioned: 234 Post(s)
Tagged: 0 Thread(s)
Quoted: 2155 Post(s)
Liked 3,404 Times
in
1,205 Posts
Good prep, Shoe Goo.
Done.
Done.
__________________
Hard at work in the Secret Underground Laboratory...
Hard at work in the Secret Underground Laboratory...
Likes For rccardr:
03-10-21, 09:17 PM
#11
SE Wis
Join Date: Apr 2005
Location: Milwaukee, WI
Posts: 10,511
Bikes: '68 Raleigh Sprite, '02 Raleigh C500, '84 Raleigh Gran Prix, '91 Trek 400, 2013 Novara Randonee, 1990 Trek 970
Mentioned: 40 Post(s)
Tagged: 0 Thread(s)
Quoted: 2746 Post(s)
Liked 3,391 Times
in
2,054 Posts
03-10-21, 09:55 PM
#12
Senior Member

Join Date: Jun 2010
Location: Medford MA
Posts: 2,089
Bikes: Ron Cooper touring, 1959 Jack Taylor 650b ladyback touring tandem, Vitus 979, Joe Bell painted Claud Butler Dalesman, Colin Laing curved tube tandem, heavily-Dilberted 1982 Trek 6xx, Ren� Herse tandem
Mentioned: 80 Post(s)
Tagged: 0 Thread(s)
Quoted: 964 Post(s)
Liked 1,451 Times
in
723 Posts
Vitus used Redux 203, an epoxy, to bond their 979 frames (patent US4479662A). This cross-references to Araldite 2011, which is readily available today.
J-B Weld is about 1/3 the tensile strength, but may be more flexible. Loctite "Magic Steel" has higher stated tensile than J-B, but I haven't used it.
J-B Weld is about 1/3 the tensile strength, but may be more flexible. Loctite "Magic Steel" has higher stated tensile than J-B, but I haven't used it.
__________________
Owner & co-founder, Cycles Ren� Hubris. Unfortunately attaching questionable braze-ons to perfectly good frames since about 2015. With style.
Owner & co-founder, Cycles Ren� Hubris. Unfortunately attaching questionable braze-ons to perfectly good frames since about 2015. With style.
03-10-21, 10:30 PM
#13
Senior Member
Join Date: Jun 2019
Location: Portland Oregon
Posts: 996
Mentioned: 7 Post(s)
Tagged: 0 Thread(s)
Quoted: 457 Post(s)
Liked 462 Times
in
270 Posts
JB really has no appreciable flex to it. I know there are much stronger adhesives out there, but they generally have to be special ordered and can be quite expensive. I've used JB enough to know that it would stick those housing guides on without issue, they would never come off unless the bike was dropped against a wall directly on the housing guide.
"Better" is the enemy of production, JB weld is "good enough" which is perfectly acceptable for this, IMO.
"Better" is the enemy of production, JB weld is "good enough" which is perfectly acceptable for this, IMO.
03-10-21, 10:40 PM
#14
Senior Member
Join Date: Jun 2019
Location: Portland Oregon
Posts: 996
Mentioned: 7 Post(s)
Tagged: 0 Thread(s)
Quoted: 457 Post(s)
Liked 462 Times
in
270 Posts
Just to throw a bit of math at it, JB has a tensile strength of 6200 PSI, those housing guides have about .5" by .25" of surface for adhesive, or .125 SI, at 6200 PSI you get 775 pounds of tensile strength holding the cable housing guide in place.
03-11-21, 03:33 AM
#15
Senior Member
Join Date: Jan 2016
Posts: 3,448
Mentioned: 33 Post(s)
Tagged: 0 Thread(s)
Quoted: 874 Post(s)
Liked 2,287 Times
in
1,278 Posts
I have used JB weld on a few projects and the stuff is amazing . On this application it may not be as clean as you would want . Whatever you use I would try to get to bare surface before bonding.
03-11-21, 05:29 AM
#16
Edumacator
Join Date: Jan 2018
Location: Goose Creek, SC
Posts: 6,806
Bikes: '87 Crestdale, '87 Basso Gap, '92 Rossin Performance EL-OS, 1990 VanTuyl, 1980s Losa, 1985 Trek 670, 1982 AD SLE, 1987 PX10, etc...
Mentioned: 59 Post(s)
Tagged: 0 Thread(s)
Quoted: 2439 Post(s)
Liked 3,123 Times
in
1,965 Posts
Interesting. I have to file that one, since my last shoe-goo repair on a pair of Adidas Sambas was a No-goo...
__________________
1987 Crest Cannondale, 1987 Basso Gap, 1992 Rossin Performance EL, 1990ish Van Tuyl, 1985 Trek 670, 1982 AD SLE, 2003 Pinarello Surprise, 1990ish MBK Atlantique, 1987 Peugeot Competition, 1987 Nishiki Tri-A, 1981 Faggin, 1996 Cannondale M500, 1984 Mercian, 1982 AD SuperLeicht, 1985 Massi (model unknown), 1988 Daccordi Griffe , 1989 Fauxsin MTB, 1981 Ciocc Mockba, 1992 Bianchi Giro, 1977 Colnago Super
1987 Crest Cannondale, 1987 Basso Gap, 1992 Rossin Performance EL, 1990ish Van Tuyl, 1985 Trek 670, 1982 AD SLE, 2003 Pinarello Surprise, 1990ish MBK Atlantique, 1987 Peugeot Competition, 1987 Nishiki Tri-A, 1981 Faggin, 1996 Cannondale M500, 1984 Mercian, 1982 AD SuperLeicht, 1985 Massi (model unknown), 1988 Daccordi Griffe , 1989 Fauxsin MTB, 1981 Ciocc Mockba, 1992 Bianchi Giro, 1977 Colnago Super
 03-11-21, 06:31 AM
#17
Senior Member
If you're OK with an uglier but more reliable fix, I would clean up the surfaces with a dremel grinder or some emery cloth and aluminum braze it on. You don't need any expensive equipment since the brazing rod melts at around 700F. You can probably get the mapp torch setup and the rods for less than $35. I don't think that low a temperature should have any effect on the thinner parts of the tubing (Those cable guides were probably brazed on at a much higher temp) but someone more knowledgeable feel free to correct me.
03-11-21, 06:38 AM
#18

Senior Member
Join Date: Dec 2005
Posts: 17,157
Mentioned: 481 Post(s)
Tagged: 0 Thread(s)
Quoted: 3810 Post(s)
Liked 6,691 Times
in
2,611 Posts
Plastic zip ties are really cheap.
03-11-21, 06:57 AM
#19
Senior Member
Join Date: Apr 2007
Location: Ottawa, Canada
Posts: 777
Bikes: Raleigh Classic 15, 84; Miyata 912, 85; Miyata Ridge Runner SE, 85; Miyata 610, 86; Miyata 100M, 86; Miyata Valley Runner, 88; Miyata Triple Cross, 89; GT Karakoram, 90; Miyata Elevation 300, 91; Marinoni Touring, 95; Long Haul Trucker, 2013
Mentioned: 9 Post(s)
Tagged: 0 Thread(s)
Quoted: 159 Post(s)
Liked 133 Times
in
80 Posts
G-Flex in a syringe is probably your best choice, but it's still pretty pricey. Good prep is key.
I'd look at a clamp if I were you.
I'd look at a clamp if I were you.
03-11-21, 07:13 AM
#20
South Carolina Ed
Join Date: Mar 2007
Location: Greer, SC
Posts: 3,889
Bikes: Holdsworth custom, Macario Pro, Ciocc San Cristobal, Viner Nemo, Cyfac Le Mythique, Giant TCR, Tommasso Mondial, Cyfac Etoile
Mentioned: 5 Post(s)
Tagged: 0 Thread(s)
Quoted: 344 Post(s)
Liked 291 Times
in
138 Posts
Gel super glue is amazing stuff. You could also just go with stainless clips.
03-11-21, 02:51 PM
#21
Senior Member
Thread Starter
Join Date: Oct 2013
Location: Connecticut
Posts: 3,448
Bikes: are fun!
Mentioned: 66 Post(s)
Tagged: 0 Thread(s)
Quoted: 466 Post(s)
Liked 863 Times
in
272 Posts
Thanks, folks. I have a West Marine nearby with the G/Flex syringe in stock. I’ll grab that over the weekend. Araldite 2011 also sounds promising, will track that down. Shoe Goo too, at least for a pair of hiking boots but worth a test here.
Huh, that actually worked!
Huh, that actually worked!
Likes For Sir_Name:
03-12-21, 07:41 AM
#22
PM me your cotters

Join Date: Jun 2015
Location: ATL
Posts: 3,241
Mentioned: 80 Post(s)
Tagged: 0 Thread(s)
Quoted: 1137 Post(s)
Liked 590 Times
in
422 Posts
I got a chuckle out of the Shoe Goo. That stuff saved many a pair of Airwalks, Vision Street Wear and Vans in my younger days.
This thread reminds me, I still need to repair this. This thread covers alloy bonding ... is there anything similar to be used for finer/thinner steel bonding repairs like the one I just linked in the previous sentence?
This thread reminds me, I still need to repair this. This thread covers alloy bonding ... is there anything similar to be used for finer/thinner steel bonding repairs like the one I just linked in the previous sentence?
__________________
███████████████
███████████████
03-12-21, 11:34 PM
#24
I am potato.

Join Date: Jun 2015
Location: Pacific Northwest
Posts: 3,116
Bikes: Only precision built, custom high performance elitist machines of the highest caliber. 🍆
Mentioned: 29 Post(s)
Tagged: 0 Thread(s)
Quoted: 1789 Post(s)
Liked 1,629 Times
in
933 Posts
Op: You mention silicone caulk/adhesive.
Nothing sticks to silicone & silicone has a way of working itself into the pores or anything it comes into contact with.
I fear you have impregnated your project with a parting agent that may never be removed. Before doing any bonding, I would use new fresh abrasives, single pass, one direction, all the way down to bare metal. The idea is to remove all potential contamination with out redepositing it so that the new adhesive can bond to a bare, fresh, clean, & uncontaminated surface.
__________________
I shouldn't have to "make myself more visible;" Drivers should just stop running people over.
Car dependency is a tax.
I shouldn't have to "make myself more visible;" Drivers should just stop running people over.
Car dependency is a tax.
Likes For base2:
03-13-21, 12:52 AM
#25
Senior Member
Remove all visible traces of any/all prior adhesives. This will likely require a file or sand paper and a deft hand.
The problem is, he used silicone caulk. Silicone is notoriously difficult to remove from surfaces to allow subsequent bonding with anything, even epoxies (like JB Weld). Our composites bonding shop will not allow silicone adhesive in the door much less allow you to use it there.
Personally, I would lightly file or sand my way down to bare metal, then clean like crazy (acetone comes to mind but mask off the surrounding paint). Do both sides of the interface to be bonded - tube and guide. Then use a clear epoxy (not JB Weld, which is grey). Whatever you use, clean off the squeeze out to keep the bonds looking nice.
Last edited by Bad Lag; 03-14-21 at 11:04 AM.