


How to bend a front derailleur to fit folding bike frames with thick seat tubes
 10-11-19, 05:21 PM
#1
Senior Member
Thread Starter
Join Date: Jan 2017
Posts: 1,064
Mentioned: 6 Post(s)
Tagged: 0 Thread(s)
Quoted: 350 Post(s)
Likes: 0
Liked 122 Times
in
90 Posts
How to bend a front derailleur to fit folding bike frames with thick seat tubes
For double chainrings
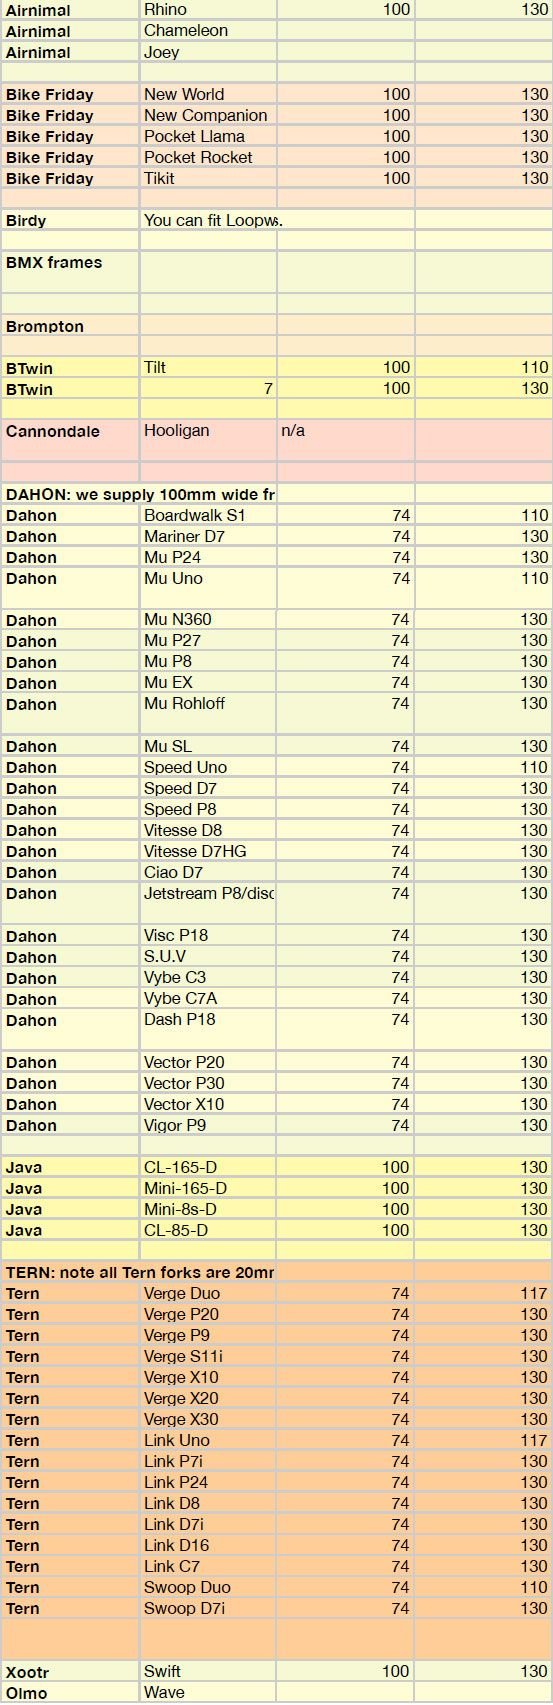
Folding bikes usually have thick seat tubes, which makes it difficult to adapt front derailleurs to work with them. Dahon has 41mm diameter for aluminum frames or 40mm diameter for steel frames. SRAM frame fit guide specifies 25mm from center of the braze-on bolt to the center of the frame, and 16mm clearance for the front derailleur spring. However, a Dahon aluminum frame would only allow the spring to be at a minimum of 20.5mm from the center of the frame.
This means you have 20.5 - 16 = 4.5mm difference, and you'll have to pivot the derailleur tail further inward in order to clear the chain when on the small-big combo.
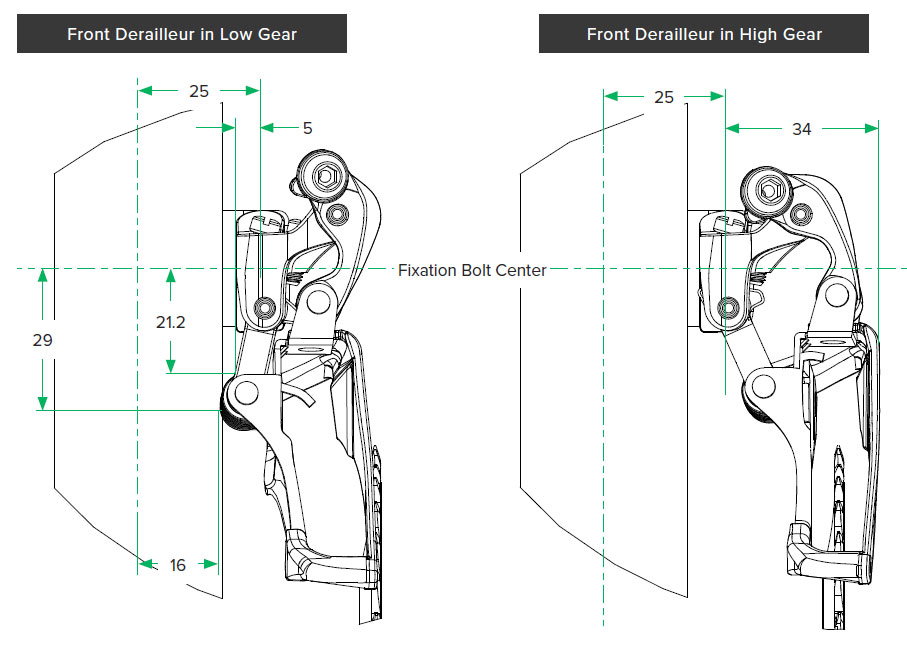
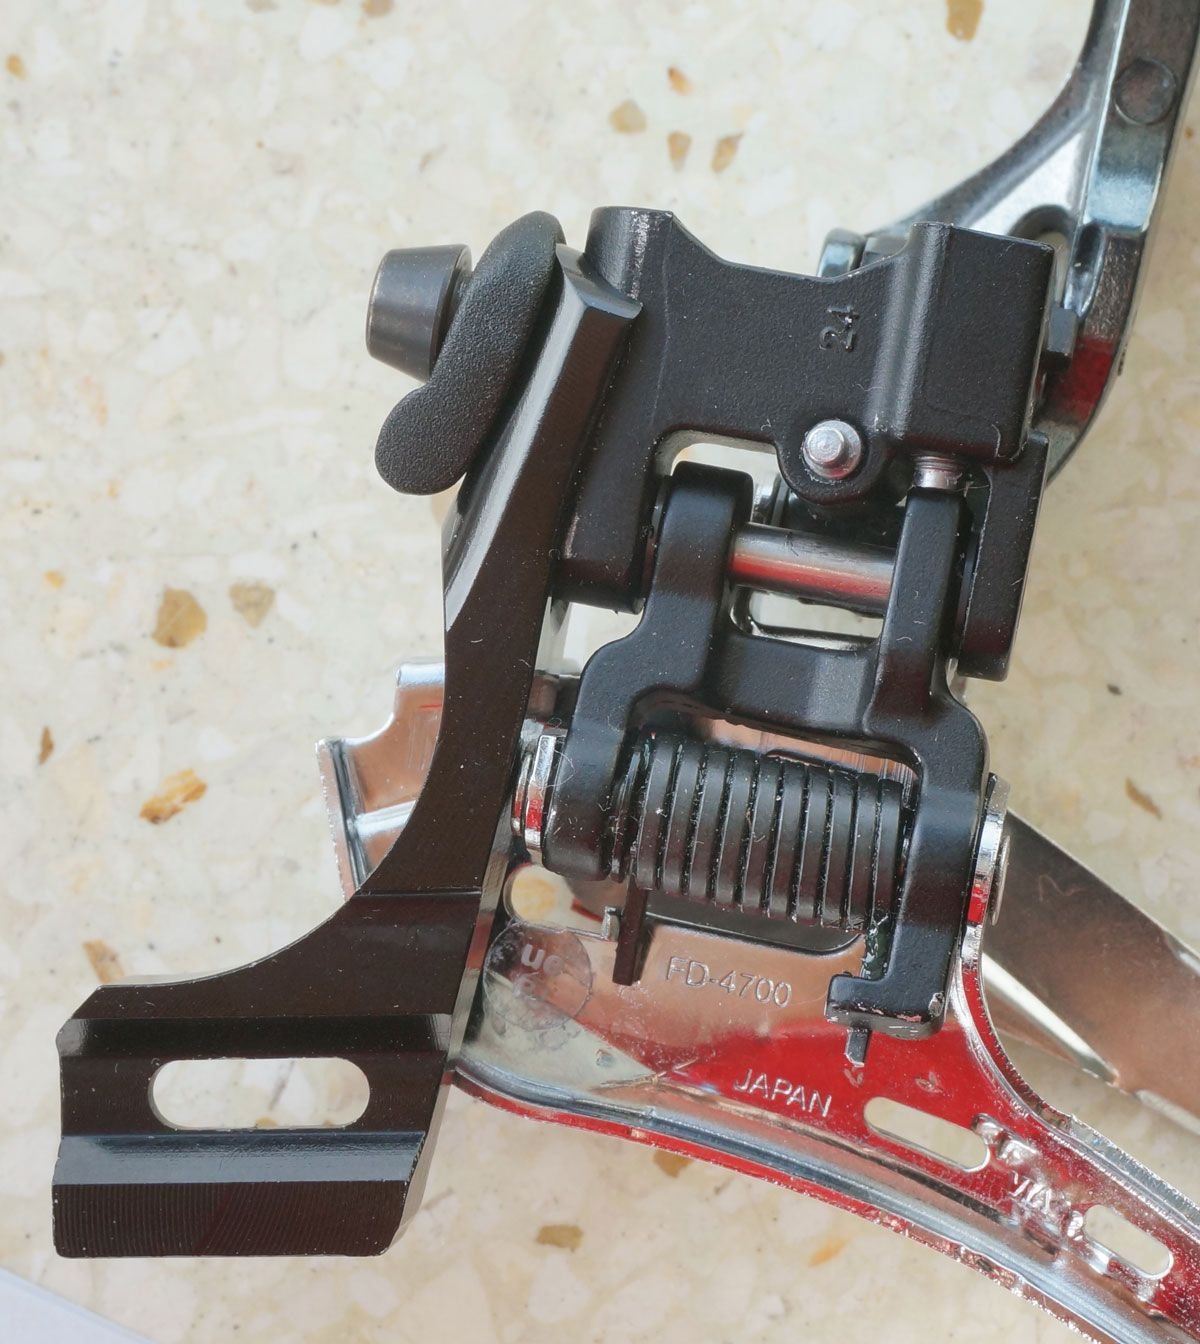
However, this also causes the front of the cage to swing outward since the front tip is forward of the pivot point. I found that the SRAM YAW derailleur inner cage plate is around 2mm closer to the spring than my Shimano FD-4700 derailleur. So the SRAM YAW would be easier to work with. When I installed a Shimano FD-4700 over 1 year ago, if I tried to swing the tail inward to clear the small-big combo, then the front of inner cage would keep hitting the chain when shifting to the big chainring. So I had to bend the tail of the inner cage of the FD-4700 inward. After many hours of bending back and forth, I eventually got it to work, but I had to brake open the tail because the bridge at the rear end is riveted together without any way to separate them. In contrast, the SRAM YAW derailleurs are connected by an easily removable M3 screw which makes bending much easier to do. Because of the angle of the derailleur, on the FD-4700 I had to use trim position at a very specific point between 6th and 7th gear.
My old FD-4700 with bent inner plate and broken bridge at the tail (because it's riveted).
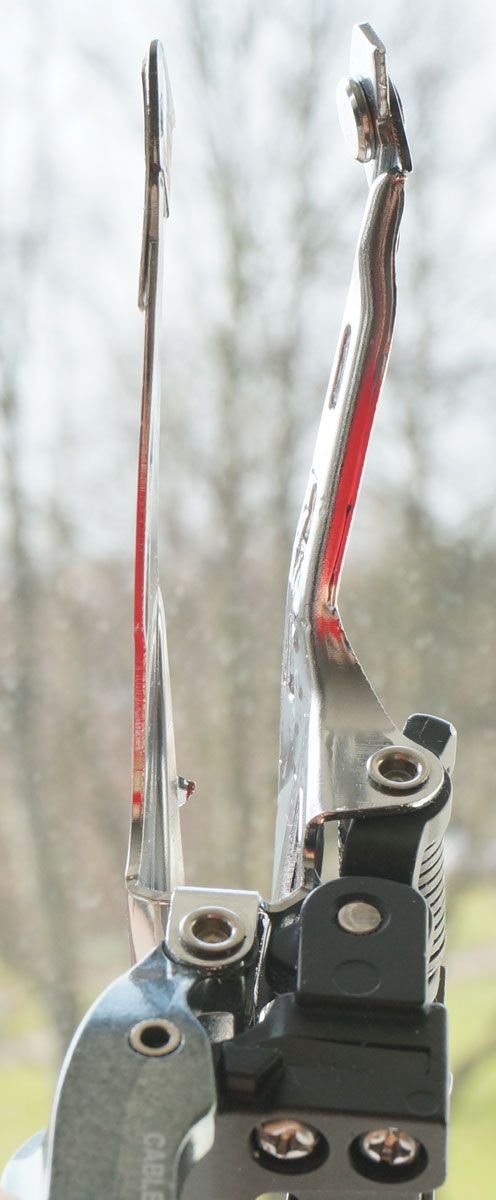
After 1.5 years, the FD-4700 cage yielded and got bent under load possibly because the tail bridge was detached, so I decided to switch to the SRAM YAW. At first I tried bending the inner cage of the SRAM YAW, like how I did with the FD-4700, but it failed to shift after bending, because the YAW mechanism makes the tail move very minimally when shifting, so it was not engaging the chain, and the kinks in the bent inner plate was pushing the chain downward away from the shift pins/ramps. Instead, the inner plate should remain as straight as possible to facilitate good shifting. So then I took a second SRAM YAW derailleur and bent the outer cage instead.
Bad: do not bend the inner plate of the SRAM YAW derailleur. Bend the outer outer instead.
Bad: do not bend the inner plate of the SRAM YAW derailleur. How I did it.
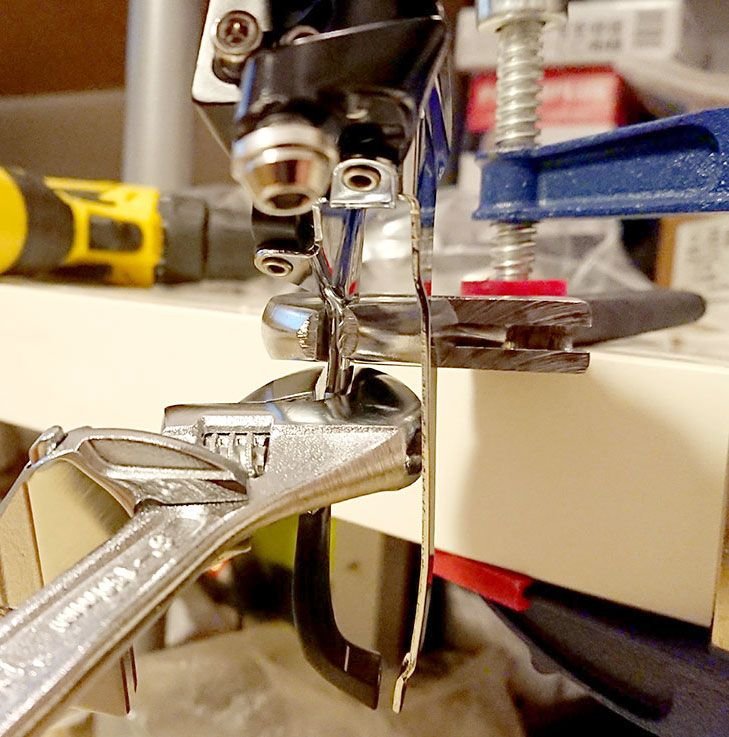
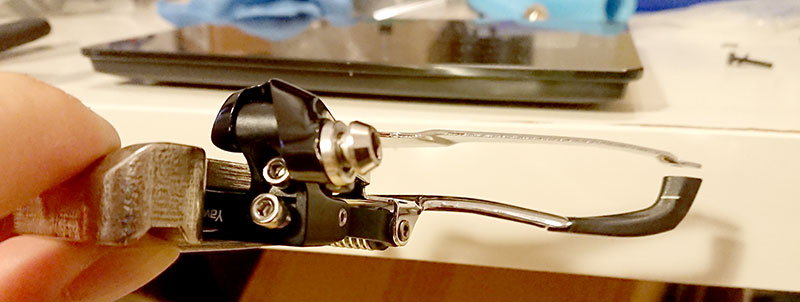
To bend the outer plate:
1) remove the M3 (6mm long) screw at the tail
2) clamp a wrench or pliers to the inner plate just below the rear of the spring. Don't clamp at the tail because you don't want to bend it.
3) clamp a wrench or pliers to the outer plate at the rear of the flat section, also near the rear of the spring.
4) pull them apart by hand, slowly and carefully, until the gap at the tail increases to around 3.5-4.0mm wide.
5) fill the gap with M3 washers, and replace the M3 screw with a longer 10mm.
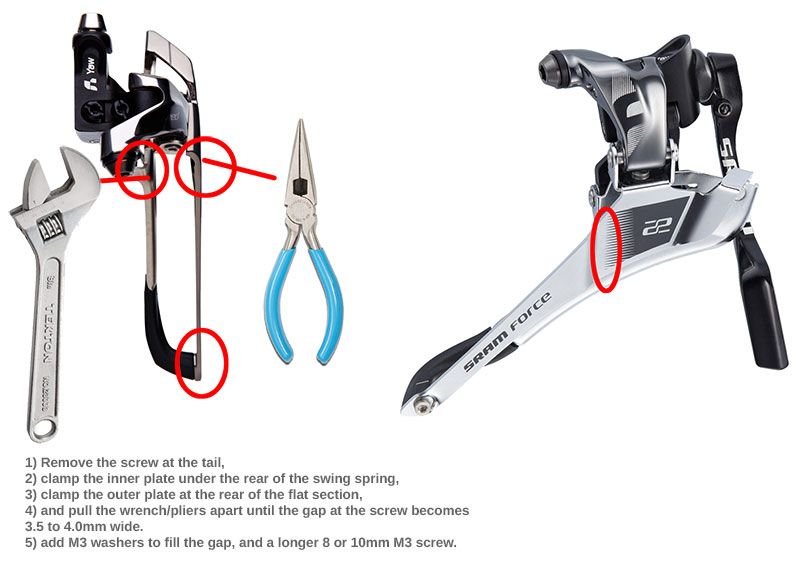
Warning, do not bend the outer cage too far outward, with the gap at the tail no more than 3.5-4mm, because you'll risk the chain dropping to the outside of the outer chainring when attempting to upshift. You could start out with a smaller gap of 3mm, test it, and then continue bending if necessary.
After bending the outer plate, I can easily upshift the chainring while on gears 1 through 5 (big cogs). I can't upshift on gears 6 and 7 because the YAW doesn't pivot the tail outward as much as a normal derailleur, so the chain is too far from the inner plate when on higher than 5th gear. It's not important though, because I have to downshift 5 cogs as I upshifting the chainring anyway, because I have a 20T jump in the chainrings.
I also do not need any trimming when on the large chainring because 1) the front of the cage on a SRAM YAW is much wider than on a Shimano front derailleur, 2) the YAW keeps the tail further inward when upshifting, 3) I've widened the cage by bending the outer plate 4) the inner plate is 2mm closer to the spring on the SRAM YAW than on a Shimano FD-4700. I can freely shift through the entire range. However, gears 8 to 10 on the small chainring will rub on the cage without trim, but I can't use them anyway because the chain rubs on the big chainring on those gears anyway.
I successfully used my old 4700 Shimano shifters (long pull, like for 11 speed versions), with the SRAM YAW front derailleur, because I only need 2 index positions anyway. But you might want to keep using a shifter with trim in case you find out that you need trim. The 11 speed Shimano shifters (including for the 4700) has too much cable pull for the low trim to be functional. You can still use the high trim if you set the high index cable tension much higher than the high limit screw position, as the FD spring will pick up the extra tension, but then you'll need more finger force on the trigger. I haven't tested other triggers, but the older short swing Shimano triggers might work better with trim. I am not familiar with SRAM triggers, so I don't know if their X series shifters have trim. But the SRAM S700/SL700 YAW flat bar triggers do not have trim.
Also, the SRAM Rival and Force YAW front derailleurs are completely identical except for the decals and color of the screws. So you can save $10 by buying the cheaper Rival label. I ordered the SRAM Red 10-speed just to compare, and the tail on the Red was actually 0.5mm narrower than the Rival/Force. I don't know if that's because it was a 10-speed model. I didn't check the 11-speed model, so I can't compare it. The Red also seems to have a different material on the outer plate, which might make it difficult to bend. So it might be better to stick with the Rival if you're intending to bend it.
Folding bikes usually have thick seat tubes, which makes it difficult to adapt front derailleurs to work with them. Dahon has 41mm diameter for aluminum frames or 40mm diameter for steel frames. SRAM frame fit guide specifies 25mm from center of the braze-on bolt to the center of the frame, and 16mm clearance for the front derailleur spring. However, a Dahon aluminum frame would only allow the spring to be at a minimum of 20.5mm from the center of the frame.
This means you have 20.5 - 16 = 4.5mm difference, and you'll have to pivot the derailleur tail further inward in order to clear the chain when on the small-big combo.
However, this also causes the front of the cage to swing outward since the front tip is forward of the pivot point. I found that the SRAM YAW derailleur inner cage plate is around 2mm closer to the spring than my Shimano FD-4700 derailleur. So the SRAM YAW would be easier to work with. When I installed a Shimano FD-4700 over 1 year ago, if I tried to swing the tail inward to clear the small-big combo, then the front of inner cage would keep hitting the chain when shifting to the big chainring. So I had to bend the tail of the inner cage of the FD-4700 inward. After many hours of bending back and forth, I eventually got it to work, but I had to brake open the tail because the bridge at the rear end is riveted together without any way to separate them. In contrast, the SRAM YAW derailleurs are connected by an easily removable M3 screw which makes bending much easier to do. Because of the angle of the derailleur, on the FD-4700 I had to use trim position at a very specific point between 6th and 7th gear.
My old FD-4700 with bent inner plate and broken bridge at the tail (because it's riveted).
After 1.5 years, the FD-4700 cage yielded and got bent under load possibly because the tail bridge was detached, so I decided to switch to the SRAM YAW. At first I tried bending the inner cage of the SRAM YAW, like how I did with the FD-4700, but it failed to shift after bending, because the YAW mechanism makes the tail move very minimally when shifting, so it was not engaging the chain, and the kinks in the bent inner plate was pushing the chain downward away from the shift pins/ramps. Instead, the inner plate should remain as straight as possible to facilitate good shifting. So then I took a second SRAM YAW derailleur and bent the outer cage instead.
Bad: do not bend the inner plate of the SRAM YAW derailleur. Bend the outer outer instead.
Bad: do not bend the inner plate of the SRAM YAW derailleur. How I did it.
To bend the outer plate:
1) remove the M3 (6mm long) screw at the tail
2) clamp a wrench or pliers to the inner plate just below the rear of the spring. Don't clamp at the tail because you don't want to bend it.
3) clamp a wrench or pliers to the outer plate at the rear of the flat section, also near the rear of the spring.
4) pull them apart by hand, slowly and carefully, until the gap at the tail increases to around 3.5-4.0mm wide.
5) fill the gap with M3 washers, and replace the M3 screw with a longer 10mm.
Warning, do not bend the outer cage too far outward, with the gap at the tail no more than 3.5-4mm, because you'll risk the chain dropping to the outside of the outer chainring when attempting to upshift. You could start out with a smaller gap of 3mm, test it, and then continue bending if necessary.
After bending the outer plate, I can easily upshift the chainring while on gears 1 through 5 (big cogs). I can't upshift on gears 6 and 7 because the YAW doesn't pivot the tail outward as much as a normal derailleur, so the chain is too far from the inner plate when on higher than 5th gear. It's not important though, because I have to downshift 5 cogs as I upshifting the chainring anyway, because I have a 20T jump in the chainrings.
I also do not need any trimming when on the large chainring because 1) the front of the cage on a SRAM YAW is much wider than on a Shimano front derailleur, 2) the YAW keeps the tail further inward when upshifting, 3) I've widened the cage by bending the outer plate 4) the inner plate is 2mm closer to the spring on the SRAM YAW than on a Shimano FD-4700. I can freely shift through the entire range. However, gears 8 to 10 on the small chainring will rub on the cage without trim, but I can't use them anyway because the chain rubs on the big chainring on those gears anyway.
I successfully used my old 4700 Shimano shifters (long pull, like for 11 speed versions), with the SRAM YAW front derailleur, because I only need 2 index positions anyway. But you might want to keep using a shifter with trim in case you find out that you need trim. The 11 speed Shimano shifters (including for the 4700) has too much cable pull for the low trim to be functional. You can still use the high trim if you set the high index cable tension much higher than the high limit screw position, as the FD spring will pick up the extra tension, but then you'll need more finger force on the trigger. I haven't tested other triggers, but the older short swing Shimano triggers might work better with trim. I am not familiar with SRAM triggers, so I don't know if their X series shifters have trim. But the SRAM S700/SL700 YAW flat bar triggers do not have trim.
Also, the SRAM Rival and Force YAW front derailleurs are completely identical except for the decals and color of the screws. So you can save $10 by buying the cheaper Rival label. I ordered the SRAM Red 10-speed just to compare, and the tail on the Red was actually 0.5mm narrower than the Rival/Force. I don't know if that's because it was a 10-speed model. I didn't check the 11-speed model, so I can't compare it. The Red also seems to have a different material on the outer plate, which might make it difficult to bend. So it might be better to stick with the Rival if you're intending to bend it.
Last edited by tomtomtom123; 10-11-19 at 05:40 PM.
 10-12-19, 05:39 AM
#2

Senior Member
Join Date: Sep 2005
Location: Michigan
Posts: 3,705
Bikes: Trek 730 (quad), 720 & 830, Bike Friday NWT, Brompton M36R & M6R, Dahon HAT060 & HT060, ...
Mentioned: 10 Post(s)
Tagged: 0 Thread(s)
Quoted: 840 Post(s)
Liked 336 Times
in
251 Posts
I solder cages using stainless steel sheet and Stay Brite silver solder. Chain wipes away solder like butter but when the solder stays behind and only steel is facing the chain it all works fine. I tried Yaw but somehow it did not work for me at all, but anyway I do triple. 20T jump is pretty good 
10-12-19, 05:54 AM
#3
Stardust

interesting post.
until now, i never heard of this specs for front derrailer.
How does this parameter inflicts on shifting?
I ask because i had 4 dahons with front shift(ecoc7)(mu sl) speed p8 and speed d7 and none seems to need bend dettailer to shift proper.
until now, i never heard of this specs for front derrailer.
How does this parameter inflicts on shifting?
I ask because i had 4 dahons with front shift(ecoc7)(mu sl) speed p8 and speed d7 and none seems to need bend dettailer to shift proper.
10-12-19, 06:44 AM
#4
Senior Member
Thread Starter
Join Date: Jan 2017
Posts: 1,064
Mentioned: 6 Post(s)
Tagged: 0 Thread(s)
Quoted: 350 Post(s)
Likes: 0
Liked 122 Times
in
90 Posts
Did your mu and speed have 135mm dropout? I have 130mm on my vigor so the cassette is 2.5mm more inward. Also I have 10 speed cassette so the overall width is 1.8mm wider than 8 or 5.3mm wider than 7 speed cassette. This means that the largest innermost cog will be much further inward on my bike than on yours.
https://bike.bikegremlin.com/3573/bicycle-cassette-rear-chainrings-standards/
One other option that I couldn't test was to tilt the FD angle further forward and push it further forward. This would give the FD a tiny bit more clearance and allow the FD to swing a little bit outward. But the braze on adapter that I made is already as far forward as possible so I can't test this.
The litepro braze on adapters are tilted too far backwards and will most likely have more trouble to setup.
Last edited by tomtomtom123; 10-12-19 at 07:17 AM.
10-12-19, 07:15 AM
#5
Senior Member
Thread Starter
Join Date: Jan 2017
Posts: 1,064
Mentioned: 6 Post(s)
Tagged: 0 Thread(s)
Quoted: 350 Post(s)
Likes: 0
Liked 122 Times
in
90 Posts
Also another thing that affects the FD clearance is the chainline at the chainrings. You could get more FD clearance by using a wider square tapered BB to push the crank arms outward, but your q factor will increase. I have sugino 24mm spindle cranks so I can only adjust the crank position by 1mm with some shims. I have my front chainline set to 44mm, with a 7.8mm distance between centers of the chainring.
I don't know what the front chainline is with the Dahon 7-8 speed bikes with front derailluer, but they seem to use square tapered BB.
I don't know what the front chainline is with the Dahon 7-8 speed bikes with front derailluer, but they seem to use square tapered BB.
10-12-19, 08:17 AM
#6
Senior Member
Thread Starter
Join Date: Jan 2017
Posts: 1,064
Mentioned: 6 Post(s)
Tagged: 0 Thread(s)
Quoted: 350 Post(s)
Likes: 0
Liked 122 Times
in
90 Posts
Ah, I guess most Dahon frames are 130mm dropout. My old Speed frame was 135mm because of the Dual Drive.
I found this spreadsheet from loopwheels that lists the dropout sizes.
https://www.loopwheels.com/wp-conten...-1-Table-1.pdf
One other thing that might affect chain to FD inner cage clearance when the big cog is the size of the big cog. I have 34T, so the chain rides higher up on the FD inner cage plate and needs the FD to angle a little further inward or pushed further forward.
10-12-19, 08:31 AM
#7
Stardust
Did your mu and speed have 135mm dropout? I have 130mm on my vigor so the cassette is 2.5mm more inward. Also I have 10 speed cassette so the overall width is 1.8mm wider than 8 or 5.3mm wider than 7 speed cassette. This means that the largest innermost cog will be much further inward on my bike than on yours.
https://bike.bikegremlin.com/3573/bi...ngs-standards/
One other option that I couldn't test was to tilt the FD angle further forward and push it further forward. This would give the FD a tiny bit more clearance and allow the FD to swing a little bit outward. But the braze on adapter that I made is already as far forward as possible so I can't test this.
The litepro braze on adapters are tilted too far backwards and will most likely have more trouble to setup.
all 3 where 130mm.
i used litepro k adapter.
all setups where very troublesome with many many many microadjust
10-12-19, 04:00 PM
#8
Senior Member
Thread Starter
Join Date: Jan 2017
Posts: 1,064
Mentioned: 6 Post(s)
Tagged: 0 Thread(s)
Quoted: 350 Post(s)
Likes: 0
Liked 122 Times
in
90 Posts
I think since you've got 7 and 8 speed cassettes, you don't have to swing the derailleur as far inward as I do with a wider 10 speed cassette. 11 speed would be even more severe, since it's another 1.8mm wider than a 10 speed cassette.
Also, if you're using a steel frame, you've got an extra 0.5mm tolerance for the FD since the seat tube is 1mm smaller in diameter than an aluminum frame.
I had another look at the litepro P adapter, and it has the center of the braze on bolt behind the centerline of the seat tube. This may allow the FD spring to swing further inward behind the seat tube. But for my 10 speed cassette the chain angles are too extreme, so having the FD that far back causes chain rub at the front of the cage all the time when on the big cog. Also, I have a small 44T outer chainring, so the FD is very low and the tail of the cage tends to hit the chainstay. So the adapter that I made has the braze on bolt in front of the centerline of the seat tube, and tilts the FD further clockwise (forward) and allows me to push the FD forward and raise the height a little bit. This lets me have less problems with trimming and the tail clears the chainstay, but it also means that the spring hits directly on the centerline of the seat tube, so I have to swing the tail further inward to clear the chain when it's on the big cog.
10-13-19, 09:14 AM
#9
Senior Member
Join Date: Apr 2013
Posts: 1,173
Bikes: Surly Disk Trucker, 2014 w/Brooks Flyer Special saddle, Tubus racks - Duo front/Logo Evo rear, 2019 Dahon Mariner D8, Both bikes share Ortlieb Packer Plus series panniers, Garmin Edge 1000
Mentioned: 2 Post(s)
Tagged: 0 Thread(s)
Quoted: 405 Post(s)
Liked 115 Times
in
99 Posts
Interesting post. Thanks for taking the time to figure this all out, document it, and share it.
I've been researching the possibility of adding more chain rings to my Dahon Mariner D8. I was contemplating just getting a size or two smaller chain ring to drop the gear-inch range for more low end to climb hills. I don't like going too fast on the bike, anyway, so the taller gears don't do me a whole lot of good. As long as I can get a few gears in my normal range, plus one or two higher, and still be able to drop down to get to climbing I'd be happy. However, if I added a smaller second chain ring I could open up the gear range a ton more than just a size change in the one chain ring.
I did find some FD adapters online that will allow mounting on the larger seat tubes on the folding bikes. I don't have any links right off hand, but there are ready-made adapters out there.
However, regardless of there being a "part" out there to buy that will allow the mounting to start with, the chain line and clearance of the FD are still tricky - and I haven't seen as good of a description of that anywhere yet that even gets close to this one. So good job and thanks for the explanation!
10-13-19, 04:52 PM
#10
Senior Member
Thread Starter
Join Date: Jan 2017
Posts: 1,064
Mentioned: 6 Post(s)
Tagged: 0 Thread(s)
Quoted: 350 Post(s)
Likes: 0
Liked 122 Times
in
90 Posts
The adapters you've seen are probably Litepro K for steel 40mm diameter and Litepro P for aluminum 41mm diameter. I have the P, but it positions the FD a bit too far back, and it doesn't fit Shimano FDs because of a strange bend that they put into it. It just barely fits the SRAM YAW FDs. The K adapter is straighter so you might have better luck fitting the FD to it, and I think the K version has the FD further forward.
I took the clamps from the P adapter and made my own braze-on adapter for it, hanging below instead of above, because the FD kept hitting the clamp.
Shimano FD doesn't fit P adapter
So I made my own adapter hanging below the clamp. Image with the old FD-4700. I have the SRAM YAW now.

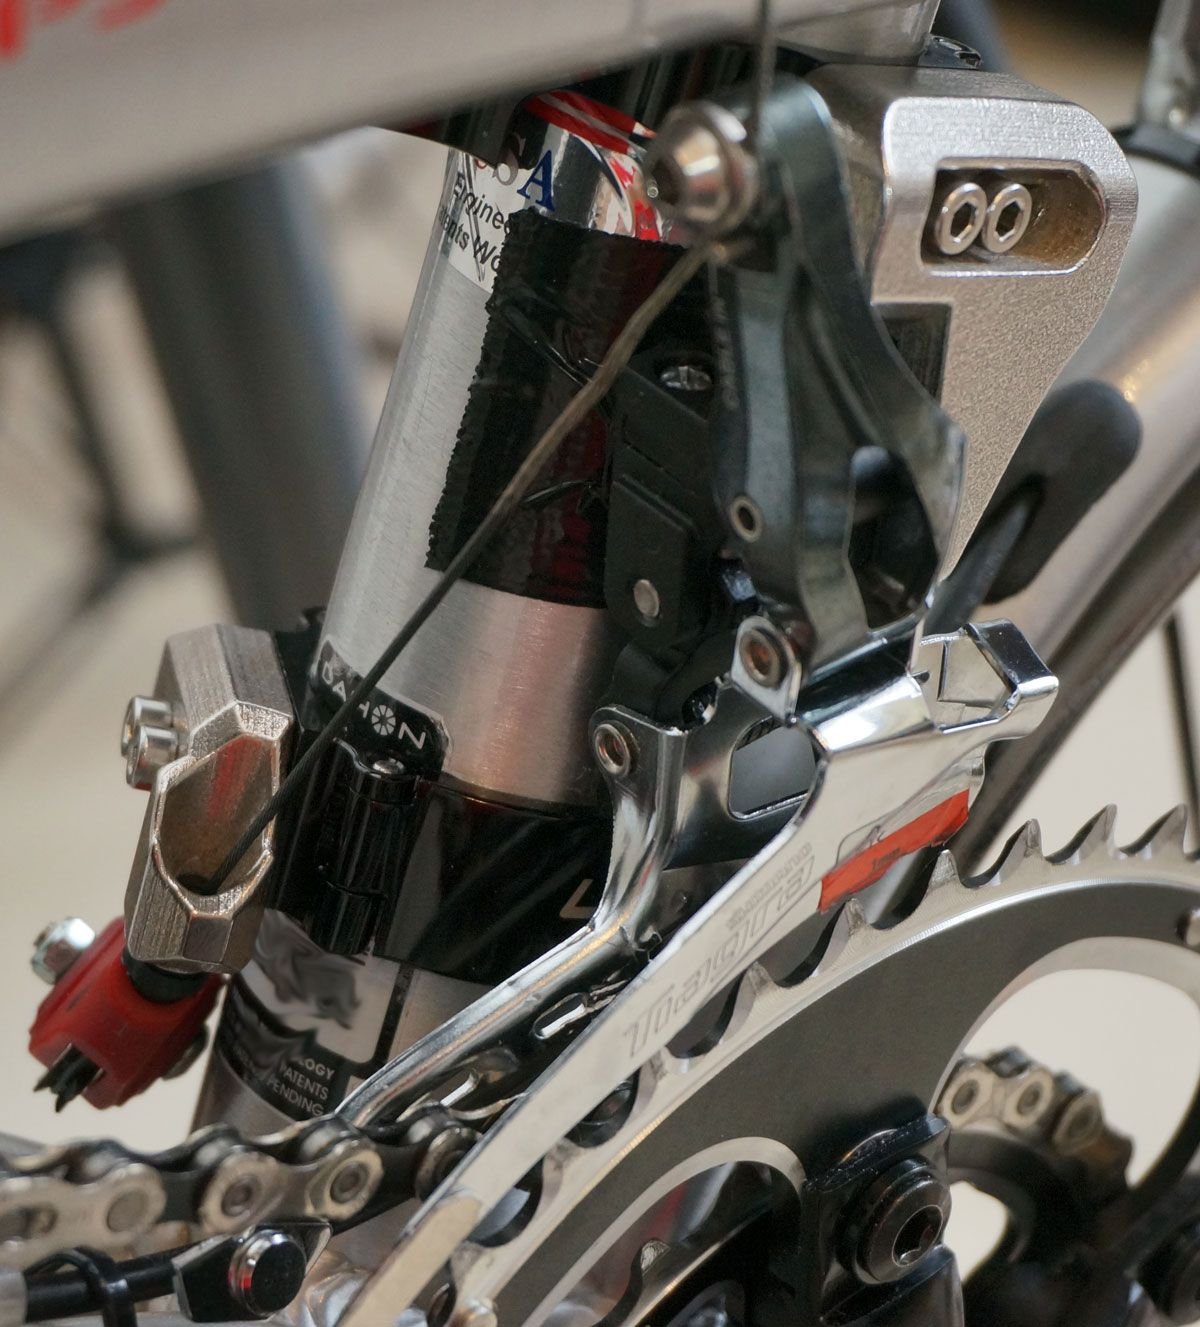

My design has the FD angled further clockwise and forward. In the comparison below, although the camera perspective affects the angles by a few degrees, the old Dahon models with built in braze-on is 3 to 5 degrees further counterclockwise and positioned around 10-15mm further rearward. I have a small 44T outer chainring so the tail would hit the chainstay if I followed the same angle/positioning as how Dahon does it. Rotating further clockwise gives me more clearance at the tail to the chainstay, and also inside in between the cage plates to the chain because the space in the tail is wider than at the front of the cage. The image of the Vector P20 has a 53T outer chainring.

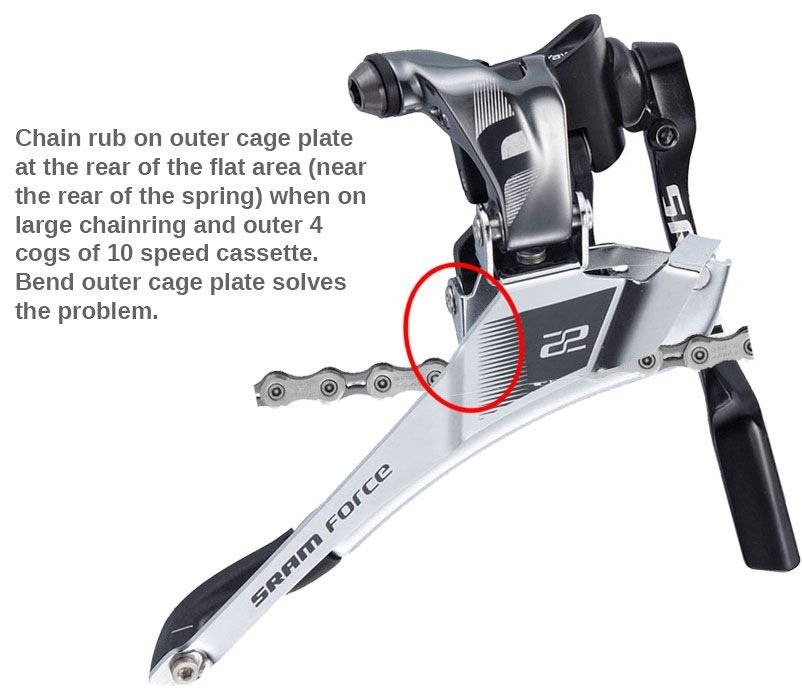
Today I've just replaced the original Dahon hub with a Shimano 11 speed road hub. The cassettes are maybe 1mm further outward now, so I was able to swing the SRAM YAW FD a little bit further out. Now the FD shifts perfectly all the way up to 7th cog, and I probably only had to bend the outer cage plate by 2mm instead of the original 3-4mm that I did before. The diagram below shows where the chain was rubbing on the outer cage when on the big chainring and outer cogs. After bending the outer cage, I don't need to trim at all.
I took the clamps from the P adapter and made my own braze-on adapter for it, hanging below instead of above, because the FD kept hitting the clamp.
Shimano FD doesn't fit P adapter
So I made my own adapter hanging below the clamp. Image with the old FD-4700. I have the SRAM YAW now.
My design has the FD angled further clockwise and forward. In the comparison below, although the camera perspective affects the angles by a few degrees, the old Dahon models with built in braze-on is 3 to 5 degrees further counterclockwise and positioned around 10-15mm further rearward. I have a small 44T outer chainring so the tail would hit the chainstay if I followed the same angle/positioning as how Dahon does it. Rotating further clockwise gives me more clearance at the tail to the chainstay, and also inside in between the cage plates to the chain because the space in the tail is wider than at the front of the cage. The image of the Vector P20 has a 53T outer chainring.
Today I've just replaced the original Dahon hub with a Shimano 11 speed road hub. The cassettes are maybe 1mm further outward now, so I was able to swing the SRAM YAW FD a little bit further out. Now the FD shifts perfectly all the way up to 7th cog, and I probably only had to bend the outer cage plate by 2mm instead of the original 3-4mm that I did before. The diagram below shows where the chain was rubbing on the outer cage when on the big chainring and outer cogs. After bending the outer cage, I don't need to trim at all.
Last edited by tomtomtom123; 10-13-19 at 05:16 PM.
10-13-19, 06:58 PM
#11
Senior Member
Join Date: Apr 2013
Posts: 1,173
Bikes: Surly Disk Trucker, 2014 w/Brooks Flyer Special saddle, Tubus racks - Duo front/Logo Evo rear, 2019 Dahon Mariner D8, Both bikes share Ortlieb Packer Plus series panniers, Garmin Edge 1000
Mentioned: 2 Post(s)
Tagged: 0 Thread(s)
Quoted: 405 Post(s)
Liked 115 Times
in
99 Posts
The adapters you've seen are probably Litepro K for steel 40mm diameter and Litepro P for aluminum 41mm diameter. I have the P, but it positions the FD a bit too far back, and it doesn't fit Shimano FDs because of a strange bend that they put into it. It just barely fits the SRAM YAW FDs. The K adapter is straighter so you might have better luck fitting the FD to it, and I think the K version has the FD further forward.
I took the clamps from the P adapter and made my own braze-on adapter for it, hanging below instead of above, because the FD kept hitting the clamp.
I took the clamps from the P adapter and made my own braze-on adapter for it, hanging below instead of above, because the FD kept hitting the clamp.
I know steel is heavier than aluminum, but I have plenty of steel laying around to fabricate my own mount - and I can weld steel. Can't say the same for aluminum, but I do have some aluminum around. It just won't work as I can't weld blocks to sheet for attaching screws/threading like I can steel. For the size of the mount it may only be a couple oz's difference anyway.
That is a massive difference in chain ring size on that bike. With the hub you put on - what is the gear inch range?
10-13-19, 08:08 PM
#12
Senior Member
Thread Starter
Join Date: Jan 2017
Posts: 1,064
Mentioned: 6 Post(s)
Tagged: 0 Thread(s)
Quoted: 350 Post(s)
Likes: 0
Liked 122 Times
in
90 Posts
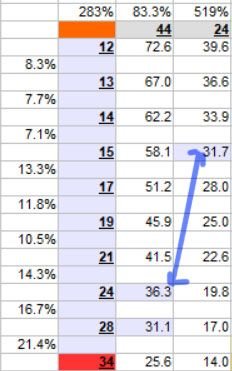
I have a 10 speed 12-34T cassette, with 44/24T double chainrings, 519% range, on Big Ben Plus 55mm tires (2.15") and I rolled it loaded to measure the actual effective diameter of 19.8". I get 14.0 to 72.6 gear inches. The 72.6 is a bit low, as I will max out at 90 RPM at 31 kph when at a slight downhill incline. I am usually going around 22-24 kph at 76 RPM, which is 60-66 gear inches. So I'm usually on 7th, 8th and 9th gear. If I'm going downhill, I would have to coast it.
With the 14 gear inches, I can go up 15-18% slopes at 70 RPM while loaded.
I could increase the big chainring by 2T, so 46/24T and 22 teeth jump, but I only tested it on a workstand. I didn't actually try riding this. The shifting will be more difficult and the chain catcher is already at maximum reach at 20 teeth jump. It's not such a big deal that I can't comfortably pedal over 29 kph, so I just leave it like that. I'm probably only on 10th gear for a maximum of 1 or 2 minutes out of 60 minutes. Not being able to get higher speeds only causes me to lose 100 meters per hour.
The custom mix of cogs came from 3 different sets of Shimano cassettes. It was a trial and error. Some cog combinations don't work at all. It would have been easier to use The Miche cogs, which can be custom ordered by dealers. The 6T jump between 28 and 34T shifts perfectly fine, but the B-screw is a little more tight, so the pulley stays farther away from the other cogs than normal, which means slightly less teeth/chain engagement, maybe by 1 tooth, but it's ok.
Also, because of the 20T jump at the chainrings, the chain will rub on the outer chainring when on the small chainring and 8,9,10 cogs. So when I reach 7th cog, I simply upshift to the large chainring, and drop 4 or 5 cogs, which the Shimano trigger shifters can do in 1 trigger press.
The Steel-bronze FD adapter that I made is 3D printed. It's brittle so the part is oversized, but really heavy. 100g. 3D printed aluminum is much stronger and lighter, so I could make it thinner and only 20-30g in aluminum, but the cost is double. I didn't bother making a new one.
Last edited by tomtomtom123; 10-13-19 at 08:33 PM.
06-29-20, 02:01 PM
#13
Junior Member
tomtomtom123, Your 3D printed adapter is just about the coolest thing I think I have ever seen. EVER. LOL.
Out of curiousity, what would it have cost to make it out of aluminum?
Out of curiousity, what would it have cost to make it out of aluminum?
06-29-20, 03:00 PM
#14
Senior Member
Thread Starter
Join Date: Jan 2017
Posts: 1,064
Mentioned: 6 Post(s)
Tagged: 0 Thread(s)
Quoted: 350 Post(s)
Likes: 0
Liked 122 Times
in
90 Posts
The aluminum was double the price as the steel-bronze print, but 1/3rd the weight. The aluminum print is also much stronger than the steel-bronze, which is supposed to be brittle, but the load is quite small. But I oversized the parts because I was worried, so they were very heavy.
Because the old Litepro K/P adapter had fixed screw holes, I made the 3D printed part long so that it could slide, which increased the size and cost of printing. The new cheaper Litepro adapters have a slot, so the 3D printed part could be much smaller and cheaper.
I also printed 2 parts, a cable stop (because I hung the FD below the adapter) and the actual braze on part, using 2 Litepro clamps. With the new Litepro adapter, the cable stop could be much smaller.
I think I originally paid $70-80 to print both parts in steel/bronze. But with the smaller size, perhaps it would be $50-60 now. The Aluminum would still be double the price. I think I used Shapeways, but you can also check i.Materialise to compare the price. They use different formulas to calculate the price.
06-30-20, 01:12 PM
#15
Junior Member
Amazing. I'm impressed.
I noticed the cable stop that you had made. Very cool. One question, doesn't the Litepro clamp that you used already have a cable stop in it? Was that not usable?
I'm really looking forward to the time when you can buy a $99 metal 3D printer and print whatever you want in aluminum or titanium. However, the refills will probably be about $1000.
06-30-20, 02:13 PM
#16
Senior Member
Thread Starter
Join Date: Jan 2017
Posts: 1,064
Mentioned: 6 Post(s)
Tagged: 0 Thread(s)
Quoted: 350 Post(s)
Likes: 0
Liked 122 Times
in
90 Posts
If hanging the FD below the clamp, then the built in cable stop is above the clamp and the cable comes from below, so it doesn't work. Even if the FD was above the cable stop, the hole is exactly vertical and just below the braze on, which isn't a good location and angle for the cable.
The aluminum printing machine probably costs over $300000.
The aluminum printing machine probably costs over $300000.


