


The VO fender install directions are HORRENDOUS! How do I get these things on?
 09-13-10, 09:17 PM
#1
neits
Thread Starter
Join Date: Apr 2010
Location: Cape Cod, MA
Posts: 1,590
Mentioned: 0 Post(s)
Tagged: 0 Thread(s)
Quoted: 0 Post(s)
Likes: 0
Liked 2 Times
in
2 Posts
The VO fender install directions are HORRENDOUS! How do I get these things on?
Basically, they say: "oh, just put the thingys on the fenders and the bike. The end." Once they mention the usage of a washer and a locknut. Once. I need better directions. Anyone care to help?
 09-13-10, 09:22 PM
#2
Fuji Fan

Haha! I remember the same thing, but I wouldn't be the best to give directions. Good luck!
 09-13-10, 09:31 PM
#4
neits
Thread Starter
Join Date: Apr 2010
Location: Cape Cod, MA
Posts: 1,590
Mentioned: 0 Post(s)
Tagged: 0 Thread(s)
Quoted: 0 Post(s)
Likes: 0
Liked 2 Times
in
2 Posts
I got the stays on fine, but attaching any other part of it is sort of a mystery. The front L bracket for example. None of the bolts even fit through the mounting hole! If that actually takes a bolt/nut, and the eyelets on the frame also take bolts/nuts, then I don't even have enough nuts. Absurd.
09-13-10, 09:34 PM
#6
Senior Member
Join Date: Jun 2006
Posts: 20,305
Mentioned: 130 Post(s)
Tagged: 0 Thread(s)
Quoted: 3464 Post(s)
Liked 2,827 Times
in
1,995 Posts
I got the stays on fine, but attaching any other part of it is sort of a mystery. The front L bracket for example. None of the bolts even fit through the mounting hole! If that actually takes a bolt/nut, and the eyelets on the frame also take bolts/nuts, then I don't even have enough nuts. Absurd.
09-13-10, 09:39 PM
#8
Senior Member

Join Date: Jan 2006
Location: Berwyn PA
Posts: 6,408
Bikes: I hate bikes!
Mentioned: 39 Post(s)
Tagged: 0 Thread(s)
Quoted: 431 Post(s)
Liked 710 Times
in
233 Posts
Well, did you purchase an incomplete set or were they new from VO? As I remember, you get the fenders, stays, bolts and mounts for the stays( to attach to the bike) Dhruma(?) bolt and washer. What type of bike are you putting them on? Any pics of the project?
09-13-10, 09:40 PM
#9
neits
Thread Starter
Join Date: Apr 2010
Location: Cape Cod, MA
Posts: 1,590
Mentioned: 0 Post(s)
Tagged: 0 Thread(s)
Quoted: 0 Post(s)
Likes: 0
Liked 2 Times
in
2 Posts
This all brand new from VO. You are correct. Going on my Austro-Daimler. I have pics of the bike but not the hardware right now.
09-13-10, 09:50 PM
#10
Senior Member
Join Date: Jan 2006
Location: Berwyn PA
Posts: 6,408
Bikes: I hate bikes!
Mentioned: 39 Post(s)
Tagged: 0 Thread(s)
Quoted: 431 Post(s)
Liked 710 Times
in
233 Posts
Here is a link to Peter White Cycles instructions for mounting metal fenders. Not exactly like VO fenders but should be close enough to guide you.
https://www.peterwhitecycles.com/berthoudinst.asp
https://www.peterwhitecycles.com/berthoudinst.asp
09-14-10, 06:23 AM
#12
neits
Thread Starter
Join Date: Apr 2010
Location: Cape Cod, MA
Posts: 1,590
Mentioned: 0 Post(s)
Tagged: 0 Thread(s)
Quoted: 0 Post(s)
Likes: 0
Liked 2 Times
in
2 Posts
Here is a link to Peter White Cycles instructions for mounting metal fenders. Not exactly like VO fenders but should be close enough to guide you.
https://www.peterwhitecycles.com/berthoudinst.asp
https://www.peterwhitecycles.com/berthoudinst.asp
09-14-10, 06:33 AM
#13
Senior Member

Join Date: Oct 2004
Posts: 1,973
Mentioned: 0 Post(s)
Tagged: 0 Thread(s)
Quoted: 39 Post(s)
Likes: 0
Liked 32 Times
in
22 Posts
I just read the directions and seems very straight forward to me. The only thing that they could do better would be to show a picture of what parts are included. Perhaps something is missing or perhaps they sent you too many parts.
09-14-10, 07:07 AM
#14
Senior Member

Join Date: Mar 2005
Location: Pinole, CA, USA
Posts: 17,392
Mentioned: 24 Post(s)
Tagged: 0 Thread(s)
Quoted: 443 Post(s)
Likes: 0
Liked 27 Times
in
25 Posts
I had no trouble following the VO instructions. They assume that you have some mechanical aptitude since you've elected to install them yourself.
09-14-10, 07:08 AM
#15

Senior Member

Stein,
My first fender installation was not easy going especially because I was mounting a front rack that shared two mounting points with the front fender. I have installed a handful of sets since and it has become exponentially easier and faster. When you resume your work post some photos and let us know where you are in the process. You will likely need a marker, hacksaw, metal file, and steel wool. A Dremel tool is very handy. A modified wine cork works great as a spacer between the fender and chain stay bridge. Patience is key. You will need to mount and remove each wheel several times.
What model AD do you have? What size wheels and tires? What model brake are you using? It would be impracticable for VO to supply hardware for all conceivable mounting options. You'll likely need to take a trip to the hardware store.
Edit: On second thought, you probably won't have to modify the rear fender at the chain stays for 37mm fenders.
I helped install these for a friend Sunday.


Don't get too frustrated, Stein. We'll get you through it!
My first fender installation was not easy going especially because I was mounting a front rack that shared two mounting points with the front fender. I have installed a handful of sets since and it has become exponentially easier and faster. When you resume your work post some photos and let us know where you are in the process. You will likely need a marker, hacksaw, metal file, and steel wool. A Dremel tool is very handy. A modified wine cork works great as a spacer between the fender and chain stay bridge. Patience is key. You will need to mount and remove each wheel several times.
What model AD do you have? What size wheels and tires? What model brake are you using? It would be impracticable for VO to supply hardware for all conceivable mounting options. You'll likely need to take a trip to the hardware store.
Edit: On second thought, you probably won't have to modify the rear fender at the chain stays for 37mm fenders.
I helped install these for a friend Sunday.
Don't get too frustrated, Stein. We'll get you through it!
Last edited by ColonelJLloyd; 09-14-10 at 07:58 AM.
09-14-10, 07:48 AM
#16
Senior Member

i have the VO 37mm pre-drilled fenders as well, stein. i had no problems installing them on my raleigh comp, although i did have to DIY some of the mounting hardware. that was due to no fault of the fender hardware, but of the bike itself.
rear fender:
front fender:
r-clip:

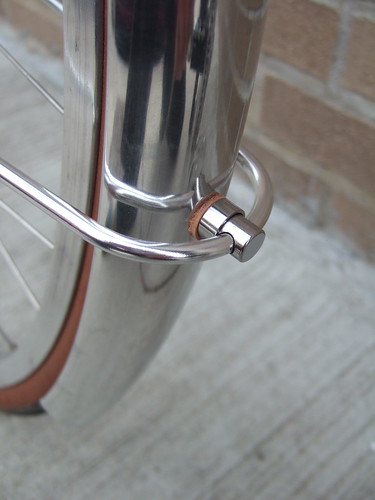
front fork crown daruma bolt (needed two rubber washers for proper fender line):
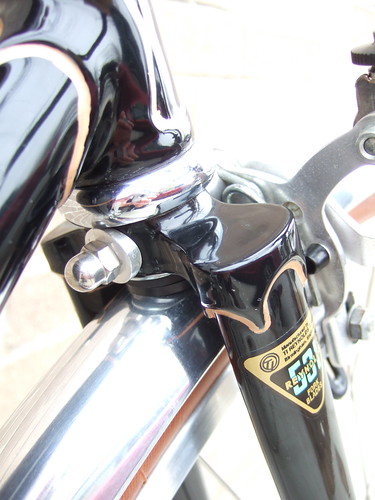
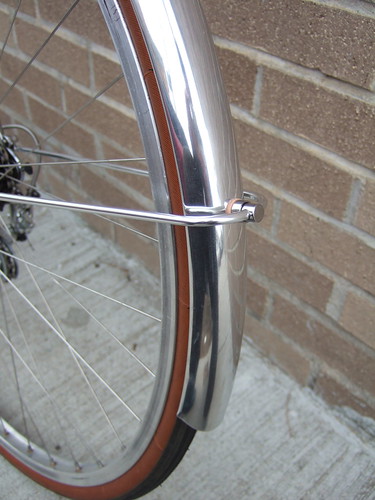
seatstay bridge bracket:
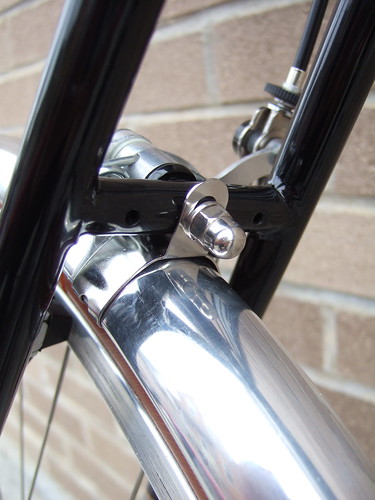
chainstay bridge (this is where i had to use a P-clamp since there was no mounting hole; i also used an aluminum spacer to achieve a proper fender line):
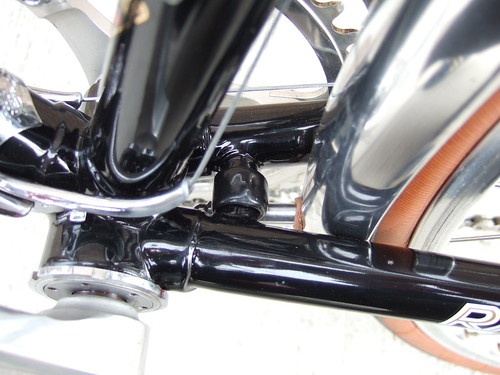
hope this helps!
rear fender:
front fender:
r-clip:
front fork crown daruma bolt (needed two rubber washers for proper fender line):
seatstay bridge bracket:
chainstay bridge (this is where i had to use a P-clamp since there was no mounting hole; i also used an aluminum spacer to achieve a proper fender line):
hope this helps!
Likes For southpawboston:
09-14-10, 07:56 AM
#17
neits
Thread Starter
Join Date: Apr 2010
Location: Cape Cod, MA
Posts: 1,590
Mentioned: 0 Post(s)
Tagged: 0 Thread(s)
Quoted: 0 Post(s)
Likes: 0
Liked 2 Times
in
2 Posts
The last two posts=spot on. Thanks guys. My A-D has 700c wheels, 23c tires. I really just needed to know which nuts and bolts went where. I'll need to grab some more nuts assuming my frame eyelets aren't threaded.
I do have a mounting point near the rear of the BB shell. Did you use leather washers on the frame end of the stays?
I do have a mounting point near the rear of the BB shell. Did you use leather washers on the frame end of the stays?
09-14-10, 08:15 AM
#18
Senior Member
The last two posts=spot on. Thanks guys. My A-D has 700c wheels, 23c tires. I really just needed to know which nuts and bolts went where. I'll need to grab some more nuts assuming my frame eyelets aren't threaded.
I do have a mounting point near the rear of the BB shell. Did you use leather washers on the frame end of the stays?
I do have a mounting point near the rear of the BB shell. Did you use leather washers on the frame end of the stays?
Stays:
At fender the sequence will be: eyelet bolt > leather washer > fender > star washer > nylon lock nut
At the dropout eyelet the sequence will be: allen bolt > R clip > eyelet > nut (if eyelet is not threaded)
At the fork crown:
Brake bolt > daruma bolt > metal washer > rubber washer > fender > star washer > nylon lock nut
At the chain stay bridge (if drilled - if not, ask southpawboston; he has great pics):
4M or 5M bolt (40-50mm long) > flat washer > rubber washer (or leather) > fender > cork (or subsitute) > chain stay bridge > rubber washer > flat washer > nylon lock nut
I see VO now sells a "spring thing" for the chain stay mount. This should work very well. You could piece it together at your hardware store I would think.
As for the rear brake bridge bracket: mount the sliding bracket to the brake bridge then position the fender against the bracket. Center it. Bend the bracket. Put some kind of protective tape on your lineman's pliers. Bend the tabs under the fender. Crimp with lineman's pliers.
Last edited by ColonelJLloyd; 09-14-10 at 08:28 AM.
09-14-10, 08:56 AM
#19
Senior Member
off topic, but colonel, let's see some more shots of your friend's lovely mixte!! did you build that for her?
09-14-10, 09:10 AM
#21
Senior Member
I recently restored a late 70s Competition GS for a friend who uses it for everything including commuting. He could use some fenders. Now I can show him pics of your GS and say, "see for yourself". What a beautiful bike! It seems you have a very competent powder coater.
Whatever gets the job done, brother!

 09-14-10, 09:26 AM
#23
Senior Member
 01-25-11, 08:02 PM
#24
Full Member
I got the stays on fine, but attaching any other part of it is sort of a mystery. The front L bracket for example. None of the bolts even fit through the mounting hole! If that actually takes a bolt/nut, and the eyelets on the frame also take bolts/nuts, then I don't even have enough nuts. Absurd.
Last edited by Derailed; 01-25-11 at 08:06 PM.
01-25-11, 08:30 PM
#25
Senior Member
Do you have pictures of this whole bike somewhere? Looks like it's probably a beauty! I kind of dream of having a nice black vintage 531 commuter someday, and I'd love to see the whole bike.