


Loosening Retainer on top of FSA Head Block threadless headset
 12-03-23, 10:34 AM
#1
Senior Member
Thread Starter
Join Date: Dec 2006
Location: Houston, TX
Posts: 895
Bikes: 2017 Co-op ADV 1.1; ~1991 Novara Arriba; 1990 Fuji Palisade; mid-90's Moots Tandem; 1985 Performance Superbe
Mentioned: 1 Post(s)
Tagged: 0 Thread(s)
Quoted: 390 Post(s)
Liked 572 Times
in
332 Posts
Loosening Retainer on top of FSA Head Block threadless headset
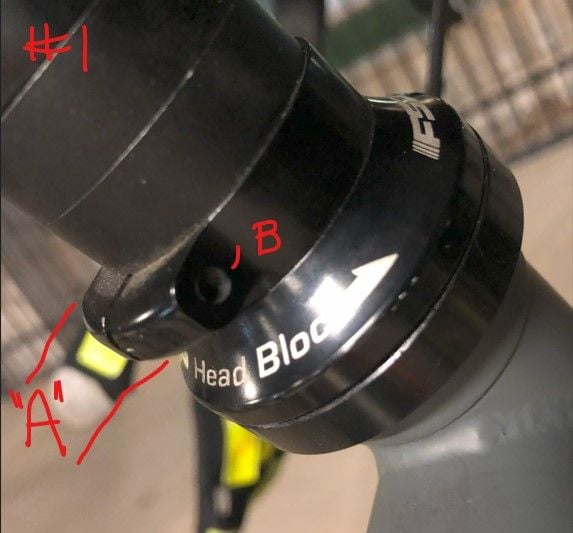
I have FSA Head Block on a 2017 CO-OP ADV 1.1 shown in the photos below. It has developed play but I cannot seem to add any compression to the bearings. I thought it best to research it before I start tearing it apart, but I can’t find any documentation the FSA website other than https://storage.fsaeasybottombracket...0055000010.pdf which does not show the unidentified retainer I have. I have contacted REI/Co-op and they told me to take it to their store which is inconvenient for me. I also sent a message from FSA's website but no response which would make sense if the retainer is not their product.
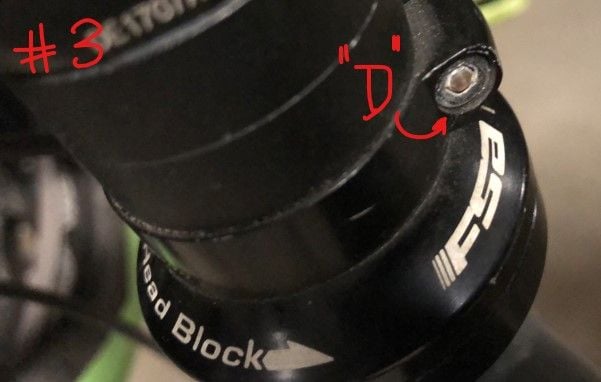
I suspect the retainer marked “A” below may be tight and preventing compression, and I do not see it on the No. 94-HBS drawing. It is not obvious to me how to loosen it. On the right side “B” the stud ends about 4-6 mm inside and it is flat with no hex or other indentation. I can see the stud spanning the gap “C” and on the left side “D” it seems to thread into a seated nut.
Anyone know about the retainer “A” and how I can loosen it?
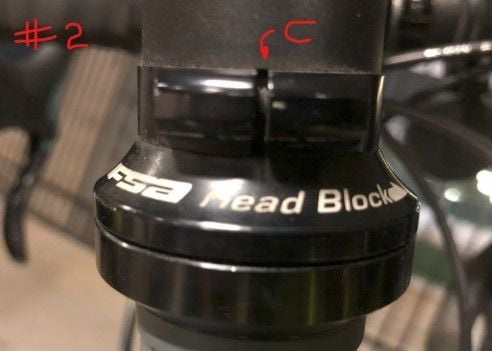
 12-03-23, 12:23 PM
#2

I'm good to go!
Join Date: Jul 2017
Location: Mississippi
Posts: 14,992
Bikes: Tarmac Disc Comp Di2 - 2020
Mentioned: 51 Post(s)
Tagged: 0 Thread(s)
Quoted: 6196 Post(s)
Liked 4,810 Times
in
3,318 Posts
Seems like you'd need to use a hex key on either "D" or "B". The pic showing "D" sort of looks like it might have a hex socket. If it's only a nut, then the "B" side will need a even smaller hex key. Most likely metric, but possibly ANSI fractional inch sizes.
Not sure what the purpose is of the clamp ring. The stem can perform the same function. But I guess it can keep the fork from falling out if someone likes to change up their spacers often. It might be something that someone added that isn't part of the FSA headset. Though the finish looks about the same.
Certainly as long as the stem is attached above it, it is unlikely to be doing anything nor will you be able to change anything by loosening it with the stem on.
12-03-23, 01:02 PM
#3
Senior Member
Join Date: Jan 2009
Location: San Diego, CA
Posts: 3,674
Mentioned: 10 Post(s)
Tagged: 0 Thread(s)
Quoted: 839 Post(s)
Liked 1,062 Times
in
746 Posts
"A" is just a lockring/spacer so you can remove/loosen the stem and not have to re-preload the headset bearings when installing the stem again. Probably not an OEM item but added at some point. As mentioned above just loosen the screw, re-tension the bearings with the top cap, tighten stem clamp bolts and then re-tighten the "A" clamp. Done.
12-03-23, 02:06 PM
#4
Senior Member
Thread Starter
Join Date: Dec 2006
Location: Houston, TX
Posts: 895
Bikes: 2017 Co-op ADV 1.1; ~1991 Novara Arriba; 1990 Fuji Palisade; mid-90's Moots Tandem; 1985 Performance Superbe
Mentioned: 1 Post(s)
Tagged: 0 Thread(s)
Quoted: 390 Post(s)
Liked 572 Times
in
332 Posts
12-03-23, 02:59 PM
#5
SE Wis
Join Date: Apr 2005
Location: Milwaukee, WI
Posts: 10,516
Bikes: '68 Raleigh Sprite, '02 Raleigh C500, '84 Raleigh Gran Prix, '91 Trek 400, 2013 Novara Randonee, 1990 Trek 970
Mentioned: 40 Post(s)
Tagged: 0 Thread(s)
Quoted: 2747 Post(s)
Liked 3,401 Times
in
2,058 Posts
Looks like someone snapped off head at D
12-03-23, 03:39 PM
#6
I'm good to go!
Join Date: Jul 2017
Location: Mississippi
Posts: 14,992
Bikes: Tarmac Disc Comp Di2 - 2020
Mentioned: 51 Post(s)
Tagged: 0 Thread(s)
Quoted: 6196 Post(s)
Liked 4,810 Times
in
3,318 Posts
If the head snapped off as another suspects, then it should be loose. Remove the stem and spacers and see if it just slips off.
Are you saying that "D" doesn't have a hole? Though blurry, it looks as if it is a hex socket when I enlarge the pic. But I could also almost, but not quite imagine that I'm seeing the sheered off remains of where the bolt head was.
Are you saying that "D" doesn't have a hole? Though blurry, it looks as if it is a hex socket when I enlarge the pic. But I could also almost, but not quite imagine that I'm seeing the sheered off remains of where the bolt head was.
12-04-23, 10:37 AM
#7
SE Wis
Join Date: Apr 2005
Location: Milwaukee, WI
Posts: 10,516
Bikes: '68 Raleigh Sprite, '02 Raleigh C500, '84 Raleigh Gran Prix, '91 Trek 400, 2013 Novara Randonee, 1990 Trek 970
Mentioned: 40 Post(s)
Tagged: 0 Thread(s)
Quoted: 2747 Post(s)
Liked 3,401 Times
in
2,058 Posts
Dremel/angle grinder @C, cut bolt, deal with it off the bike.
12-04-23, 10:46 AM
#8
Senior Member

Join Date: Jul 2005
Location: Boulder County, CO
Posts: 4,397
Bikes: '80 Masi Gran Criterium, '12 Trek Madone, early '60s Frejus track
Mentioned: 6 Post(s)
Tagged: 0 Thread(s)
Quoted: 514 Post(s)
Liked 450 Times
in
338 Posts
With the fork firmly supported, loosen hex bolt D. Then loosen corresponding bolts on the stem and tighten the bolt on the top cap. If that won't increase the bearing load, remove the top cap to find out why. You have to find out whether this fork has a star nut or and expanding nut, and if it is an expanding nut, if it is slipping. Or the top cap might already be bottomed out at the end of the steerer. If you can't figure out what I'm saying, take it to a shop. They should be able to figure it out in 15 minutes.
12-04-23, 12:56 PM
#9
Senior Member
Thread Starter
Join Date: Dec 2006
Location: Houston, TX
Posts: 895
Bikes: 2017 Co-op ADV 1.1; ~1991 Novara Arriba; 1990 Fuji Palisade; mid-90's Moots Tandem; 1985 Performance Superbe
Mentioned: 1 Post(s)
Tagged: 0 Thread(s)
Quoted: 390 Post(s)
Liked 572 Times
in
332 Posts
12-04-23, 01:02 PM
#10
SE Wis
Join Date: Apr 2005
Location: Milwaukee, WI
Posts: 10,516
Bikes: '68 Raleigh Sprite, '02 Raleigh C500, '84 Raleigh Gran Prix, '91 Trek 400, 2013 Novara Randonee, 1990 Trek 970
Mentioned: 40 Post(s)
Tagged: 0 Thread(s)
Quoted: 2747 Post(s)
Liked 3,401 Times
in
2,058 Posts
With the fork firmly supported, loosen hex bolt D. Then loosen corresponding bolts on the stem and tighten the bolt on the top cap. If that won't increase the bearing load, remove the top cap to find out why. You have to find out whether this fork has a star nut or and expanding nut, and if it is an expanding nut, if it is slipping. Or the top cap might already be bottomed out at the end of the steerer. If you can't figure out what I'm saying, take it to a shop. They should be able to figure it out in 15 minutes.
I'm of the opinion if they can't figure it out, cut the extra retainer and add a spacer if needed.
Likes For dedhed:
12-04-23, 05:23 PM
#11
Junior Member
Join Date: Nov 2015
Posts: 185
Mentioned: 0 Post(s)
Tagged: 0 Thread(s)
Quoted: 45 Post(s)
Likes: 0
Liked 44 Times
in
23 Posts
D must surely have been a hex socket originally so what is that piece in the middle?
Maybe someone rounded the socket, tried to drill it out and snapped the drill - but it is a bit neat for that.
Maybe some sort of plug stuck in to prevent theft of the fork - is that a thing?
Just dremel down the slot and chuck it in the bin. Alternatively a large screw driver in the slot and lever it apart may be enough to slide it off the steerer tube.
