


Fitting cotter pins
 08-26-20, 08:16 AM
#26

Friendship is Magic

Join Date: Nov 2010
Location: Sacramento, CA
Posts: 22,984
Bikes: old ones
Mentioned: 304 Post(s)
Tagged: 0 Thread(s)
Quoted: 26382 Post(s)
Liked 10,362 Times
in
7,196 Posts
@3alarmer
Please so is your sequence for this apply heat, apply ATF/Acetone, apply press once cooled?
Please so is your sequence for this apply heat, apply ATF/Acetone, apply press once cooled?
I try to heat mostly the cotter, to avoid any problems with possibly discoloring the chrome on the arm.

Likes For 3alarmer:
08-26-20, 08:22 AM
#27
Senior Member

Join Date: Jun 2018
Location: The Urban Shores Of Michigami
Posts: 1,748
Bikes: ........................................ .....Holdsworth "Special"..... .......Falcon "Special".......... .........Miyata 912........... ........................................
Mentioned: 11 Post(s)
Tagged: 0 Thread(s)
Quoted: 702 Post(s)
Liked 671 Times
in
419 Posts
I don�t currently own a vise because I have broken two. Have also broken a big shop vise and a friends machinist vise. Also have never been able to get anything to sit still in a vise ever. Don�t you need machinists blocks and clamps and an array of fixtures and accessories to do that?
Completely serious about the above. I am that bad. And maybe I can�t do this. Do know that this was once the standard of the world and hundreds of millions, maybe billions of bikes were operated this way. The supply of mechanical savants is not that big and neither is the supply of machinists shops that would want to diddle with cotter pins. Thinking of randyjawa technique and trying to see how it would be possible to do 0.002� or 0.005� at a time when the vises I am used to are not accurate to 0.020�. Or worse. Also thinking of Dave Moulton and his cohort who did this successfully many years with a file and a hammer. It gets done in 4th world shops where they use rocks.
I have enough mechanical sense to operate a QR as a cam and not a wingnut. I can mount tires every time, never touched bead jacks. I can stop a rim brake bike in the rain quicker and safer than nearly anyone on discs. I can do basic stuff. Some things are beyond me. If this is one of them I need a bike shop badly. Last one I asked they said they were not friends with cotter pins but they could figure it out. Leave bike two weeks. $100.
 08-26-20, 09:55 AM
#29
Senior Member
Thread Starter
An analogy. I have read dozens of versions of how to build a wheel. Some well written some badly written. Most include unnecessary steps and superstitious nonsense. Every account ever seen of how to build a wheel will result in a wheel. Follow the directions, get a wheel every time. Not every wheel is great, they are all wheels.
Bicycles are are simple machines. Knowledge of how to get cotter pins to work was widespread not that long ago. Doing it with Germanic precision will certainly get the job done. Cannot believe that millions and millions of bikes were assembled with that kind of precision. My brother just sent me photos of some very old Stronglight pins that work and work well. The flats are not flat. They look like a mountain range. And they work. No idea why.
08-26-20, 10:16 AM
#30
Senior Member
Join Date: Aug 2013
Posts: 2,321
Mentioned: 35 Post(s)
Tagged: 0 Thread(s)
Quoted: 767 Post(s)
Liked 1,898 Times
in
889 Posts
They probably work because the angles are close to the same. No need to over think this - no need for "Germanic precision" (whatever the hell that is). Both flat angles need to match or your cranks won't be clocked right and your pins will loosen because the securing forces aren't distributed across the flat, but rather at a small portion on the flat, causing a gouge. Especially important on a fixed gear where pedal pressure is in both the forward and reverse directions. iab's sharpie trick is the way to go if you want to slowly figure out the correct angle.
08-26-20, 12:21 PM
#31
Passista
Join Date: Jul 2005
Posts: 7,596
Bikes: 1998 Pinarello Asolo, 1992 KHS Monta�a pro, 1980 Raleigh DL-1, IGH Hybrid, IGH Utility
Mentioned: 5 Post(s)
Tagged: 0 Thread(s)
Quoted: 866 Post(s)
Liked 720 Times
in
395 Posts
Cotters are a very simple way of securing cranks. The more precise the better, but they don't need to be ultra precise. In fact some spindles come quite roughly finished and they work OK. I read something on one of your posts about tapping the cotter. They should not be tapped, but but installed with force, either with a press or by hammering (supporting the crank in this case). If not, they will come loose.
08-26-20, 02:44 PM
#32
aka Tom Reingold

Join Date: Jan 2009
Location: New York, NY, and High Falls, NY, USA
Posts: 40,498
Bikes: 1962 Rudge Sports, 1971 Raleigh Super Course, 1971 Raleigh Pro Track, 1974 Raleigh International, 1975 Viscount Fixie, 1982 McLean, 1996 Lemond (Ti), 2002 Burley Zydeco tandem
Mentioned: 511 Post(s)
Tagged: 0 Thread(s)
Quoted: 7345 Post(s)
Liked 2,452 Times
in
1,430 Posts
Wow, I'm surprised there is so much fuss about it.
I started working in bike shops in 1978. In that year, I think we had more bikes with cotters than without. So I had to do it a fair bit. We did not have a cotter press because one of the owners was cheap with tools, and his 3rd world ways were good enough.
Take two cotters from the same source so their cut angles are the same. The diameter must be right, as someone mentioned above. Test fit the cotters to see if they expose all the threads. If not, file them down.
To file them, put them in a vise, and maintain the angle by eye. All these methods for ensuring that are impressive, but I guess my eye is good enough. Or maybe the cranks I installed were not perfectly 180� apart but no one ever noticed a problem.
Rest the spindle on a big heavy support. We used a plumbing nipple that was six inches in diameter or so and about 12 inches tall. One person held the bike from the top and lowered it onto the nipple. And by the way, we called the nipple Herman so we didn't have to say the word nipple. So hold the bike on Herman, and the other person bangs the cotter in. Unlike what you said, @63rickert, no, not with a light tap but with very vigorous and repeated banging. This banging is forceful enough that if you do not support the spindle with Herman, you will damage the cups. You'll do the damage because the shock to the cotter transfers to the arm which transfers to the spindle which transfers to the bearing balls which transfers to the cups. Use a ball peen hammer or a sledge hammer, not a carpenter's hammer.
At subsequent shops, we had a Park cotter press. It usually worked but not always, especially for removing.
I might have used a VAR press at some point.
I've tried the homemade presses, including the one made out of a motorcycle chain riveting tool from Harbor Freight. They did not press the cotters in tightly enough.
__________________
Tom Reingold, tom@noglider.com
New York City and High Falls, NY
Blogs: The Experienced Cyclist; noglider's ride blog
�When man invented the bicycle he reached the peak of his attainments.� � Elizabeth West, US author
Please email me rather than PM'ing me. Thanks.
Tom Reingold, tom@noglider.com
New York City and High Falls, NY
Blogs: The Experienced Cyclist; noglider's ride blog
�When man invented the bicycle he reached the peak of his attainments.� � Elizabeth West, US author
Please email me rather than PM'ing me. Thanks.
08-26-20, 03:09 PM
#33

multimodal commuter

Join Date: Nov 2006
Location: NJ, NYC, LI
Posts: 19,808
Bikes: 1940s Fothergill, 1959 Allegro Special, 1963? Claud Butler Olympic Sprint, Lambert 'Clubman', 1974 Fuji "the Ace", 1976 Holdsworth 650b conversion rando bike, 1983 Trek 720 tourer, 1984 Counterpoint Opus II, 1993 Basso Gap, 2010 Downtube 8h, and...
Mentioned: 584 Post(s)
Tagged: 0 Thread(s)
Quoted: 1908 Post(s)
Liked 574 Times
in
339 Posts
I rarely file cotters. It's rarely necessary. If I'm reusing an old cotter, and the face is damaged, i will file it smooth. And of course if a cotter just won't fit othwise, break out the file.
My tool of choice is a small vise, the kind made for use with a drill press. i have several other cotter tools, including the BikeSmith one, and they all have their pros and cons. The BikeSmith tool is made for Raleigh Sports cranks, which have a chain guard. More racy bikes have thinner cranks and the Bike Smith tool just doesn't work.
My first ten speed had a cottered Nervar crank that always creaked. i replaced the cotters many times, but it always creaked. I eventually concluded that the cotters weren't the issue.
__________________
www.rhmsaddles.com.
www.rhmsaddles.com.
08-26-20, 05:20 PM
#34

Senior Member
Join Date: Dec 2005
Posts: 17,146
Mentioned: 481 Post(s)
Tagged: 0 Thread(s)
Quoted: 3803 Post(s)
Liked 6,639 Times
in
2,602 Posts
They probably work because the angles are close to the same. No need to over think this - no need for "Germanic precision" (whatever the hell that is). Both flat angles need to match or your cranks won't be clocked right and your pins will loosen because the securing forces aren't distributed across the flat, but rather at a small portion on the flat, causing a gouge. Especially important on a fixed gear where pedal pressure is in both the forward and reverse directions. iab's sharpie trick is the way to go if you want to slowly figure out the correct angle.
08-26-20, 05:59 PM
#35
Senior Member

Join Date: Apr 2007
Location: Thunder Bay, Ontario, Canada - burrrrr!
Posts: 11,674
Bikes: 1958 Rabeneick 120D, 1968 Legnano Gran Premio, 196? Torpado Professional, 2000 Marinoni Piuma
Mentioned: 210 Post(s)
Tagged: 0 Thread(s)
Quoted: 1372 Post(s)
Likes: 0
Liked 1,748 Times
in
937 Posts
I've always called them crank cotters bcuz they don't look anything like cotter pins!
__________________
"98% of the bikes I buy are projects".
"98% of the bikes I buy are projects".
08-26-20, 06:20 PM
#36
aka Tom Reingold
Join Date: Jan 2009
Location: New York, NY, and High Falls, NY, USA
Posts: 40,498
Bikes: 1962 Rudge Sports, 1971 Raleigh Super Course, 1971 Raleigh Pro Track, 1974 Raleigh International, 1975 Viscount Fixie, 1982 McLean, 1996 Lemond (Ti), 2002 Burley Zydeco tandem
Mentioned: 511 Post(s)
Tagged: 0 Thread(s)
Quoted: 7345 Post(s)
Liked 2,452 Times
in
1,430 Posts
You don't even bang or press them in with a leveraged device?
__________________
Tom Reingold, tom@noglider.com
New York City and High Falls, NY
Blogs: The Experienced Cyclist; noglider's ride blog
�When man invented the bicycle he reached the peak of his attainments.� � Elizabeth West, US author
Please email me rather than PM'ing me. Thanks.
Tom Reingold, tom@noglider.com
New York City and High Falls, NY
Blogs: The Experienced Cyclist; noglider's ride blog
�When man invented the bicycle he reached the peak of his attainments.� � Elizabeth West, US author
Please email me rather than PM'ing me. Thanks.
08-26-20, 06:38 PM
#37
Senior Member
Join Date: Dec 2005
Posts: 17,146
Mentioned: 481 Post(s)
Tagged: 0 Thread(s)
Quoted: 3803 Post(s)
Liked 6,639 Times
in
2,602 Posts
Likes For nlerner:
08-27-20, 11:32 AM
#38
Senior Member
Thread Starter
They probably work because the angles are close to the same. No need to over think this - no need for "Germanic precision" (whatever the hell that is). Both flat angles need to match or your cranks won't be clocked right and your pins will loosen because the securing forces aren't distributed across the flat, but rather at a small portion on the flat, causing a gouge. Especially important on a fixed gear where pedal pressure is in both the forward and reverse directions. iab's sharpie trick is the way to go if you want to slowly figure out the correct angle.
Yes to the part about gouges. Each test fit that seems to work well enough to attempt riding there is a gouge across the face of the wedge. The pins inserted with LBS Var tools also made a gouge. The LBS gouges are engaging much less of the pin than my attempts but work longer. Long in this case is ten miles.
Have done the sharpie routine more more than a dozen times now. Cannot glean any information that way.
How to engage the two mating flats is the whole problem. There has to be a simple way to do that. Every attempt so far engages the edge of spindle to a line on the cotter. Or at least that is what the damage says to me.
08-27-20, 11:34 AM
#39
Senior Member
Thread Starter
08-27-20, 11:35 AM
#40
PM me your cotters

Join Date: Jun 2015
Location: ATL
Posts: 3,241
Mentioned: 80 Post(s)
Tagged: 0 Thread(s)
Quoted: 1137 Post(s)
Liked 588 Times
in
420 Posts
A cotter is a pin or wedge passing through a hole to fix parts tightly together. In British usage cotter pin has the same meaning, but in the U.S. it refers to a split pin. Typical applications are in fixing a crank to its crankshaft, as in a bicycle, or a piston rod to a crosshead, as in a steam engine. Wikipedia
__________________
███████████████
███████████████
Likes For francophile:
08-27-20, 11:38 AM
#41
Senior Member
Join Date: Dec 2005
Posts: 17,146
Mentioned: 481 Post(s)
Tagged: 0 Thread(s)
Quoted: 3803 Post(s)
Liked 6,639 Times
in
2,602 Posts
Likes For nlerner:
08-27-20, 11:39 AM
#42
Senior Member
Thread Starter
Interesting but not useful. I don�t have your bag of cotters. There is some reason that casual fitting of type described works. I am getting a lot of reports that casual work often does the job. But something has to be right with that casual fit. Everything tried so far is wrong.
08-27-20, 11:51 AM
#43
Senior Member
Thread Starter
I rarely file cotters. It's rarely necessary. If I'm reusing an old cotter, and the face is damaged, i will file it smooth. And of course if a cotter just won't fit othwise, break out the file.
My tool of choice is a small vise, the kind made for use with a drill press. i have several other cotter tools, including the BikeSmith one, and they all have their pros and cons. The BikeSmith tool is made for Raleigh Sports cranks, which have a chain guard. More racy bikes have thinner cranks and the Bike Smith tool just doesn't work.
My first ten speed had a cottered Nervar crank that always creaked. i replaced the cotters many times, but it always creaked. I eventually concluded that the cotters weren't the issue.
My tool of choice is a small vise, the kind made for use with a drill press. i have several other cotter tools, including the BikeSmith one, and they all have their pros and cons. The BikeSmith tool is made for Raleigh Sports cranks, which have a chain guard. More racy bikes have thinner cranks and the Bike Smith tool just doesn't work.
My first ten speed had a cottered Nervar crank that always creaked. i replaced the cotters many times, but it always creaked. I eventually concluded that the cotters weren't the issue.
I am working with new pins. No old pins here. They don�t fit at all if used as is.
Yesterday had a forty minute tutorial on how to file and get a flat surface. My teacher was a plumber and luthier. He said I was the worst student he had ever had but by end of session my work was good enough for plumbing or bikes. Still no clue at all what the shape of the cotter pin should be. How steep is the taper? How deep is the cut? No one seems to know.
There is no question my problem is the cotter. Crank comes off.
08-27-20, 12:01 PM
#44
Senior Member
Thread Starter
Wow, I'm surprised there is so much fuss about it.
I started working in bike shops in 1978. In that year, I think we had more bikes with cotters than without. So I had to do it a fair bit. We did not have a cotter press because one of the owners was cheap with tools, and his 3rd world ways were good enough.
Take two cotters from the same source so their cut angles are the same. The diameter must be right, as someone mentioned above. Test fit the cotters to see if they expose all the threads. If not, file them down.
To file them, put them in a vise, and maintain the angle by eye. All these methods for ensuring that are impressive, but I guess my eye is good enough. Or maybe the cranks I installed were not perfectly 180� apart but no one ever noticed a problem.
Rest the spindle on a big heavy support. We used a plumbing nipple that was six inches in diameter or so and about 12 inches tall. One person held the bike from the top and lowered it onto the nipple. And by the way, we called the nipple Herman so we didn't have to say the word nipple. So hold the bike on Herman, and the other person bangs the cotter in. Unlike what you said, @63rickert, no, not with a light tap but with very vigorous and repeated banging. This banging is forceful enough that if you do not support the spindle with Herman, you will damage the cups. You'll do the damage because the shock to the cotter transfers to the arm which transfers to the spindle which transfers to the bearing balls which transfers to the cups. Use a ball peen hammer or a sledge hammer, not a carpenter's hammer.
At subsequent shops, we had a Park cotter press. It usually worked but not always, especially for removing.
I might have used a VAR press at some point.
I've tried the homemade presses, including the one made out of a motorcycle chain riveting tool from Harbor Freight. They did not press the cotters in tightly enough.
I started working in bike shops in 1978. In that year, I think we had more bikes with cotters than without. So I had to do it a fair bit. We did not have a cotter press because one of the owners was cheap with tools, and his 3rd world ways were good enough.
Take two cotters from the same source so their cut angles are the same. The diameter must be right, as someone mentioned above. Test fit the cotters to see if they expose all the threads. If not, file them down.
To file them, put them in a vise, and maintain the angle by eye. All these methods for ensuring that are impressive, but I guess my eye is good enough. Or maybe the cranks I installed were not perfectly 180� apart but no one ever noticed a problem.
Rest the spindle on a big heavy support. We used a plumbing nipple that was six inches in diameter or so and about 12 inches tall. One person held the bike from the top and lowered it onto the nipple. And by the way, we called the nipple Herman so we didn't have to say the word nipple. So hold the bike on Herman, and the other person bangs the cotter in. Unlike what you said, @63rickert, no, not with a light tap but with very vigorous and repeated banging. This banging is forceful enough that if you do not support the spindle with Herman, you will damage the cups. You'll do the damage because the shock to the cotter transfers to the arm which transfers to the spindle which transfers to the bearing balls which transfers to the cups. Use a ball peen hammer or a sledge hammer, not a carpenter's hammer.
At subsequent shops, we had a Park cotter press. It usually worked but not always, especially for removing.
I might have used a VAR press at some point.
I've tried the homemade presses, including the one made out of a motorcycle chain riveting tool from Harbor Freight. They did not press the cotters in tightly enough.
Many many reports from old mechanics that sledgehammer work is not necessary. Have now inspected sample old cranks on which the cotters lift out with two fingers or a tap with a 6 ounce hammer. Those cotters work. Why do they work?
If I had access to a Var 7 or even a Park it would make sense to learn how those work. In meantime any archived Var tools that exist are in LBS where it is all covid rules and I get to stand outside the door while a young hourly employee makes a hash of the job.
08-27-20, 12:06 PM
#45
PM me your cotters
Join Date: Jun 2015
Location: ATL
Posts: 3,241
Mentioned: 80 Post(s)
Tagged: 0 Thread(s)
Quoted: 1137 Post(s)
Liked 588 Times
in
420 Posts
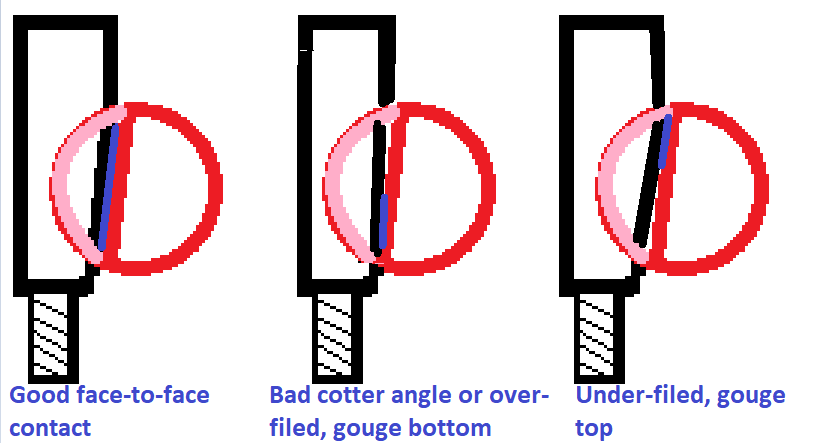
You need to press or punch in the cotter enough to see where you're making contact, then adjust the angle of the cotter so the flats match. Sometimes you'll get lucky and you'll get good engagement without touching a file - it happens! But more often than not, especially with the French stuff I'm wont to work on, I'm filing a good bit of the face.
Best I can do is throw together a picture to visualize it. Blue line is where you're meeting the spindle. You want contact flushly across the face for a long blue line, engaging across a lot of the surface. If your angle isn't steep enough to meet the face, you'll gouge at the blunt end. If you over-file, you'll gouge a line into the threaded end. It's that simple. File things flatter on the end you're gouging, or if you're gouging on the threaded side, you might've over-filed already (it depends on how much blunt end is exposed after a full press!)
Make any more sense? Just make sure you file evenly, flatly, because the spindle face should be perfectly flat also, you want flat to flat.
__________________
███████████████
███████████████
Last edited by francophile; 08-27-20 at 12:21 PM.
Likes For francophile:
08-27-20, 12:06 PM
#46
aka Tom Reingold
Join Date: Jan 2009
Location: New York, NY, and High Falls, NY, USA
Posts: 40,498
Bikes: 1962 Rudge Sports, 1971 Raleigh Super Course, 1971 Raleigh Pro Track, 1974 Raleigh International, 1975 Viscount Fixie, 1982 McLean, 1996 Lemond (Ti), 2002 Burley Zydeco tandem
Mentioned: 511 Post(s)
Tagged: 0 Thread(s)
Quoted: 7345 Post(s)
Liked 2,452 Times
in
1,430 Posts
We saw the cotter pins get shredded when we did not bang or press the cotters in hard. A lot of torque goes into the spindle.
__________________
Tom Reingold, tom@noglider.com
New York City and High Falls, NY
Blogs: The Experienced Cyclist; noglider's ride blog
�When man invented the bicycle he reached the peak of his attainments.� � Elizabeth West, US author
Please email me rather than PM'ing me. Thanks.
Tom Reingold, tom@noglider.com
New York City and High Falls, NY
Blogs: The Experienced Cyclist; noglider's ride blog
�When man invented the bicycle he reached the peak of his attainments.� � Elizabeth West, US author
Please email me rather than PM'ing me. Thanks.
08-27-20, 12:07 PM
#47
aka Tom Reingold
Join Date: Jan 2009
Location: New York, NY, and High Falls, NY, USA
Posts: 40,498
Bikes: 1962 Rudge Sports, 1971 Raleigh Super Course, 1971 Raleigh Pro Track, 1974 Raleigh International, 1975 Viscount Fixie, 1982 McLean, 1996 Lemond (Ti), 2002 Burley Zydeco tandem
Mentioned: 511 Post(s)
Tagged: 0 Thread(s)
Quoted: 7345 Post(s)
Liked 2,452 Times
in
1,430 Posts
Hmm, maybe we didn't manage to get good surface area unless we banged hard. Perhaps our filing technique was bad enough to require hard banging.
__________________
Tom Reingold, tom@noglider.com
New York City and High Falls, NY
Blogs: The Experienced Cyclist; noglider's ride blog
�When man invented the bicycle he reached the peak of his attainments.� � Elizabeth West, US author
Please email me rather than PM'ing me. Thanks.
Tom Reingold, tom@noglider.com
New York City and High Falls, NY
Blogs: The Experienced Cyclist; noglider's ride blog
�When man invented the bicycle he reached the peak of his attainments.� � Elizabeth West, US author
Please email me rather than PM'ing me. Thanks.
08-27-20, 12:18 PM
#48
PM me your cotters
Join Date: Jun 2015
Location: ATL
Posts: 3,241
Mentioned: 80 Post(s)
Tagged: 0 Thread(s)
Quoted: 1137 Post(s)
Liked 588 Times
in
420 Posts

Reality is, I wish I could get full-surface contact like the far left cotter. But the reality is, I'm usually only getting about 1/2 - 2/3 contact best I can tell. And I'm mashing hard on them at a low setting, generating 2x-3x what a BFH would when I press in.
But when you see a 1mm gouge on the high or low side, you know your angle is off, and the side with the gouge is the "high" side you need to plane down. I normally aim for a wide rub, deep linear gouge is bad.
__________________
███████████████
███████████████
08-27-20, 12:26 PM
#49
Senior Member
Join Date: Jan 2004
Location: Madison, WI USA
Posts: 6,149
Mentioned: 50 Post(s)
Tagged: 0 Thread(s)
Quoted: 2362 Post(s)
Liked 1,746 Times
in
1,190 Posts