


Any tricks to getting a stuck bottom bracket nut off
 08-10-20, 12:04 PM
#1

Senior Member
Thread Starter
Join Date: Jun 2018
Location: NW Ohio
Posts: 1,142
Bikes: 1983 Univega Super Strada, 1986 Panasonic DX5000, 1984 Fuji Team 85 Univega Gran Turismo, 1984 Lotus Unique, 1987 Centurion Expert, 1987 Centurion Ironman Master,
Mentioned: 14 Post(s)
Tagged: 0 Thread(s)
Quoted: 677 Post(s)
Liked 459 Times
in
182 Posts
Any tricks to getting a stuck bottom bracket nut off
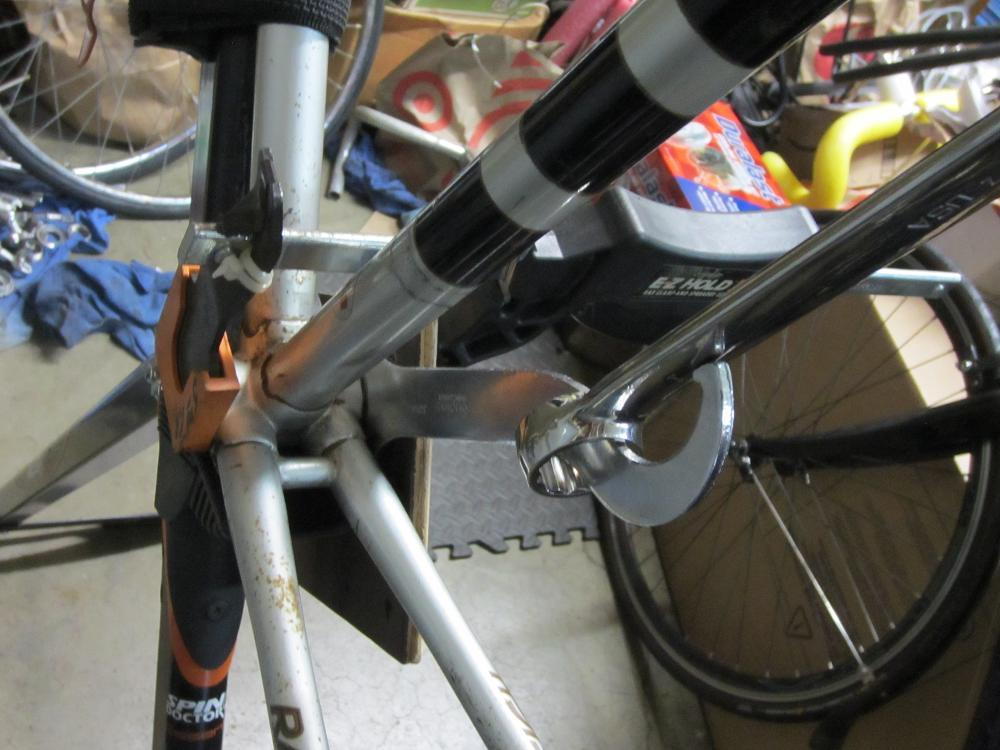
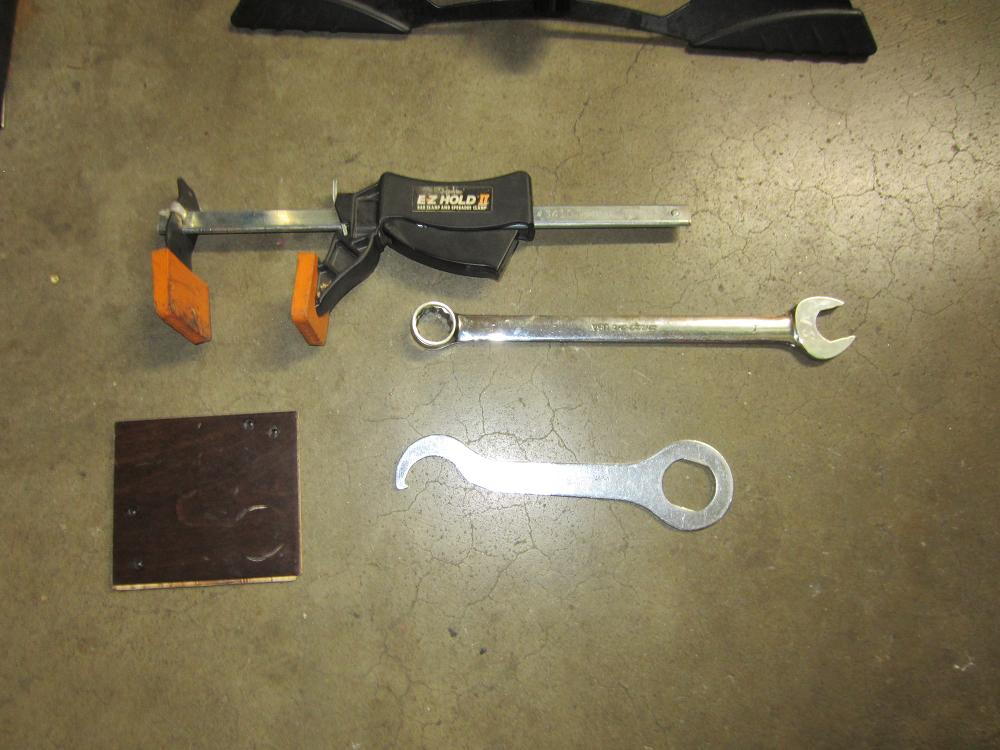
This is on an 84 Team Fuji.I've been using the Park 36mm HCW 10 tool
and a hammer and PB Blaster but can't get the fixed cup to budge.Any other tricks I might be missing?
This is on the drive side
and a hammer and PB Blaster but can't get the fixed cup to budge.Any other tricks I might be missing?
This is on the drive side
Last edited by robertj298; 08-10-20 at 12:08 PM.
 08-10-20, 12:08 PM
#2
Senior Member

Join Date: May 2008
Location: Fredericksburg, Va
Posts: 9,579
Bikes: '65 Frejus TDF, '73 Bottecchia Giro d'Italia, '83 Colnago Superissimo, '84 Trek 610, '84 Trek 760, '88 Pinarello Veneto, '88 De Rosa Pro, '89 Pinarello Montello, '94 Burley Duet, 97 Specialized RockHopper, 2010 Langster, Tern Link D8
Mentioned: 73 Post(s)
Tagged: 0 Thread(s)
Quoted: 1607 Post(s)
Liked 2,216 Times
in
1,103 Posts
Stick it in a vice and turn the frame. Or use Sheldon Browns method - https://sheldonbrown.com/tooltips/bbcups.html
BTW: it is the drive side cup
BTW: it is the drive side cup
__________________
Bikes don't stand alone. They are two tired.
Bikes don't stand alone. They are two tired.
08-10-20, 12:13 PM
#3
Senior Member
Join Date: May 2005
Location: Southern Maryland
Posts: 1,447
Bikes: A few
Mentioned: 21 Post(s)
Tagged: 0 Thread(s)
Quoted: 289 Post(s)
Liked 195 Times
in
102 Posts
Make sure you're turning it in the correct direction. Some BB's are left hand thread.
My method of removal is similar to the Sheldon method. Just a bolt thru the BB cup, nut, flat and lock washers, and a very large flat washer that captures the BB wrench so it can't slip off the cup. Hasn't let me down yet.
My method of removal is similar to the Sheldon method. Just a bolt thru the BB cup, nut, flat and lock washers, and a very large flat washer that captures the BB wrench so it can't slip off the cup. Hasn't let me down yet.
08-10-20, 12:46 PM
#4
Master Parts Rearranger

Join Date: Mar 2015
Location: Portlandia's Kuiper Belt, OR
Posts: 4,402
Bikes: 1982 Trek 720 - 1985 Trek 620 - 1984 Trek 620 - 1980 Trek 510 - Other luminaries past and present
Mentioned: 221 Post(s)
Tagged: 0 Thread(s)
Quoted: 1556 Post(s)
Liked 2,024 Times
in
989 Posts
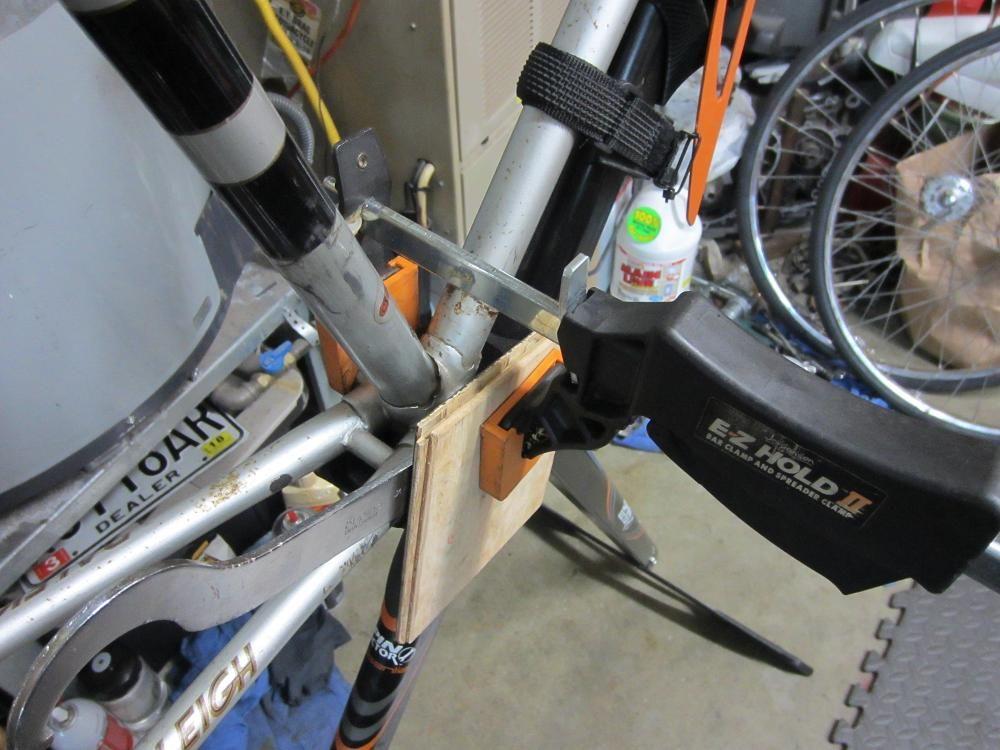
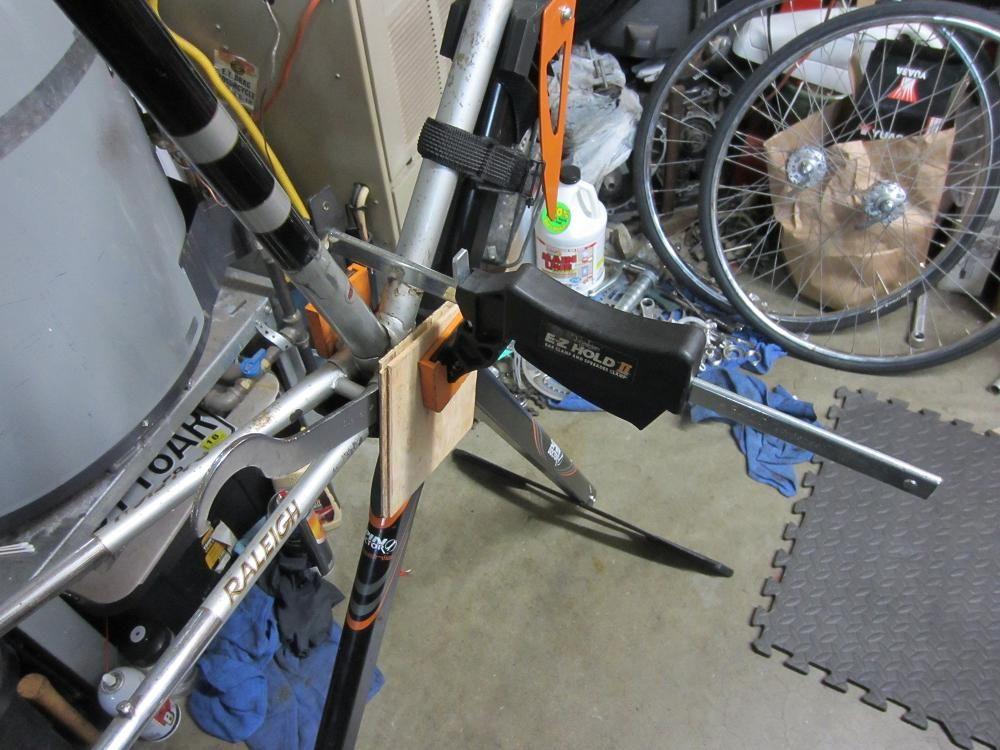
The Sheldon method is a winner. I've never really read up on it, let alone used it, but the thinking is sound and it has worked for a number of people here (which is great). In lieu of finding and employing that hardware, I've found that using some nearly-fender washers (that have an ID slightly larger than the BB spindle) very-gently sandwiched in between the BB cup/tool (placed on the BB cup) and a barely-snugged (non-drive-side, preferably) crank arm works really well. The tool is kept on the BB cup, which is critical when using one's own strength or a hammer to knock the BB cup loose. Once you know it's loose and you "have it on the run," then you can remove the crank arm and washers and spin the BB cup out with just the tool or your hand if it's amenable.
08-10-20, 01:17 PM
#5
Friendship is Magic

Join Date: Nov 2010
Location: Sacramento, CA
Posts: 22,984
Bikes: old ones
Mentioned: 304 Post(s)
Tagged: 0 Thread(s)
Quoted: 26410 Post(s)
Liked 10,376 Times
in
7,204 Posts
^^^^^^^
....much like this, before I bought a Hozan fixed cup tool for this, I used to use a few fender washers (outer diameter larger than the BB shell, inner diameter big enough to accept a large bolt), and a large bolt and nut that is long enough to accept the washers and still clear the width of the shell, with a little extra room (length is not critical in terms of too long. You use one fender washer on the fixed cup side to hold your fixed cup wrench in place (you need a proper fixed cup wrench for this method). The other washer or washers goes on the other side of the BB shell, and the bolt and nut holds everything together. All of these are for sale at places like Home Depot or Lowe's.
You still need penetrating oil, and some torch heat doesn't hurt as long as you keep it moderate enough to not hurt the paint.
Now you are set up so you can hit the end of your fixed cup wrench with a dead blow hammer, or one of those big heavy brass hammers you see on sale at Harbor Freight. Make sure you have the frame clamp pretty close to the BB shell on the seat tube, or you lose a lot of the impact to frame flex.
Or you can look for someone who has one of those Hozan fixed cup tools and pay him to do it.
 08-10-20, 01:49 PM
#6
aka Tom Reingold

Join Date: Jan 2009
Location: New York, NY, and High Falls, NY, USA
Posts: 40,502
Bikes: 1962 Rudge Sports, 1971 Raleigh Super Course, 1971 Raleigh Pro Track, 1974 Raleigh International, 1975 Viscount Fixie, 1982 McLean, 1996 Lemond (Ti), 2002 Burley Zydeco tandem
Mentioned: 511 Post(s)
Tagged: 0 Thread(s)
Quoted: 7348 Post(s)
Liked 2,464 Times
in
1,433 Posts
I've tried the Sheldon method, and it never worked for me. The bolt turns even after tightening the nut. What am I doing wrong?
@robertj298, be sure you are turning clockwise, i.e. the opposite direction from normal, as this is a reverse thread.
@robertj298, be sure you are turning clockwise, i.e. the opposite direction from normal, as this is a reverse thread.
__________________
Tom Reingold, tom@noglider.com
New York City and High Falls, NY
Blogs: The Experienced Cyclist; noglider's ride blog
�When man invented the bicycle he reached the peak of his attainments.� � Elizabeth West, US author
Please email me rather than PM'ing me. Thanks.
Tom Reingold, tom@noglider.com
New York City and High Falls, NY
Blogs: The Experienced Cyclist; noglider's ride blog
�When man invented the bicycle he reached the peak of his attainments.� � Elizabeth West, US author
Please email me rather than PM'ing me. Thanks.
08-10-20, 01:54 PM
#7

feros ferio

Join Date: Jul 2000
Location: www.ci.encinitas.ca.us
Posts: 21,796
Bikes: 1959 Capo Modell Campagnolo; 1960 Capo Sieger (2); 1962 Carlton Franco Suisse; 1970 Peugeot UO-8; 1982 Bianchi Campione d'Italia; 1988 Schwinn Project KOM-10;
Mentioned: 44 Post(s)
Tagged: 0 Thread(s)
Quoted: 1392 Post(s)
Liked 1,324 Times
in
836 Posts
You might try applying a bit of anti-clockwise (yes, tightening) pressure, followed by an abrupt clockwise jerk. This worked for me on my Swiss-threaded Peugeot PKN-10.
A bench vise is the way to go, if you have one available.
A bench vise is the way to go, if you have one available.
__________________
"Far and away the best prize that life offers is the chance to work hard at work worth doing." --Theodore Roosevelt
Capo: 1959 Modell Campagnolo, S/N 40324; 1960 Sieger (2), S/N 42624, 42597
Carlton: 1962 Franco Suisse, S/N K7911
Peugeot: 1970 UO-8, S/N 0010468
Bianchi: 1982 Campione d'Italia, S/N 1.M9914
Schwinn: 1988 Project KOM-10, S/N F804069
08-10-20, 02:29 PM
#8

Senior Member
Join Date: Dec 2005
Posts: 17,156
Mentioned: 481 Post(s)
Tagged: 0 Thread(s)
Quoted: 3810 Post(s)
Liked 6,689 Times
in
2,610 Posts
08-10-20, 02:57 PM
#9
Senior Member
Join Date: May 2008
Location: Fredericksburg, Va
Posts: 9,579
Bikes: '65 Frejus TDF, '73 Bottecchia Giro d'Italia, '83 Colnago Superissimo, '84 Trek 610, '84 Trek 760, '88 Pinarello Veneto, '88 De Rosa Pro, '89 Pinarello Montello, '94 Burley Duet, 97 Specialized RockHopper, 2010 Langster, Tern Link D8
Mentioned: 73 Post(s)
Tagged: 0 Thread(s)
Quoted: 1607 Post(s)
Liked 2,216 Times
in
1,103 Posts
I also fouhd heat on the cup only, then cooling will help.
__________________
Bikes don't stand alone. They are two tired.
Bikes don't stand alone. They are two tired.
08-10-20, 02:58 PM
#10
Senior Member
Thread Starter
Join Date: Jun 2018
Location: NW Ohio
Posts: 1,142
Bikes: 1983 Univega Super Strada, 1986 Panasonic DX5000, 1984 Fuji Team 85 Univega Gran Turismo, 1984 Lotus Unique, 1987 Centurion Expert, 1987 Centurion Ironman Master,
Mentioned: 14 Post(s)
Tagged: 0 Thread(s)
Quoted: 677 Post(s)
Liked 459 Times
in
182 Posts
08-10-20, 03:01 PM
#11
Senior Member
An alternative solution would be to take it to a bike shop with a proper fixed cup tool.
This is the right tool for the job:
https://www.amazon.com/HOZAN-Bottom-...77856708&psc=1
This is the right tool for the job:
https://www.amazon.com/HOZAN-Bottom-...77856708&psc=1
08-10-20, 03:20 PM
#12
Senior Member
Thread Starter
Join Date: Jun 2018
Location: NW Ohio
Posts: 1,142
Bikes: 1983 Univega Super Strada, 1986 Panasonic DX5000, 1984 Fuji Team 85 Univega Gran Turismo, 1984 Lotus Unique, 1987 Centurion Expert, 1987 Centurion Ironman Master,
Mentioned: 14 Post(s)
Tagged: 0 Thread(s)
Quoted: 677 Post(s)
Liked 459 Times
in
182 Posts
Being new I've done 5 bottom brackets before but never realized until I read Sheldons page
that maybe I should just leave the fixed cup in as he suggests. Clean all the grease out from the opposite side
and regrease and install the caged bearings from the other side?
that maybe I should just leave the fixed cup in as he suggests. Clean all the grease out from the opposite side
and regrease and install the caged bearings from the other side?
08-10-20, 03:37 PM
#13
Senior Member
Join Date: Dec 2005
Posts: 17,156
Mentioned: 481 Post(s)
Tagged: 0 Thread(s)
Quoted: 3810 Post(s)
Liked 6,689 Times
in
2,610 Posts
08-10-20, 03:57 PM
#14
Senior Member

It's on a Fuji, so that should be English/ISO thread. Clockwise to remove, CCW to tighten.
08-10-20, 04:39 PM
#15
Senior Member
Join Date: Oct 2015
Location: PDX
Posts: 13,038
Bikes: Merz x 5 + Specialized Merz Allez x 2, Strawberry/Newlands/DiNucci/Ti x3, Gordon, Fuso/Moulton x2, Bornstein, Paisley,1958-74 Paramounts x3, 3rensho, 74 Moto TC, 73-78 Raleigh Pro's x5, Marinoni x2, 1960 Cinelli SC, 1980 Bianchi SC, PX-10 X 2
Mentioned: 267 Post(s)
Tagged: 0 Thread(s)
Quoted: 4510 Post(s)
Liked 6,377 Times
in
3,667 Posts

You can use a pipe for the cheater if necessary.
This method doesn't care if you go the wrong way to start, it still cracks loose then you reverse direction and spin it off.
I have never failed, hurt any tools, parts, frames or myself with this.
It works best if the BB is well supported.

Last edited by merziac; 08-10-20 at 04:43 PM.
08-10-20, 04:40 PM
#16
Ride, Wrench, Swap, Race

Join Date: Jan 2010
Location: Northern California
Posts: 9,193
Bikes: Cheltenham-Pedersen racer, Boulder F/S Paris-Roubaix, Varsity racer, '52 Christophe, '62 Continental, '92 Merckx, '75 Limongi, '76 Presto, '72 Gitane SC, '71 Schwinn SS, etc.
Mentioned: 132 Post(s)
Tagged: 0 Thread(s)
Quoted: 1565 Post(s)
Liked 1,295 Times
in
865 Posts
Yeah, it looks like the cup is being tightened on that Raleigh!
Perhaps he wanted it "guttenteight" (?).
Perhaps he wanted it "guttenteight" (?).
08-10-20, 04:44 PM
#17
Senior Member

Join Date: Jul 2006
Location: San Jose (Willow Glen) Ca
Posts: 9,845
Bikes: Kirk Custom JK Special, '84 Team Miyata,(dura ace old school) 80?? SR Semi-Pro 600 Arabesque
Mentioned: 106 Post(s)
Tagged: 0 Thread(s)
Quoted: 2338 Post(s)
Liked 2,822 Times
in
1,541 Posts
Stick it in a vice and turn the frame. Or use Sheldon Browns method - https://sheldonbrown.com/tooltips/bbcups.html
BTW: it is the drive side cup
BTW: it is the drive side cup
__________________
Life is too short not to ride the best bike you have, as much as you can
(looking for Torpado Super light frame/fork or for Raleigh International frame fork 58cm)
Life is too short not to ride the best bike you have, as much as you can
(looking for Torpado Super light frame/fork or for Raleigh International frame fork 58cm)
08-10-20, 04:48 PM
#18
Senior Member
Join Date: Oct 2015
Location: PDX
Posts: 13,038
Bikes: Merz x 5 + Specialized Merz Allez x 2, Strawberry/Newlands/DiNucci/Ti x3, Gordon, Fuso/Moulton x2, Bornstein, Paisley,1958-74 Paramounts x3, 3rensho, 74 Moto TC, 73-78 Raleigh Pro's x5, Marinoni x2, 1960 Cinelli SC, 1980 Bianchi SC, PX-10 X 2
Mentioned: 267 Post(s)
Tagged: 0 Thread(s)
Quoted: 4510 Post(s)
Liked 6,377 Times
in
3,667 Posts

Not on my watch.
The fixed cup always come out to properly clean, inspect and service cup, threads and shell so it comes out like its supposed to when something goes bad down the line.
The method above will have you done with this in no time.
Likes For merziac:
08-10-20, 04:52 PM
#19
Senior Member
Join Date: Oct 2015
Location: PDX
Posts: 13,038
Bikes: Merz x 5 + Specialized Merz Allez x 2, Strawberry/Newlands/DiNucci/Ti x3, Gordon, Fuso/Moulton x2, Bornstein, Paisley,1958-74 Paramounts x3, 3rensho, 74 Moto TC, 73-78 Raleigh Pro's x5, Marinoni x2, 1960 Cinelli SC, 1980 Bianchi SC, PX-10 X 2
Mentioned: 267 Post(s)
Tagged: 0 Thread(s)
Quoted: 4510 Post(s)
Liked 6,377 Times
in
3,667 Posts
It always comes out with this .
08-10-20, 04:53 PM
#20
Senior Member
The wrong way start might crack a tight thread sometimes, but I wouldn't count on it. Might be worth a try on a Brit/iso threaded BB. It seems to work for Merziac.
BITD mechanics would tighten on fixed cups with a proper campy or VAR fixed cup tool, often with a breaker bar. I personally would only use a breaker on French and Italian threads, but some people went full gorilla on all of them. If the BB shell was faced and chased first, ain't going to be a lot of slack to even crack it if trying to loosen the wrong way.
I mention this mostly because some may be wondering why they are so hard to get off sometimes.
Last edited by Salamandrine; 08-10-20 at 04:56 PM.
08-10-20, 05:03 PM
#21
Senior Member
Join Date: Oct 2015
Location: PDX
Posts: 13,038
Bikes: Merz x 5 + Specialized Merz Allez x 2, Strawberry/Newlands/DiNucci/Ti x3, Gordon, Fuso/Moulton x2, Bornstein, Paisley,1958-74 Paramounts x3, 3rensho, 74 Moto TC, 73-78 Raleigh Pro's x5, Marinoni x2, 1960 Cinelli SC, 1980 Bianchi SC, PX-10 X 2
Mentioned: 267 Post(s)
Tagged: 0 Thread(s)
Quoted: 4510 Post(s)
Liked 6,377 Times
in
3,667 Posts
The wrong way start might crack a tight thread sometimes, but I wouldn't count on it. Might be worth a try on a Brit/iso threaded BB. It seems to work for Merziac.
BITD mechanics would tighten on fixed cups with a proper campy or VAR fixed cup tool, often with a breaker bar. I personally would only use a breaker on French and Italian threads, but some people went full gorilla on all of them. If the BB shell was faced and chased first, ain't going to be a lot of slack to even crack it if trying to loosen the wrong way.
I mention this mostly because some may be wondering why they are so hard to get off sometimes.
BITD mechanics would tighten on fixed cups with a proper campy or VAR fixed cup tool, often with a breaker bar. I personally would only use a breaker on French and Italian threads, but some people went full gorilla on all of them. If the BB shell was faced and chased first, ain't going to be a lot of slack to even crack it if trying to loosen the wrong way.
I mention this mostly because some may be wondering why they are so hard to get off sometimes.
I think this is why this is the way to go, get it out everytime so the threads are clean and the cup is properly torqued after service and will come out like it should when it needs to down the road.
IF they have been properly serviced then this will not normally be such a problem.
08-10-20, 05:08 PM
#22
Senior Member

We have this debate every 3 months like clockwork.
Let me say this for the opposing view. If you are renovating an old classic bike that has not been maintained in properly or at all, it is not a bad idea to remove the entire BB to inspect for corrosion, badly or unfaced shell, etc. In fact it's good practice. Call this case 1.
But, let's say like many folks BITD you have one good bike. This is case #2 . You ride every day, or close to it. Maybe you race. Maybe you tour. The BB was properly installed when you got the bike. In that case proper maintenance on average would entail repacking your BB 2 or 3 times a year. For these regular maintenance repacks, normally the fixed cup would be left in place, and the rest cleaned and repacked. BTW you don't need to use caged bearings for this. Just glop a lot of grease in there and the bearings will stay in place.
Case 2 used to be the more common situation. That's kind of what Sheldon is assuming, presumably. Probably for many here they are collectors and don't ride any one bike enough to warrant repacks every few months.
Likes For Salamandrine:
08-10-20, 05:16 PM
#23
Senior Member
I can't remember if I've ever done it with a BB or not, to be honest. 99.9% of the BB's I've installed or removed I would have used a fixed cup tool though, and you could always reach for a breaker pipe if it wouldn't budge.
There's also the trick of starting a thread by turning a nut or something the wrong way until you feel it click in, they turning it the right way. Good way to avoid cross threading. I've had people try to explain to me which way threads go when they saw me doing that.
") 08-10-20, 05:35 PM
08-10-20, 05:35 PM
#24
Mad bike riding scientist

Join Date: Nov 2004
Location: Denver, CO
Posts: 27,362
Bikes: Some silver ones, a red one, a black and orange one, and a few titanium ones
Mentioned: 152 Post(s)
Tagged: 1 Thread(s)
Quoted: 6218 Post(s)
Liked 4,217 Times
in
2,364 Posts
Stick it in a vice and turn the frame. Or use Sheldon Browns method - https://sheldonbrown.com/tooltips/bbcups.html
BTW: it is the drive side cup
BTW: it is the drive side cup
The thread on the drive is left hand so make sure you are turning it clockwise to remove. A cheater bar is commonly needed to actually break the cup loose. It usually works a but better than a hammer.
__________________
Stuart Black
Plan Epsilon Around Lake Michigan in the era of Covid
Old School�When It Wasn�t Ancient bikepacking
Gold Fever Three days of dirt in Colorado
Pokin' around the Poconos A cold ride around Lake Erie
Dinosaurs in Colorado A mountain bike guide to the Purgatory Canyon dinosaur trackway
Solo Without Pie. The search for pie in the Midwest.
Picking the Scablands. Washington and Oregon, 2005. Pie and spiders on the Columbia River!
08-10-20, 05:38 PM
#25
Mad bike riding scientist
Join Date: Nov 2004
Location: Denver, CO
Posts: 27,362
Bikes: Some silver ones, a red one, a black and orange one, and a few titanium ones
Mentioned: 152 Post(s)
Tagged: 1 Thread(s)
Quoted: 6218 Post(s)
Liked 4,217 Times
in
2,364 Posts
I�ve never liked Brown�s method and I�ve seen damaged cups from trying to use it. Try my method in post 24. I find it works much better.
__________________
Stuart Black
Plan Epsilon Around Lake Michigan in the era of Covid
Old School�When It Wasn�t Ancient bikepacking
Gold Fever Three days of dirt in Colorado
Pokin' around the Poconos A cold ride around Lake Erie
Dinosaurs in Colorado A mountain bike guide to the Purgatory Canyon dinosaur trackway
Solo Without Pie. The search for pie in the Midwest.
Picking the Scablands. Washington and Oregon, 2005. Pie and spiders on the Columbia River!
Stuart Black
Plan Epsilon Around Lake Michigan in the era of Covid
Old School�When It Wasn�t Ancient bikepacking
Gold Fever Three days of dirt in Colorado
Pokin' around the Poconos A cold ride around Lake Erie
Dinosaurs in Colorado A mountain bike guide to the Purgatory Canyon dinosaur trackway
Solo Without Pie. The search for pie in the Midwest.
Picking the Scablands. Washington and Oregon, 2005. Pie and spiders on the Columbia River!